Hallelujah! I’ve found a way to make KILLER Texas-style smoked beef brisket…without a smoker. Yes, for real! This recipe is magic. Use your gas grill to smoke it, then move it to the OVEN to get the most amazing, mouth-watering, tender, smoky brisket that will make you cry happy tears. I have tons of pictures and details to show you exactly how to cook a smoked brisket. Make this for any cookout, holiday, or meal when you want to knock ’em dead!

Table of Contents
- No smoker? No problem.
- How to smoke brisket without a smoker:
- Tips for the BEST brisket
- What is brisket anyway?
- How to choose the best brisket
- Don’t trim the fat cap
- Why so slow?
- You can’t time a brisket
- The rub
- The dry brine
- The smoke
- The sauce
- Beef brisket recipe ingredients
- How to cook a beef brisket in the oven
- How to slice brisket
- What to serve with smoked beef brisket
- How to store leftover brisket
- Can you freeze smoked brisket?
- Smoked beef brisket in the oven frequently asked questions
- More amazing barbecue and grilled meats
- Easy Smoked Beef Brisket in the Oven Recipe
My 5-year-old son Edison told me this morning, “Your look tired Mommy.”
“Oh yeah? How do I look tired?”
“You have these dark parts, right here, under your eye. And it looks bumpy.”
Oh boy, THANKS EDISON. You really know how to cheer a girl up! I guess that’s what I get for asking for clarifying details. I even got a solid 7 hours of sleep last night! My body didn’t get the memo that I am TOTALLY well-rested!! Welcome to the middle ages, haha.
Edison’s not far off though. I have been waking up at obscenely early times lately, all in the name of this here briskety brisk, which requires some tender lovin’ care at 5am if you want to eat it for dinner that day. My sister Laura has talked to me for YEARS about her mother-in-law’s smoked Texas brisket, and how insanely delicious it is. I’ve been on a MISSION, YA’LL. Sleep be damned.
I’m a born and raised California girl. I love me some barbecue, but it’s not in my blood the way it is for Texans. My friend Lawrence, who is from Texas, went to college in Utah. First week there, someone invited him to a “barbecue.” He shows up and everyone’s eating hamburgers and hot dogs. EXCUSE ME, WHERE IS THE BARBECUE?! Poor Lawrence. 😂
My point is, I would never attempt a real Texas barbecue recipe without a source. Laura has lived in Dallas for 15 years now, and is slowly morphing into “one of them” for better or for worse. (I slap her every time she says y’all. I’m totally joking, oh my gosh!)

But one thing I’m not sad about is her increasing level of expertise when it comes to barbecue, which she has learned from her mother-in-law Chris, who is a Real Texan through and through.
(Laura’s in-laws are also the source of these Tejano Pinto Beans and Tejano Carne Guisada. Bless them, bless them. Two of my favorite recipes of all time. Laura, when cooking out of town, has drawn Texans out of the woodwork just from the SMELL of that guisada. “Excuse me…is that Carne Guisada you’re cooking in here? Are you from Texas?” YES, bloodhound, well done.)
I digress. Today I’m going to tell you all about how you too can attract all your Texas-root neighbors to your yard just from the SMELL of this brisket smoking away. You’ve always been meaning to get to know your neighbors more, right? Here’s your chance, folks.
No smoker? No problem.
Now listen up. We all know that smoked brisket is its own category of transcendency. I used to think that unless you’re part of the small percentage of the population that owns a smoker (not me!) you had to fly to Texas to get the good stuff.
BUT! Laura’s mother-in-law Chris (not to be confused with MY mother-in-law Kris!!) has developed a trick over the years for making amazing brisket that delivers that smokey flavor without an expensive smoker. Her technique is actually very similar to my method for making Smoked Pulled Pork without a smoker! Here’s an overview of what makes this taste like legit smoked Brisket. Then we will dig into details:
How to smoke brisket without a smoker:
- Make the easiest 3 ingredient dry rub made from salt, pepper, and garlic granules
- Let the brisket marinate with the dry rub for at least 6 hours or overnight. This allows the salt to be absorbed by the meat prior to cooking, seasoning your meat to the very center.
- Smoke your brisket with real wood chips RIGHT IN YOUR GAS GRILL for a couple hours. This is the magic step that brings in that smokey flavor you can’t get anywhere else!
- Transfer the brisket to the oven for some low and slow cooking until it reaches 203 degrees. You can do this overnight, it’s completely hands off!
- Let the brisket rest about 30-60 minutes after cooking to make sure all the juices are reabsorbed by the meat. Don’t skip this!
- Serve your BBQ Sauce on the side so the Texans don’t come after you
You’re seriously not going to believe how easy this is! That’s the best part. I know this may sound a little intimidating, but I swear, once you get the hang of it, it’s a very hands-off recipe!
Tips for the BEST brisket
I got some rules, as usual:
- truly find the best cut of brisket you can. This will make the biggest difference to how your brisket tastes. Even if you follow all the rules, a fat-less brisket will yield sad, dry results.
- dry brine your brisket and let it rest in the fridge overnight
- don’t trim the fat cap. At all. We need all that fat to seep down into our meat!
- use Hickory wood chips for the best flavor.
- cook your brisket LOW and SLOW
- use a leave-in probe meat thermometer. A meat thermometer is the ONLY way to know if your brisket is finished cooking!
- some ovens are kind of terrible at cooking on low heat. If you are not careful, you will either cook it too fast and it will be tough, or the temperature will dip too low, meaning your brisket will be delicious but may take 100 years to finish. Use an oven thermometer to make sure your oven is at the right temperature.
What is brisket anyway?
Let’s break it down. Brisket is located on the lower chest of the cow. There are two parts: the lean “flat” cut, and the fatty “point cut.” Sold together, they are called a “full packer” and can be over 20 pounds. Most grocery stores (outside of Texas) are only going to have prepackaged flat cuts available. That’s what we’re cooking with today.
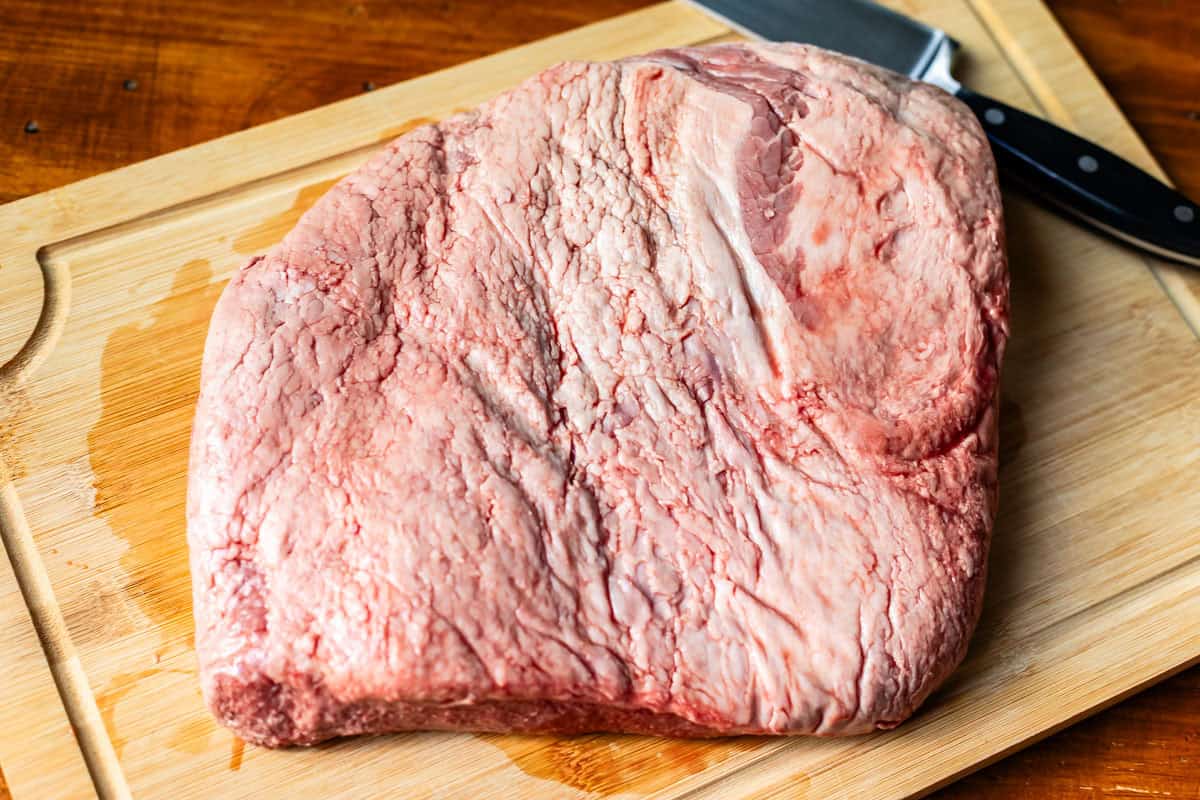
Flat cut brisket here, no fatty point cut pictured.
These are the cuts of brisket available:
- Flat cut (1st cut) (usually 6-10 pounds)
- Point cut (2nd cut) (5-6 pounds)
- Full packer (this is simply a flat cut + a point cut that have not be separated, usually 12-20 pounds)
I can’t buy point cuts at the grocery store round these parts (I live in Sacramento.) Only flat cuts are sold as a pre-packaged cut.
The point cut is usually SO fatty that it’s not fit for slicing. If you’ve ever heard of burnt ends (for your sake I really hope the answer is yes because HELLO deliciousness), it’s made from brisket point cut cubes that are smoked a second time. 😱 Nice clean slices of brisket come from the flat cut.
I don’t usually want to cook 20 pounds of meat at a time, and I’m guessing you don’t either. So for this recipe, we are working with the 6-10 pound flat cut. I will show you all the steps you need to take to make sure it doesn’t come out dry, in spite of it’s lack of fat marbling. First things first:
How to choose the best brisket
If you are spending this kind of money, spend a little more to get a decent cut. “Decent” = Choice grade.
- Prime grade cuts come from the top 3% of cattle appraised. Sometimes the prime grade cuts, believe it or not, are TOO fatty.
- Choice cuts come from the next 50-97% of cows. There is going to be a big difference between that 50% cow and that 95% cow.
Find a brisket that is Choice grade, with the biggest fat cap you can find.
If it’s not vacuum sealed, bend the brisket in half to see if it folds easily—a bendy brisket will be tender and properly aged. The next thing is color: the muscle should be reddish pink, and the fat cap should be white, not yellow.
Don’t trim the fat cap
I said what I said.
There is only ONE layer of fat on the flat cut of a brisket; the fat is not marbled throughout the muscle. Fat IS marbled throughout the point cut of a brisket—but usually butchers don’t sell this by itself. You either have to purchase both (called a “full packer”) which can be up to 20 pounds, or you can buy the flat cut, available at any grocery store, packed and ready to go.
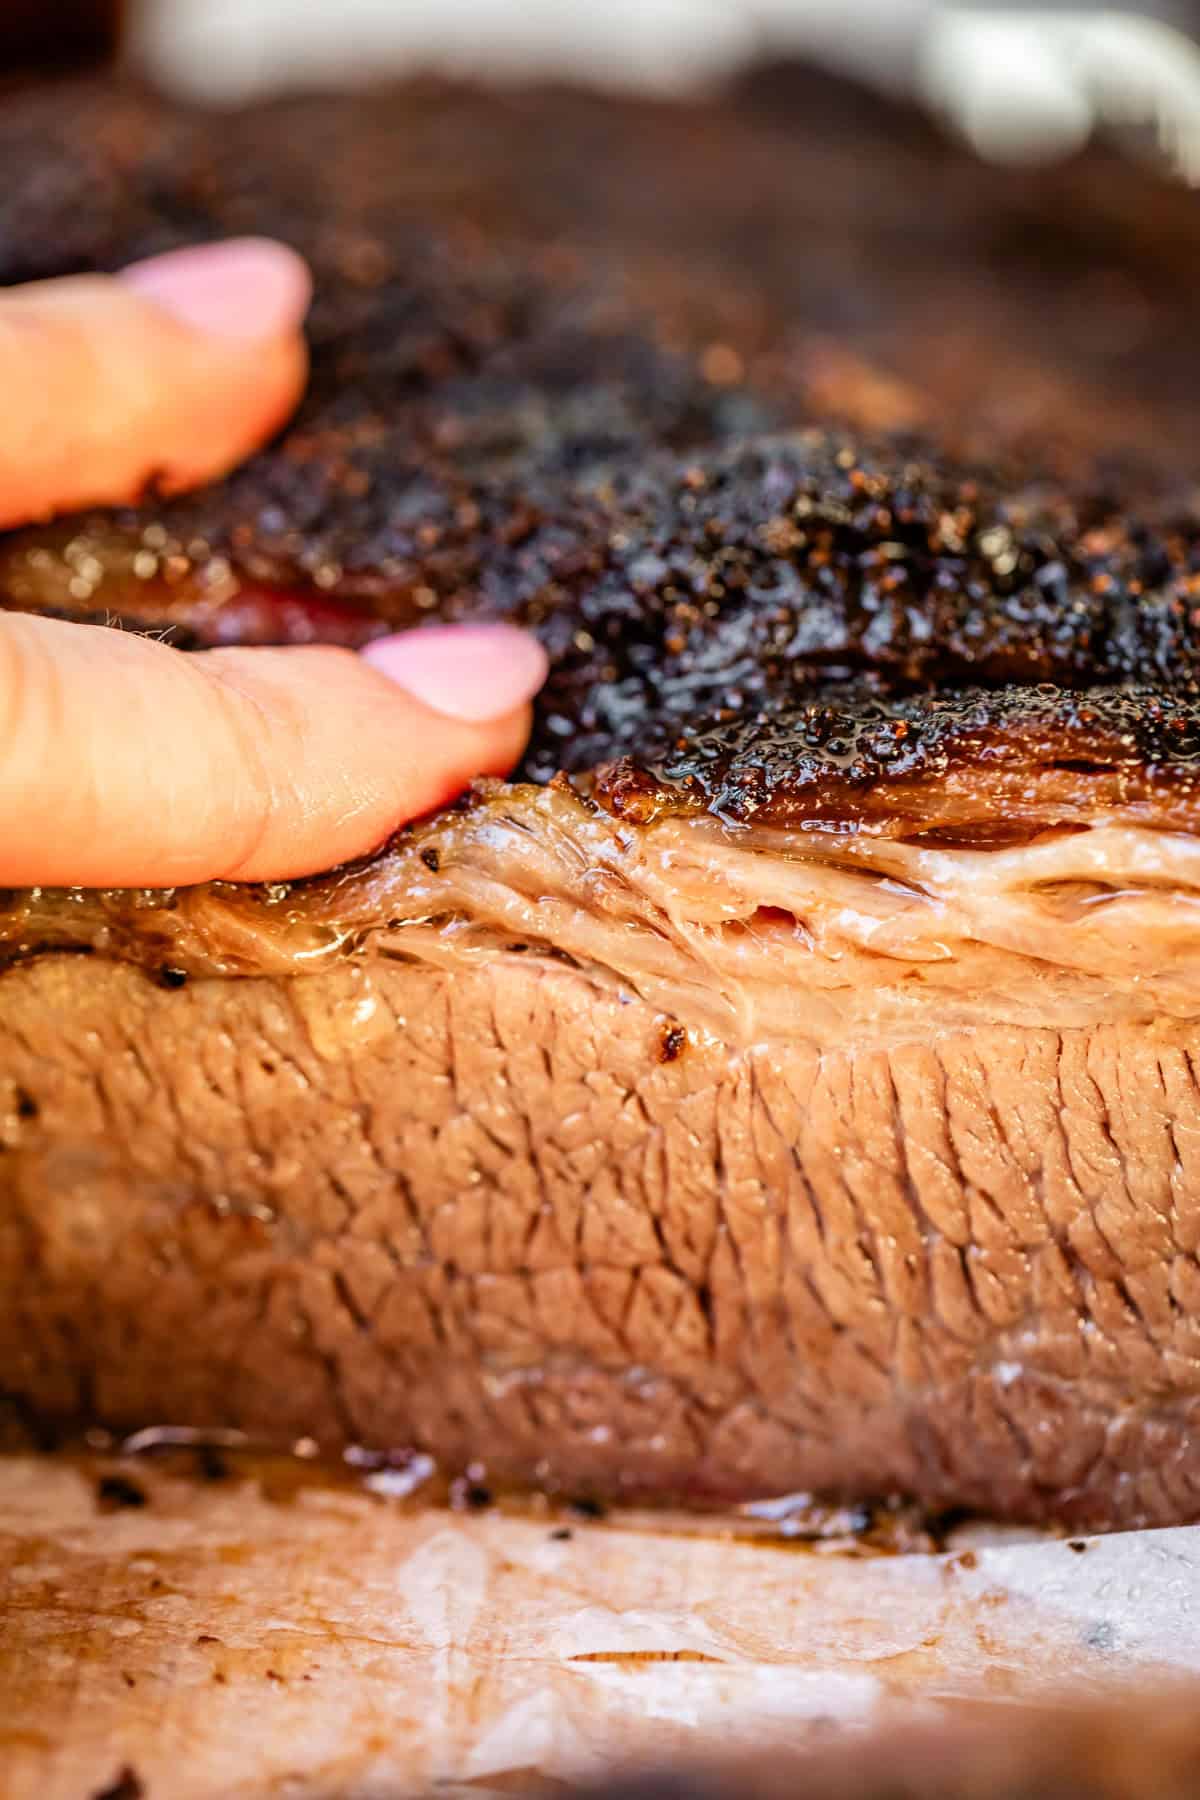
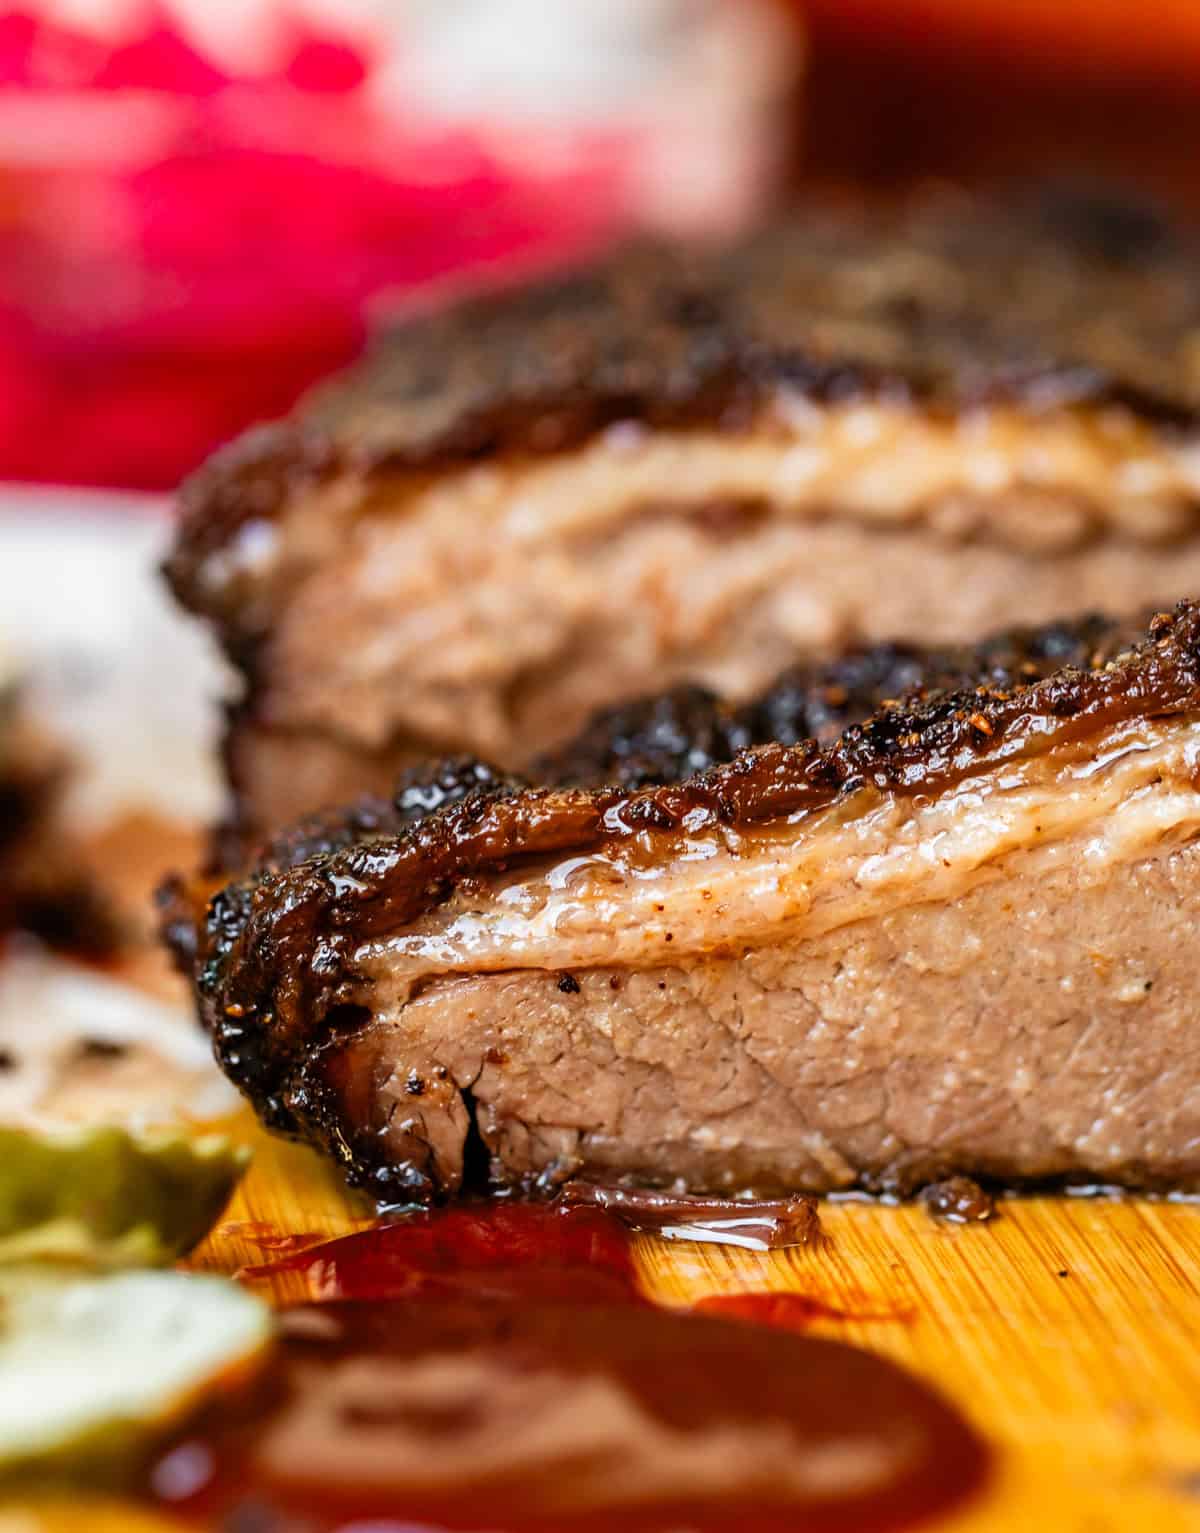
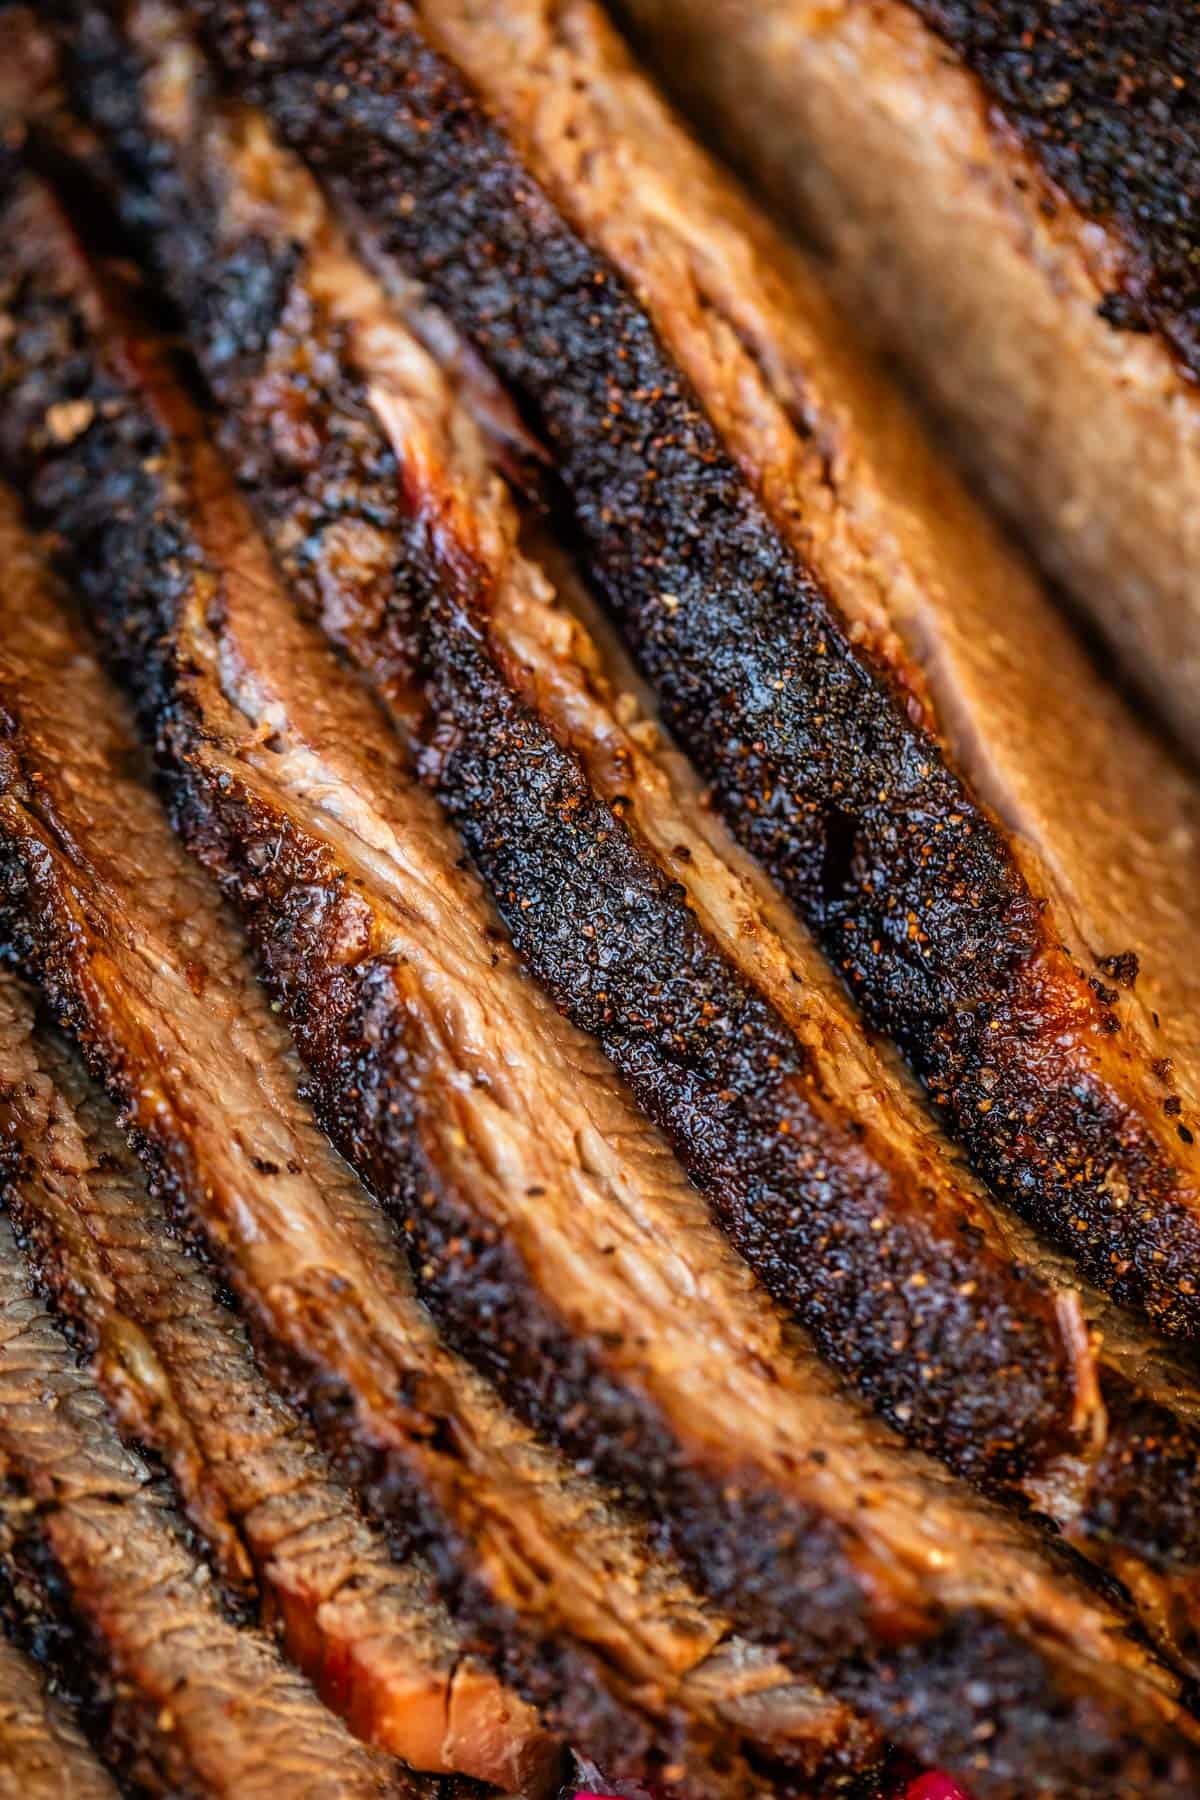
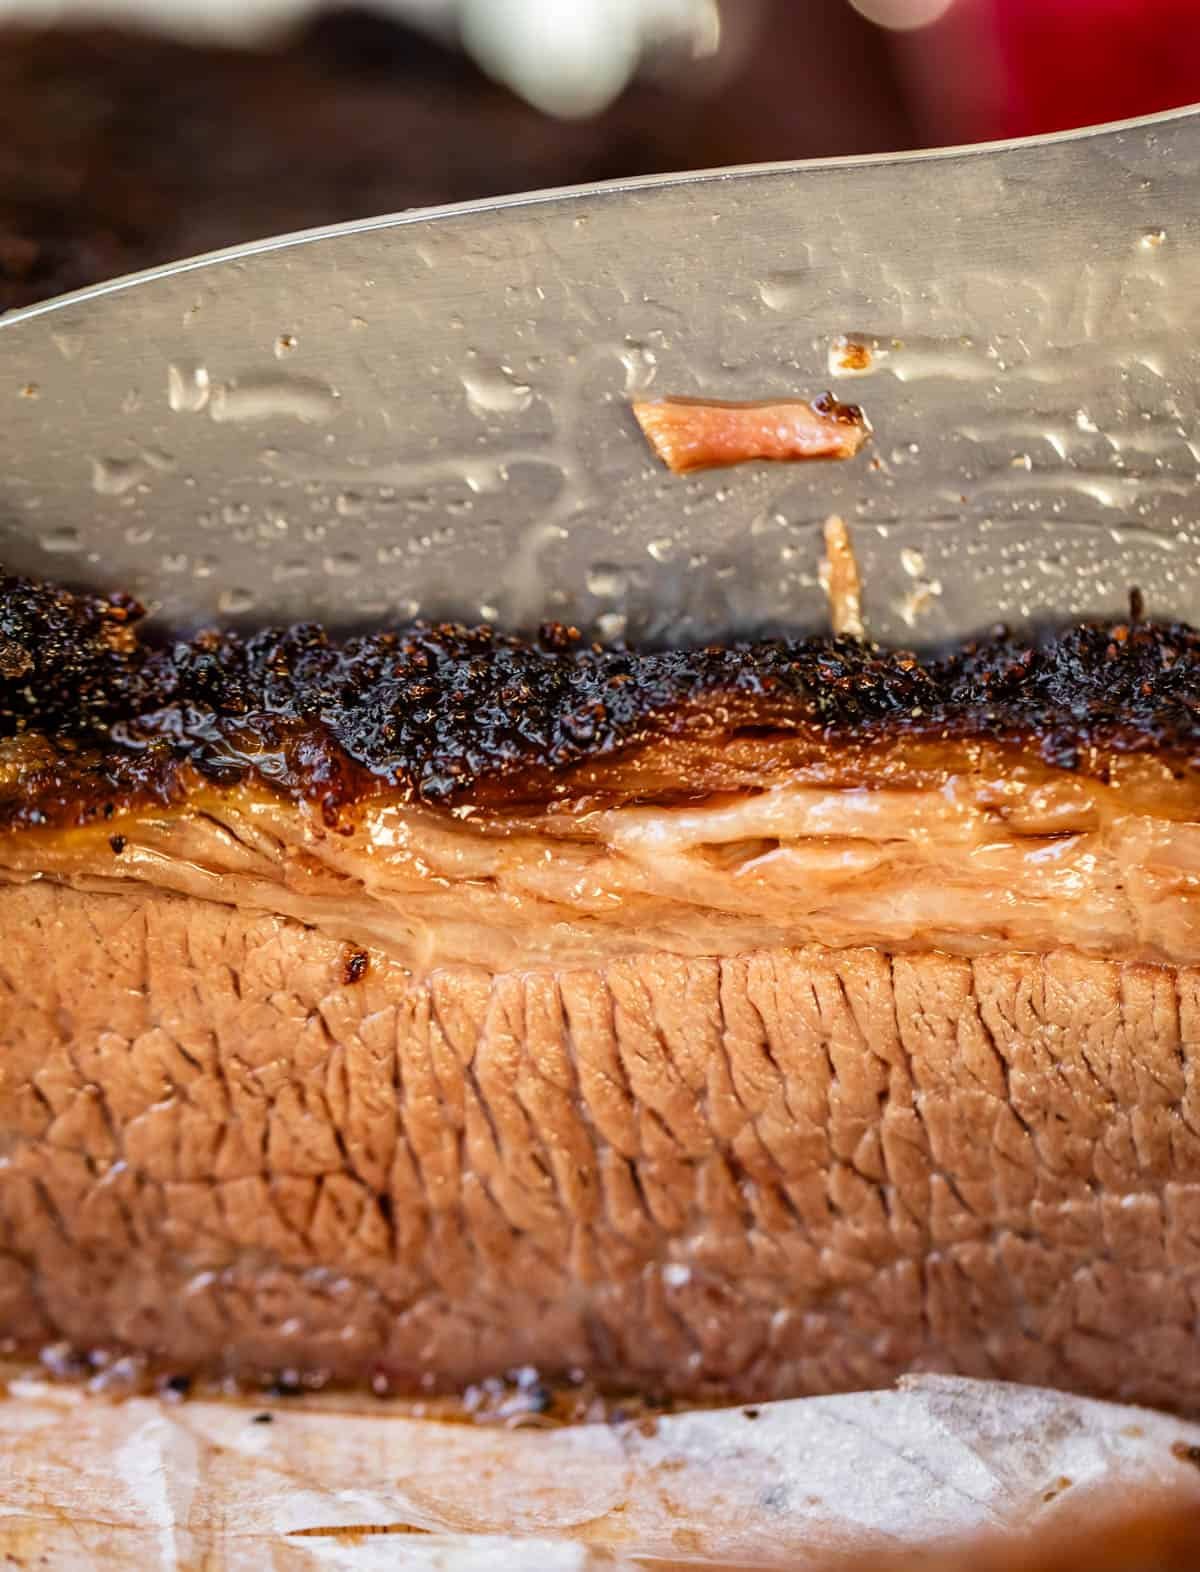
Almost every recipe I’ve found for brisket instructs you to trim the fat cap so it’s about 1/4 inch thick. I did this on the first brisket I made, and sorely regretted it. There is only ONE source of FAT on the flat cut of the brisket—and it’s all gathered in this one fat cap. We should not get rid of it!
We need that fat cooking on top of our meat, seeping down through the muscle fibers during the entire cooking process. The fat develops a crispy bark on the outside that is absolutely delicious. I’m not usually a fatty meat lover (I usually slice around it when eating steak, for example) but I make an exception for brisket. The salty crusty bark sitting right next to it gives it the texture of crispy pork belly.
Why so slow?
Brisket must be cooked lowwww and slowwww. The flat cut of a brisket is lean and tough, and has a lot of muscle-strengthening collagen. A slow cooking process allows time for the collagen in the meat to break down into tender gelatin, yielding a tender bite.
For a cut of meat this tough, your options are to 1) braise it in the oven or slow cooker, or 2) smoke it. If you braise it or cook it in the slow cooker, it’s going to taste similar to a pot roast. A pot roast that cost twice as much. Smoking really is the best option for brisket.
You can’t time a brisket
You can’t put a price on love, and you can’t put a time limit on brisket. These are just the facts my friend. Brisket is a bit of an art. There are no exact times for this recipe. We are relying completely on our meat thermometer to tell us when this baby is done cooking. An internal temperature of 203 degrees F is what we are aiming for. Between the smoking time on the grill, the oven time, and resting time, you are looking at anywhere between 8-15 hours.
Chris and Laura always smoke their brisket at night, and let it cook slow in the oven overnight. It’s easy to wrap up brisket that’s ready in the morning and serve it that night for dinner. That’s much preferable to all of your dinner guests hungrily watching for the thermometer to finally say 203! Make sure you plan ahead.
If your brisket is small, be aware that it might take less time, so don’t choose the overnight method if your brisket is kinda scrawny.
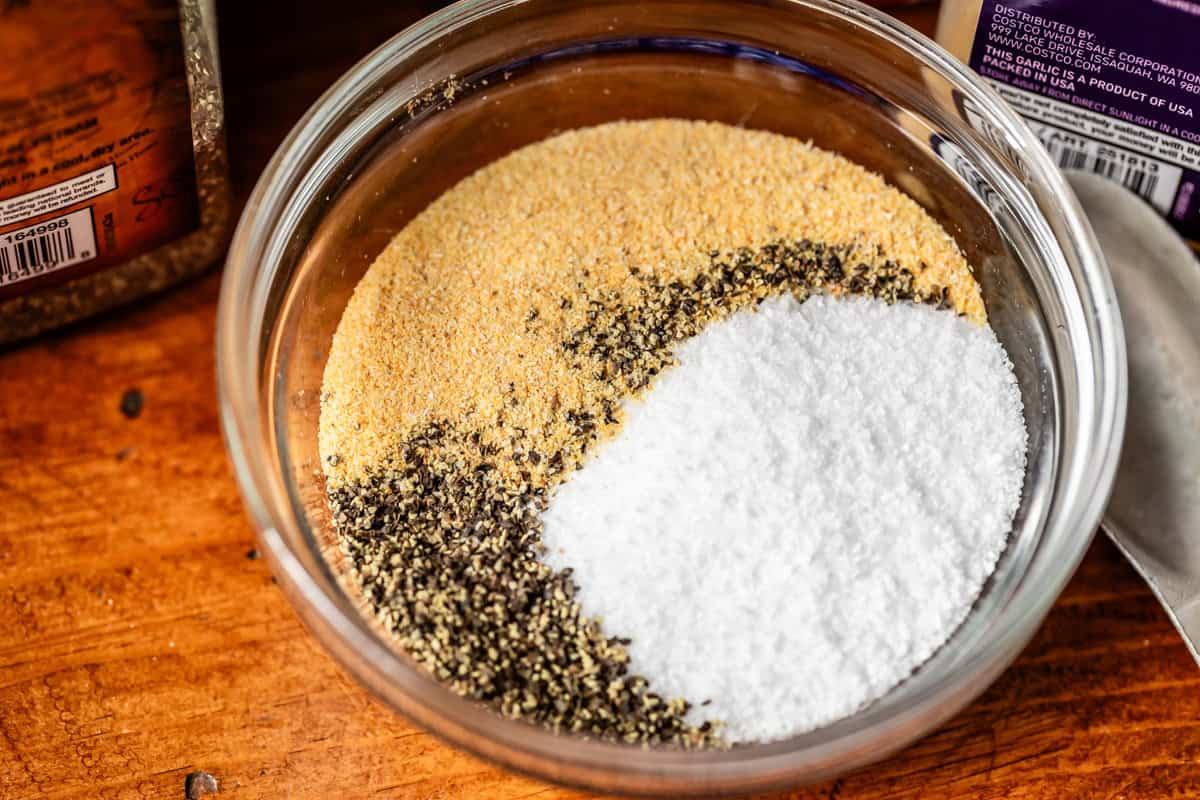
The rub
You will find one thousand brisket rub recipes, each more complicated than the last, but really all you need is kosher salt, pepper, and garlic granules. But there are some rules.
Yes, this is 1/4 cup of kosher salt:
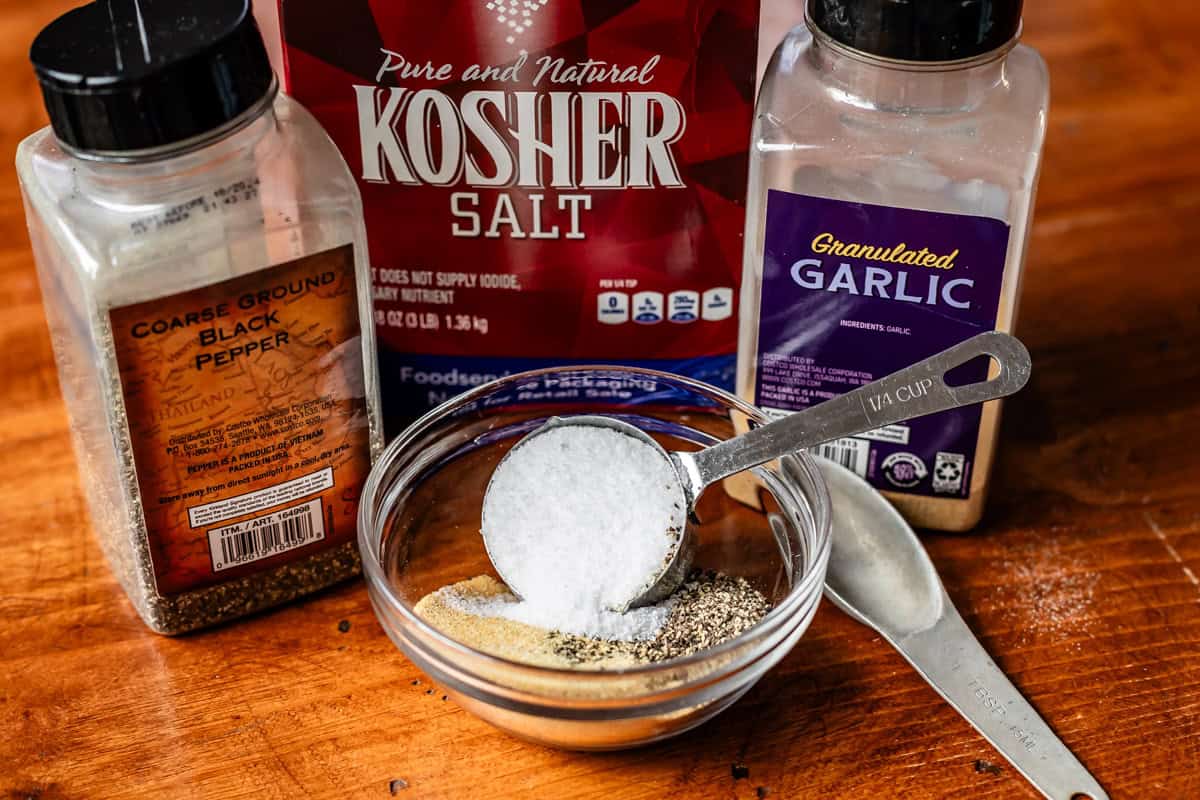
You cannot screw up on the salt you use. I don’t consider myself a fussy foodie, but kosher salt is the one hill I will die on. It is less “salty” than table salt. If you are going to the trouble of buying a big expensive brisket, please don’t rub it with table salt. It just won’t taste as good, and you run the risk of it tasting overly salted. I live and die by Diamond Crystal Kosher Salt. If you really insist, use about half the amount of table salt.
The dry brine
We are not just adding salt to the brisket for flavor. We are adding it way ahead of time so that it can work its tenderizing magic before we even start cooking. This step is not optional!
Salting beef ahead of time is a tried and true method. I do this for my Ribeye Steak as well as Prime Rib. The salt draws moisture out of the meat. Then, through osmosis, the moisture and salt is pulled back inside—all the way to the center of the meat. This slow process is the best and ONLY way to season the center of the meat.
We are rubbing the brisket, then putting it on a rack in the fridge, UNCOVERED. This drying process helps prepare the edges of the meat to develop a fantastic “bark” or crust. It does NOT dry out the meat. You will get juicy and tender brisket with the dry brine method, it’s been well tried and tested.
The smoke
SMOKE is the special flavor of a Texas brisket. There is no way to fake it. (Liquid smoke is not going to make up for the real thing!)
If you skip the smoking step, your brisket will taste like a pot roast. Now don’t get me wrong, I love me some Pot Roast…I just don’t want to pay brisket-level prices for it.
Back in the day, brisket used to be a cheap cut of meat. An inexpensive way to feed a crowd. But it’s become so popular that these days it’s one of the most expensive cuts. Crazy, right? If you are not going to smoke it, just go by a chuck roast instead for a 1/3 of the price.
The sauce
To BBQ sauce, or not to BBQ sauce? This is a question that will tear families apart, Capulet and Montague style.
A perfectly smoked brisket hardly needs sauce, it’s true. It can overwhelm the perfectly savory, smokey flavor of simple juicy MEAT in your mouth. But usually at least halfway through a plate, I start wanting something a little saucy, because I’m a heathen apparently.
The moral of the story is that barbecue sauce should always be served on the side of the smoked brisket. Heaven forbid you invite a Central Texan to your barbecue and they have to suffer through your sauce. It would almost be as bad as the time Laura showed up with white chicken chili to a neighborhood cookoff in Dallas. (They would not even allow her to enter into the running).
Laura’s mother-in-law Chris always serves a semi-homemade sauce made from Sweet Baby Ray’s, Claude’s Fajita Marinade, and yellow mustard. Claude’s is a regional brand and I couldn’t get it here in Sacramento. I served our brisket with my own homemade BBQ Sauce and it was *amazing.* Highly recommend. You can even serve it on top of the brisket if you don’t invite Lawrence to dinner.
If you’re trying to be super authentic, typical sauces in Texas BBQ are more tangy than sweet, with some chili powder or other seasoning that adds a bit of a kick. If you’re buying a sauce, try Stubbs, Jack Daniels, or look for one that says “hickory” or “vinegar” on it. If you buy a sauce it and isn’t tangy enough, Laura says you can add vinegar or mustard to get it where you like it!
Beef brisket recipe ingredients
While there aren’t many ingredients needed for brisket, there are a few specialty items, so make sure to glance at this list. The full recipe with ingredient measurements is at the bottom of the post in the recipe card!
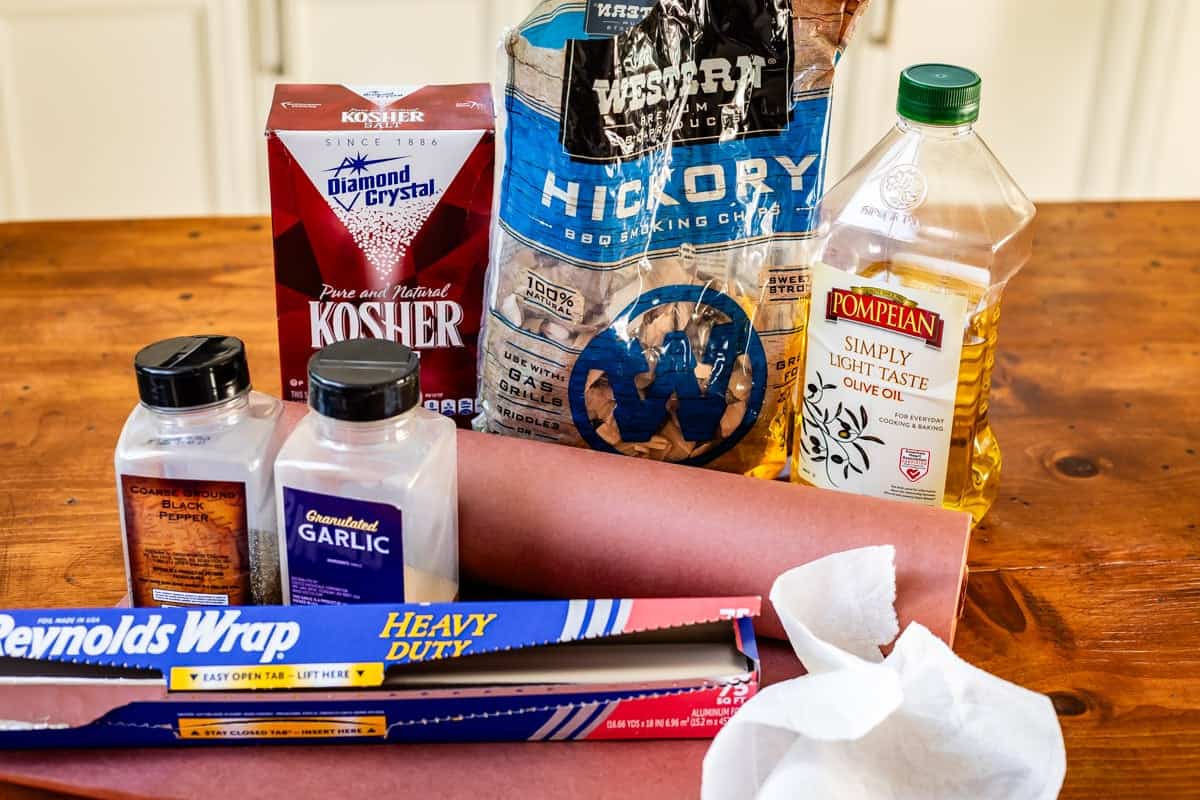
- kosher salt
- coarse ground pepper
- garlic granules (or powder)
- brisket (full packer, 12-15 lbs) or a flat (4-8 lbs)
- Hickory wood chips
- probe or instant read thermometer
- pink butcher paper (optional; foil works ok)
- your favorite Barbecue Sauce, I love my homemade recipe that takes 20 minutes, see notes for more sauce ideas
How to cook a beef brisket in the oven
The first thing you need to do of course, is buy a brisket. Normally I do not cover the purchasing step in the how-to process, but I SERIOUSLY NEED YOU TO NOT MESS THIS UP. If you are spending this much money on a cut of meat, make it the best it can be.
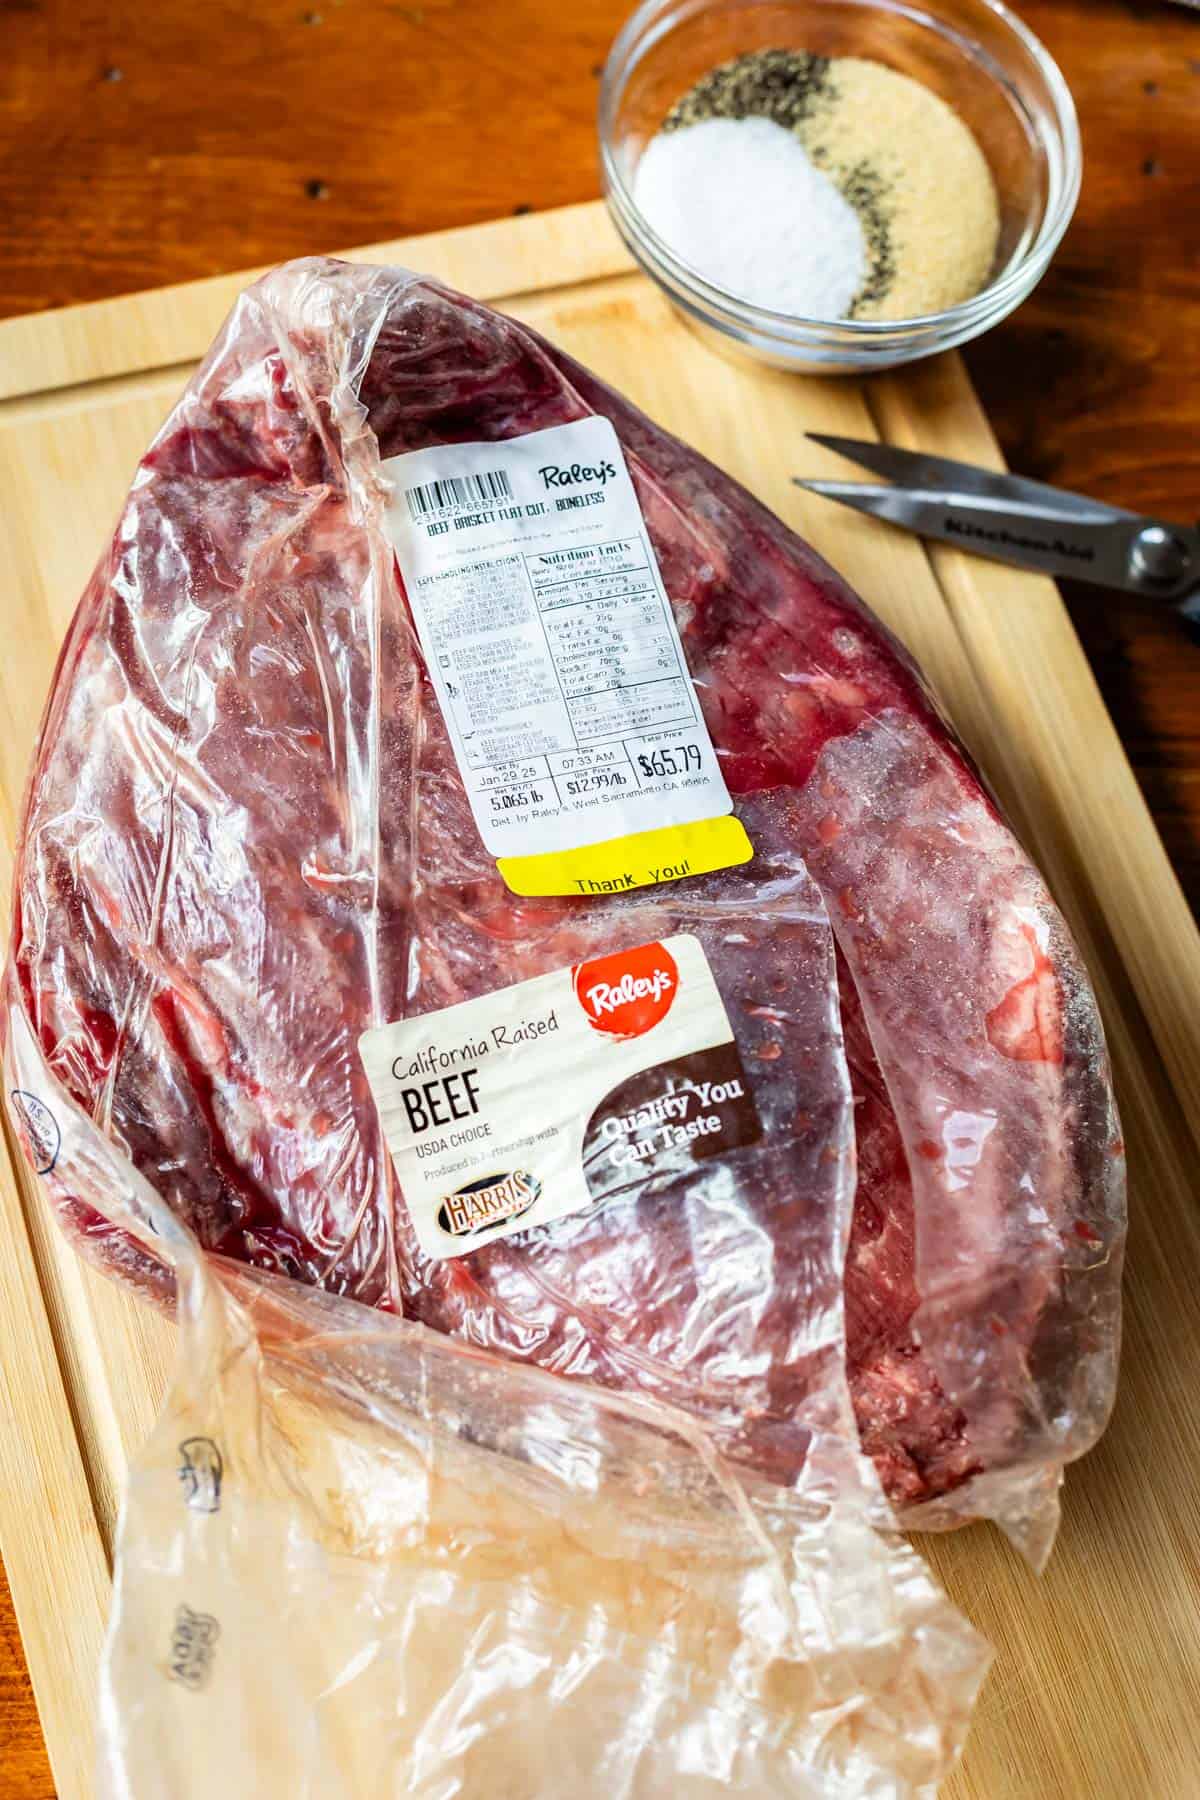
Head to a nice store with a large butcher counter, or a nice butcher shop. Ask the butcher about what cuts of brisket are available. Buy a flat cut (or a full packer) with the biggest fat cap you can find that is Choice grade.
This fat cap is NOT super thick, and this particular brisket was not the best (it was my first trial). Find a fat cap thicker than this!
If it’s not vacuum sealed, bend the brisket in half to see if it folds easily—a bendy brisket shows that it is tender and properly aged. The next thing is color: the muscle should be reddish pink, and the fat cap should be white, not yellow.
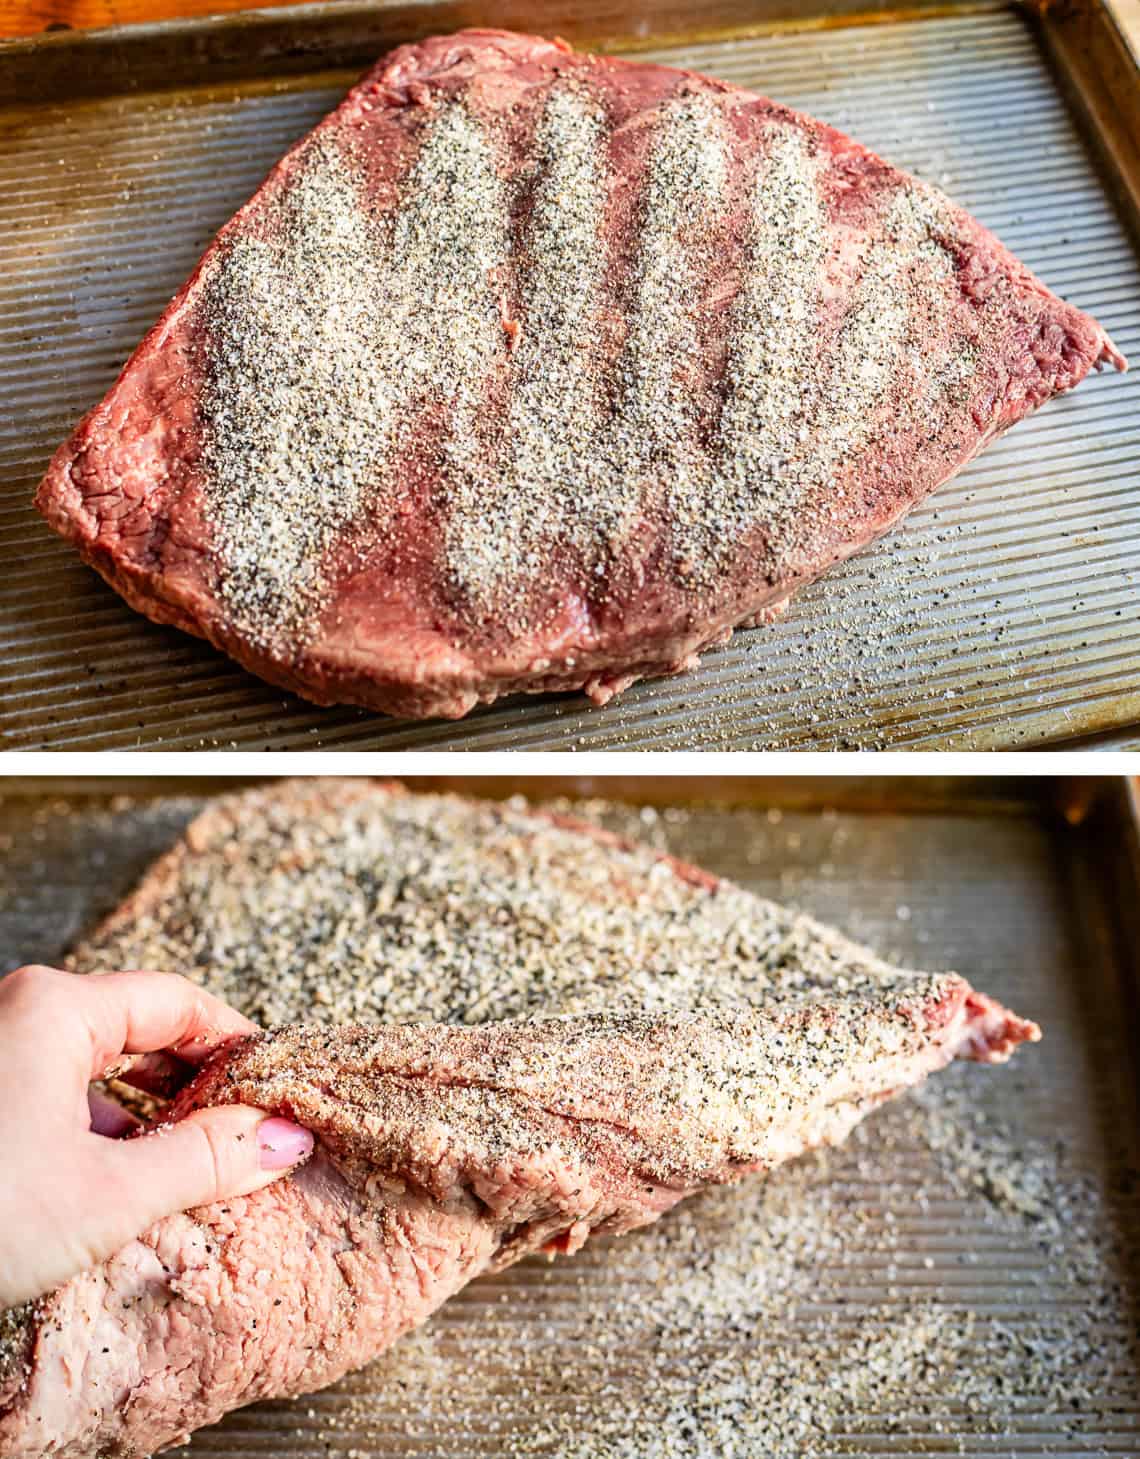
Take your brisket home and get ready to dry brine. Place your brisket on a half baking sheet and rub it down with your brine: just kosher salt, pepper, and garlic GRANULES, not the same as garlic powder.
Now let it sit in the fridge for a day or two. Seriously! The longer the marinade, the better. You can go up to 2 days. Don’t cover it. You want it to dry out a bit on the edges; this helps get a super amazing crust (bark) on your brisket, but doesn’t make the meat dry when you eat it, I promise.
I put mine on a cooling rack to lift it out of sitting in its own juice. The “moistness” of your brisket when you eat it has very little to do with its water content, and everything to do with its fat content. The fat on your brisket does not evaporate when it’s uncovered. So lift it up out of the juices so that you get a nice crispy edge to your brisket.
Place your brisket uncovered in the fridge for 6-48 hours.
Once the meat has had time to absorb the dry brine, it’s time to SMOKE. The first step is to make your wood chip packets.
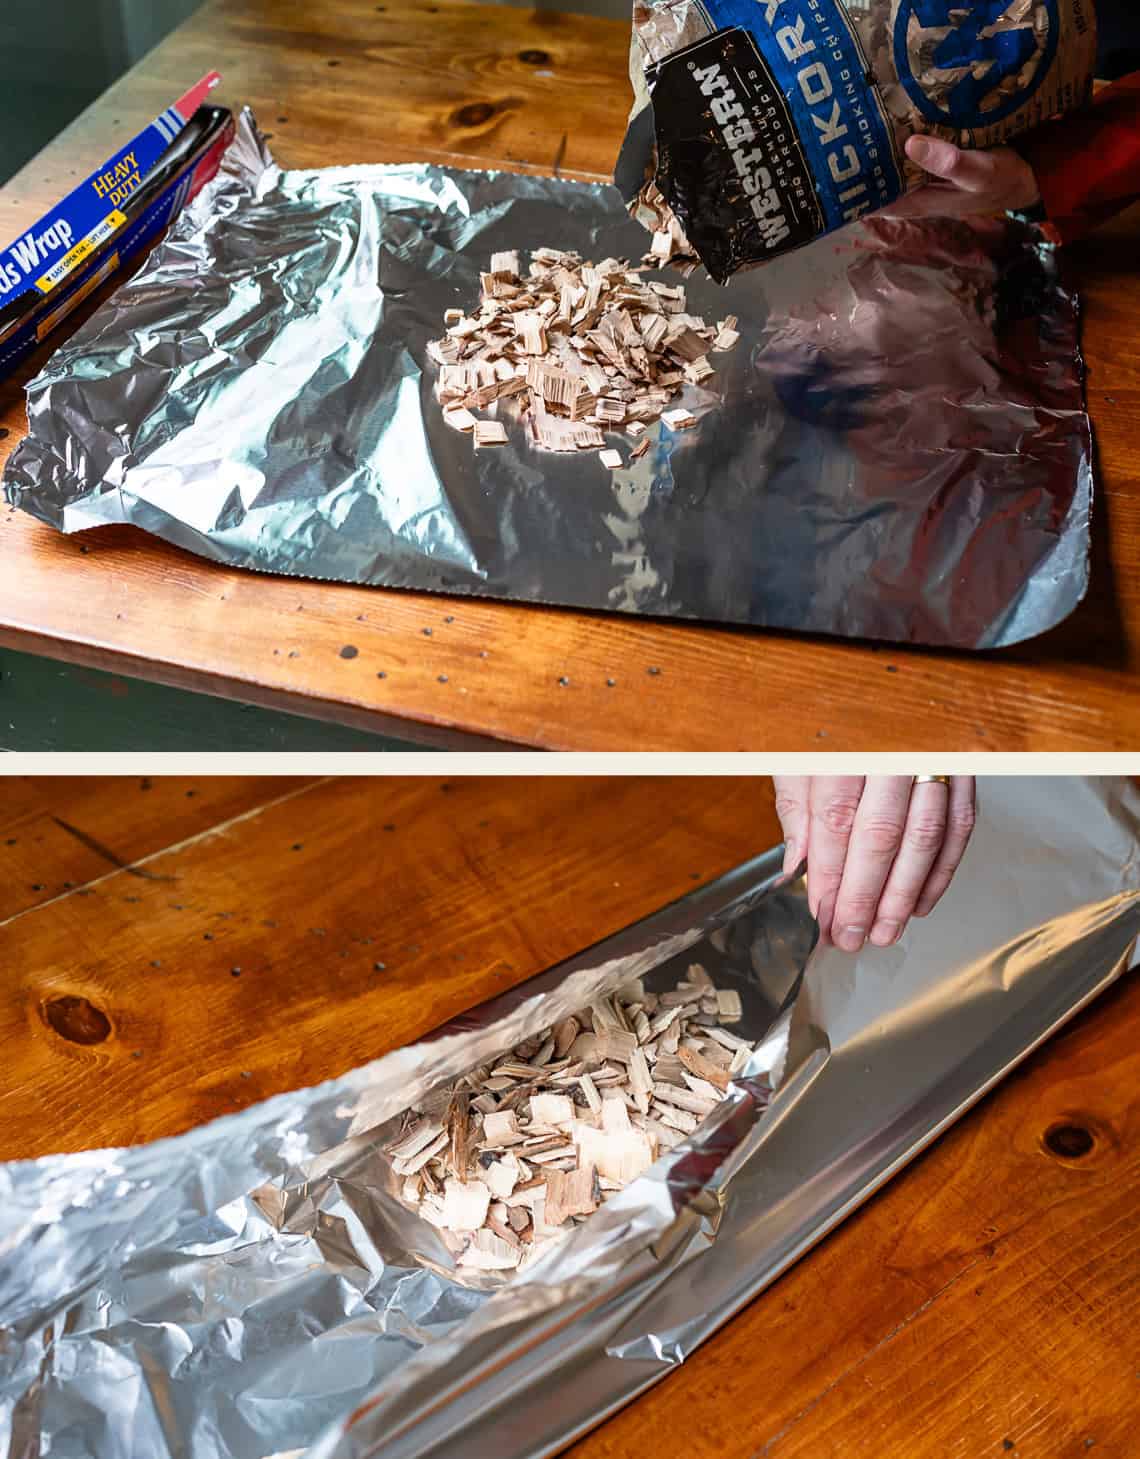
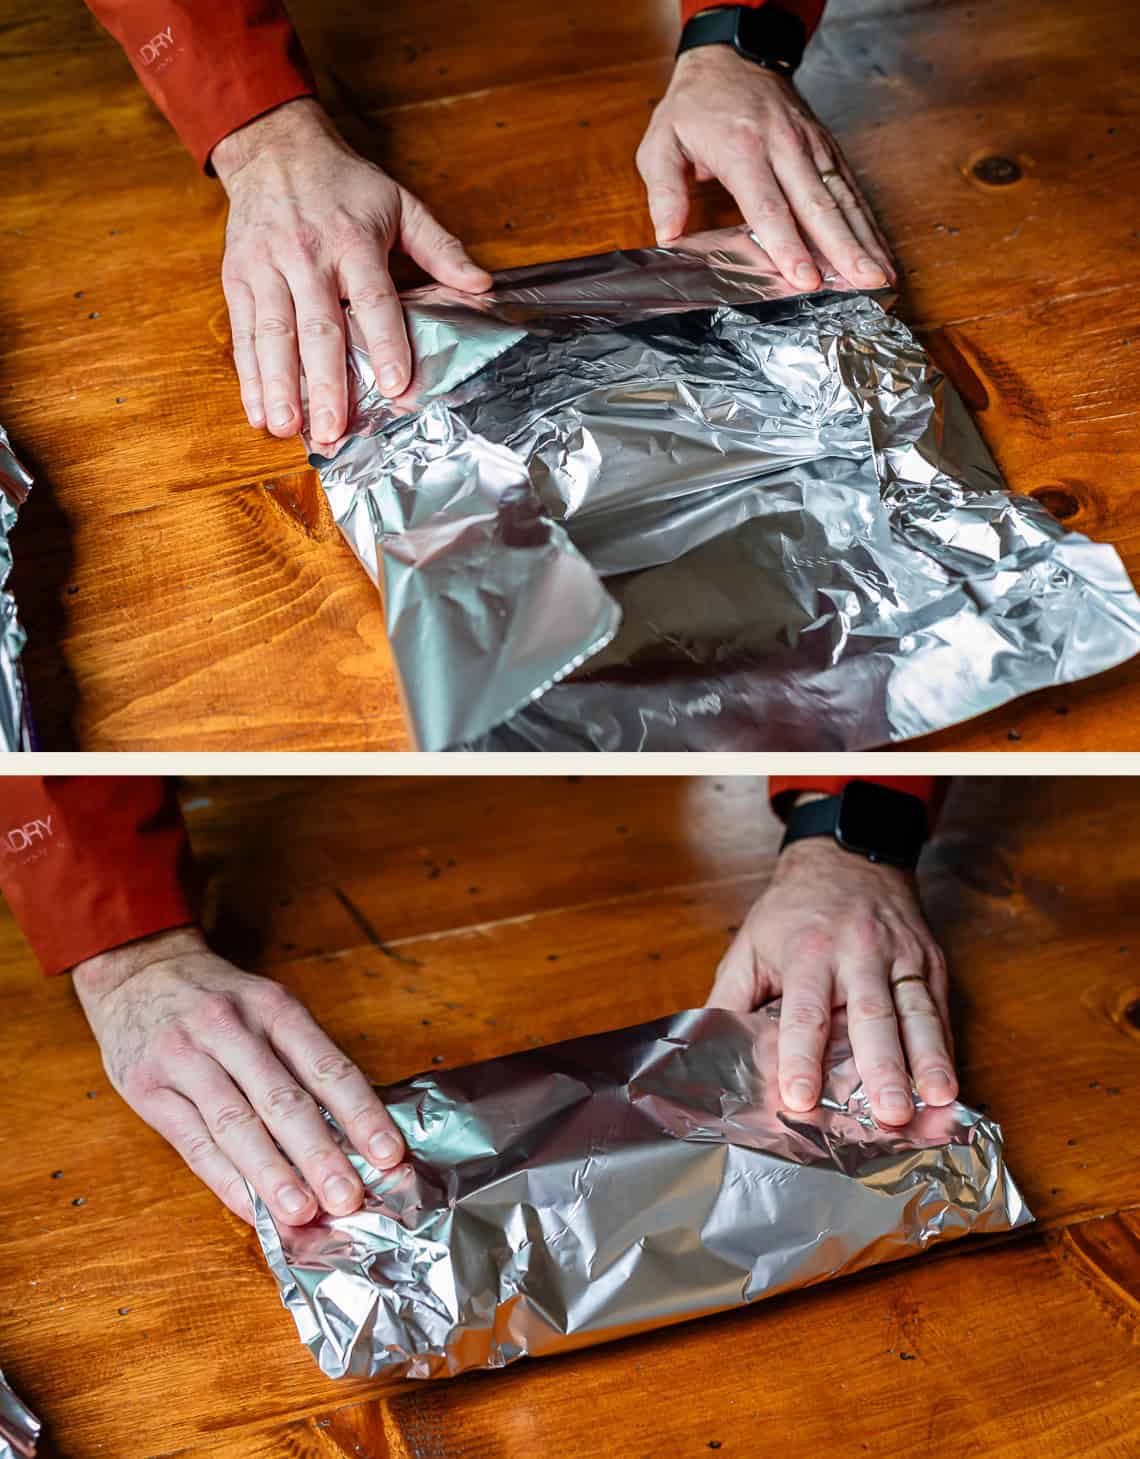
Pour about 2 cups of wood chips on a large layer of heavy duty aluminum foil. Bring two edges together, and fold them so that they are sealed:
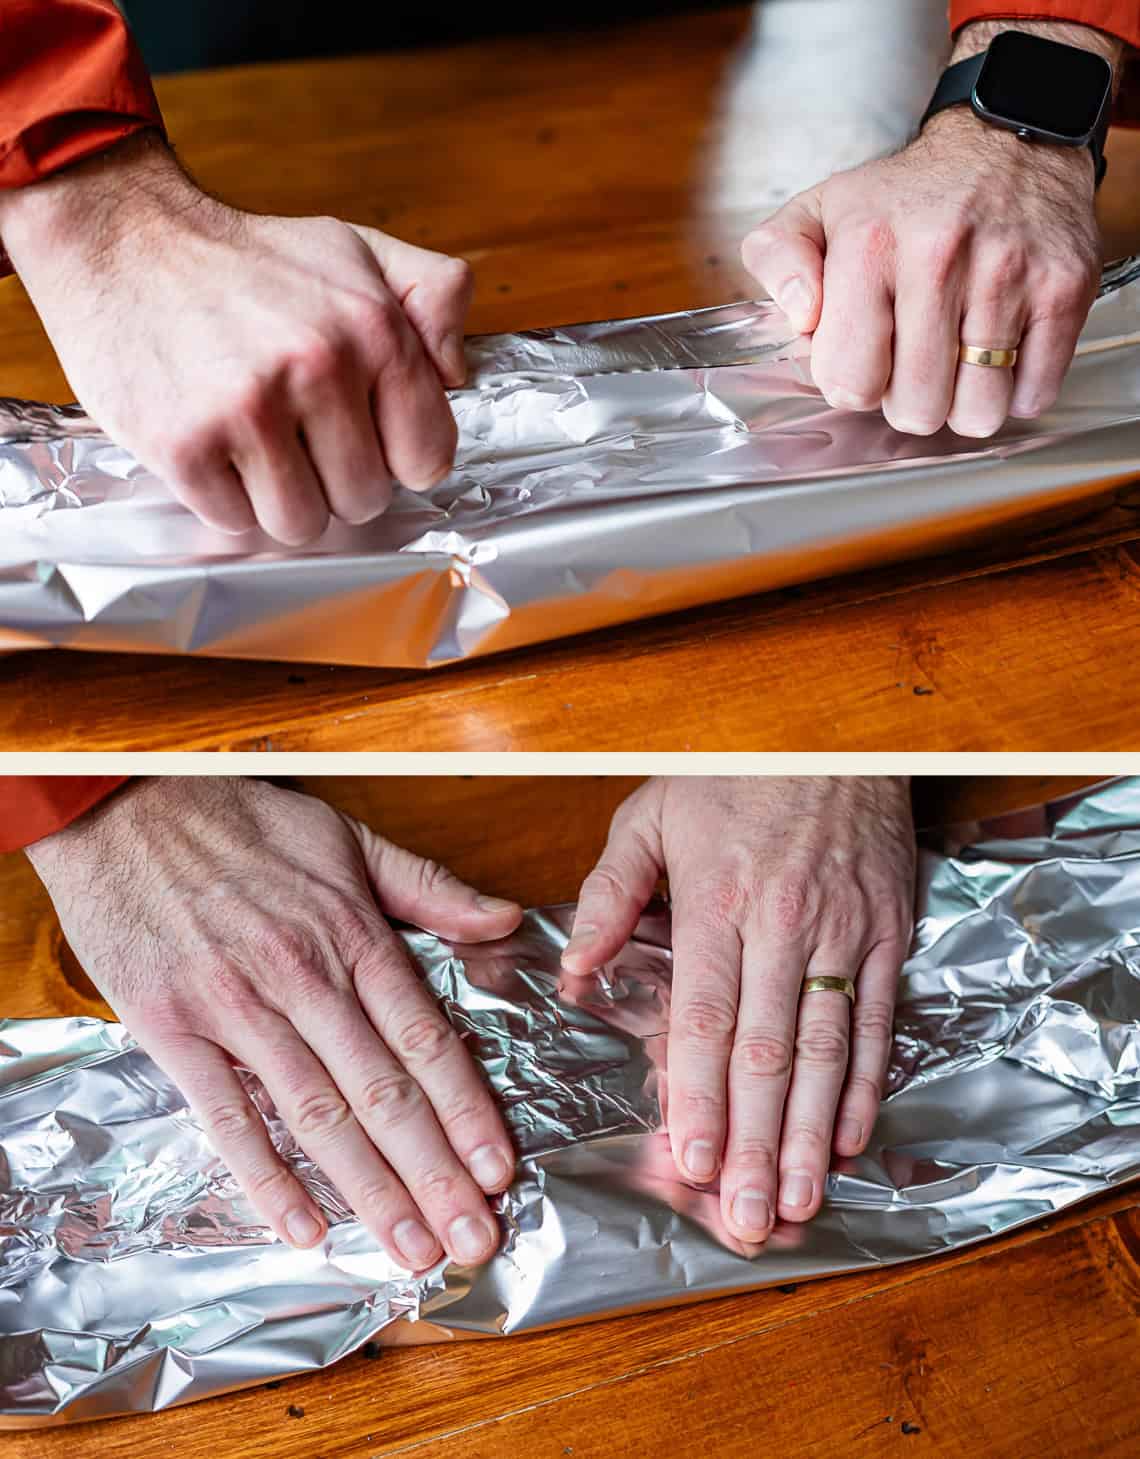
Keep folding all the way down. Then lift up each end of the packet on both sides.
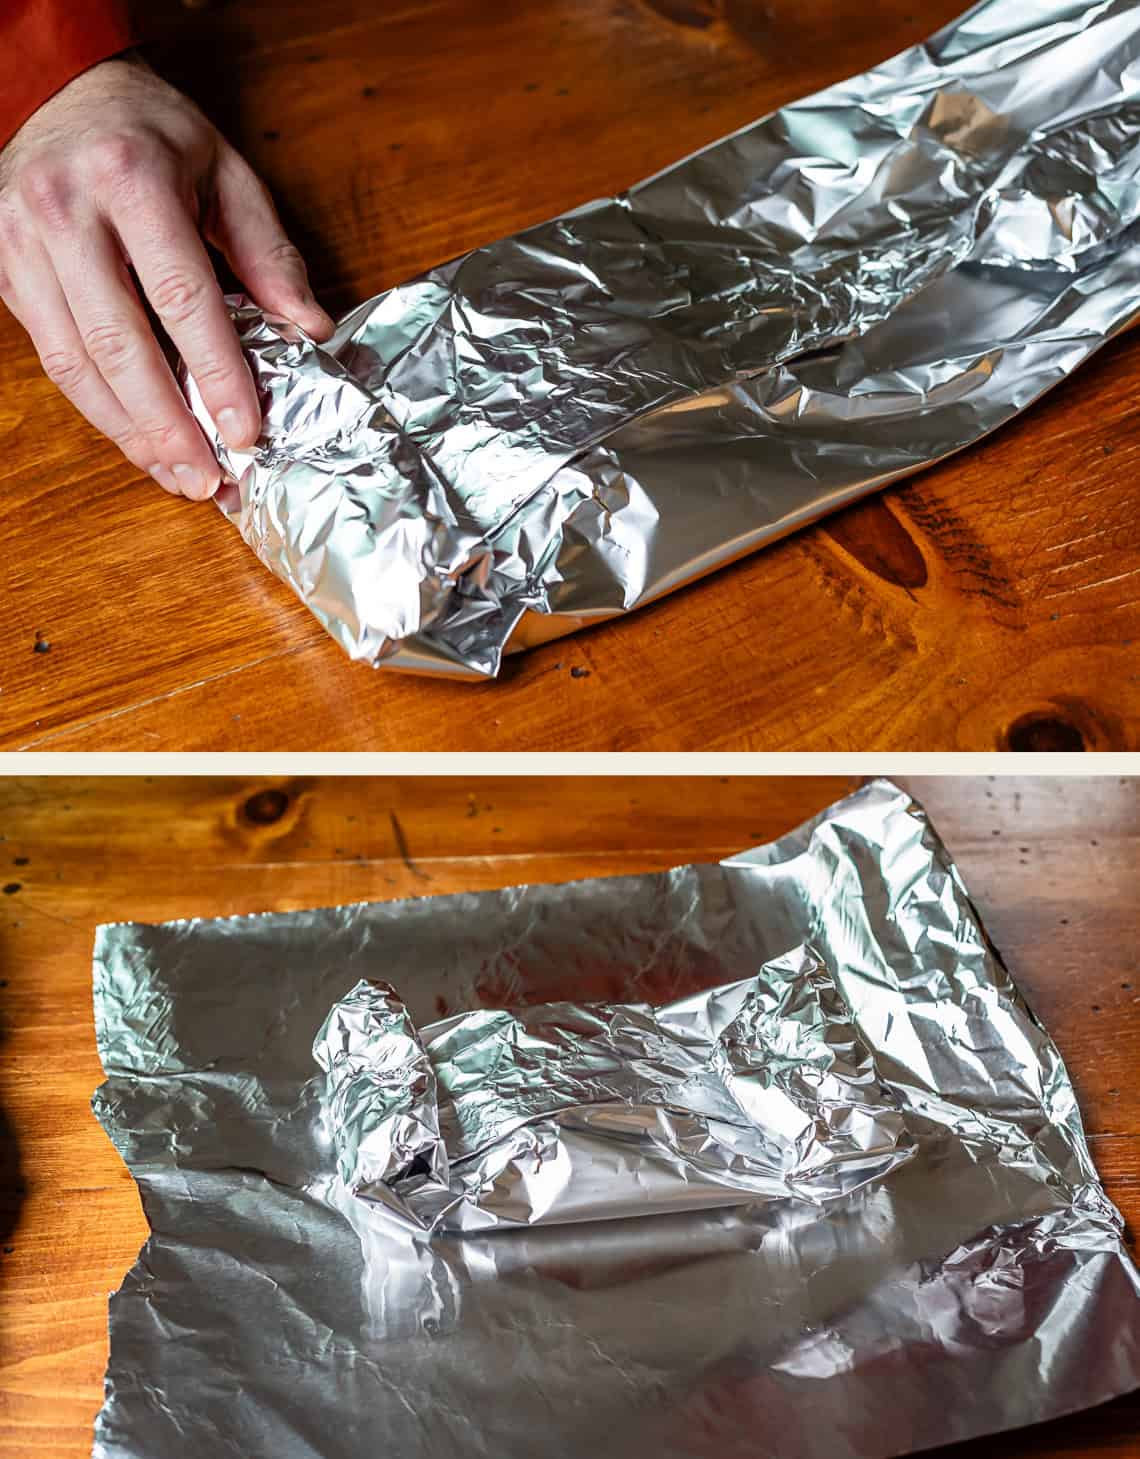
Place the packet on a second sheet of foil, to reinforce the bottom. This layer doesn’t need to be sealed quite so fussy.
Then, take a sharp knife to the top to make 2 or 3 (1-inch) holes. This is where the smoke will escape from!
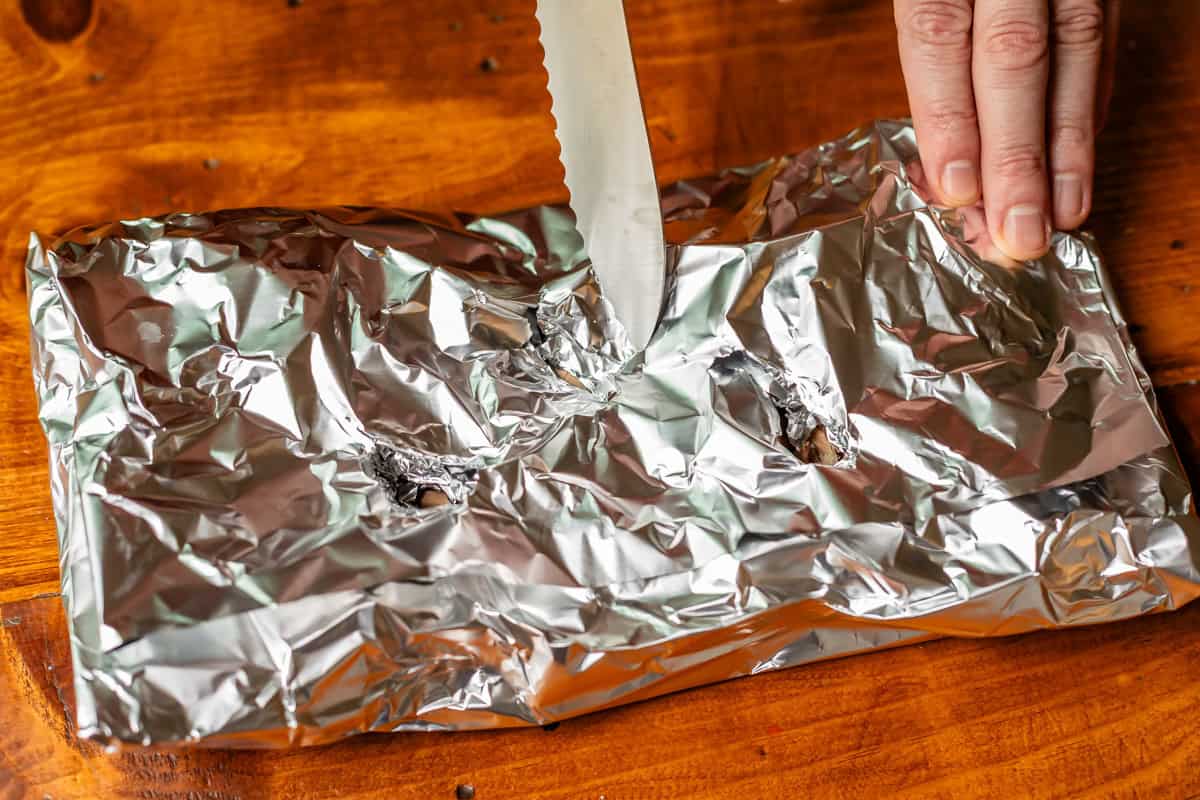
Now it’s action time. Preheat the grill to 250 degrees F.
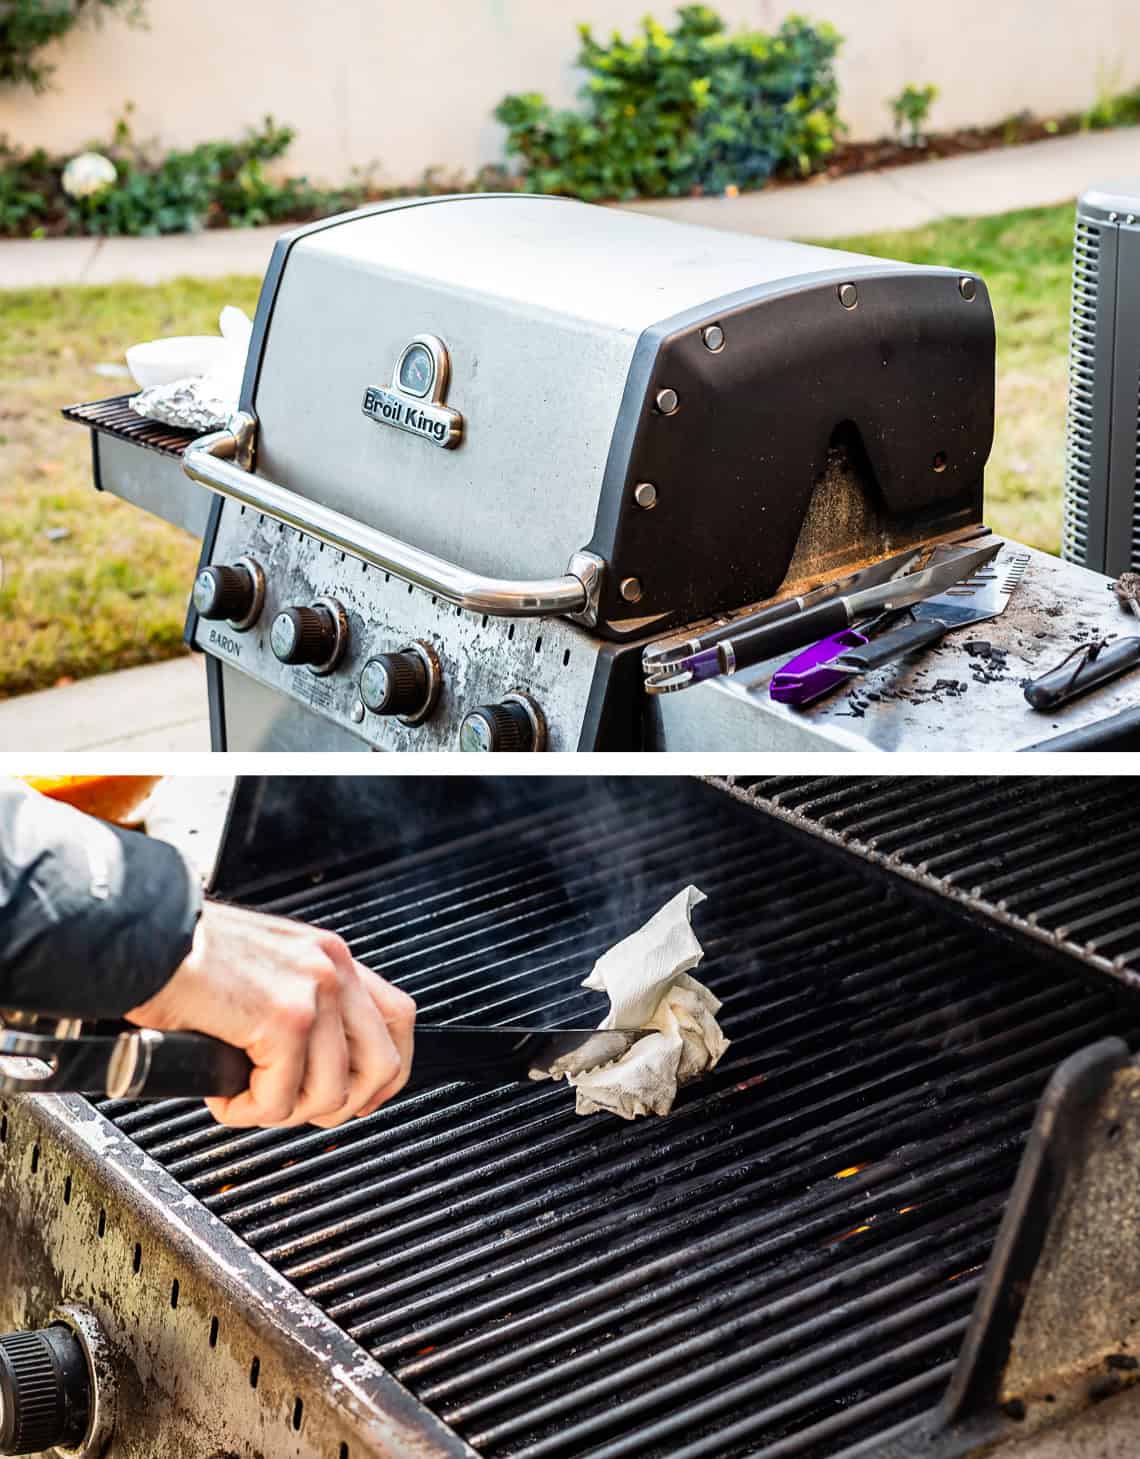
Use a paper towel dipped in a bit of vegetable oil to rub the grill grates. We don’t want any of our brisket crust sticking to the grill! That would be so tragic.
And here is our set up for smoking:
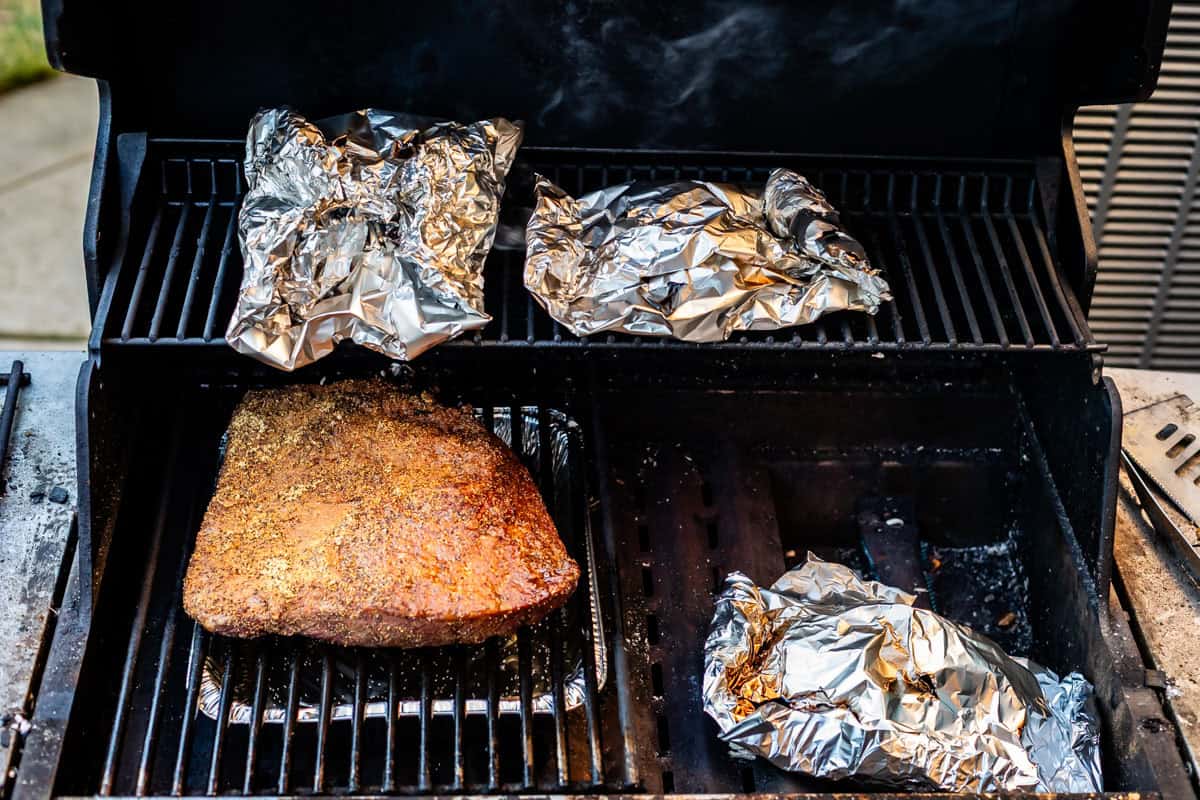
Place the brisket fat-side-up on one side of the oiled grill grates. (Ignore the pan of water under the brisket—I was testing it out but it’s not necessary!)
Remove the grill grates AND heat plates on the opposite side of the grill, and place the smoke packets directly on the heat. Turn the heat off that is right below the brisket. Close the lid and wait a few minutes. Once the packets start smoking, move them up a bit, either on a top rack, or on top of the heat plates, so that they don’t light on fire (been there, done that 🤣).
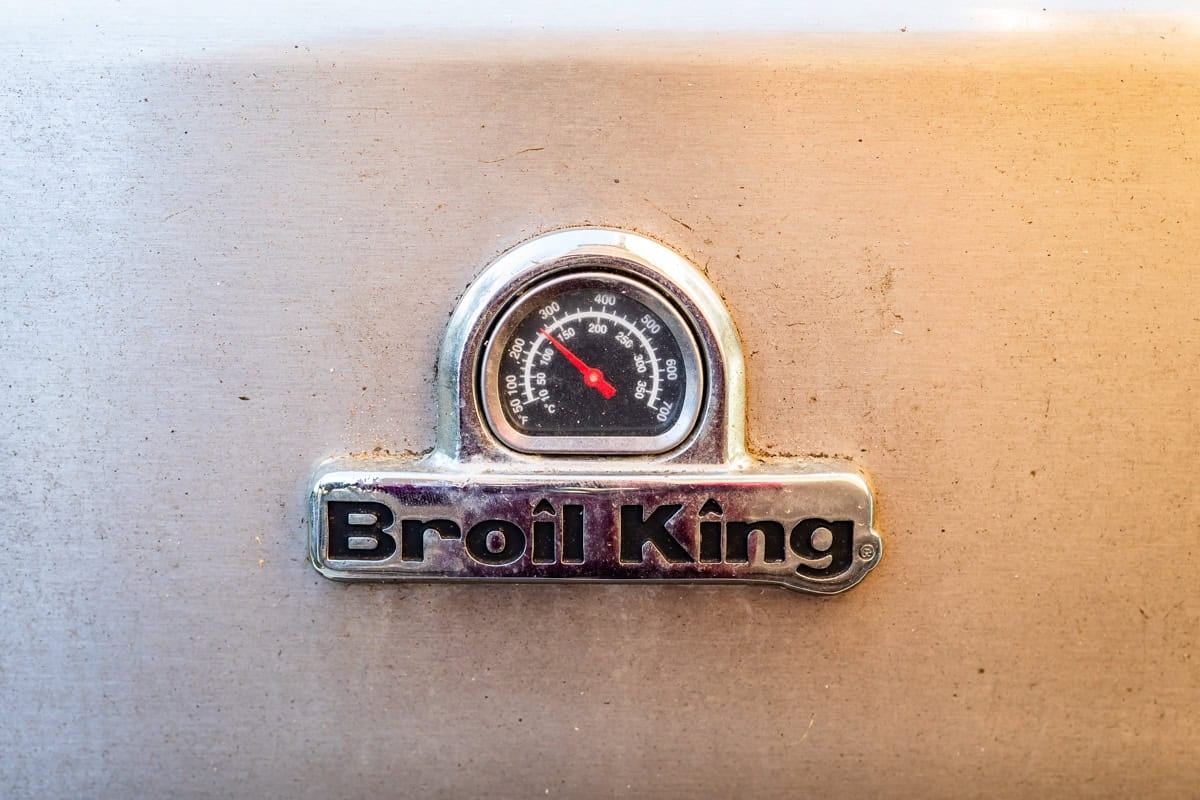
This is the most hands-on part of the whole process. Stick around and keep an eye on the temperature of the grill. You want to keep the heat right at 250. Avoid opening the lid of the grill at all costs. Depending on how sensitive your grill is, you may have to adjust the heat of the burners up or down. Try to keep the heat as steady as possible.
Smoke the brisket through 2 sets of smoke packets (4 total.) Once the first 2 packets have burned out (or almost burned out), replace it with the next two packets. A smoke packet usually takes about 45-60 minutes to burn out. Once the first set of two are burned out or almost burned out, you can add the next set of two packets. (You can see 3 packets in the photo above: the top two were almost burned out and I was in the process of adding the second set.)
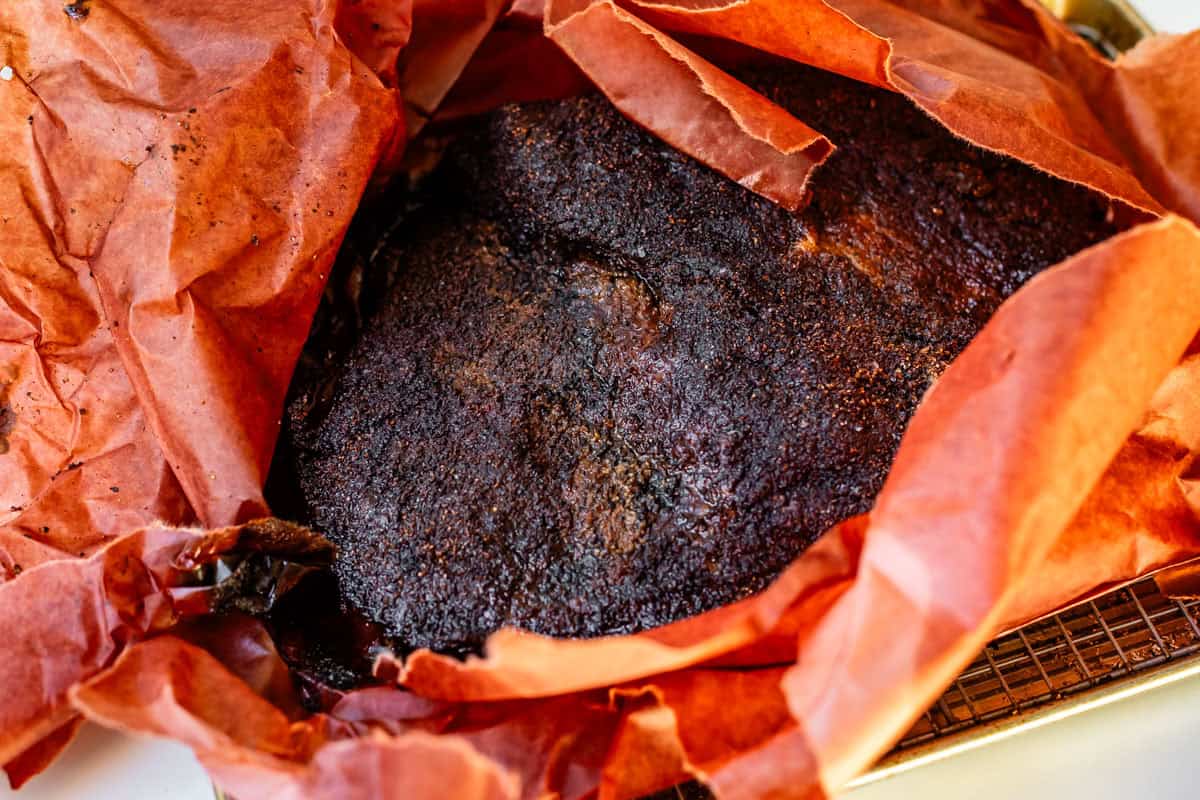
Here she is all smoked and ready to go in the oven.
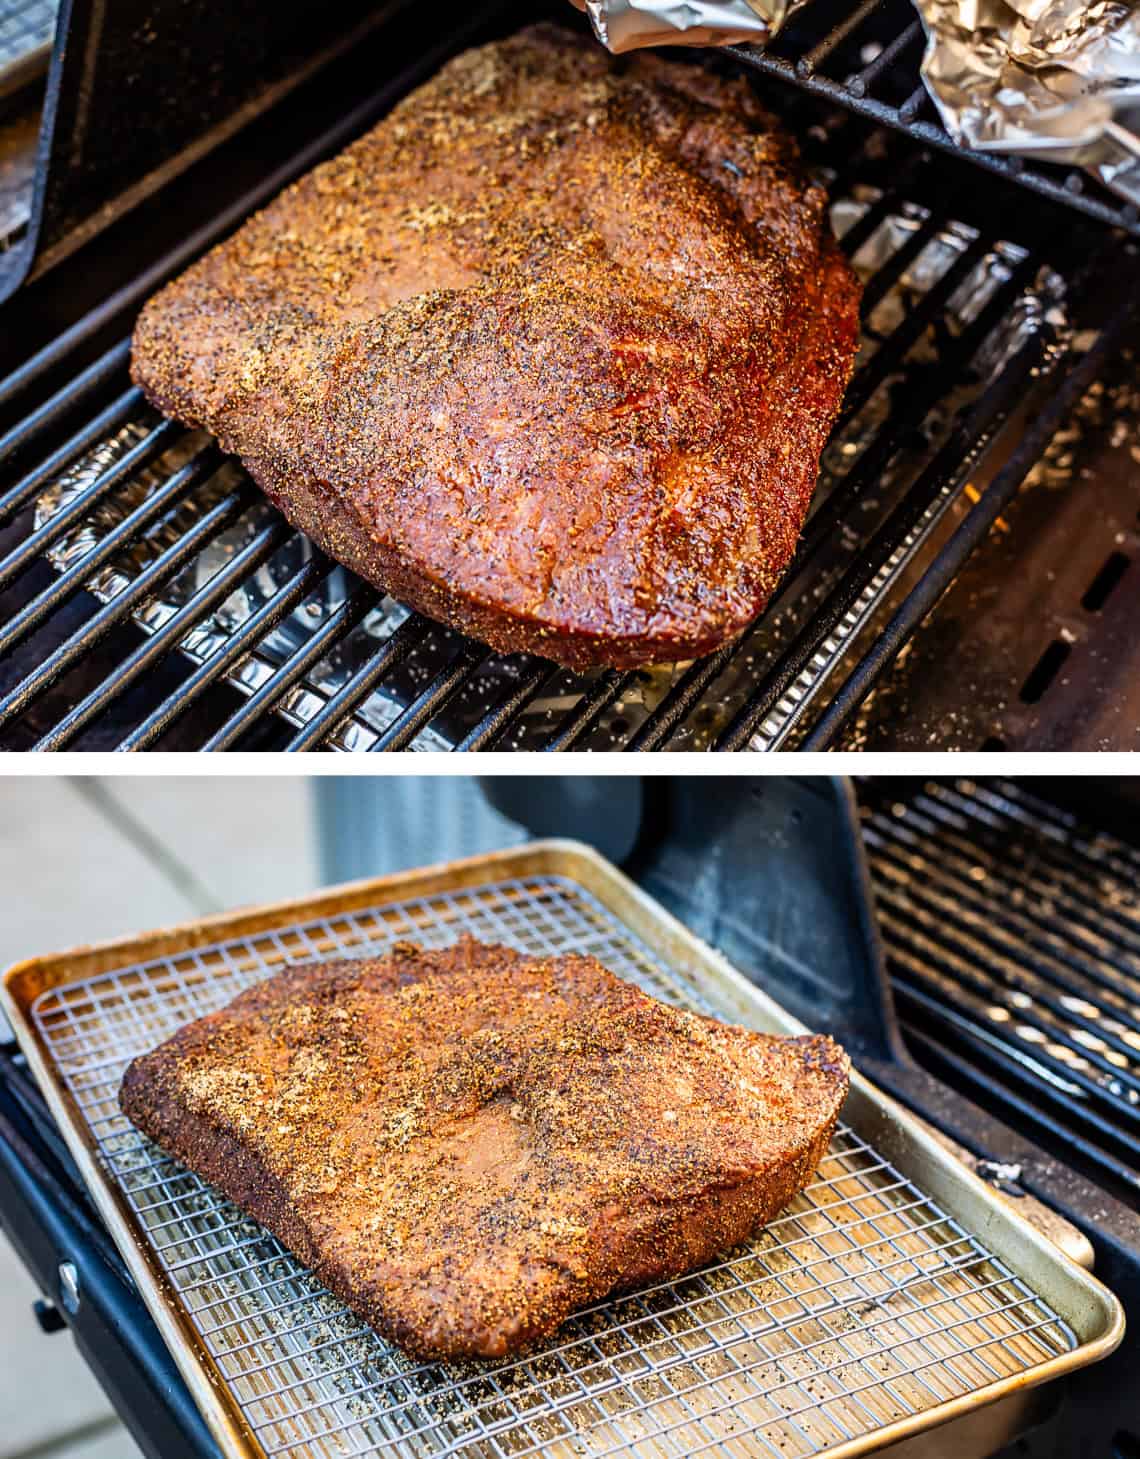
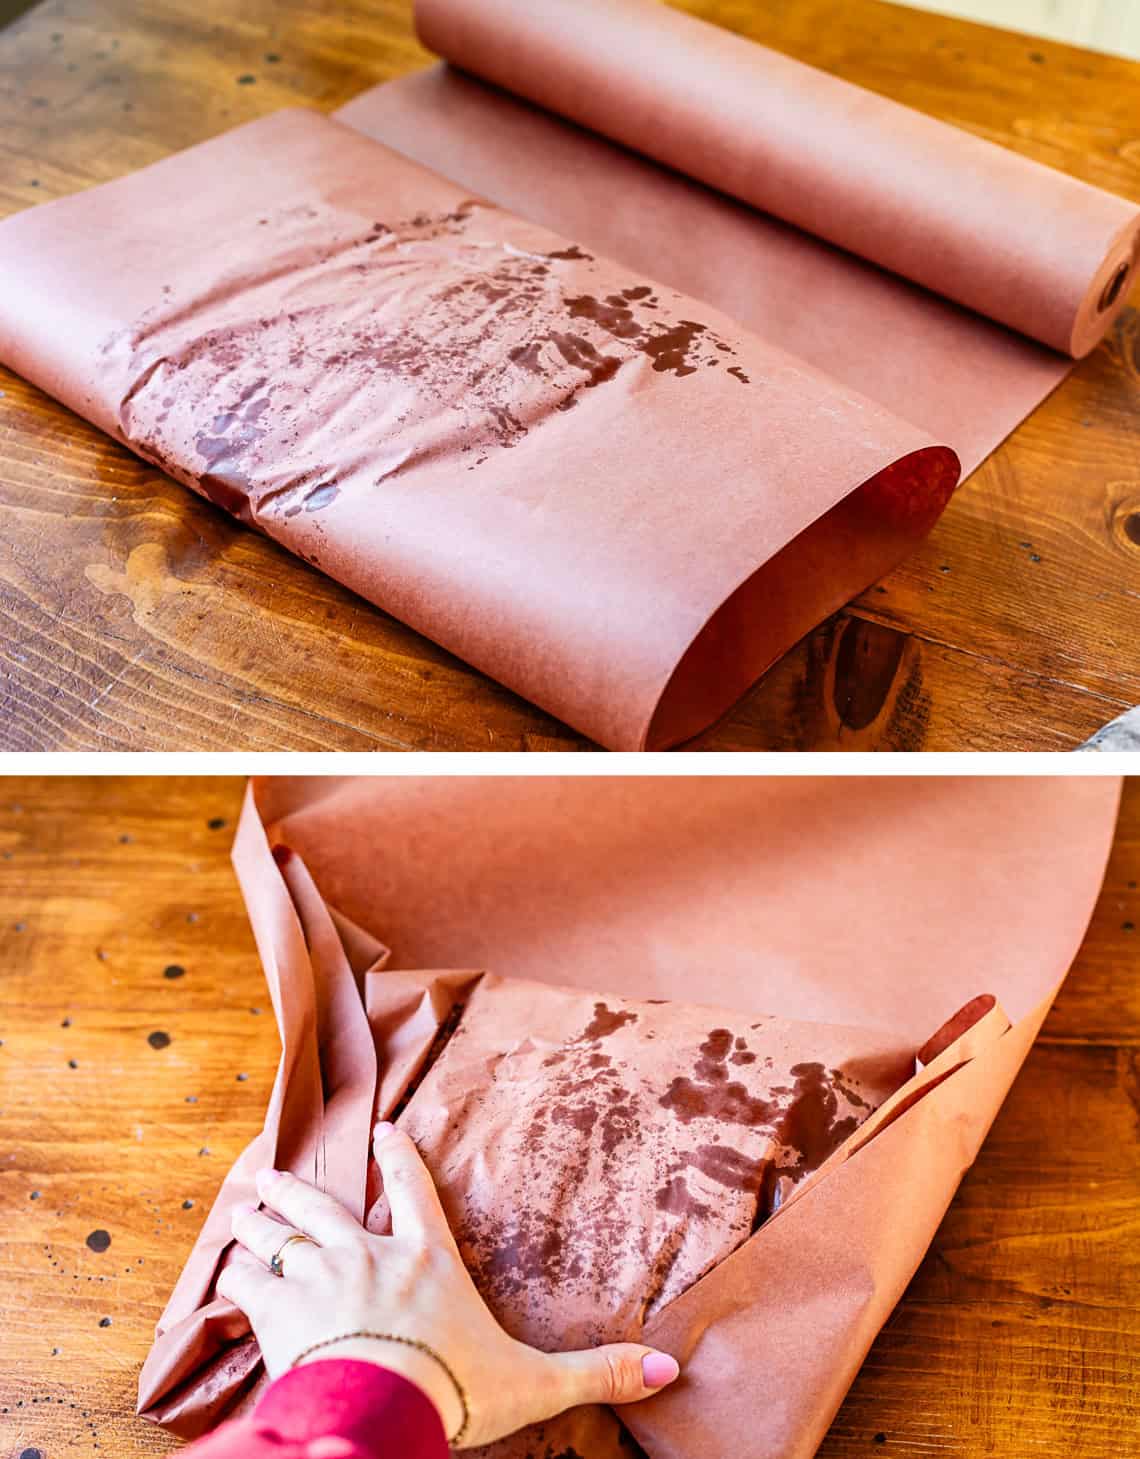
Place the brisket back on the cooling rack, then transfer to a large sheet of butcher paper (or foil), fat side UP.
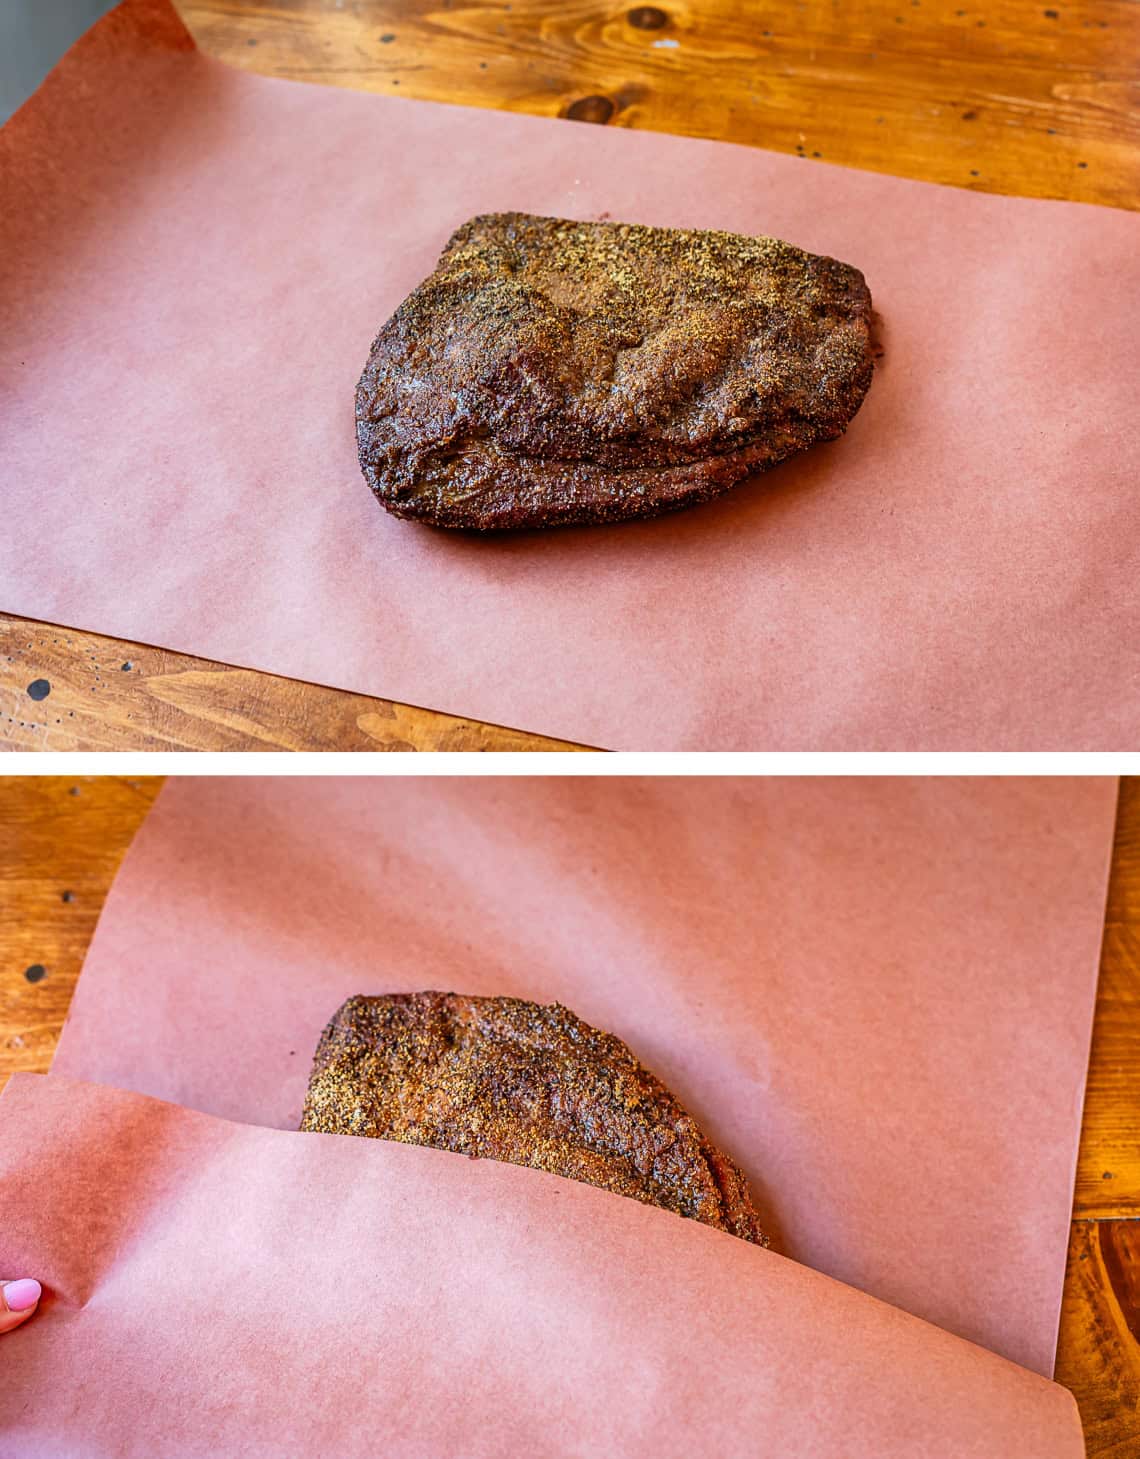
Keep folding, wrapping in the ends like a birthday present, and making sure to keep track of where the fat cap is.
It must be placed in the oven fat cap side up.
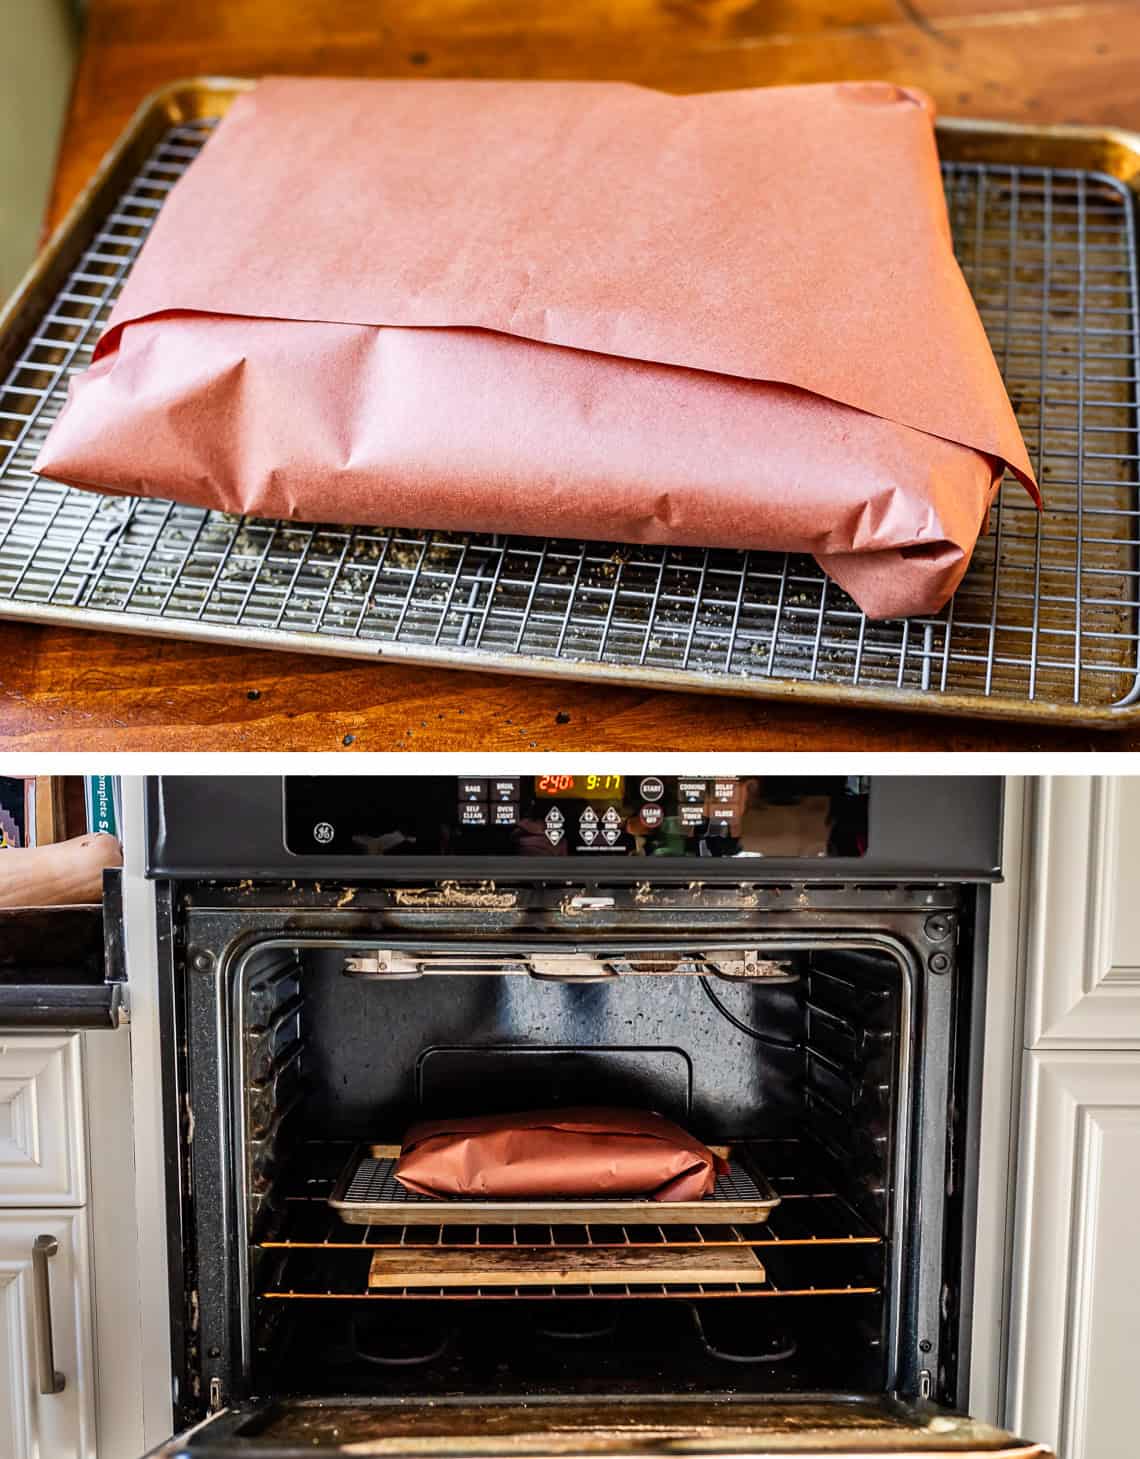
Place the wrapped brisket back on the cooling rack on top of the rimmed half baking sheet, and place in the oven set to 250 degrees F. (I know mine says 240—my oven runs hot!)
Before you close the door, place a leave-in meat thermometer probe in the thickest part of the brisket. Set the temperature alarm to go off at 203 degrees.

Now settle in for the long wait! There are SO many variables to how long this will take, so plan ahead!! Sometimes it can take just 4-6 hours, sometimes it can take up to 10 hours. This depends a lot on the particular brisket you have! Rely on the meat thermometer saying 203, don’t try to time this.

When you take it out of the oven, there is even more waiting to do! The juices need a chance to reabsorb. Wait at least 30-60 minutes before unwrapping and cutting into your brisket, or a lot of the moisture (FAT) will be lost. The temperature will go down to about 140-150 F.
How to slice brisket
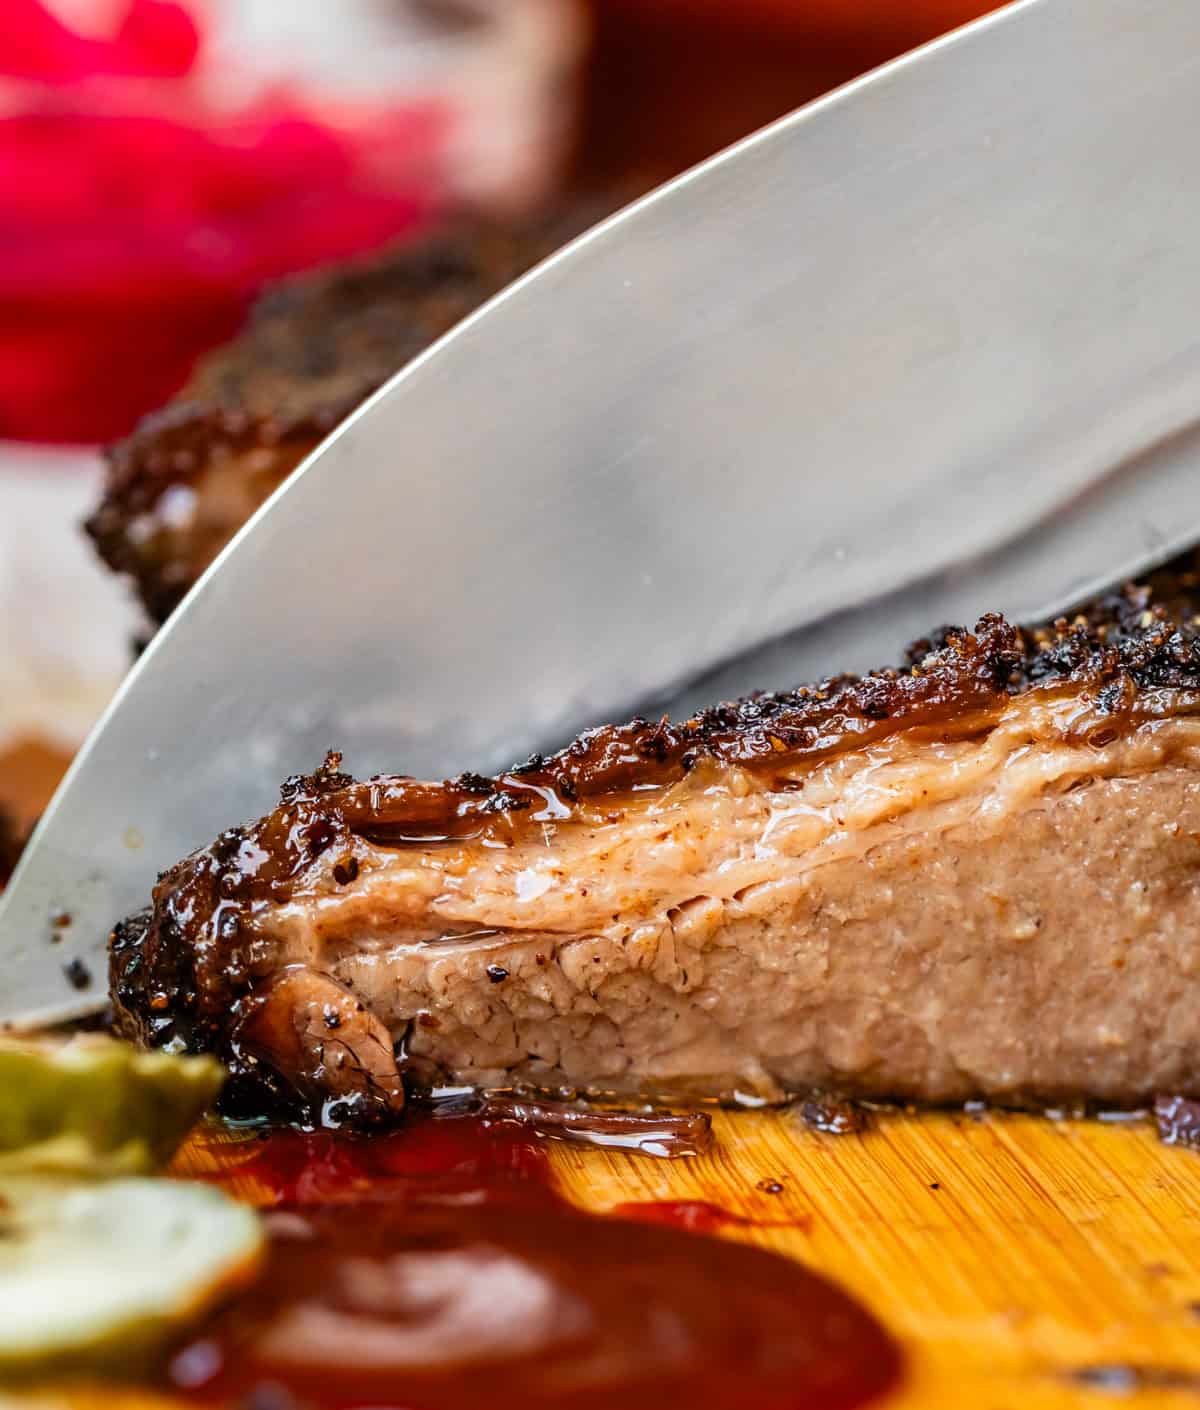
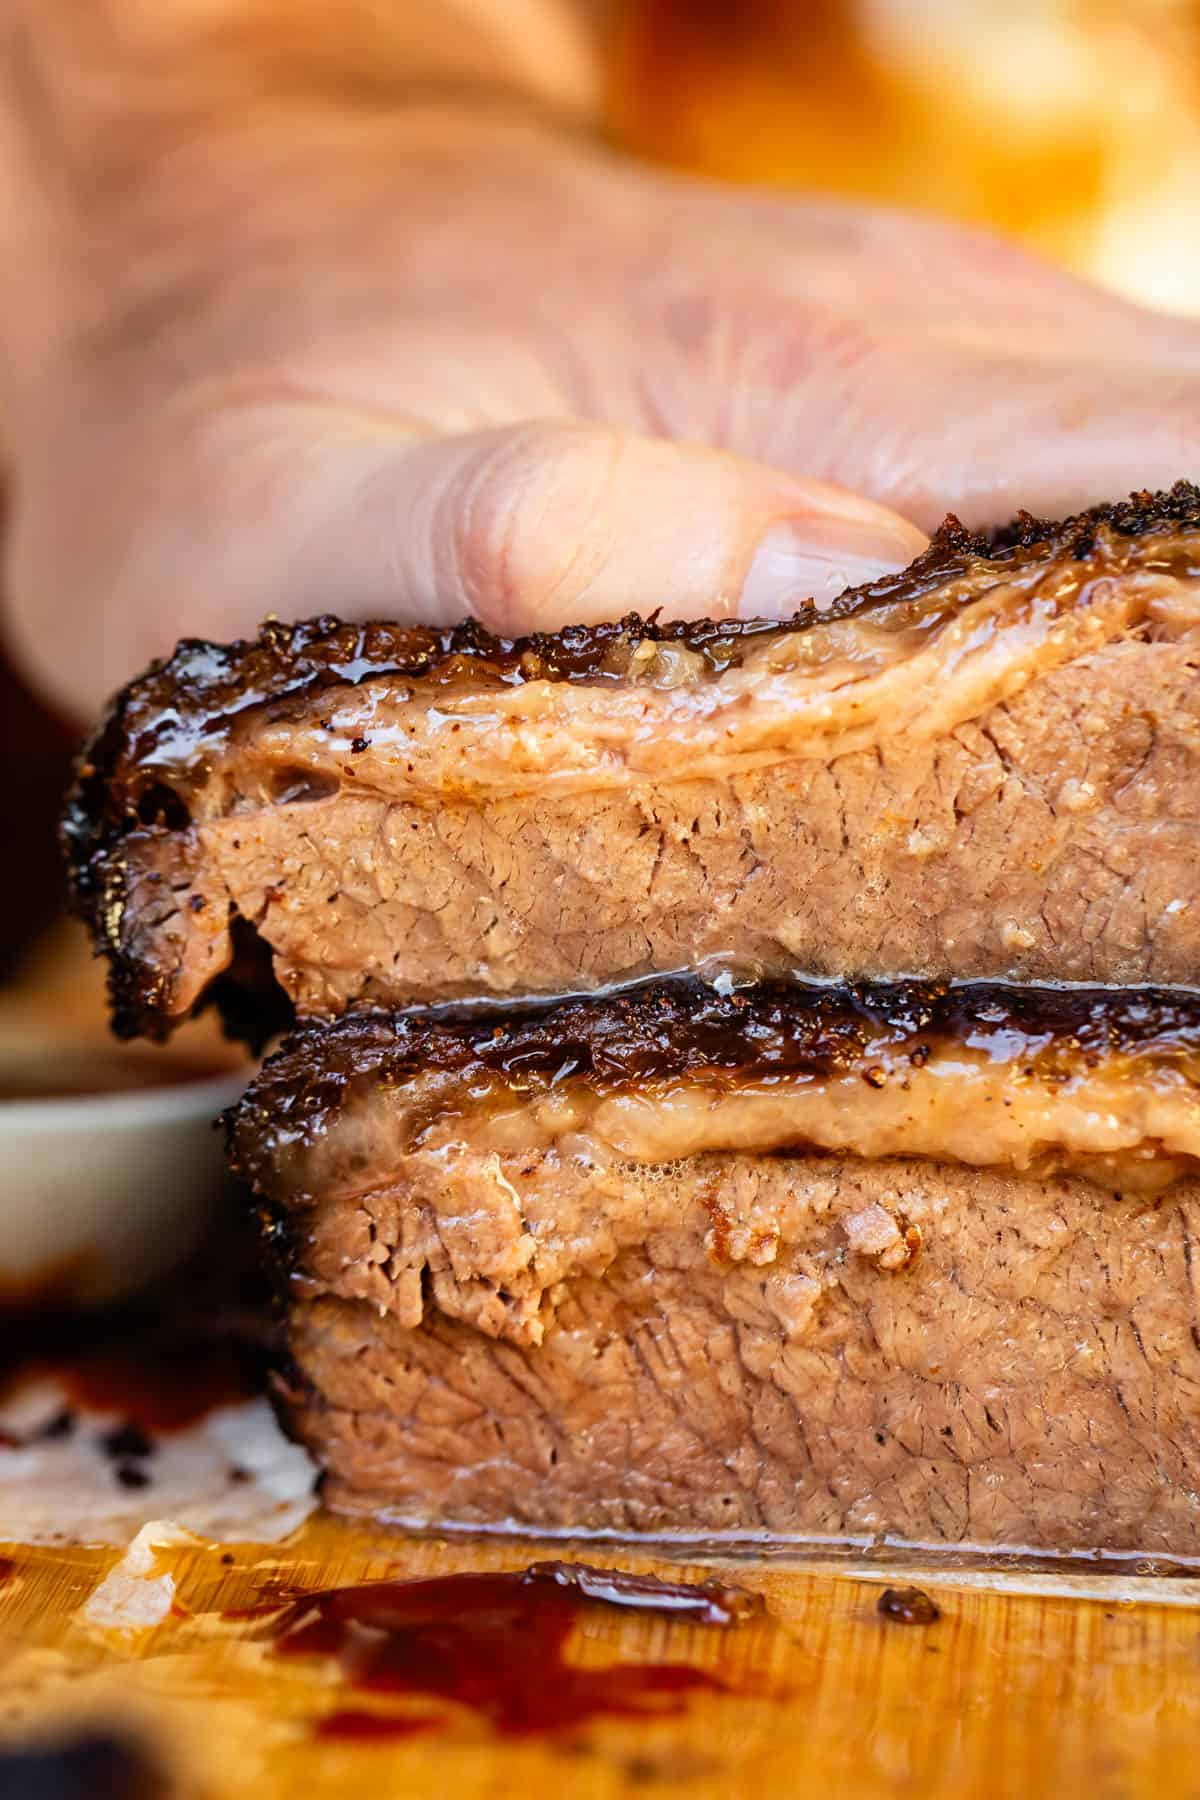
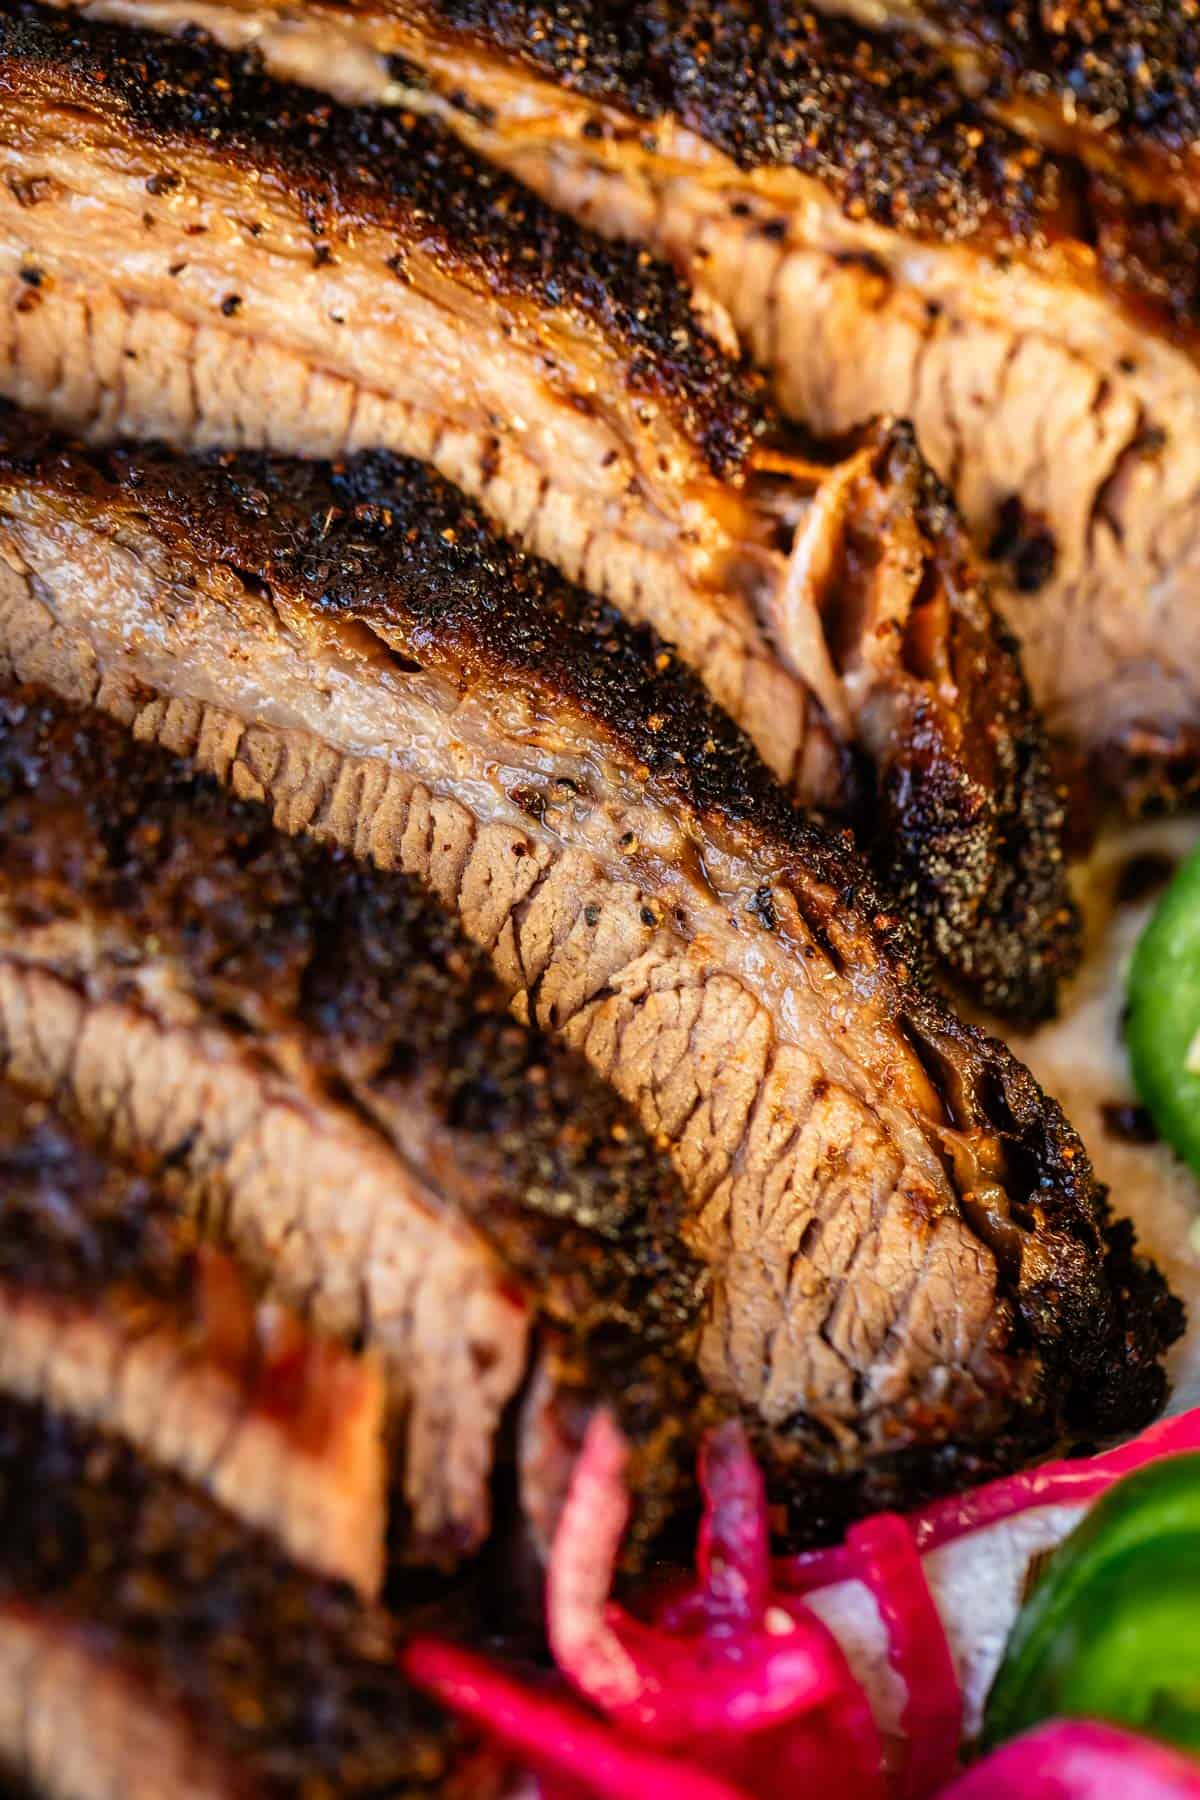
Now that it’s cooked, how do you slice it?? There is exactly one way to slice a flat cut brisket, and that is against the very visible and easy to find grain. Here’s a visual using an uncooked brisket:
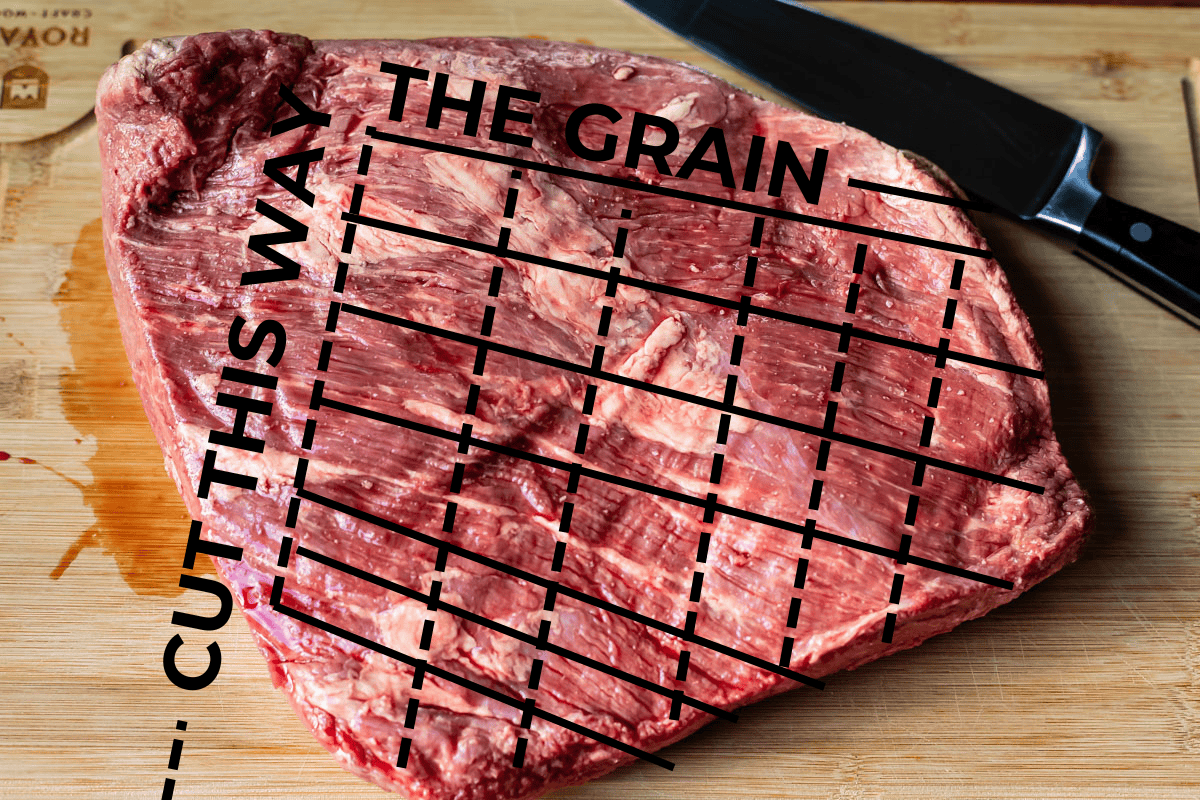
Brisket is a muscle with long, thin strands, so all you need to do is make sure you are cutting against them. If you are slicing a full packer brisket, things get more complicated. But the bottom line is that the knife needs to go perpendicular to the lines running along the meat. When you cut, each slice of meat should have little squares or rectangles on them, not long, chewy lines.
Do you see what I mean about the little rectangles/triangles? There should be a bunch of little closed off sections, not long strips with no breaks.
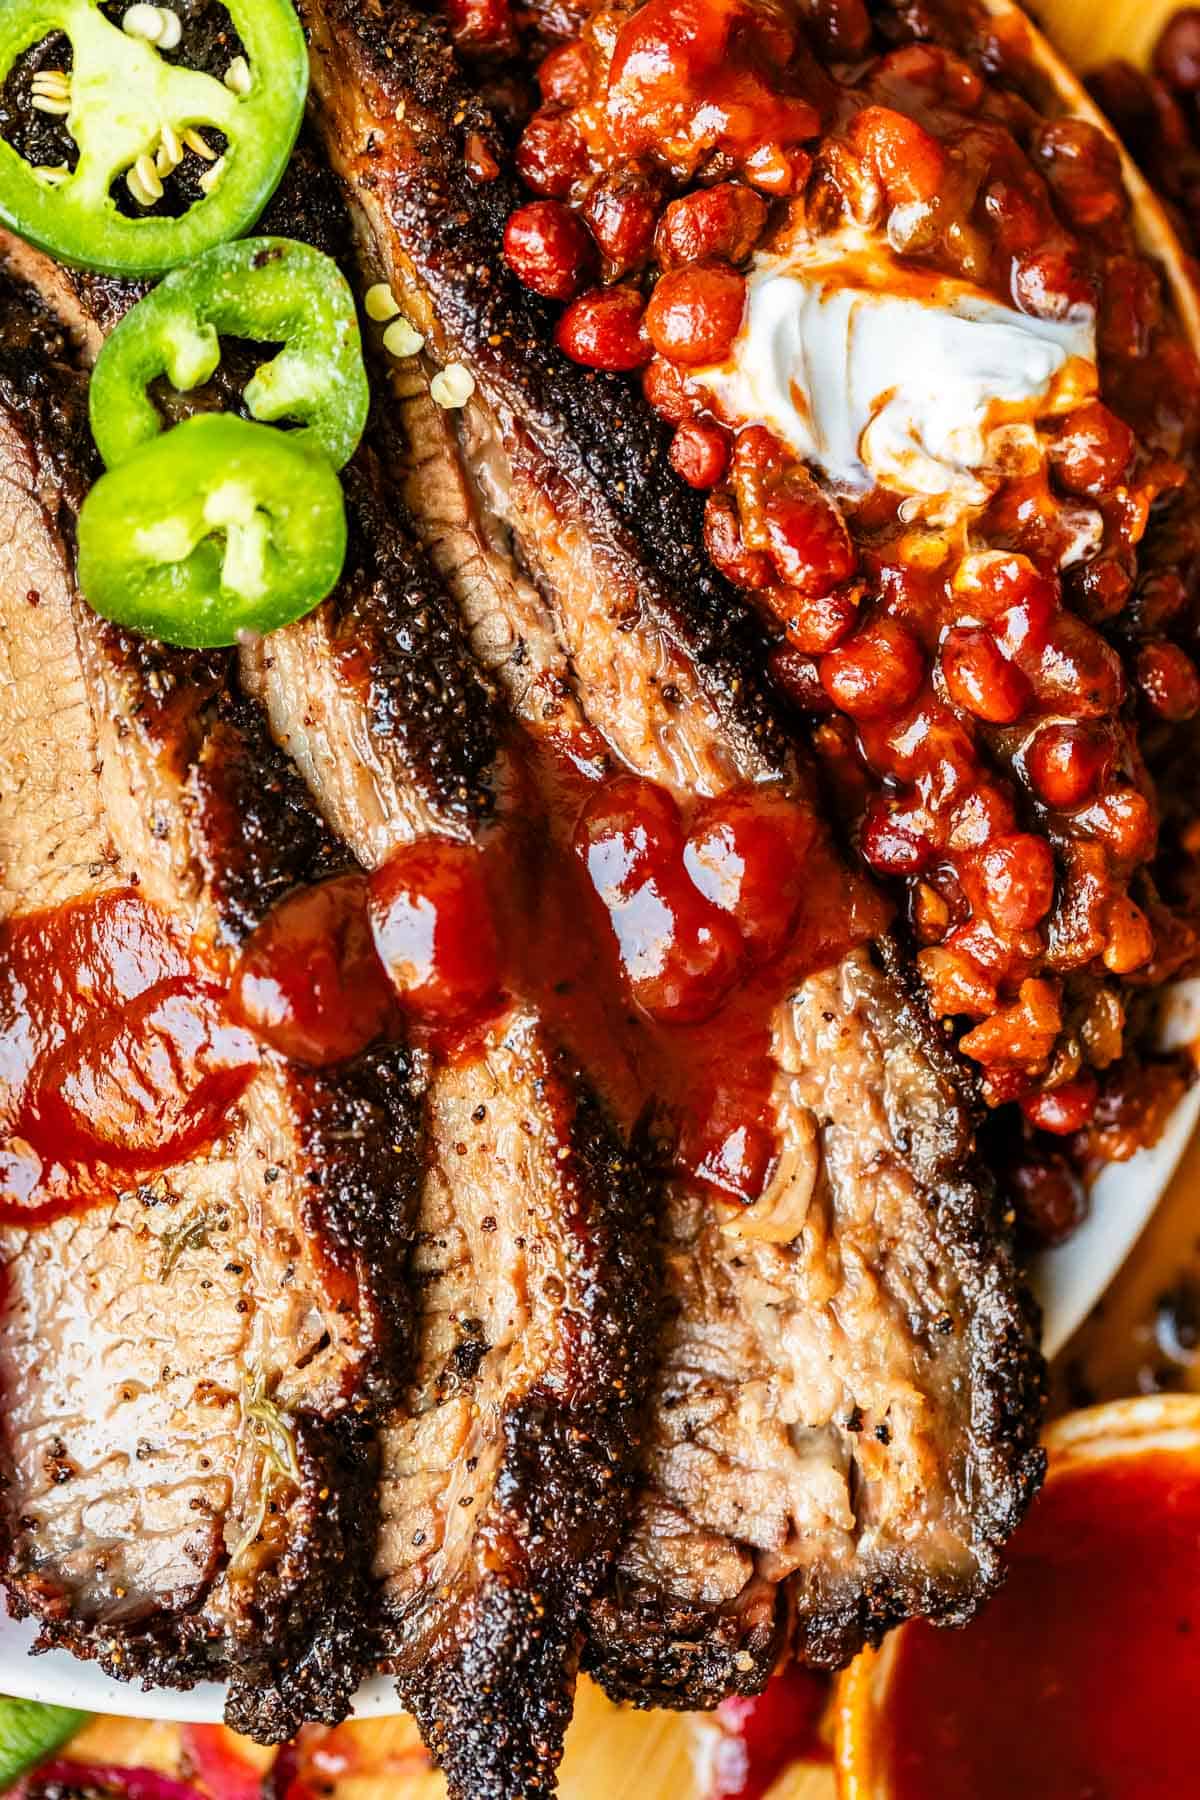
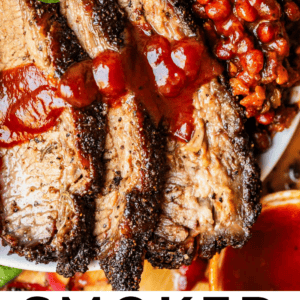
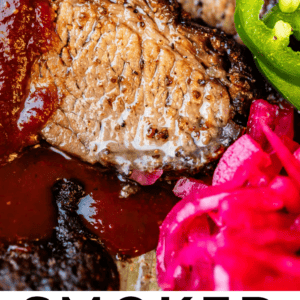
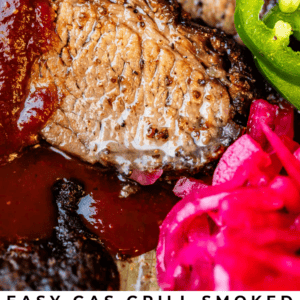
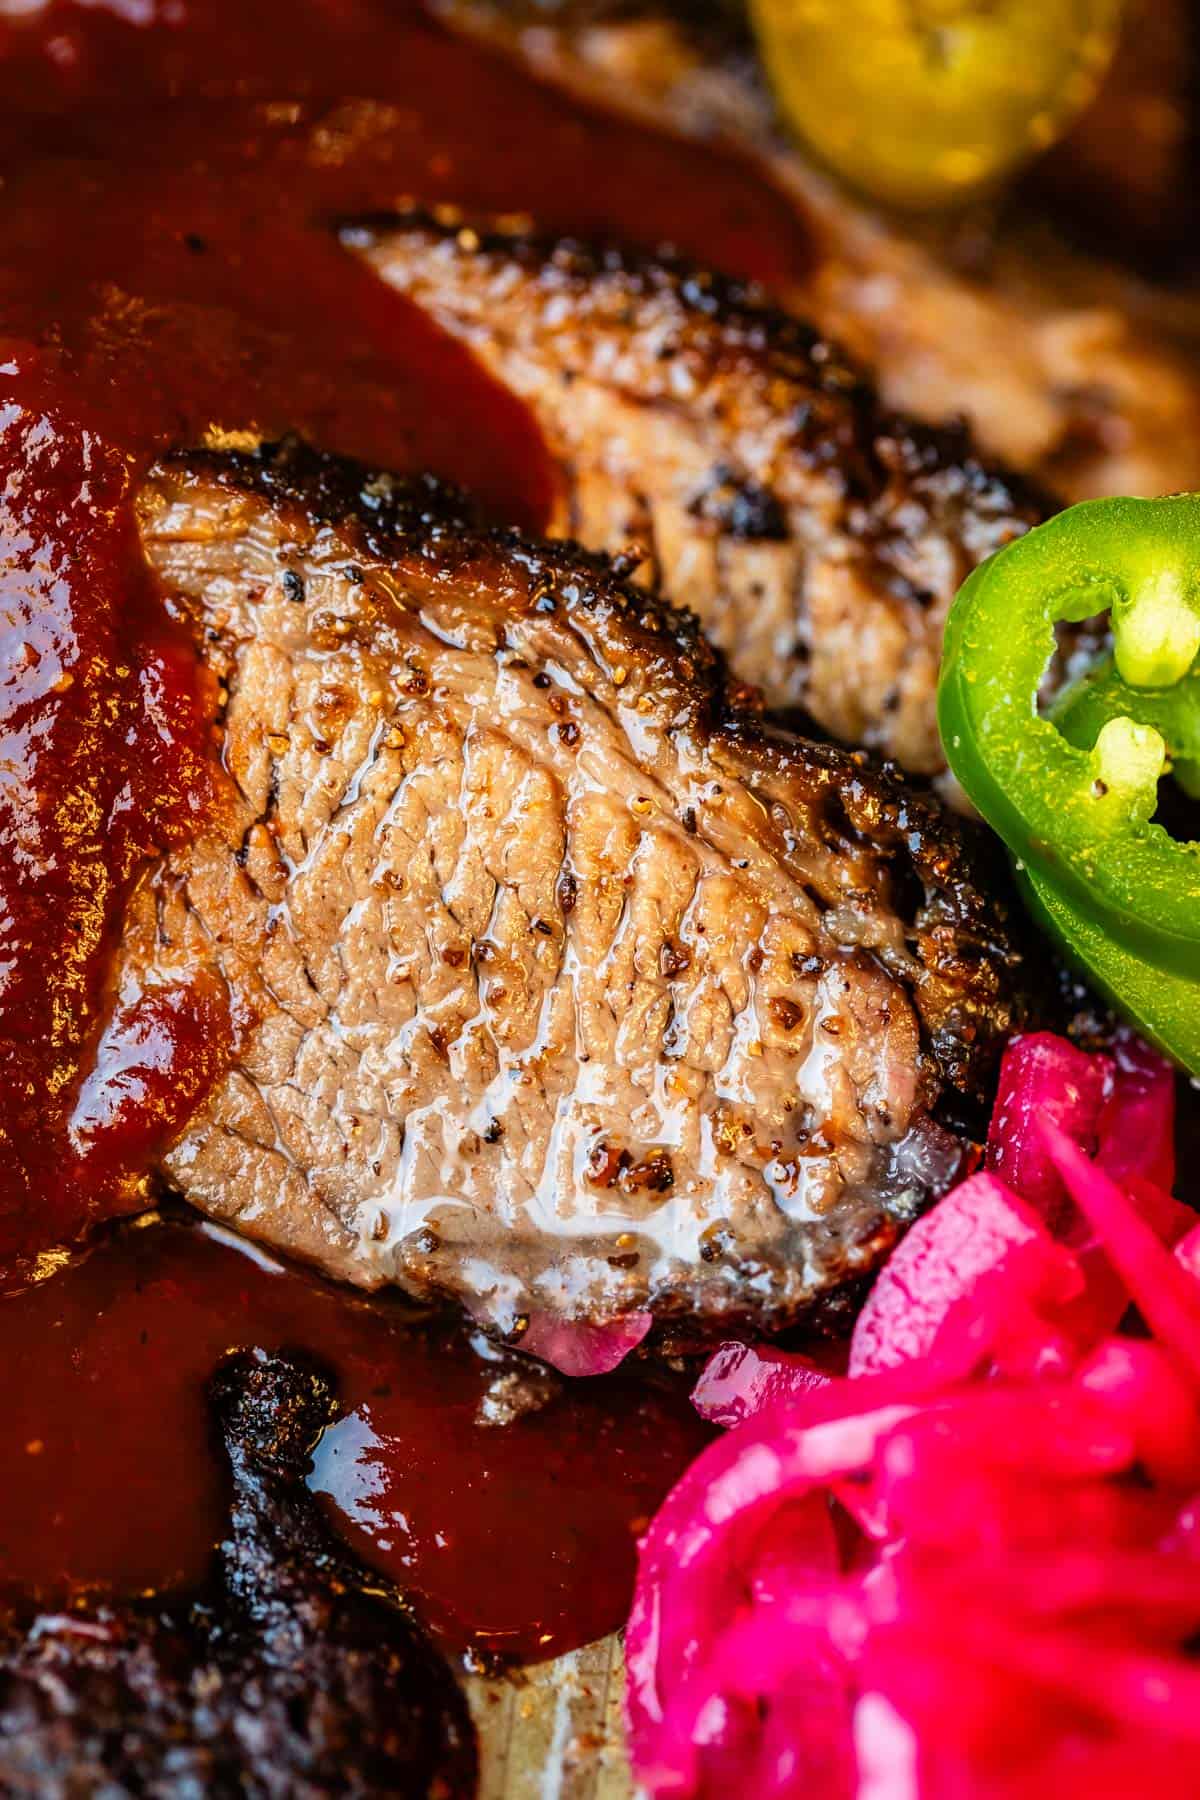
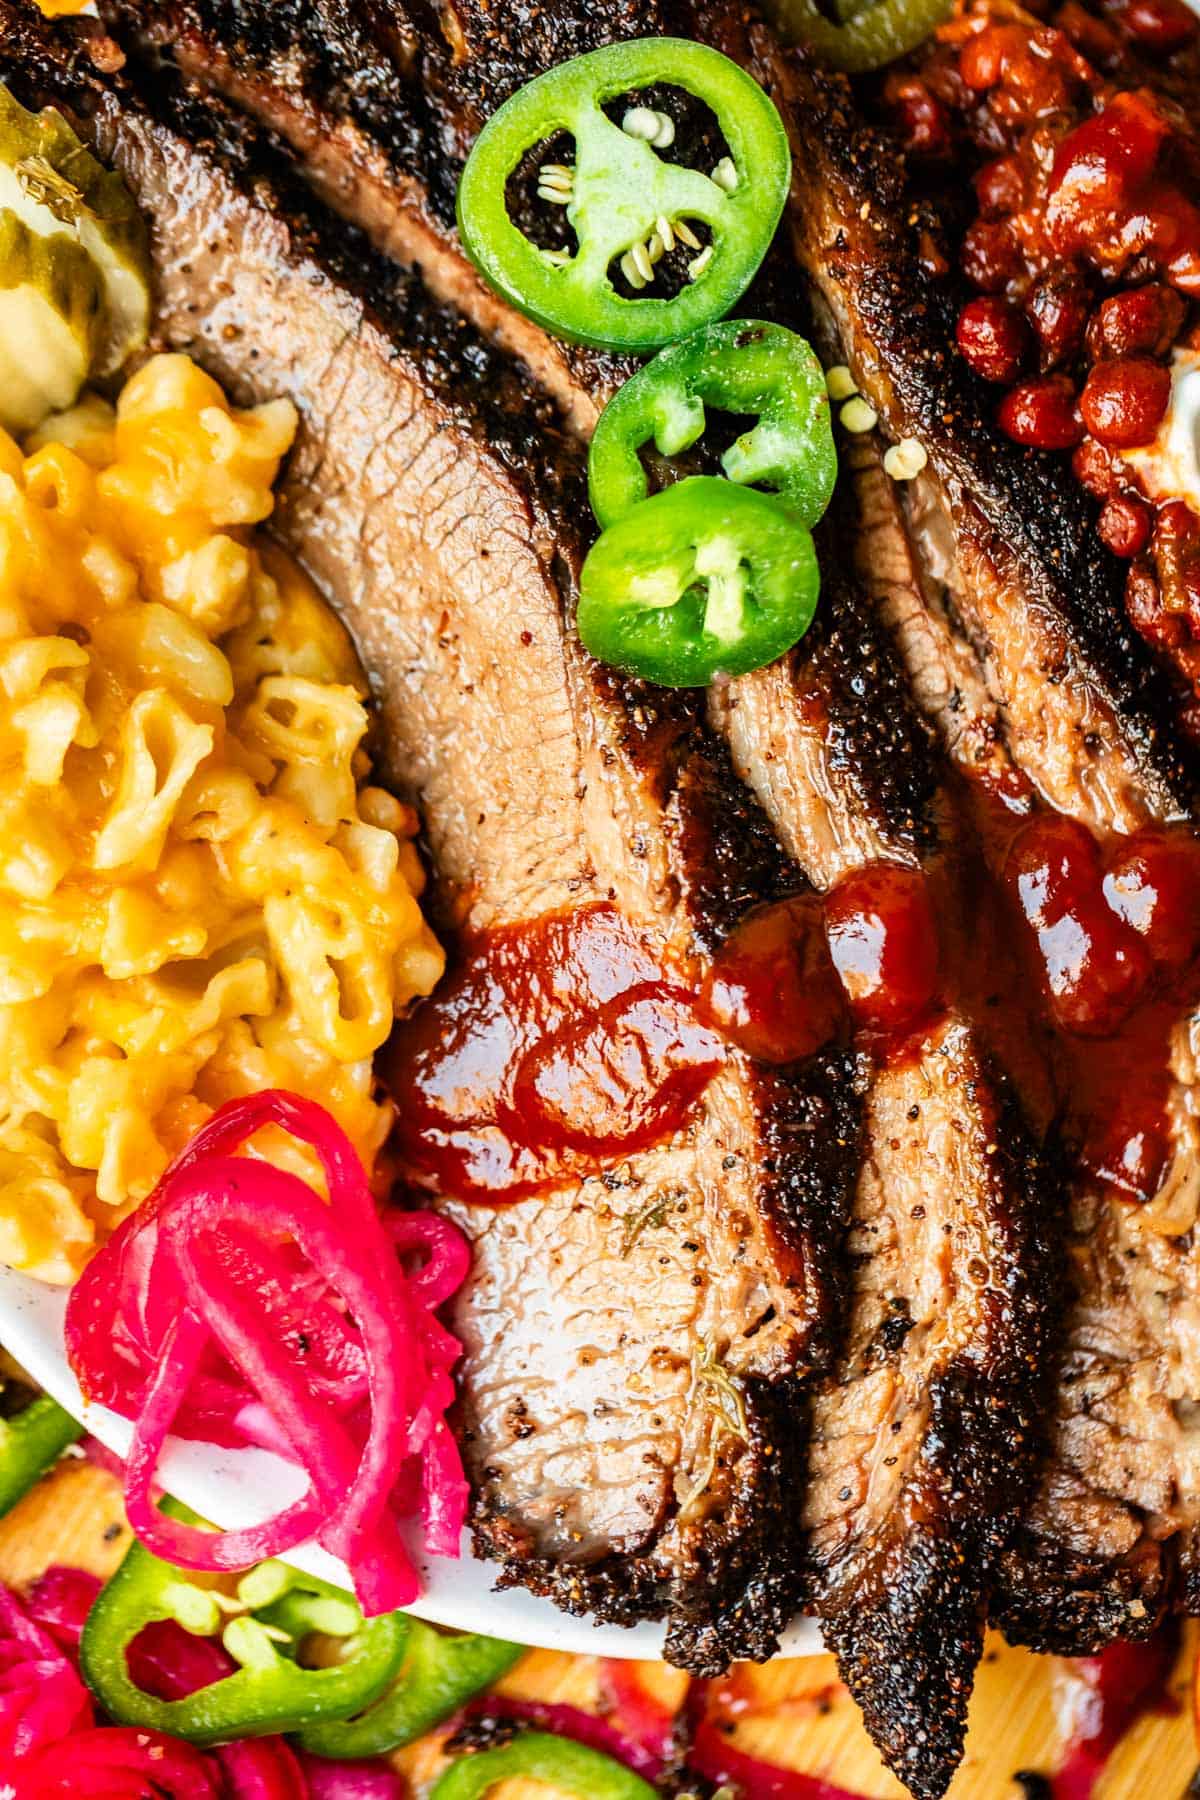
And finally…it’s time to eat!! You will NOT be able to stop snagging bites!! Serve with my favorite BBQ Sauce…on the side :) Lots more side dish suggestions right here! ↓
What to serve with smoked beef brisket
Oh man. This is hard because when there is fresh cooked brisket around I go full caveman and it’s hard to eat anything else! But, I do try to show some level of restraint, and it really helps that I love all the different sides that go with brisket. There are SOOO many good things to choose from!
First, here are some ideas and recipes of sides that are typically found at a bbq restaurant in Texas, if you’re trying to be authentic through the whole meal!
- White Bread: it’s always served, at every restaurant. Just pulled straight outta the plastic bag. Why? There are many theories (it’s cheap, it soaks up sauce, it’s an edible napkin, etc). Just know that if you ever step into a bbq place in Texas there WILL be white bread!
- French Fries
- Fried Okra
- Creamed Corn
- Loaded Baked Potato (and most places offer “stuffed” where you add the meat to the potato!)
- Bacon Wrapped Jalapeño Poppers >> crispy perfection! If you want to be super Texan, make a “Texas Twinkie” – add some chopped brisket to the filling of your jalapeno popper!!
- Beans: each place is going to have their own version, but usually it’s some variation of pinto beans
- Traditional Tejano Pinto Beans (Slow Cooker Mexican Beans) >> I think this recipe is the closest to the style of beans you can get in a Texas bbq joint!
- Santa Maria Beans >> perfect summer side dish, smokey and sweet. These are the beans pictured in the plated photos of the brisket on this post.
- Bacon Baked Beans >> the most classic version of baked beans on my site
- Best EVER Potato Salad >> a staple in any cookout, and this one is hands down the best
- Easy Broccoli Bacon Salad Recipe >> this one is STUFFED with all the good stuff and a huge crowd pleaser
- Fresh Coleslaw (with Lemon and Herbs!) >> light and bright with lots of fresh herbs, you’ll love it more than any coleslaw you can buy
- Southern Green Beans from Small Town Woman
- Cornbread Casserole Recipe >> creamy, corny, custardy, and sweet. Oohhhhh yeah, baby!
- The BEST Mac N Cheese >> about as creamy and cheesy as it gets! This is the mac and cheese you see in the plated photos on this post.
- The BEST Banana Cream Pie Recipe >> ok ok, what they traditionally serve is banana pudding. But I promise you this pie is a like the grand slam version of banana pudding. The best!!
- Homemade Peach Cobbler >> is there anything better than good fresh peach cobbler with a scoop of ice cream on top?
If you’re looking for a few more options that are more fall/winter holiday or cold weather centered, here are some ideas!
- Sweet and Moist Cornbread Recipe >> no dry cornbread around here! This cornbread is supremely moist and tender
- Aunt Shirley’s Mashed Potatoes Recipe with Cream Cheese >> these are THE mashed potatoes you are looking for, promise
- Roasted Red Potatoes in Oven >> you’ll appreciate how EASY (and tasty) these are after cooking a brisket!
- Best Roasted Brussel Sprouts and Roasted Sweet Potatoes Recipe >> one of my favorite side dishes, especially for the holidays
- Lemon Almond Green Beans >> super easy, and tons of flavor
- Gooey Chocolate Chip Cookie Pie >> tastes like a warm chocolate chip cookie, except in a buttery, flaky pie crust
- Apple Crisp with Oatmeal (and a ridiculous amount of streusel!) >> perfect for the fall or any holiday, and much easier than pie!
How to store leftover brisket
Brisket will keep well in a container with an airtight lid in the refrigerator for 4-5 days. I also like to rewrap mine in butcher paper so the juices will stay in for reheating. The brisket will reheat best if you only slice up what you need for the initial serving. Then, either cut off a slice or two as needed or reheat the whole remaining uncut piece.
Brisket is a very time involved process, and depending on when you finish you may not want to serve it right away. But luckily it makes a great make ahead main dish! To serve at a later time, wait until the brisket cools down to almost room temperature. Keep it wrapped in the butcher paper, and cover the whole tray really well with plastic wrap and put it in the refrigerator.
To reheat brisket that was made ahead or a large portion of leftovers, pull the brisket out and let it sit on the counter for about 30 minutes. Remove any plastic wrap and cover the whole tray with 1-2 layers of foil (or, if the portion is small enough, you can transfer to a dutch oven with a lid. Make sure to add all the juices and fat too.) Put in an oven at 250 degrees and let the brisket come up to serving temperature, about 140-160 degrees. The amount of time will vary depending on how much brisket you are reheating! A good estimate is about 8 minutes per pound.
If you are only heating up a slice or two, the oven is still the best method. Use an oven proof dish, spritz with water or pour some meat juices over the brisket if you have them, cover well with foil, and put in the 250 degree oven til warm. The microwave tends to dry brisket out and make it tough.
But if you need to use it, place the brisket on a plate and put a fairly damp paper towel right on top of the brisket. Use a splatter cover over the plate to keep the moisture around the brisket. Microwave at 50% power for a minute. If it’s warm enough pull it out. If not, keep cooking at 50% power 30 seconds at a time til warm. You want to warm it up in as little time as possible to keep it from getting tough!
Can you freeze smoked brisket?
Freezing brisket is a GREAT idea. I have tons leftover in my freezer from all my rounds of testing. If you’re not planning to serve your brisket to a large crowd, chances are you are going to have a lot of leftovers. Putting a big section of the brisket in the freezer just means a delicious meal without any of the effort where you can thank your past self for being amazing!
Keep any portion you plan to freeze unsliced, and keep it wrapped in the original butcher paper (if possible) or new butcher paper. Add as much juice and fat as you can, it will help keep the brisket moist when reheating. Once wrapped well in the paper, wrap again in two layer of plastic wrap. If it will fit, put it in a gallon ziplock freezer bag (I love these 2 gallon ziplock freezer bags) and seal. If it’s too big, wrap it all again in 2 layers of heavy duty foil. It will be good about 2-3 months if it’s in a bag. If it’s wrapped in foil, use it within 1-2 months or it’s at risk for getting freezer burn or very dried out. If you happen to have a vacuum sealer, you can also use that and it will last 4-6 months!
To heat a cooked, frozen brisket, pull the brisket out of the freezer and let it thaw in the refrigerator. This may take a day or two depending on how big the portion of brisket is! Once thawed, remove any plastic. Rewrap in butcher paper if needed, and set it on a rimmed baking sheet, or in a dutch oven. Make sure to add all the juices and fat on top. If you feel like there isn’t enough juice or fat, top it with a few pats of butter.
Cover the dutch oven with a lid, or cover your baking sheet well with 2 layers of heavy duty foil. Put in the oven at 250 degrees and let the brisket come up to serving temperature, about 140-160 degrees. The amount of time will vary depending on how much brisket you are reheating! A good estimate is about 8 minutes per pound.
If you want to learn about more methods for reheating (like sous vide if it’s in a vacuum sealed bag) or videos showing how to slice brisket, Franklin BBQ has some great tutorials that you might like to watch!
Smoked beef brisket in the oven frequently asked questions
I’ll be honest with you. The absolute best, most flavorful way to cook a brisket is in a smoker! BUT, I don’t have a smoker and I’m guessing you don’t either. We’re in luck though, because the method in this recipe is the next best thing! A relatively short smoke time on your gas grill and then a long cook in the oven is the next best thing. You will get delectably tender, smoky, juicy brisket that is pretty dang close to real deal.
The 3-2-1 rule follows a pattern for cooking brisket that is supposed to yield really tender brisket and is somewhat similar to the methods used in this recipe. The formula is: 3 hours smoked or baked at 225 degrees, then wrap in foil or butcher paper and cook another 2 hours, then unwrap and cook for 1 more hour.
While it’s a good start, I think the method ignores really important things like how big your brisket is, how long your stall might be (a time where the brisket just hovers around the same temperature; the temp and time totally varies), and the internal temperature of the meat when finished. Brisket is finicky, and the best method for ensuring good brisket is relying on your instant read thermometer, NOT just a standard amount of time. I usually end up cooking my brisket for 7-8 hours to make sure it lands between 200-203 degrees, where it is the most tender.
It depends on what you’re going for! In this recipe we’re going for a Texas style, smoked brisket that is more bbq style and is definitely best in the oven (after smoking a bit on the gas grill, of course). The oven can provide that low and dry heat necessary to get bbq style results.
A slow cooker can definitely make tender brisket, but it is more of a braised type meat and will give results more similar to pot roast. Still delicious, and there for sure is room in this world for slow cooker brisket. It’s just not going to give you the type of brisket that you’d expect from a bbq place, which is what we’re going for in this recipe.
First and most importantly, low and slow is key. Low temperature and slow cook time helps break down the hard tissues to get tender meat. Other key points are to dry brine, wrap the brisket well, let the brisket rest fully, and more. Be sure to read through the How-to section for all the details!
More amazing barbecue and grilled meats
There’s just something about pulling perfectly cooked meat off the grill! It’s just really hard to beat that smoky flavor paired with a tender, juicy bite. Check out some of these other meat options for the next cookout!
- Best Smoked Pulled Pork Recipe >> this pulled pork recipe uses almost the same method as this brisket (smoking on the gas grill) to get the most delicious pulled pork of your life with NO smoker (you can also check out this slow cooker version that is also amazing and skip the grill entirely!)
- Tri Tip Steak (Grilled or Oven-Roasted) >> we ate this at Christmas every year growing up, and I never, ever get tired of it
- Ribeye Steak Recipe (Grilled or Pan-Seared) >> tender and juicy, easy, and at a fraction of the price of a steakhouse
- How to Make Carne Asada >> I promise, this will taste better than your favorite Mexican restaurant
- Grilled Chicken Marinade Recipe >> when you want easy but YUMMY, this is the perfect recipe
- How to Cook Flank Steak (Grilled or Oven Broiled) >> I’ll give you all the secrets to a fabulous flank steak – it’s easier than you think
- Slow Grilled Mustard Chicken >> I think you’ll love how tender these chicken thighs get from cooking low and slow
- Homemade Smash Burgers (Cast Iron Burgers) >> my favorite way to make hamburgers!
- Grilled Pork Chops from Dinner at the Zoo
- Grilled Meatloaf from Butter Your Biscuit
Easy Smoked Beef Brisket in the Oven
Equipment
- heavy duty aluminum foil or a smoker box
- pink butcher paper optional; you can use foil in a pinch
Ingredients
- 5-6 pound brisket flat, OR whole full-packer brisket (12-18 lbs)***
- 1/4 cup kosher salt
- 2 tablespoons coarse ground black pepper*
- 2 tablespoons garlic granules, this is a step up from garlic powder
- 8 cups hickory smoke chips
- 1 batch Homemade BBQ Sauce**, or your favorite sauce
Instructions
- Read carefully. There are some special items needed for this recipe. In addition to the brisket and spice rub, make sure you read over the equipment list above: you need heavy duty foil, butcher paper, and a leave-in probe thermometer.
- Choose your brisket: Go to a quality butcher or a high-end grocery store. Ask the butcher for a choice grade flat cut brisket (or a full-packer, if you are all in). If they only have prepackaged cuts, make sure it is Choice grade. Find the one with the biggest fat cap you can find. Bend the brisket to see if it folds in half easily (if it's vacuum sealed, skip this, bending won't tell you much.) The fat cap should be white, not yellow.
- Assemble the spice rub. In a small bowl, add 1/4 cup Diamond Crystal kosher salt. DO NOT USE TABLE SALT. (If that's all you have, use half the amount.) Add 2 tablespoons coarse black pepper and 2 tablespoons garlic granules.
- Prepare the brisket. Set out a rimmed half baking sheet and a cooling rack. Cut open the packaging and pat the brisket with paper towels to dry it off. Place it on the baking sheet, fat-side up.
- Dry brine. Rub about one third of the seasoning over the fat cap and edges, carefully patting it onto the meat. Flip the brisket over and sprinkle the remaining dry rub all over the sides and top of the brisket. If the spices fall onto the baking sheet, scoop it up and rub it in.
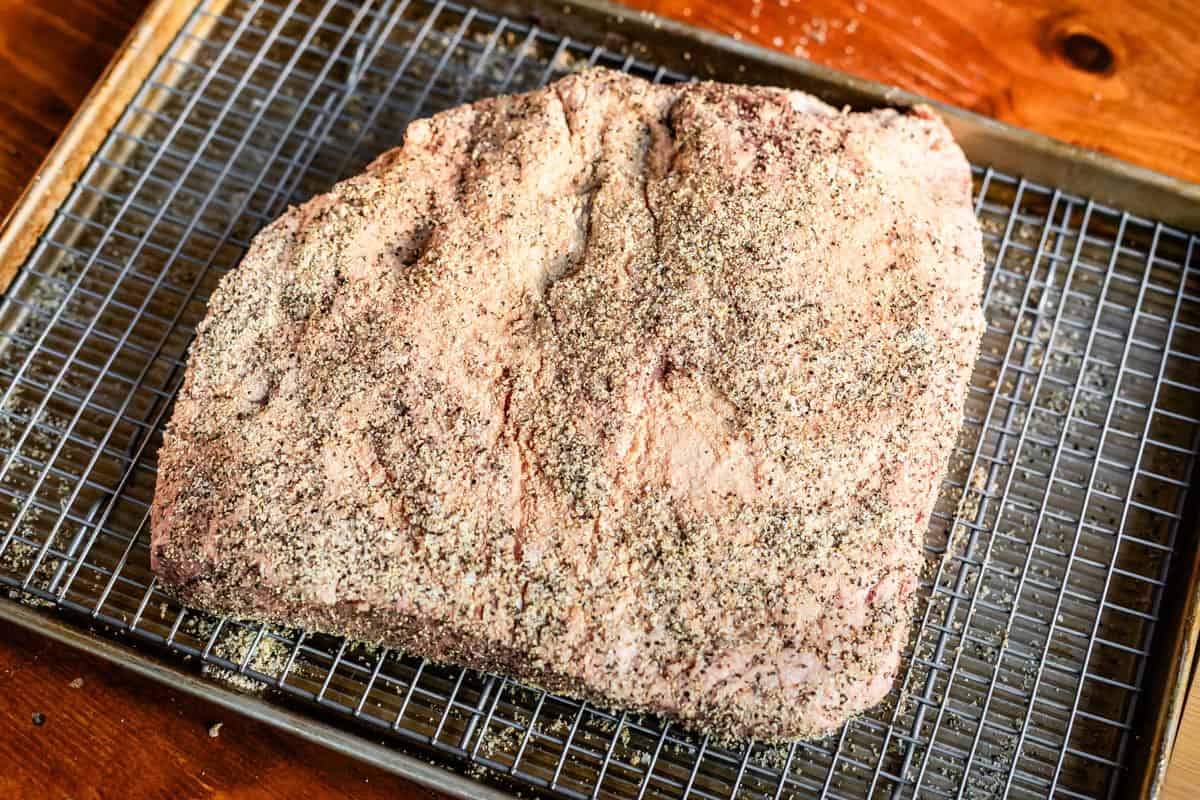
- Make sure every part of the meat is seasoned, top, bottom, and sides. Make additional rub if you haven't covered every part of the brisket. The ratio is 2 parts kosher salt to 1 part pepper, to 1 part garlic. Lift the brisket and slide the cooling rack underneath the meat, so that the brisket is sitting on the cooling rack, which is nestled in the baking sheet.
- Refrigerate. Transfer the brisket to the refrigerator to chill, UNCOVERED. This helps dry out the edges so you get an amazing crispy "bark." It does not make your brisket dried out, I promise it will still be moist (if it has enough fat). Chill overnight or for at least 4-6 hours.
- Let the brisket rest out of the fridge. Take the meat out of the fridge and let it sit on the counter for about 30 minutes while you prepare to smoke.
- Instructions for wood chip smoker foil packets. Use large sheets of heavy duty foil to make four 4 packets, each filled with about 2 cups dry wood chips. See photos. Seal the foil at the top by folding it over, then fold up the ends. Your packets should be about 8×5 inches. Make sure that they are well sealed, and that the chips do not puncture the foil on the bottom or edges. Use a sharp knife to poke a 2-inch slit on either side of the top of the packets. This will allow smoke to escape, and oxygen in to feed our chips. Make 4 packets total, we will be using 2 at a time on the grill.
- Smoker box instructions: (I have a smoker box and still prefer to use foil smoke packets – save your money unless you already have one.) Add 4 cups dry hickory wood chips to your smoker box, or however much will fit with the lid closed.
- Prepare the grill. Clean off your grill grates of any debris from the last time you grilled. Remove the grill grates on the side that has the primary burner. Place 2 foil packets over the primary burner, either on the heat plates, or directly on the burner. (If you have a smoker box, remove the grates from your grill and place the smoker box directly on the primary burner. You may need to remove the heat plate entirely from your grill.)
- Turn on the grill. Turn all the burners on the grill to high heat if you are using a smoker box, or to medium heat if you are using foil packets. Let it preheat for 10 minutes.
- After 10 minutes, turn off the burners on the empty side of the grill, the side with the grill grates still on. This is where our brisket will sit. Turn the other burners down to LOW. You need to bring the grill temperature all the way back down to 250 degrees and make sure it stays at 250 degrees. You can open the lid for a minute or two to let some heat escape if it's too hot. Do NOT put the brisket into the grill if it's too hot! It will not cook the proper way and you'll end up with dry meat.
- Oil the grate. Use tongs to dip a crumpled paper towel into a bit of oil, then rub on the grill grate.
- Smoke. Place the brisket fat side UP on the oiled grate over the burners that are TURNED OFF. Save the cookie sheet and cooling rack for later. Close the lid and smoke the brisket for about an hour, maintaining a grill temperature of about 250 degrees. Come back and adjust it as necessary. Use an oven thermometer set inside your grill to gauge the temperature if your grill doesn't have a built in thermometer. Check to make sure your wood chips are still smoking (turn heat up a bit momentarily to get them to smoke again if necessary, returning the heat back down to maintain 250 degrees F.)
- Smoke again. After an hour, remove the spent foil packets if they are no longer smoking, or move them to the back if they still have smoke coming out. Add the remaining two foil pouches to the side with the flame. Or, if you have a smoker box, carefully dump out the spent chips and add 3 more cups of hickory chips to the smoker box.Close the lid and smoke the brisket for another 60-70 minutes, maintaining a grill temperature of 250 degrees. Come back and adjust it as necessary.
- Preheat the oven to 250 degrees, about 10 minutes before your brisket is done smoking.
- Remove from grill. Once the smoke packets are spent, turn the grill off, and use grill gloves or a large metal spatula to move the brisket back over to the cooling rack on top of the cookie sheet. VERY carefully, take it inside.
- Wrap the brisket. Making sure you have a wide space, pull out a large section of butcher paper but don't cut it yet. Set the brisket fat side up on the paper, then fold the paper up over the brisket. Flip the brisket over in the paper, then wrap up the ends like a birthday present. See photos. Flip the brisket again and MAKE SURE the fat side is up. (Unwrap it if you're not sure!!) Tuck and wrap the paper as necessary to make sure the paper doesn't come undone in the oven.
- Transfer to the oven. Place the wrapped brisket back onto the cooling rack on the baking sheet, fat side up. If you have one, insert the probe of a leave-in meat thermometer into the thickest part of the brisket, and set the alarm to ring when the internal temperature reaches 203 degrees F. Double check that your oven is set to 250 degrees, and place the wrapped brisket in the oven. Settle in for the long haul! Do not open the oven door until your brisket reaches that 203 mark. If you don't have a leave-in thermometer, start checking the temperature with an instant read thermometer after about 3-4 hours, depending on how big your brisket is. Keep checking until it reaches 203. It could take twice as long! Plan to make this a day ahead of your event if you are not sure!
- Rest. Once it's reached temperature, as carefully as possible remove the baking sheet (there will be melted fat and juices so don't burn yourself!). You will be tempted but DON'T UNWRAP it! Let it sit at room temperature for 30-60 minutes to let it rest and reabsorb all the fat. Check the temperature and make sure the meat is 140-150 degrees before unwrapping.
- Unwrap. Unwrap the brisket, carefully catching all the juices in the rimmed baking sheet. Place the brisket on a cutting board with a juice groove.
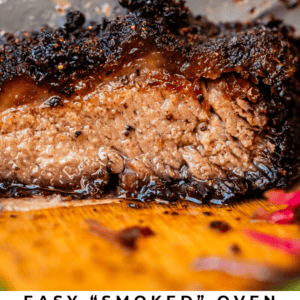
- Slice. Look for the grain in the brisket, and then slice against (perpendicular to) the grain with a sharp chef's knife (see photos). Snag a bite. Die and go to heaven.
- Serve with Homemade BBQ Sauce. On the side! I like to serve brisket with Mac and Cheese, or Santa Maria Pinquito Beans!
- Storage. Store covered in the fridge for 4-5 days. Brisket freezes very well! See post for details, as well as reheating instructions.
Notes
- *The amount of pepper you add is up to you. Some people in Texas like a super peppery crust and add as much as a whole cup of pepper to a full packer brisket! The most common is a 1:1 salt to pepper ratio, but I like things a little milder, so I went with half as much pepper as salt. Follow your heart to decide how much you want!
- 1/2 cup Claude’s Fajita Marinade
- 1 cup Hickory and Brown Sugar BBQ Sauce
- 2 tablespoons mustard
- For a flat we don’t remove any of the fat cap. For a full brisket, you’ll definitely want to trim the fat cap to about 1/4″ thick, especially on the fatty point.
- Double the amount of marinade you use. 1/2 cup salt, 1/4 cup of coarse pepper, and 1/4 cup garlic granules should be enough to cover a whole brisket.
- Follow the same smoking, wrapping, and oven cooking steps. The main difference will be cook time – it may need to cook a bit longer (which is why Laura and her mother in law often smoke in the evening and cook all night). Just BE AWARE that it may seems like it would take twice as long since it’s twice as big, but it’s just not true. In testing, a full brisket only took an hour or two longer than a flat! Timing is still finicky so you still need to very much depend on your thermometer!!
- Letting the brisket rest will take slightly longer as well, but again, not twice as long. Just keep an eye on things.
- Slicing the brisket: Use the image in the post for slicing the flat. Once you start to get to the point, you should notice that the grain switches directions due to the way the muscle works. Switch angles and cut against the new grain! Because it’s thicker and more fatty, many people cut the point into cubes rather than slices. You could also try to resmoke the cubes to make burnt ends!
- As with most foods, the more often you make it, the better you will understand what works for you in your kitchen, with your tools. There’s a lot of room for variation in this recipe due to your specific brisket, your grill and oven, your thermometer, etc. If it isn’t perfect the first time, take note of what could improve and try again! If you have any questions as you think through the process, let us know in the comments and we’ll do our best to get the answer to you!!


This sounds looks and sounds delicious. The only change I would make is use mesquite wood smoke chips. Thank you for sharing this. I have been bugging my husband to get a smoker but, he doesn’t want one. lol. Now we can do this your way.
Okay Di I haven’t tried this with mesquite and now I’m intrigued! I will have to try it next time! Let me know if you try it out and how it goes, I hope you love it! Saving your husband some cash that’s for sure, haha!! 😂 Brisket forever
My brother, a Texan, cooked a 15 lb brisket using this method. WOW!!!! Absolutely delicious and we thank you so very much for your detailed description.
Oh I’m so happy to hear this Betty!! I’m so honored a real Texan made this!! 🤣 Brisket it hard to beat, right. Thank you SO much for taking the time to be the very first review on this recipe that we poured our hearts into 💕