This Lemon Bread recipe really packs a punch! Lemony to the max! The loaf is moist with a tender crumb, and bursting with lemon flavor from the juice and zest. The glaze on top will make you pucker up. It’s quick and easy to make! Ditch the Starbucks loaf and make this instead! Originally published February 7, 2020.

Table of Contents
You will love this Lemon Loaf Recipe
Happy February! February in California means driving around the neighborhood to see citrus trees all over the place, weighed down to the ground with lemons and oranges and limes and grapefruit. You walk in to church to see citrus piled high on the entry table, picked and ready to take home. Friends mass text, “anyone want lemons?? We’re drowning over here!” and I always answer, YES give me all the lemons!

I’m not one of those good people of the world* who sees a ton of lemons in the fridge and thinks “oh awesome, now I can squeeze lemon into my ice water” or “ooh, got some lemons, gonna make myself some Lemon Glazed Carrots or maybe some Lemon Pasta!

I mean. Maybe I’ll get there eventually, after several days of lemon surplus…But my first instinct is ALWAYS dessert. Lemon bars, lemon curd, lemon cookies, oh my! Bring on the sugar.

(*Every time I hear the phrase “good people of the world” I think of that song, “And the good people of the world are washing their cars on their lunch breaks, hosing and scrubbing as best they can in skirts and suits.” Who can name that song?? It’s a 90’s classic!)

So anyway, thank you to all the lemon trees in my neighborhood (and awesome neighbors!) for bringing us this lemon bread today. Maybe I’ll come up with something healthy to do with the surplus next February.
Because let’s be real, this “lemon bread” business is just a front. This is basically a lemon cake. I mean, just look at it. It even has frosting on top. And if you’re like me, you double the frosting and eat every piece of your “lemon bread” with a hefty dose of frosting spread all across the top.

I made this on a whim one day with my lemons, and shared a photo on Instagram stories. I got so many people asking for the recipe that I decided to make it again and take photos for the blog. Thanks for the inspiration, Instagram! Getting back into sharing recipes has come slower than I would like after the baby! (Who is 6 weeks old now and starting to hold his head up more and more lately! He’s so cute. Follow along on Instagram if you would like more baby updates.)
Lemon Loaf ingredients
Here’s a quick shopping list to help you gather your ingredients. See the recipe card below for the full ingredients and instructions!
- Flour
- Baking powder
- Salt
- Sugar
- Lemon zest
- Melted butter
- Oil
- Eggs
- Sour cream
- Lemon juice
How to Make Lemon Bread
They don’t call it quick bread for nothing! All you need for this recipe are a couple bowls and a spatula. You can use a mixer if you want, but an old fashioned whisk will do ya just fine.

First put together the dry ingredients:
- flour
- baking powder
- salt
- sugar
- lemon zest
I know, technically lemon zest isn’t a dry ingredient, but I like to stir it in so that it gets coated with flour. It distributes in the bread more evenly that way, instead of getting all clumpy.
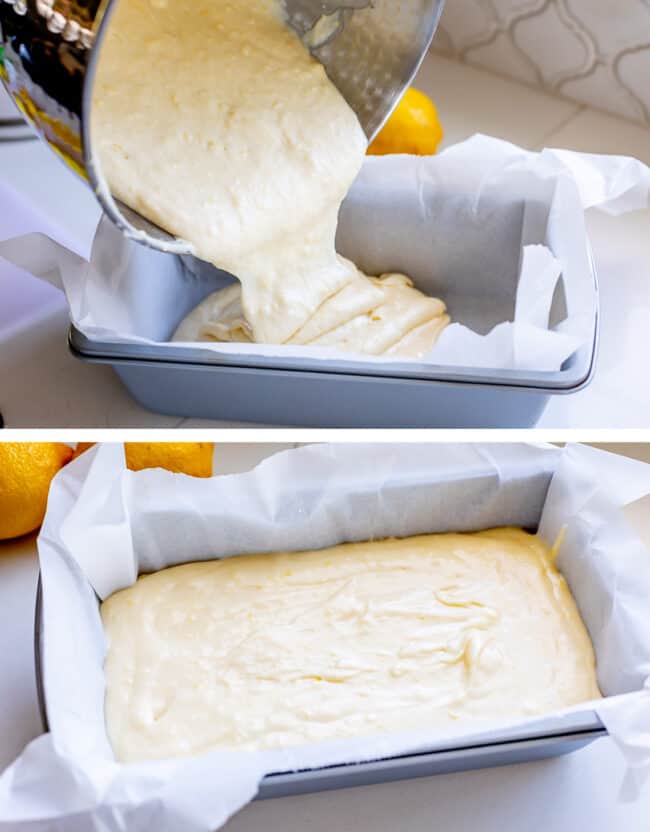
Then add your wet ingredients:
- melted butter
- oil
- eggs
- sour cream
- lemon juice
I tested this recipe using lemon extract. I know there are some recipes out there that swear by it, and you will definitely find it in that classic Starbucks Iced Lemon Loaf Cake. But it’s just not my favorite flavor. It tastes more chemically than lemony to me. I prefer to just use a LOT of fresh lemon juice and a LOT of lemon zest. Lemons have tons of flavor, let’s let them do the talking! (If you want to try it with the extract, replace one tablespoon of lemon juice with 1 tablespoon extract.)
Then you literally just stir together the wet and dry ingredients, and voila, batter done. Bake it up and you’re almost done.
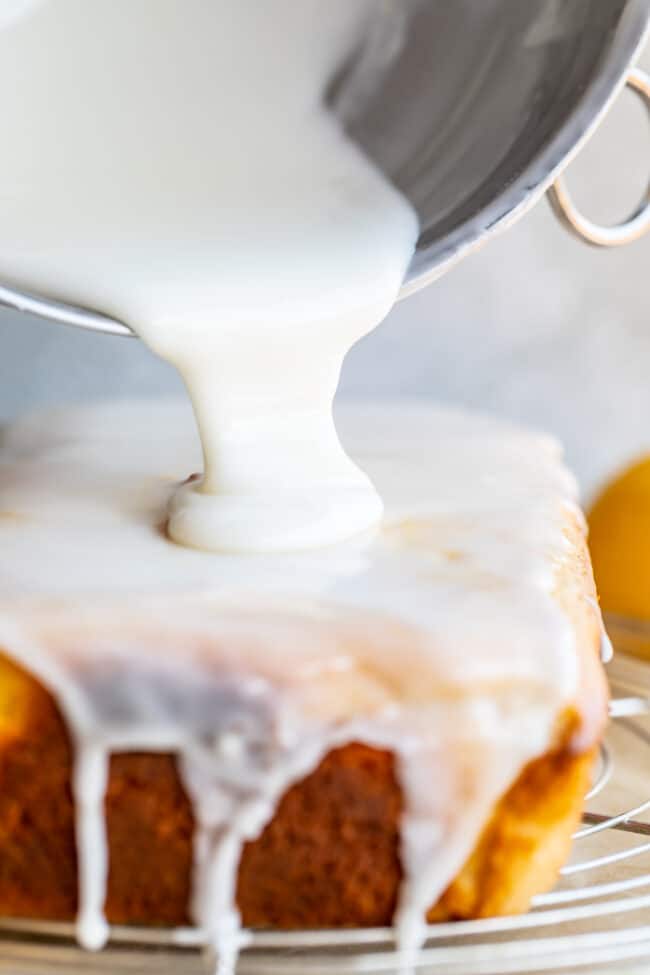
The last step is the glaze. It’s TART and that’s not an apology. It really takes this bread from “Yum” to “WOW yum!” And I have a trick to make sure your glaze is extra thick: add one layer of glaze and let it set. Then add another layer. Then another layer! This is the best way to get that really thick white glaze on top and still get the pretty drips down the side.

This lemon bread is really pretty for serving at baby showers or any type of potluck. It’s also great to make on a random Wednesday afternoon! Makes a tasty breakfast the next morning. Happy citrus season ya’ll!
How to store Lemon Bread with glaze
Lemon bread can be kept on the counter for 3-5 days, covered. If you want to save it for much later, you can freeze an entire loaf or individual slices as you prefer and defrost them on the counter at room temperature when you’re ready.
Does lemon bread need to be refrigerated?
No, you don’t need to refrigerate lemon bread. The glaze doesn’t contain any dairy and the bread is fully cooked, so it’s safe to store covered on the counter.
Glazed Lemon Bread FAQs
“Lemon bread” or “lemon loaf” is really a type of cake, don’t let the bread shape fool you! Its origins are impossible to determine. It’s a type of pound cake, which dates back to England in the 1700s, but when someone first added lemons and a sweet, tart glaze is unknown.
In Britain, it’s called lemon drizzle cake and served with afternoon tea. In Germany, it’s called Saint Barbara’s cake and is made around December 4 (on the feast of St. Barbara). Whatever you call it, it’s the perfect breakfast treat or indulgent snack and I am all about it.
Bottled lemon juice works fine when you’re just adding a little to a recipe in which it’s not the predominant flavor. IF, however, you are making this LEMON bread, you need lemons. Not only will the juice be far more flavorful, but you need them for their zest, which adds even more flavor. I’m not saying it’s impossible to make the bread with bottled lemon juice, but I absolutely do not recommend it. Wait for a day when you’ve got the real thing!
More lemon recipes you are going to love!
- Raspberry Lemon-Glazed Muffins << such a bright flavor!
- Lemon Lush Dessert << such a great crowd-pleasing pan of lemony goodness!
- Lemon Crinkle Cookies with Lemon Frosting << Never enough lemon!
- Lemon Cupcakes << doctored cake mixes ftw!
- The Best Lemon Bars << This is my favorite dessert. Ever. Maybe tied with the best brownies.
- Strawberry Lemon Shortcake << Strawberry shortcake is delicious, but even better with lemon!
- Meyer Lemon Tart << a sophisticated dessert!
- The Best Lemon Curd << check the reviews! It’s so good!
- Raspberry Lemon Cake from View from Great Island
- Lemon Bar Cookie Cups from Barbara Bakes
Facebook | Pinterest | Instagram
Iced Lemon Loaf Cake

Ingredients
Dry ingredients
- 1 & 3/4 cups flour, spooned and leveled
- 1 cup sugar
- 1 & 1/2 teaspoons baking powder
- 1/2 teaspoon salt
- 2 tablespoons lemon zest, from about 2 lemons
Wet ingredients
- 1/4 cup butter, melted (1/2 stick)
- 2 large eggs
- 1/4 cup oil, I like light flavored olive oil
- 1 cup sour cream
- 1/3 cup lemon juice, you will need at least 2 large lemons
For the glaze
- 2 cups powdered sugar, sifted if clumpy
- 3-4 tablespoons lemon juice, you will need at least 1 large lemon
Instructions
- Preheat the oven to 350 degrees F.
- Line a 9×5 in loaf pan with parchment paper for easy removal. Or you could spray the pan with nonstick spray. (Or line with foil; be sure to grease.)
- In a medium bowl, whisk together the dry ingredients: 1 and 3/4 cup flour, 1 cup sugar, 1 and 1/2 teaspoons baking powder, and 1/2 teaspoon salt.
- Use a microplane grater to zest 2 large lemons into the dry ingredients. You want at least 2 tablespoons. Whisk it all together and set aside.
- In a small bowl, microwave 1/4 cup butter until melted. Set aside to cool a bit.
- In another large bowl* or stand mixer, add the wet ingredients: beat 2 large eggs until combined and smooth. Add 1/4 cup oil, 1 cup sour cream, and 1/3 cup lemon juice.
- Add in the melted butter. Stir it all together.
- Add the dry ingredients (and then wipe out the dry bowl and put it back in your cupboard.) Stir until combined. Make sure that everything is incorporated, but do not over beat. A few lumps are ok. See photos above to see the batter.
- Pour the batter into the prepared pan and smooth out the top.
- Bake at 350 for about 45-52 minutes. Every oven is different, so start checking early. The bread is done when there are brown spots on top and a toothpick, when inserted in the center, comes out with no wet batter on it.
- Let the pan cool on a wire rack for 20 minutes before lifting the bread from the pan. Let the bread continue cooling on the wire rack while you make the glaze.
- To make the glaze, add 2 cups of powdered sugar to a medium bowl. If it looks rather clumpy, sift it through a strainer so that you don’t have lumps in your glaze.
- Add 3 tablespoons lemon juice to the bowl and use a whisk to combine. Add more lemon juice if necessary to get a glaze consistency that easily drips off of a spoon.
- Glaze the bread in increments. Add about 1/3 of the glaze to the cooled bread and spread to the edges, letting it drip down the sides. Allow the glaze to set for 10-20 minutes until it has formed a crust. (Stick it in the fridge or freezer to speed this up.)
- Add another 1/3 of the glaze and let set as before.
- Add the rest of the glaze and let set completely. You don’t have to add the glaze in stages like this, but it’s the best way to get a really thick glaze on top of the bread.
- Slice the bread and serve!
- Store the bread covered on the counter for 2-3 days. After that, store in the fridge.
- This bread can be frozen and served later! Let thaw on the counter in the container that you froze it in (sealed).








I’ve been searching for this Lemon Pound Cake ala Starbucks Lemon Loaf Cake forever and this one comes very close. It was very delicious. I only made a couple of changes…used 1/2 cup of Butter instead of 1/4 Cup Butter / 1/4 Cup Oil, and for the Glaze, I added a bit more Lemon juice and some Lemon Zest to give it a bit more tartness. The cake was pretty dense. I was wondering if we added a little Baking Powder to the recipe if it would make the texture a bit lighter. Any comments or advice?
I want to try this recipe. Is the butter unsalted?
Hi Zade! I use salted butter, but either kind will work great for this recipe! Enjoy :)
This did not turn out well. Instead of a cake-like texture, it was more like a sour cream cheesecake. I believe this is due to the 1 cup of sour cream that is used. I would use less next time but I don’t think I will make this again.
It was very dense and only about one and a quarter inch thick once cooled. Not at all what I expected.
Hi Star, so sorry to hear this didn’t turn out well for you! This is a dense loaf, and not particularly tall, but under 2 inches sounds like there may have been a problem with your baking powder. It’s best to use it within 6 months of opening it, or you can end up with a very sad flat result. Sometimes over-mixing the batter can also result in a dense loaf. I hope that your next baking project turns out perfectly!
My daughter made this with plain yogurt instead of the sour cream since one of us is lactose intolerant. She also added some leftover lemon zest to the icing and it turned out beautifully! The slices of cake were pretty and tasted amazing. The only problem we had was one loaf lasted less than a day since it was so easy to grab a piece as were walked by. Great recipe, thank you!
Just made your lemon loaf and it is incredible. I actually doubled the recipe so I could make one for my brothers. Thank you for sharing your recipe. This one is a keeper for me
So so good! My lemons are beginning to ripen and I had a craving for lemon something, so I tried your recipe. It is outstanding! The 2 tablespoons of zest and the 1/3 cup juice kick up the flavor so well It is so moist and delicious I’m having a tough time not slicing off another serving this morning. I did halve the glaze portion and even my half portion covered the entire loaf well. Thanks for this keeper!!
Can’t wait to try this!
Can I use vegetable oil ?
Hi Alicia! Yes, vegetable oil will work great! Enjoy!
This is a very good cake, if you like dense pound cake. A lovely, moist crumb, the cake itself is very mild tasting and the icing is where the flare is, so you can decide the flare ratio. I baked for 50 mins.
What I altered:
I didn’t have sour cream, but had greek yogurt with 11% milk fat, so very similar.
I only used 1.5 cups of icing sugar for the glaze and more lemon juice than 3tbsp to get the consistency I wanted, which was a little bit runny.
MOST IMPORTANT, if you really want to step up the game of your lemon loaves (probably any citrus-based loaf), add a liquid glaze to the loaf. 3tbsp granulated sugar, 2-3 tbsp lemon juice, 1-2 tbsp water warmed up to melt sugar. Make sure it is very tart. Use a pastry/basting brush to paint all the liquid glaze into the bread, its top and its sides, allowing the liquid to soak down into the loaf while it is still warm. Continue with the regular glaze as normal.
I’ve made this twice now and the inside never seems to be done, always wet in the middle even after I come it an extra 20 mins. What am I doing wrong?
Hi Reeanna! I’ve never had that issue with this bread. I’m sorry you’re having troubles. Do you have an oven thermometer? I’m wondering if it’s not up to temperature. Is it over browning on top? If not, your oven is probably not at the correct temp. If so, then I don’t know, and my best suggestion is to cover with foil to prevent more browning until the center cooks. Hope this helps!