There is no stopping this Garlic Bread, y’all. It is the BEST recipe. What could be better than delicious crispy-yet-chewy bread, toasted with softened salted butter and garlic in every bite?! I’ve got 3 basic tips that will level up your homemade garlic bread, and 3 methods for how to make it. Let me show you just how easy it is! Originally published May 19, 2023.
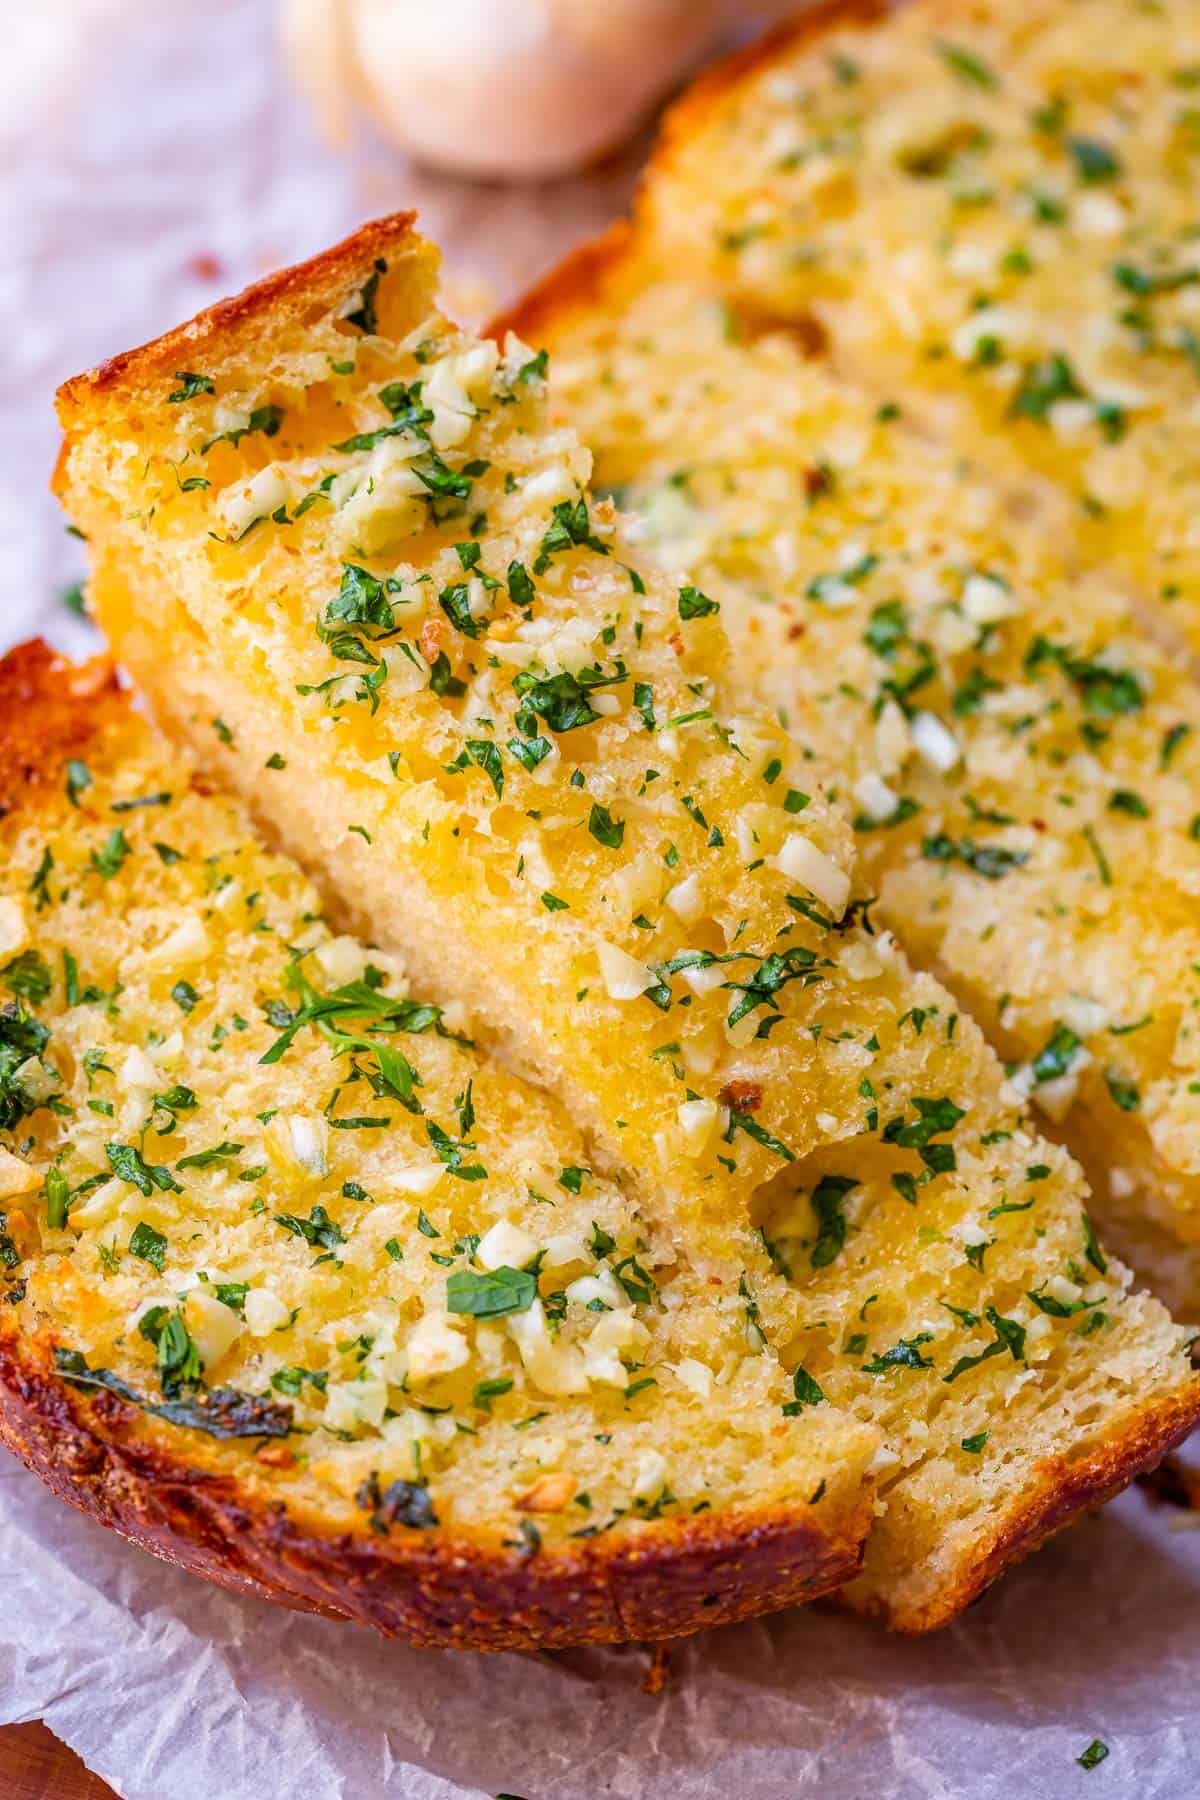
Table of Contents
- There is nothing better than a slice (or 5) of Garlic Bread
- The BEST Garlic Bread Recipe
- Homemade Garlic Bread Recipe ingredients
- How to make Garlic Bread Butter
- How to make garlic bread in the oven
- Make this Homemade Garlic Bread Recipe CHEESY
- 3 tips for the best Homemade Garlic Bread
- What to serve with this Garlic Bread Recipe
- How to store Garlic Butter Bread
- More like this Homemade Garlic Bread Recipe
- Homemade Garlic Bread Recipe Recipe
The other day we were at my parents’ house and my 3-year-old threw a bouncy ball across the room. It ricocheted off the wall, the couch, the chair, and I’m pretty sure made contact with grandma’s head at some point. I told him, in my most menacing mom voice, “If I see you throw that ball one more time I’m taking it away.”
A few minutes later we hear more bouncy ball noises from the living room. I race over to the mayhem and say “Edison! You can’t throw the bouncy ball!” And he looks back at me so calmly, as if he’s explaining something to an idiot: “But you didn’t see me.”
Agh! He got me you guys!! Rookie parenting move, who even am I??
There is nothing better than a slice (or 5) of Garlic Bread
You know when you’re about to dive into a nice, respectable dinner full of protein and vegetables and then someone busts out the garlic bread, and you lose your ever-loving mind? All rational decision-making goes out the window. You are a transformed into a bread-and-butter machine. Your pupils might even turn into heart-shaped garlic bulbs at some point.
This happens every time I visit an Italian restaurant. I scour the menu for the perfect dish, then they take the menus away and bring out the bread. The garlic-mania sets in, and I decide I was actually planning to eat my carefully chosen meal for lunch tomorrow anyway, because right now all I want is the hot toasty garlicky butter bread in front of me. And I want it right now. (In case you’re wondering, I would definitely be the kid who fails the marshmallow test.)
There is just nothing better than fresh garlic bread. I’m actually pretty sure God was talking about garlic bread specifically when he mentioned the staff of life.
The BEST Garlic Bread Recipe
I used to be absolutely terrible at making garlic bread. How is it possible to screw up something so simple? But I always did. I would burn it, not add enough butter, add too much salt. Ugh.
I made probably about 15 loaves of garlic bread testing for this post, and my freezer is full of reject bread to prove it. Edison likes to punish me when I serve him overly-crusty garlic bread. He eats the one bite from the center that is buttery and soft, and then methodically crushes the too-hard edge into smithereens that he sprinkles about under his chair. My shrieks of indignation after each meal are worth every ounce of effort to him, no doubt.
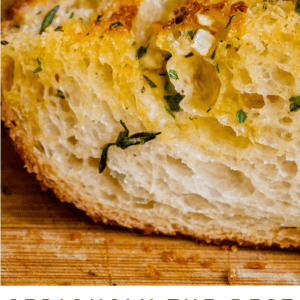
I’m here to make sure this never happens to you. Here are all my best tips that will deliver garlic bread that is pleasantly soft and chewy in the center, yet shatteringly crispy on the edges (if you want–I also include instructions for soft garlic bread.) It is perfectly buttery in every bite. And I’ll show you how to make it without it getting dried out.
Homemade Garlic Bread Recipe ingredients
Garlic bread is stupid easy, guys. There are only 4 essential ingredients, plus some extra bonus ones if you’re feelin fancy. Full recipe is at the bottom of the post!
- good bread, details on that below
- lotsa butter. more than you’re thinking.
- kosher salt
- *high quality garlic powder*
- fresh garlic (optional! eep! more on that below)
- Optional ingredients to take it to the next level: fresh rosemary, thyme, and parsley
- To make it cheesy: shredded mozzarella and/or Parmesan
What is the best bread for Garlic Bread?
This recipe is so simple that the ingredients actually do matter. (That said, you add enough butter and garlic to cardboard and I will probably eat it.)
French bread is the most traditional. I like to use the “Country French Bread” from Costco, it is amazing. (That’s what you see in the photos.) A French loaf from the grocery store will do too! But don’t limit yourself, you can make garlic bread out of anything (not cardboard, I was kidding):
- Homemade French Bread (only takes one hour to make!)
- Sourdough bread
- Ciabatta loaves
- Focaccia
- Sesame seed loaf
- Texas toast
These are just ideas. You can use any kind of bread you want! The higher quality it is, the better your garlic bread will be!
How to make Garlic Bread Butter
Let’s get to it! Here’s how to make the garlic butter part of your garlic bread. Full recipe is at the bottom of the post!
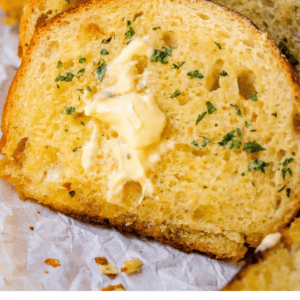
We are going to use 3/4 cup butter for one loaf of bread, that’s 1 and 1/2 sticks. There is no secret ingredient in this recipe, the secret is just MORE BUTTER. Most recipes call for one stick of butter for a loaf, and it’s just not enough to make it the best garlic bread. Yolo, man.
The reason I like to use more butter is because as the bread bakes, the butter seeps down through the bread. You are not just getting bread with butter on the top. You really are getting butter top-to-bottom.
Start out with 3/4 cup butter in a bowl. I like to use a really high quality brand of butter, like Kerry Gold. Let it soften to room temperature, or heat it in the microwave at a low power level until it’s soft. I heat on power level 2 for about a minute and it works perfect.
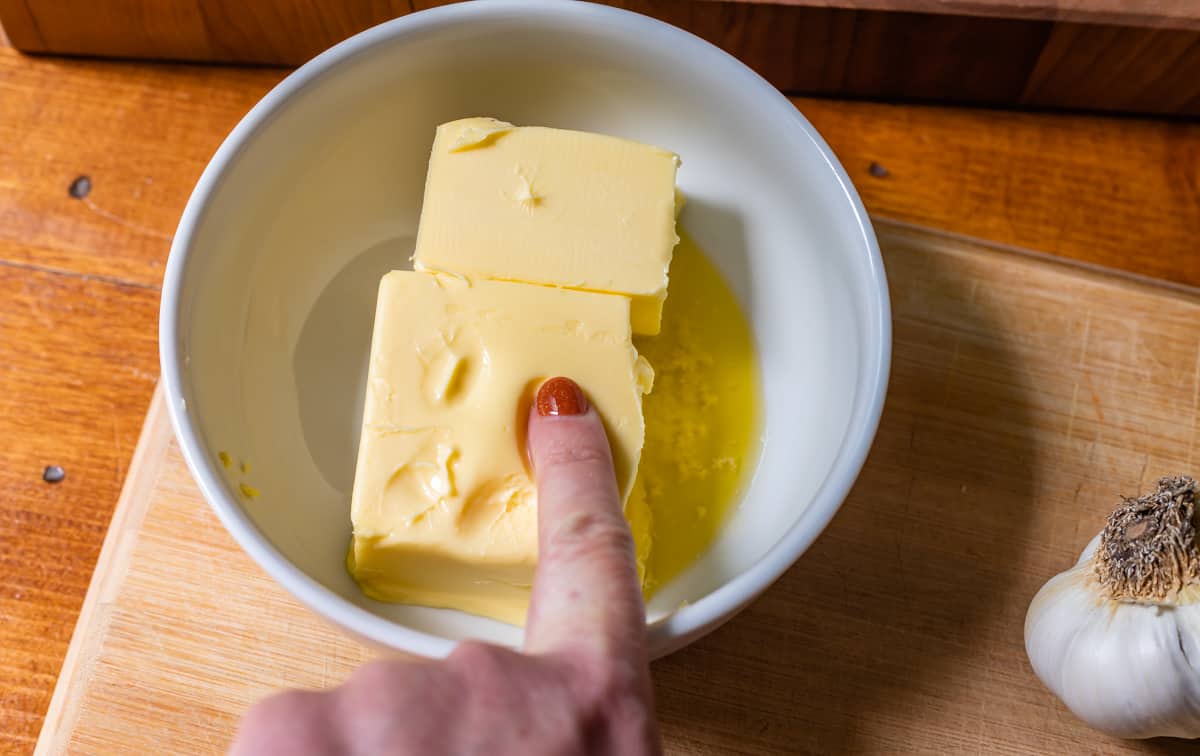
You don’t want to use melted butter. It’s harder to get an even spread on your garlic bread. And then, because it’s already melted when it hits the oven, it tends to just melt right off the bread onto your pan. When you use softened butter, it melts slowly INTO your bread.
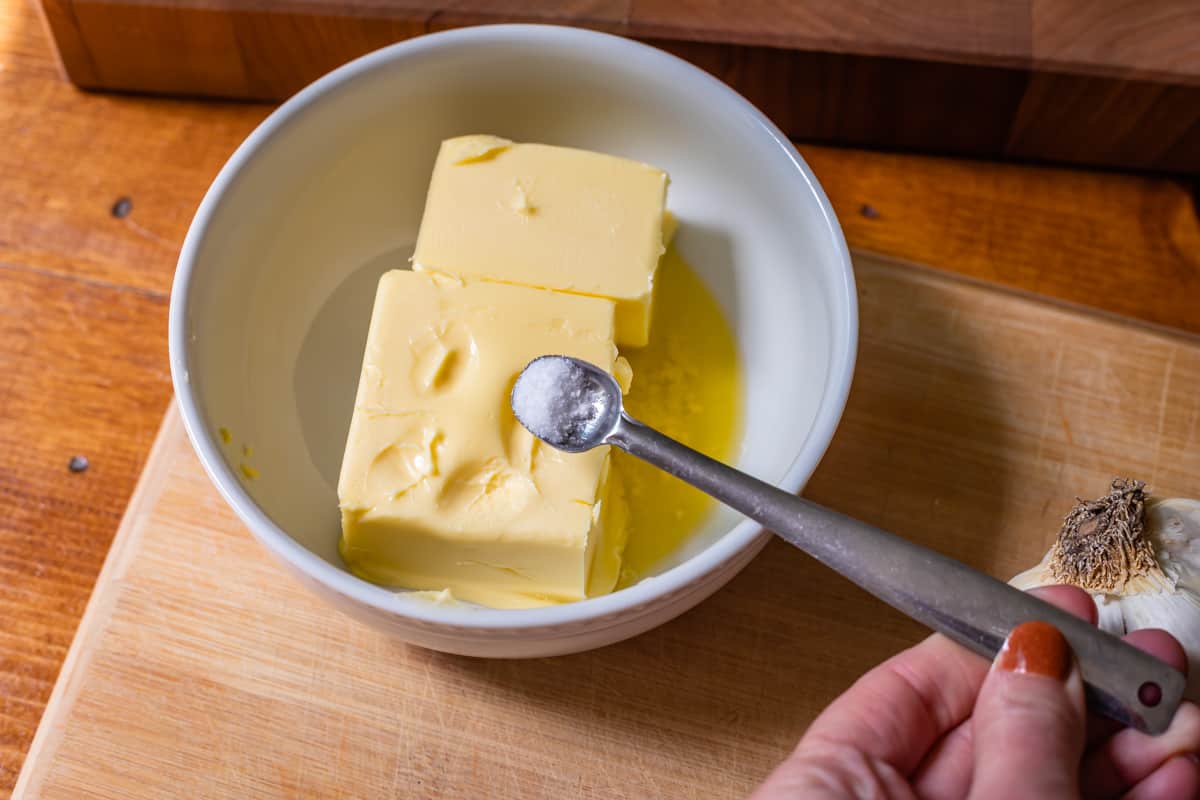
Add a bit of kosher salt to your butter. Use about 1/8 teaspoon if you have salted butter. Use upwards of 1/2 teaspoon if you have unsalted butter. (If all you have is table salt, use less.)
Add 1/4 teaspoon high quality garlic powder, even if you are using real garlic. I love how this flavors the butter in addition to the individual pieces of garlic.
Now it’s time to smash and mince our garlic.
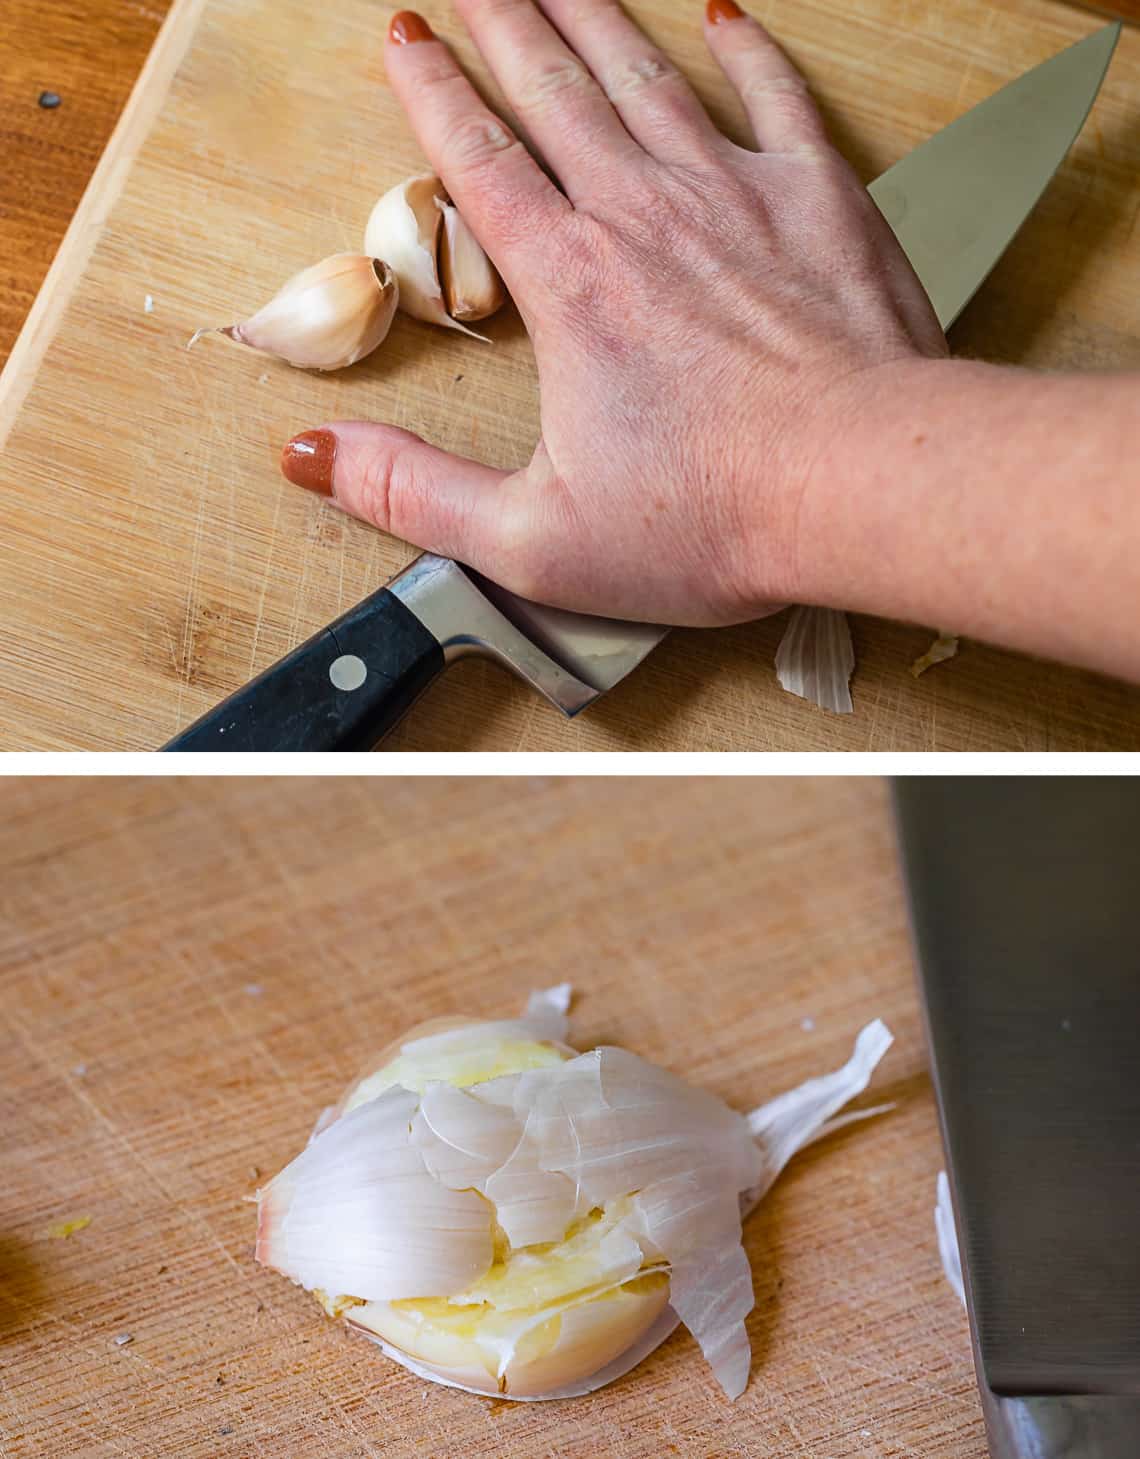
Use a chef’s knife. I’ve tried every other garlic method in the land. Garlic press, garlic grate plate, shaking cloves in a mason jar to remove peels, etc. Nothing works as well as a simple knife, trust me. If you put your back into it and smash them real good, the peels come right off.
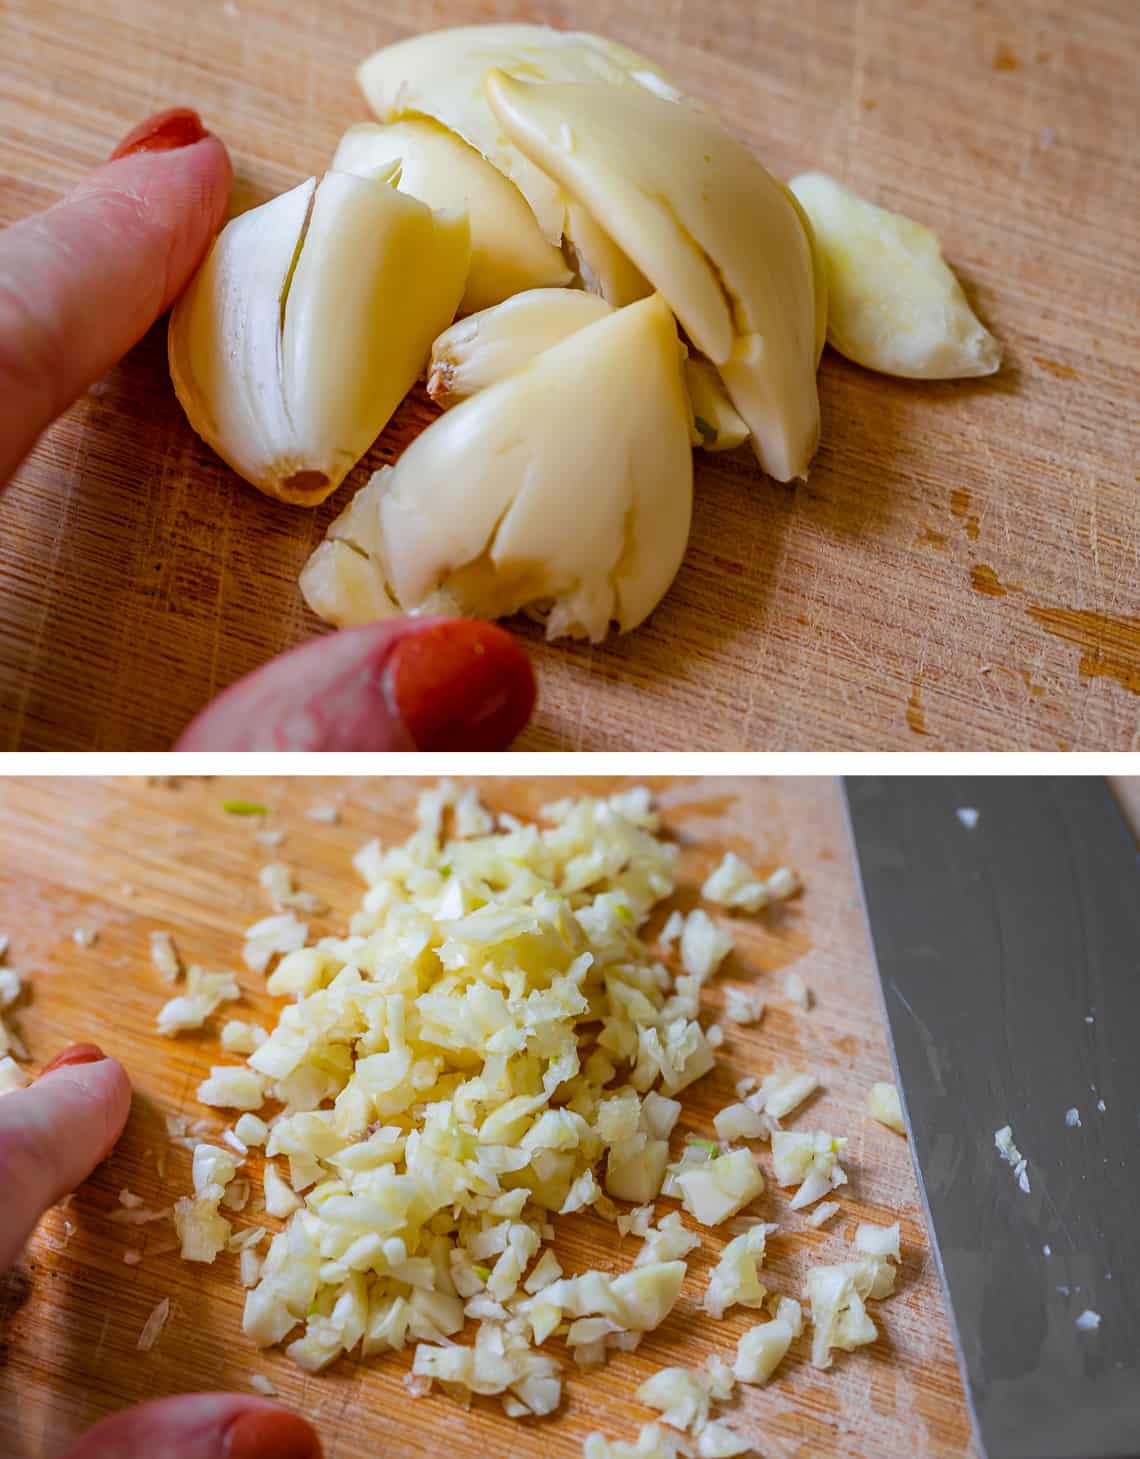
Mince your garlic pretty fine. I like to use about 5-6 cloves, or about 3 tablespoons per loaf of bread. But you can use less than that if you want! I’m kind of a garlic freak. Go big or go home.
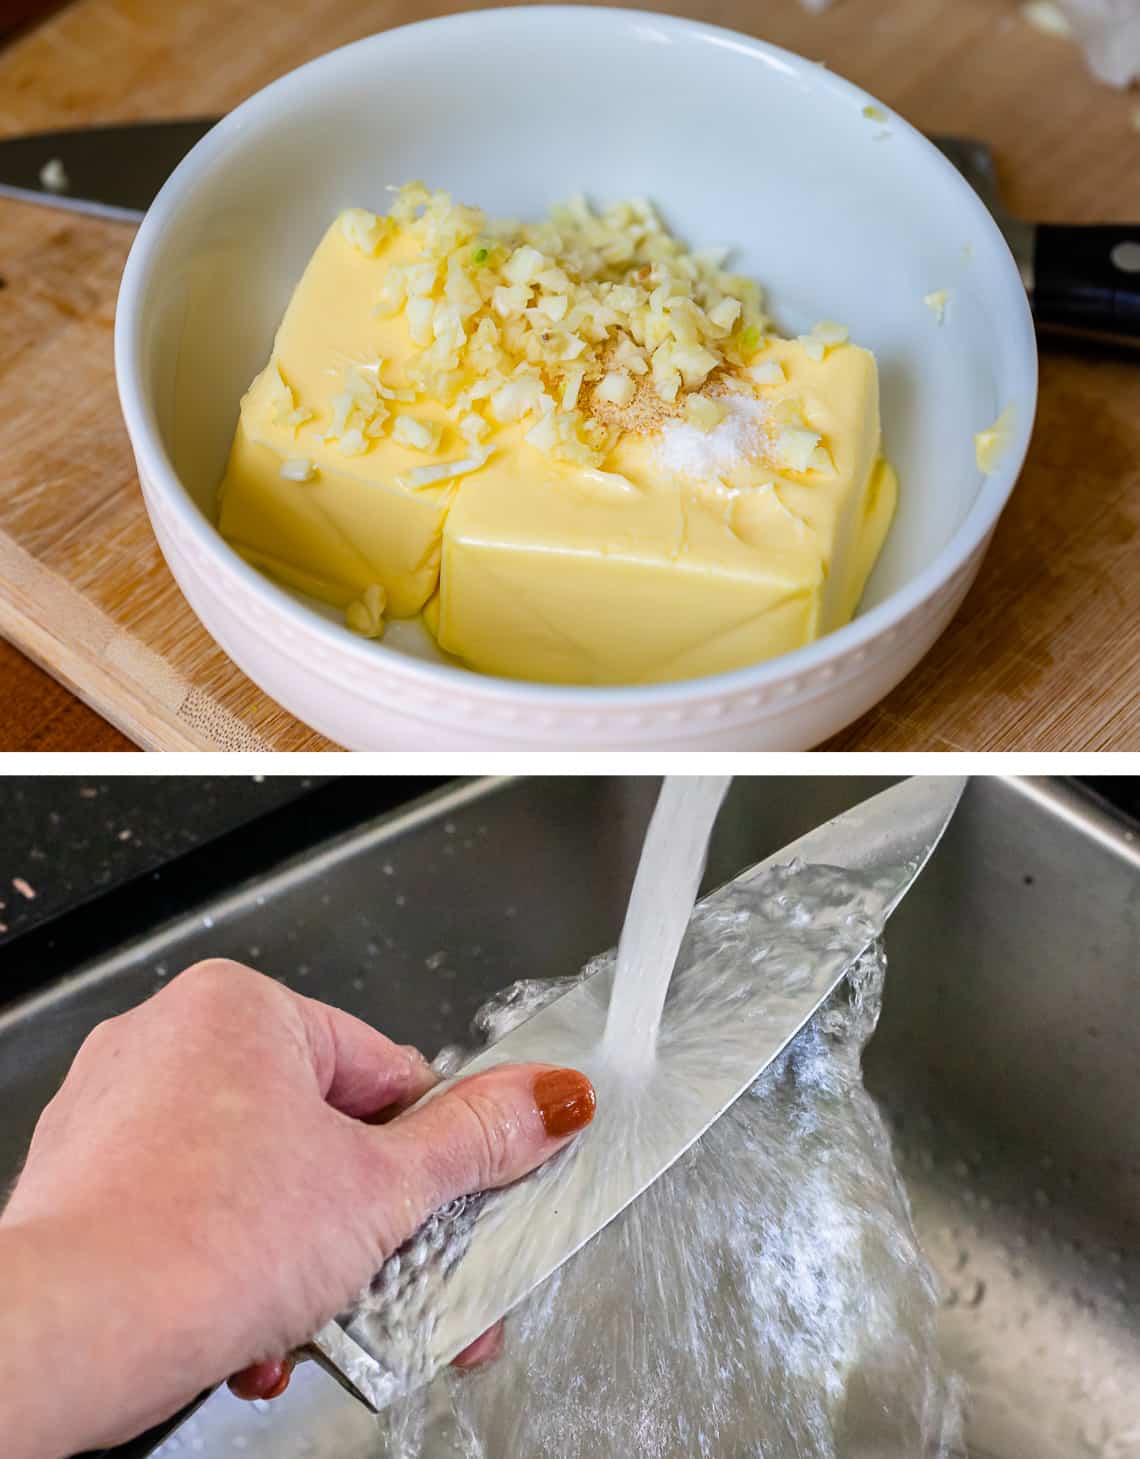
Now it’s time to rub your fingers on your knife under running water to get the stinky garlic smell off your fingers. Don’t skip this step, I hate garlic fingers. It works so well!
Okay now for extra credit:
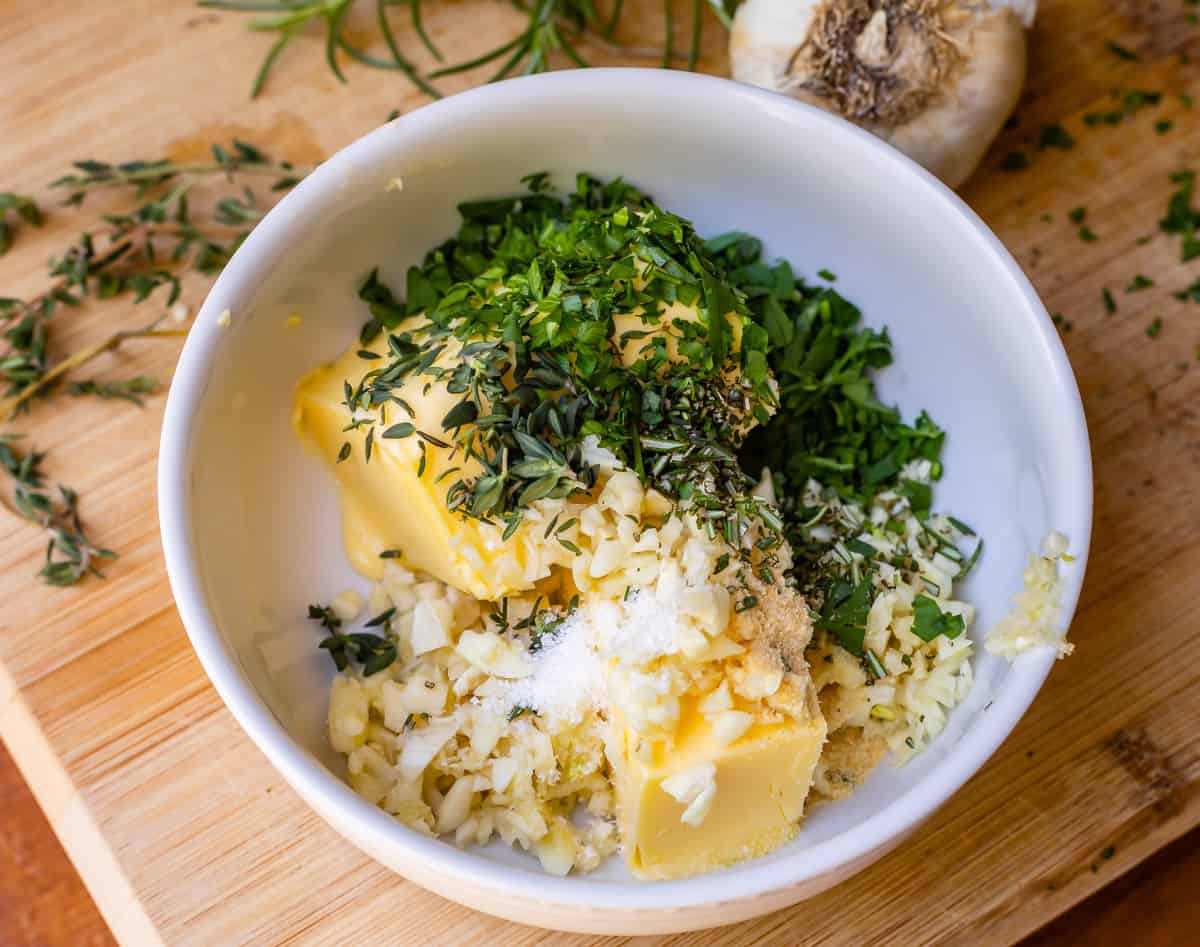
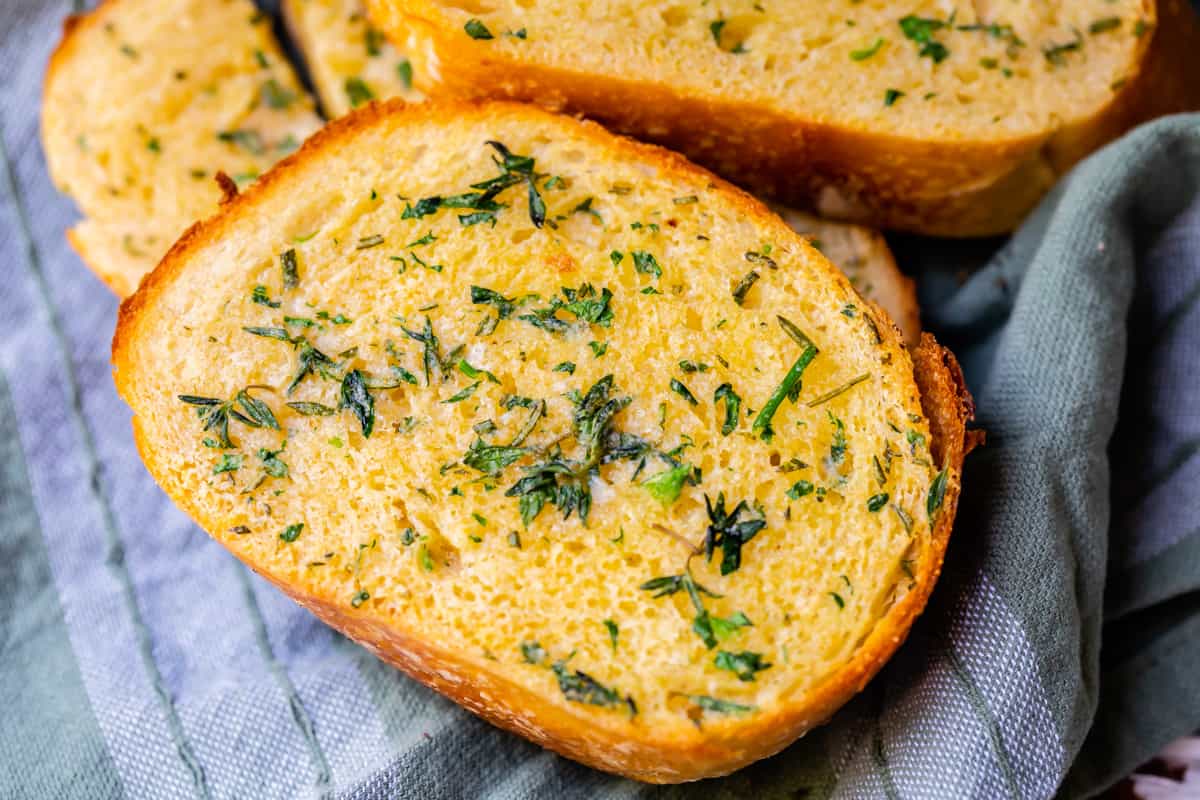
I love herby garlic bread. My favorite combo is a little rosemary, a little thyme, and a buncha parsley. You could do all three or just one. It really levels up your garlic bread! I love it!
Mix it all up and give it a taste to make sure you love it!
How to make garlic bread in the oven
Once you’ve got your garlic butter made, choose what kind of garlic bread you want. I’ve got 3 methods for you:
- Crispy-edge, pillow-y center garlic bread
- Soft and tender edge garlic bread
- Fast and easy garlic bread
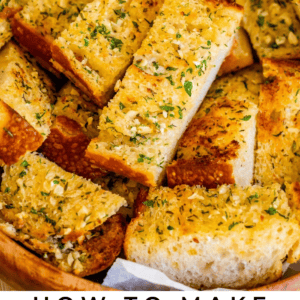
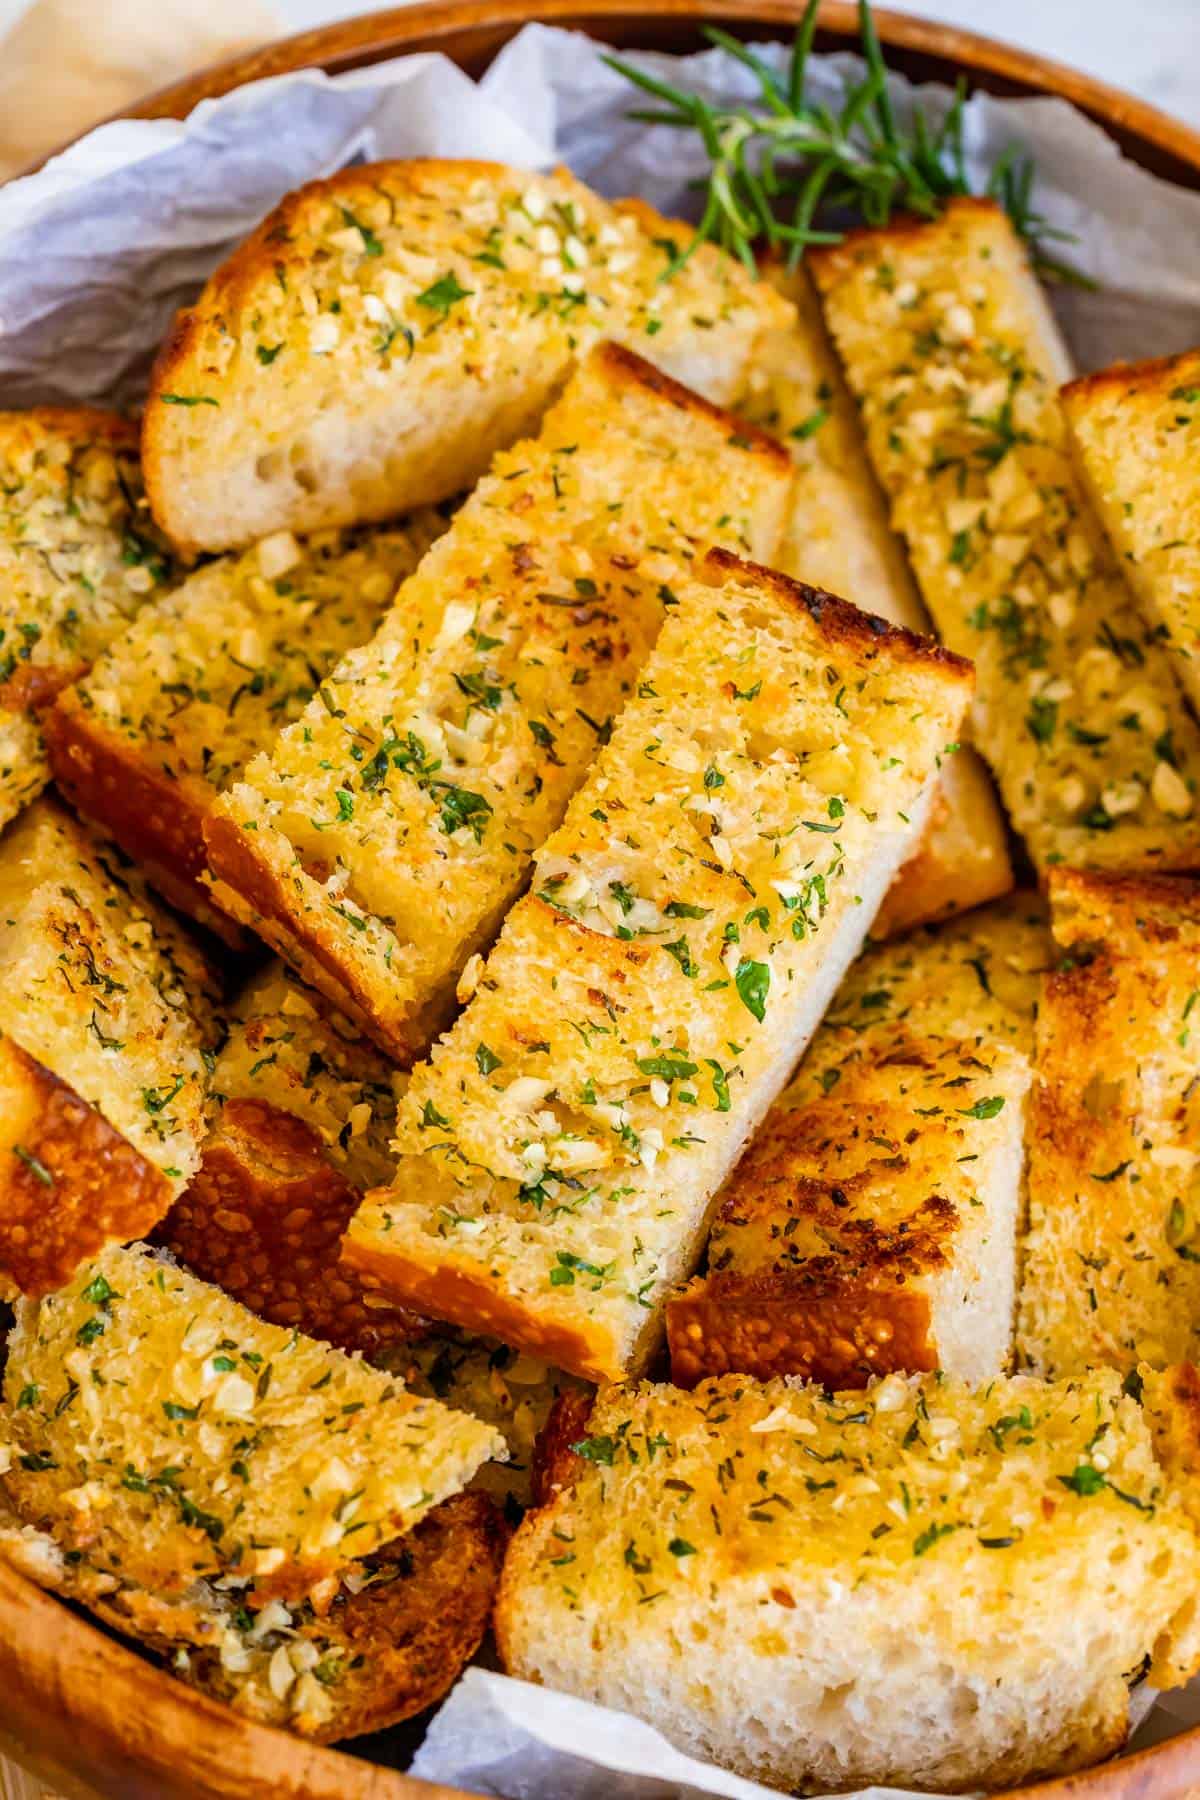
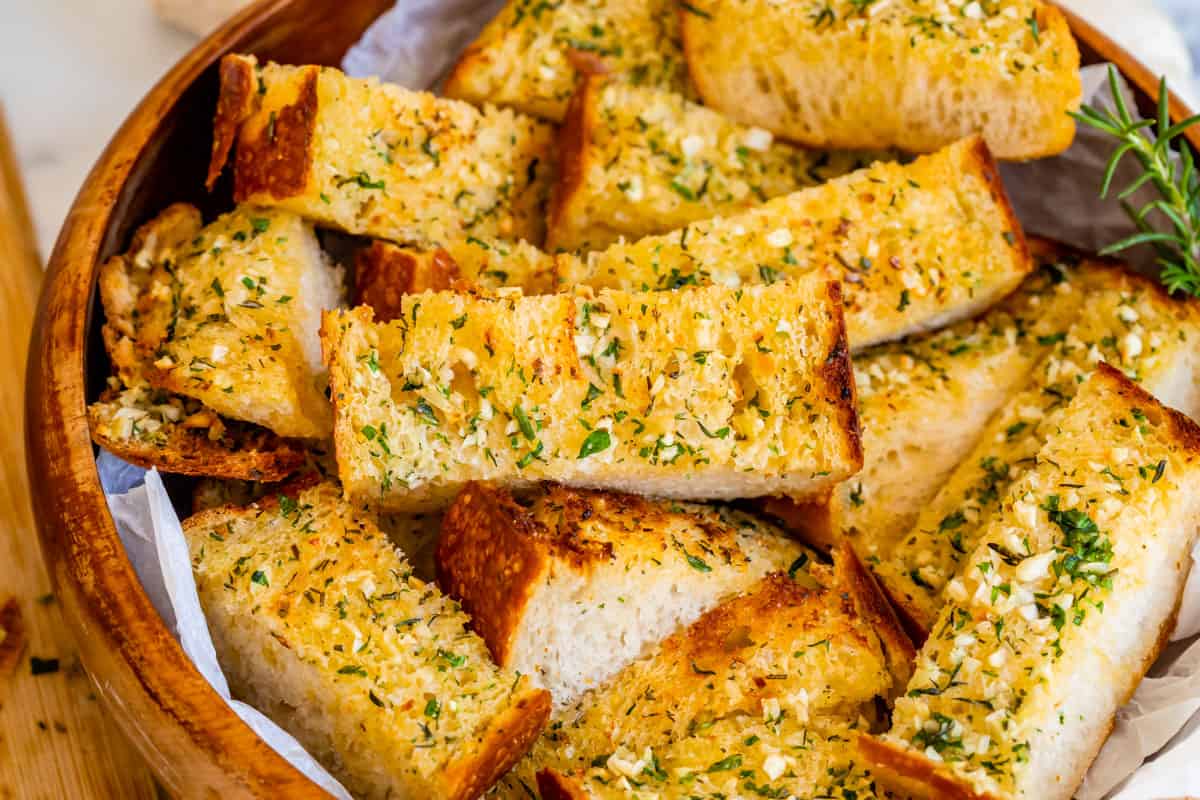
Garlic bread success is all down to technique. So choose which kind you want to try and go for it! Pictures are here; full recipe is below.
How to make Homemade Garlic Bread edges crispy
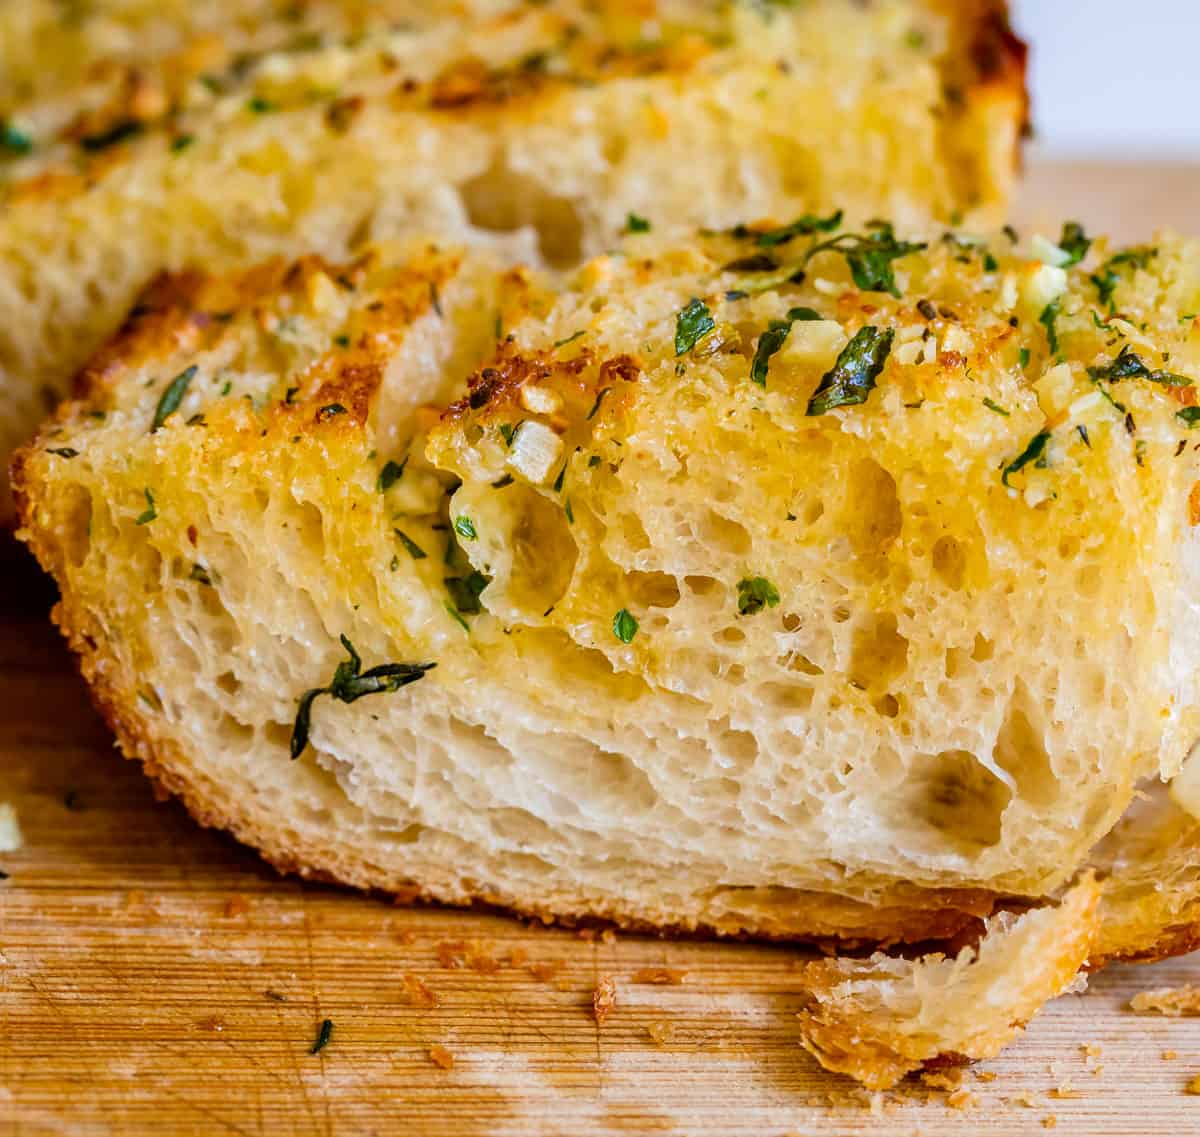
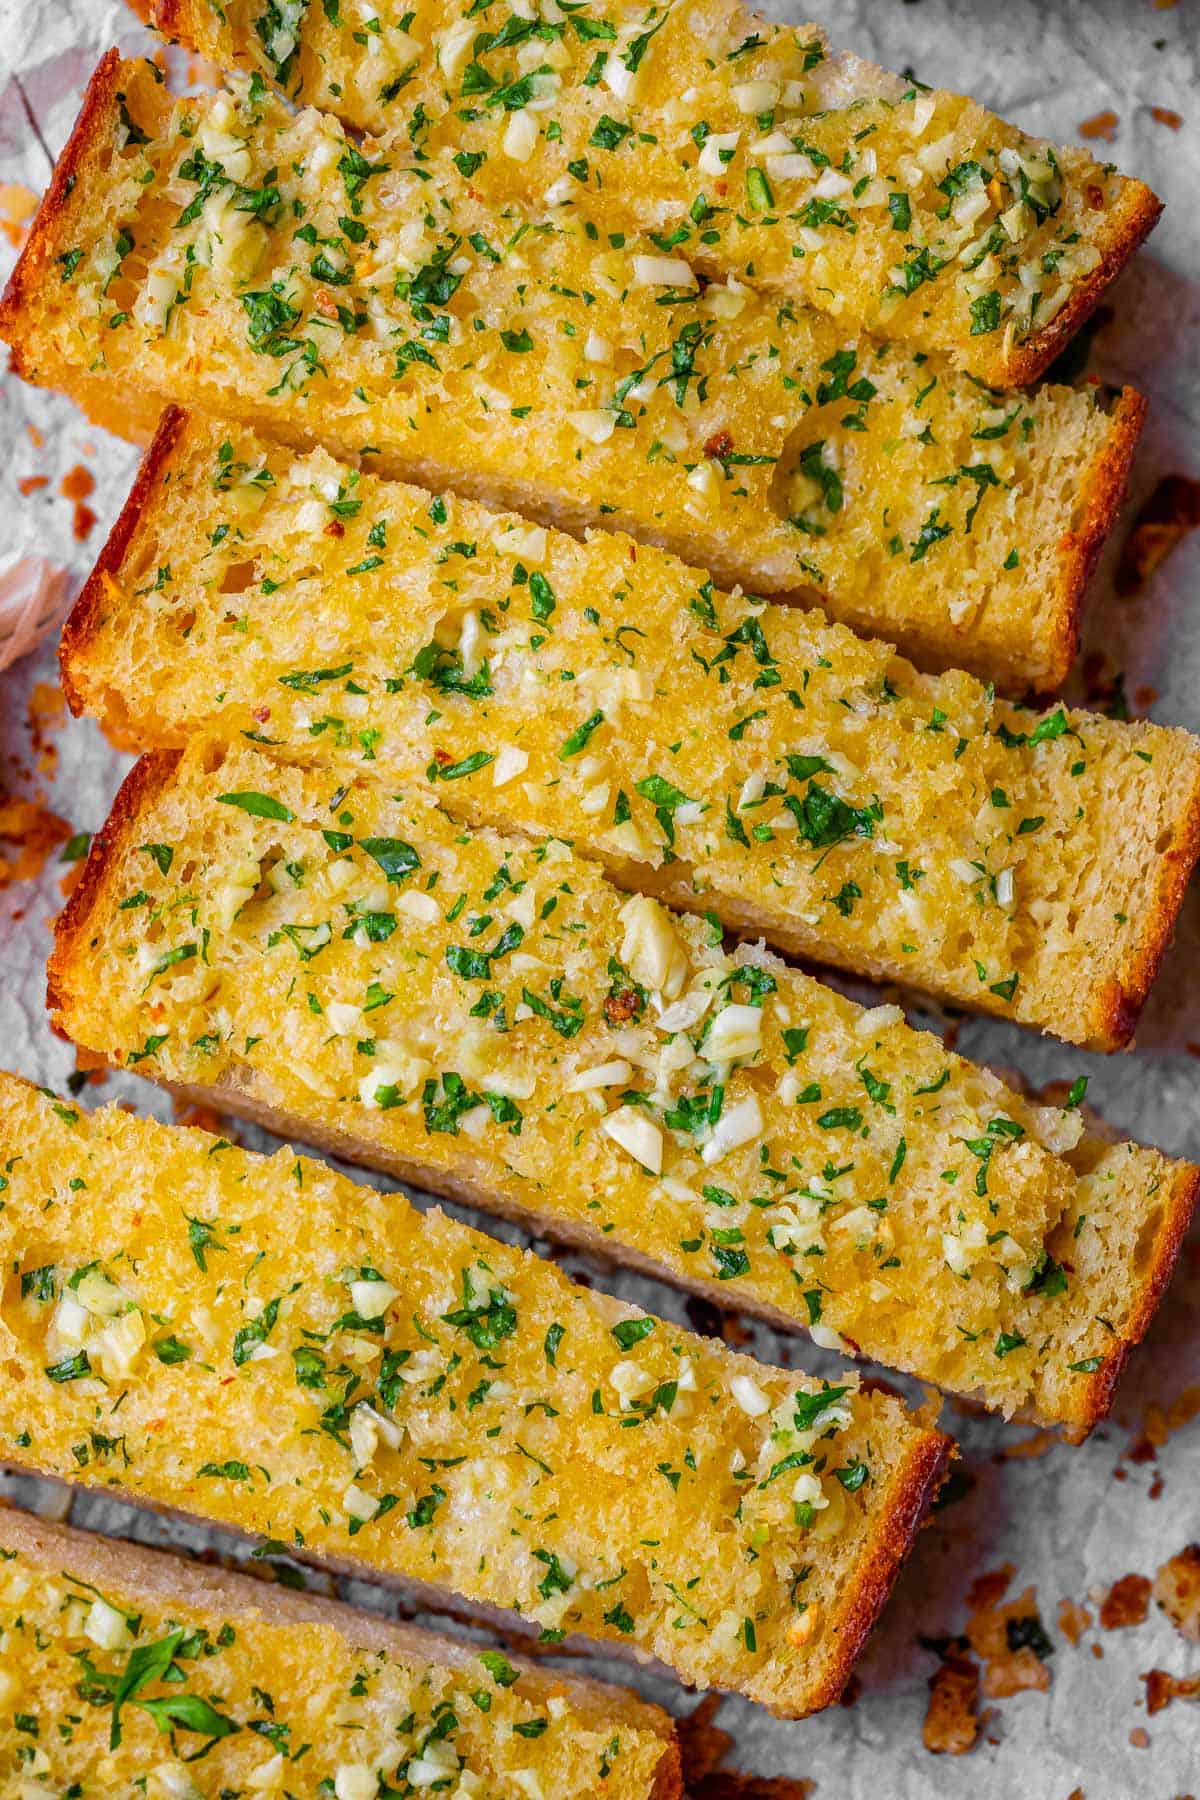
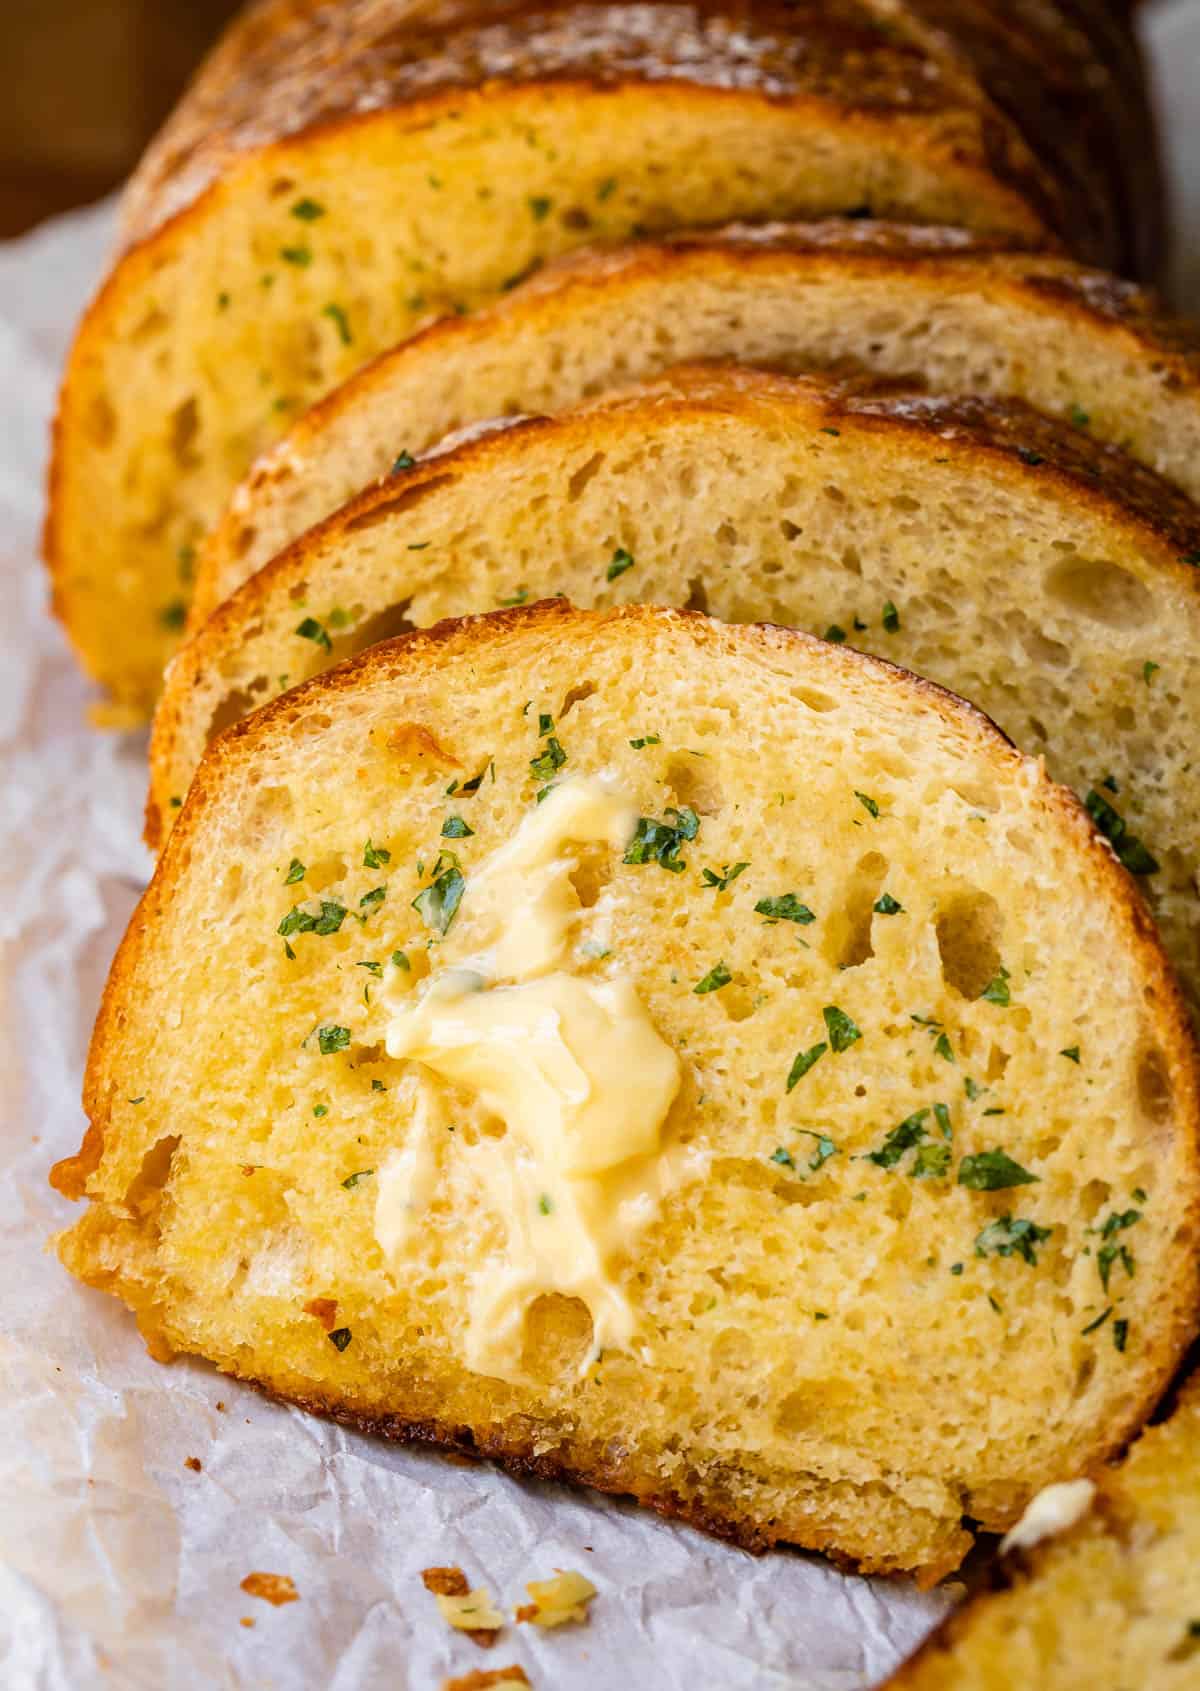
This first method is my favorite way to make garlic bread. I love a good crispy edge with buttery layers that shatter when you bite in, and a soft buttery center.
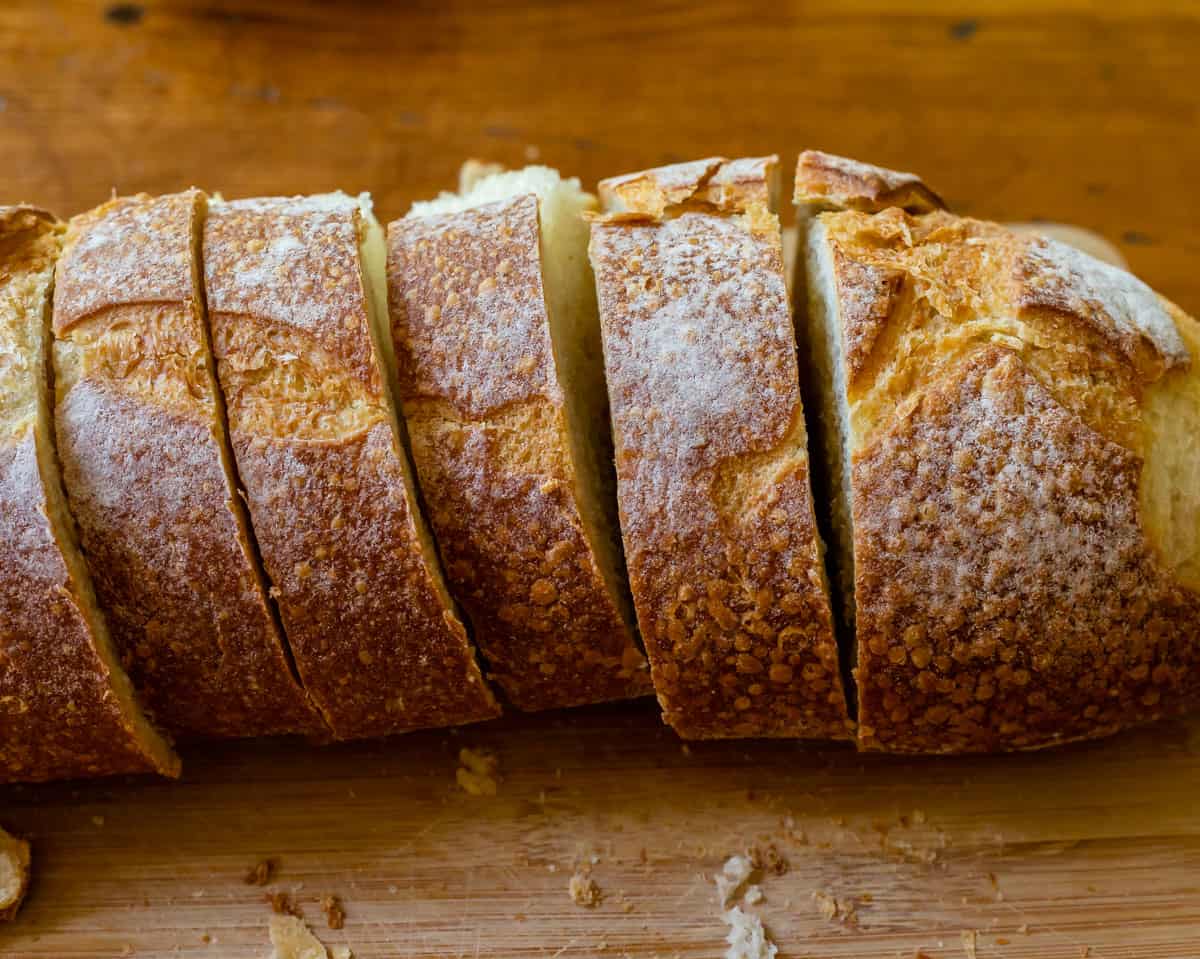
First cut your bread in half this way:

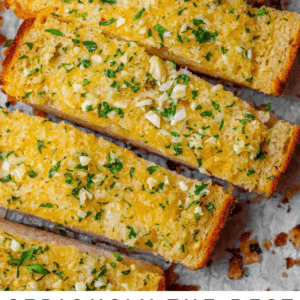
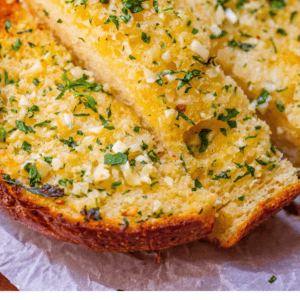
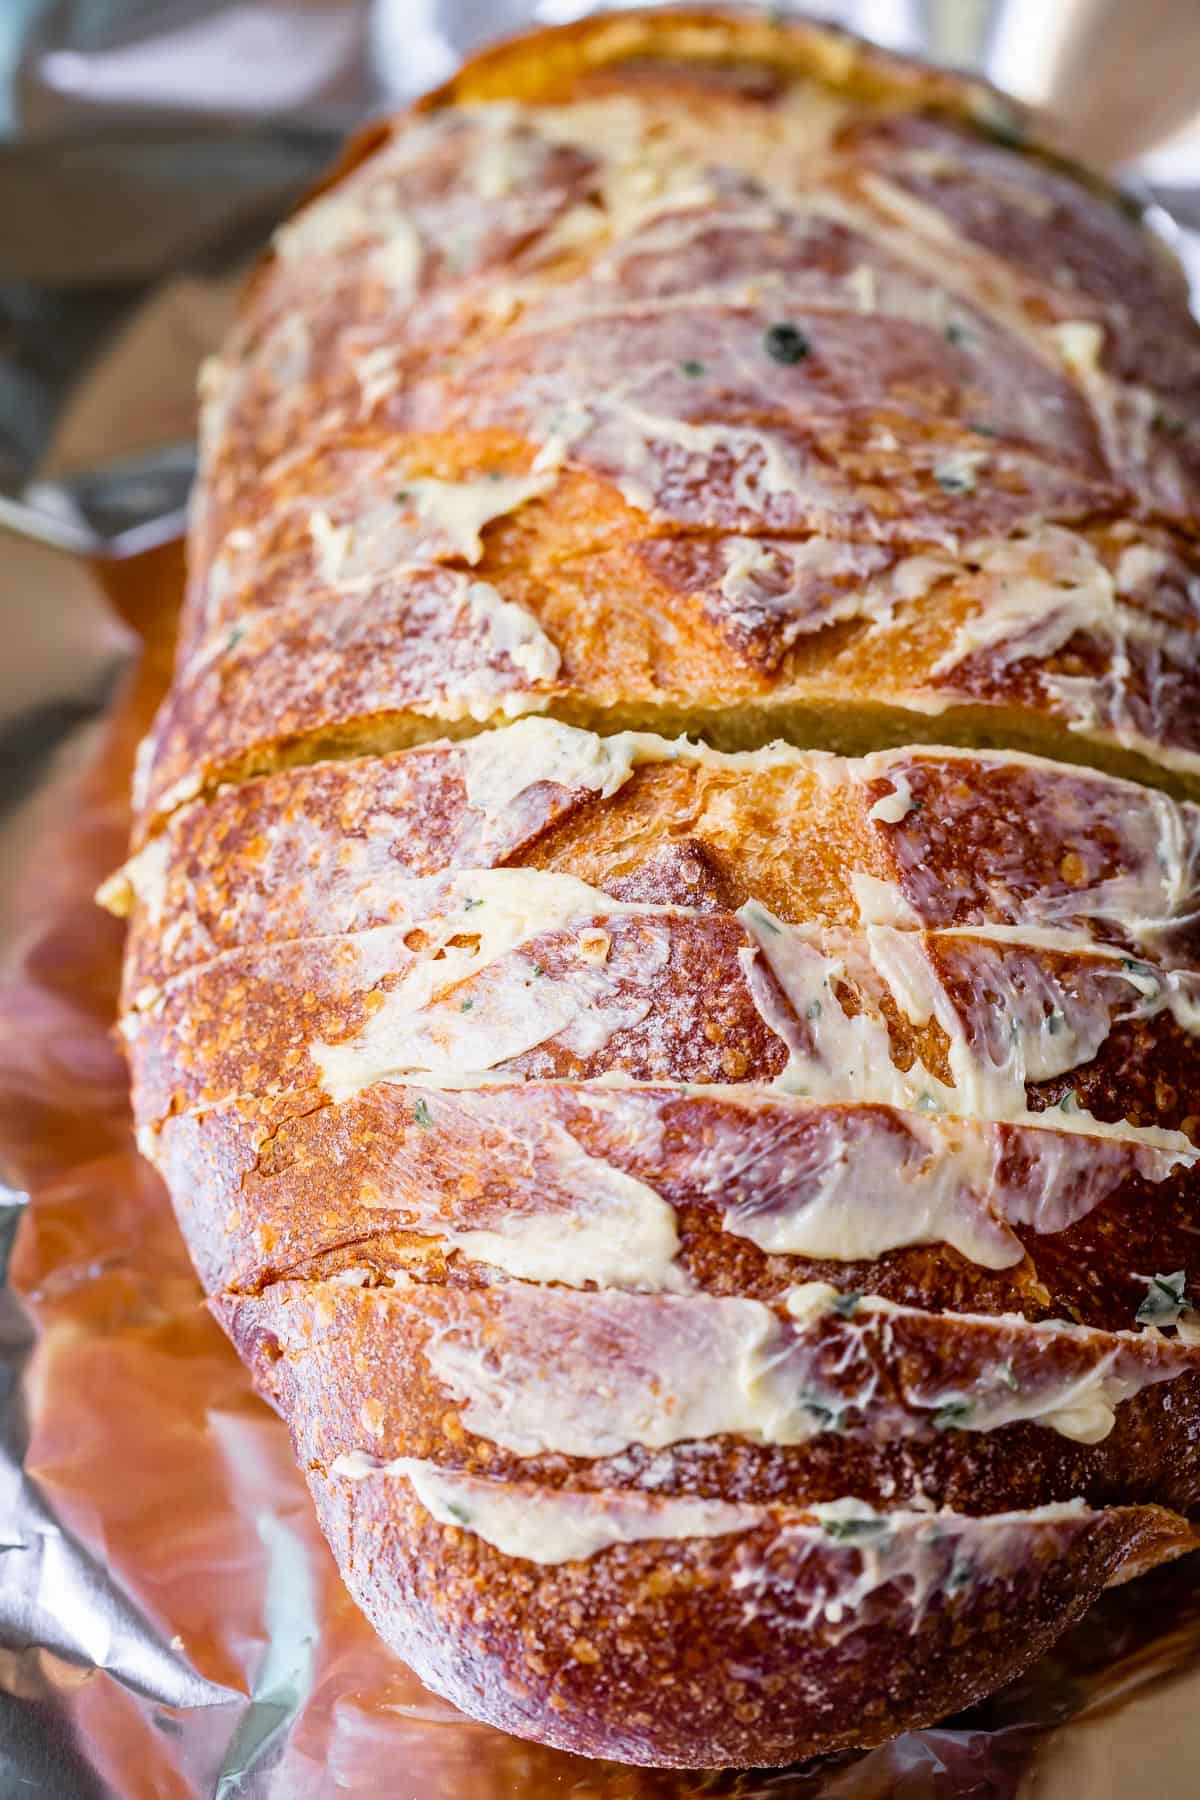
Slap that garlic butter on the bread.
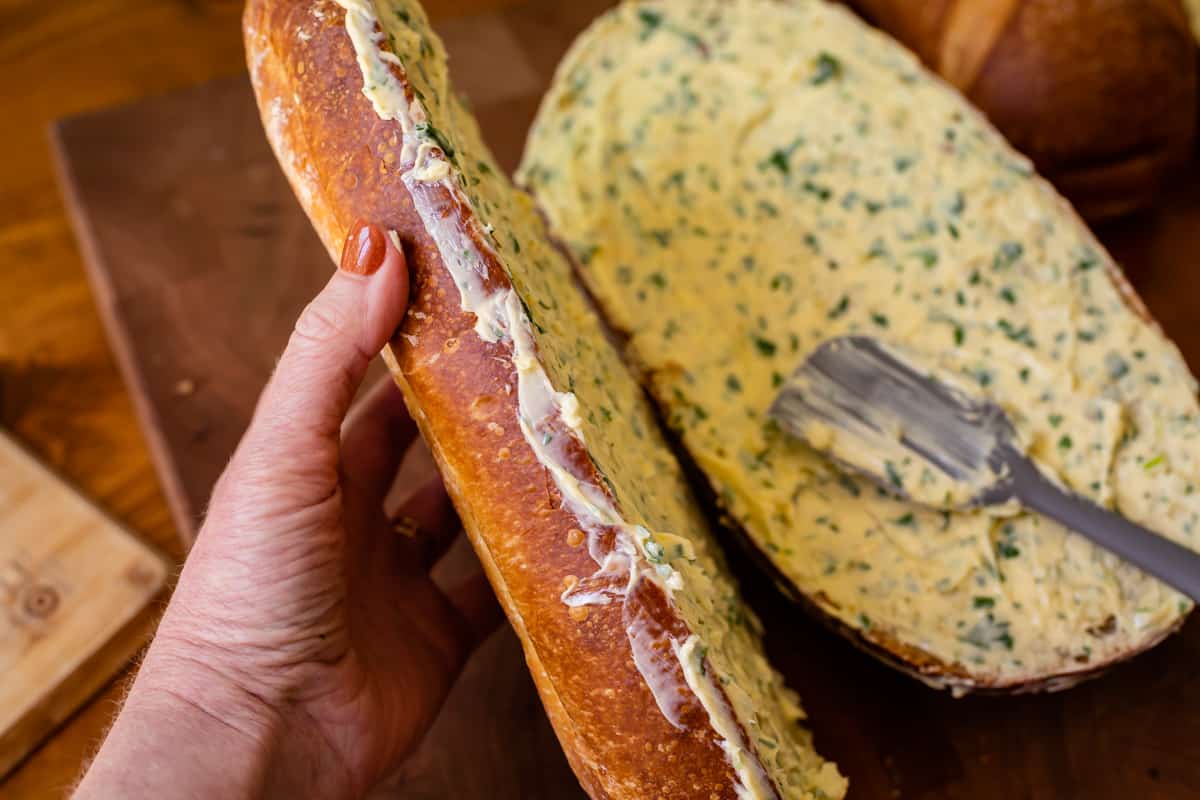
Not just on the top though, oh no. Take your inappropriate amount of butter and get the edges too, like so.
This is what I call No Corner Left Behind:
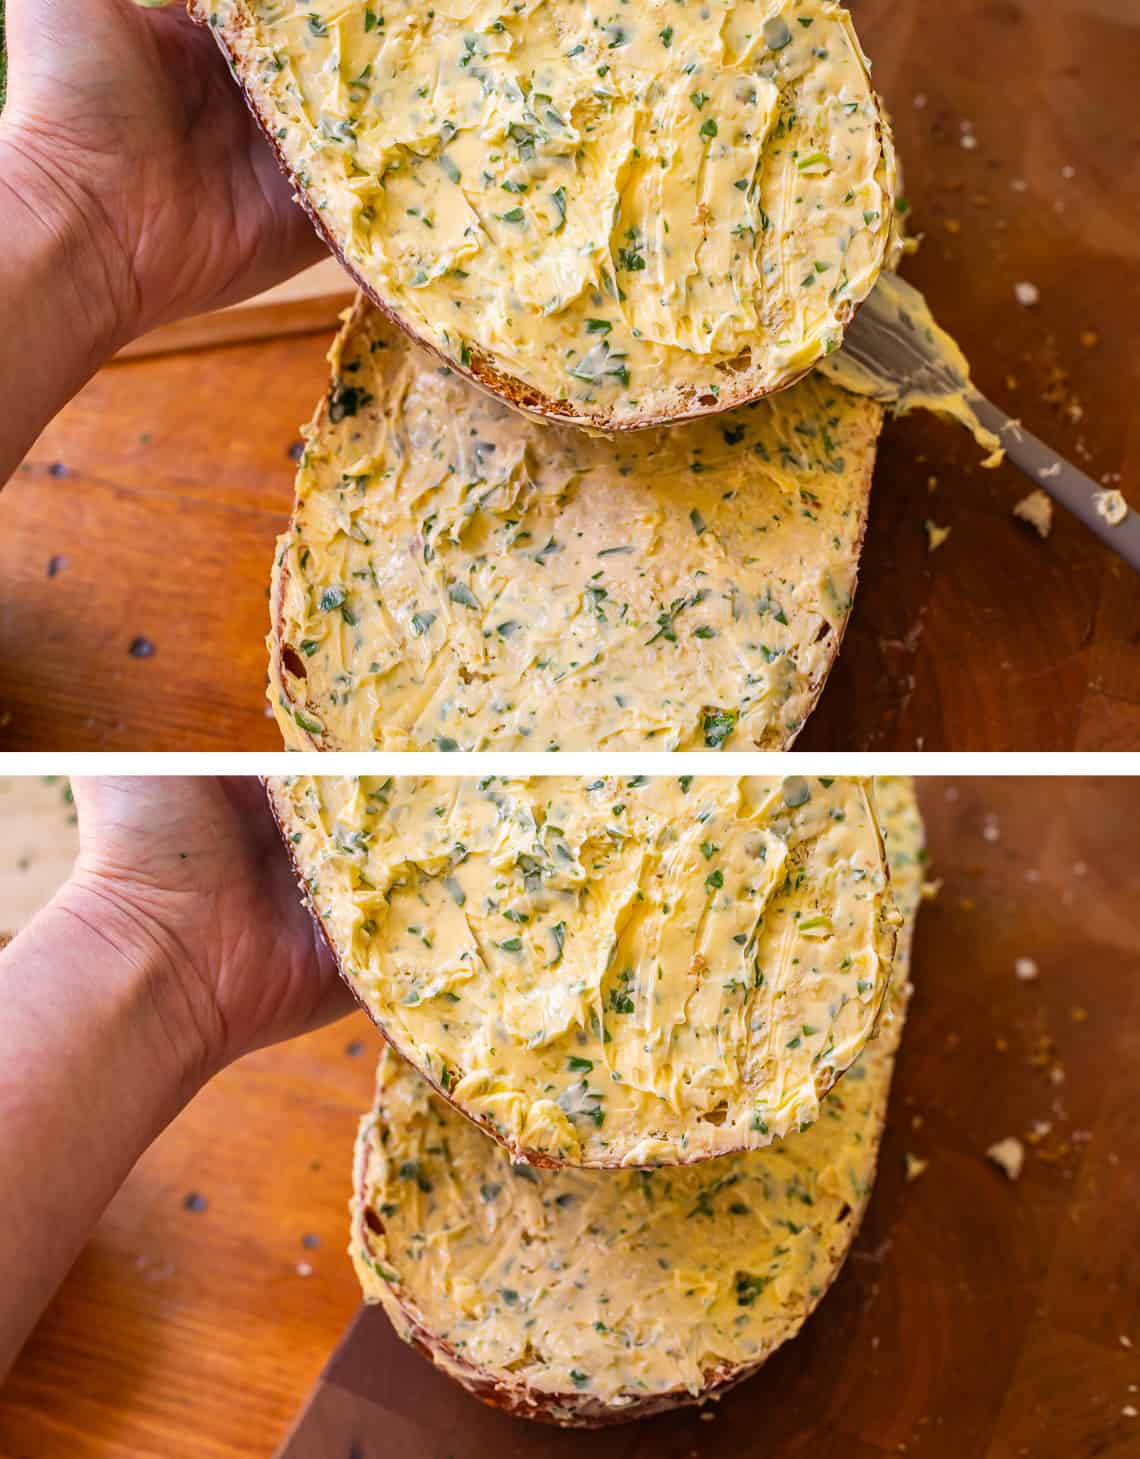
Do you see that sad sorry dried out spot? Don’t be like that. Give it some butterlove. You have to butter every single nook and cranny of this bread. We want super crunchy crispy craggy edges, and butter is how we get there.
I still remember a conversation between my brother and our cousin Tony when we were all pretty young kids. Tony was saying that no one knows how to make PB&J’s the right way except him. “People are always just slapping the peanut butter in the middle. You have to carefully spread to the very edge. My mom never gets it right.”
I’m trying to imagine how fast my eyes would pop out of my head if my ingrate 10-year-old complained about the way I made his sandwiches…but in this case, I have to say, you are very disrespectful, Tony, but you are also very right. SPREAD TO THE VERY EDGE Y’ALL. It matters.
(PS, Tony’s mom is Shirley, as in Aunt Shirley, the same blessed Shirley who gave us these Creamy Mashed Potatoes and the Famous Dinner Rolls. So I think we can forgive her if she didn’t spend more than about 5 seconds per sandwich as she tossed them out to her 6 children.)
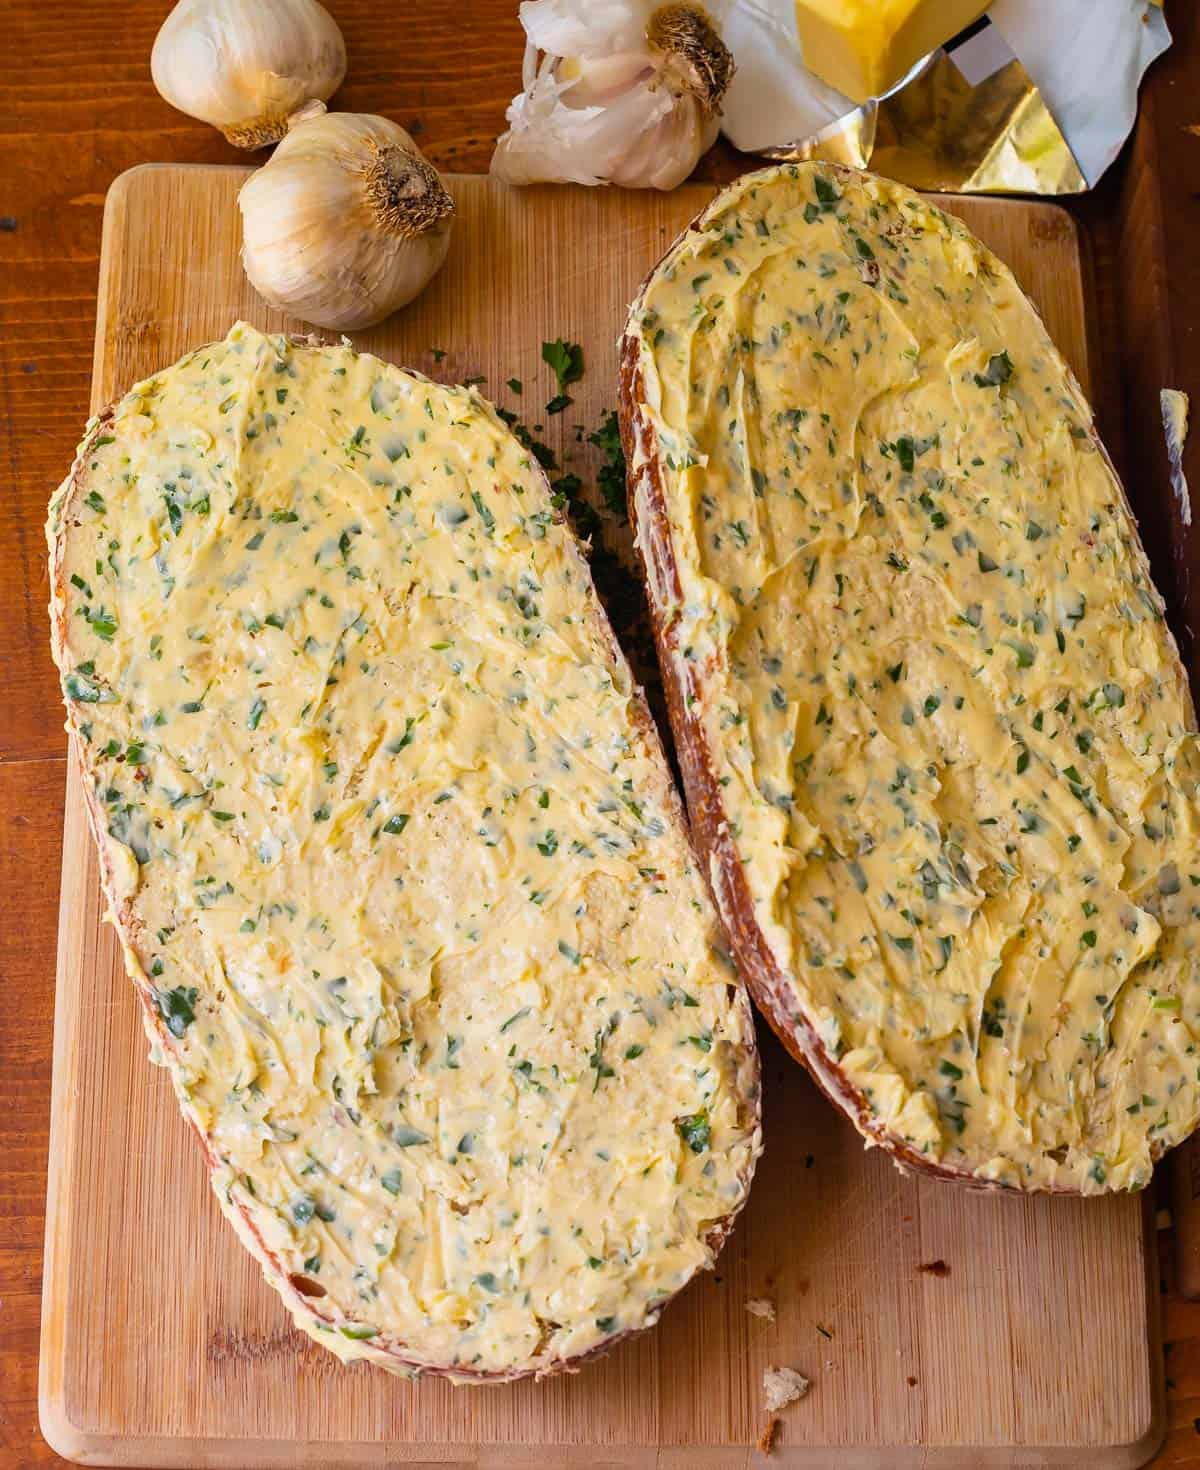
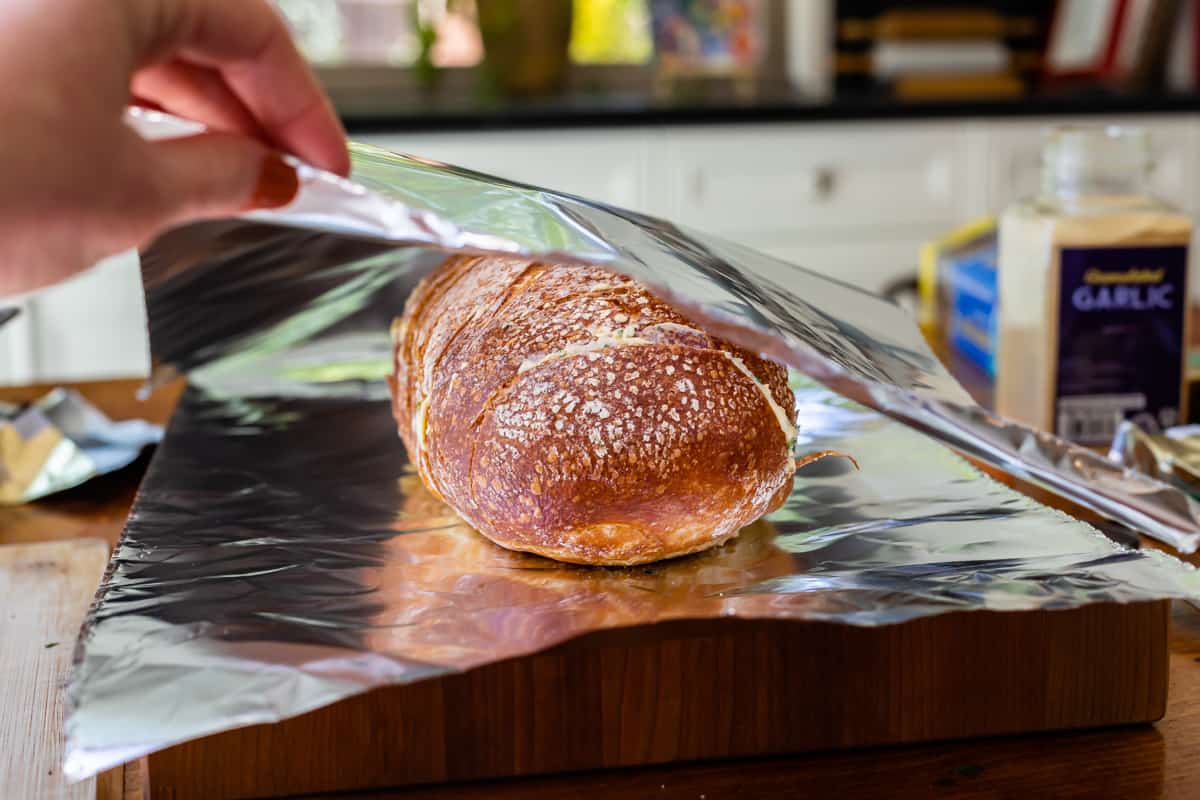
She’s all ready for the oven.
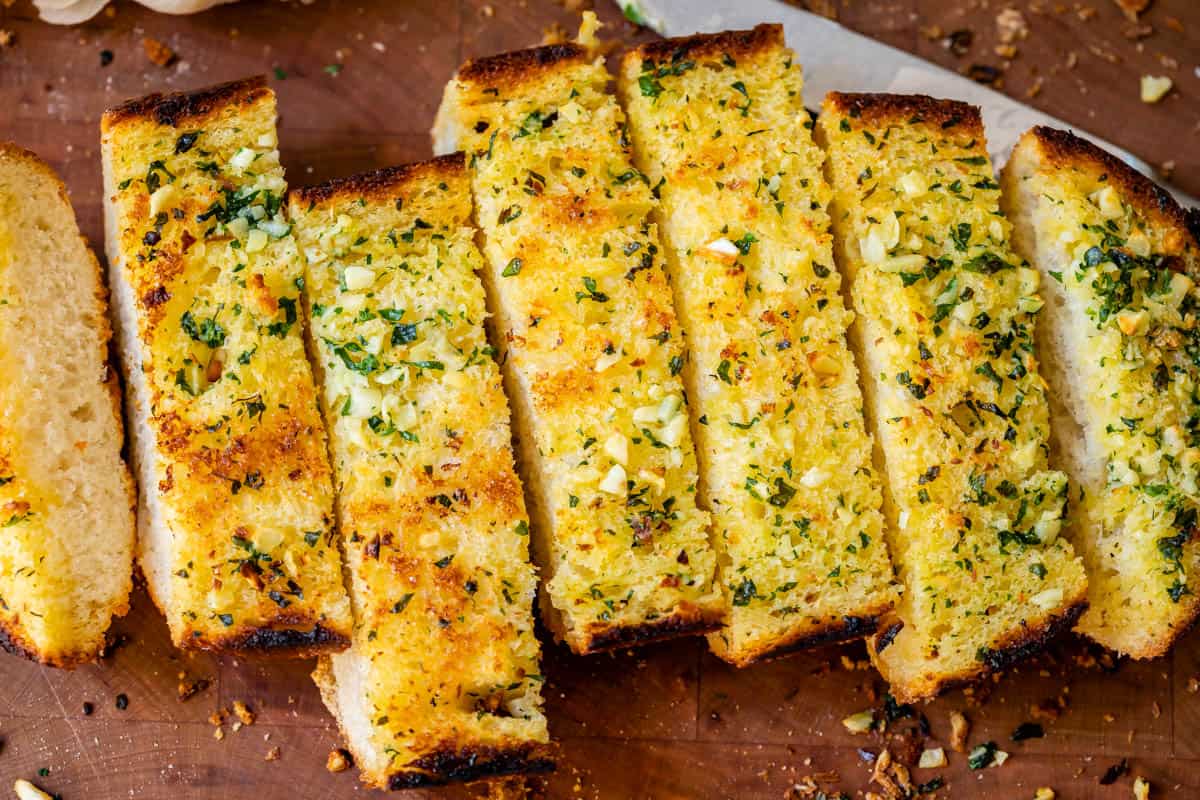
Bake at 350 for about 10 minutes, right on the pan, no foil. This is where the magic happens and the butter seeps throughout the bread. After 10 minutes, crank up the heat to broil and move the oven rack up to the top. Broil for 1-2 minutes (don’t walk away!) until the top is as crispy as you like it.
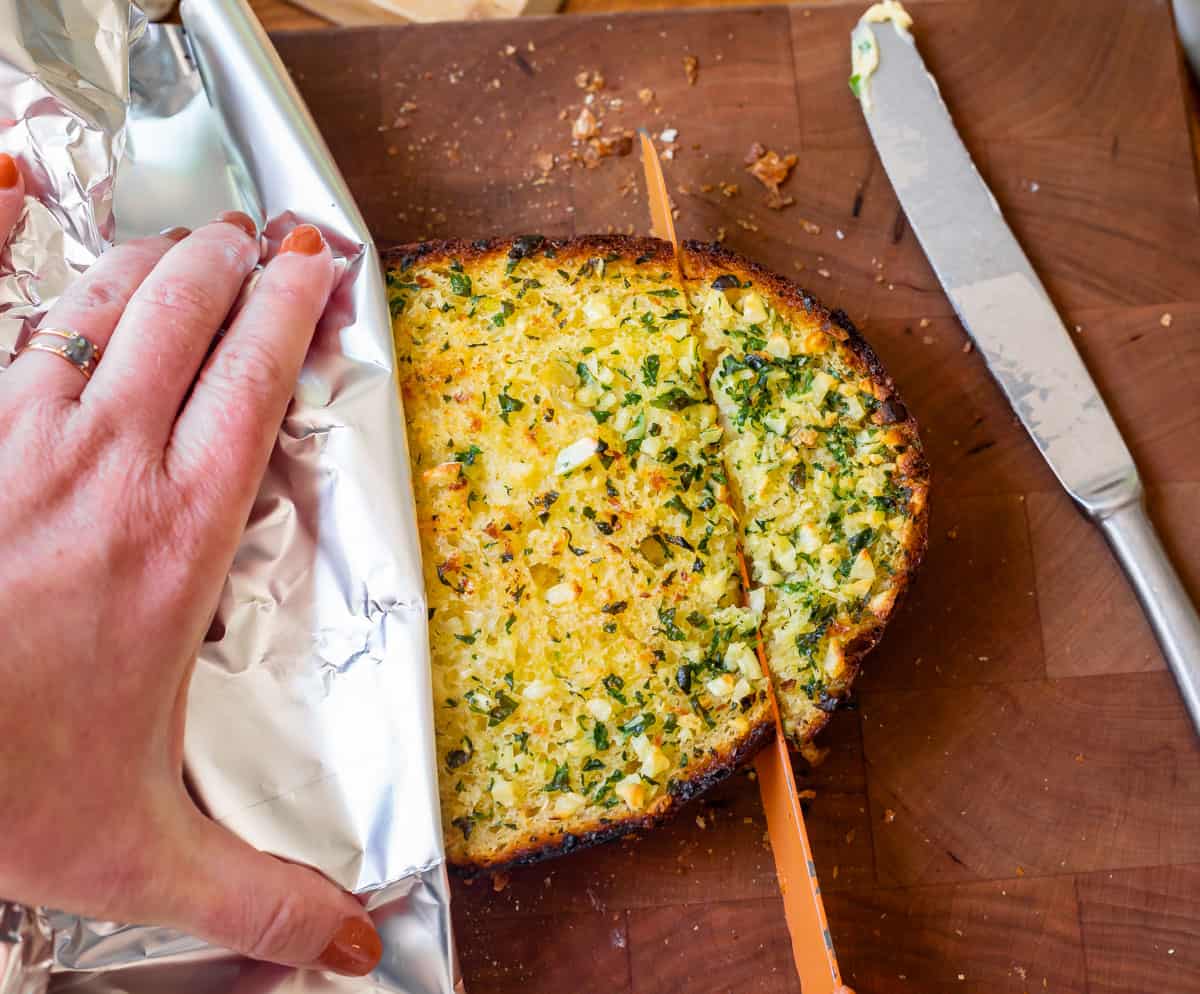
Remove the bread to a cutting board right away. I like to use a piece of foil to brace the bread while I slice with a serrated knife. Yes it’s hot, but I want to eat piping hot bread and so do you. Serve right away! (Or tent with foil and set back in the oven on the “Keep warm” setting if the rest of your dinner isn’t ready yet.)
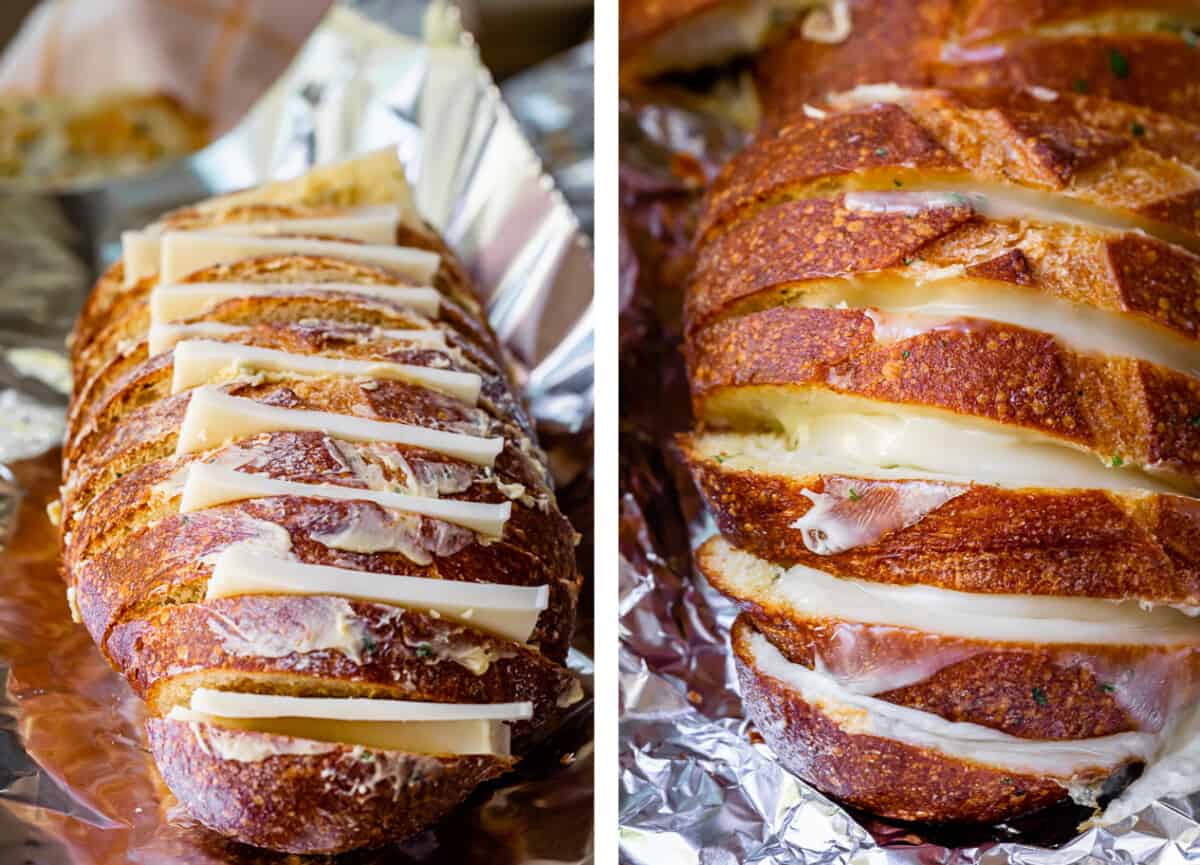
How to make soft and tender Garlic Butter Bread
Use a serrated knife to slice your loaf of bread into 1 inch thick slices, all the way through the bottom of the bread. Keep them lined up; we are reshaping the bread into a loaf later.
Spread the garlic butter on one side of each slice of bread (I actually tried buttering both sides of each slice of bread; it was too much, which is saying something because I tend to be that person who’s like LET’S DO MORE.)
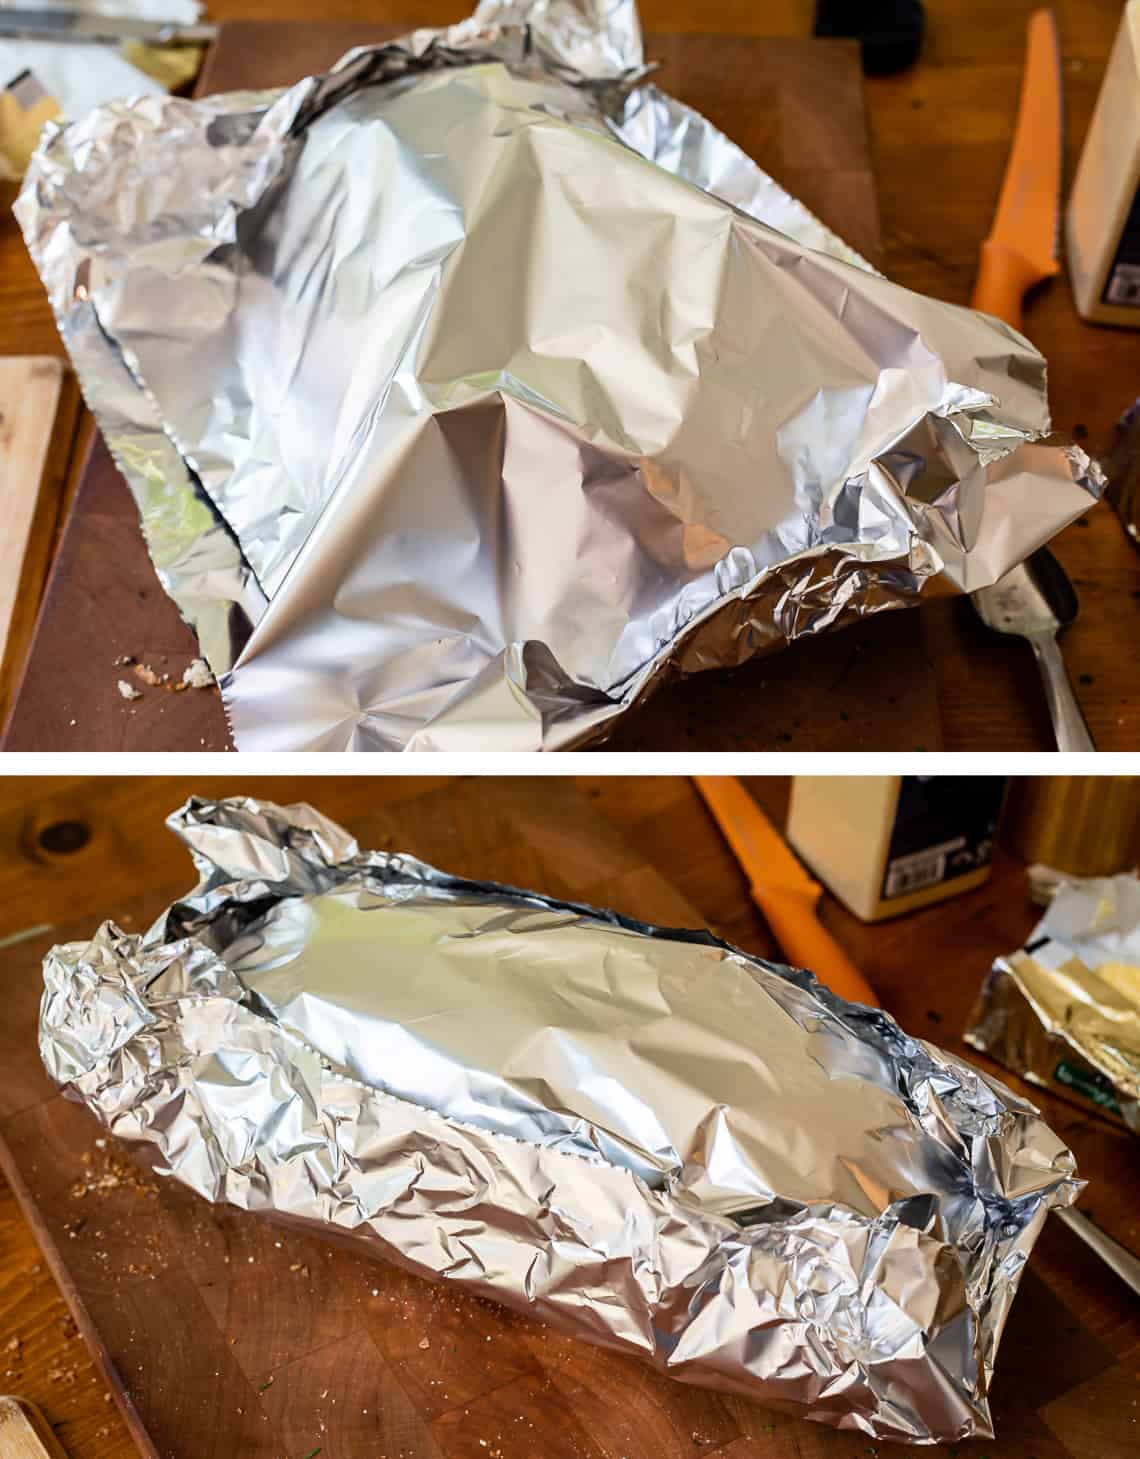
Lay out a large sheet of foil and arrange your sliced and buttered bread back into its loaf shape; each slice should be upright. If you have any extra butter, spread it right on top of the reshaped loaf.
Place another sheet of foil over the top of the bread
Press the foil together and then fold it up to seal, like so:
Bake on a sheet pan at 350 for about 15 minutes, until the butter is melted.
This bread is quite soft and buttery, so if you want to crisp it up just a tiny bit, unwrap the top of the foil toward the last couple minutes of cook time. Serve hot!
How to make Homemade Garlic Bread last minute
Sometimes garlic bread is a decision made in the last 4 minutes before we are supposed to eat. When that is the case, I choose this fast and easy method.
Cut the bread on a bias into 1-inch slices. Add in a single layer to a sheet pan. Spread the top of each slice with the softened garlic butter. Bake at a higher temperature, 475. This will melt the butter and get them get them nice and toasty really quickly.
That’s it! It gets the job done quick!
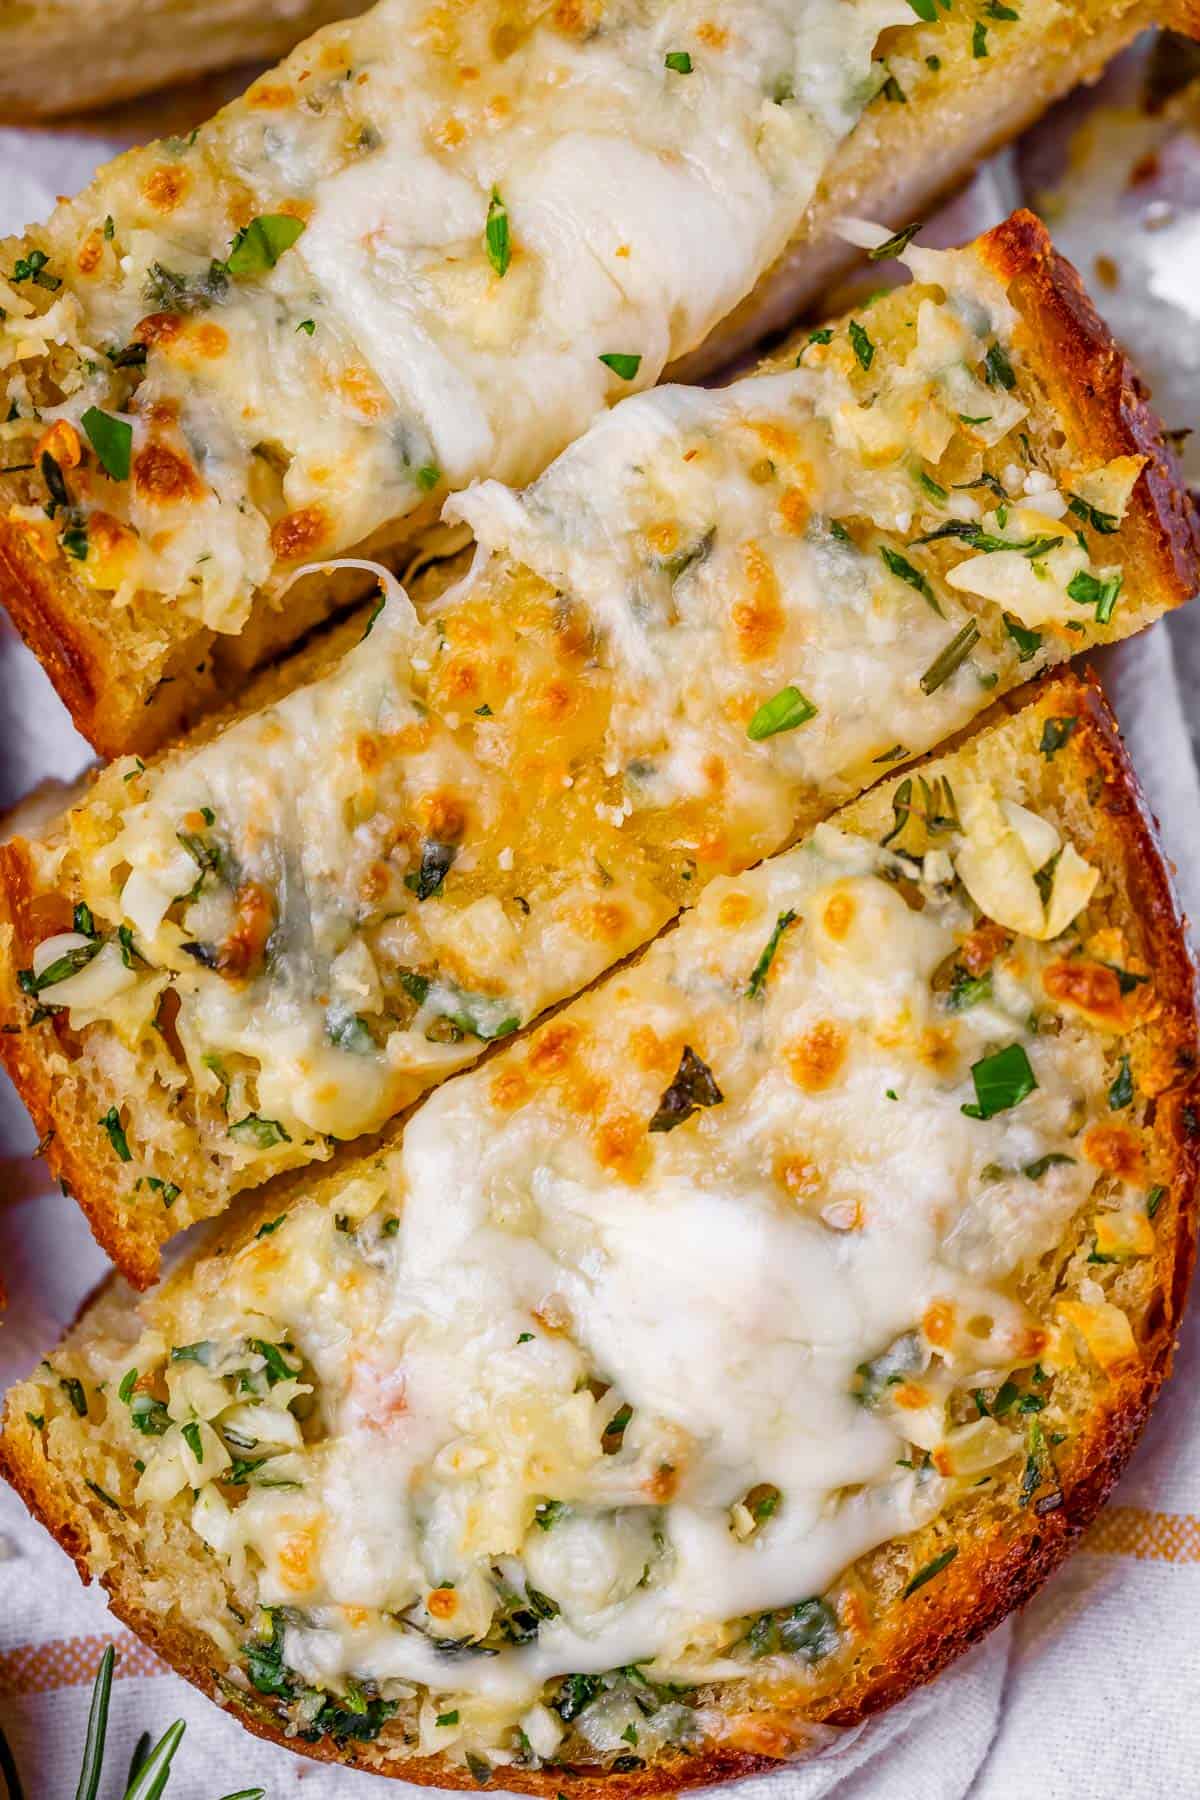
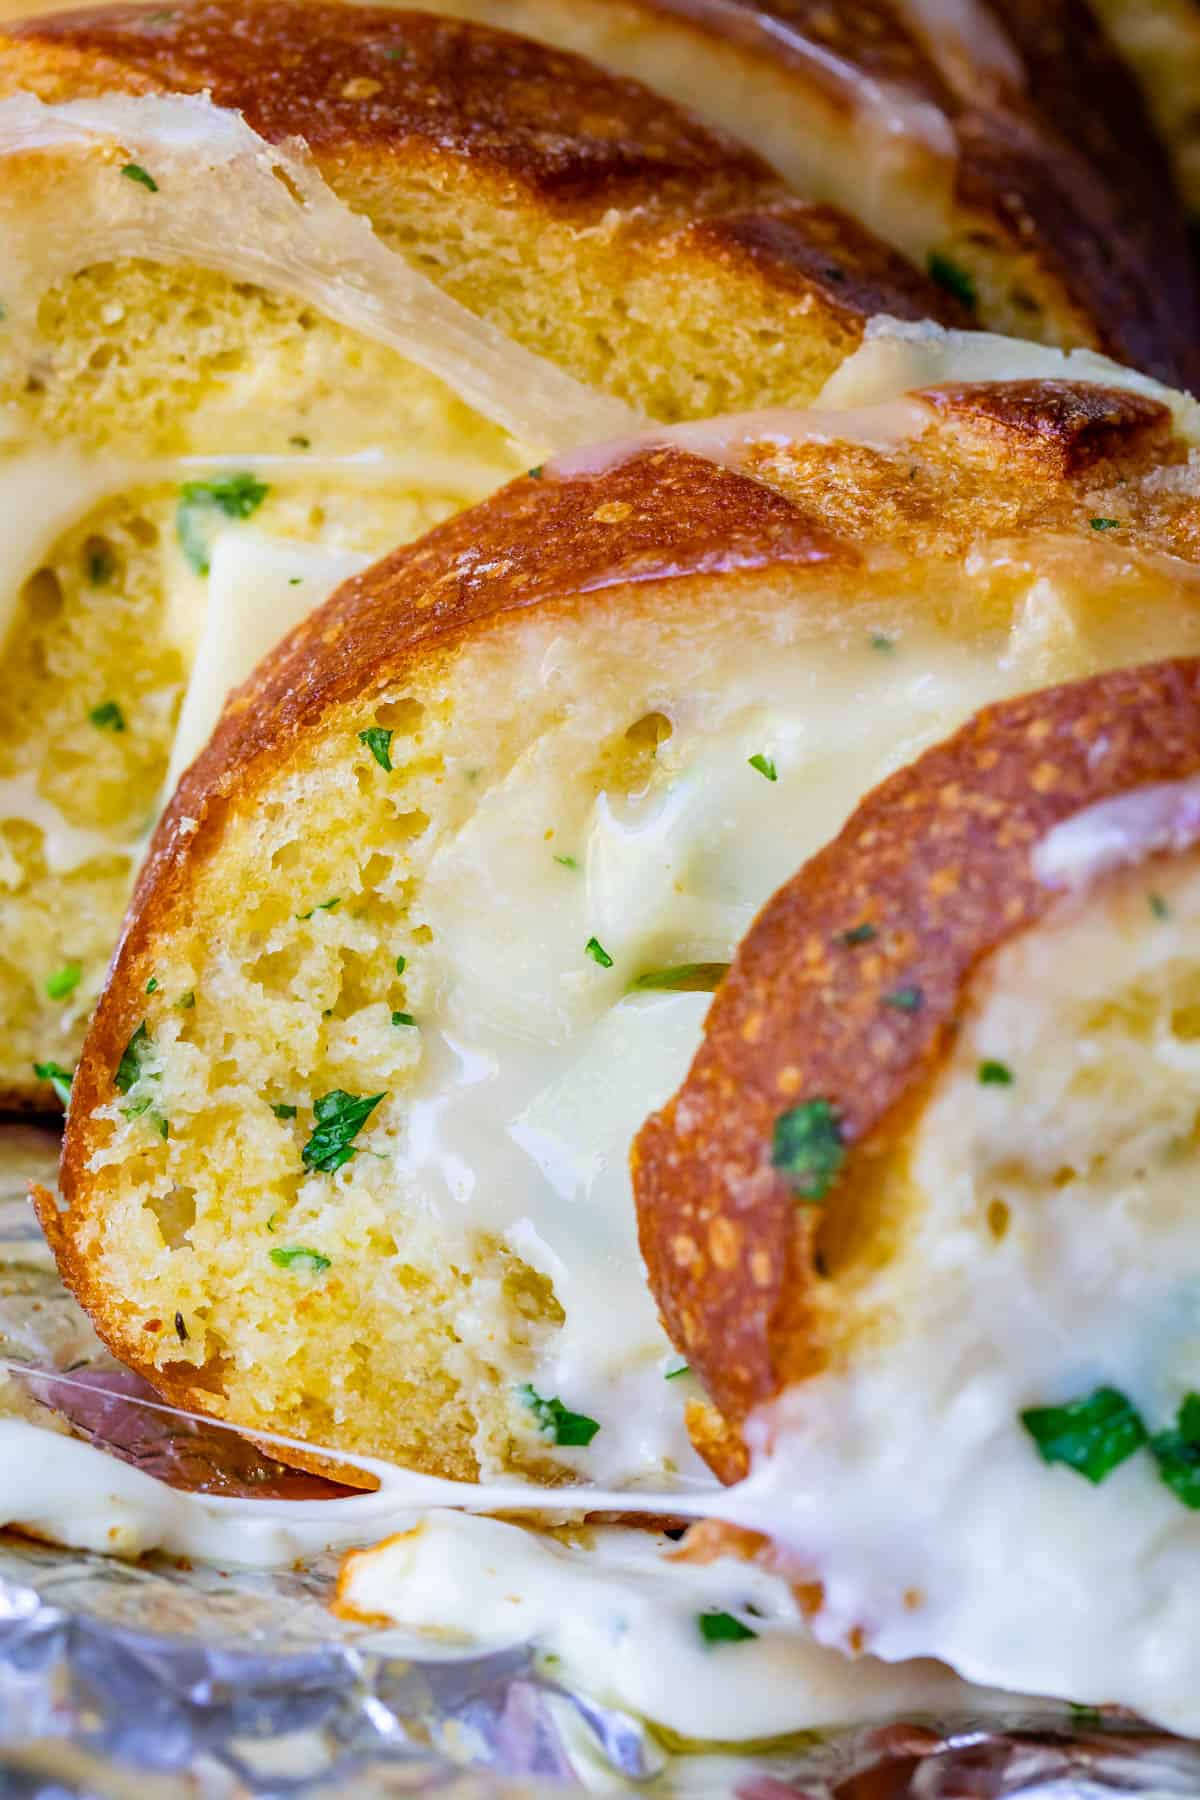
Make this Homemade Garlic Bread Recipe CHEESY
You thought we were done? It ain’t over til the cheese comes home.
Cheesy garlic bread is the only way to make garlic bread even better than it already is.
I love the flavor of Parmesan but it doesn’t melt well. So hide it under a layer of mozzarella and you get the flavor without the weird crackly parmesan melt. Or skip the parm altogether and just use mozzarella, up to you.
For Crispy Garlic Bread, add the cheese right before broiling. Broil for 1-3 minutes until the cheese starts to brown. Something like this:
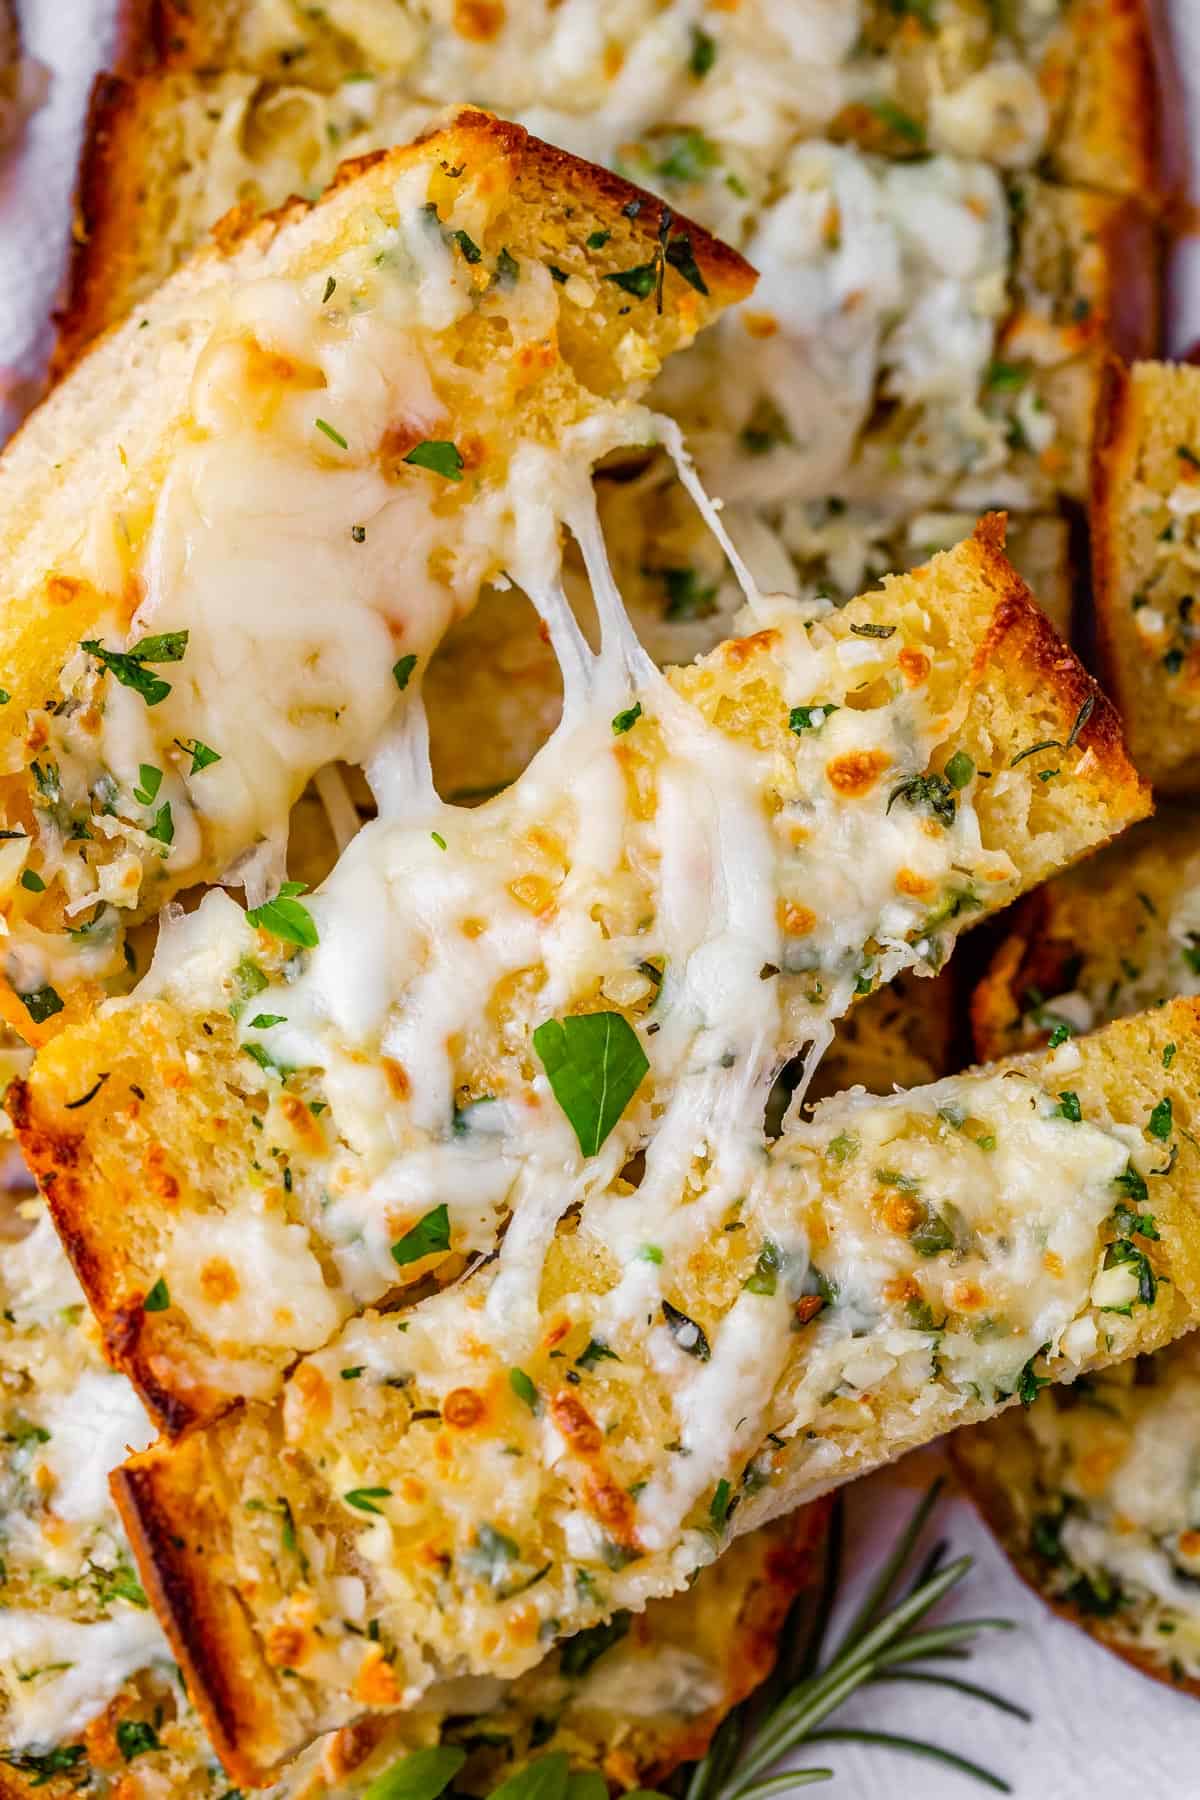
For Soft Garlic Bread, mix grated parmesan into the garlic butter before spreading on the bread. If you want EXTRA cheesy bread, add a slice of mozzarella cheese in between each slice of bread, wrap in foil, and bake as directed.
This is like, ULTRA cheesy, so prepare yourself.
For Fast Garlic Bread, sprinkle the cheese on each slice before baking at 475.
How long to bake Garlic Bread in Oven
It depends on your method!
- If you are going for crispy-edge garlic bread, you need 10 minutes to heat it through, then 1-2 minutes under the broiler.
- If you want soft garlic bread, wrap it in foil; it will take about 15 minutes to get all the butter inside melted.
- If you want lightning fast garlic bread, slice the bread before baking, spread slices in a single layer on a baking sheet, top each slice with the garlic butter mixture, and bake at 425 for about 3-5 minutes until toasted.
3 tips for the best Homemade Garlic Bread
- Use more butter than you think you ought to, and soften it, no melting plz
- Don’t over bake; read all the tips about when/how to use foil to achieve shatteringly crispy – OR – soft and tender garlic bread.
- Always include high quality garlic powder, even if you’re also using fresh garlic
I do not insist on using real, fresh garlic for my garlic bread. Don’t get me wrong, I love me some real deal garlic, but sometimes on a weeknight if you ask me to smash and peel and mince 5 cloves of real garlic I will punch you in the face. Just kidding. For real though, I think good quality garlic powder does a knock out job for garlic bread.
You can tell a garlic powder is high quality by how it looks. The kind at Costco that I buy is actually called “granulated garlic” and you can indeed see little granules. It should be golden yellow. If it looks like a bottle of white chalk dust, don’t you dare.
What to serve with this Garlic Bread Recipe
What can you NOT serve with garlic bread? I mean let’s be real. Anything with a good sauce to mop up is a great place to start:
- Easy Spaghetti Sauce Recipe (30 minutes) >> Easy Spaghetti, easy garlic bread, and Caesar salad is a total staple around our house!
- This Bolognese Sauce will Knock Your Socks Off >> The heartier, more depth of flavor version of spaghetti sauce and SO worth it if you want to knock someone’s socks off.
- Killer Homemade Lasagna Recipe >> Sop up all that extra sauce with your garlic bread. YUM.
- Best Chicken Alfredo Recipe >> Garlic bread with Chicken Alfredo is like peas & carrots or pb & j.
- Laura’s Tomato Bisque Soup >> the MOTHER of all tomato soups and just begging for some buttery, garlicky goodness
- Minestrone with Sausage and Pesto (Stovetop or Slow Cooker) >> Such a delicious, hearty soup.
- Pan Seared Sea Scallops with Sauce >> Tender, buttery scallops in a creamy wine sauce would be perfect alongside some garlic bread.
- The Best Baked Ziti >> This feeds a HUGE crowd and is all things cheesy goodness.
- Easy Slow Cooker Chicken Stroganoff >> Creamy noodles and chicken? Yes please!
- French Onion Soup >> Flavors of the Kitchen
How to store Garlic Butter Bread
Your leftovers are best stored in a sealed container (or even a ziplock bag). Don’t store it in the refrigerator unless you like dried out, stale bread (ew). It will keep for about 3-4 days, but my family tends to consume garlic bread like a vacuum so it never lasts that long around here. To reheat, especially if it’s a whole loaf or most of a loaf, wrap in foil and bake at 350 for about 15 minutes until warmed all the way through. If you want the outside to be extra crunchy, take the foil off the last few minutes.
A large air fryer would also work (shorten the time by a few minutes). You can also toast one piece or two at a time (will make it toasty rather than soft in the middle). Use a microwave if you must; but your bread will become unpleasantly tough after just a short time. Don’t heat longer than 8-10 seconds.
Can you freeze Garlic Butter Bread?
Oh but can you!! I have so much garlic bread in my freezer right now you would not even believe!
You can freeze a prepared and unbaked loaf, or an already baked loaf. Either way, make sure the bread is not warm and then place in a large freezer ziplock bag (I love these 2 gallon ziplocks) and try to seal it with as little air in the bag as possible.
You can also double wrap with foil and then plastic wrap if you don’t have a big enough freezer bag. When you’re ready to eat, you can bake it straight from frozen at 350 for about 15-25 minutes. Be sure to remove any plastic before baking and only leave the foil on!
In my opinion, the best kind of bread to use is French Bread. I like to buy the Country French bread from Costco, but you can also try your hand at this Homemade French Bread (only takes one hour to make)! Really, any good quality bread of your liking – like sourdough, ciabatta, or even texas toast will work.
It depends on which method you choose for preparing your loaf, but in general you should plan to bake your garlic bread for about 10-15 minutes at 350 degrees F. I share three methods in this post: soft sliced loaf at 15 minutes, crusty loaf at 12-13 minutes, and a quick weeknight version at 4-7 minutes. If you add cheese, you’ll need to plan for extra time for any of those versions.
Wrap your leftovers in foil and bake at 350 for 15 minutes until warmed all the way through. If you want the outside to be extra crunchy, take the foil off the last few minutes. A large air fryer would also work (shorten the time by a few minutes). You can also toast one piece or two at a time (will make it toasty rather than soft in the middle). A last resort would be in the microwave for about 10 seconds, but it will make the bread a bit tough.
Healthy for your soul? Yes! For your body… well, all things in moderation I say. I mean garlic bread is basically bread with lots of butter that happens to have garlic and other spices in it. So, if you watch your carbs, fat intake, or overall calorie intake you’ll need to decide for yourself just how much you can have!
Turns out, the American idea of garlic bread is just that… an American idea! Bruschetta is a distant relative, but you can thank early Italian-American immigrants for this glorious buttery tradition. Early immigrants were sometimes called “garlic eaters” or said to be wearing “Italian perfume” since garlic was so ubiquitous (and pungent) in Southern Italian cooking. I think Italians took the attempted insult as a challenge and rolled with it, throwing garlic even on top of their bread. Take that, haters! Garlic for liiiiife.
Both! Garlic powder has a lot of concentrated flavor, but you also need fresh garlic for texture and that indescribably good intensity. See the recipe card for amounts!
More like this Homemade Garlic Bread Recipe
- Quick and Easy French Bread Recipe >> So fast, and a great start for garlic bread if you want all homemade!
- Garlic Knots Recipe >> Similar garlicky goodness, but in knotted-roll format
- Garlic and Rosemary Skillet Bread >> Kind of like a pan pizza version of garlic bread. It’s amazing!
- Olive Garden Breadsticks >> Pretty sure I could eat my weight in breadsticks.
- Big Fat Crescent Rolls, yeah >> They are big. They are fat. They’re the BEST crescent rolls of your life.
- Cheddar Biscuits >> these taste just like the ones from Red Lobster..maybe better.
- Flaky Buttermilk Biscuits From Scratch >> It’s hard to beat a super flaky-yet-tender biscuit.
- Samoan Coconut Rolls (Pani Popo) >> Have you even lived if you haven’t let your dinner rolls cook in a bath of coconut milk.
- Texas Toast >> Farmgirl’s Dabbles
- Focaccia >> Once Upon a Chef
Facebook | Pinterest | Instagram
Homemade Garlic Bread Recipe
Ingredients
- 1 (16-oz) loaf of French bread
- 3/4 cup salted butter, (1 & 1/2 sticks), softened
- 1/8 teaspoon kosher salt
- 1/4 teaspoon garlic powder*, high quality, see notes
- 5-6 cloves fresh garlic*, about 3 tablespoons, see notes
- 1 teaspoon fresh rosemary, minced, optional
- 1 teaspoon fresh thyme, optional
- 2 tablespoons fresh parsley, chopped fine, optional
For cheesy garlic bread (optional)
- 1/2 cup shredded parmesan cheese
- 1 cup shredded mozzarella cheese, or 8 ounces sliced mozzarella
Instructions
Make the garlic butter
- Add 3/4 cup butter to a small bowl. Let soften to room temperature, or speed it up by microwaving it in 30 second increments at a low power level (I used power level 2). It's ok if a little bit of the butter starts to melt, don't stress. But try to make the bulk of it softened and not melted.
- Add 1/8 teaspoon salt and 1/4 teaspoon garlic powder* to the bowl. If you are using UNSALTED butter, triple the salt. (If you only have table salt, go easy.)
- Mince the garlic.* Use the side of your chef's knife to smash 5-6 cloves of garlic. Peel the papery stuff off, then mince the garlic finely. Add to the bowl with the softened butter.
- Optional: Add fresh herbs. Finely mince 1 teaspoon rosemary, 1 teaspoon thyme and 2 tablespoons parsley. I just made up all those measurements. Add in whatever your heart tells you. You can use just one or all these herbs. This combo is my favorite!
- Use a spatula to mix the butter and garlic and the rest all together. Choose one of the following methods for making your garlic bread:
Crispy-Edge Garlic bread (my fav)
- Preheat your oven to 350 degrees F.
- Use a serrated knife to cut your loaf of bread in half the long way.
- Use the spatula to spread all the garlic butter on the inside of the cut loaf. It might feel like too much. Add it all anyway. Make sure you coat the edges of the bread, even the top edges of the side of the bread.
- Place each loaf half on a sturdy baking sheet that can handle high temperatures.
- Bake at 350 for 10 minutes until heated through and the butter is all melted.
- Turn your broiler on to high heat. Take out the bread and move your oven rack up to the highest it can go, then return the pan to the oven. Set a timer for 1 minute and do not walk away. Take the bread out when the top is as toasty as you like. Don't burn it! Also, burned bread tastes ok, but burned garlic does not taste okay. TOASTY, yes. Burned, no. So be careful.
- Cheese option: Right before you broil, sprinkle the top of the loaves with 1/2 cup parmesan and 1 cup shredded mozzarella. Broil until the edges are crispy and the cheese starts to turn golden, 1-3 minutes, don't walk away!
- Let cool for a hot minute before slicing and serving. Use foil to hold the bread so you don't burn your hand. I like to serve the slices in a tea-towel lined bread basket or bowl.
Soft Garlic Bread
- Preheat your oven to 350 degrees F.
- Cut your loaf of bread into about 1 inch slices.** Spread the garlic butter on one side of each slice. Use all of it!
- Lay out a large piece of foil and place all the buttered bread on the foil, reshaped back into a loaf. (Each slice of bread should be standing on its edge.) Lay another piece of foil on top of the loaf. Press the foil together and fold the edges up. See photos.
- Place the foil-wrapped loaf on a sturdy baking sheet and bake at 350 for about 15 minutes until the butter is all melted. Serve hot!
- Cheese option: Stir 1/4 or 1/2 cup shredded parmesan into your garlic butter before spreading it on the bread. Then slice about 8 ounces of mozzarella cheese and layer it in between each slice of bread. Spray your foil with nonstick spray so it doesn't stick, and wrap as directed. Bake for about 20 minutes at 325. (You need a lower temperature for a longer time to help the cheese melt.)
Fast Garlic bread
- Preheat your oven to 425 degrees F.
- Slice your loaf of bread into 1 inch slices, cut on a bias, and spread them out in a single layer on one or two sturdy baking sheets. Spread each slice with the softened garlic butter.
- Bake at 425 for about 3-7 minutes, depending on how crispy you want it.
- Cheese option: Once the butter is melted, remove the bread from the oven and sprinkle 1/2 cup parmesan and 1 cup mozzarella over all the slices of bread. Turn the broiler up to high heat, and return to the oven for 1-2 minutes until the cheese is melted. Don't walk away from your oven when the broiler is on! Set a timer!


Can you prepare this earlier in the day and then bake later?
Hi Stacy, yes, you definitely can! Just keep it in the fridge until you’re ready to bake it. Enjoy!
I think Tony showed zero disrespect. He obviously thinks seriously about his peanut butter. I never had convictions like that when I was his age.
I have to say, you may be right Sal. Peanut Butter convictions can carry you through in life, really.
You are missing the upper echelon levels of garlic bread:
1) For crisp top garlic bread, when the bread is pulled from the oven, rub nice fresh raw organic garlic cloves all over the top of the bread. The garlic melts right into the bread. No smashing or mincing required. You can’t beat this for the best garlic bread.
2) Have homemade toum (Lebanese garlic sauce) on the side to dip the bread in. It’s like eating a garlic cloud.
Then you’ll be in absolute garlic heaven. With multiple forms creating complexity and depth in flavor profiles, texture, aromatics and taste experiences.
doesnt look nearly as good as yours. maybe this would have gone better for me if id not used a stone pan. it was only crispy on top. it had decent flavor. i did the most basic version you can have- none of the optional ingredients were added. our broiler (on a cheap oven) apparently sucks so it only really toasted the center third of the bread halves. i worked with it though. it was pretty good but im disappointed by what went wrong on my own end that made these not as good as id hoped.
Karen, You have never disappointed me! I always look forward to your emails and new recipes!
I was wondering if you have a great recipe for Blueberry Scones! I’m having a lot of house guests over the holidays and would like to make really great Scones for breakfast!!!
Hi Patricia! Thank you so much for reaching out, I love hearing this! It’s what keeps me going :) I DO have a scone recipe I love – it’s a master Scone Recipe that you can decide what to mix in, blueberries are a great option. You could also add some lemon zest if you want to take it in the light and bright direction. I hope you enjoy! I’d love to see it if you make them, snap a picture! 💕
I tried the crispy edge garlic bread, did the 10 minutes at 350 then turned it up to broil but didn’t even move the oven rack, checked on it not even 1 minute later and it was COMPLETELY burnt, thanks for that stupid suggestion and ruining my garlic bread.
Hi Ryan, I’m so sorry this didn’t work out for you! Every oven is different and broiling is always a risk, you have to watch it! When I broil, I set a timer, even if it’s for 30 seconds. Either that or I stand by the oven and watch. I even leave the oven door open, you don’t need it shut for broiling. And even knowing all this I still have had to carry bread that is literally ON FIRE out of my house to the yard 😂
thanks i didnt know you can leave the oven door open for broiling.
Hello, last night made the crispy edge garlic bread. On hand thyme, curly parsley, hoagie rolls & rest of the recipe ingredients. It’s the best garlic bread I’ve made with the edges starting to char, yummy. Left over’s heated in the microwave for breakfast with eggs over easy. Your recipes are fantastic.
Thank you :)
Ooh leftovers with eggs over easy! I love this plan! Garlic bread for breakfast lunch and dinner please :) I’m so glad you loves it Barb, thank you so much for taking the time to comment!
YUMMY! I make this recipe and freeze it so it is available quickly. I did use 1/2 cup butter and 1/4 cup good olive oil, also thought I might try adding chopped kalamata olives. Great recipe other than just adding garlic. Air fryer sounds like a great idea. Guess I will have to break down and buy one. Just another electric kitchen appliance I won’t be able to live without!
I made the crispy edge with a loaf of french bread in the oven, following the recipe exactly except I realized that my garlic was growing (oops!) so I used the jarred minced garlic. I did use fresh herbs from my herb basket thing (hard to describe). It was AWESOME! Now, a big loaf of garlic bread is way too much for me, so I cut it into (large) servings, double wrapped in foil and put in a couple of freezer bags. Last weekend I pulled one serving out, put in the air fryer at 350 for the 10 minutes, then pulled out, took out of the foil & threw back in for a couple of minutes to crisp the edges back up. Just as great as the first day!
OOh love the air fryer hack Lynnette! That’s a great idea. Thank you for sharing! So glad it was a success, thank you for commenting!
For single people, couples, etc., a huge anything is *way* too much. So I develop air fryer leftover hacks since I even got my office to buy one for our lunches. :)
Karen,
This was everything you said! Absolutely awesome, after makeing this for dinner and loveing it I put the rest in a container, I woke up the next morning and my wife yells at me
“You idiot why did you make that bread” apparently she kept at it all night until it was all gone, she said she couldn’t stop eating it
Delicious!!!
Bahaha!! Okay this is exactly how I feel almost every time I make this after polishing off the last piece. “You idiot why did you make that bread” 😂😂😂 no regrets!!! so glad you guys loved it, thank you so much for taking the time to review!
AT LAST!! An easy, TENDER, soooo delicious garlic bread recipe! Everybody loved it! This is the ONLY recipe I am going to use going forward for a quick garlic bread. And I will be relishing the expressions and actions of family/friends in the future as they reach for it and fight over the extra pieces, haha! Guess I’ll have to make an extra loaf each time. Why haven’t more people tried and reviewed this recipe? Garlic Bread Lovers of America – MAKE THIS NOW!!
Making your family fight over food really is one of the most satisfying things, right Elizabeth?? So happy you had the satisfaction!! haha! I definitely think you should make the extra loaf next time 😂 Thank you so much for being one of the first to review, reviews are so important to us food bloggers! this recipe is still pretty new (couple weeks old) so that’s why there aren’t too many comments yet. Hopefully with your recommendation there will be more to come! 💕
YES!!!!!!
Ahaha I love this review Elizabeth!! 😂😂💕💕
How I wish Chip and I had been around for all this testing. I don’t even want to tell Chip we missed it all. So, so sad. . . . On the other hand! Can’t wait to eat it soon! Yummo 😋