


No, your scone is NOT supposed to be a sad dry heap of useless carbs! The best scones are crispy on the edges and tender in the middle. They are buttery, flaky, perfectly moist pieces of breakfast perfection that are surprisingly easy to make with a few tips. Don’t let the sad coffeehouse selections fool you into thinking you don’t like scones. You just haven’t tried this recipe yet! Originally posted February 13, 2012.

Table of Contents
- Homemade scones for the win!
- What is a scone?
- Scone ingredients
- How to make Scones
- Tips for making this scone recipe
- Mix-in ideas for this recipe for scones
- Savory scones recipe tip
- What is the difference between a scone and a biscuit?
- How to store scones
- Do scones freeze well?
- Can this scone recipe be made ahead of time?
- What to put on a scone:
- More recipes you are going to love!
- Best Recipe for Scones (Sweet or Savory) Recipe
My best friend Sarah just texted me: “It’s 7:15 am and both my dishwasher and washing machine are running, so I’m loving life right now. I’m just sitting on the couch listening to them and feeling so productive!”
You know how most people want quiet appliances? Like, the kind where you can’t even tell if the dishwasher is running? Not Sarah. She’s always talking about how when everything is running at once she feels like someone else is doing all the work for her. Like a regular old Rosey the Robot, from Jetsons. The future, guys: we have arrived.

Also, I just want to add a note that there has been literally no day in my life where both the washing machine and dishwasher were running by 7:15 am. Most days I’m barely crawling out of bed by then. Things have not changed since we were roommates in college and she would have to shove my piling laundry back on my side of the room with a broom handle. Sarah and I: the odd couple indeed!

Sarah and her family are in the middle of a transcontinental move right now. They are heading back to the States after a 3-year stint in Japan with the military. I can’t even tell you how excited I am to be back in the same time zone as my best friend! Even after 3 years, I still call her half the time and then hang up frantically when I realize it’s 4 am in Japan.

How is everyone holding up lately? I can’t believe July is over. Only one more month before school starts…except it’s not starting. Cue the tears.
Or how about we just bake away all our sorrows?? Scones for the win! If you are not feeling excited about the prospect of a freshly baked scone yet, it’s because you’ve never had a decent one. Curse you and your dried out baked goods, Starbucks! Ruining the reputation of classic British baked goods the world over!
I decided to make scones a few weeks ago when my friend Kim promised my 9-year-old daughter that she would throw an Anne of Green Gables watching party if Charlotte finished the book. Well, she finished the book and all 72 sequels after that, so an Anne party we had! (We even dyed our hair green. Just kidding.) What food could be more early-century Canadian than scones??

Homemade scones for the win!
A warm homemade scone spread with butter and jam is one of life’s greatest pleasures, but I didn’t always think so. Mostly because my mom never made scones growing up, so my only experience with them came from coffee shops. An already-bad scone that has been sitting in a glass display for 8 hours? I need a glass of milk just thinking about it.
The first time I had a truly amazing scone was when Eric and I went to High Tea at this fancy hotel in Victoria one time. They had the cucumber sandwiches and 3 tiered serving platter and everything. The scones were SO GOOD. Perfectly moist and tender on the inside, delightfully crispy on the edges, and full of buttery flavor. And topped with clotted cream and freshly made jam! Heaven!

What is a scone?
A scone is similar to a biscuit. It is a flaky dough made by cutting cold butter into flour and uses baking powder to rise. They can be sweet or savory. English scones are a little bit different (they are made with softened butter rather than cold butter, changing the texture.) Usually, they are shaped with round biscuit cutters instead of the triangle shape popular here in the US.

Scone ingredients
Here’s a quick list of what you’ll need to make these scones. Scroll down to the recipe card at the bottom of the post for more details!
- all purpose flour
- granulated sugar
- kosher salt
- baking powder
- butter
- egg
- vanilla extract
- heavy whipping cream
- sour cream
- cream cheese (optional)
- powdered sugar (for the glaze)
- milk (for the glaze)
How to make Scones
It’s true that scones are really easy to put together, but there are a few really important tips to follow if you want to avoid sad dry scones, or scones that end up cakey instead of flaky.
First put together all your dry ingredients: flour, sugar, salt, and baking powder.

Then use a pastry cutter (or a cheese grater!) to cut the cold, cold butter into the flour.

Next pour in the wet ingredients: egg, vanilla, cream, sour cream. Stir it together into a shaggy dough and then switch to using your hands, making sure to coat them with flour first. Use your hands to fold the dough on top of itself in layers until it comes together. Try to use as few strokes as possible.

Fold in mix-ins if you like (it’s not necessary), and pat into a circle.
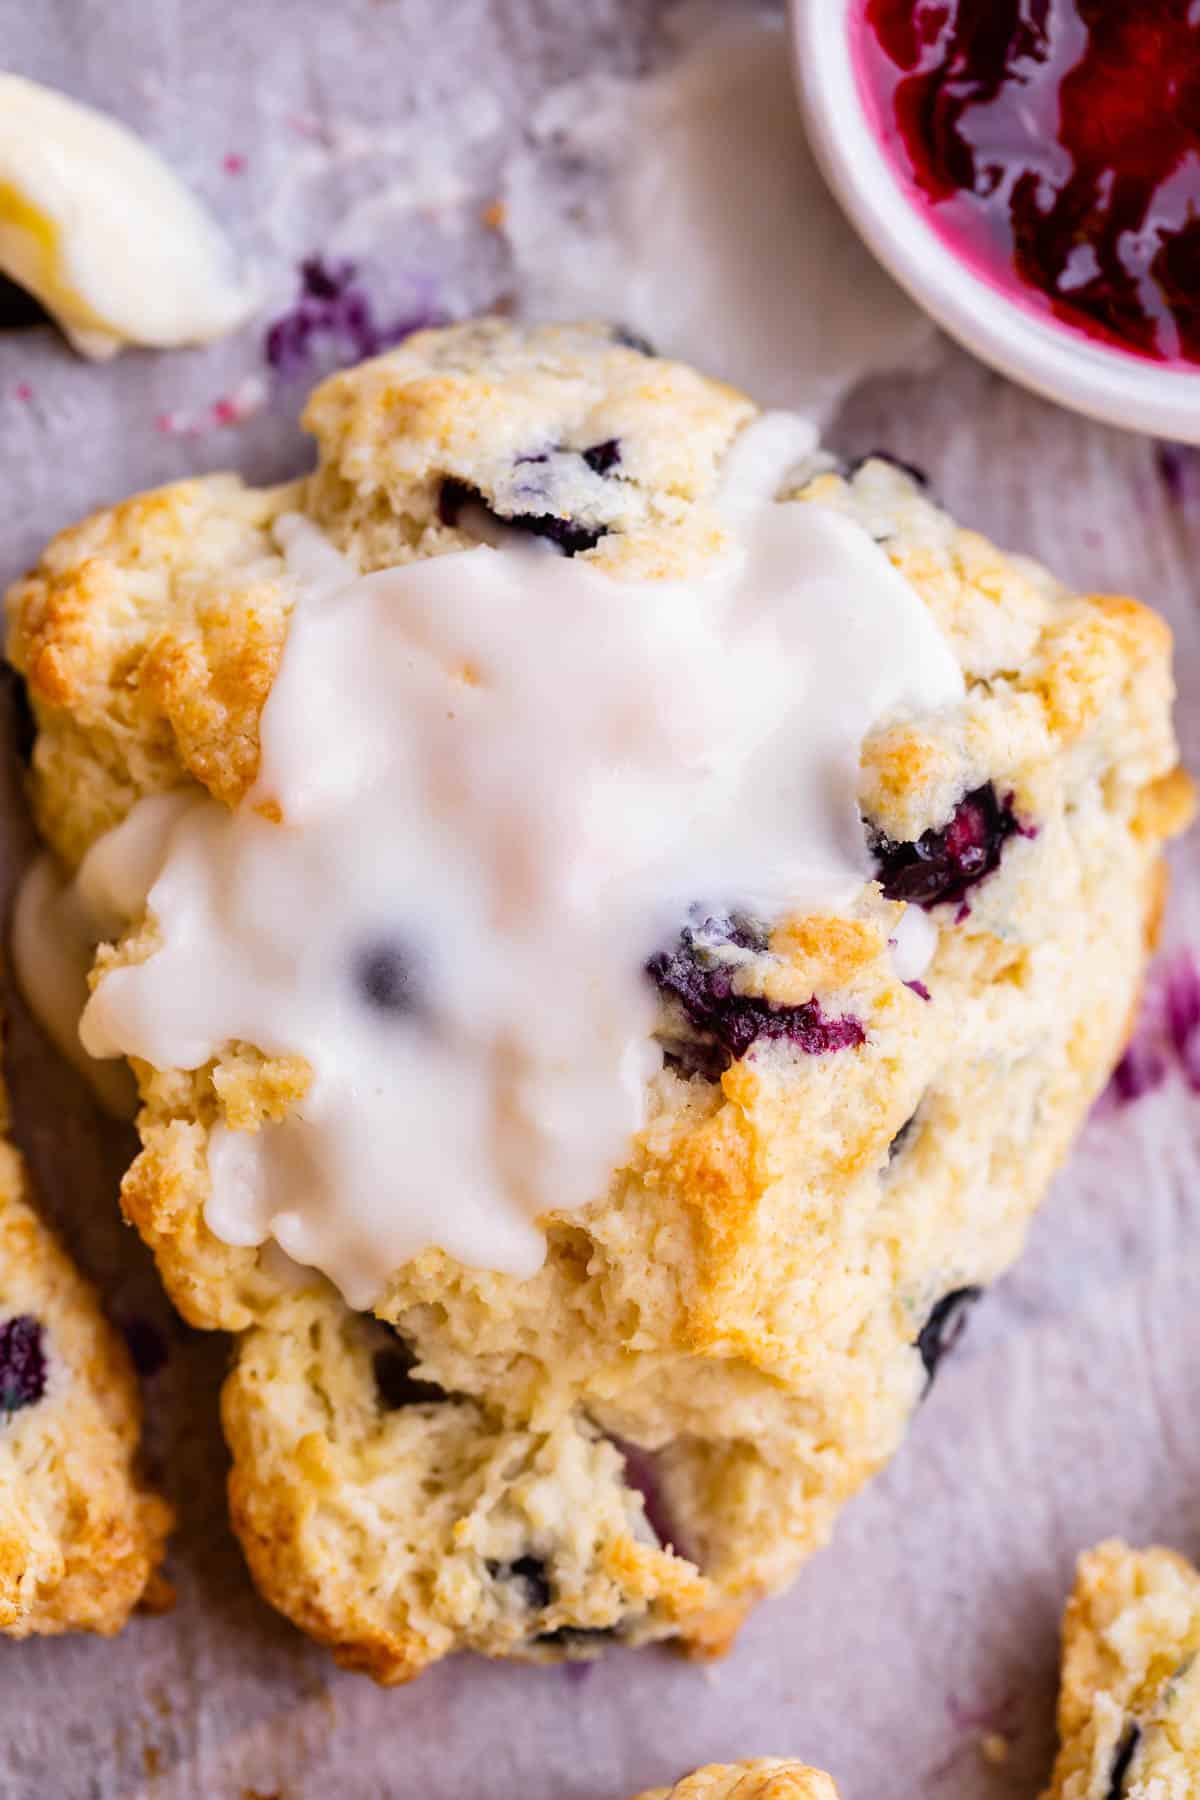
This is a master scone dough recipe and you can add any type of mix-ins that you like. I made a few different versions: cream cheese, blueberry, and plain.

Here in California we don’t have clotted cream at the grocery store (I think they have it in Canada??), and it’s kind of a long process to make your own (I will post a recipe someday!). So my quick fix is adding chunks of cream cheese coated in sugar to my scones. It’s so good! You could even try doing half cream cheese, and half blueberry scones. That would be delicious.

Use a pizza cutter or sharp knife to slice your circle in half, then each half into 3 triangles.

Look at how thick it is! Can you see the layers? You get that by not overworking your dough.

Freeze for 30 minutes. This freezing step is really, really important. Super cold butter going into a screaming hot oven is what makes your scone tender and flaky instead of tough and dry.

If you don’t have room in your freezer for the whole baking sheet, just put them on a plate in the freezer and transfer them back to a baking sheet after 30 minutes.
Tips for making this scone recipe
Butter melts very quickly in the oven, and the little pockets of butter in your scone are no exception. If they start out ice cold, they are going to take longer to melt. This gives your scone a chance to rise higher in the oven, creating little pockets of air where the cold butter used to be. This is how you get a flaky scone texture!
You want to have pea-size pieces of butter. Don’t over mix it! You can use a food processor for this step if you like. Or a cheese grater as shown above. You can even use frozen butter. The colder the butter, the better!

Mix-in ideas for this recipe for scones
The sky is the limit on what to fold into your scone recipe. This recipe is all about sugary cream cheese goodness, but seriously the sky´s the limit with scones. Go wild. Just know that you´ll want to add about 3/4 to 1 cup of total mix-ins for this amount of dough. Here are some ideas for variations!
Sweet:
- Berries (blackberries, raspberries, strawberries even) with a tablespoon of lemon zest
- Chocolate chips and toasted pecans
- Dried tart cherries with almond extract (top with sliced almonds)
- Dried cranberries with orange or lemon zest
- Grated marzipan, chocolate chips, and orange zest
- Raspberry and white chocolate (frozen raspberries work great)
- Apple and cinnamon
- Dried apricots and coconut extract
Savory: you will want to reduce the sugar to about 1/4 cup if you are doing savory scones.
- Bacon and White Cheddar (like in this overnight recipe)
- Parmesan cheese and rosemary
- Sun-dried tomatoes, pine nuts, and basil
- Apple, cheddar, and crumbled bacon
- Kalamata olives, sun-dried tomatoes, and feta
- Mini pepperoni and chopped chunks of mozzarella. Dip in marinara.
Savory scones recipe tip
If you plan to make savory scones, use 1/4 cup sugar or less! But don’t take it all out. A little sugar in your savory baked goods is often the secret to success. Also, the sugar provides structure when baking.

(The brown crystallized sugar you see in this photo is from the sugar I coated my cream cheese chunks in. Normal scones won’t do that. But it sure is delicious. Who can say no to a bit of crystallized sugar??)
What is the difference between a scone and a biscuit?
Visually, the biggest difference between a scone and a biscuit is the shape. Biscuits are almost always cut into circles, and scones are often cut into triangles. Traditional British scones are more dense and crispy, using heavy cream rather than butter as the fat. This recipe is not dense and is only crispy on the edges. The inside is light, flaky and tender. We are using butter, cream, and sour cream to make sure it’s super moist. Biscuits are usually savory and more buttery. Here is my favorite Flaky Buttermilk Biscuit Recipe! It’s so good.

How to store scones
You can store these scones, covered, on the counter for 2-4 days. Day 1 is when they’ll still have crispy edges, after that, they’ll start to get a little soggy. If you do the optional cream cheese mix-in, you’ll probably want to store them in the refrigerator. You can also freeze them, then heat one up in the microwave whenever you want a scone. No, it won’t have crispy edges, but it will still be totally delicious.
Do scones freeze well?
Yes! To store longer than a few days, wrap the baked scones so they are air-tight. Freeze for up to 3 months. Rewarm in the microwave on a low setting and don’t overdo it. Don’t “cook” the scones in the microwave, just warm them. You can also slice it in half and toast.
Can this scone recipe be made ahead of time?
Yes, I do this all the time!
To make the dough in advance, follow the recipe through cutting the dough into triangles. Put the triangles onto a pan or plate and freeze for 30 minutes. Then tightly seal the frozen sections of dough in a ziplock. You can have scones on any random day! Just take them out and pop them in the oven totally frozen. This is also a great recipe to make for overnight guests. Make the dough the night before, then toss them in the oven in the morning.

What to put on a scone:
For sweet scones, the toppings are where it’s at. Try these:
- The Best Lemon Curd << If you’ve only ever had store bought lemon curd, MAKE THIS. They are just not even in the same category.
- Cinnamon Honey Butter << So easy to make and to-die-for on fresh baked goods!
- 2 Minute Maple Butter << Easy and delicious!
- Easy Strawberry Jam from Dinner Then Dessert
- Grape Jelly from A Baker’s House
More recipes you are going to love!
Craving a sweet breakfast or an afternoon treat with your cup of tea? Here are some of my favorites.
The Best Chocolate Babka >> buttery brioche dough with tons of chocolate, yes please
Homemade Donuts >> time consuming , but WORTH IT
Glazed Lemon Loaf >> just like Starbucks (except maybe even better)
Swedish Cinnamon Buns with Cardamom >> do you love cardamom as much as I do? so good
Easy Banana Bake with Cream Cheese Frosting >> banana bread’s cooler, more sophisticated cousin
Tea Sandwiches from Bounded by Buns
English Muffins from The View From Great Island
Perfect Petit Fours from Rose Bakes
Facebook | Pinterest | Instagram
Best Recipe for Scones (Sweet or Savory)
Ingredients
- 2 & 1/2 cups all purpose flour, spooned and leveled
- 1/2 cup granulated sugar
- 1/2 teaspoon kosher salt
- 1 & 1/2 tablespoons baking powder, yes really
- 1/2 cup butter, (1 stick) COLD butter, frozen butter is great too
- 1 large egg
- 2 teaspoons vanilla
- 1/3 cup heavy cream*
- 1/3 cup sour cream
- more cream, for brushing
Optional add in
- 1 (8-oz) package COLD cream cheese, chopped
- 1/3 to 1/2 cup sugar, for coating cream cheese
For the glaze
- 2 tablespoons butter, very soft
- 1 & 1/2 cups powdered sugar
- 1/2 teaspoon vanilla
- 1/4 teaspoon kosher salt
- 1-3 tablespoons milk
Instructions
- Dry ingredients: In a large bowl, combine 2 and 1/2 cups flour, 1/2 cup sugar**, 1/2 teaspoon kosher salt, and 1 and 1/2 tablespoons baking powder.
- Wet ingredients: In another medium bowl, add 1 egg, 2 teaspoons vanilla (omit for savory scones), 1/3 cup cream and 1/3 cup sour cream. Whisk it together. Set aside.
- Cut in butter: Now back to the dry ingredients. Use a pastry cutter to cut in the COLD or frozen butter. You can also grate the butter using a cheese grater and mix it in that way. Cut the butter in until it is incorporated and there are still pieces of butter about the size of a pea. Don’t overdo it! See photos.
- Add the wet ingredients to the dry ingredients. Use a wooden spoon to stir it together until it forms a shaggy dough.
- Coat your hands with flour and finish kneading the dough in as few strokes as possible. (Overworking the dough makes for a tough scone.) Use your hands to fold the dough on top of itself, creating more and more layers until it has come together and all the flour is incorporated. You can add a tablespoon or two of ice cold water if you think it’s necessary. I try to get the dough to come together in 5-8 folds. Do your best and remember that you will get better with practice!
- Mix-ins: At this point add in any mix ins you plan to use. (If you want to add cream cheese like you can see in the photos, chop an 8 ounce block of cream cheese into 1/2 inch chunks. Coat with 1/3 to 1/2 cup sugar in a bowl, making sure all the cream cheese is coated. Carefully fold into the dough.)
- Prepare a work space with plenty of flour. I like to use a pastry cloth. Transfer the dough to the work place and use your hands to shape the dough into a 6 to 8 inch circle. I like really thick, tall scones. The thicker your circle of dough is, the taller your scones will be. If you added mix ins, your circle will be a bit larger.
- Use a sharp knife or pizza cutter to cut the circle in half. Cut each half into 3 equal triangles.
- Place on a baking sheet that has been lined with a silicone baking mat or parchment paper. Place the scones at least 3 inches apart from each other.
- Freeze for 30 minutes.*** If you don’t have room in your freezer, you can put them in the fridge for 45 minutes. If you don’t have room to chill a whole baking sheet, place the scones on a plate and then transfer to the baking sheet when they are frozen/cold.
- 15 minutes before the scones are done freezing, turn your oven on to 400 degrees F.
- Place the cold scones on a baking sheet if you haven’t done so yet.
- Brush the top of each scone with cream. This will make the scones get nice and brown. Top each scone with coarse sugar if you like, or a bit of salt if you are doing savory scones.
- Bake: Put the scones in the oven and bake for 10 minutes at 400 degrees.
- Turn the heat down to 375 without opening the oven.**** Bake for another 8-15 minutes, until the tops are golden brown. DO NOT OVER BAKE. This is where the magic happens, so stay nearby. If you over bake your scones, they will be dry even if you did everything else right. If you are not sure, use a spatula to lift up one of the scones. If they are a nice golden brown on the bottom, they are done.
- Remove from the oven and let set up on the pan for 10-15 minutes. Transfer to a wire rack to cool completely.
- Make the glaze: in a small bowl, whisk or use an electric beater to cream 2 tablespoons of very soft butter. Add 1 and 1/2 cups powdered sugar, 1/2 teaspoon vanilla, 1/4 teaspoon kosher salt, and 1 tablespoon milk. Whisk together and add more milk until you have a consistency you like. Drizzle over the tops of the scones and let harden (it usually takes 20-30 minutes.)
- Top your scones with butter and jam! They are great reheated in the microwave.
- Store scones covered on the counter for 2-4 days. They are best eaten on day 1 so that you can get those crispy edges. After storing for a while it’s hard to avoid a bit of sogginess. (Starbucks solves this problem but leaving them out in the air, but then eventually the center gets dried out. So, pick your poison. Or just eat all 6 scones single handedly on day 1. No judgment here.)


I’ve been searching for a good scone recipe and this hit the spot! I used chocolate chips as my mix in and only had whole milk on hand instead of cream. Followed everything else to a T and they were SO good. This will be my go to recipe from now on.
Perfect in every way! Easy to make and well worth the carbs!
First time making scones & these were a huge hit! I found the recipe quite simple to follow (and believe me, I am no baker!). Can’t wait to experiment with add-ins!
Your scone recipe sounds delicious. Do you bake them on the upper third rack ?
Hi David! I bake mine right in the middle of my oven. Enjoy!
As far as lowering the temperature half way through baking, a electric oven does not cool down as fast as a gas oven. Do I need to shorten baking time?
Hi Cyndi! I don’t use an electric oven so I am not sure about this. You will have to experiment! Let me know how it goes!
I would cut dough in half before cutting into 6. So that it would make 12 as my scones were rather large that I cut in half when I served them.They were delicious and rich.
Gathered with friends to celebrate the Duke of Edinburgh’s life on Saturday morning, and I said I’d bring scones, clotted cream, strawberry preserves and Earl Grey tea. (Obviously, an all Brit menu was required.) I’m not a baker, and when I do, it’s from a box, not from scratch, but as a tribute to the Queen and Prince Phillip, I thought I would do my best. I was chagrined when another friend, who hadn’t been paying attention, had stopped by our local tearoom, run by a British ex-pat, and also picked up a box of scones. But all’s well that ends well. My friends RAVED about the scones I made from your recipe and said the British made ones were unpleasantly dry and not particularly flavorful in comparison to my offering. Everyone requested the recipe. :-)
I followed your recipe to the tee, with a couple of small amendments that I think you would approve. I FROZE the stick of butter and chilled the cheese grater, so I got a lovely pile of little butter nuggets to cut into the dry ingredients.
Once I formed the scone cake, (it measured 7.25 inches in diameter and about 2.25 high) I let it rest in the refrigerator all night, then transported it in a cool bag to my friend’s where we baked it. (I understood from my reading that it is very important to keep the butter chilled and intact until bake time.) I will say after the initial 10 minutes at 400, we had to bake at 375 for a good 30 minutes, but then we achieved scone perfection.
I did not frost, glaze or sugar, because with the clotted cream and preserves, I didn’t want to put anyone in a diabetic coma.
I am so proud of turning out a baked good that pleased everyone, I may try baking more in the future. Thank you for the recipe.
Made blueberry scones … haven’t tasted yet…still cooling. Used 1 cup frozen berries. Seemed to spread out more than rise high. Maybe because of frozen fruit?
Hi Sharon! Was the dough completely chilled when it went in the oven? It sounds like a case of warm dough. Frozen berries work just fine in this recipe, as long as they are still cold going into the oven.
I have found that frozen blueberries makes mine spread more than using fresh. I prefer using fresh.
I need suggestions on how to mail scones to my kids. I’m in NC and they are in CO. I have frozen the scones after baking and shipped them that way, but need some ideas. Do I let them bake them? Or bake them half way? Shipping them frozen was okay, I wrap them individually very tightly in plastic wrap.
I’m considering shipping my baked goods through UPS instead of the post office. Recently I’ve been having horrible delays with the post office.
Hi Christine! I haven’t tried shipping scones. I would send them frozen as you’ve tried in the past, to keep them as fresh as possible. I would not send the raw dough, it will spoil while shipping. Hope this helps!
Tried your recipe tonight. 2 words: I.died. Wow! They are so flaky and tender but yet has a slight crunch. I am a now lover of your scones! Thank you so much.
It’s a whole new world right Tammy! I’m so glad to be a scone convert! :) Thanks for leaving such a kind review!
Omg!!! I have tried so many scone recipes but this one is by far the absolute best!!! I mean wow!!! My hubby and I are so excited! We were saying we can’t share these lol. I will have to make another batch for family and friends! I added in blueberries and cream cheese! They were divine! Thanks a bunch for this recipe ❤️
I’m so happy you both loved them Danielle! I’m definitely going to try the blueberry cream cheese combo next time! Yum. Thanks for taking the time to review!
I do love this recipe and have made it several times using blueberries.
Do you think this recipe would be easily adaptable to be gluten-free using cup-4-cup gf flour? I love the recipe as is, but have family members who need gf products.
BTW, the tip on grating the butter is a life changer. Thanks!
So glad you are loving the scones Dianne! Sadly I’m pretty inexperienced with gf baking. If you try it out, let us know how it tastes!
Can’t wait to try it!!! Can I add cream cheese and blueberries at the same time?
Hi Monica! Yes totally! Just use about a half cup of each. Sounds delicious :) Enjoy!
This is only the second time I have made scones. First was about ten years ago. They were so so.
I made blueberry last night, put them in the freezer overnight, and baked them this morning. They are pretty close to perfection. Hubby, who lived in England as a child… had nothing but praise from him. Thank you!
I have made a lot of scones in my time, but these are the best! My husband just concurred! Not sure if it’s b/c of the freezer step? But these are everything they are claim to be!
So happy to hear this Jan! You know when you get down to it, the technique in baking (those tiny, sometimes insignificant-seeming steps) is usually what takes your scone or cookie from okay to amazing. It’s taken me a long time to realize this! But it really does make a difference. I’m so glad you agree :) Thank you for taking the time to review!