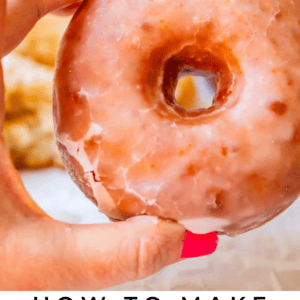


I have found the secret to making the BEST fluffy glazed donuts of your life! Not all yeast doughnuts are created equal, and you may not even know what you’re missing if you’ve only visited a chain donut shop. This fried donut recipe is easy to make and such a fun process. I will show you how to make them at home step by step, NO fancy equipment (not even a doughnut cutter) required. You can even try filling it with Pastry Cream to make Bavarian Cream Donuts, check out those posts for all the details! Originally published September 28, 2023.
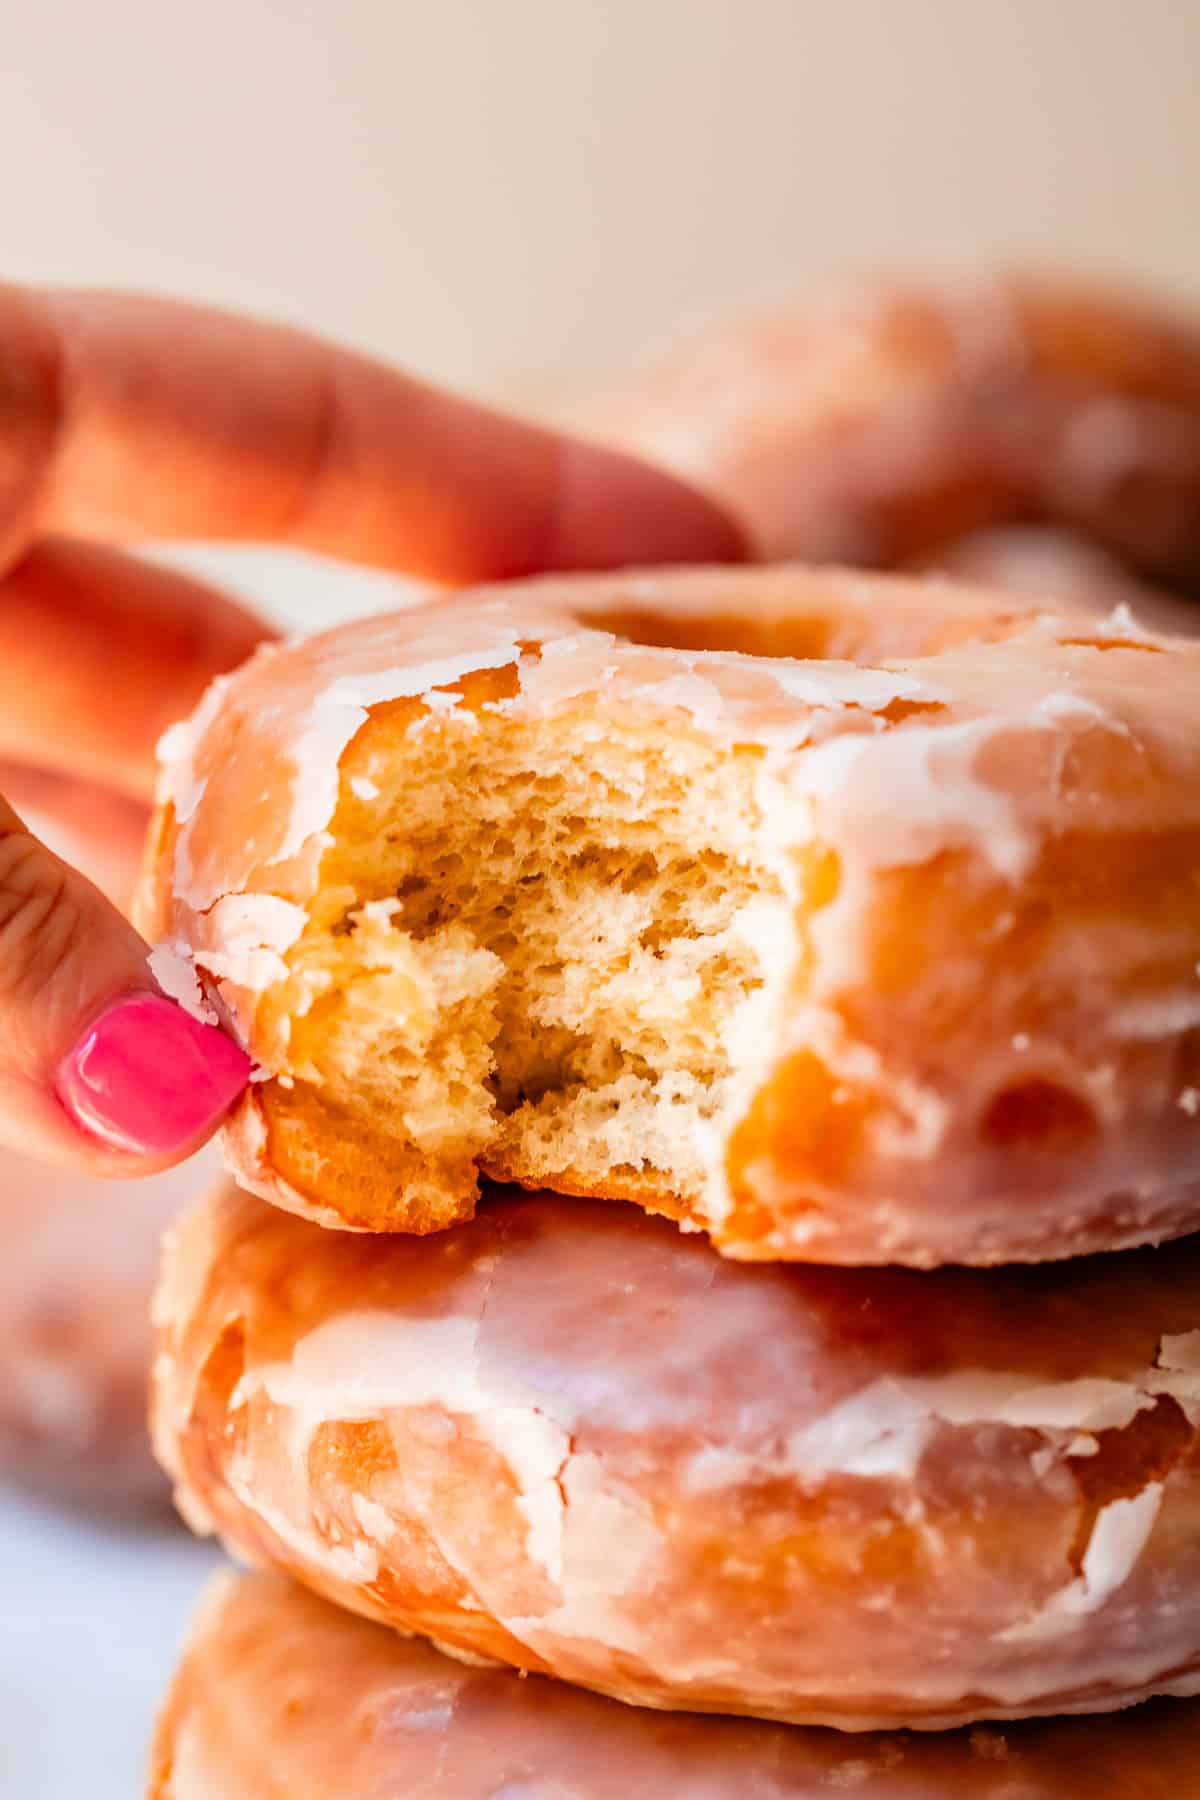
Table of Contents
- Donuts in California are better…no for real
- Homemade donuts, Ted’s donuts, or bust.
- The best Donut Recipe hands down
- Doughnut Recipe ingredients
- How to make Homemade Donuts
- Donut topping ideas
- What to serve with donuts
- How to store leftover donuts
- Frequently asked questions
- More sweet breakfast goodness to try
- Homemade Donut Recipe Recipe
My parents live in the same smallish town where I grew up in Manteca, California. (Manteca means “lard” in Spanish, because ‘Merica.) They live in the same house on the same street as always: right by the church, across the street from the high school, and exactly one mile from the Taco Bell on Main Street.
I know this because one time when I was little I asked my mom how far a mile was and she said, “oh, about down to Taco Bell.” I still think of it every time I need to visualize a mile.

Lately my parents have been coming up with creative ways to both get their exercise in, and address the massive amount of things that seem to pile up as time goes by. My dad decided to finally do something about his random jars of change that were lying around the house. (People had actual coins before Venmo, apparently.)
So once a week, Mom and Dad have made it their date night to take a leisurely (1 mile) walk down to Taco Bell, where they…yes, you guessed it. Pour all their change on the counter and count out $4.99 for a Crunchwrap Supreme to share.
Halfway through separating out their nickels and dimes, the young cashier gently says to them, “Do you guys want the senior discount…?” They died laughing. My parents are not poor, just forever frugal-minded. And what else is there to do on a late summer evening??
What they REALLY should do is walk another half mile further to Sam’s Donuts on Main Street (maybe you guys should make this your Saturday morning ritual, mom and dad??) I would be happy to spend ALL my loose change on those donuts, they are the fluffiest puffiest in all the land. Let me tell you why.
Donuts in California are better…no for real
No one explained to me when I was a kid why my local shop had the most magical, heavenly doughnuts. I just assumed Sam was an angel sent from the pastry gods.
I learned all about it a few years ago when I read an article about Ted Ngoy, the Cambodian donut king of California. I learned his rags to riches, (back to rags, back to riches!) story. (it’s nuts guys.) I learned why the best donuts always come in pink boxes. And I finally understood why every donut I’ve ever had while on vacation tasted like cardboard when compared to the impossibly fluffy, raised to the sky, perfectly glaze-crackled morsels of delight I grew up with.
Long story short, Ted Ngoy came to the US as a refugee and found himself working at a local donut place. He eventually saved enough to buy his own shop (and eventually many more), but made one important change to the system:
- Instead of making one giant batch in the morning, he had his employees make small batches throughout the day (I don’t know if you have ever had a day-old donut, but they are garbage.)
- He would let each shop he bought keep their recipes (customers don’t like change), but would insist on upgrading to the finest ingredients. Bad flour makes a bad donut.
Ted’s shops were successful because he insisted on quality, and had connections to incoming refugee families with aunties, cousins, and uncles: a built-in network of very hard working people excited about the chance to own their own business. Pretty much every donut shop in CA for decades used this business plan.
Homemade donuts, Ted’s donuts, or bust.
The reason I’m telling you about Ted and his legacy is because I want you to understand what we’re aiming for here with our homemade donuts. It’s not Dunkin’ Donuts, and it’s not even Krispy Kreme. I have extremely high standards when it comes to donuts. Dunkin’ sells JBOD products. “Just Baked on Demand.” Their donuts are baked off site, frozen, delivered, and popped in the oven on location. THIS EXPLAINS EVERYTHING. Ugh.
Krispy Kreme is a different story. Their donuts are actually fried on site at each location. But they still are overly-greasy and lacking flavor in my opinion, and cannot hold a candle to a classic California donut.
Dunkin tried to break into the California market back in the 80s/90s and failed miserably. They eventually closed every single location because they couldn’t compete with Ted’s shops. Customers are not stupid. Why would you buy a frozen baked donut when someone down the road fried a fresh one 20 minutes ago? (Dunkin recently started opening CA stores again in the last 10 years; there are dozens now. This is how I tried my first Dunkin Donut ever earlier this year, and I almost spit it out, no joke.)
I’m sure there are lots of other stand-alone shops across the country that are amazing, because they have the same standard as Ted’s: baked throughout the day, with extremely high quality ingredients. But not many have been able to franchise the way Ted did, without losing quality, Dunkin case in point. (Krispy Kreme is the closest imo, and Top Pot in Seattle is close too.)
I live near Sacramento CA now, and the local BJ Cinnamon’s is my new Sam’s Donut. I’m telling you, talk to any California native, they will have a Sam’s or a BJ’s they swear by. (I just read on their yelp page a question from someone, “Do they have anything keto?” and owner Chanthoeun replied, “NO! It’s a donut shop!” These are my people.)
So, to sum up, if you live in California, you don’t need today’s recipe. Walk yourself down to the local shop and get yourself a dozen. Maybe pay in loose change like my parents 😂
BUT. If you live in a place where you only have chain donut shops, homemade donuts are ABSOLUTELY worth every ounce of effort.
The best Donut Recipe hands down
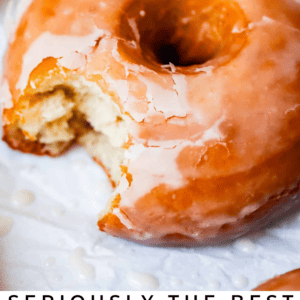
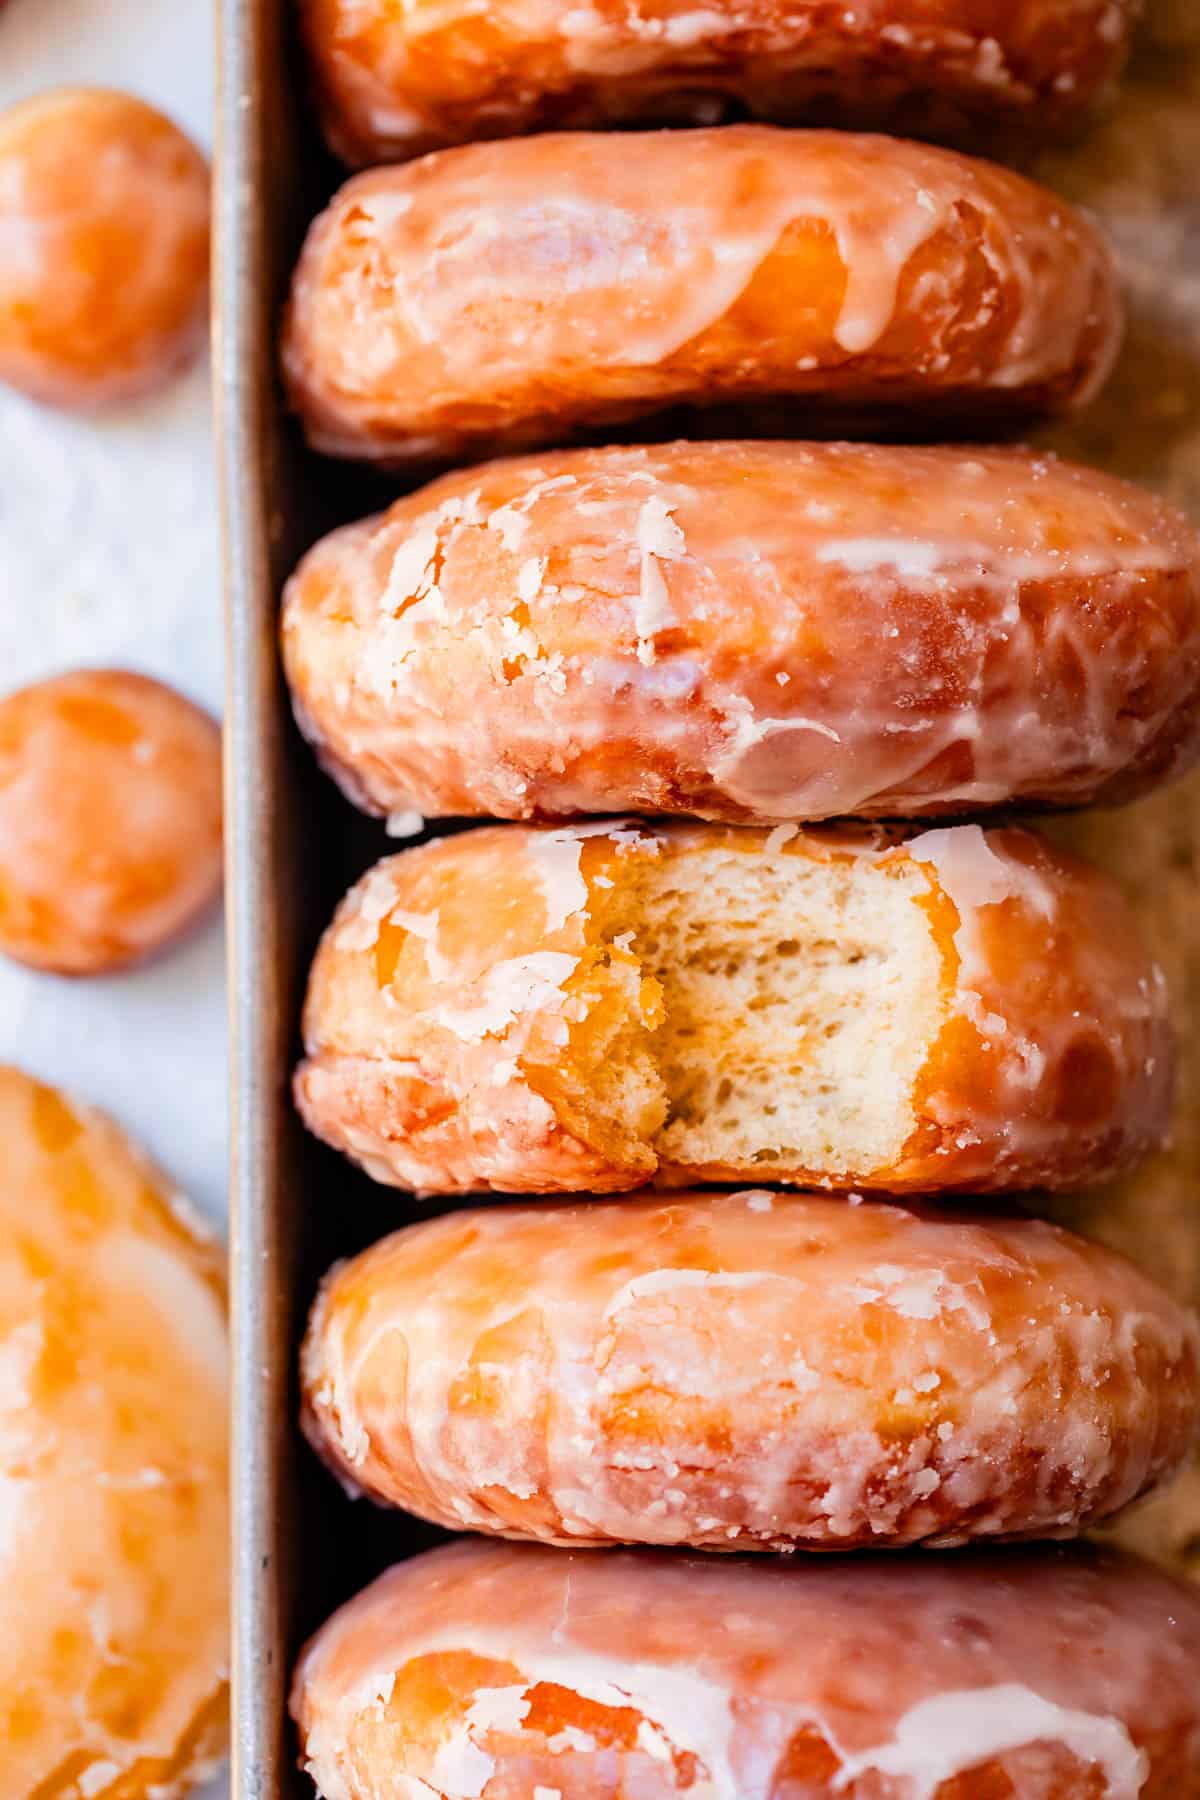
Today’s recipe is exactly like the fluffy, soft, extremely puffy yeast donut of my youth. They live up to all my California dreams. High quality ingredients, no hard-to-find tools (you DON’T need a donut cutter!) and just a couple hours start to finish.
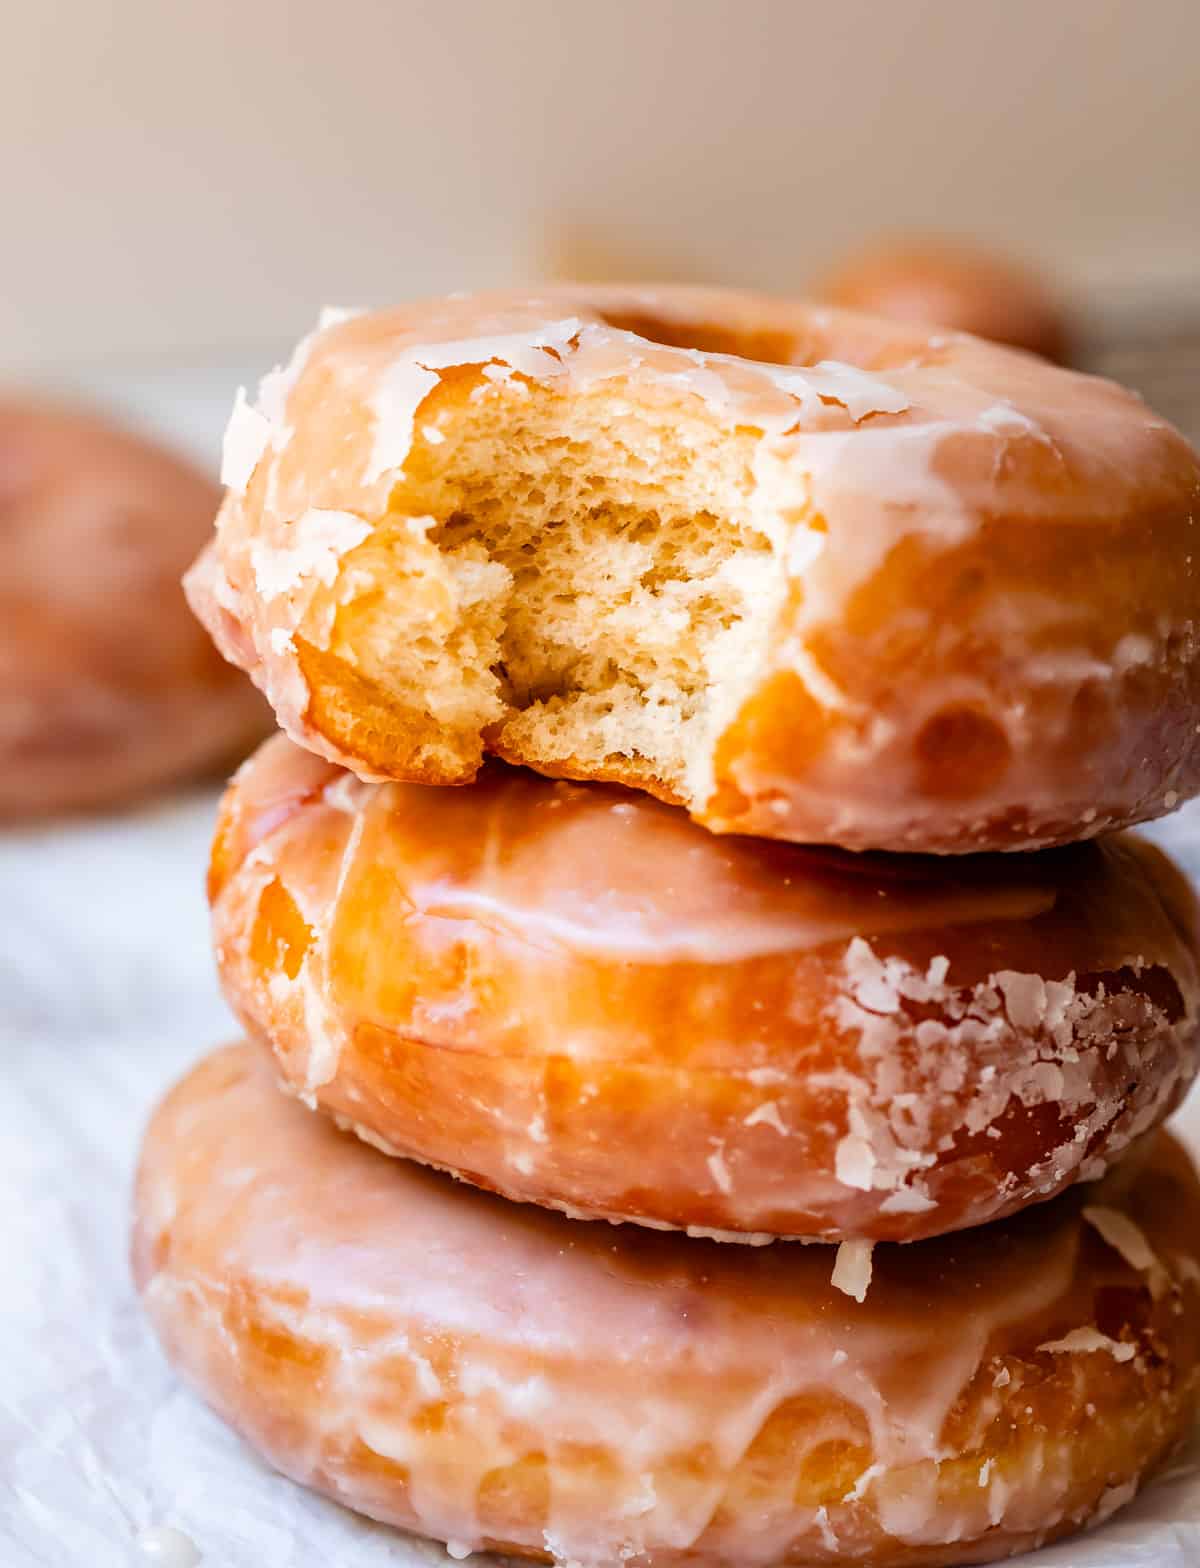
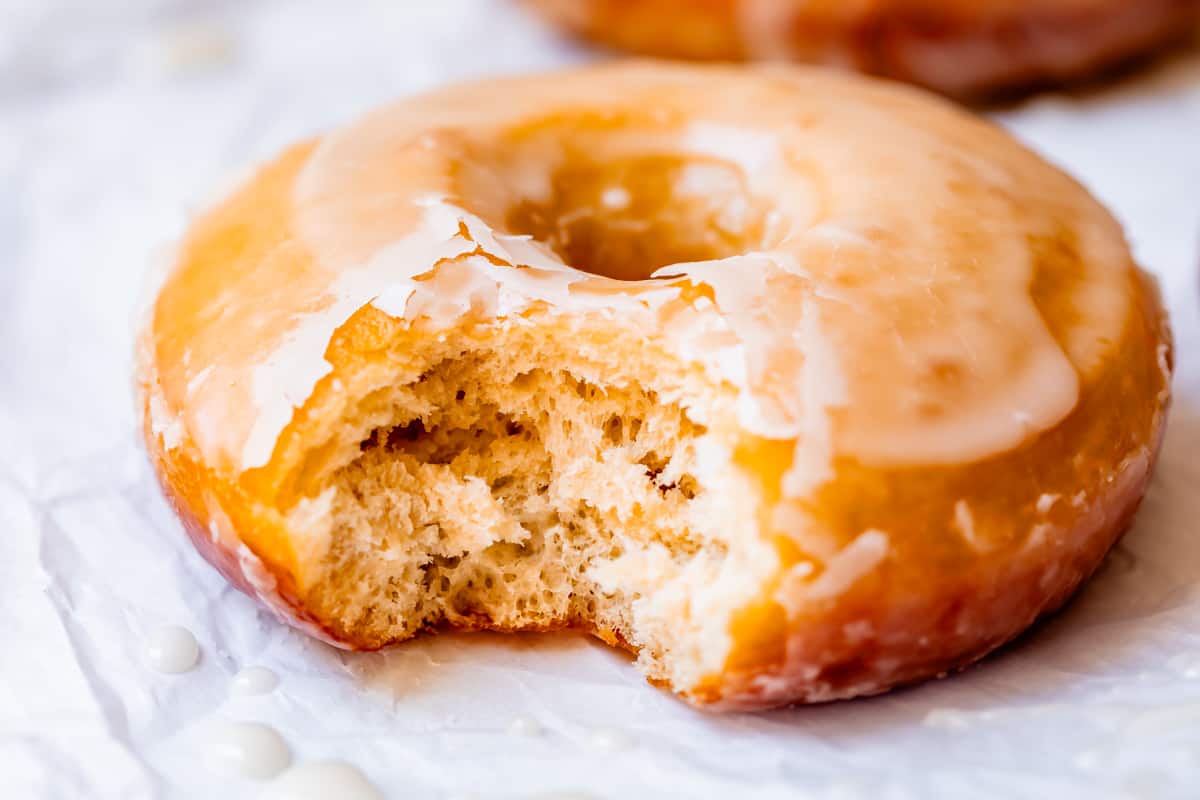
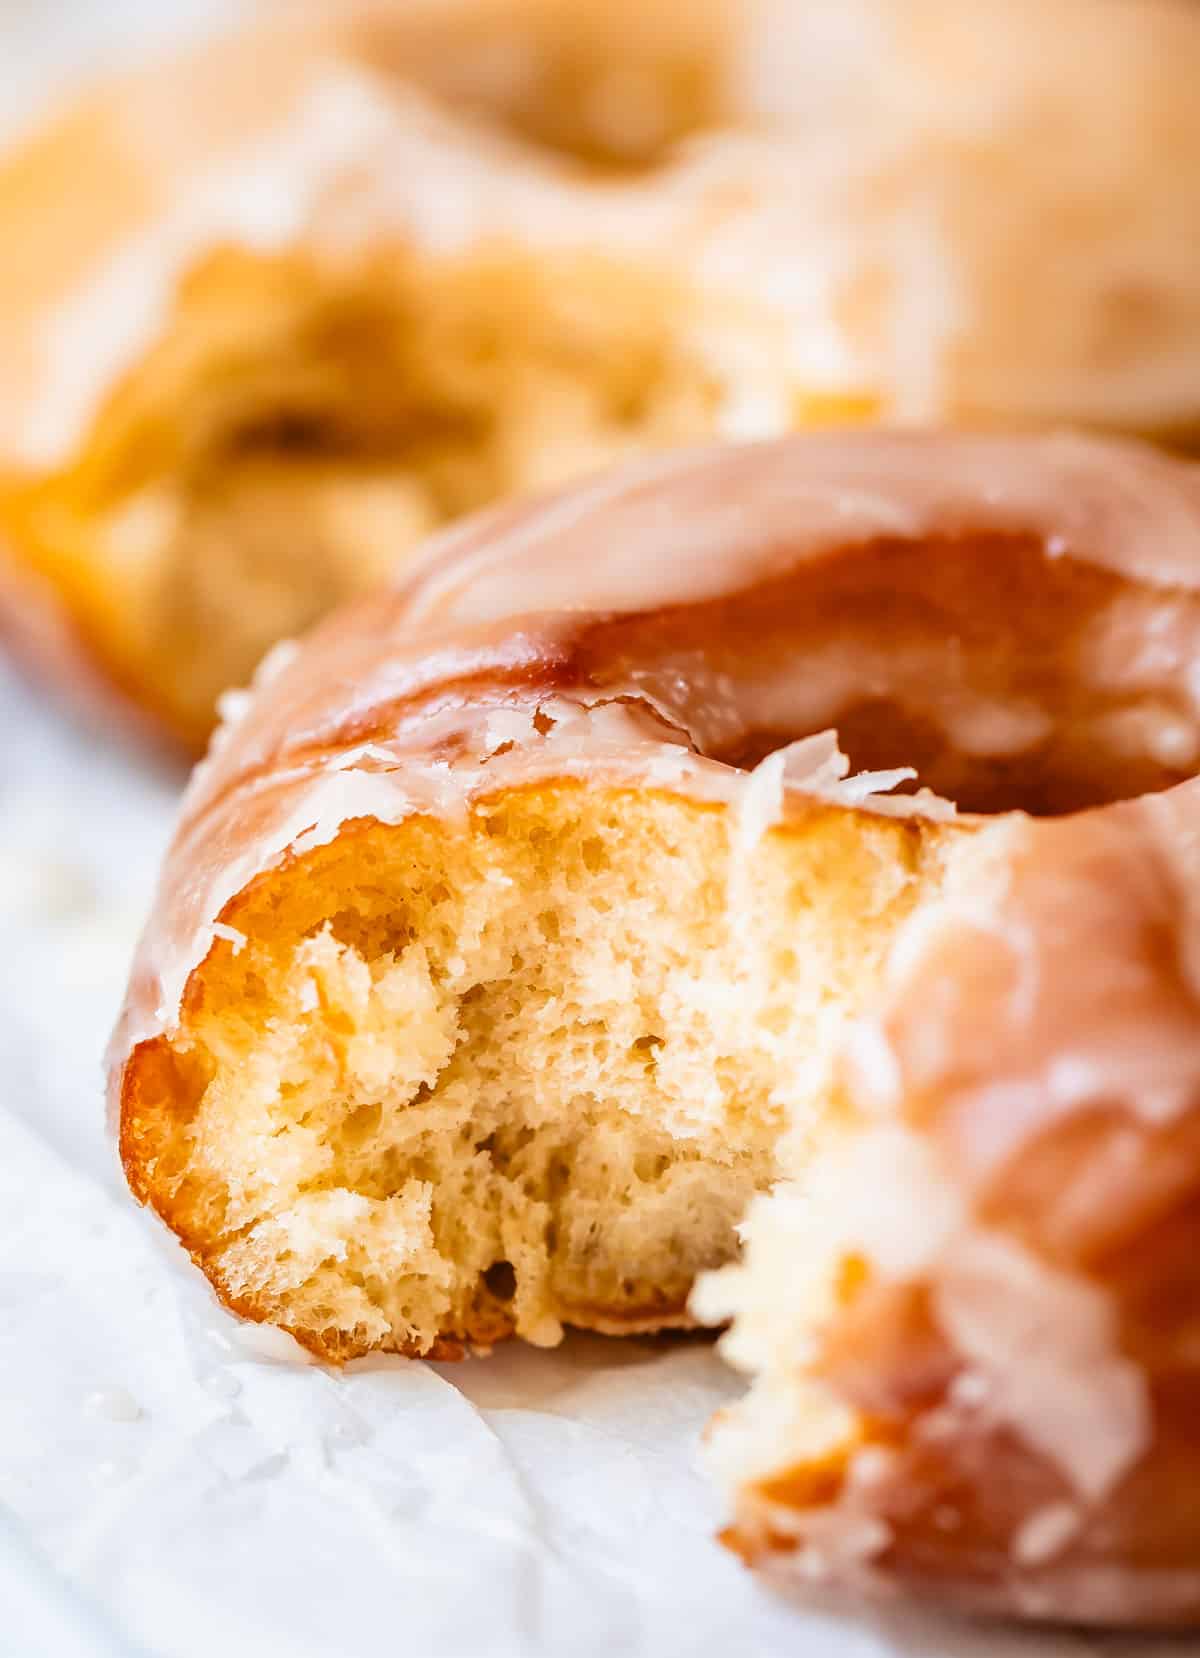
The final donut is literally heaven. The difference between a good donut and a bad donut has to do with quality ingredients and the recipe, of course, but it also has a lot to do with freshness. Making them at home means you are getting the freshest fried dough of your life! So good.
This recipe uses milk for richness, and bread flour to give it that special chew (and to add structure to the dough.)
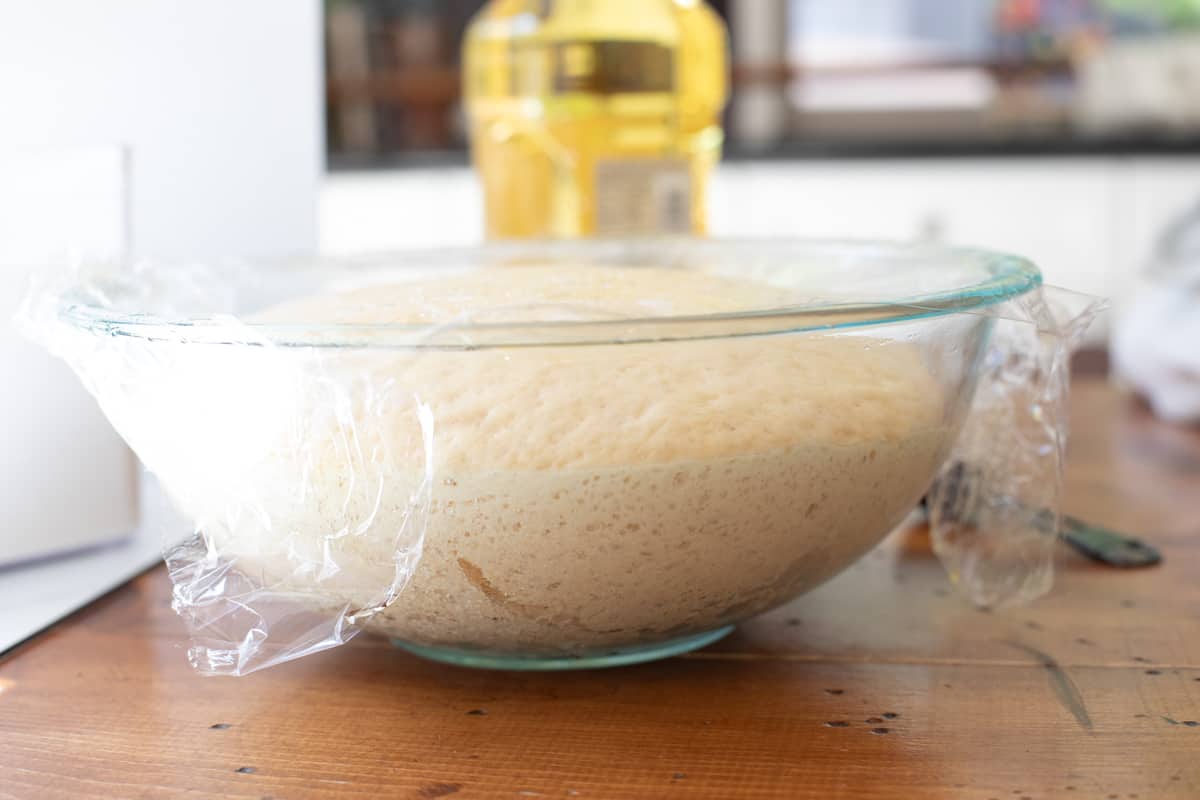
In addition to yeast, we are adding a little baking soda and baking powder to the dough to make it rise and puff EVEN MORE. I’m telling you, when I say fluffy puffy I am not messing around.
Then we dunk the whole thing in a simple glaze with a special ingredient (granulated sugar, oddly enough; we’re making a simple syrup first) that helps the glaze stick to the doughnut.
You will neverrrrr go back, guys.
Doughnut Recipe ingredients
Like many other classics, these donuts come together with very simple ingredients. Here’s a lil shopping list to give you an idea of what you need. The full recipe and instructions are in the recipe card at the bottom of the post!
- Whole milk
- Active dry yeast
- Granulated sugar
- Shortening
- Eggs
- Vanilla extract
- Bread flour
- Kosher salt
- Baking powder
- Baking soda
- Powdered sugar
- Corn syrup
- Cornstarch
- Butter
- Oil for frying
How to make Homemade Donuts
- First we are going to proof our yeast. Add 1 cup milk to a measuring cup and heat in the microwave until it is warm but not hot. If you wouldn’t dump this cup of milk on top of a baby’s head, it’s too hot.
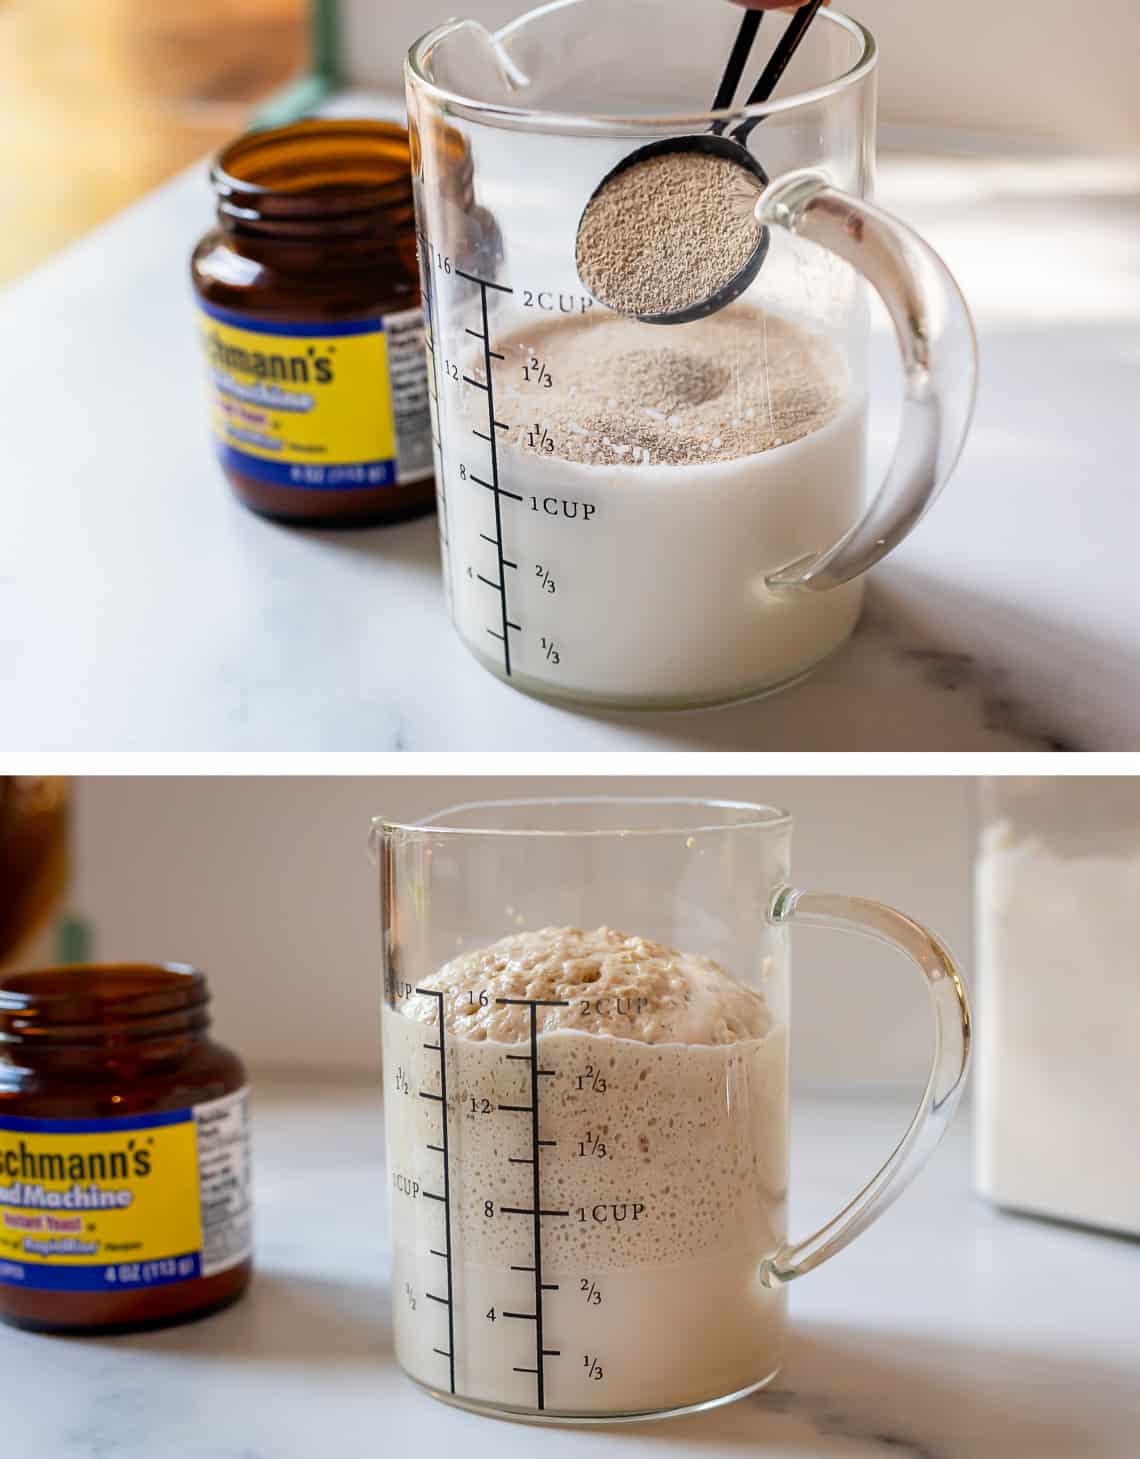
- Add in a lil sugar and allll the yeast. 3 tablespoons yes yes. After a few minutes it should be extra puffy and bubbly.
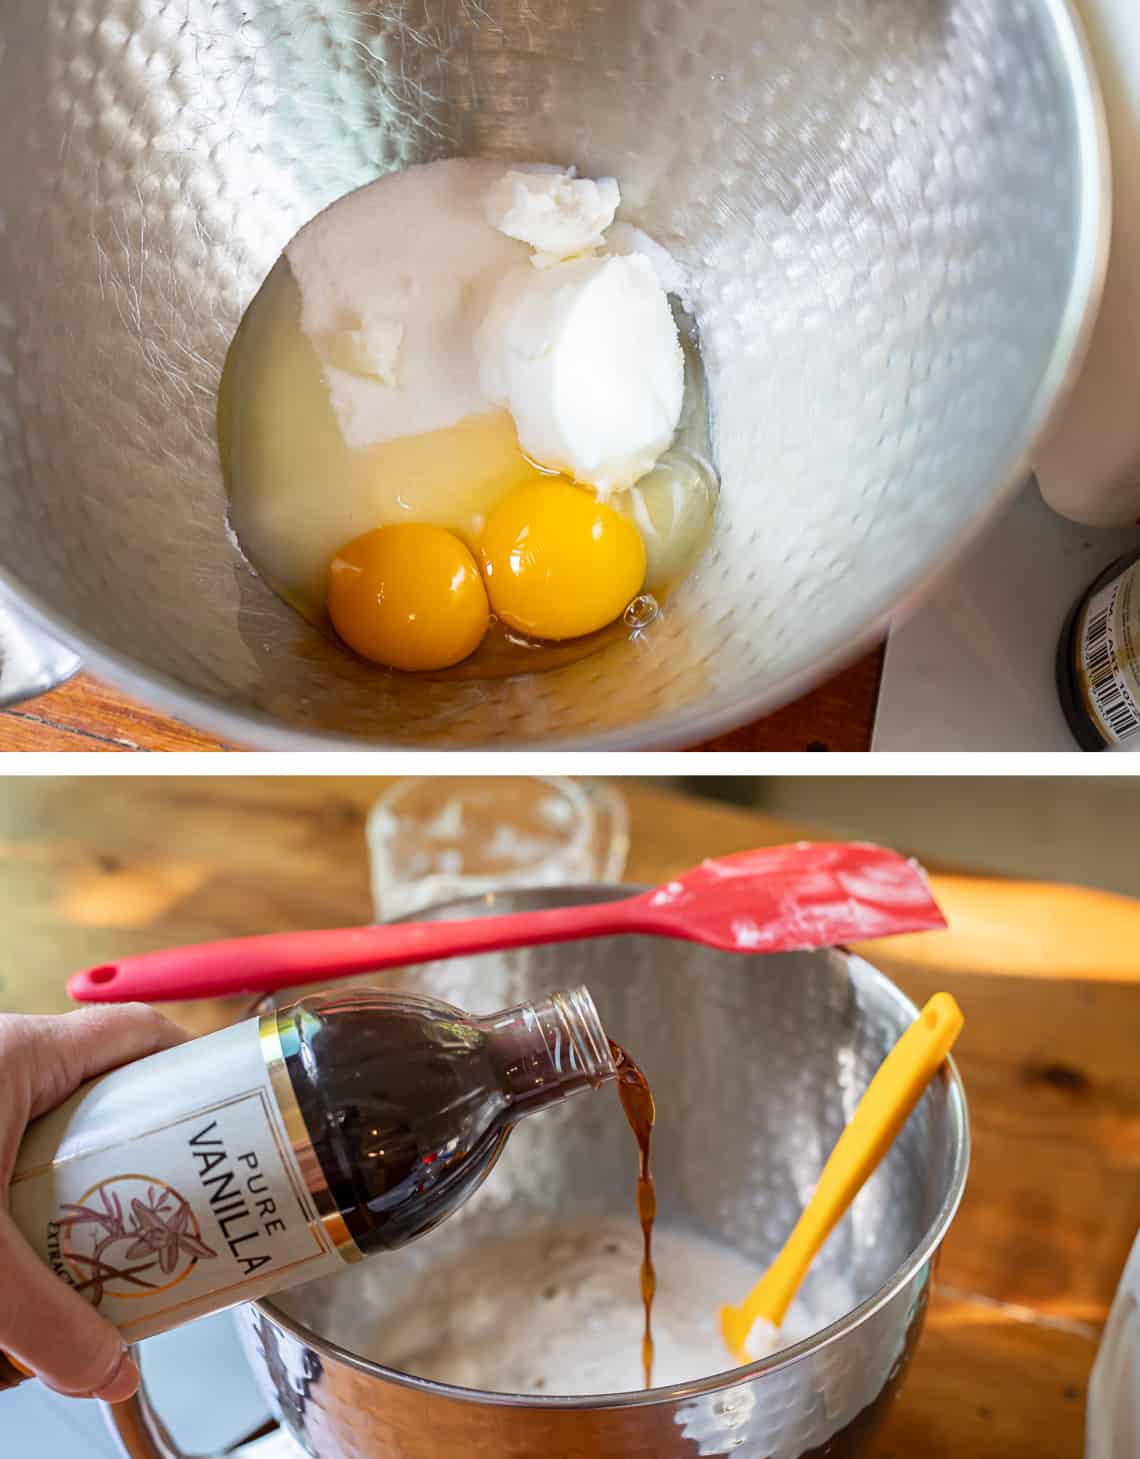
- Add some more sugar and eggs to a mixing bowl, and some vanilla to make our dough nice and fragrant. 10 years ago I used to get so irritated when food bloggers would call for a specific vanilla measurement and then show a picture like this where they are CLEARLY NOT MEASURING. who even am i guys. don’t hate me for selling out.
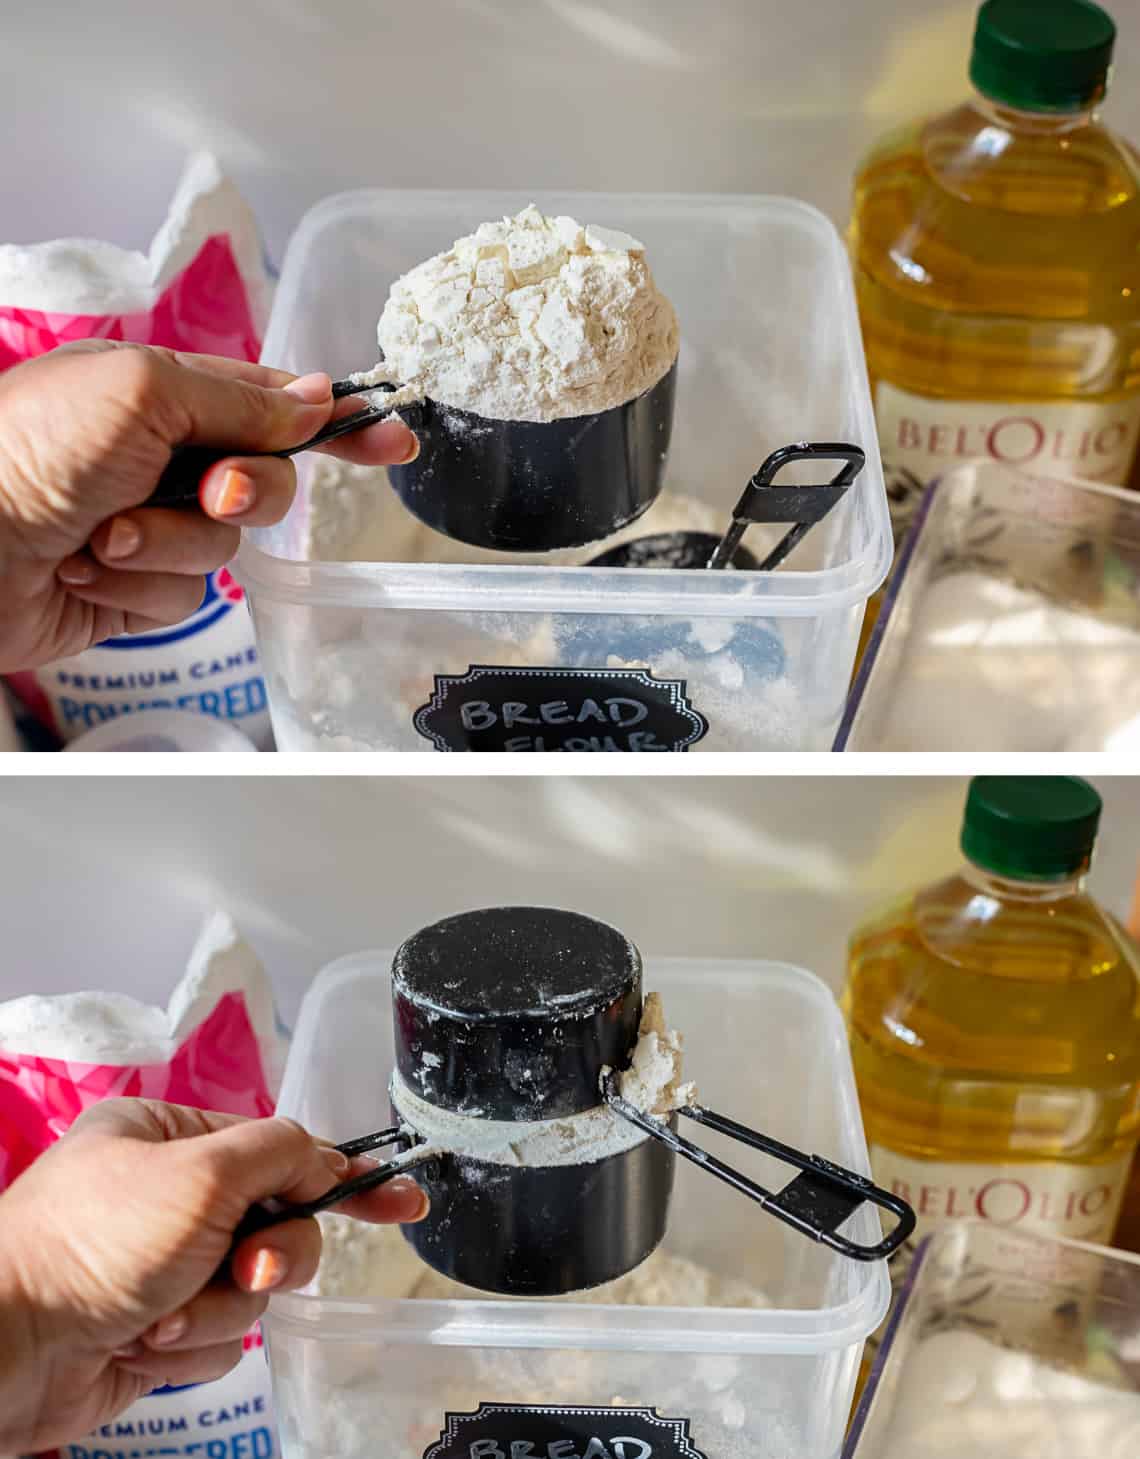
- Mix together your wet ingredients, then add in the flour. Make sure to spoon and measure so your flour doesn’t get too packed in. I always use two measuring cups, easy peasy.
We are using bread flour for this recipe because it has extra protein. It helps with dough structure, and gives our donuts a nice chew. (See my Homemade Bread recipe for all the details on why bread flour is great when you need structure.)
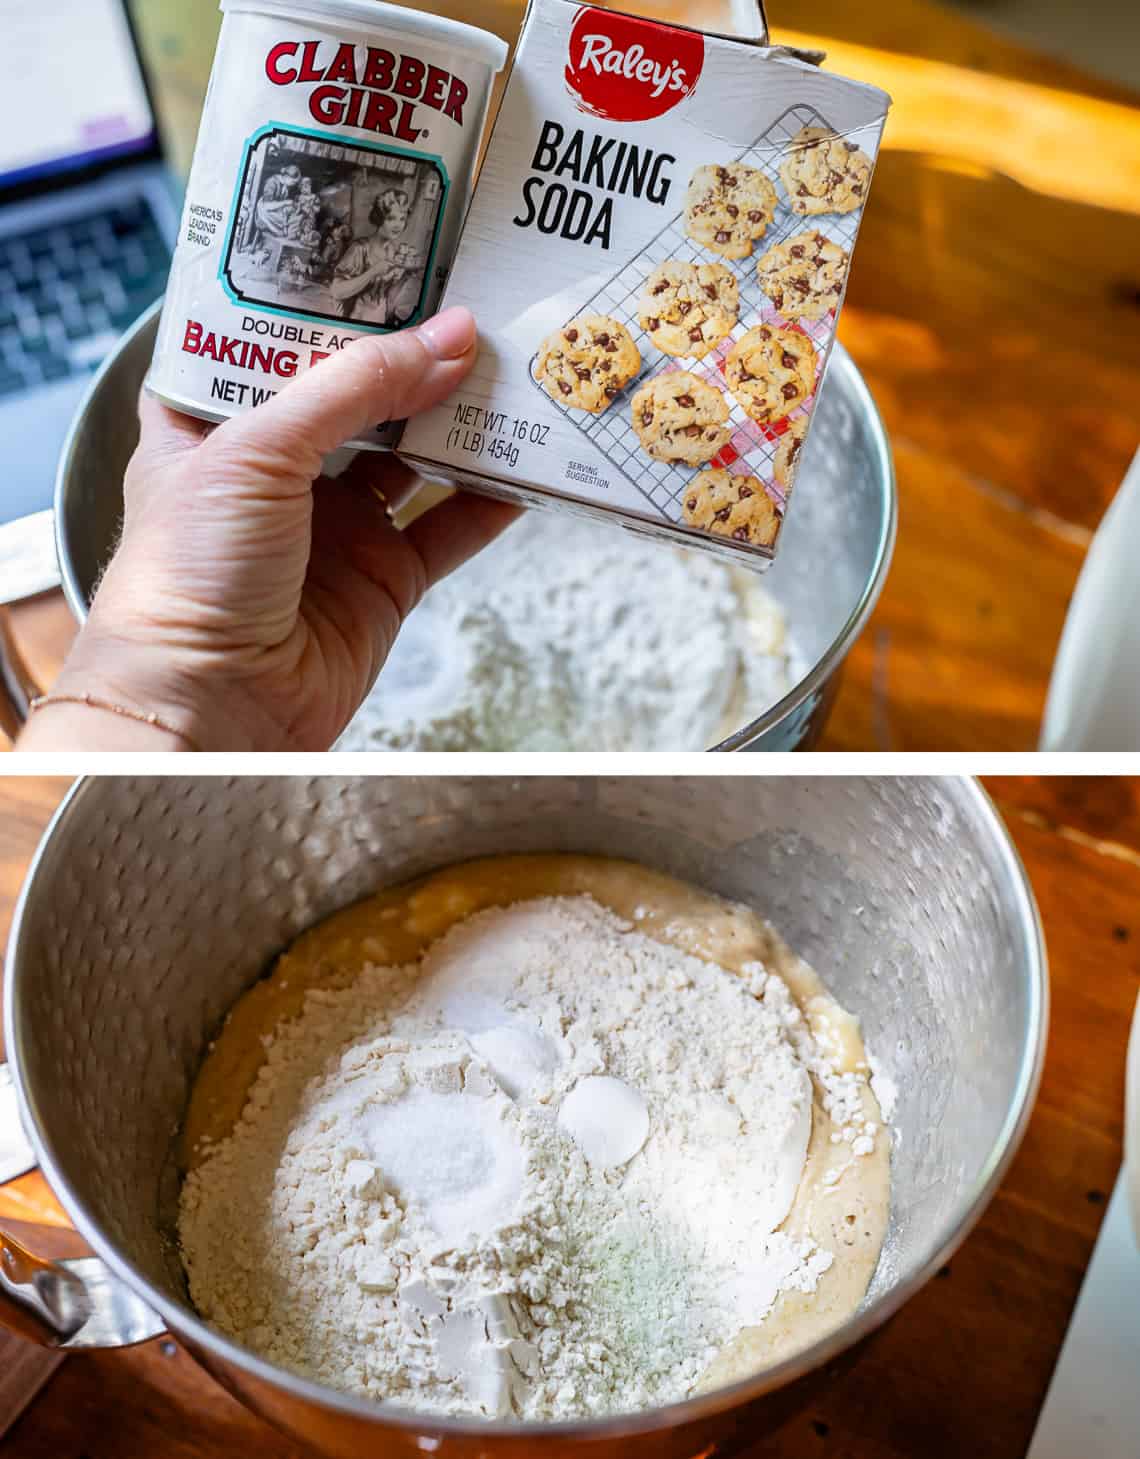
- This recipe is a little different because it uses baking soda and baking powder in addition to the yeast. I love the added lift it gives these donuts!! Ignore my computer in the background up there, oops. Eric is always asking why my computer keyboard is so dusty…exhibit A.
- Mix your dough with a spatula until it looks like this ↓ then switch to the dough hook (or start kneading by hand.)
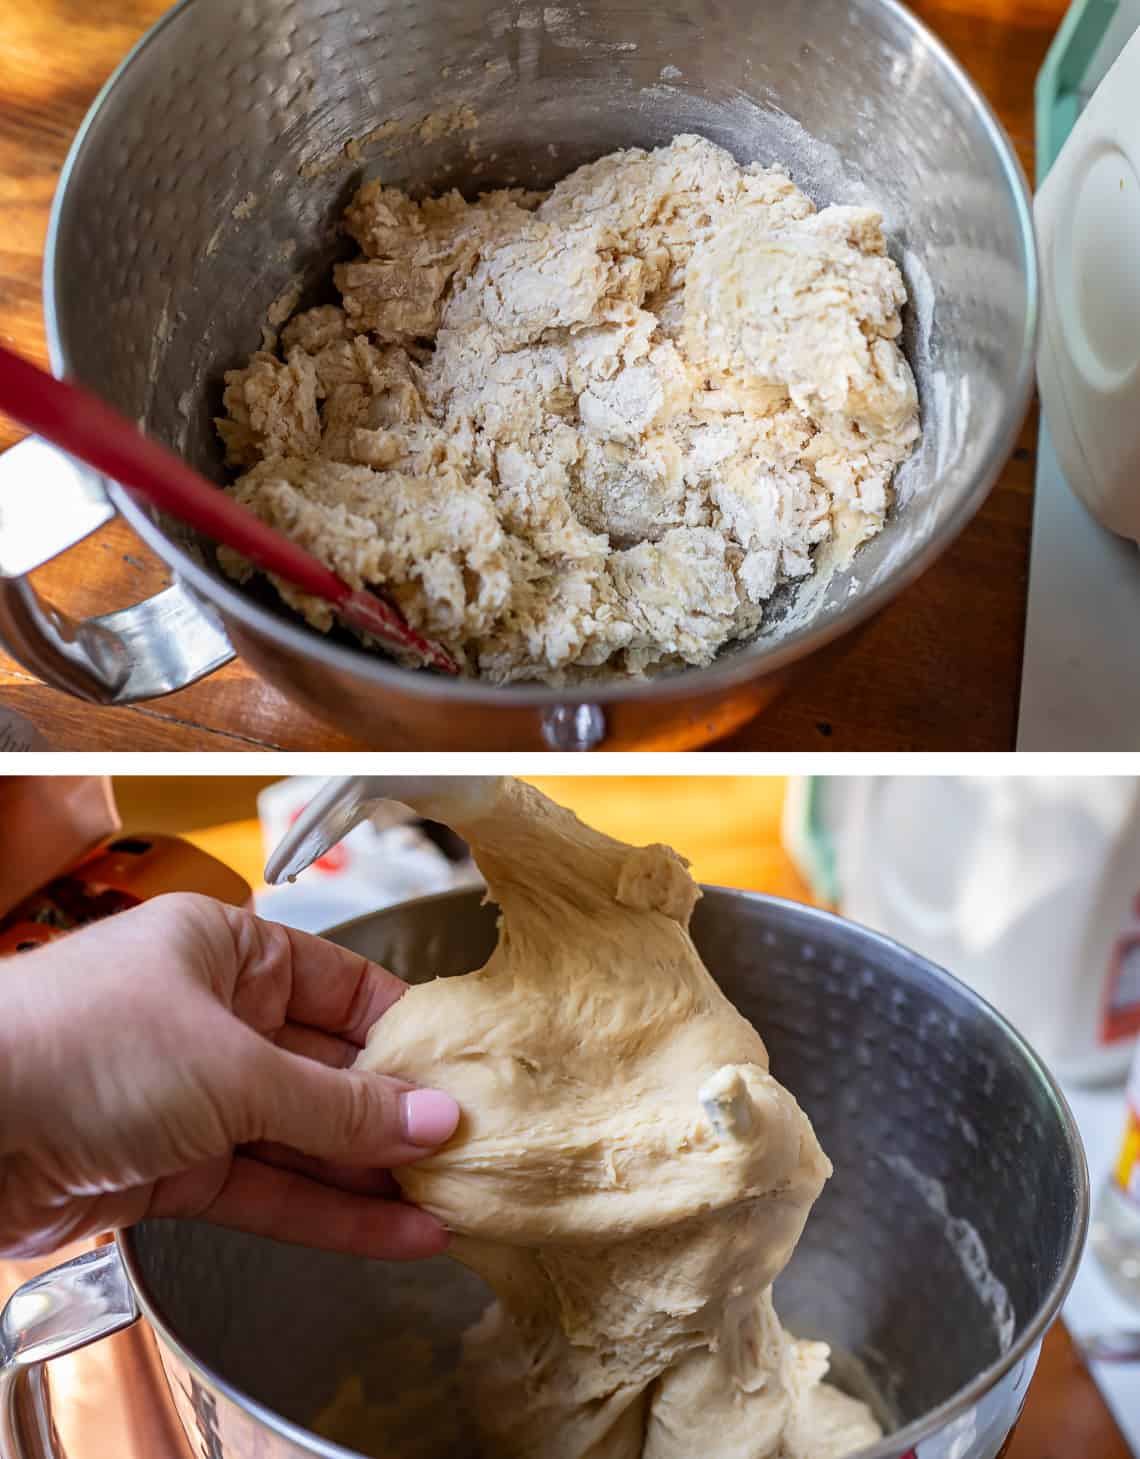
- Here is the dough after 5 minutes of kneading. It should be pulling away from the sides of the bowl, have formed a ball shape, and should be smooth and elastic. DON’T over flour your dough! If it seems very sticky, add another 1/4 cup flour, but don’t go crazy or your donuts will end up dry and tough.
- Transfer to a greased bowl and cover. Turn your oven on for a hot minute so it gets nice and toasty inside, then turn it off before it gets too hot. You should be able to touch the racks with your fingers.
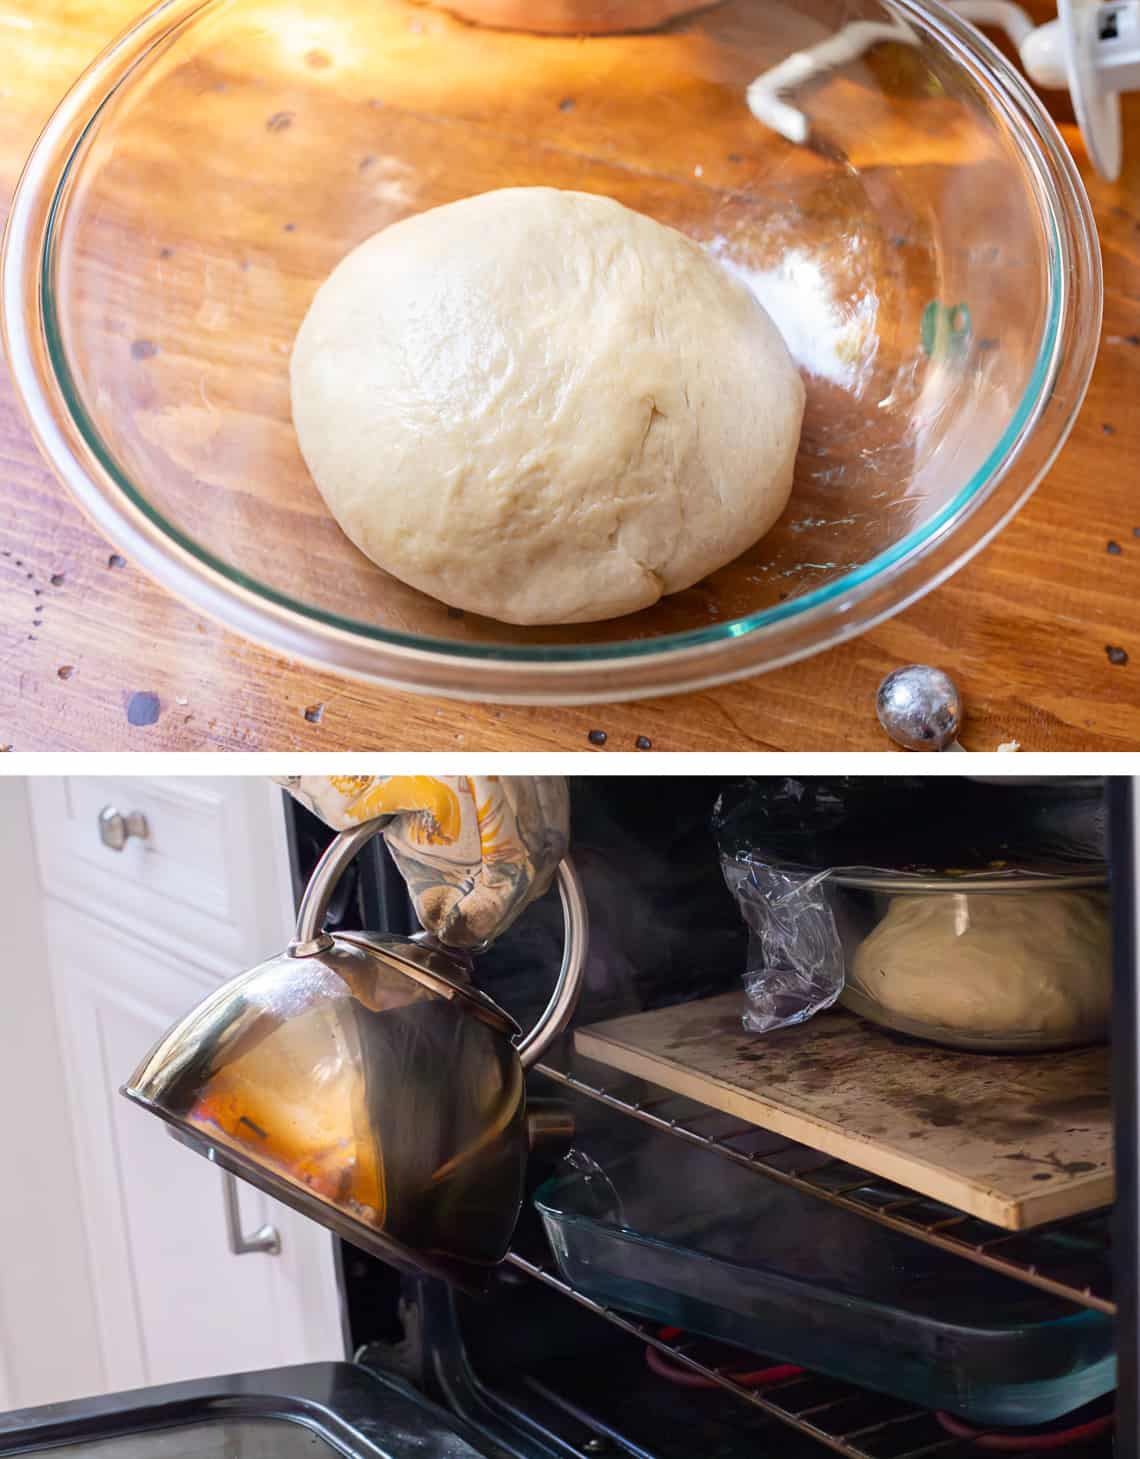
Please try to unsee my oven. Don’t you just feel really good about yourself and your hygiene level right now? You’re welcome.
- Heat up a pot of water, or use your kettle. This is where the magic happens. We are creating a mini proofing box out of our oven. The steam from the boiling water and the heat from turning on the oven for a minute create an ideal climate for this dough to rise!
- Here she is all grown up! Punch it down and smooth it out.
How to make donuts without a donut cutter
- You do NOT need a donut cutter to make donuts. Grab a piece of dough about this size.
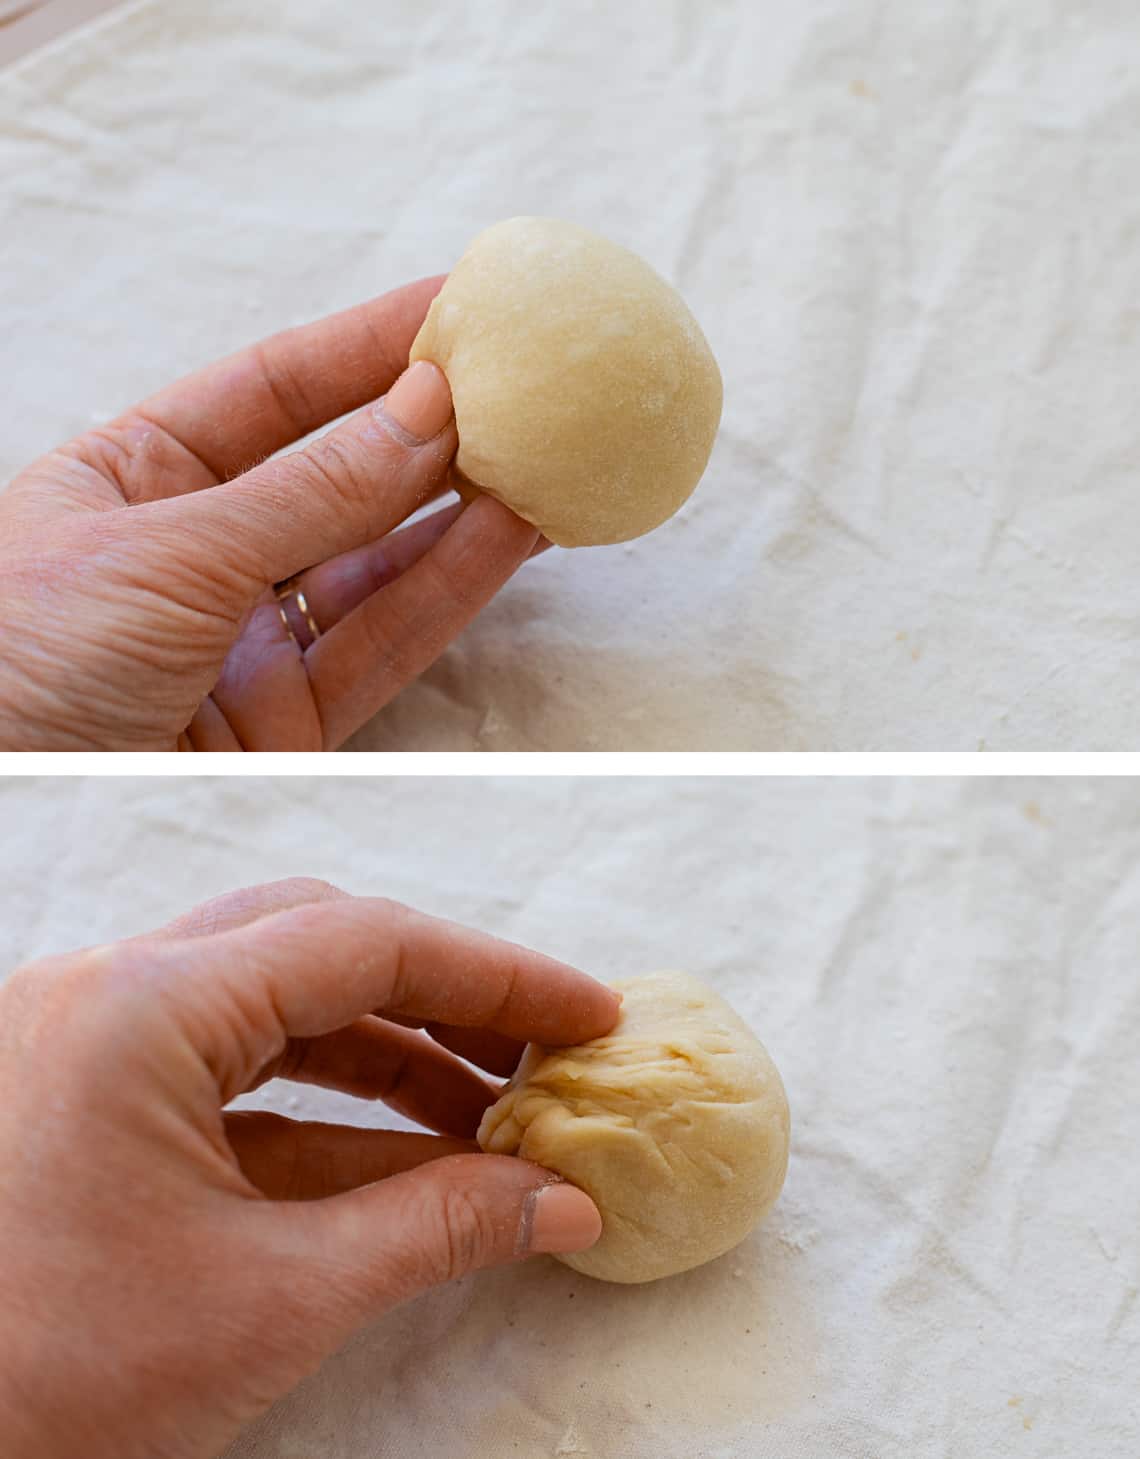
- Shape it into a smooth ball.
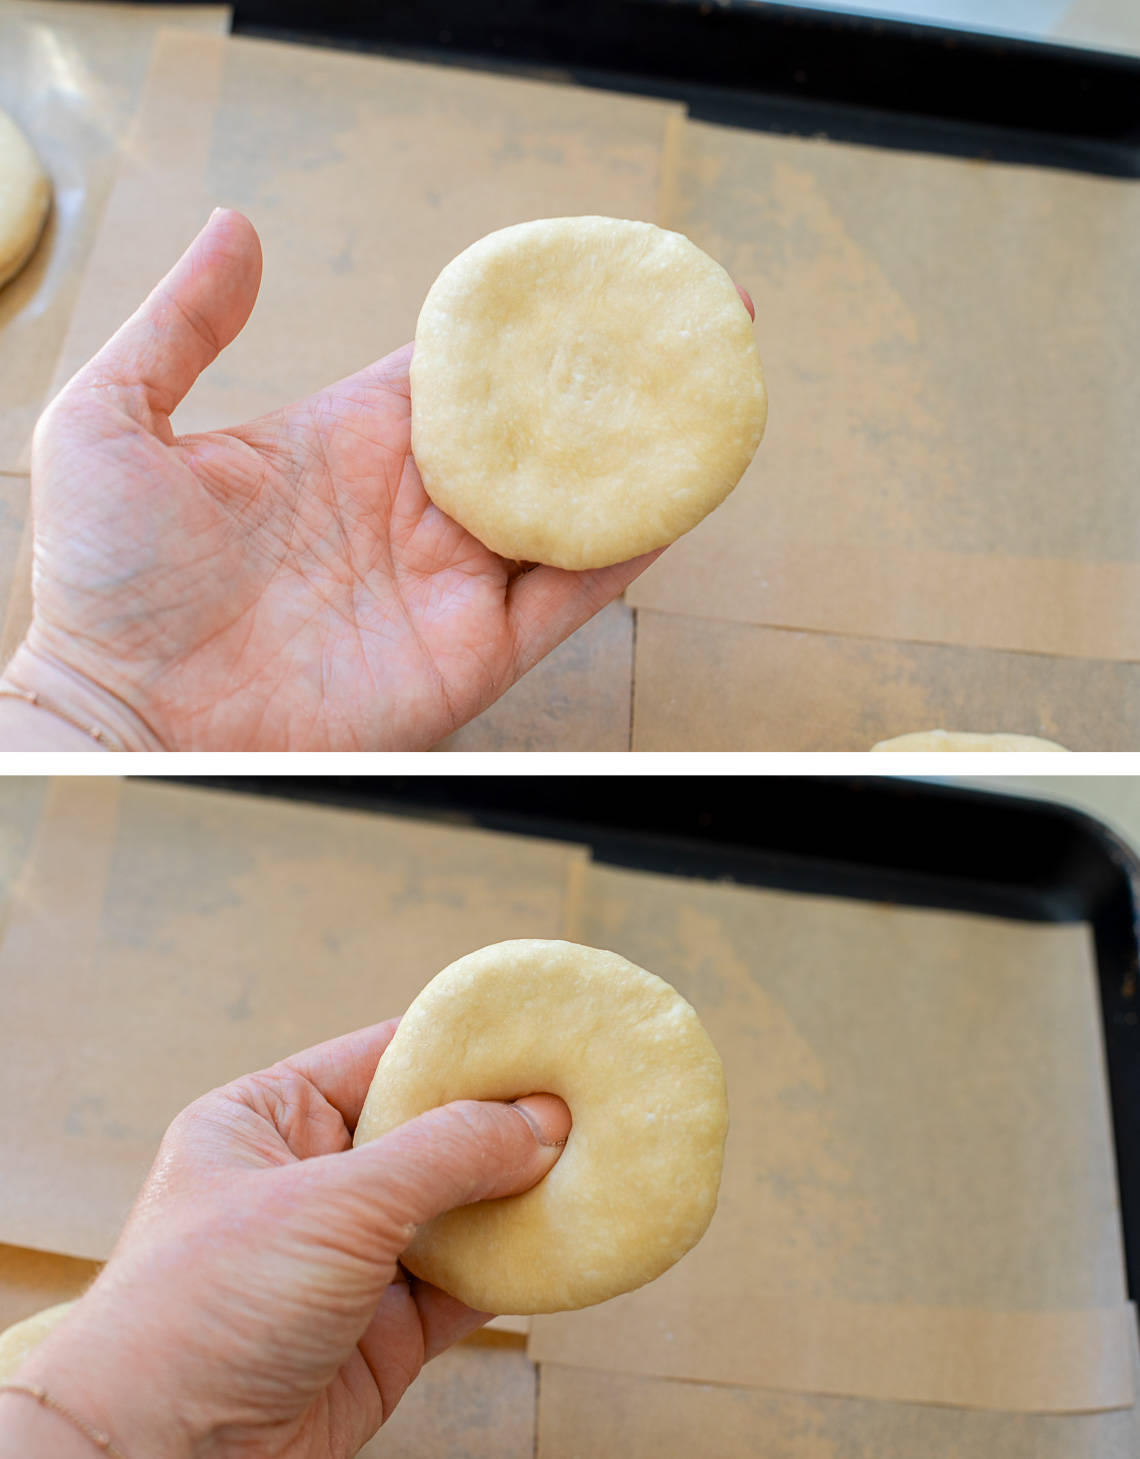
- Flatten out the dough into a disc like this. Press your thumb through the center until it pokes through. Coat your hands with flour if necessary.
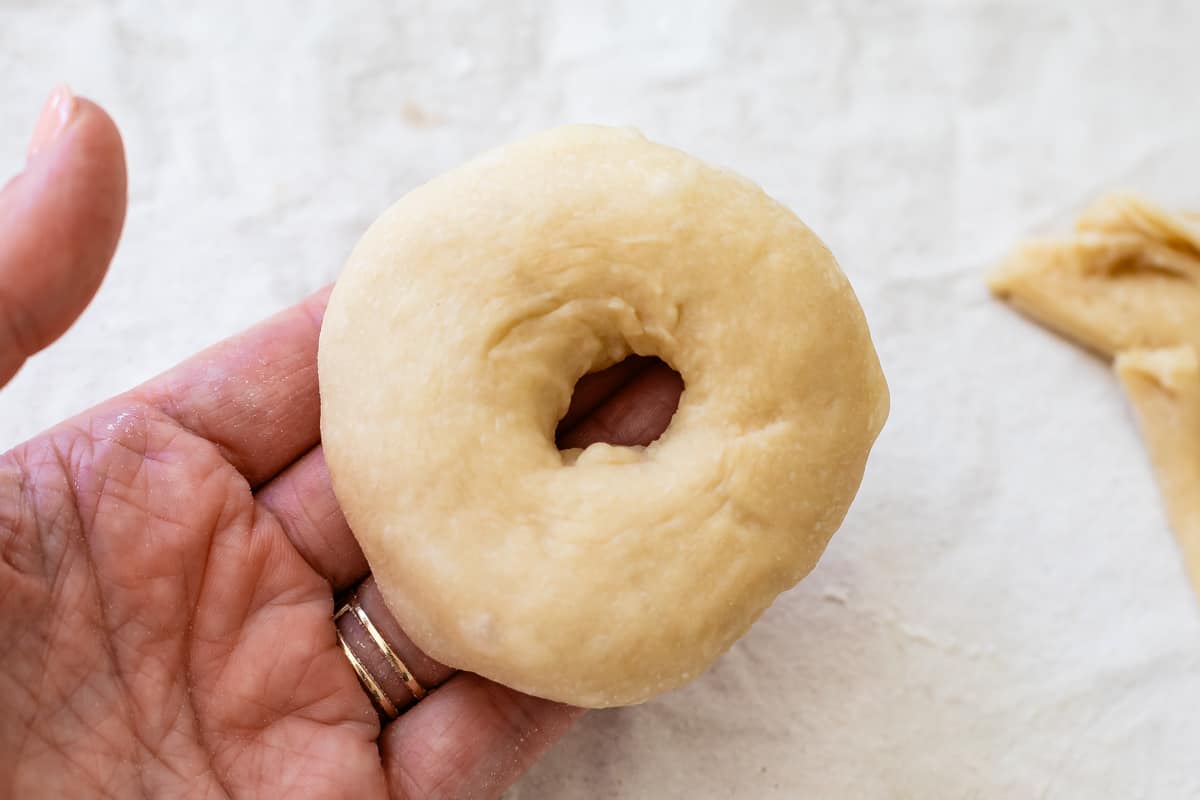
- Pull and shape the dough into a donut shape. Put it on your finger and spin it around a few times! It actually helps so much to get the dough moving outward. It’s so fun, grab your kids and let them do one!
- Use your fingers to make sure the donut is a nice tall shape. We want things to rise UP! Make the hole in the donut larger than you would think.
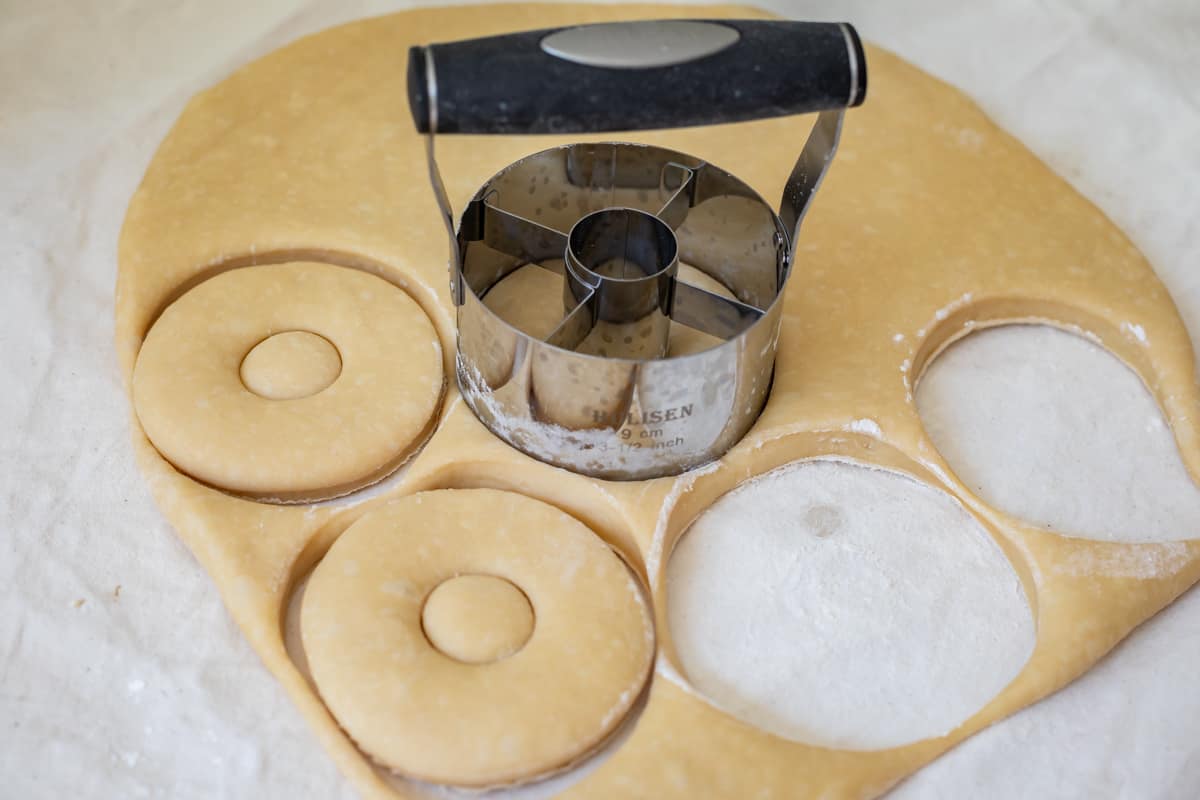
I wanted to show you that you can also roll this dough out and cut them the traditional way, if you have a donut cutter. I bought this cutter just for this post and thought it would be so much better but I actually MUCH prefer shaping the donuts with my hands! I found that hand-shaping allowed them to rise easier on the outside edge of the donut. Every donut I made with the cutter sloped down on the edges, the hand shaped ones looked more “plump”:
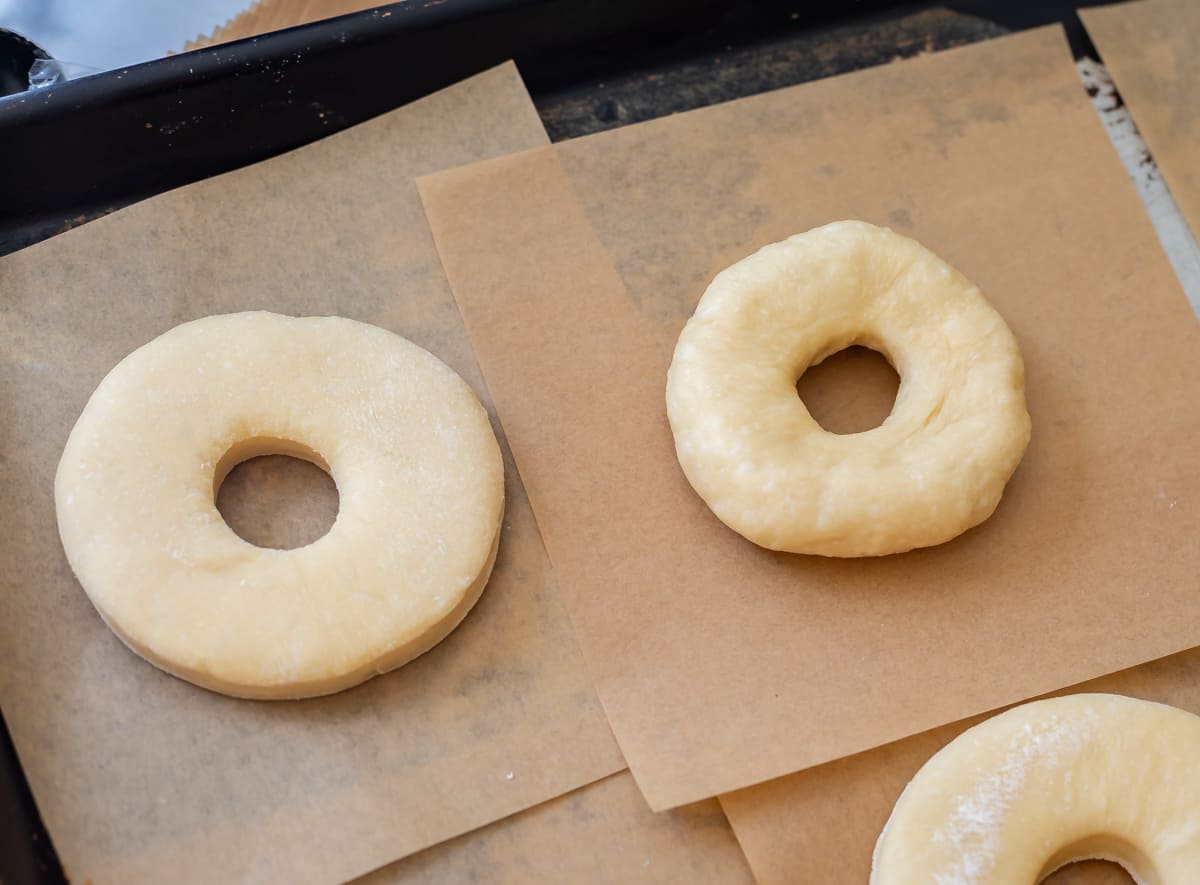
In both the pictures above, I used a donut cutter on the donuts on the left. I hand shaped the donuts on the right.
Do you see what I mean? These are both great, tasty donuts that rose well. But the cut donuts slope down on the edges. The hand shaped ones are more rounded. This is a tiny detail, either method works great! If you hand shape, you won’t have donut holes. You can just grab a couple smaller balls of dough and shape them into a ball yourself, if you love donut holes. (Who doesn’t?)
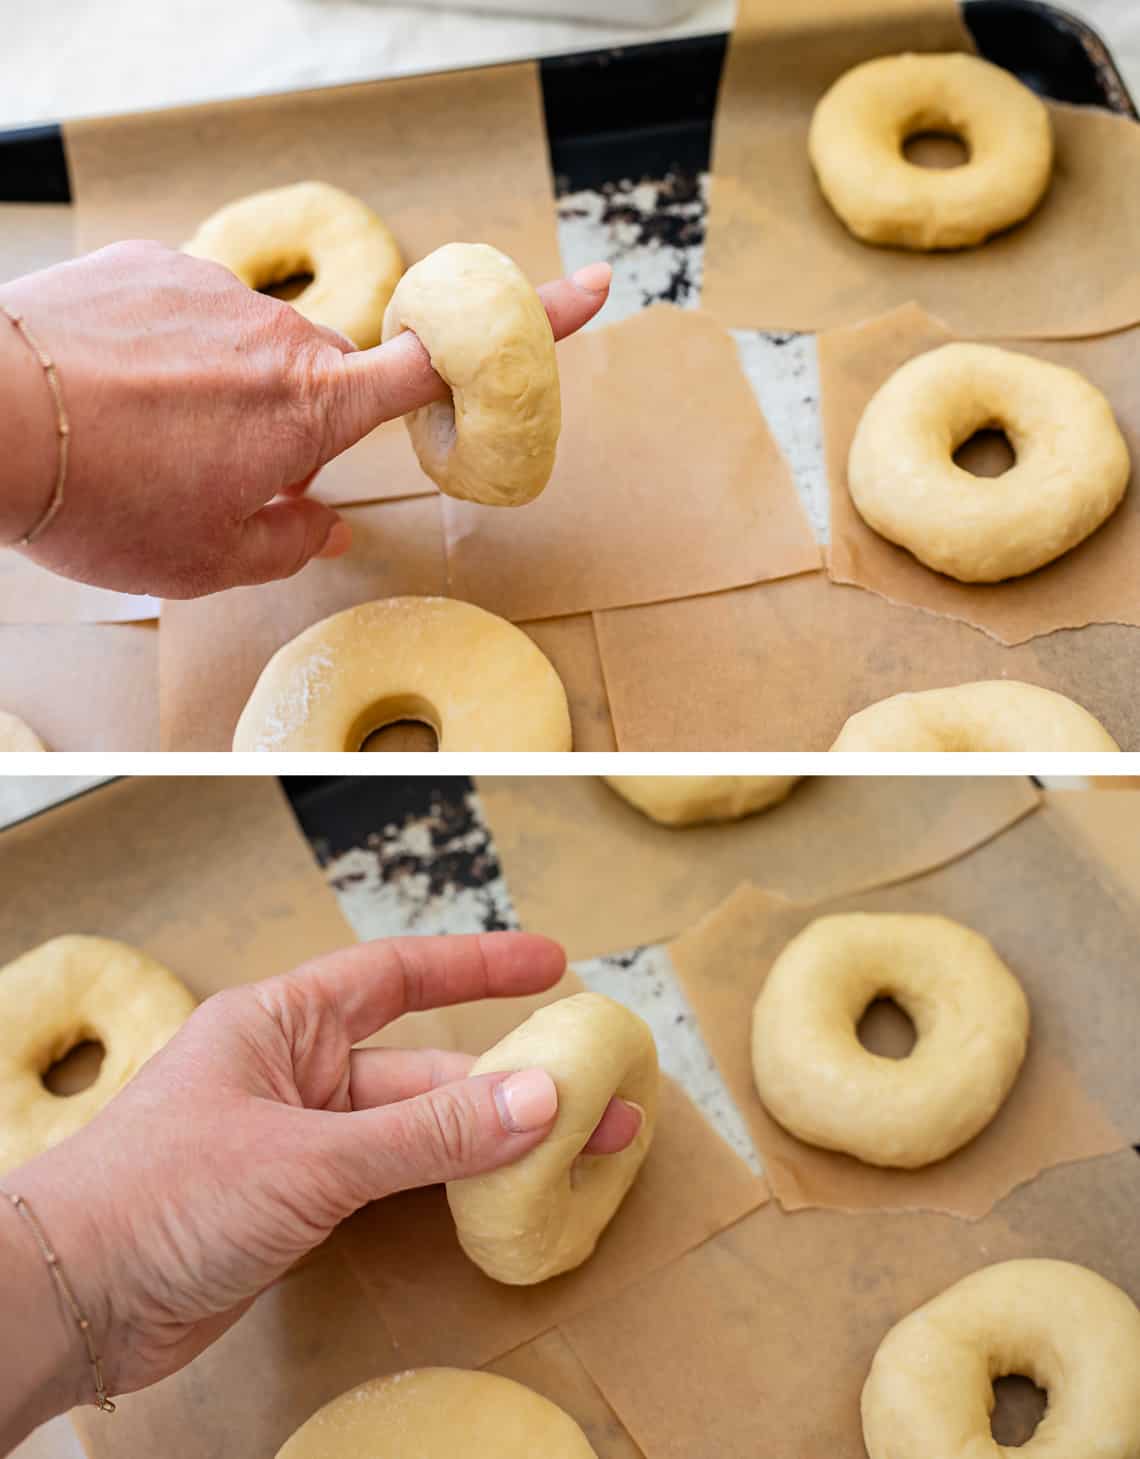
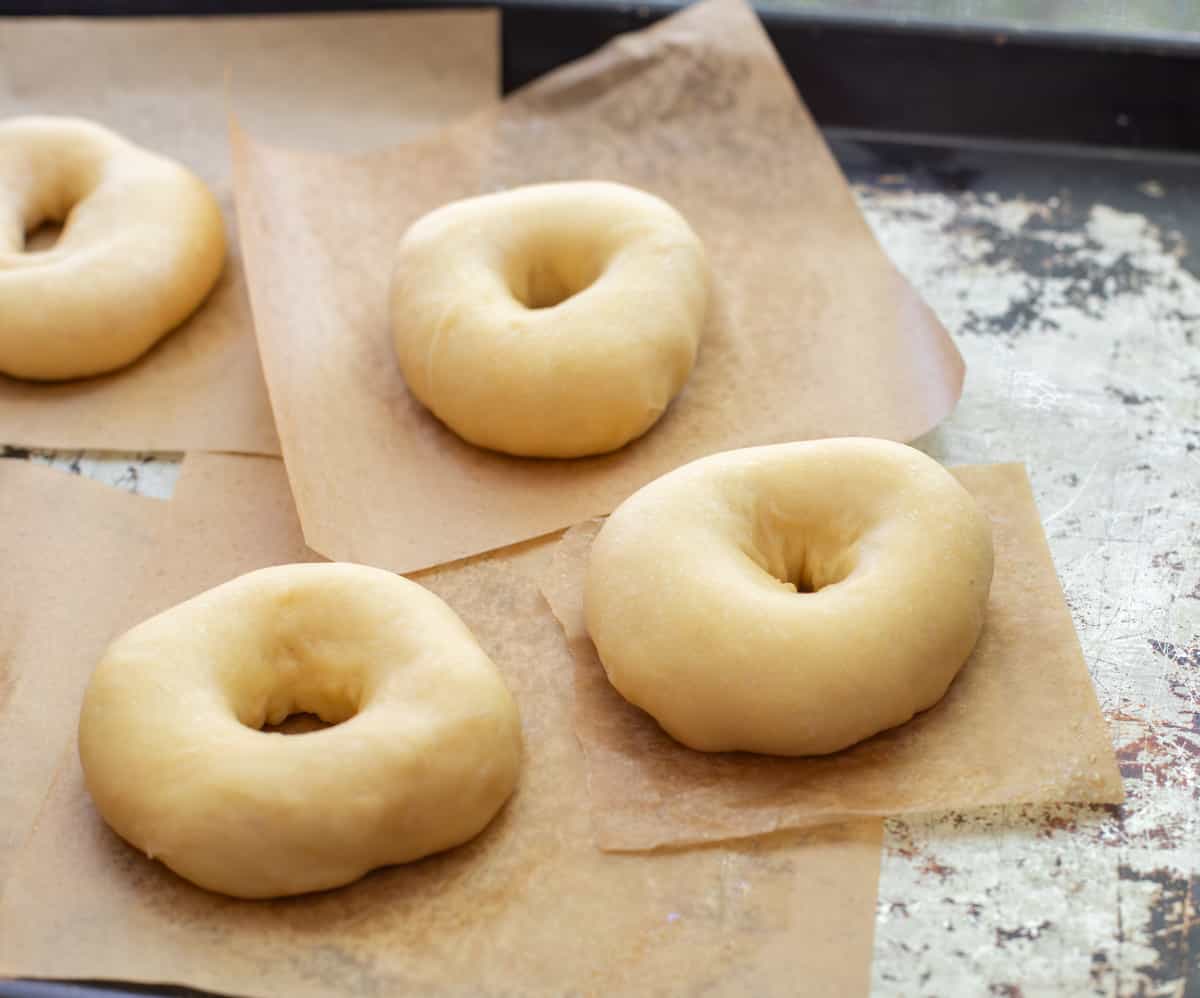
- Line up all your donuts on a baking sheet, with plenty of space in between. Each donut should be on its own square of parchment paper. You can cut them yourself, or buy these handy 6×6 inch parchment paper squares. Don’t cover the donuts this time.
- We’re going to do that proofing box thing again. Heat up some water and heat up your oven a bit.
In the photo above, I have my pan of water directly on the element, because I couldn’t fit two pans on the top rack. 😬 DO NOT turn on your oven with a pan on it like this. Heat the oven and turn it off before you put the pan in. Also don’t be dumb and don’t sue me. 😂
How to make glaze for donuts
- While the donuts are rising, make the glaze. For glazed donuts, it’s best to glaze them while the icing and the donut are still warm, so make it now.
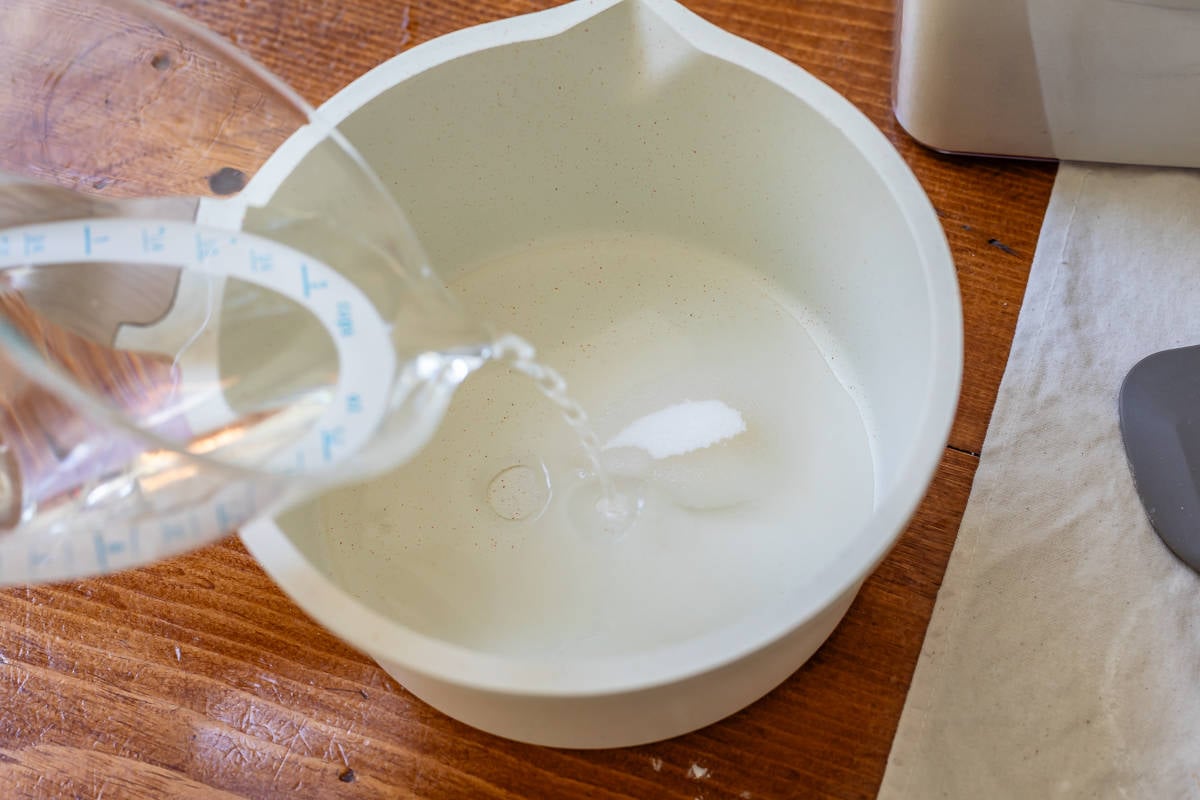
- First we’re going to make a simple syrup with some cornstarch, granulated sugar, and cold water. And pretend there is butter, I added it after the photo! Can’t have no glaze without some butterrrr
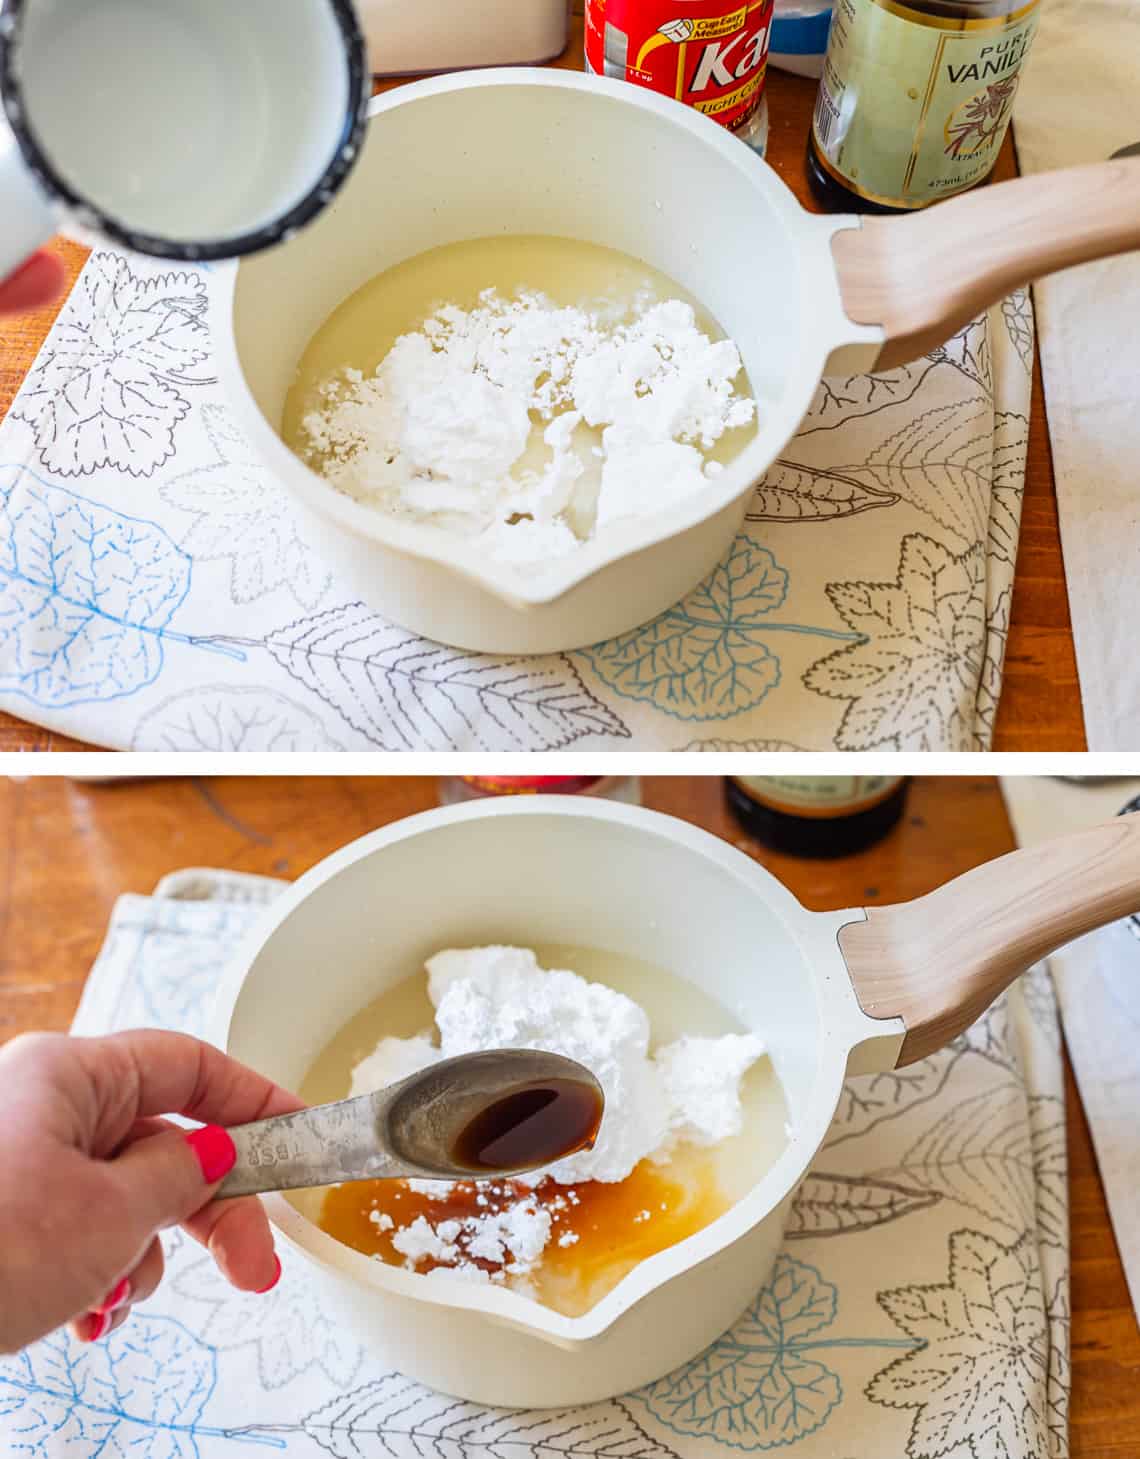
- After you boil it to dissolve the sugar, add in powdered sugar, vanilla, salt, and corn syrup. Sift your powdered sugar if it’s clumpy, lumps are tough to whisk out of a glaze. Make sure you measure the vanilla this time so everyone knows how committed you are to your measurements. Whisk it all together and set aside.
Fry the donuts
- Just after making the glaze, heat your oil in a high sided skillet.
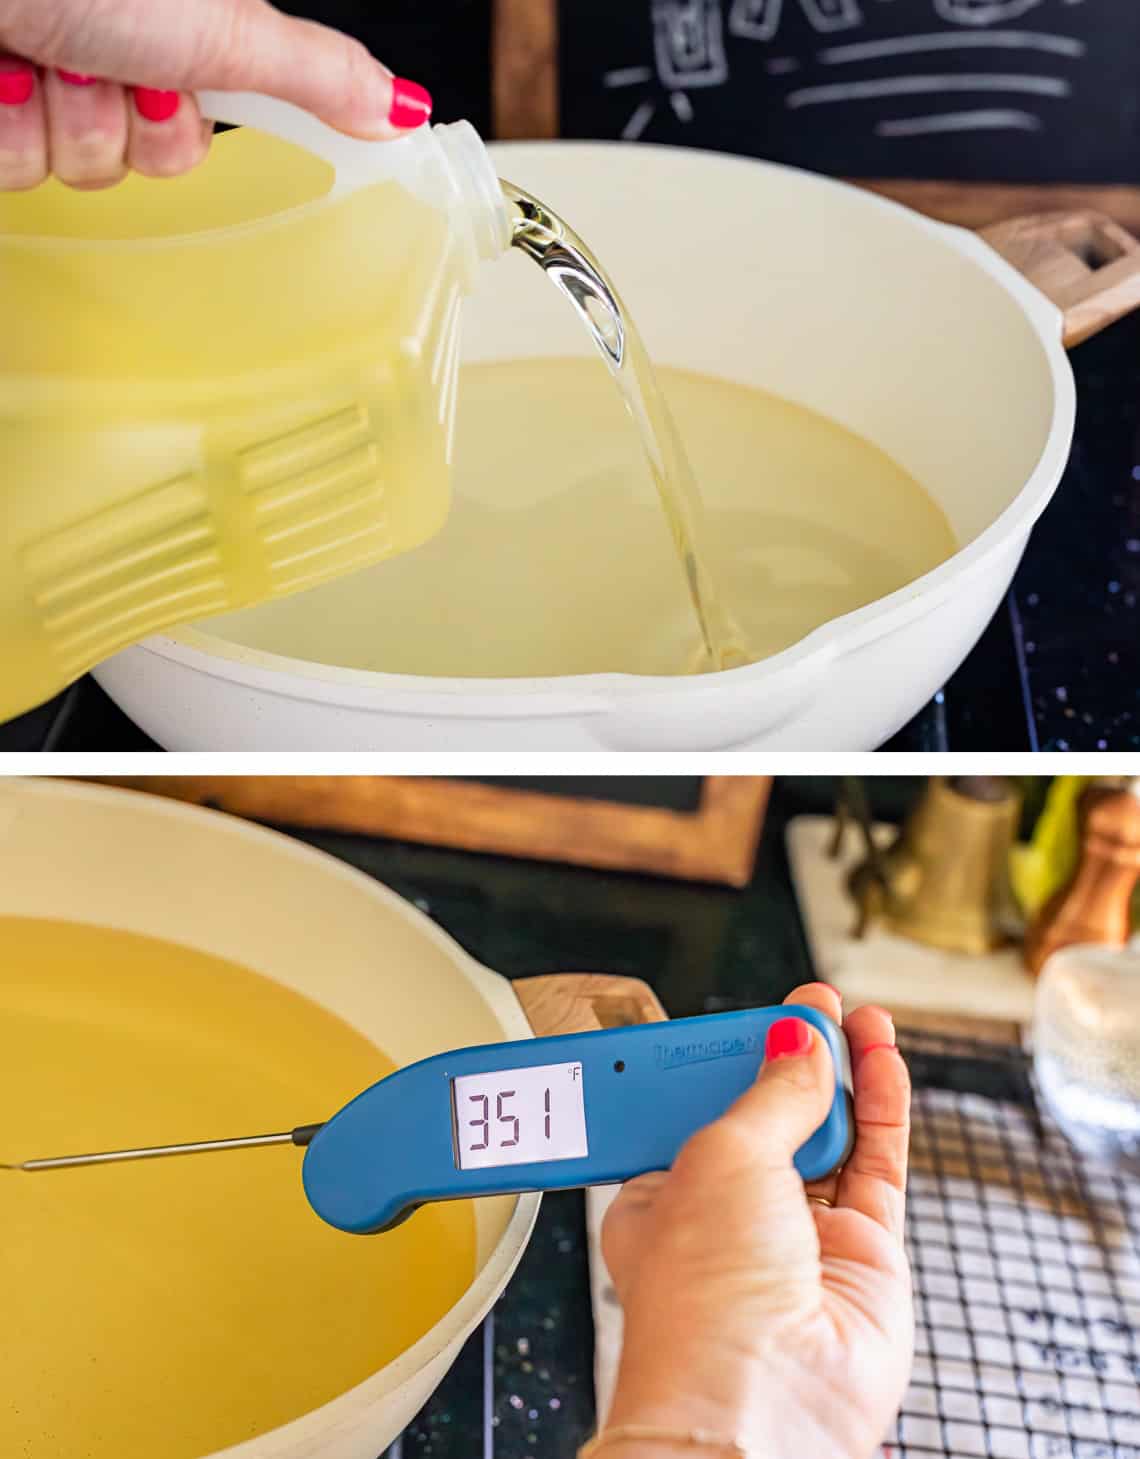
- Let the oil heat for at least 15 minutes. You are aiming for a temperature of 350 degrees. You need a LOT of oil, at least 2 inches. They call it deep frying for a reason. If you don’t use enough oil, it will be really hard to maintain a steady temperature. With a small amount of oil, the temp will rise and fall too dramatically, giving you burned/doughy donuts.
- Set up your frying station so everything is handy when you are frying.
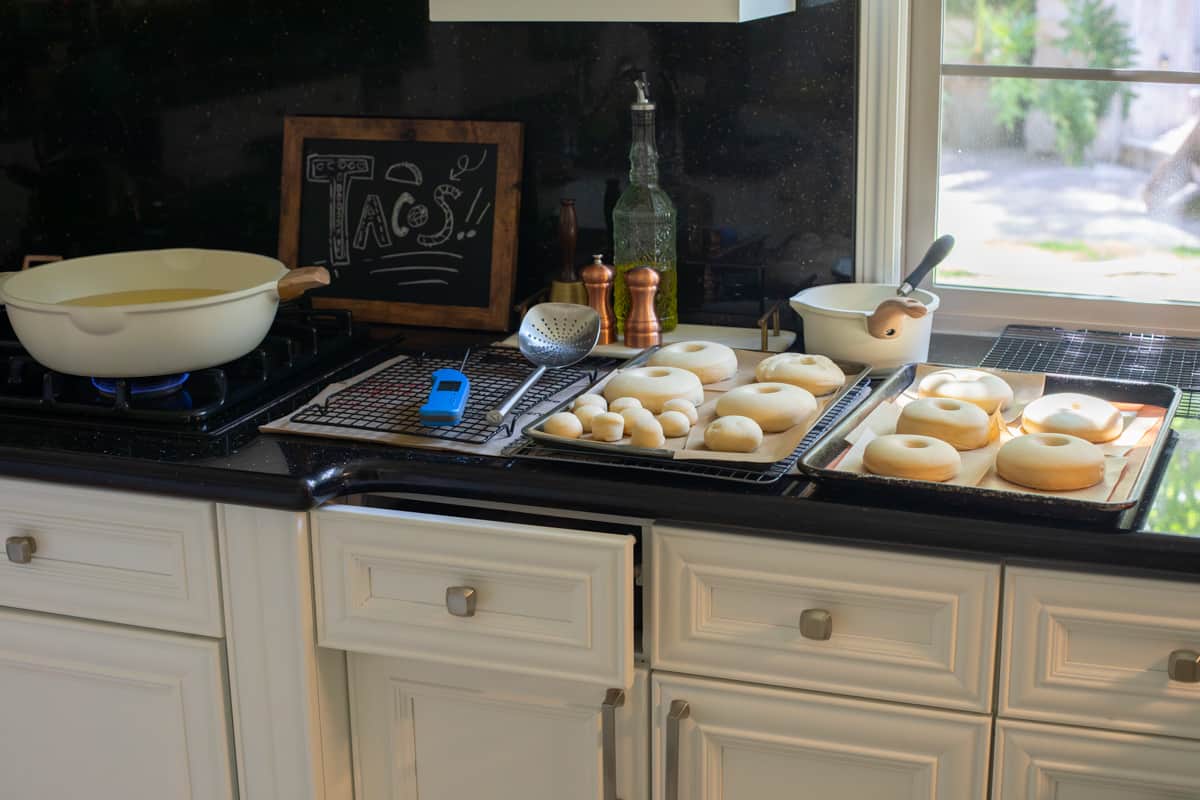
Ignore my taco sign (leftover from this summer’s Taco nights) and constant open drawers (it’s a curse)
Fry station: Heated oil, cooling rack on top of paper bag or paper towels, thermometer to check temp, a slotted spoon to remove donuts (A spider strainer is even better, and I actually have one and have no idea why I didn’t use it 🤦♀️) and all the risen donuts nearby. I even have the glaze there ready to go.
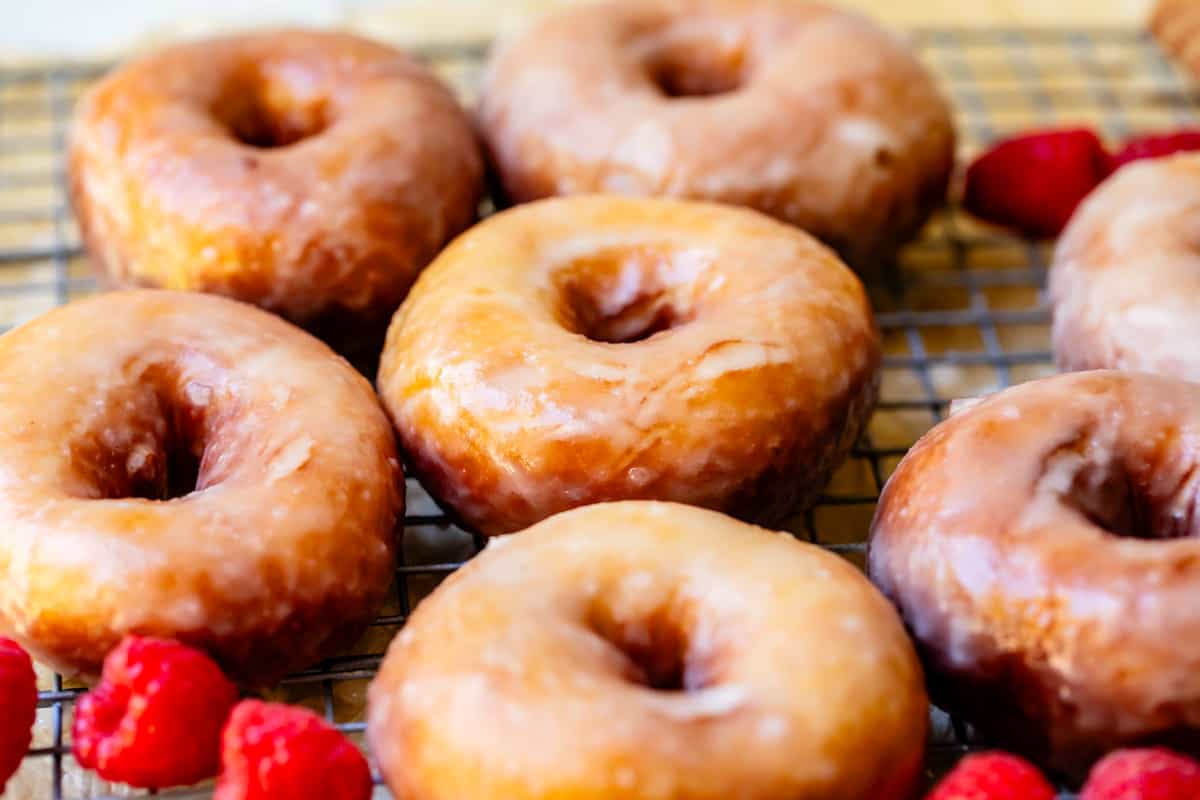
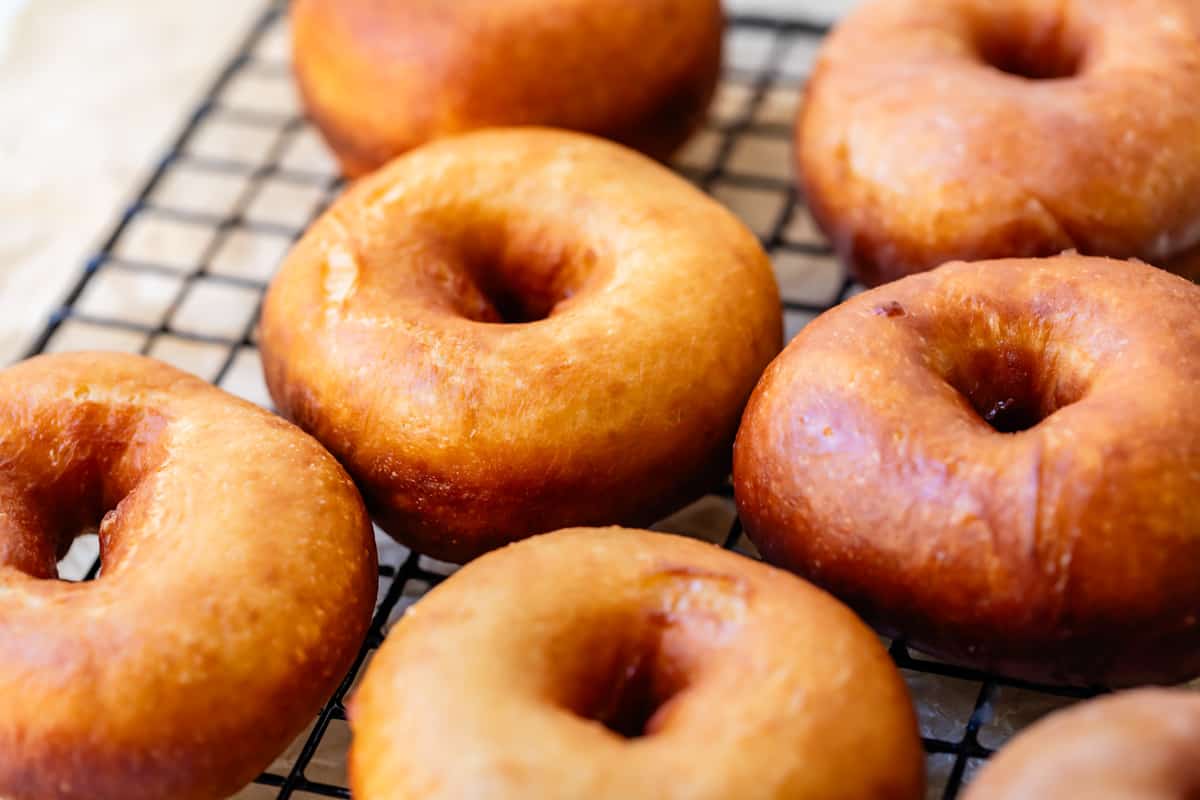
Look at these beauts! All ready for the fryer!
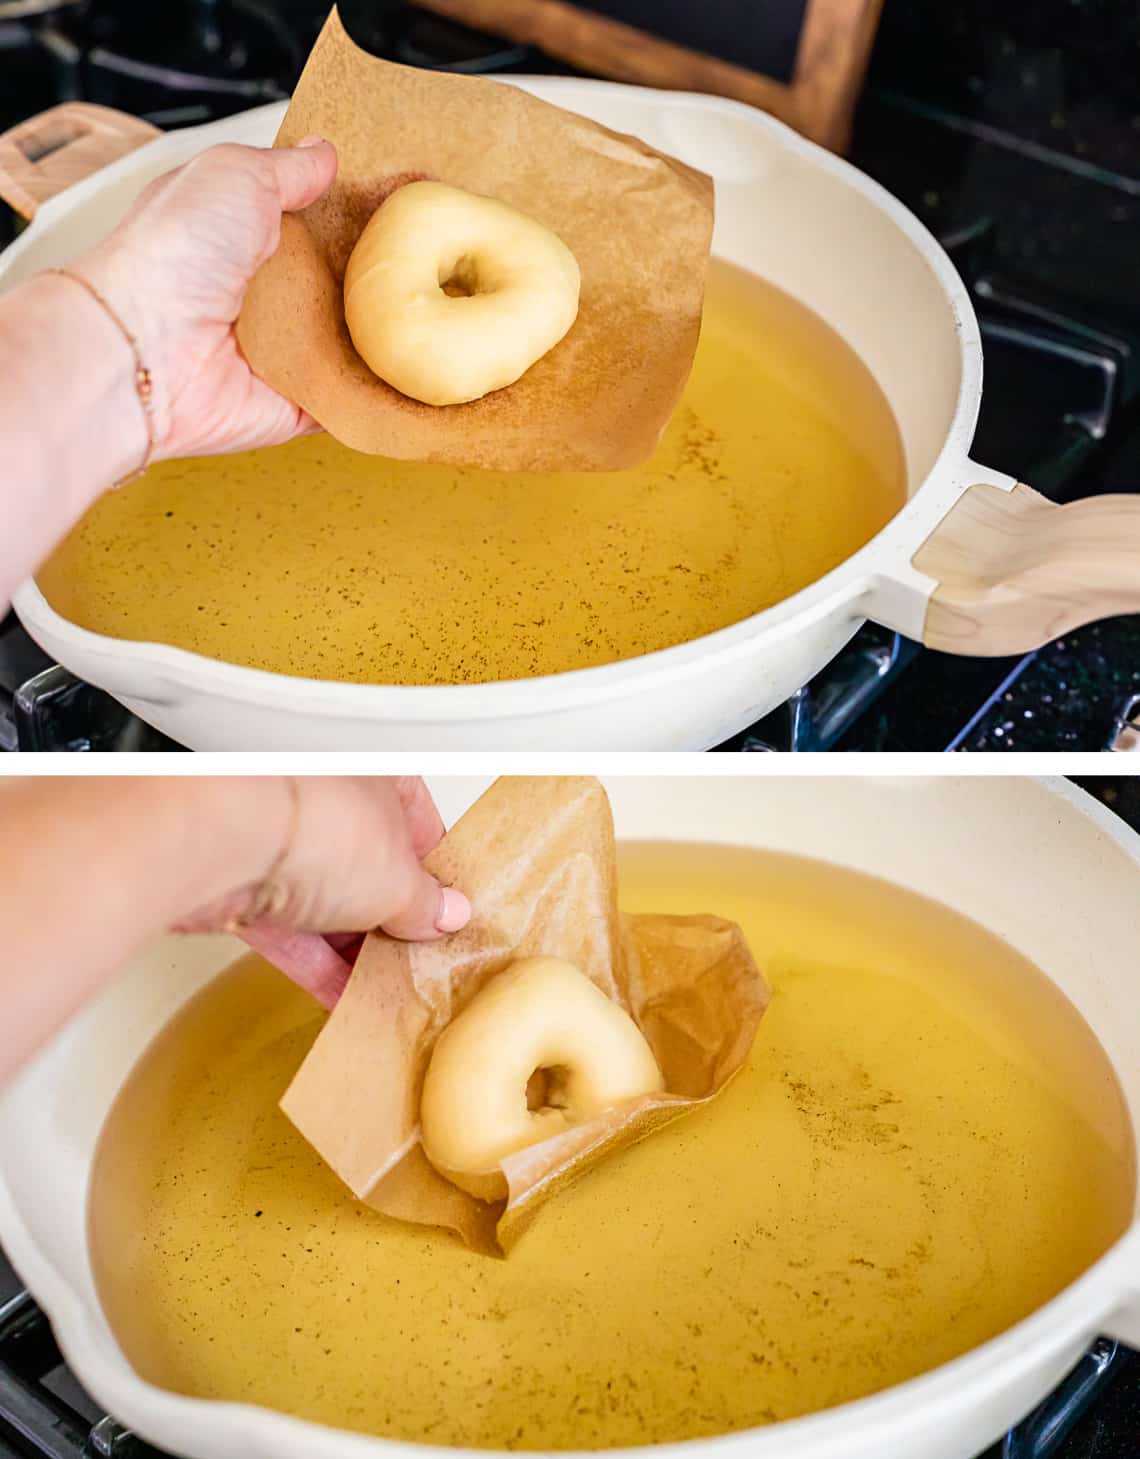
- Here’s why I love to use little squares of parchment paper. I CAN’T TELL YOU how many gorgeous risen donuts I have destroyed trying to get it from the pan into the oil. With any sort of spatula you might use to lift it, you run the risk of puncturing and deflating your donut, right before it hits the oil. Parchment paper solves this problem completely. The paper itself is lowered into the oil.
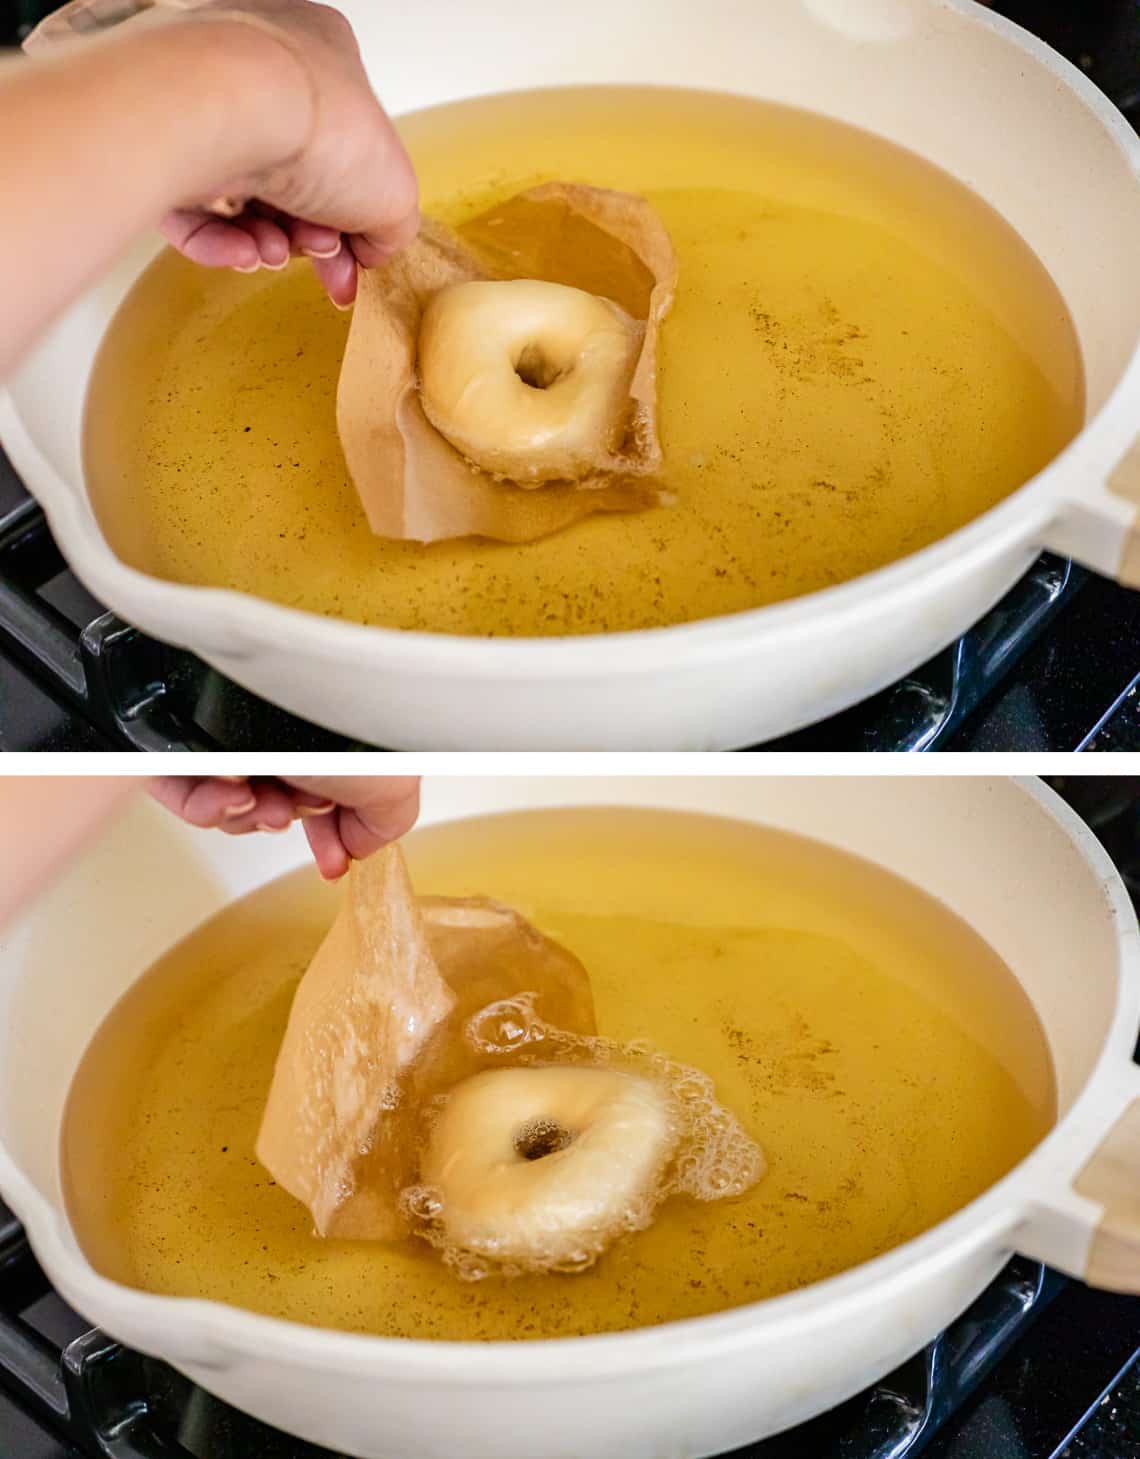
- You have to hold the paper in the oil for a few seconds, and eventually the donut will loosen from the paper and slide off. Be careful! This oil will burn you!
- Fry all the donuts, (about 45-120 seconds per side). Keep in mind that the color will continue to darken even after you remove it from the oil. But don’t underdo it, you don’t want a doughy donut!
- Make sure you wait in between frying if necessary, to let the temperature climb back up to 350.
Glazing the donuts
- Let the donuts cool for a few minutes so you don’t burn your fingers off. But remember, you do want to glaze them when the donuts and glaze are still quite warm.
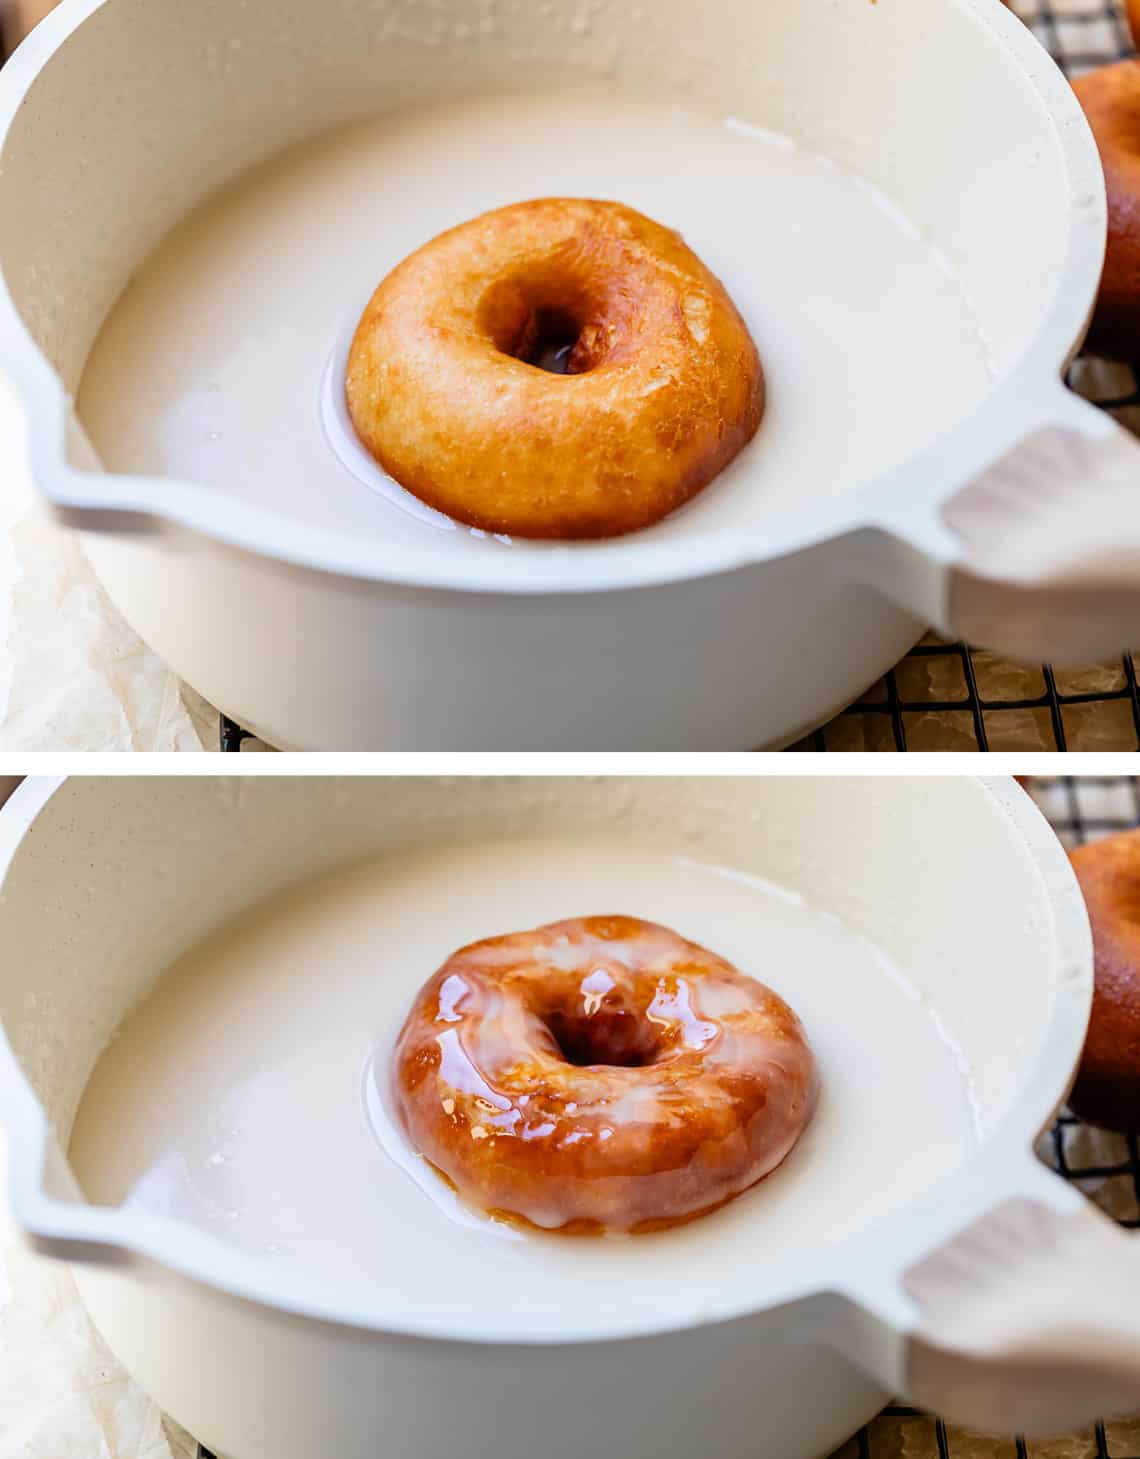
- Toss a donut one at a time in the glaze, then flip.
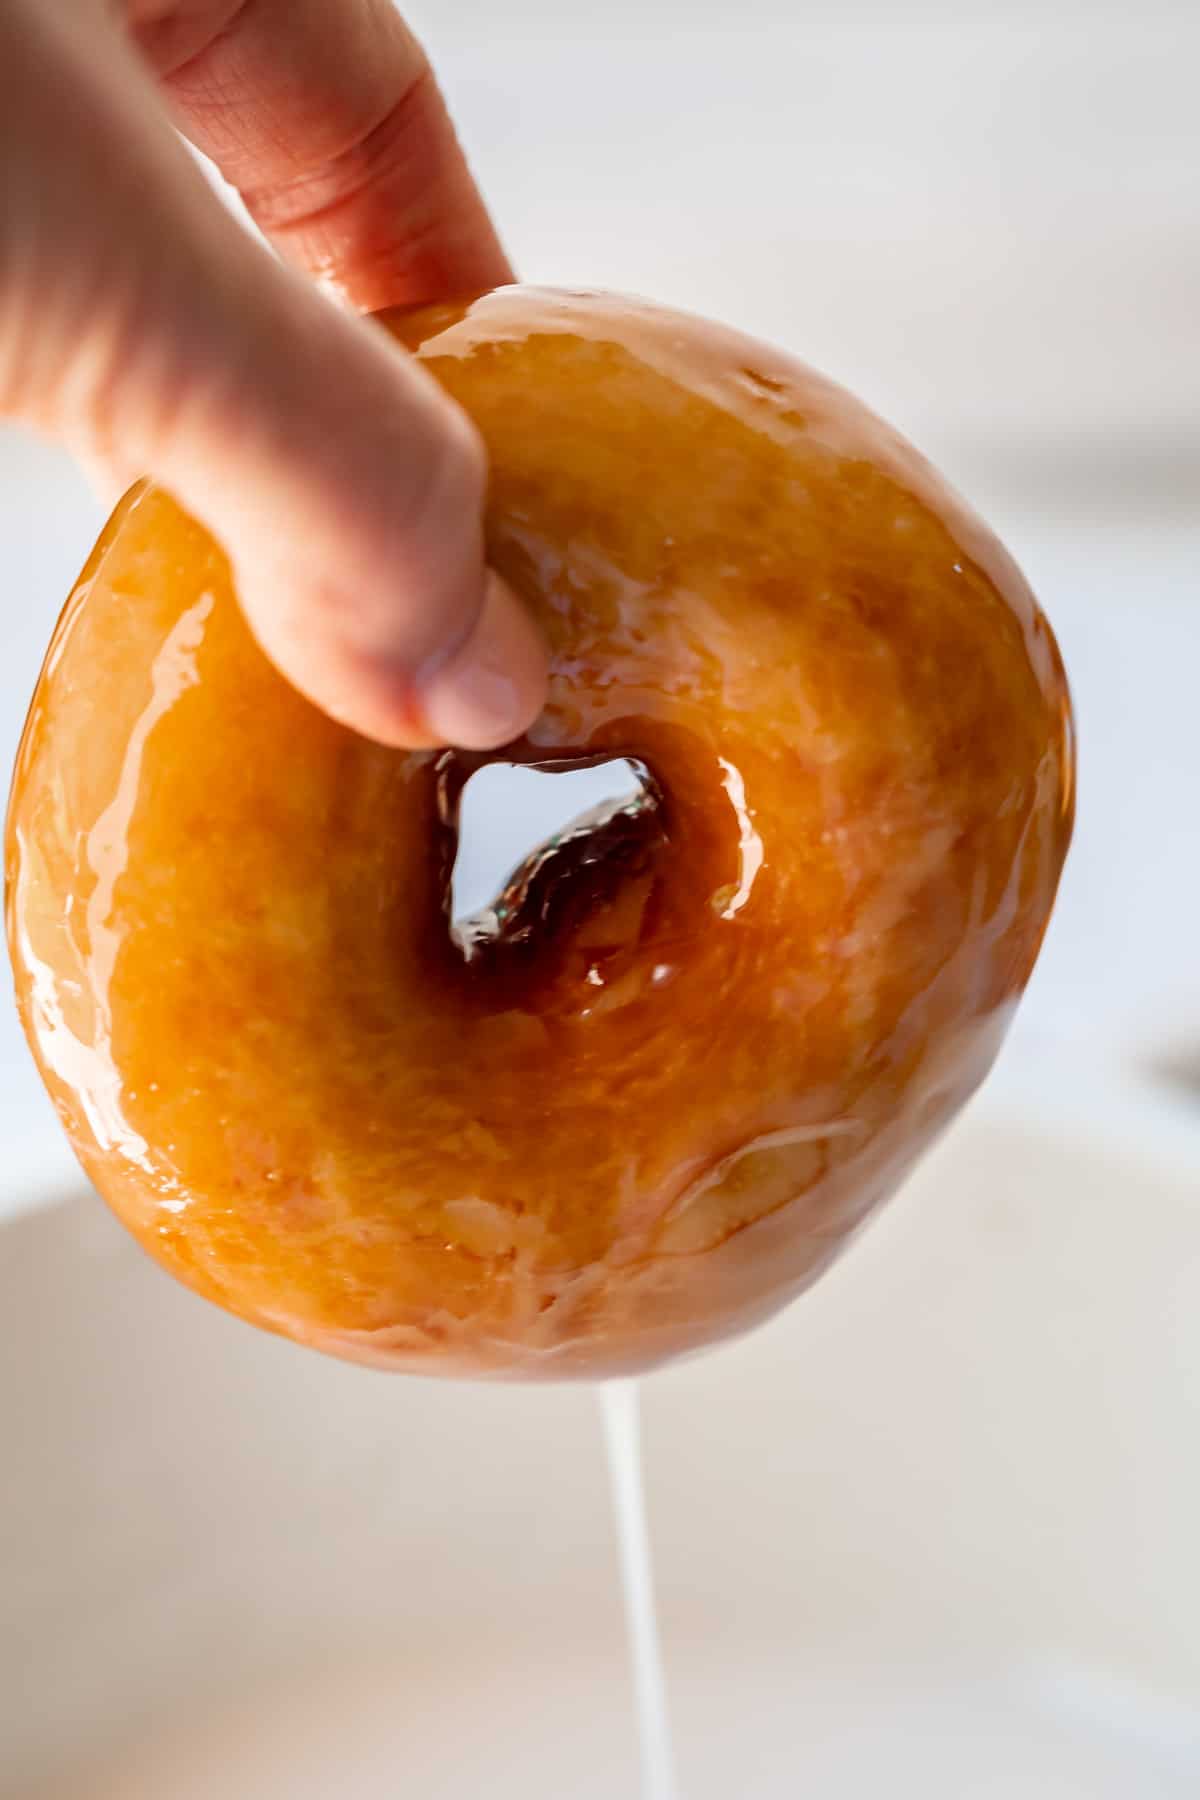
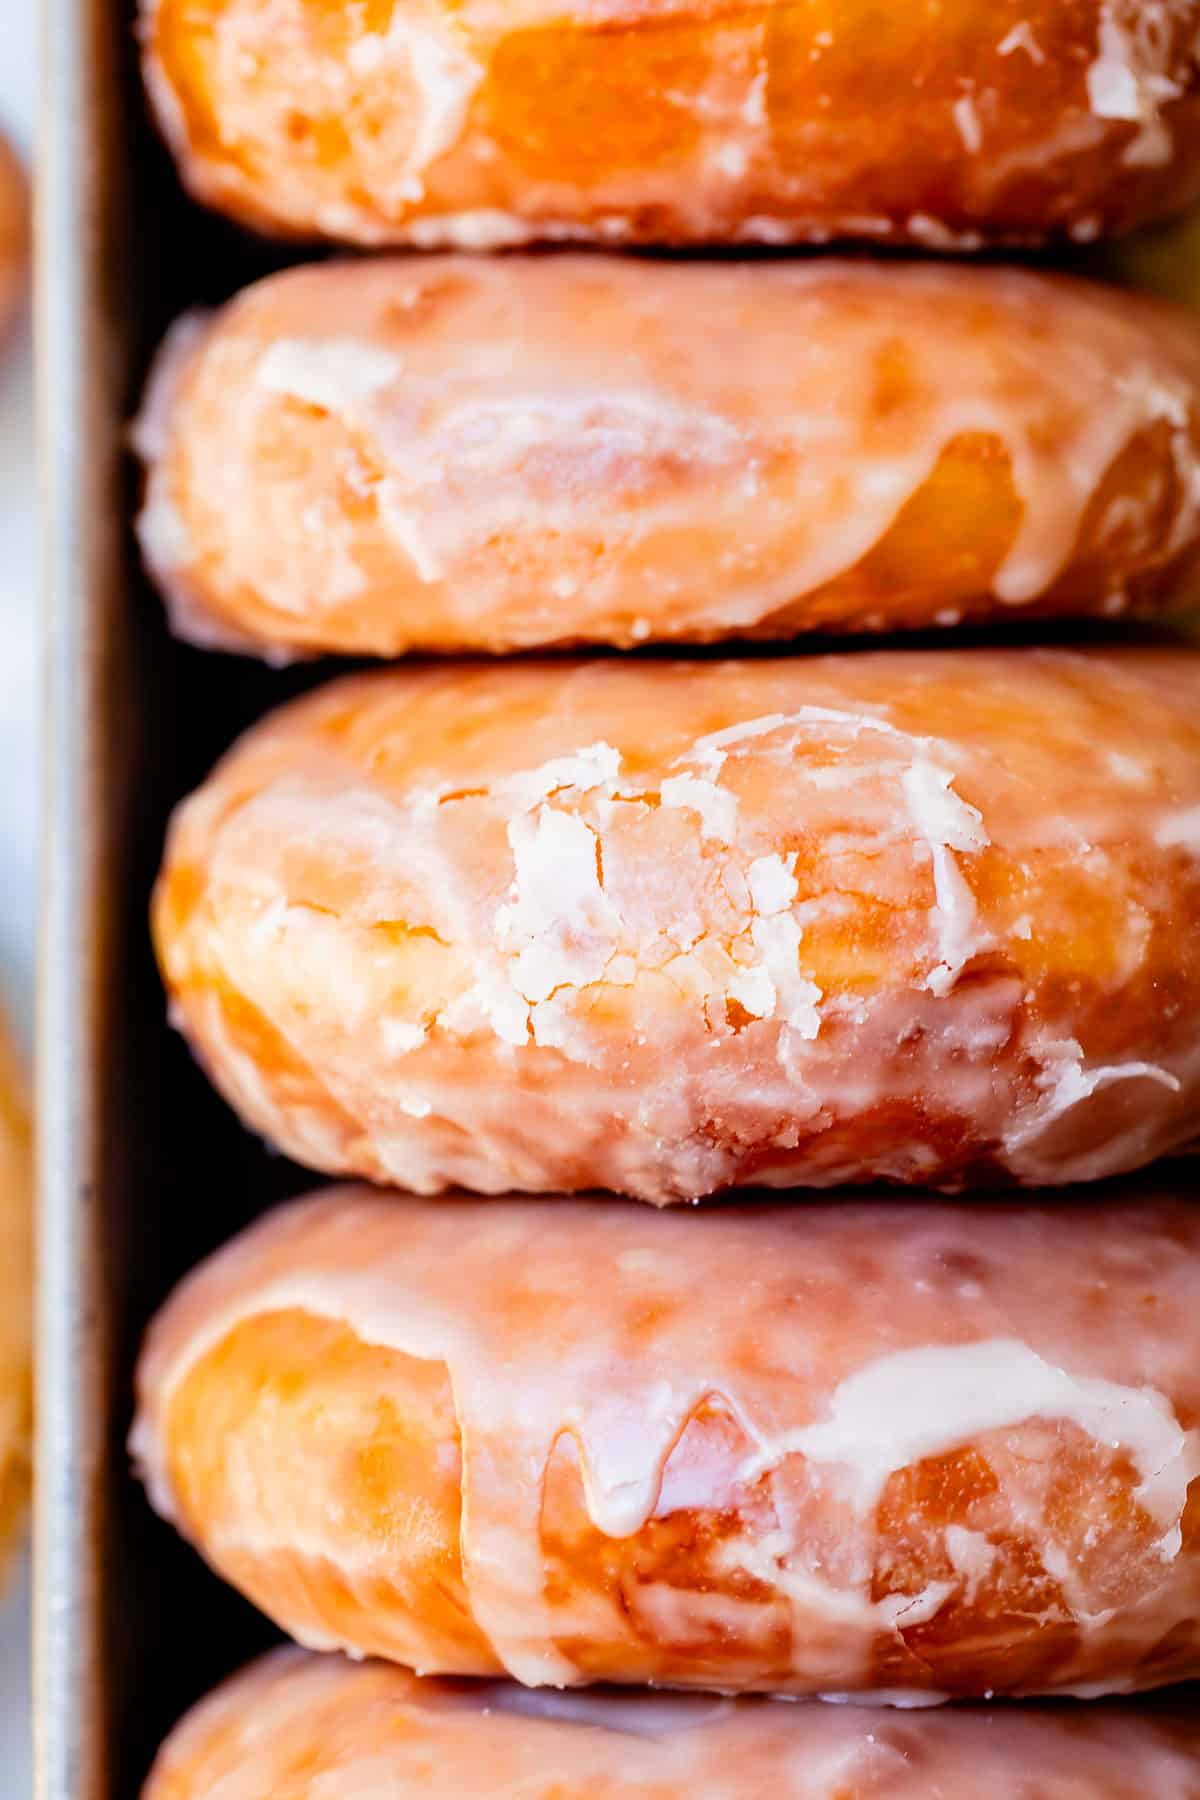
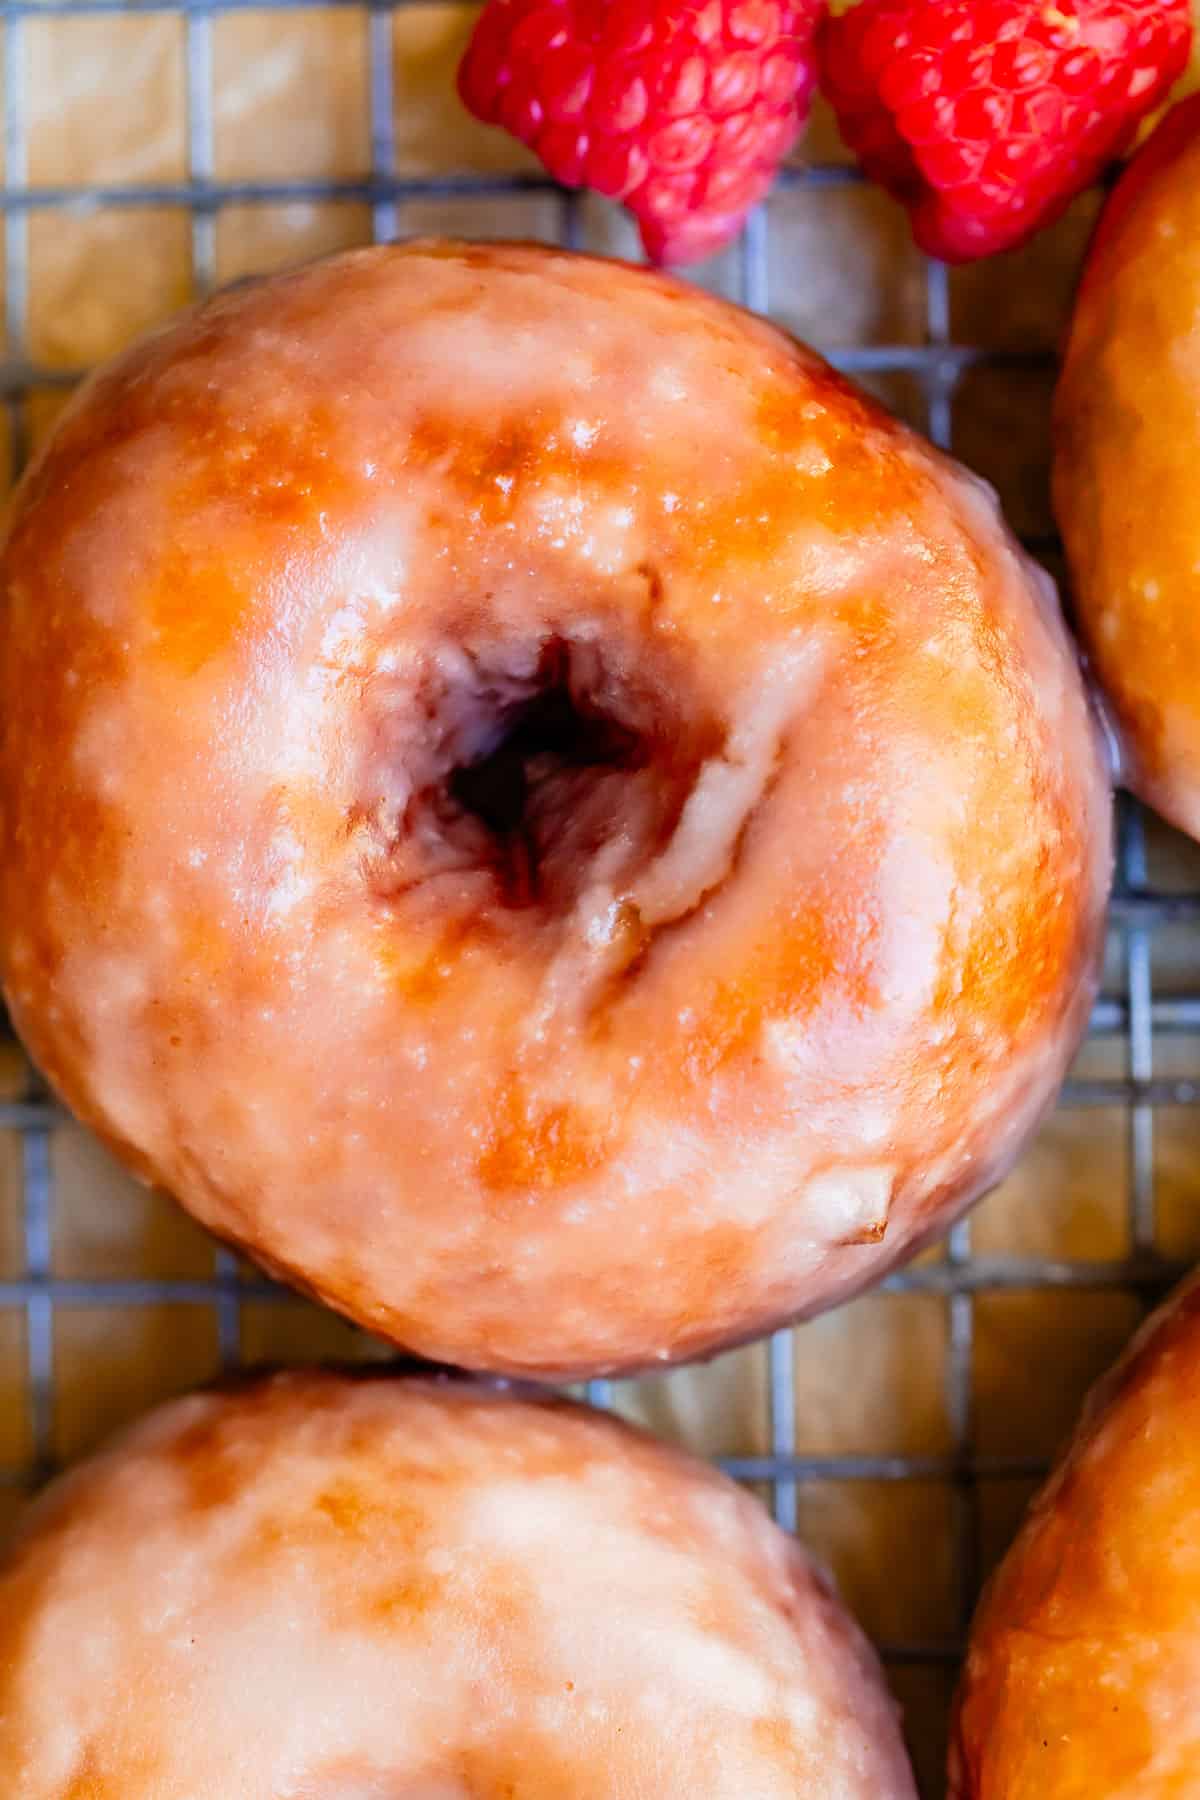
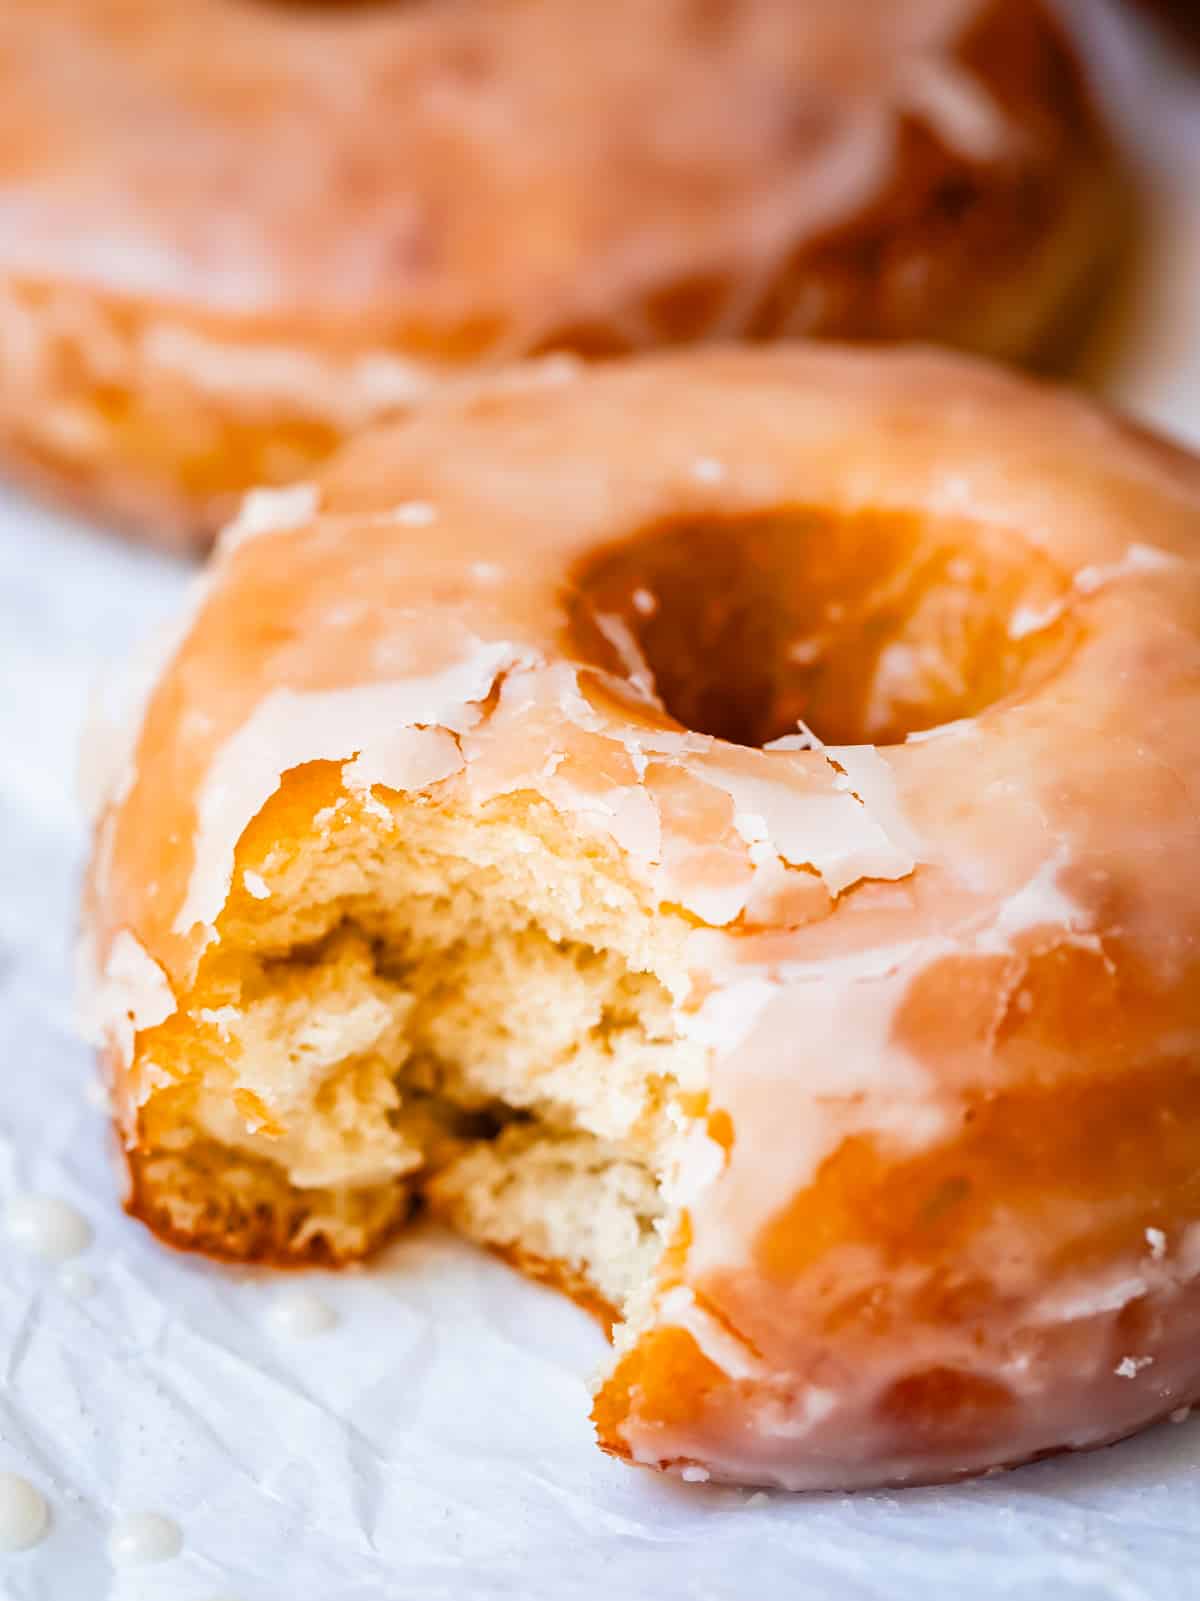
- Let it drip for a second, then place on a cooling rack to let the glaze harden. It’s tempting to take a bite now, but trust me, wait. It’s so much better when the glaze has hardened.
- Dip all the donuts, let set up for 20-30 minutes, then dip again! A dipped donut is great, a double dipped donut is even better.
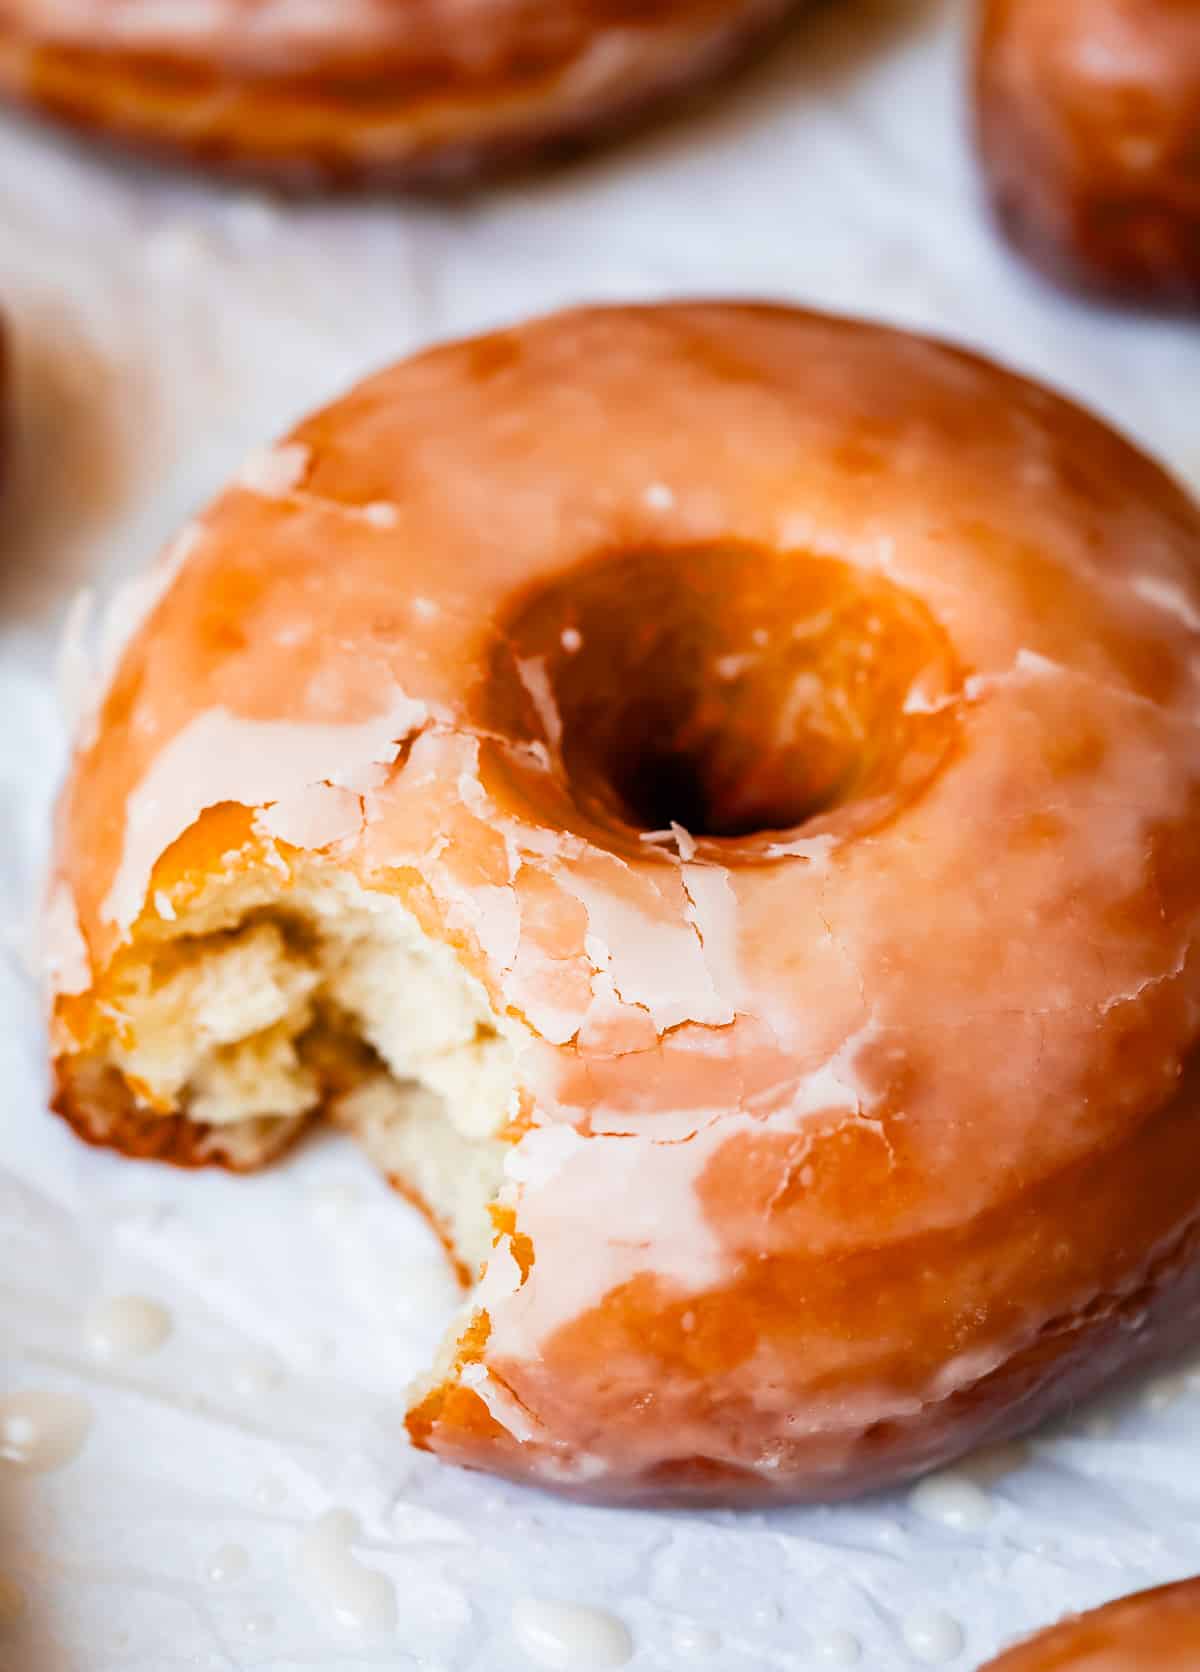
- You will know the glaze has set up enough to take a bite when you pick it up. If the glaze crackles and flakes, it’s ready. If it’s still drippy, let it set up a little more.
Professional donut shops use special ingredients like emulsifiers, starch, or agar that helps the glaze harden up lightning fast. This is how Krispy Kreme sells donuts that are still warm, but also has glaze that crackles. You can find agar on Amazon if you want to experiment! We are using cornstarch in our glaze, which has almost the same effect. (not quite as fast, but pretty good.)
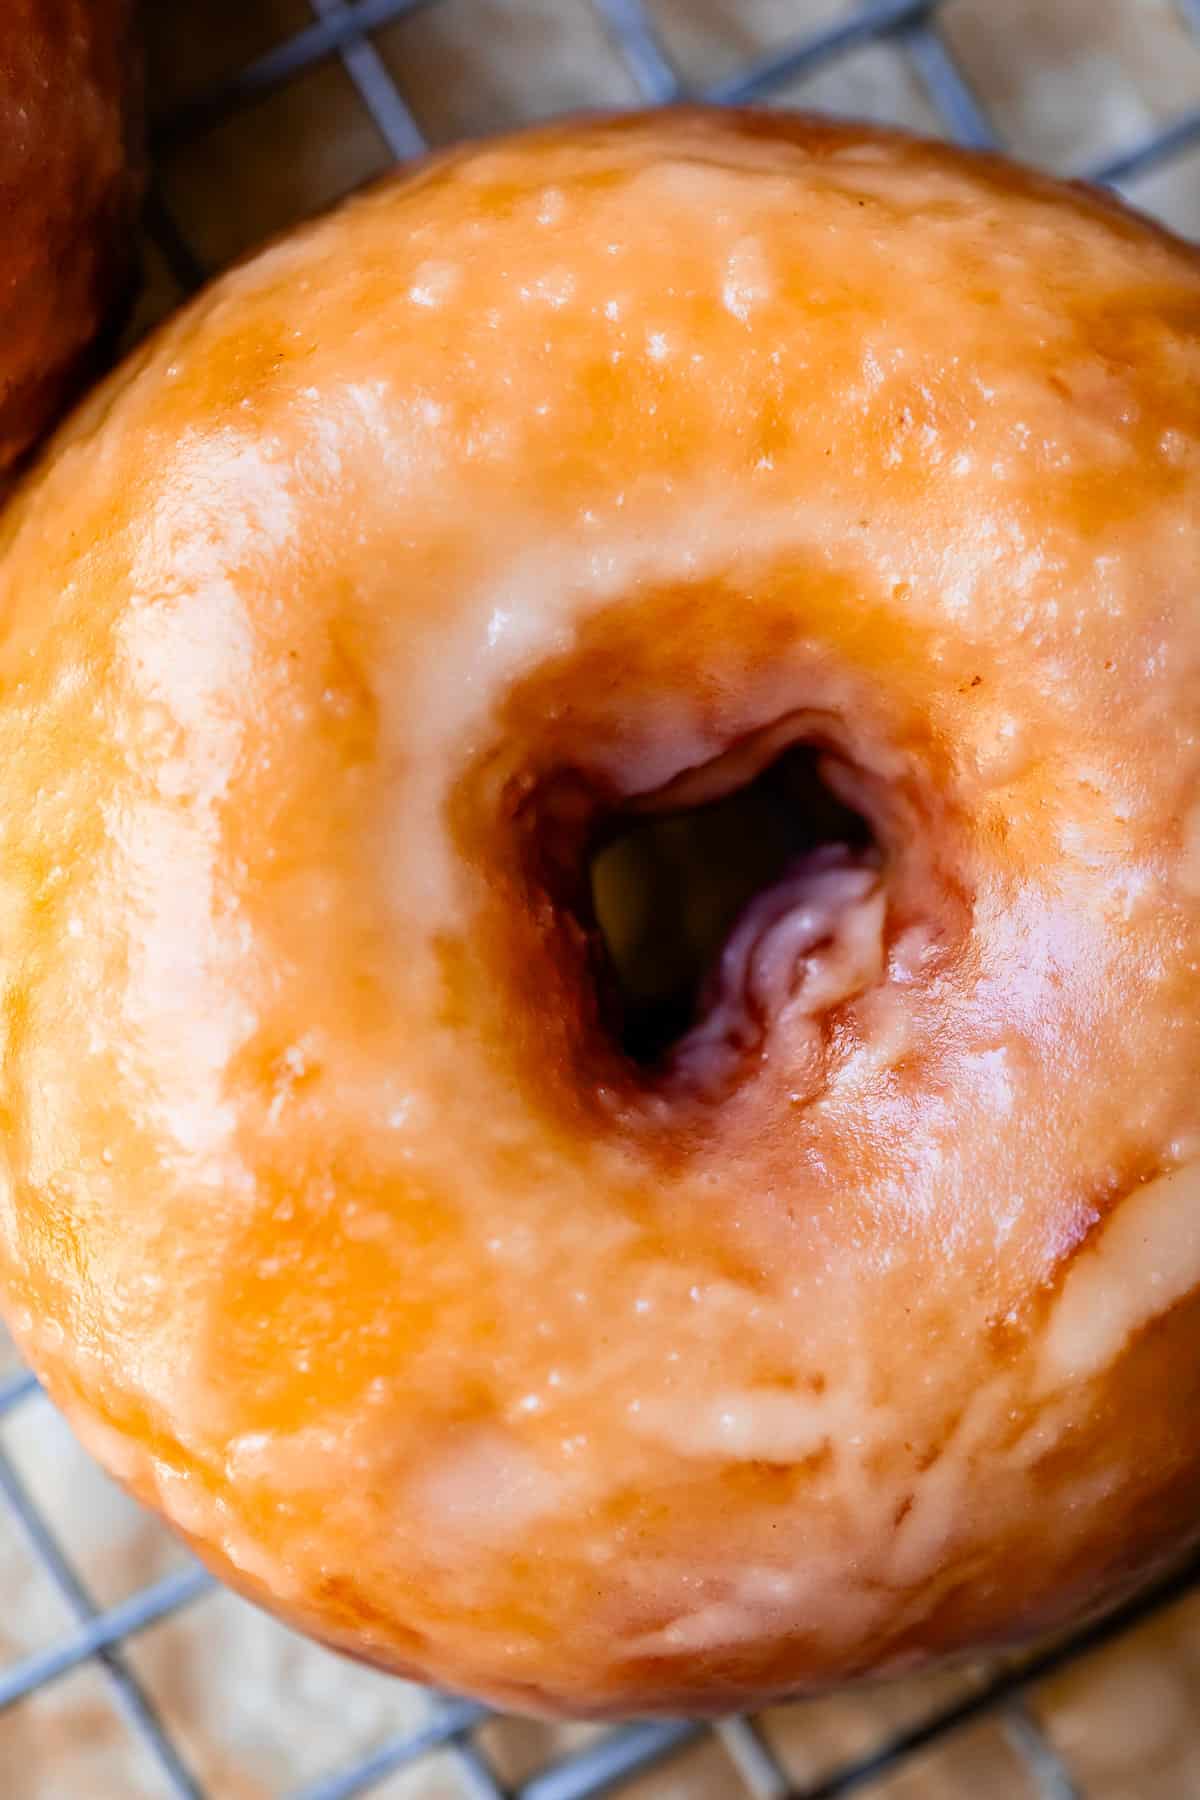
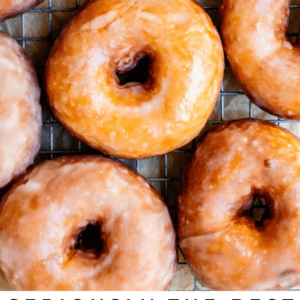
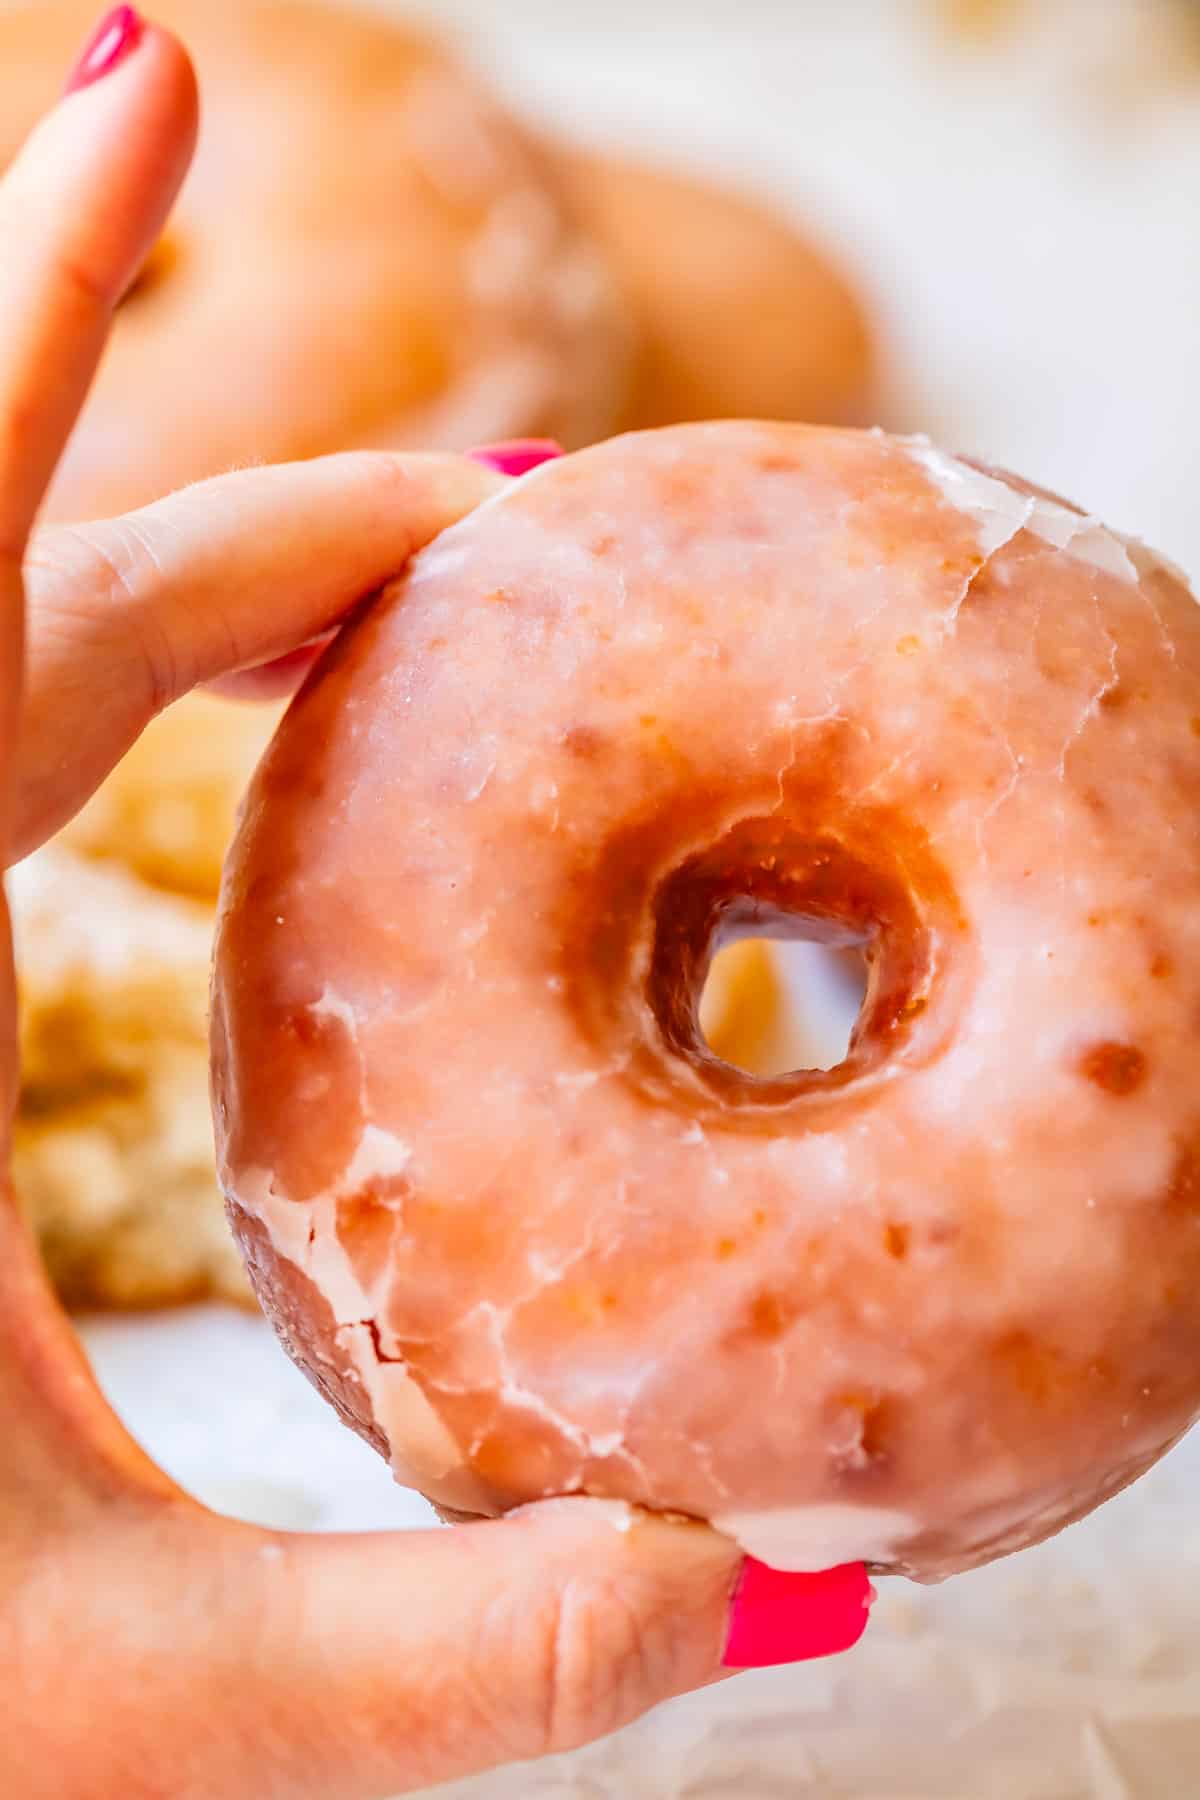
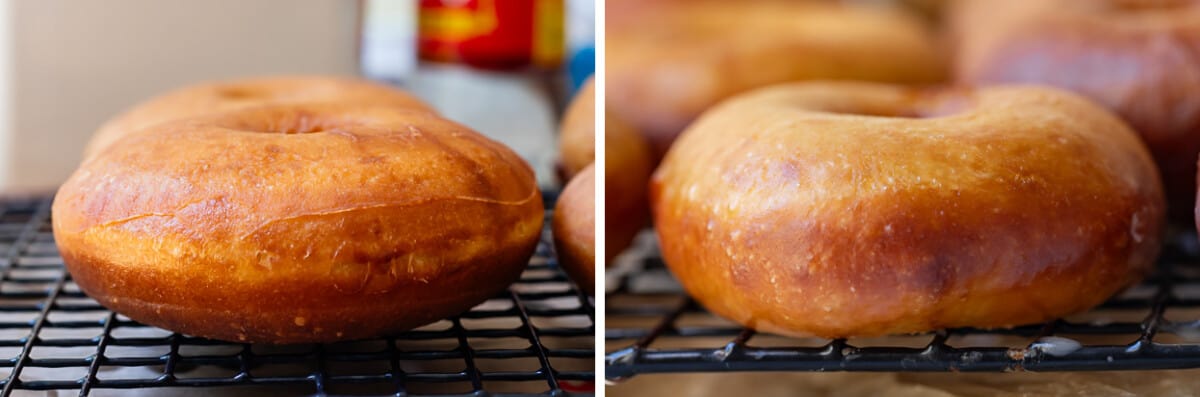
Just look at this beauty queen.
And THAT’S IT!! Who are you going to share your donuts with???
Donut topping ideas
In general, I disapprove of toppings on donuts, besides icing or glaze. I find it distracts from the simplicity and greatness of the donut itself.
But I think I might be a grouchy grouch. Live your best life. Here are some ideas, you could even make a donut bar and let people choose their own toppings for a party! I am all about donut parties!
- sprinkles!
- crushed or whole pieces of cereal, like Fruit Loops or Cocoa Puffs. (This is a thing people do, so I’m listing it here, but I honestly have no respect for them.)
- crushed cookies, like Oreos or Nutter Butters (Again. no respect. I will judge you.)
- chopped nuts, pretzels, or bacon for a salty twist. This could be good, especially on a Maple Bar.
- finely chopped fresh fruit (must be added RIGHT before eating or it will make the donut soggy!)
- crushed freeze-dried fruit – I definitely approve of this one
- mini chocolate chips or M&Ms (girl. no.)
- shredded sweetened coconut (I can get behind this one.)
What to serve with donuts
I like to serve my donuts with more donuts. Ha! It’s like pizza. Do you really need that side? I’m just sayin. But here are some ideas if you have a big crowd.
- Of course donuts pair perfectly with milk, tea or coffee
- Baked Bacon >> Ready in about 10 minutes, and the perfect savory balance to all that sweet
- Make Ahead Scrambled Eggs >> so creamy and tender and easy to have waiting while you finish the donuts
- Cheesy Hashbrown Breakfast Casserole with Ham >> make it the night before, pop it in the oven that morning
- Best Breakfast Casserole Recipe with Sausage >>also make ahead, and perfect for all your sausage lovers
- Chili Rellenos Casserole >> trust me when I say you will LOVE how flavorful this is!
- Cheesy Ham and Broccoli Frittata >>easy to make, super fast, and full of cheesy deliciousness
- Fresh Rainbow Fruit Skewers from The Recipe Critic
How to store leftover donuts
Eating too many donuts right away is always the best option. If you can’t manage on your own, it’s time to bring round all the neighbors for a donut party. If you can’t find ANY breathing souls to eat these precious morsels within a few hours of making, here’s how to store:
SKIP the fridge! The cold circulated air will dry them out in no time. Instead, you have a few options:
- First option: place them in an airtight container. This keeps the donuts themselves fresh and moist, but can make the glaze soggy the longer they sit.
- Second option: keep them in a loosely closed paper bag. This maintains the crispness of the glaze, but they will dry out faster than those in an airtight container. It’s up to you which way you want to go!
Either way, the donuts will be good sitting on the counter for about 2 days. The best way to eat leftover donuts is to rewarm them. Place leftovers on a sheet pan and stick them in a 300 degree oven for about 5-10 minutes. Don’t overdo it or the glaze will melt off!
Can you freeze donuts?
Yes oh yes! A much better option, actually, then letting them sit overnight to get stale.
Lay out your donuts on a sheet pan and flash freeze them for 20-30 minutes. Then, layer them in a freezer ziplock bag with wax or parchment paper in between so they don’t stick together. Seal the bag well and the donuts should last a good 2-3 months in the freezer.
To defrost, simply leave the bag out on the counter overnight and they’ll be ready to eat in the morning. If you’re thawing several, I would warm them for 5-10 minutes in a 300 degree oven. If you want only 1-2 donuts at a time, you can remove just those donuts from the bag, return it to the freezer, and then put the donut(s) in the microwave for 10 seconds at a time till perfectly soft and warm again!
Frequently asked questions
Let’s settle something: is there a right way to spell do(ugh)nut?? Apparently, most English-speaking countries use ‘doughnut.’ But Americans have been using the alternative “donut” for about a century, because ‘Merica. Just kidding, supposedly the spelling was adopted to help immigrants understand how to pronounce the word. Over the years “donut” has became commonly accepted, and here we are. Either one is fine!
A donut-shaped stork brings the baby donuts. Just kidding! Basically, fried sweet dough is native to almost every culture. I found this quote in the Joy of Cooking, “It seems to us that the various forms of fried dough enjoyed by people across the globe may well have been invented to assuage the ills of the human condition.” There you go, donuts are here for world peace.
That being said, the traditional ring style donut was created in America, purportedly by a sailor who disliked that many larger “dough-nuts” were not cooked through in the center. His work-around was to eliminate the center completely, which is actually totally genius! The idea caught on, and here we are.
If the question is better tasting, then fried donuts win hands down. The added fat and richness, the crispiness it adds to the outside… that’s hard to top. If the question is better for you, then definitely baked. By eliminating the oil you can save a ton of calories. But in my opinion donuts are a sugar/carb/fat laden treat anyway, so go big and fry or go home.
Yes! Old-fashioned donuts are also called “cake doughnuts” because they skip the yeast and use the same leavening agents as a cake, usually baking powder or baking soda. Because of the difference in composition, it is usually fried at a lower temperature as well, which is why you get those craggy, rough edges in an old-fashioned. They are not quite as light and airy as the typical yeast glazed donuts.
More sweet breakfast goodness to try
- Bavarian Cream Donuts >> stuff your donuts with Pastry Cream. Die and go to heaven.
- Maple Donut Recipe (Maple Bars) >> one of my FAVORITE donuts ever
- Nutella Stuffed Donuts >> soft, puffy donuts filled with Nutella? Yes, please
- 4 Ingredient Apple Cider Doughnuts >> too easy, and perfect for fall
- Best Cinnamon Roll Recipe >> so fluffy, and you can make them overnight!
- Soft Caramel Pecan Sticky Buns Recipe >> such a decadent recipe that tastes like it’s from a bakery
- Swedish Cinnamon Buns with Cardamom >> similar to cinnamon rolls, but dotted with pearl sugar instead of frosting
- Puff Pastry Recipe from Preppy Kitchen
- Butter Braid Pastry (Amish Recipe) from Amish-Heritage
I think that’s everything in my brain about yeast donuts guys! If you are not dying for a donut by the end of reading this post, you have a will of STEEL. I would love to see if you try out the recipe! Tell me how they compare to your local shop (that’s not a chain.) Tag @thefoodcharlatan on Instagram!
Don’t forget to check out the sister posts to this one, Bavarian Cream Donuts and the filling, Pastry Cream! And we thought it couldn’t get any better.
Facebook | Pinterest | Instagram
Homemade Donut Recipe
Equipment
- nonstick spray
Ingredients
- 1 cup whole milk
- 3 tablespoons active dry yeast*
- 1 tablespoon granulated sugar
- 1/2 cup granulated sugar
- 1/4 cup shortening
- 1 large egg
- 1 large egg yolk
- 1 and 1/2 teaspoons vanilla extract
- 3 and 1/4 cups bread flour, plus 1/4 cup if necessary
- 2 and 1/2 teaspoons kosher salt, or 2 teaspoons table salt
- 1/2 teaspoon baking powder
- 1/2 teaspoon baking soda
For frying
- 12 cups canola oil, or peanut oil
For the glaze
- 1/2 cup cold water
- 1 tablespoon cornstarch
- 3 tablespoons granulated sugar
- 1/4 cup butter
- 1 tablespoon corn syrup
- 2 teaspoons vanilla
- 4 cups powdered sugar
- 1/2 teaspoon kosher salt, use 1/4 teaspoon table salt
Instructions
- Make the dough. In a glass measuring cup, add 1 cup whole milk. Microwave it until it is warm but not hot. Stick your finger in it to make sure. If you wouldn't give a baby a bath in this milk, it's too hot. (I don't know why I can never think of a better temperature gauge than bathing children, but there you go.) Temp should be around 105-110 F.
- Add 3 tablespoons active dry yeast*. Yes! 3 tablespoons! We are not messing around! Add 1 tablespoon sugar so the yeast has something to eat.
- Wait a couple minutes until you see bubbles forming in your yeast mixture. (If it stays completely flat, you killed it, game over! Try again.)
- Add yeast mixture to a large bowl or the bowl of a stand mixer. Add 1/2 cup granulated sugar, 1/4 cup shortening, 1 egg, 1 egg yolk, and 1 and 1/2 teaspoons vanilla. Stir it all together with a rubber spatula.
- Carefully measure 3 and 1/4 cups bread flour (spoon the flour into the measuring cup, then level off the top.) Add the flour to your yeast mixture but don't stir yet.
- Add 2 and 1/2 teaspoons kosher salt, 1/2 teaspoon baking powder, and 1/2 teaspoon baking soda. Stir this into the flour.
- Knead the dough. Use the dough hook (or a wooden spoon) to stir the dough until it is thick enough to knead. Knead with the dough hook (or by hand on a lightly floured surface) for 5 full minutes. The dough should have come together and be stretchy and elastic. If you touch the dough and your fingers come away sticky, add the extra 1/4 cup of flour (or more as necessary), to get a workable dough.
- Grease a large bowl with oil or nonstick spray. Shape the dough into a ball, slap it in the bowl, and turn it over so the top side is greased. Cover with plastic wrap that has been sprayed generously with nonstick spray.
- Create a proofing box in your oven: Bring about 8-10 cups of water to a boil, either in a kettle or in a pot on the stove. Turn your oven on to 350 degrees F for about 30-60 seconds, then turn it off. The oven should be warm but not hot. You should be able to touch the oven racks with your fingers.
- Place the covered bowl of dough on the top rack in your oven. Place a 9×13 inch cake pan on the bottom rack of the oven. Pour the boiling water into the pan and shut the door right away to capture all the steam.
- Let the dough rise in this toasty, humid environment for 1 hour. The dough should have doubled in size.
- Prepare two half baking sheets with parchment paper. I love to use these 6×6 inch parchment paper squares (one rising donut per square.) If you don't have the fancy squares, I would take the time to cut 6×6 inch squares. Lay them out on the baking sheets.
- Pour the water from the 9×13 inch pan back into the pot or kettle and bring to a boil again. Heat your oven to 350 for 30-60 seconds, just like before, and turn it off. Warm, not hot.
- Shape the donuts. Scrape the dough onto a greased pastry mat or lightly floured work surface. Knead the dough a couple times, then divide the dough into 12-14 pieces, depending on how large you want your doughnuts to be. (If you want, make some tiny balls of dough and fry them as-is, for donut holes.)
- Pat each piece of dough into a 3 to 4 inch disc. Use a rolling pin if you want, I just used my hands. Use your thumb to press and eventually break through the center of the dough. Use your fingers to widen the hole to at least 1 and 1/2 inches, smoothing the dough along the edges as best you can. Stretch and mold your donut wider, and round out the ring of the donut. I found it helpful to place the donut on my finger and spin it a few times. Centrifugal force is real, folks #science. Shape your donut to be as round and puffy as you want it to look when you are eating it.
- Let the shaped donuts rise. Place each shaped donut on a square of parchment paper, with plenty of room to rise. Eight donuts is the max per pan I would say. Shape all the dough into donuts. Do not cover this time.
- Place the two pans of rising donuts in your oven, both pans on the top rack if you can squeeze them in. Place the 9×13 pan on the bottom rack. (If you can't squeeze, place one pan on each rack and place the 9×13 pan on the bottom of the oven, yes, directly on the element, but ONLY after you have shut off the oven. Make sure it's not hot to the touch. Do not turn the oven on!)
- Once all the shaped donuts are in the warm oven, pour the boiling water into the 9×13 inch pan. Shut the door right away. Let the shaped donuts rise for 30-45 minutes, until doubled in size.
- Make the glaze. Do this during the final rise, because you want to glaze the donuts when they are hot. In a small saucepan, add 1/2 cup cold water and 1 tablespoon cornstarch. Whisk together until smooth. Add 3 tablespoons granulated sugar and 1/4 cup butter. Turn the heat on to medium and whisk constantly. Cook for about 2 minutes, until the butter is melted and small bubbles are JUST beginning to form on the edges. Remove from the heat right away. (if you over cook this mixture, the cornstarch will get too thick.)
- Add 1 tablespoon corn syrup, 2 teaspoons vanilla, and 1/2 teaspoon kosher salt. Then add 4 cups SIFTED powdered sugar. (Add it through a strainer). Use a whisk to combine it all until there are no lumps. Keep the whisk handy; the glaze will start to harden on top, and you need to whisk it occasionally to keep it smooth. You may need to thin the glaze with a little more water, (or thicken with more powdered sugar), add it 1 tablespoon at a time.
- Heat the oil. Halfway through the rise time, start heating your oil. In a 12-inch high-sided skillet, add canola oil until it reaches about 2 inches up the side of the pan. Turn the heat to medium. Heat until the temperature reads 350 degrees F on a candy thermometer. Don't throw away the oil container.
- Prep your work station. Line a few paper grocery bags (or paper towels) on the counter and place 2 cooling racks on top. Have a pair of tongs handy. Keep your thermometer either clipped onto the side of the pan or nearby to recheck the temperature.
- Fry the donuts. When the doughnuts are doubled in size, remove the pans from the oven. Use two hands to lift the edges of a piece of parchment paper with one raised donut on it. Slowly lower the paper into the oil, dropping one side completely, and holding the paper up on the other side. The paper and the donut should be completely in the oil, except the corner you are holding with your fingers. Shimmy the paper back and forth until the donut slides off into the oil.
- Let the donut fry on the first side for about 30-60 seconds, until light brown. Use tongs or chopsticks to flip the donut and continue frying for another 30-60 seconds until light brown. (The donuts will continue to darken in color even after cooking.)
- Use a spider strainer (or slotted spoon or tongs) to gently lift the fried donut to the cooling rack set on top of the absorbent paper.
- Take the time to check the temperature of the oil before frying more. You might need to wait a couple minutes for the oil to climb back up to 350. Keeping the oil temperature steady is one of the reasons you need to use so much oil when deep frying.
- Continue frying the donuts, adding 3-4 donuts per batch, whatever you can fit. Check the temperature frequently and make sure it's near 350.
- When the donuts are all fried, turn off the heat and set the oil aside to cool.
- Glaze the donuts. When the donuts are cooled enough to touch but still warm, dip them in the glaze. Flip them over and make sure they get completely coated. Wait 20 minutes, then dip each donut again. One dip makes a good donut; double dipping makes a fantastic donut.
- Let the donuts cool completely. The glaze tastes better when it has had time to dry out and get crisp and crackly. But this of course means you don't get to eat a hot donut. Professional donut shops use a special ingredient (agar) to help the glaze set up faster. (If you want to try it, add 1/2 teaspoon agar to one batch of glaze.)
- Eat your donuts on day one. No, really. Find a neighbor to share with! Have a donut party! Calories don't count today! Day-old donuts are just not great.
- How to store donuts: Okay fine, no donut party.The first option is to store them in an airtight container. This keeps the donuts themselves fresh and moist, but can make the glaze soggy the longer they sit.Second, you can keep them in a loosely closed paper bag. This maintains the structure of the glaze, but they will dry out faster than those in an airtight container.
- What to do with the leftover oil: Hopefully you saved your oil container! If not, use mason jars. Place your container in the sink. Holler at your people for some help. Place a funnel on top of the container. Hold a strainer over the top of the funnel to catch any dough bits. Pour it in. Save it! Store in the cupboard. I use oil 2-3 times before funneling it back in the container a final time and tossing it in the trash.


Thank you for the very interesting and informative article. I am fortunate to live in Southern California and have two donut stores close by. Last week my husband stopped at Crispy Cream and purchased six glazed donuts which cost $14 and they almost half the size of a standard donut. Additionally they were too sweet, but they were in a pink box.