I thought prime rib must be overrated. But boy-oh-boy does it live up to the hype! There is something magical about this roast! The whole process can seem daunting, but I’m here to show you how to cook it step by step, with tons of pictures. With the right techniques (plenty of time + salt), you will get the BEST prime rib. It’s juicy, tender, and has a unique melt-in-your-mouth flavor. Make this show stopper recipe for Christmas, Easter, or Thanksgiving!
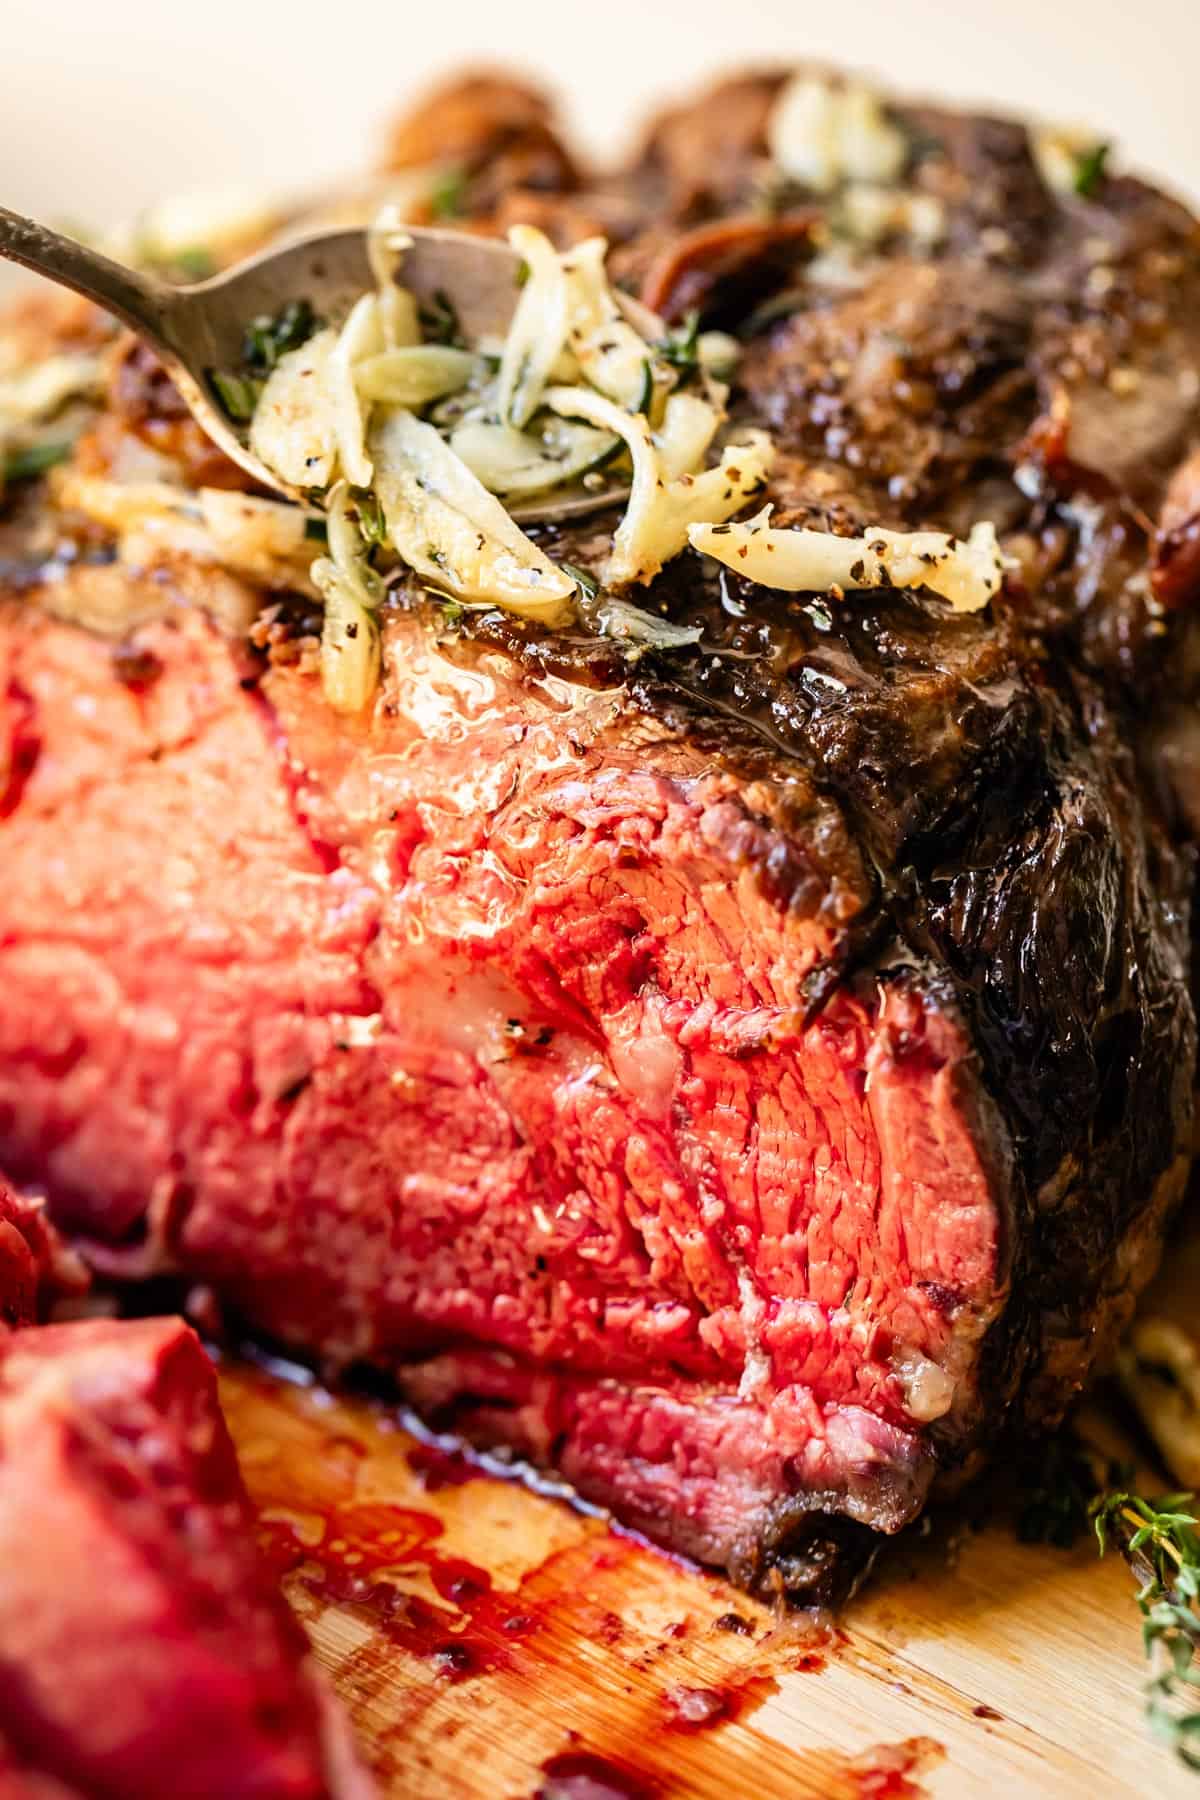
Table of Contents
- Prime rib: not as intimidating as you think
- What is prime rib, anyway?
- How do you prepare prime rib before cooking?
- Pass the salt
- Wait, which salt?
- Let your roast dry out in the fridge overnight
- How to choose the best prime rib
- Prime-grade vs. Choice-grade
- The secret to making perfect prime rib
- Please, buy yourself an insert meat thermometer.
- Prime rib should be served RARE
- Prime rib recipe ingredients
- How much prime rib per person?
- How to cook prime rib
- Make the gravy
- Make the garlic sauce
- Broil the roast
- Serve the roast
- What to serve with prime rib roast
- How to store and reheat leftover prime rib
- How to reheat leftover prime rib (don’t screw this up)
- Can you freeze prime rib?
- Frequently Asked Questions
- More centerpiece main dishes to impress
- The Best Prime Rib Recipe Recipe
Roberto-the-fireplace-repairman arrived at our house last week.
Whatever fireplace repairman stereotype you are envisioning right now, you are correct. I think the fireplace repairman lives right next door to the fireman, and they make calendars together every Christmas. Just kidding. Maybe. THIS guy’s name was Roberto and he had an accent to go with the O on the end of his name.
Eric stuck around to talk fireplace details while I went off to do anything besides hover. (Does anyone else turn into a completely inept social disaster when there is a repairman in your house? Even the ones without sexy accents make me not sure where to sit or stand in my own darn house.)
Anyway, I get a text from Eric 5 minutes later. “Karen. The wall switch. It turns the fireplace off and on. It’s just been turned off.”
The fireplace hasn’t worked for a good 6 months. Apparently we haven’t touched the light switch that’s right next to the fireplace in 6 months either. We always wondered why that was there…
You guys. Why is this the theme of my life?? Do you remember last year when I thought the automatic door to my minivan was broken, and I took it into the dealership only to have them call me an hour later, saying that the feature had been turned off? (there was a button.)
Or how about the time we thought our fridge was dead, and were about to call a repairman, and my mom noticed that the temperature dial had simply been switched off? (That one was Edison, the little rascal.)
I swear. I don’t even know how I function sometimes, with the lack of common sense going on around here.
The good news for you is that there are no switches or buttons required to make an amazing Prime Rib. I should be able to explain this process to you with zero hiccups or repairman calls. I may not be able to manage the extremely simple things in life, but give me a holiday project and I go DEEP my friends.
Prime rib: not as intimidating as you think
This recipe is a long time coming. I’ve known for years that I wanted to master Prime Rib. It’s such a classic cut to serve for the holidays, and holidays are kinda my thing. Did you make any of my dishes for Thanksgiving last week? The Food Charlatan had record-breaking traffic on WBT! (That’s “Wednesday Before Thanksgiving,” keep up. WBT is an official holiday in our household 😂 Top post of the day? Dutch Apple Pie.)
BUT. I kept putting off the Prime Rib Project. For years!! It’s a little intimidating, right? Have you ever made a prime rib? Those suckers are expensive, and overcooking it (my biggest fear) would be a huge disappointment.
I finally buckled down and got all the details. It’s actually WAY easier than I thought it would be. All you need, really, is a hot oven, a roasting pan, and a meat thermometer. Oh, and SALT. I’ve got lots of pictures in the how-to section below of what the roast looks like, exactly what to tell your butcher (yes, you have to talk to a butcher, get your big girl panties on), and what it should look like before, during, and after roasting. Let’s dive in!
What is prime rib, anyway?
A prime rib is a cut of beef from the beef rib primal section of a cow. It’s also called a standing rib roast because of how it sits on the rack of bones.
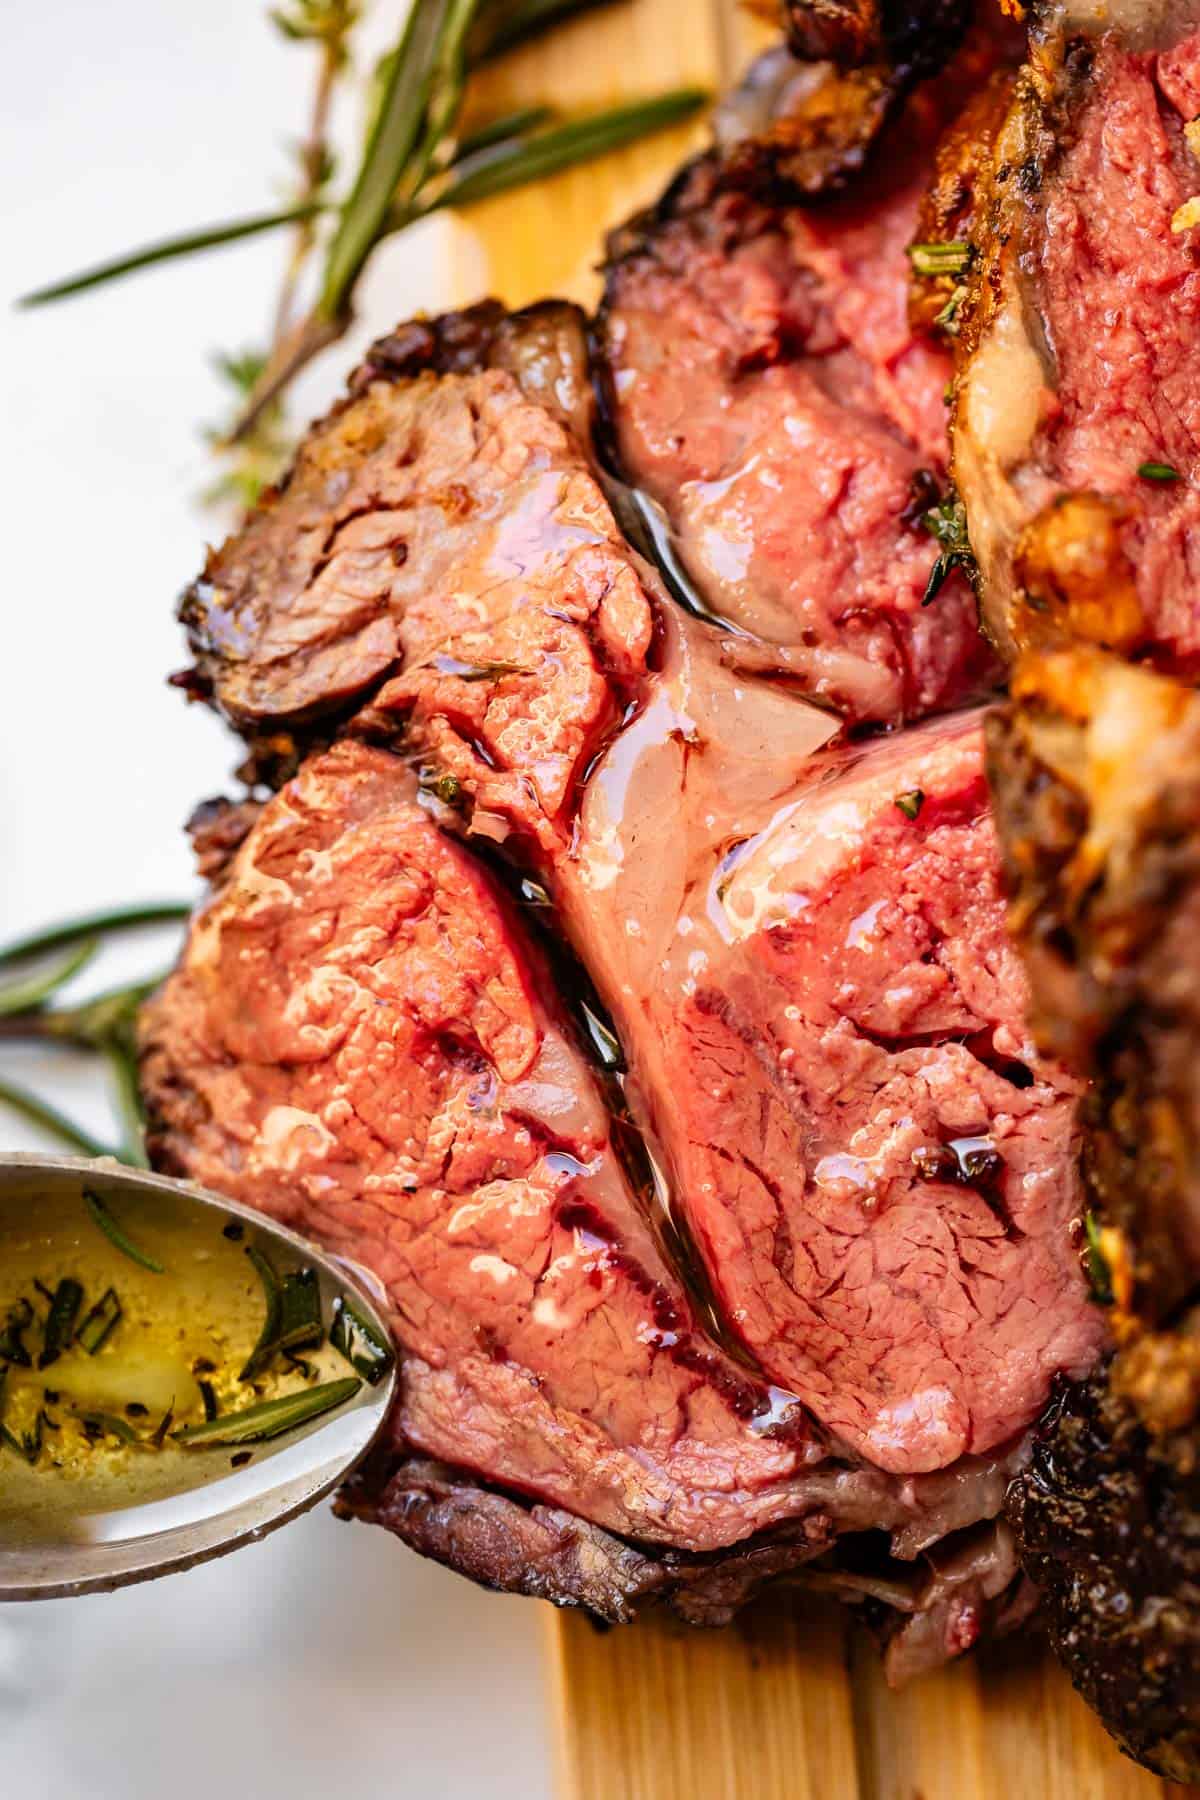
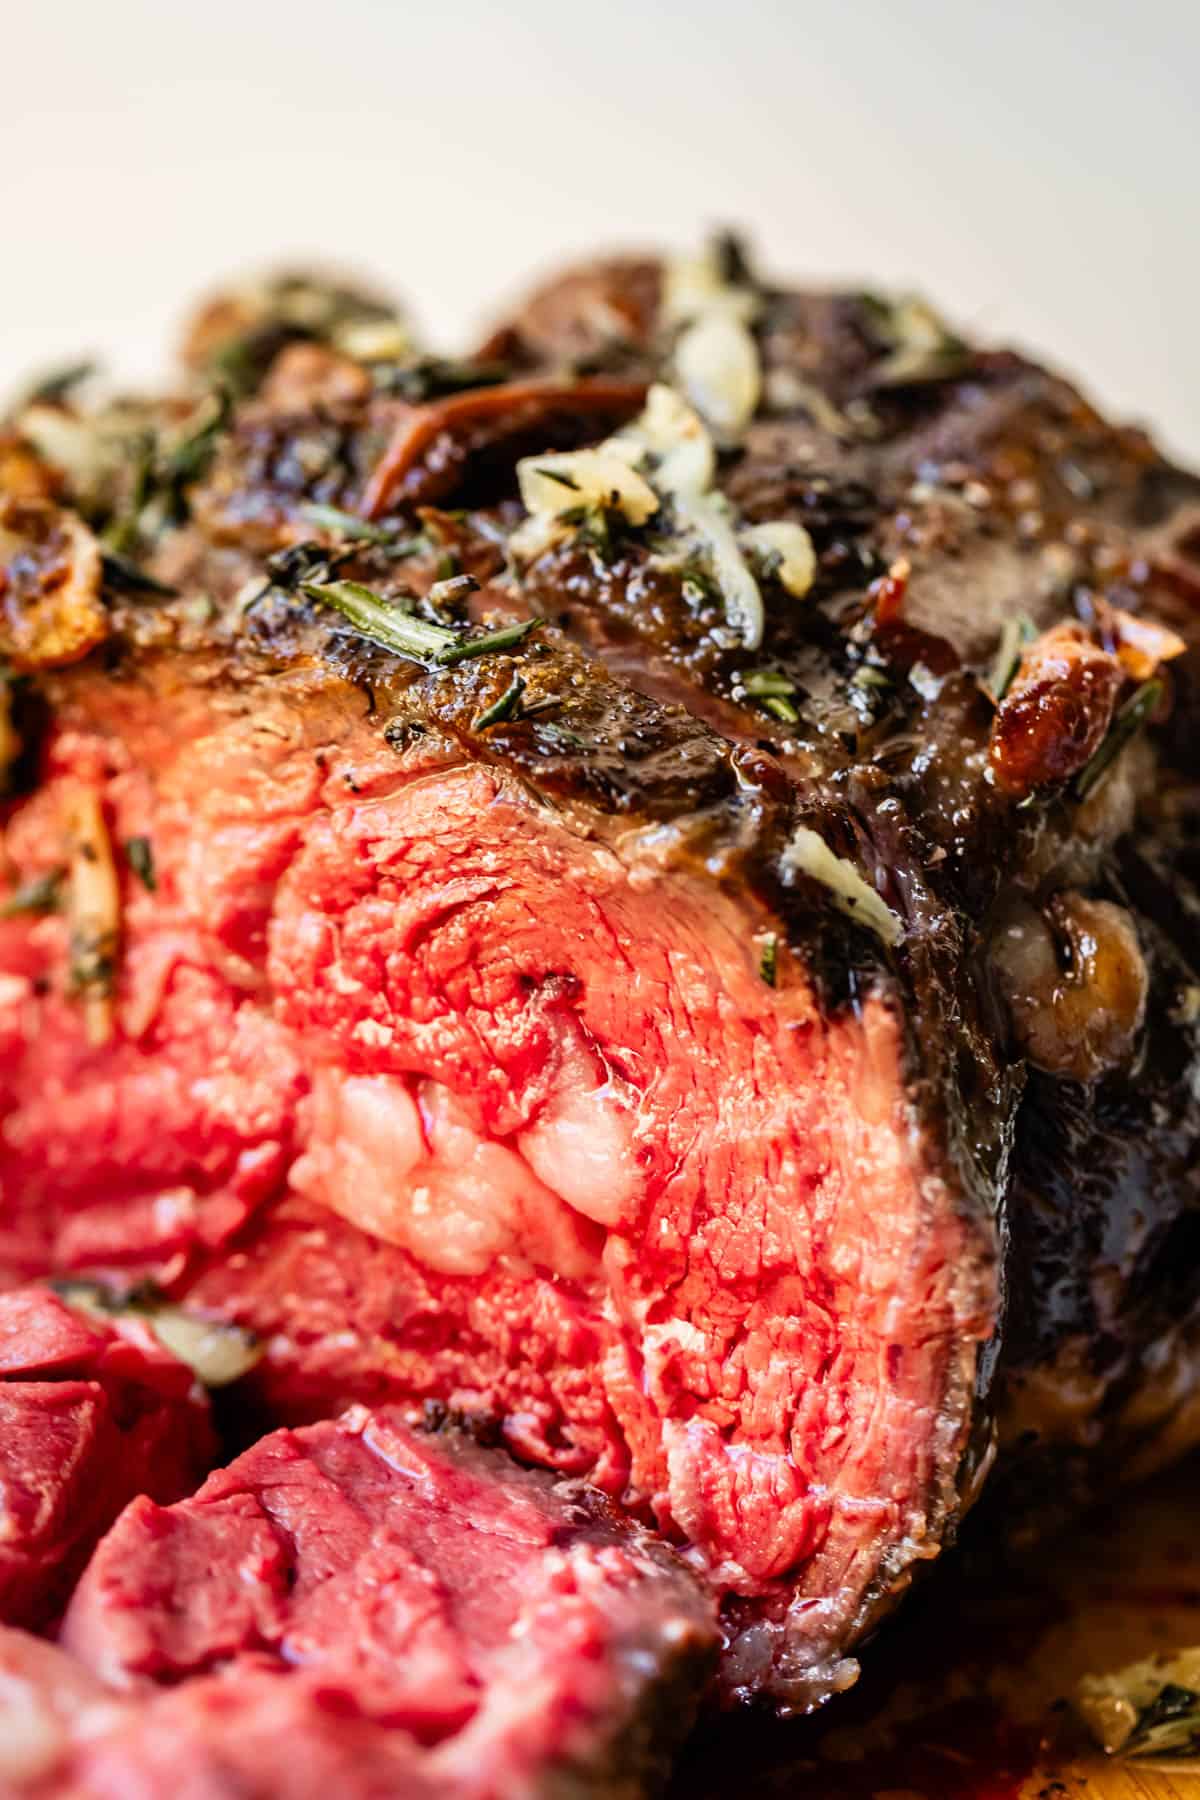
The center of a prime rib is extremely tender and has a very unique flavor — I was actually blown away. You’re thinking this is going to be an extra-tender version of a pot roast, right? Wrong. It’s straight STEAK. Cooked as a roast. The flavor is unbelievable. It’s super rich and concentrated.
Because prime rib is large and in charge, a powerhouse of flavor, it makes a super impressive holiday main dish. Did your family ever make this for Christmas?
I will be honest, one of the reasons I held off on making prime rib so long is not just because it’s expensive, it’s because I wasn’t that excited about eating such rare meat. I’m more of a medium-girl myself, and prime rib is supposed to be rare. But this recipe has changed my mind. Prime rib is incredible when cooked properly. It has a flavor you can’t find anywhere else.
How do you prepare prime rib before cooking?
Because the flavor is so unique, we are not messing around with too many other flavors. The recipe is very simple. It’s mostly just kosher salt and a 24 hour wait. I do love to add a quick garlic butter sauce on top, but that’s just before serving, and it’s actually totally optional.
Pass the salt
Salting the roast 24 hours in advance magically (okay, osmosis-ly) infuses the very center of the meat. First the salt draws moisture out of the roast, pooling on the outer edge. But then osmosis draws all the salt and moisture back into the roast, making sure that even the very center of the roast is well-seasoned. You need to give it the full 24 hours for the salt to properly distribute throughout the roast. The salt is not staying crusted on the outside.
Wait, which salt?
Diamond Crystal Kosher Salt is what you want. It’s the only salt I use in my kitchen, and if you are buying a fancy prime rib, it’s worth it to buy the fancy salt to go with it (and then you will never go back 😂)
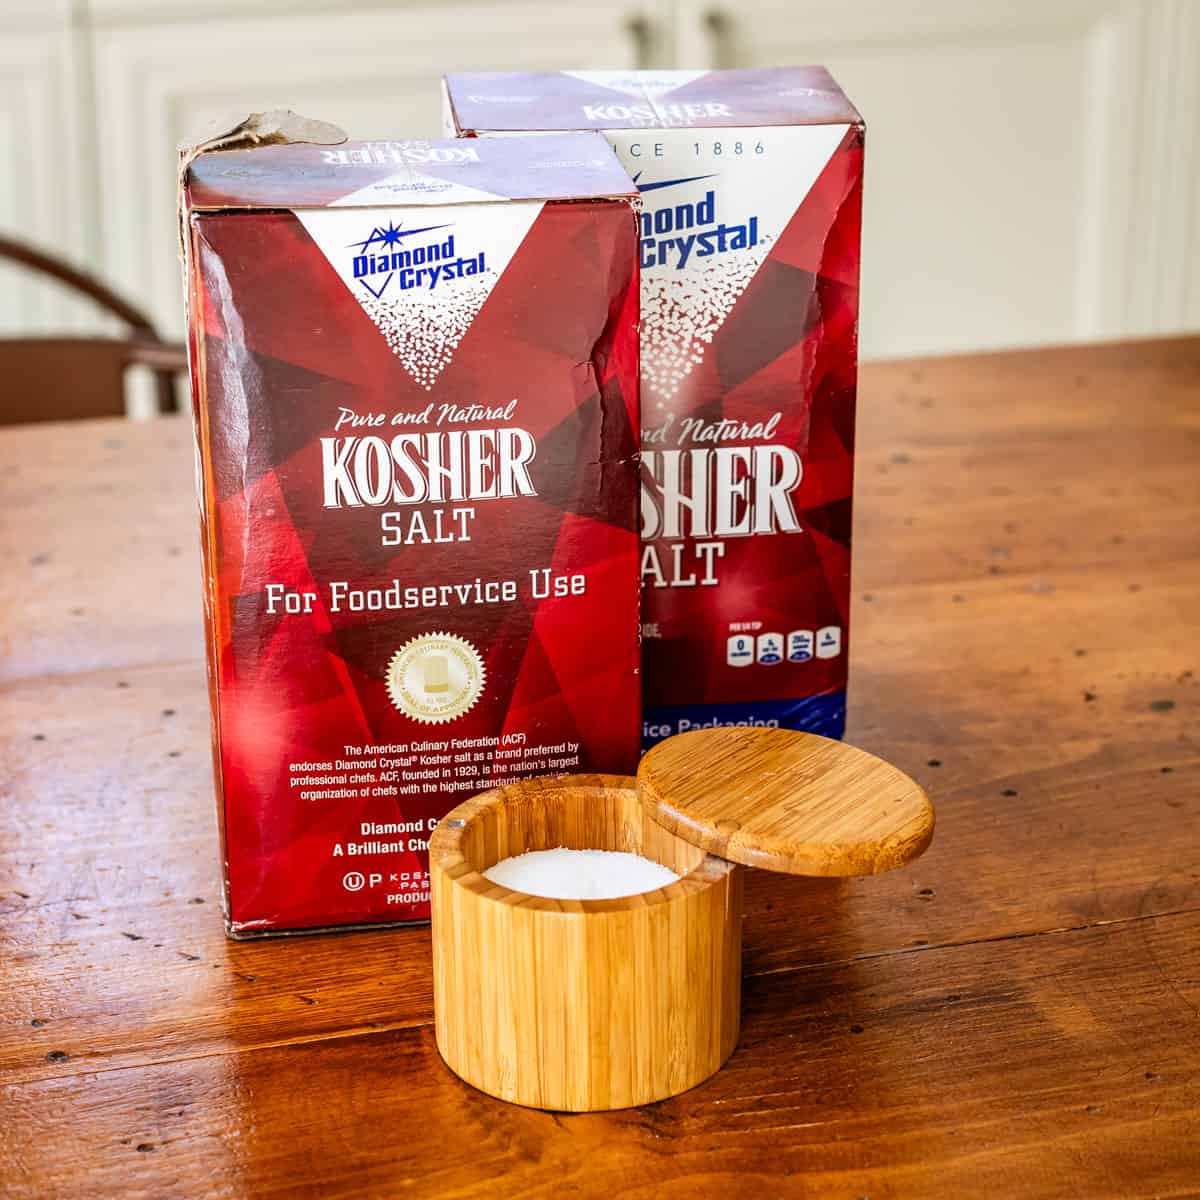
Regular table salt tastes too salty. I said what I said. This may be something you can only know for yourself when you compare them. Iodized table salt has a metallic “salty” flavor to it. Kosher salt doesn’t taste salty when used properly. It simply acts as a megaphone to amplify all the other flavors in your dish.
Let your roast dry out in the fridge overnight
Salting your prime rib and allowing it to stand uncovered in the fridge overnight allows the edge of the roast to get very dry. This is perfect, because the drier the edge of your roast is when you sear it, the better browning you will get. Don’t worry that this will result in a dried-out main dish; the amount of total moisture lost overnight in the fridge is actually minimal. The fat in your roast is where most of the flavor and moisture is. I promise, it’s not going to evaporate overnight.
How to choose the best prime rib
A cow has 13 ribs per side. Ribs number 6-12 are considered prime rib.
First Cut Prime Rib. Ribs 10, 11, and 12 are the ones closest to the loin at the back of the cow (rib 13 is sold as part of the loin). These ribs are the best, and are called “the first cut” of prime rib. If you can afford it, buy this!! Talk to your butcher or meat department dude to make sure you are getting the right one.
Second Cut Prime Rib. Closer to the front of the cow are ribs 6, 7, 8, and 9. This section is called “the second cut” of prime rib. This cut has more fatty pockets than the first cut, which is tasty and flavorful, but means your slices will be less uniform and attractive. (Marbling of fat is better than pockets of fat.)
Prime-grade vs. Choice-grade
On top of the difference between first and second cut (which refers to where on the cow your prime rib is cut from) is the question of quality of meat, which has to do with the grade of cow itself.
Prime rib is confusing because “prime” is the word butchers use to describe the top grade of meat sold. So you can buy “prime-grade” prime rib, or you can buy “choice-grade” prime rib. The prime grade is going to have more fat marbling and flavor. Buy what you can afford. They are both going to taste great.
If you want the best of the best, choose prime-grade first cut; if the 19-year-old meat department assistant looks confused when you request this, walk right out and find yourself a specialized butcher shop.
The secret to making perfect prime rib
Okay, here’s the sum-up. I’ve got some RULES for making the best Prime Rib, get ready to be bossed around:
- Ask your butcher for the “first cut” of prime rib. These are ribs 10-12.
- Salt your roast 24 hours in advance.
- Allow your roast to DRY OUT uncovered in the fridge for 24 hours.
- Sear the meat in oil before roasting, for the crispiest edges.
- Cook at a LOW LOW LOW temperature. 200 degrees is best!
- Please, for the love, DO NOT overcook your prime rib.
- To ensure this, use an insert meat thermometer, more on that below!
- Top your finished roast with butter, garlic, and herbs AFTER cooking.
Please, buy yourself an insert meat thermometer.
If you have the cash to buy a cut of prime rib, then you have enough cash to buy yourself the one tool that is going to guarantee you don’t royally screw it up. I’m being totally serious! You wouldn’t make a smoothie without a blender, would you? It’s the same idea.

For prime rib, I prefer a meat thermometer where the probe stays in the meat while it cooks. The stainless steel probe is attached by an oven-safe wire connected to the digital piece outside the oven. You can set the alarm to ring when your meat is at the EXACT temperature you want, it’s amazing. This completely eliminates any guesswork for knowing when the roast is done, and it means that you don’t have to open the oven door a hundred times to check the internal temperature of your meat with an instant-read thermometer.
Prime rib should be served RARE
In general, I am not a rare meat lover. I prefer my steak cooked to medium, usually. So when I say with emphasis that prime rib should be cooked RARE, I mean it! Being a little shy about this is one of the reasons I put off researching and developing a prime rib recipe for so long. But I have seen the light!
Prime rib has that unique flavor I keep mentioning, and it is buttery soft, when not over cooked. Prime rib that is cooked to medium or, heaven forbid, well done, is dry and tough and rubbery, and an absolute tragedy of wasted potential.
If you really, really can’t handle the idea of rare or medium rare beef…make something else. Seriously. Don’t waste the money. Make a Pot Roast. Make Tri Tip. Make a Meatloaf.
If you have some guests that love rare meat, and some that are squeamish, check the recipe notes. My recommendation is to cook the roast to the lowest temperature that any guest wants, and then broil individual slices just before serving for those who like it more well done.
Prime rib recipe ingredients
This is just a short list to give you a glance at what you’ll need. It’s not long! The magic of prime rib is in the meat itself. Full ingredient list and instructions are in the recipe card at the bottom of the post!
For the roast and garlic butter sauce
- prime rib roast
- kosher salt
- vegetable oil
- Better than Bouillon Beef Base
- butter
- garlic cloves
- granulated garlic
- fresh black pepper
- fresh rosemary
- fresh thyme
For the gravy
- drippings
- flour
- black pepper
- butter, optional
How much prime rib per person?
Another thing to think about when gathering your ingredients is just how much you’re going to need to make sure you have enough to serve everyone. Plus, if you’re like me, you’re going to want some leftovers -that’s just how I like to live my life! If you are focusing just on prime rib and not many sides, about 1 pound per person (or one rib per two diners) is normal. Keep in mind that this includes the weight of the bones which will NOT be eaten, so the weight is not total meat, it’s everything. If you’re serving this at a holiday dinner with plenty of hearty side dishes, you can lower that amount to about 1/2 – 3/4 pound per person.
How to cook prime rib
Start at the store. Ask your butcher about the prime ribs available, if they are already cut. If they aren’t cut, ask for the prime-grade first cut prime rib. Ask them to cut the bones off and tie them back on. This may sound like Greek to you, but they will get it I promise!
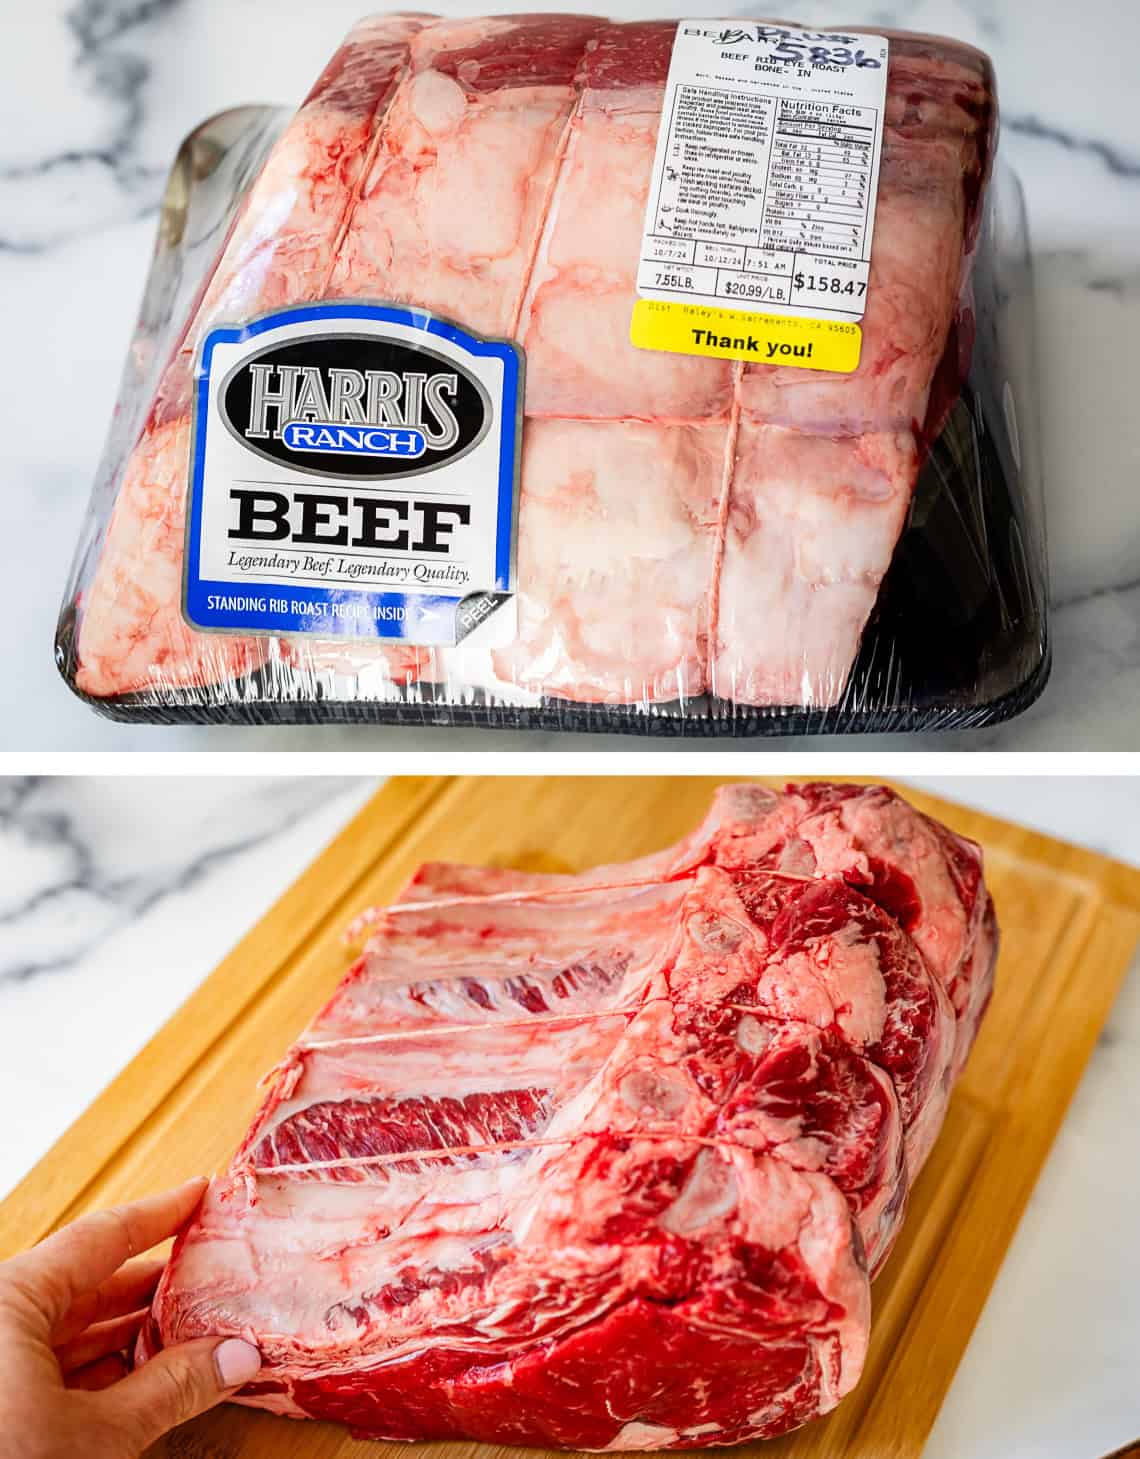
Unwrap your ribs. You can see below that my ribs are already cut.
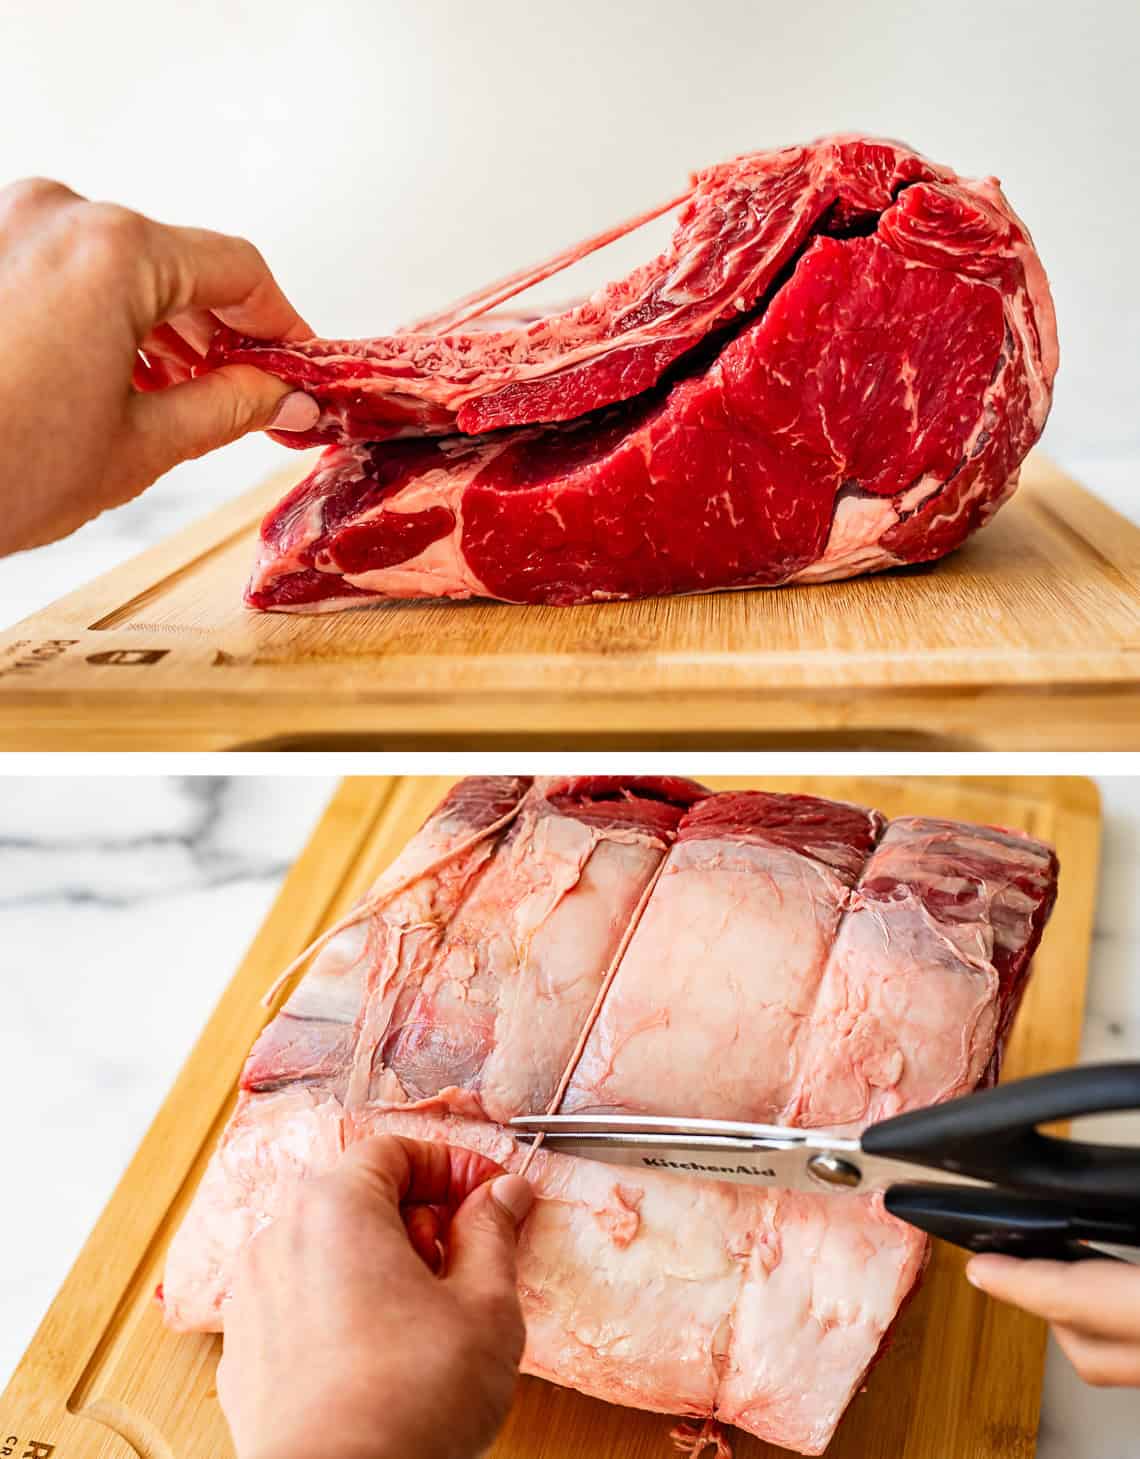
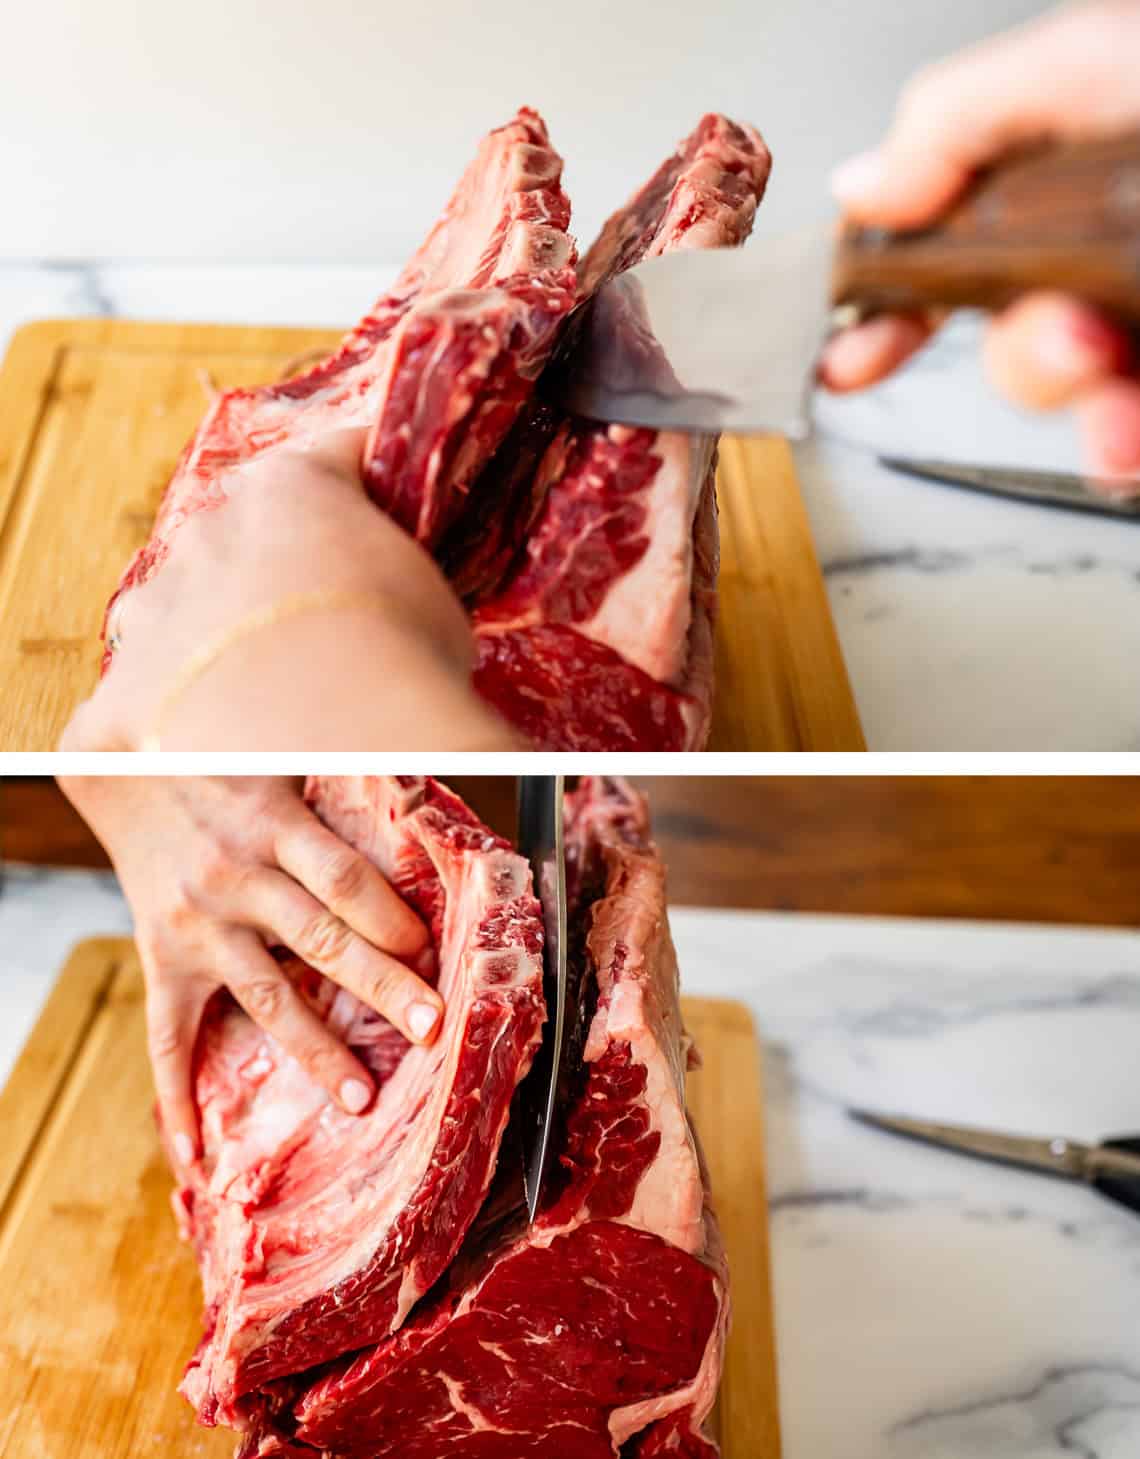
If they hadn’t been cut, this is where you start. Run a sharp knife along the edge of the bones, all the way down, following the curve.
Hopefully your butcher did this for you! Don’t toss the bones, we still need them.
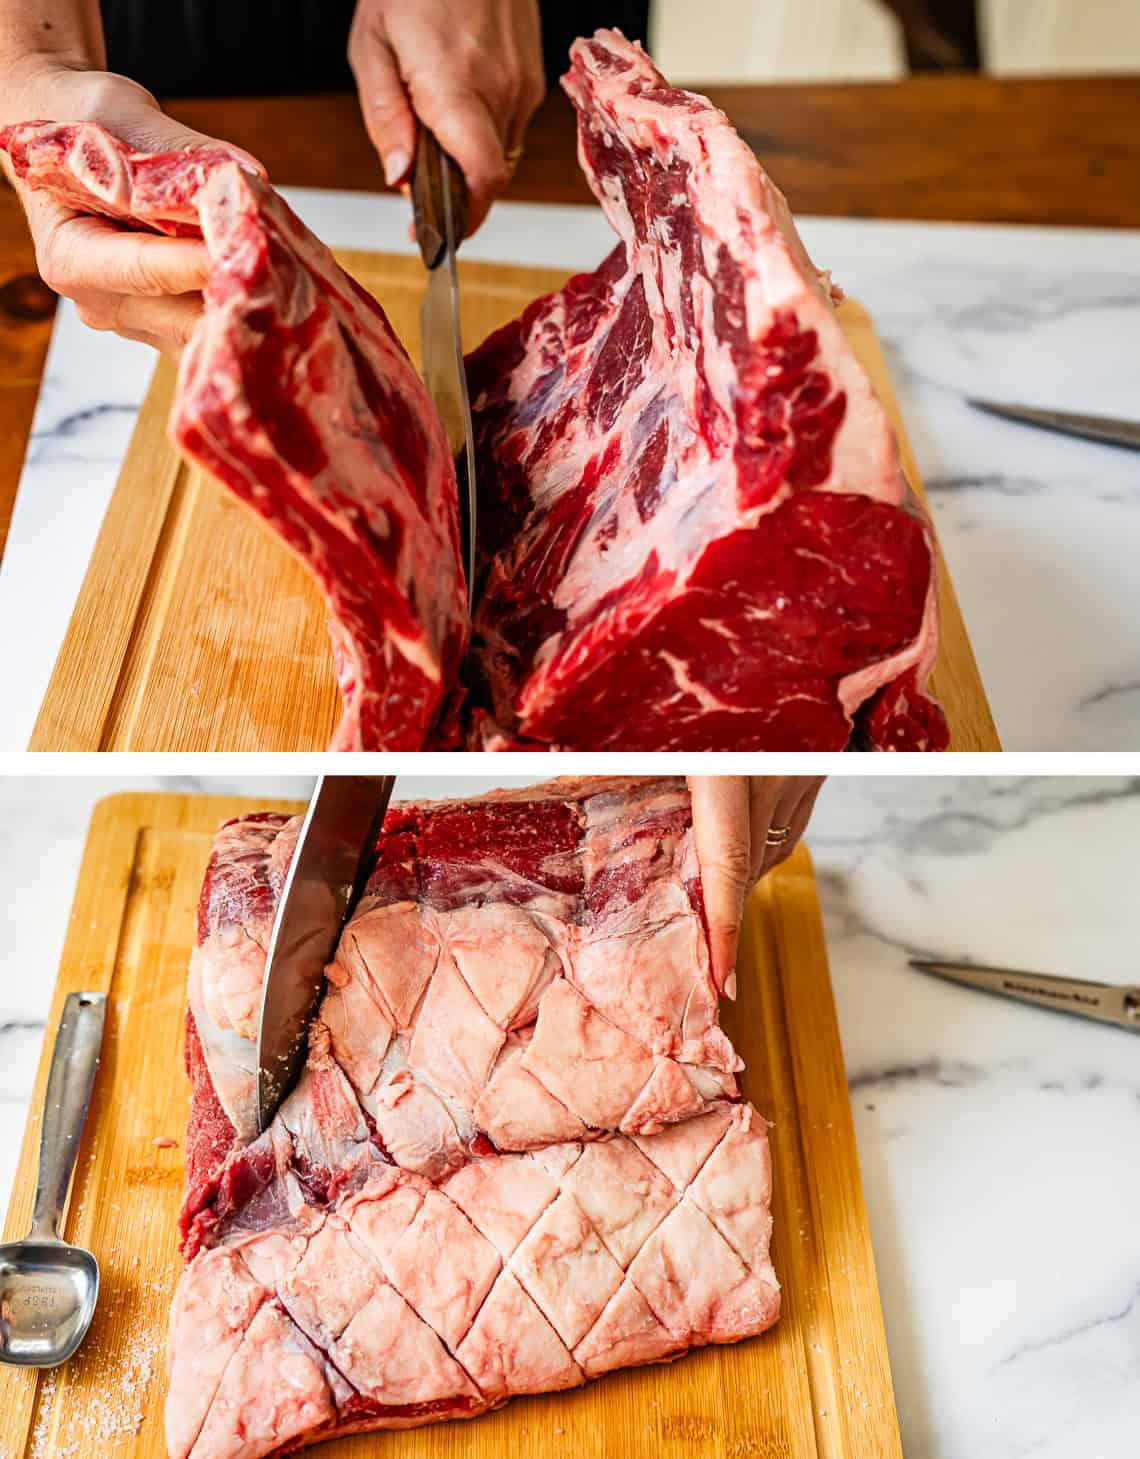
Now it’s time to make some crosshatch cuts in the fat cap. This helps the salt penetrate more easily to the center of the roast, meaning your roast will be seasoned all the way to the inside. It also helps get more crispy edges when you sear it! Don’t cut into the muscle; just cut the fat.
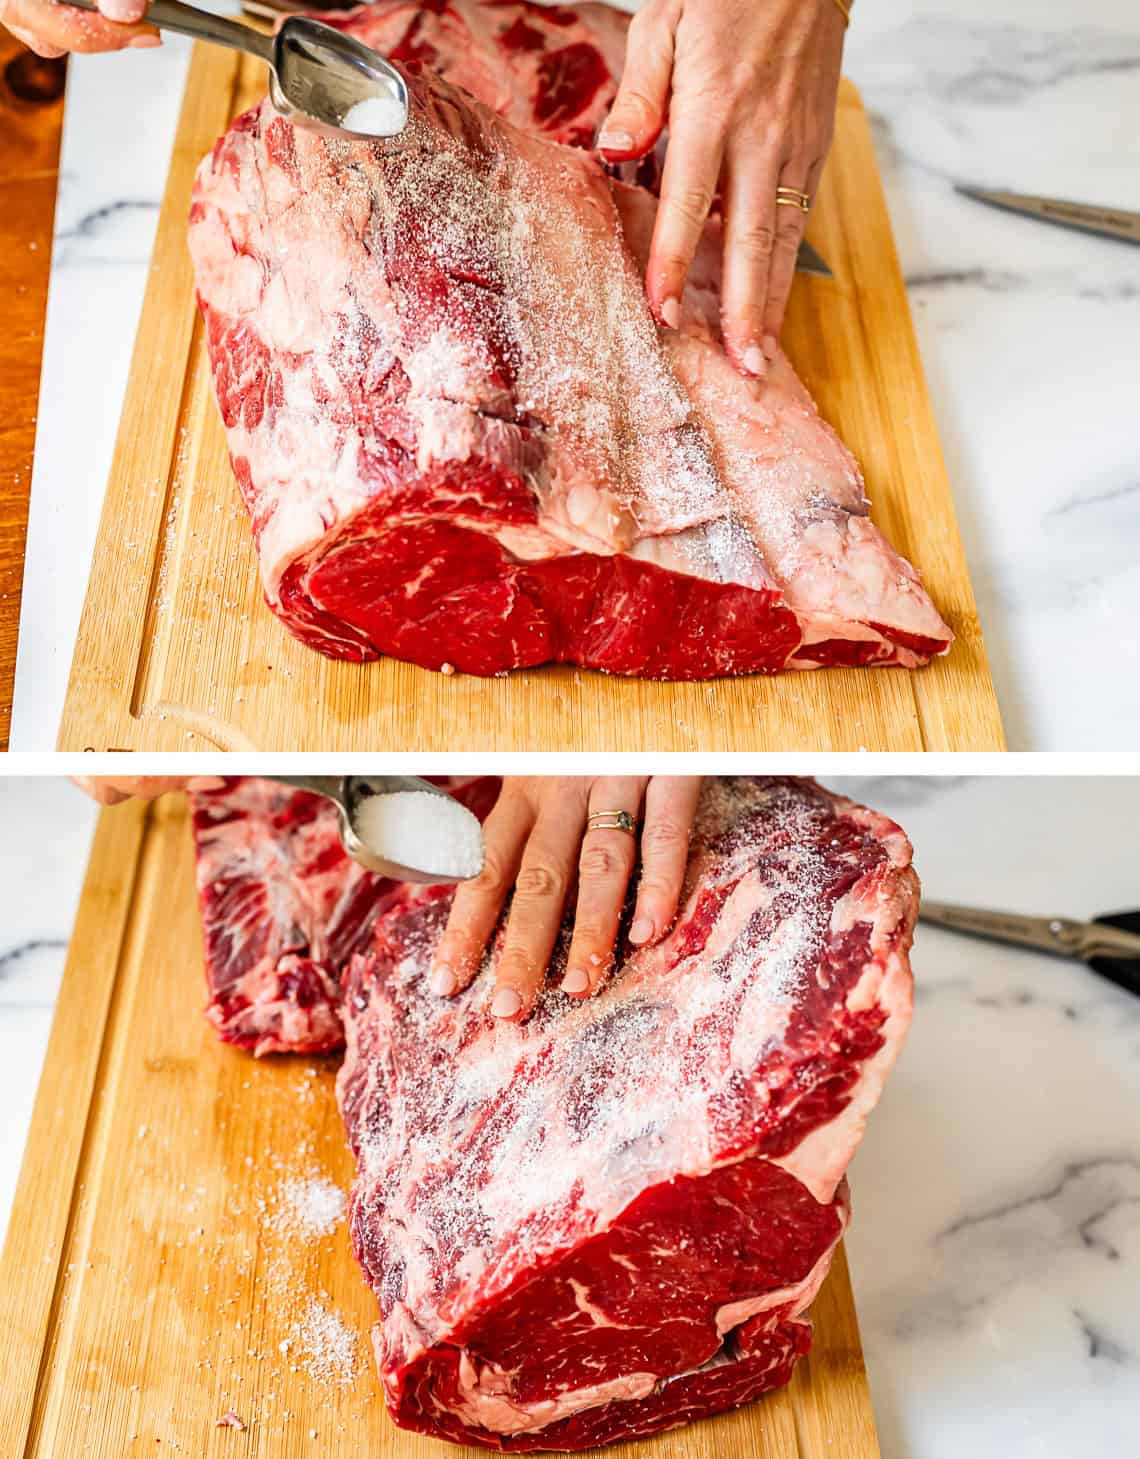
Now it’s time to rub this baby down with a heck ton of salt. Don’t be shy! This salt is not staying on the outside edge of the roast. Over the next 24 hours it’s going to travel all the way to the center of the roast, so that every inch of it is perfectly seasoned. Osmosis! Science! IT’S AMAZING!!
Place your salted roast on a cooling rack set over a rimmed baking sheet, or the roasting pan and rack you plan to cook with. Whatever it is, it has to fit in your fridge, so budge up and make some room in there. Ignore the kitchen twine, you do NOT need to tie the roast together at this point.
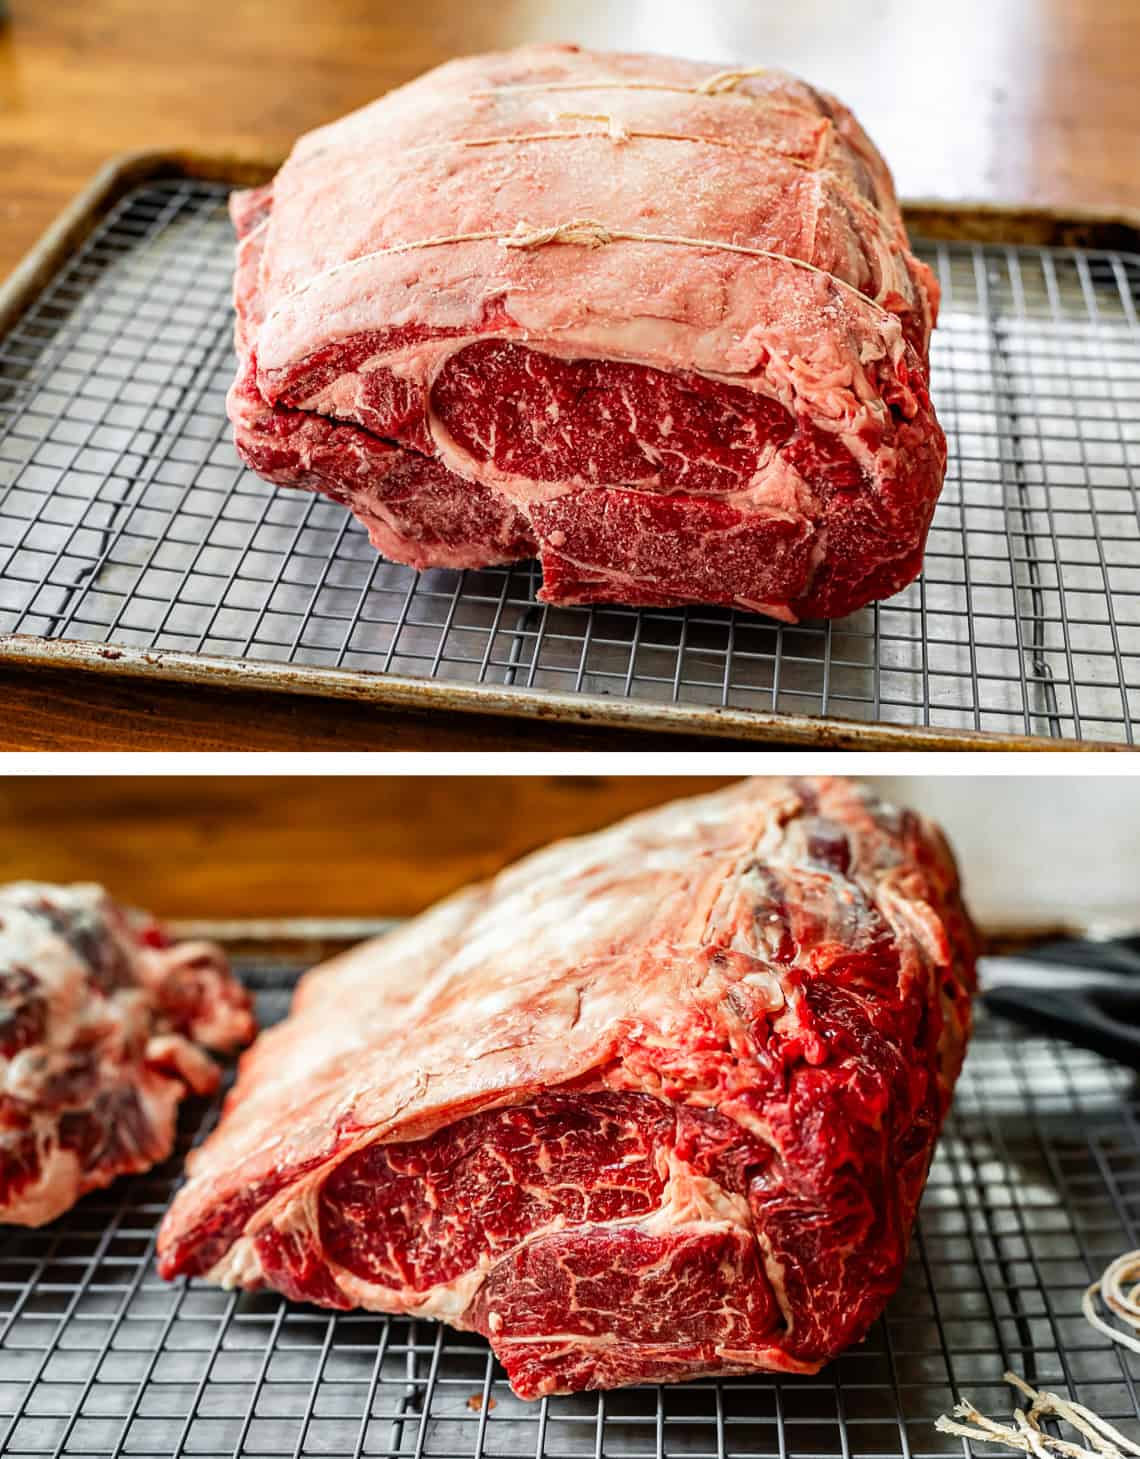
Here is the roast 24 hours later, separate from the bones. You can see that all of the salt has been absorbed, and there are a couple drips, but for the most part, the roast is super dry. Pat it with some paper towels if it looks drippy on the bottom.
Heat a high sided skillet until it’s smokin’ hot.
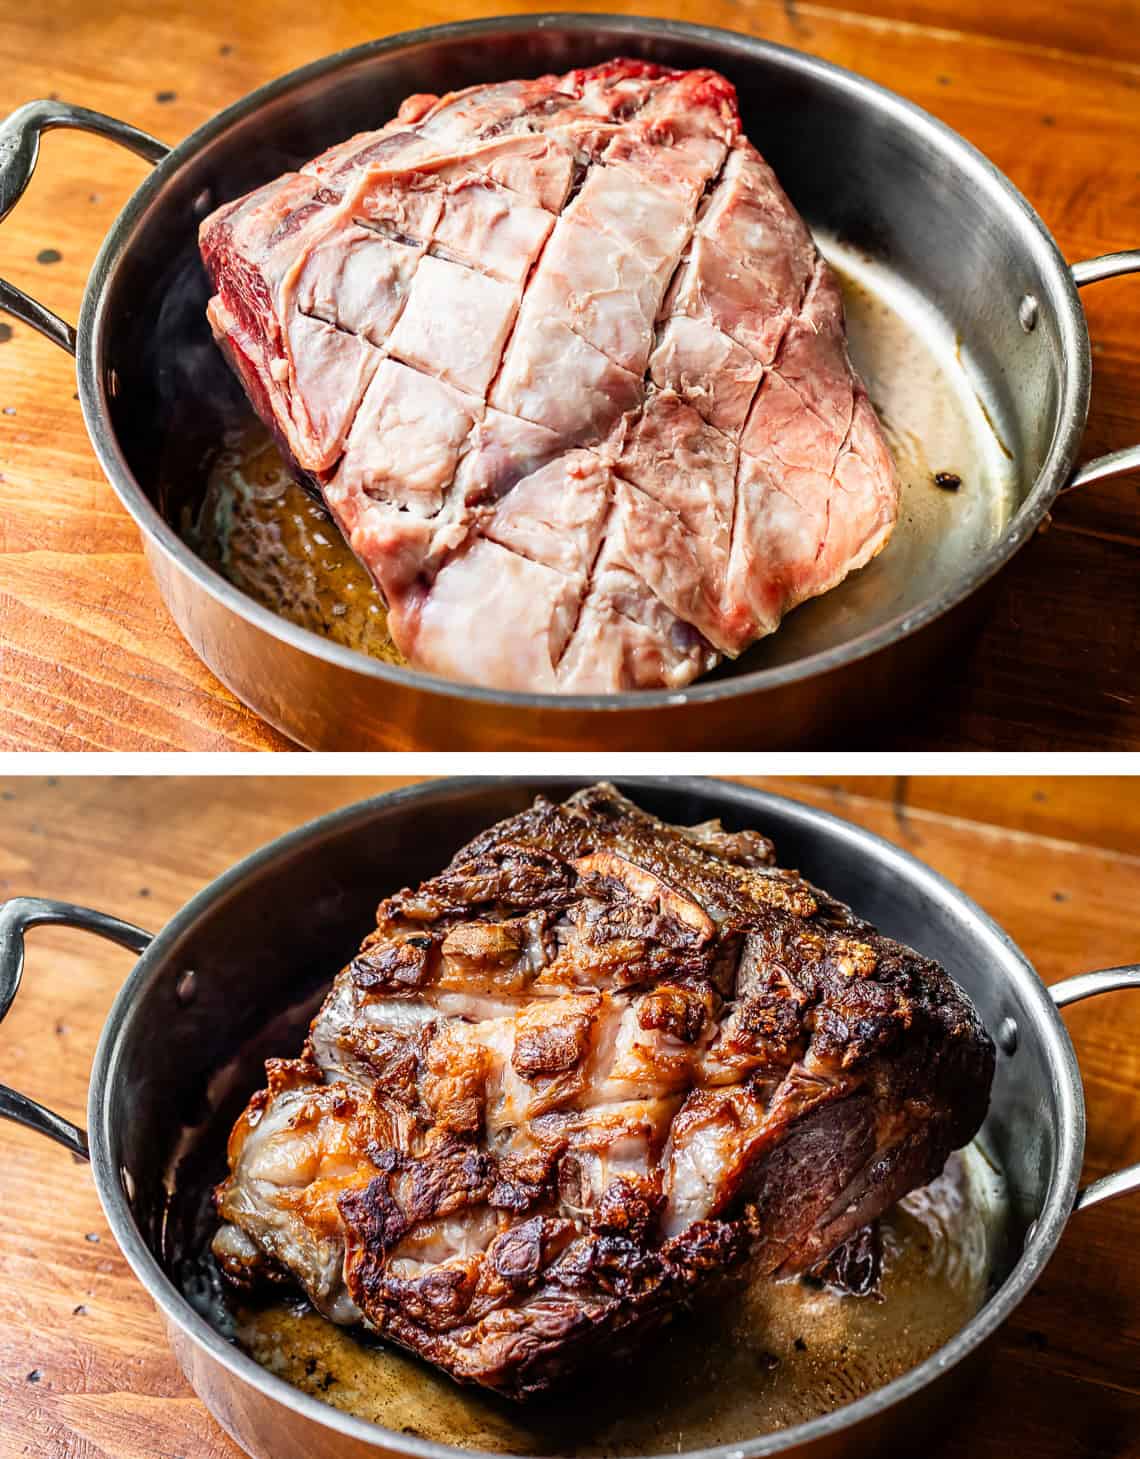
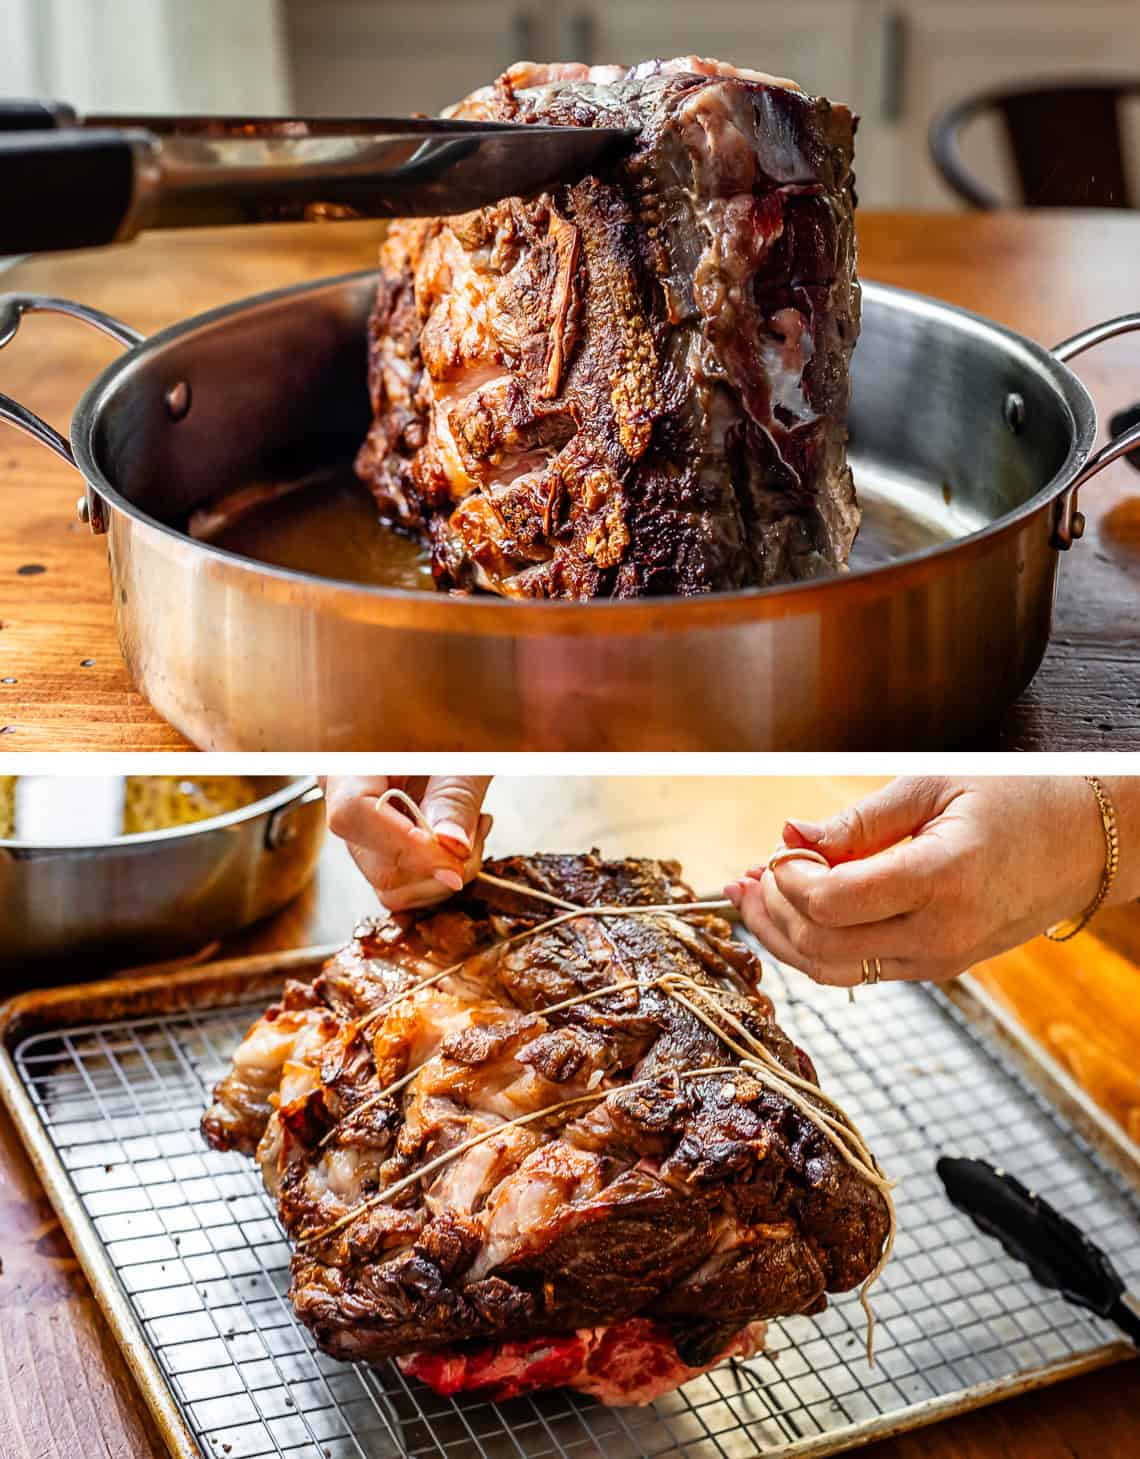
Sear each side of the roast, about 2-3 minutes per side. Don’t forget the edges! I hold up the roast with tongs while it cooks.
You can take the time to sear the bones, if you like, but it’s not necessary.
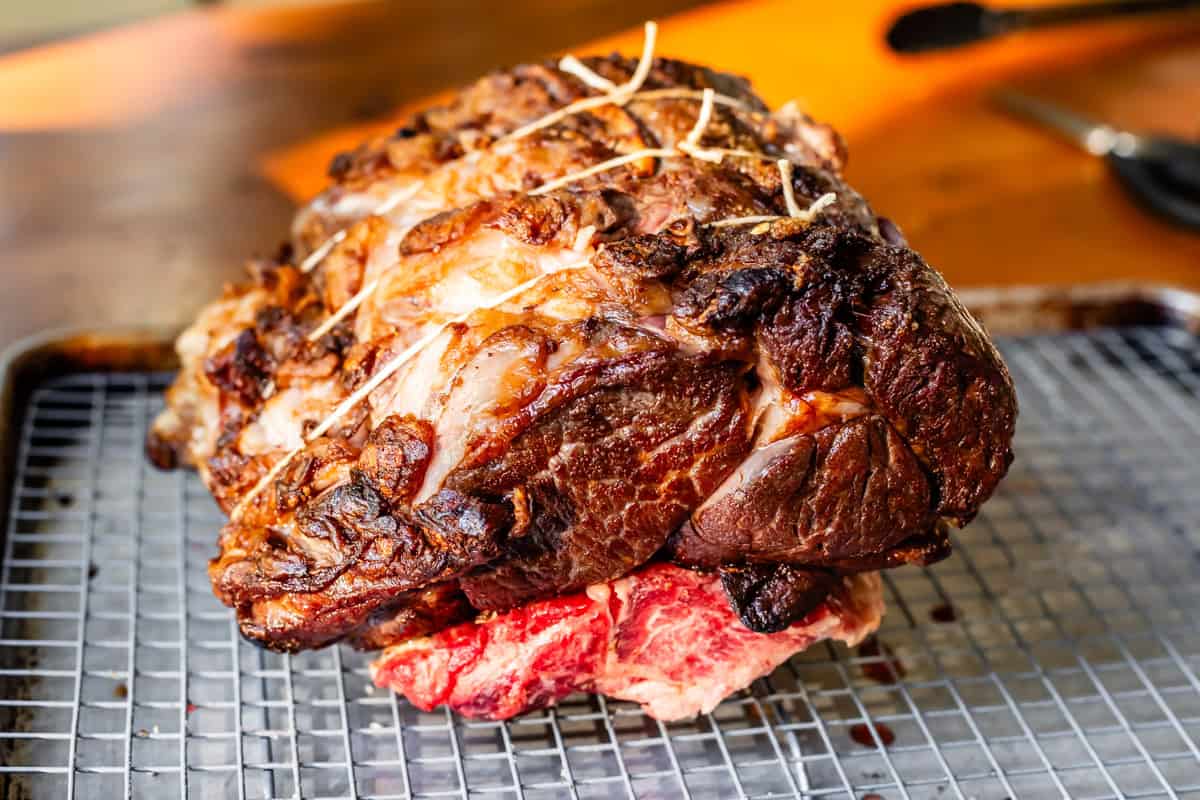
Set the bones on the rack and top with the seared roast. Tie them together using kitchen twine.
Meanwhile, add some water and beef base to the pan that you seared in. This makes a tasty broth, we don’t want to miss those browned bits!
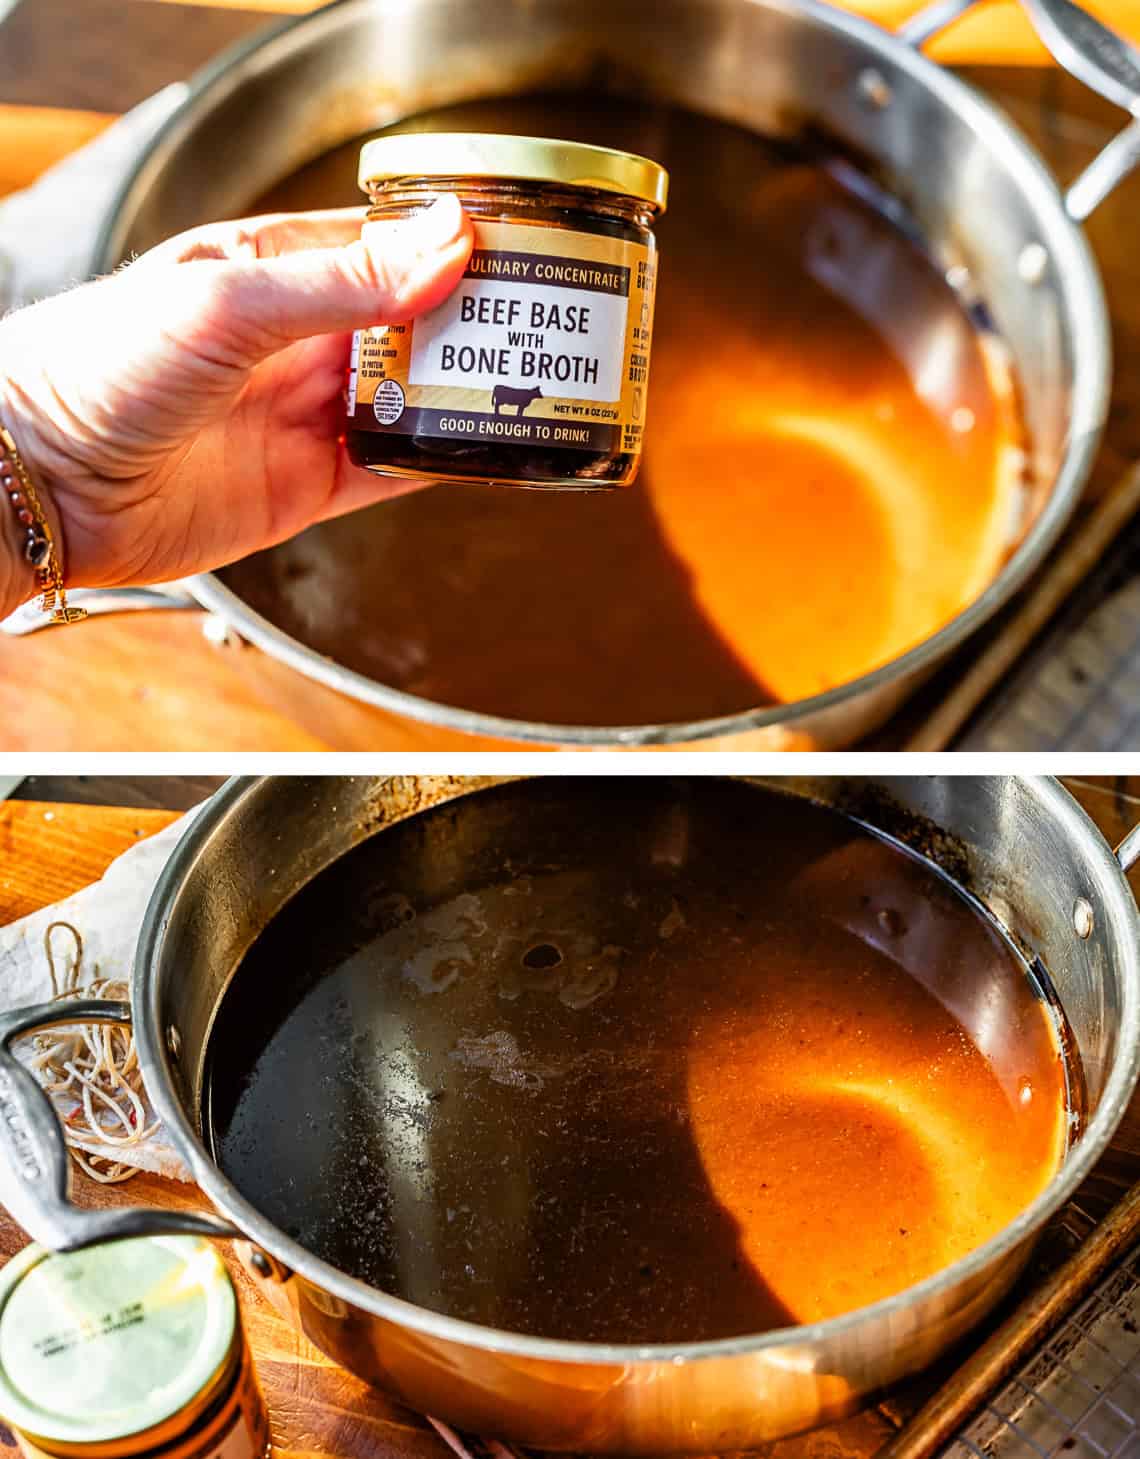
Pour the beef broth from the skillet into the roasting pan you are using. If you are using a rimmed baking sheet, be careful, you probably don’t want to add all the broth, it will overflow or slosh around too much as you take it in and out of the oven.
Place your meat thermometer probe right in the center, in the thickest part of the roast.
Now it’s time to cook! Place in a 200 degrees oven. When the roast has reached 110 degrees on the inside, DON’T take it out of the oven. Instead turn off the oven and crack the oven door. See the recipe and notes for more details about which temperature to choose. We are letting our roast sit in the turned-off-door-cracked-oven for a while so that it can slowly reach it’s final temperature. 125 degrees is what you want for rare.
Rare: 120-125°F
Medium rare: 130°F
Medium: 135°F
Remember, these are the FINAL temperatures that you want to eat the roast at. We are turning off the oven and opening the door 10-15 degrees before it reaches the final desired temperature.
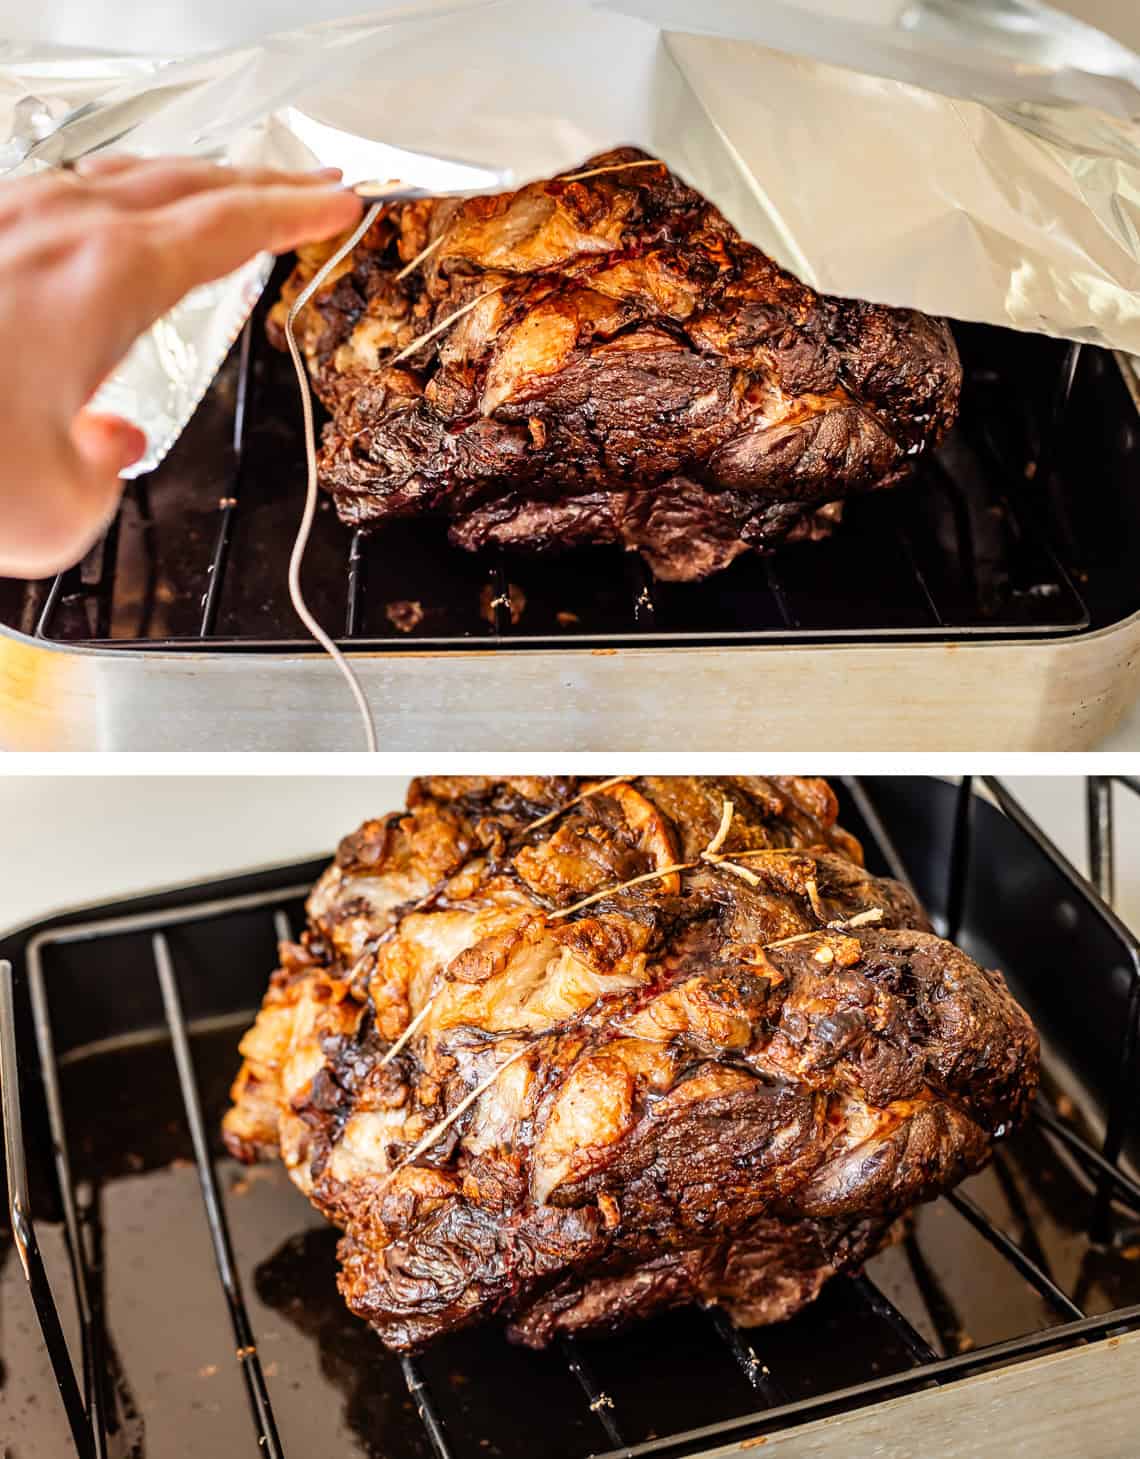
Once the roast has reached the temperature you like in the turned-off-door-cracked oven, take it out. Tent it with foil right away. Let the roast rest for about 30 minutes, or up to 60 minutes.
Make the gravy
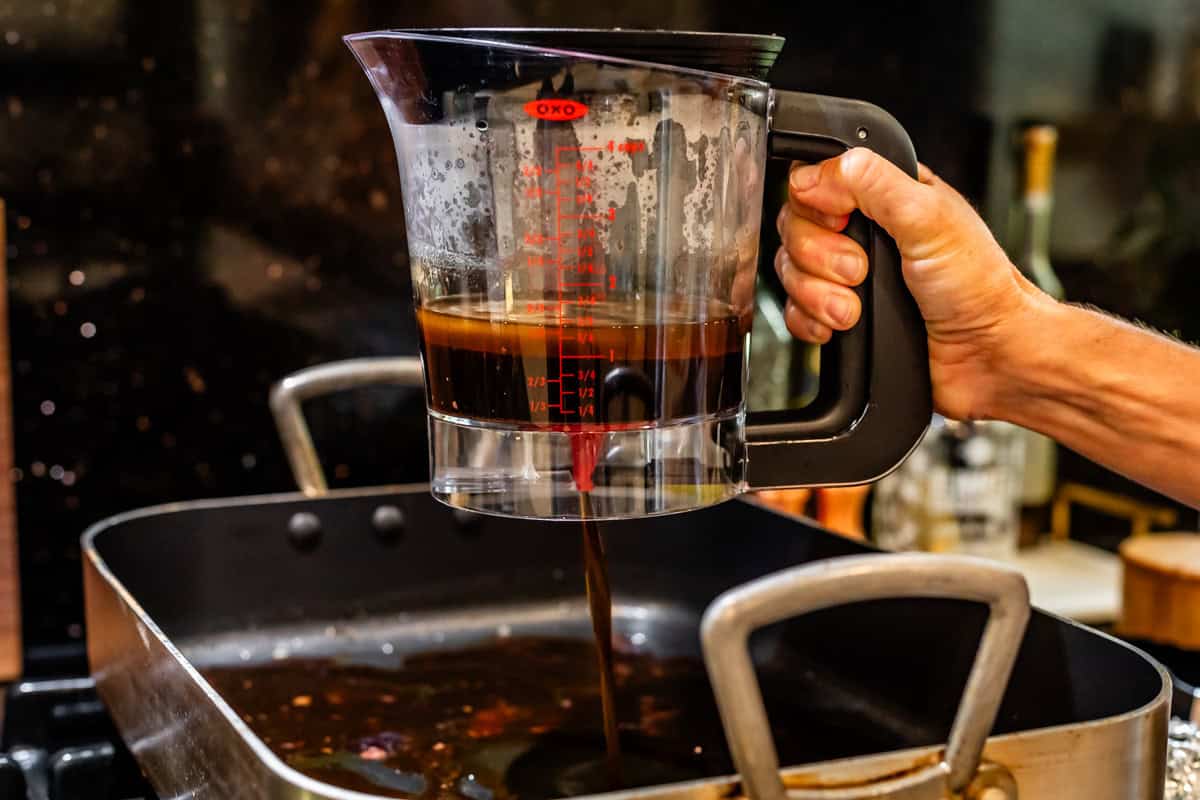
While the roast is resting, make the gravy, if you are interested in gravy. (You are interested in gravy. Don’t be a fool.) Pour the broth and juices from the pan into a fat separator. You can skip this and embrace your fatty side, of course!
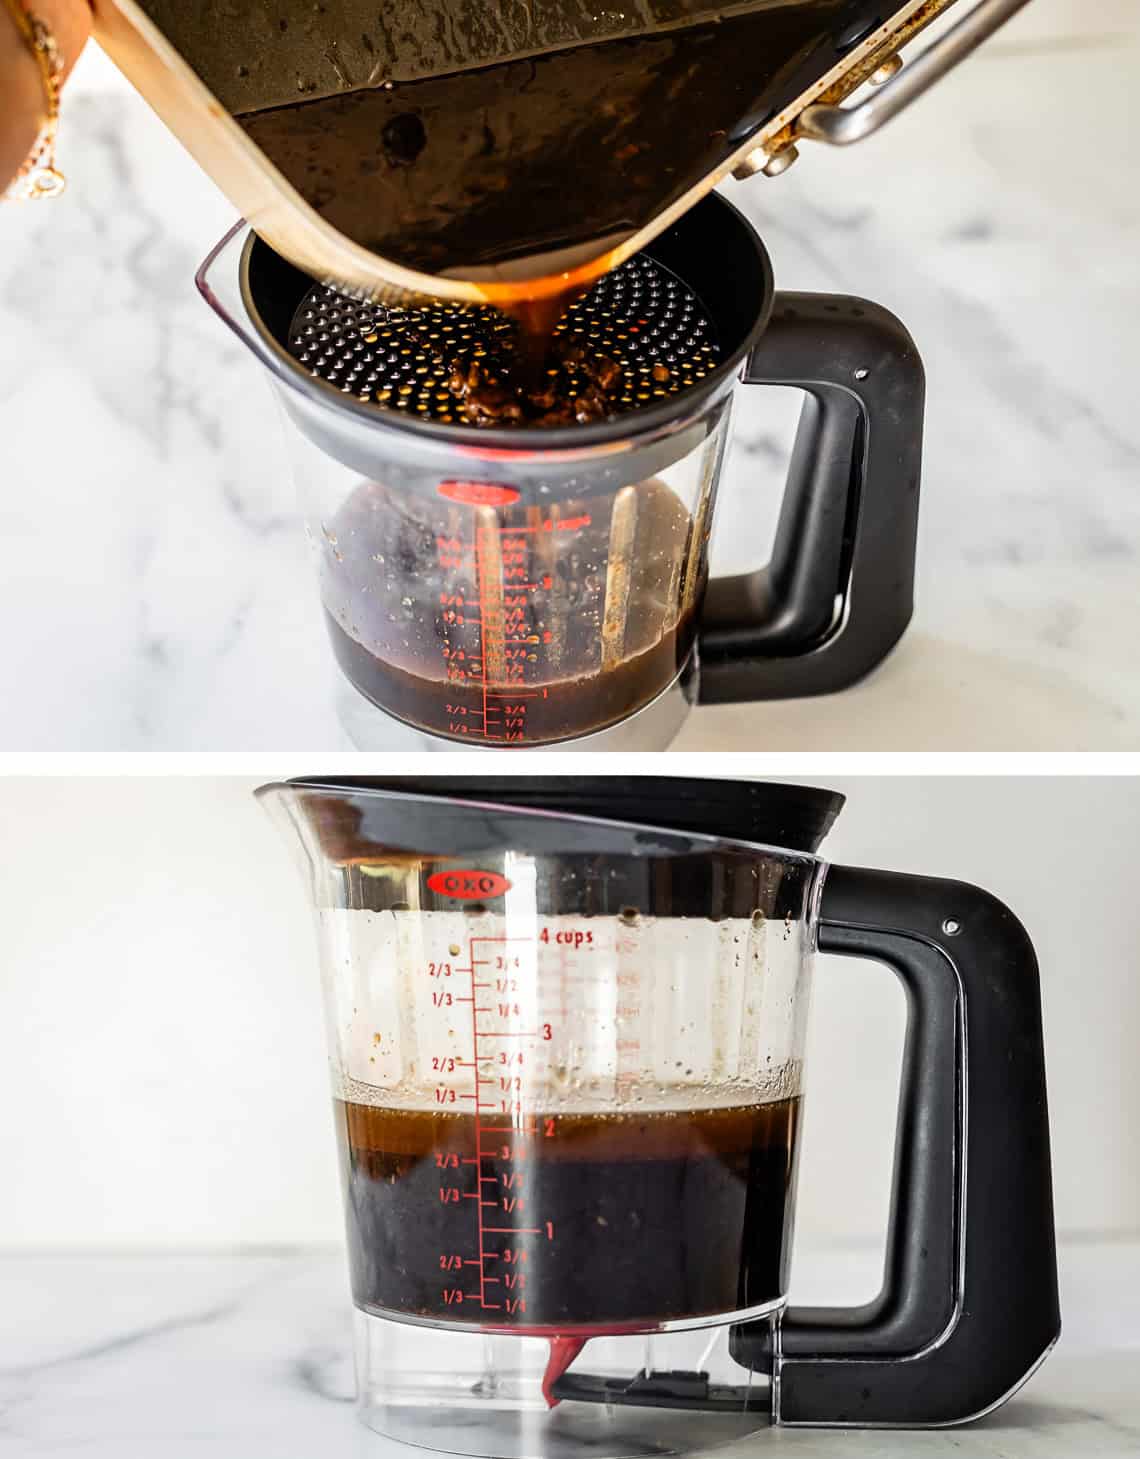
I am newly OBSESSED with this fat separator. Check this out! The drippings are released from the bottom! It’s so amazing! Add the broth back into the roasting pan, or you can do this in a different saucepan if you like.
Add in some whisked up flour and water to the boiling drippings, add a little butter and pepper, and voila! Easy, SUPER flavorful prime rib gravy.
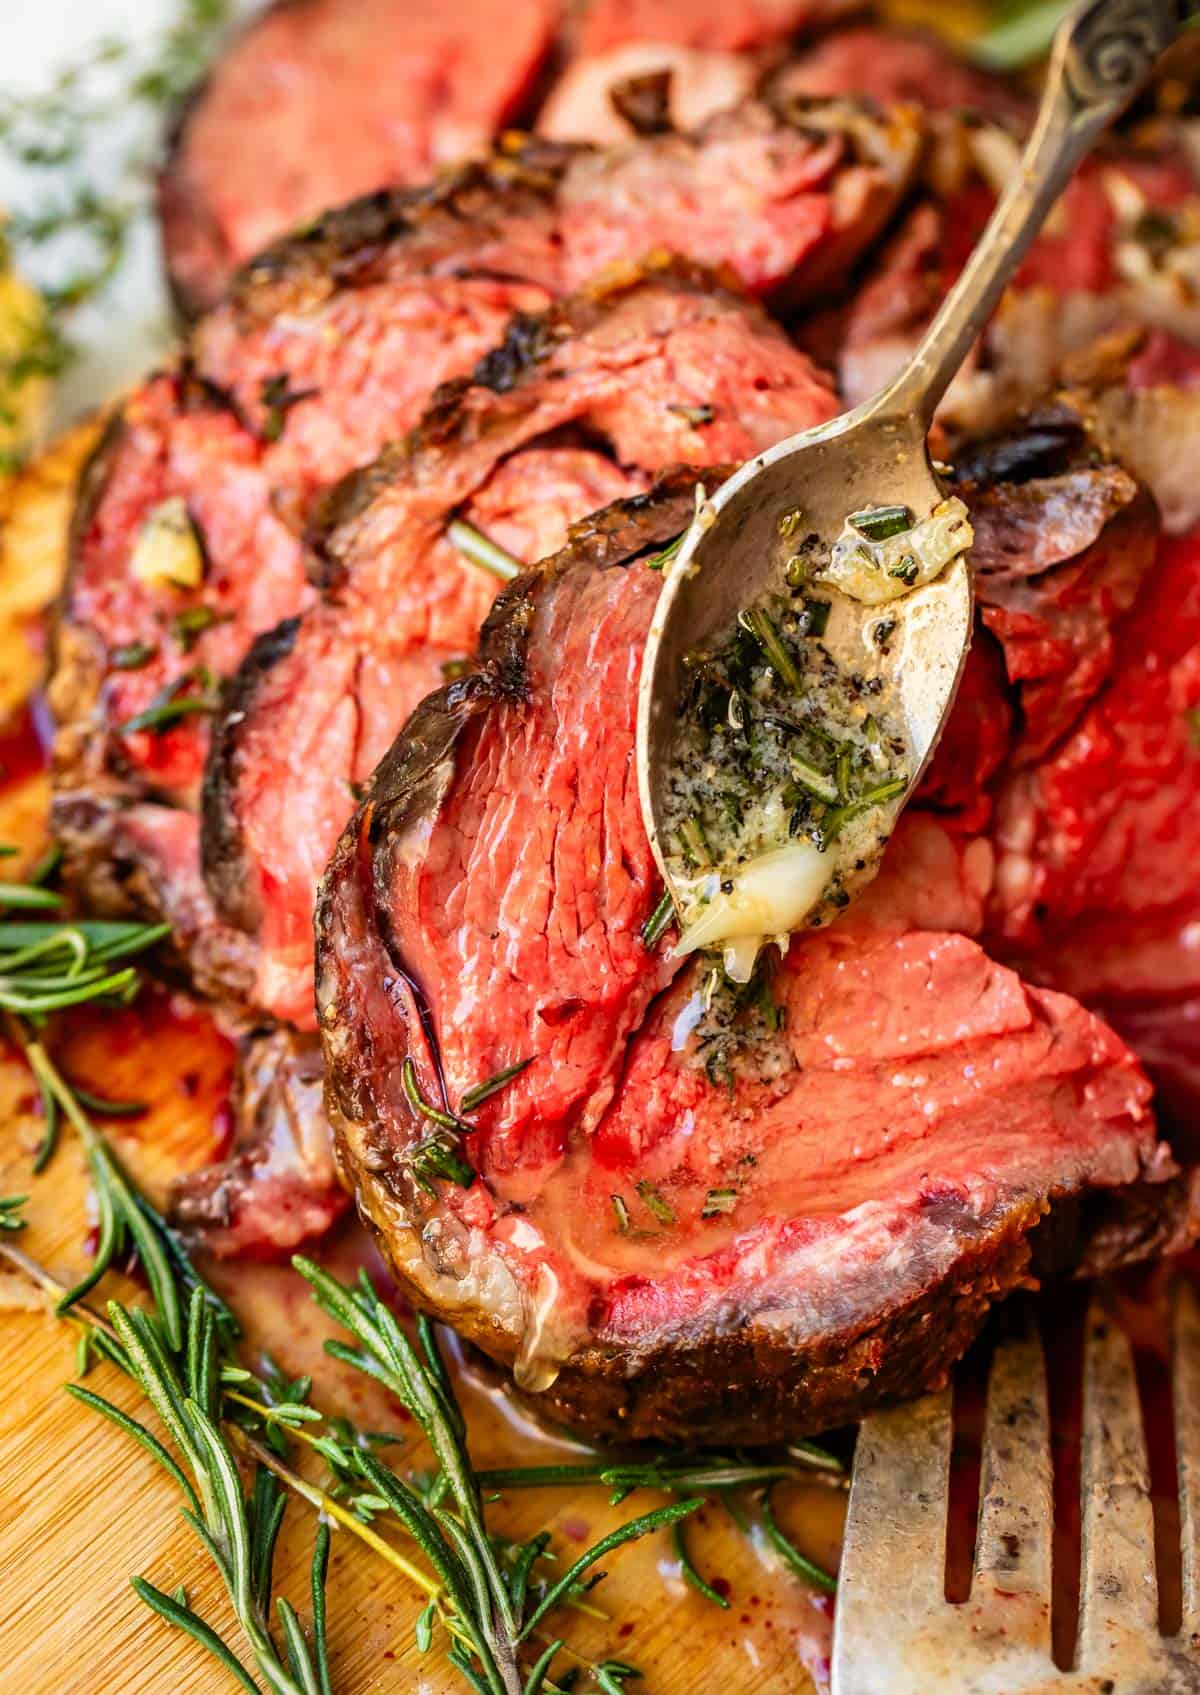
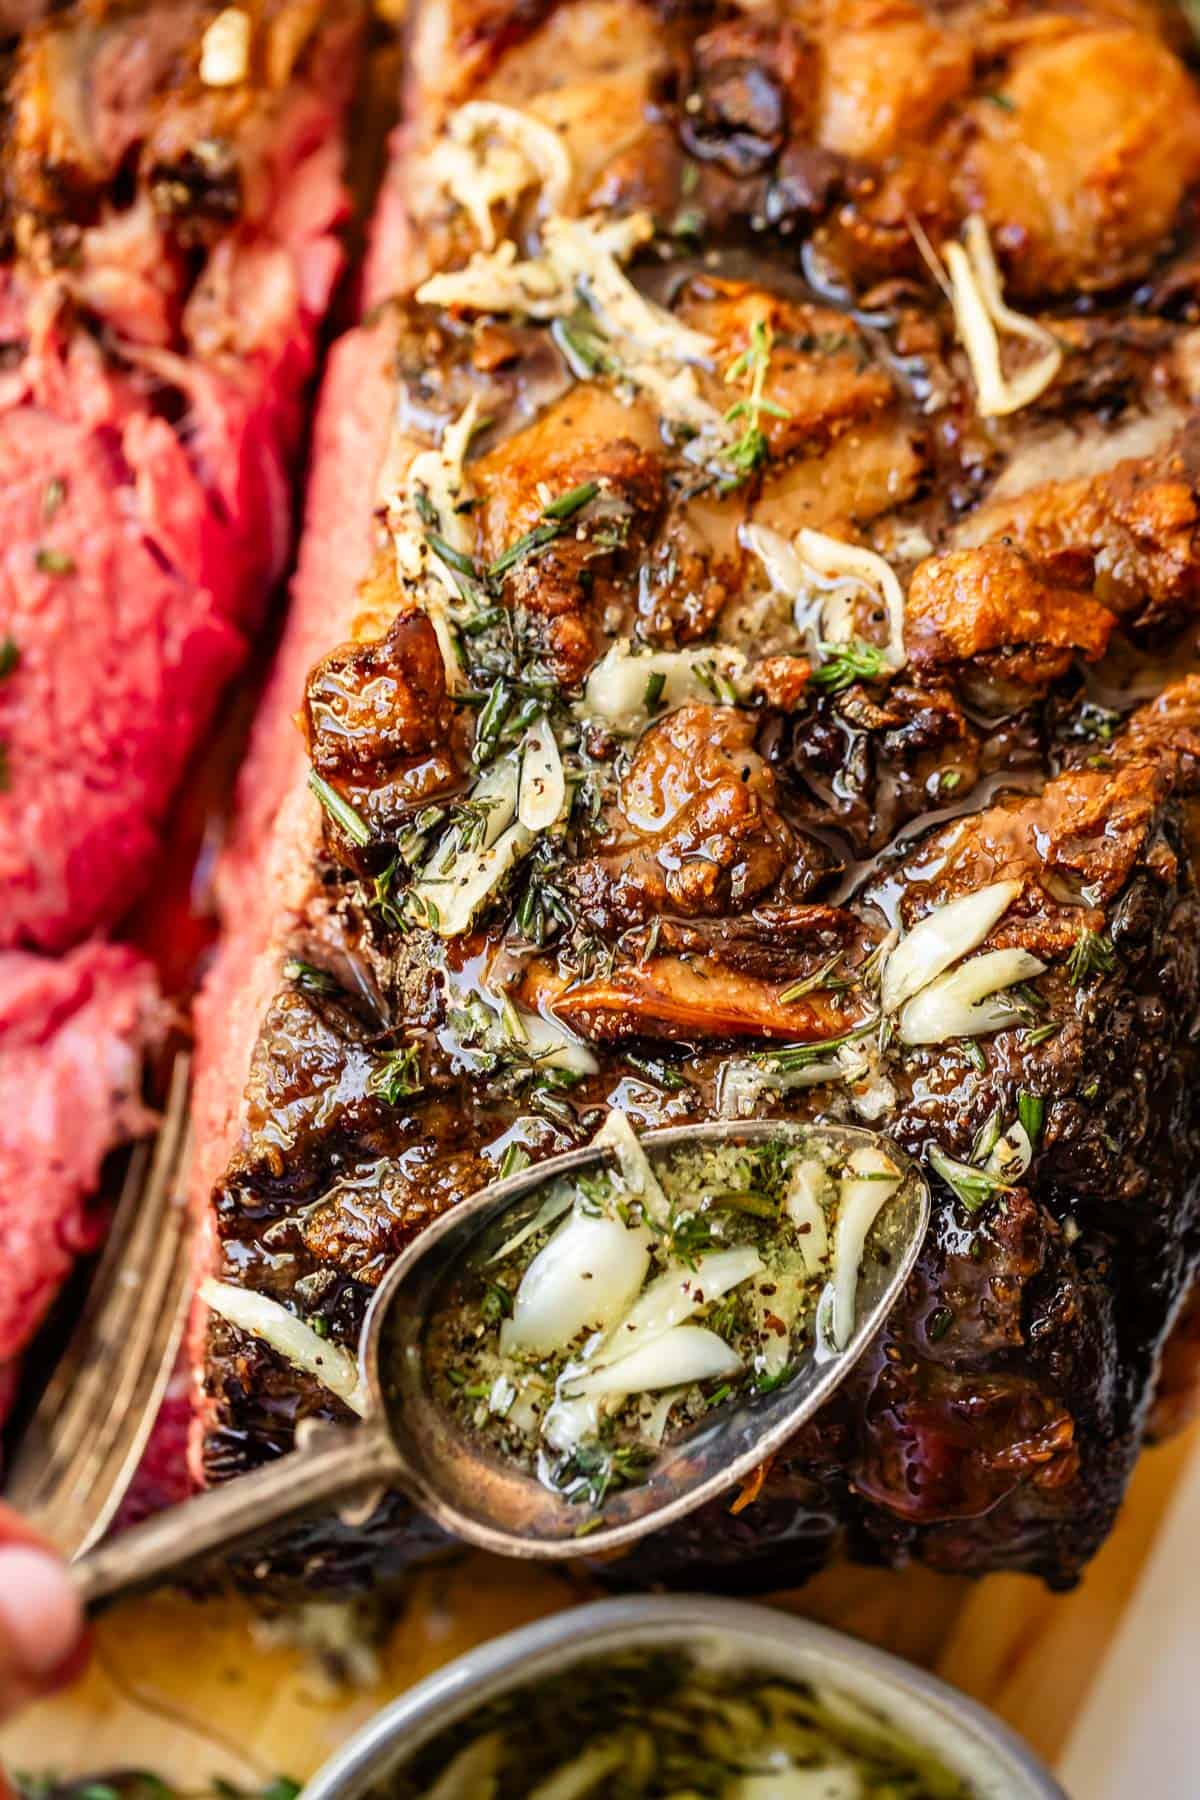
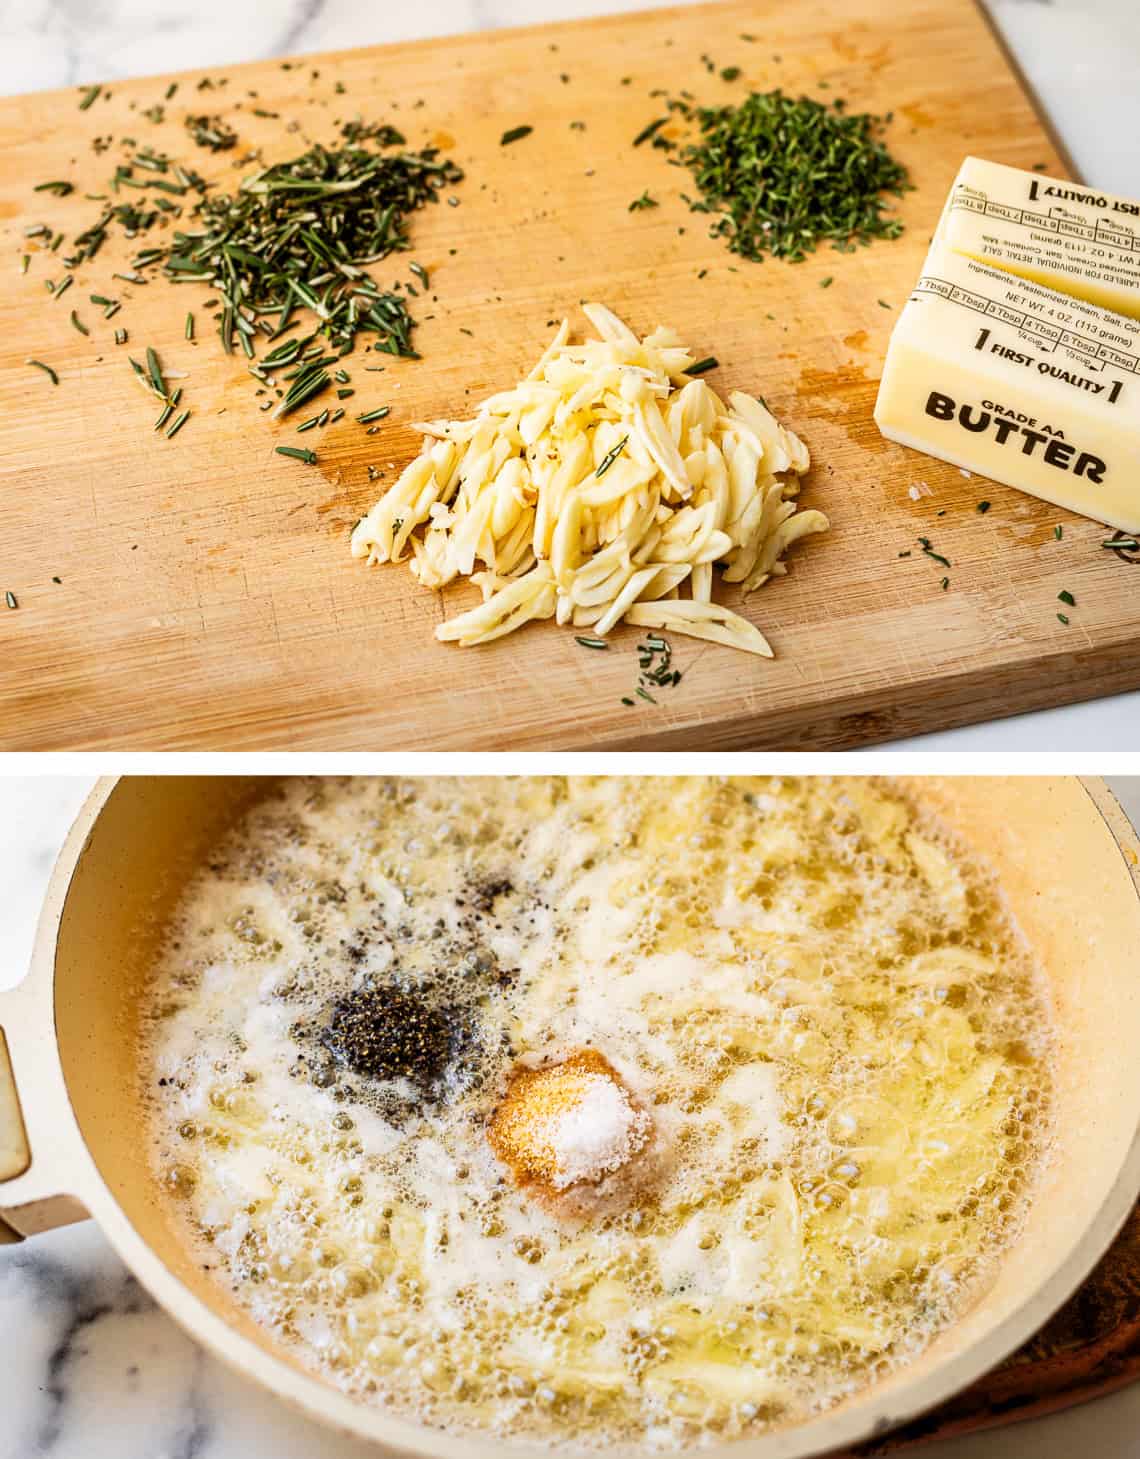
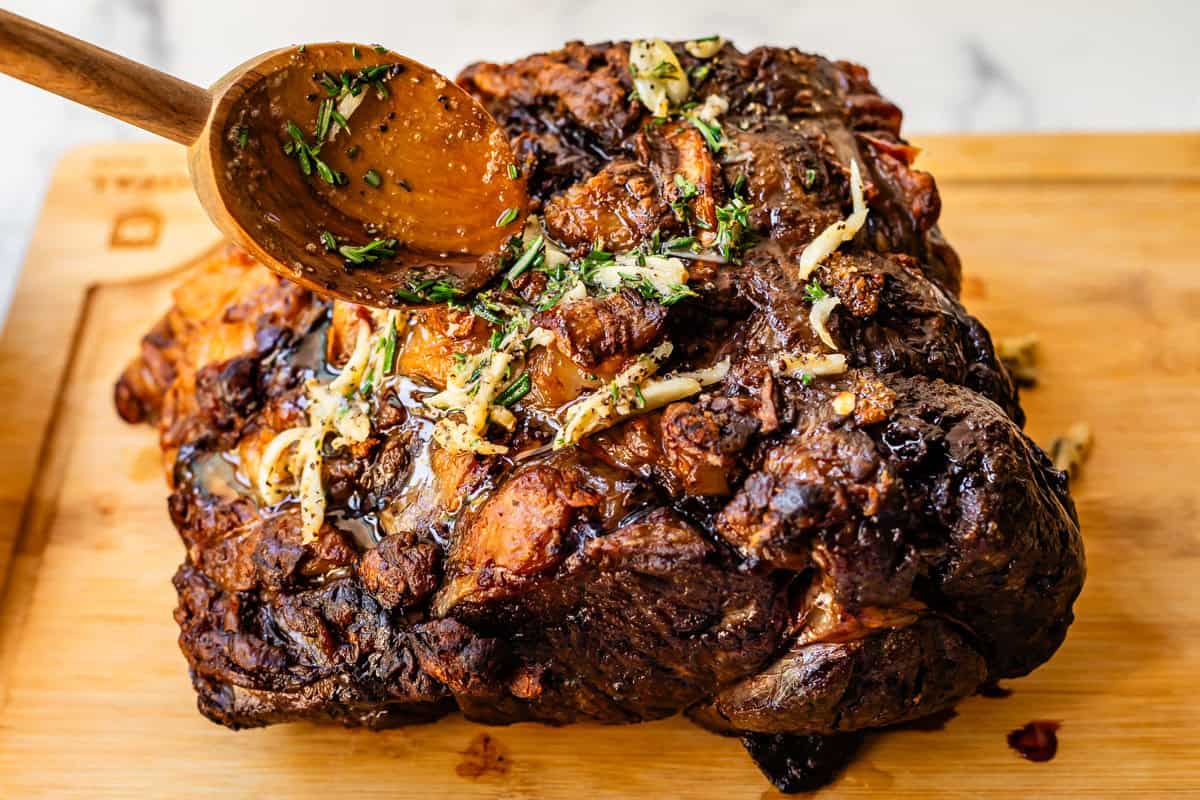
Make the garlic sauce
You might be thinking…we just made gravy. Why are we making garlic butter sauce now?? Because we are living our best lives, my friend.
It just takes 10 minutes and I love to spoon it directly over the prime rib roast before it’s sliced into, so that it melts into all of it. Then I pass the rest at the table. Is it overkill? Maybe. Has anyone ever complained? Nope.
We are just toasting the garlic a tiiiinny bit, then taking it off heat and adding a bunch of fresh herbs. Prime rib is so flavorful that it doesn’t really NEED this per se, but fresh herbs amp up the flavor of everything in my book.
Back to our roast beast:
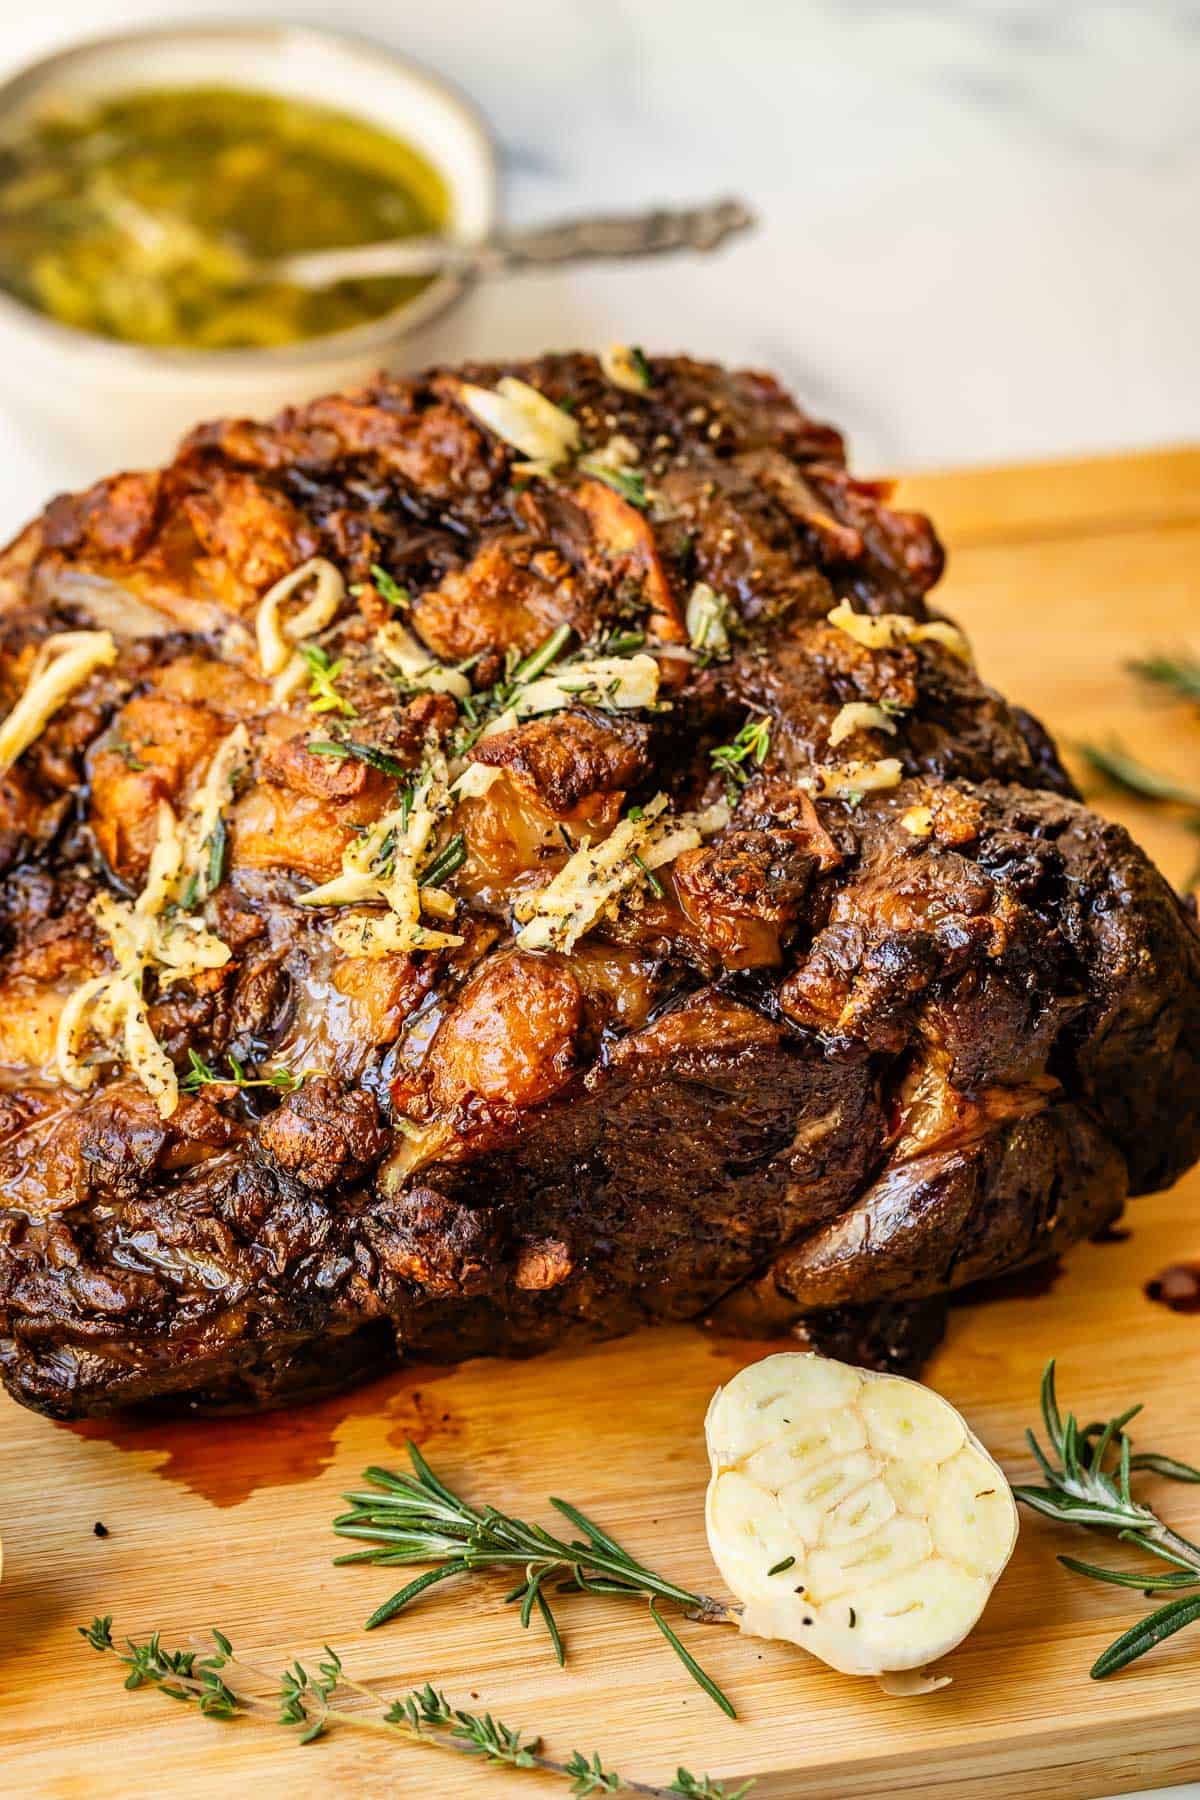
Broil the roast
A few minutes before you are ready to serve, we are going to blast the roast one last time under the broiler. This crisps the edges beautifully, and serves to reheat the edges of roast after is has cooled a bit from resting.
Take the foil that you used to tent the roast and crumple it into a ball. Use the foil to tilt the roast up on the edge, so the top of it is parallel to the broiler. I picked up this tip from America’s Test Kitchen! Genius!

Place the roast directly under the broiler and blast it on high heat for about 2 to 5 minutes, checking every minute. Don’t walk awaaayyyyy!!!!!
Serve the roast
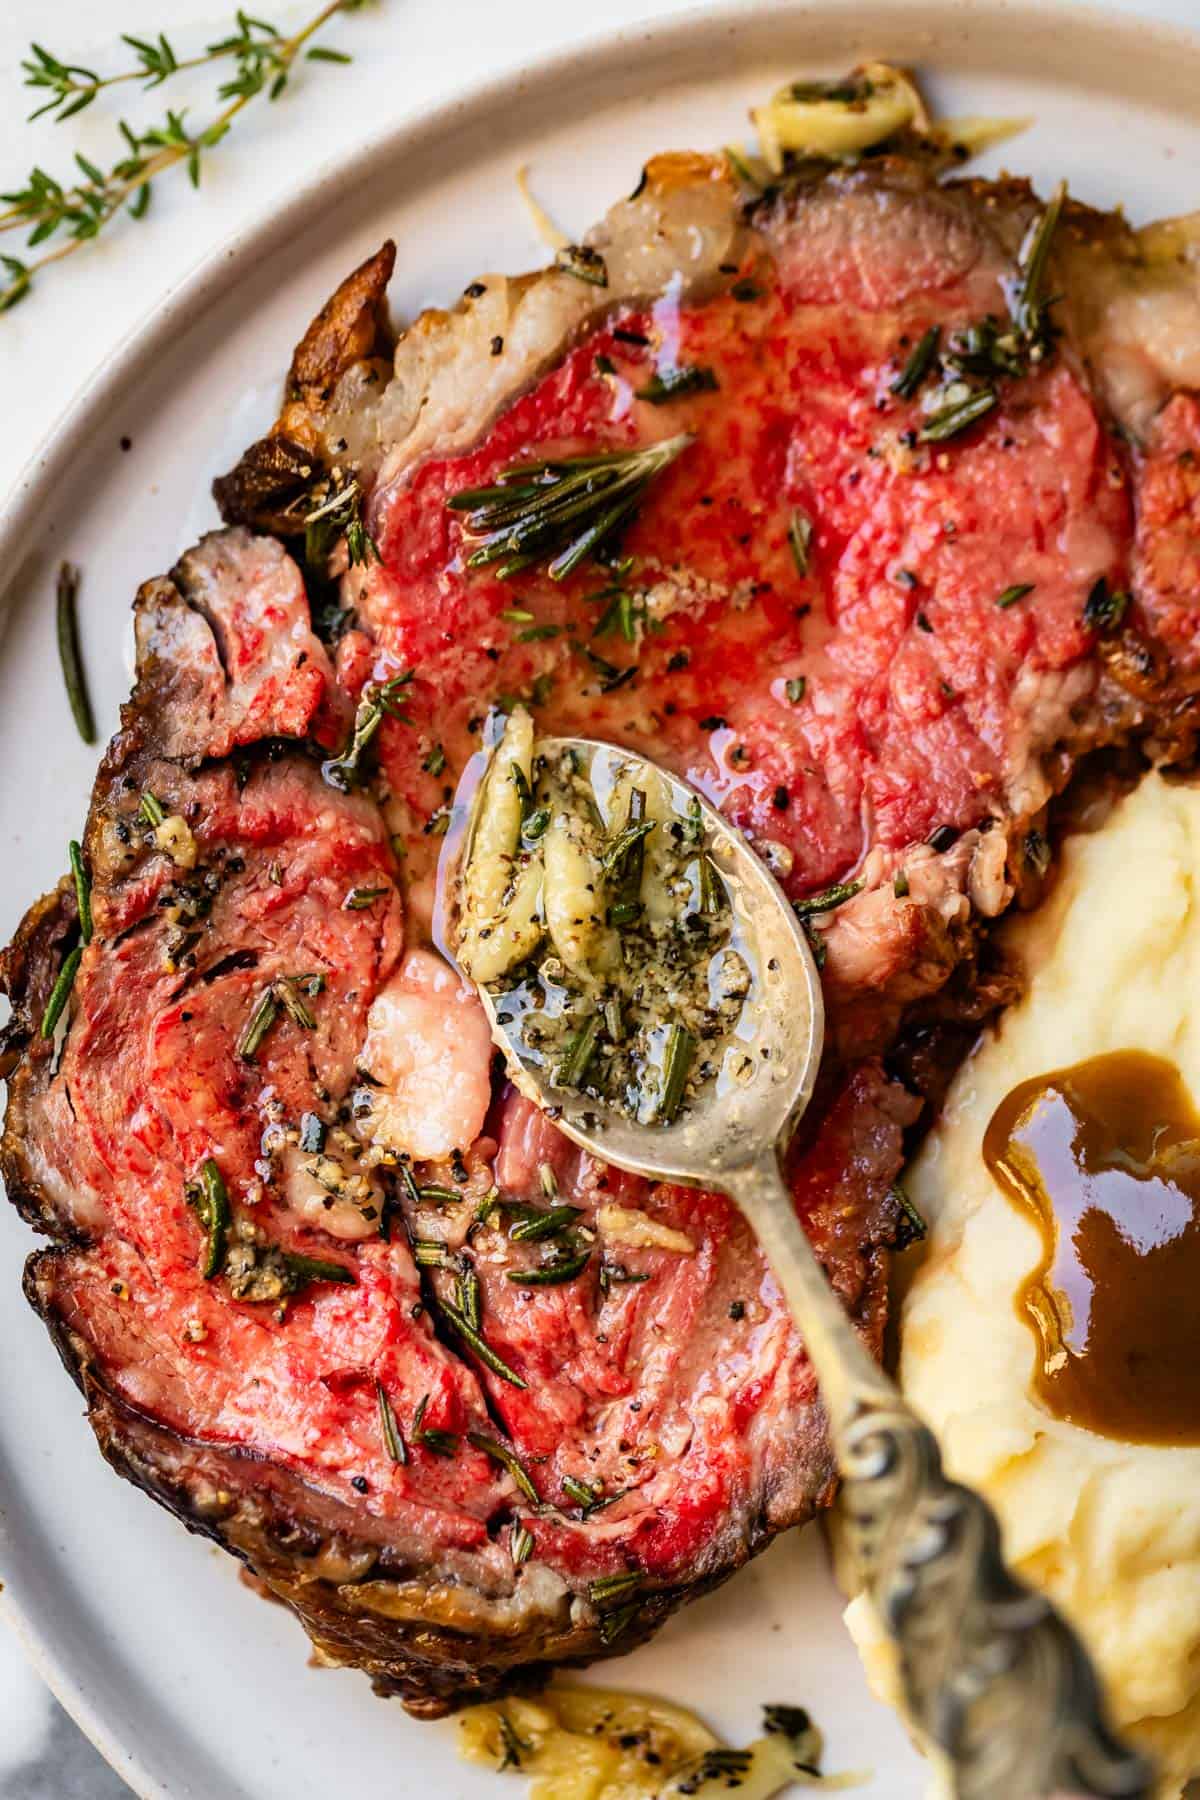
After it’s broiled, cut away the kitchen twine.
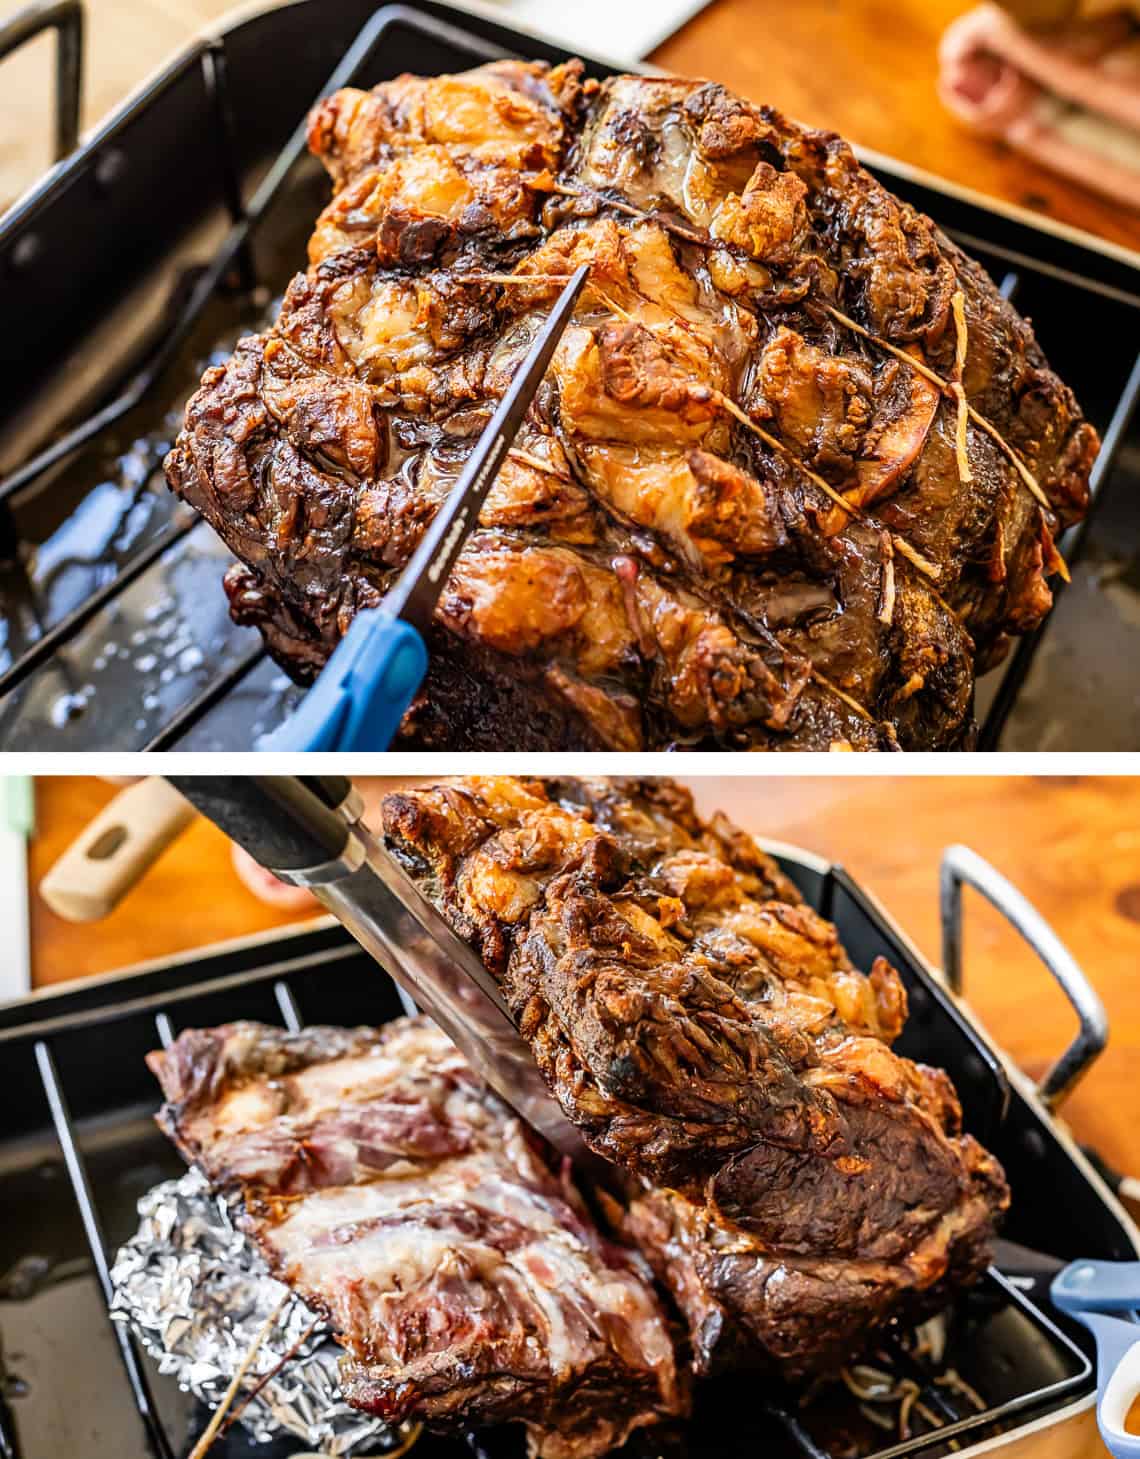
Lift up the roast from the rib bones beneath. Transfer the roast to a cutting board with a juice groove, so that you don’t have drippings flooding your counter. (Or place it directly on your serving dish, if you plan to carve it there.)
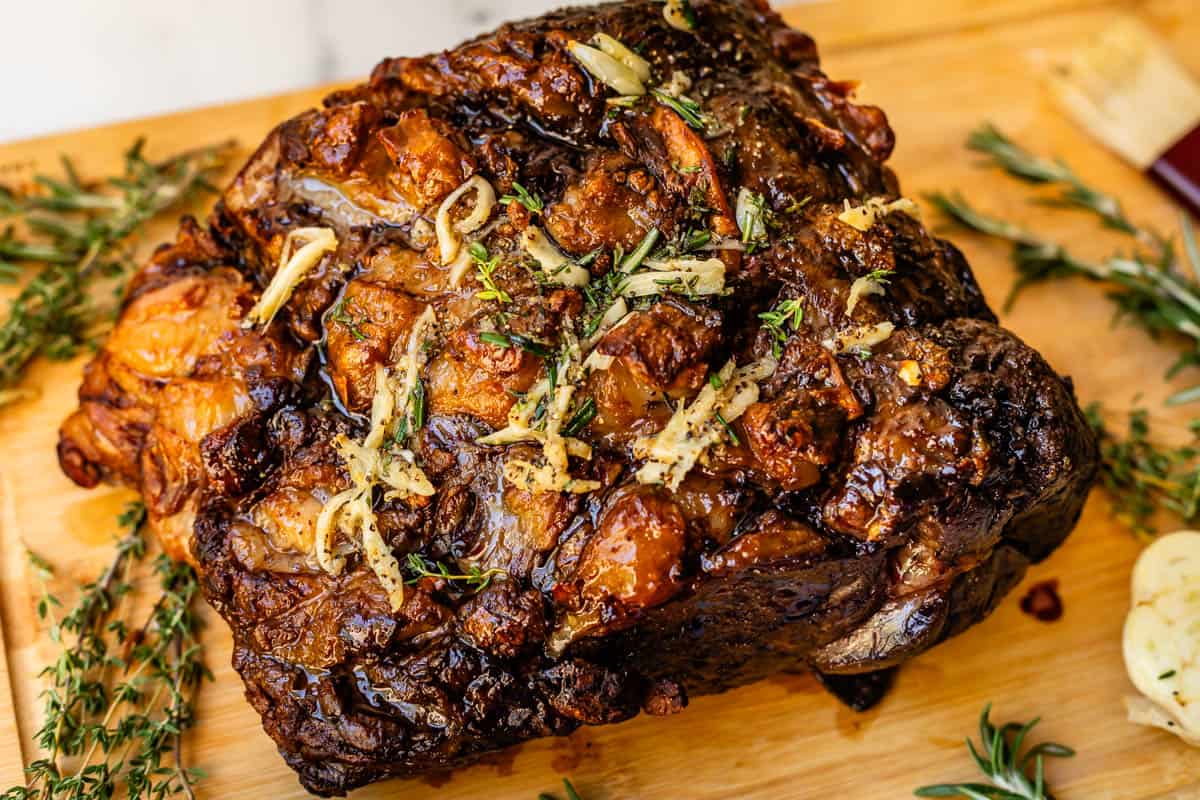
Spoon on the garlic butter sauce. Get in all the nooks and crannies!
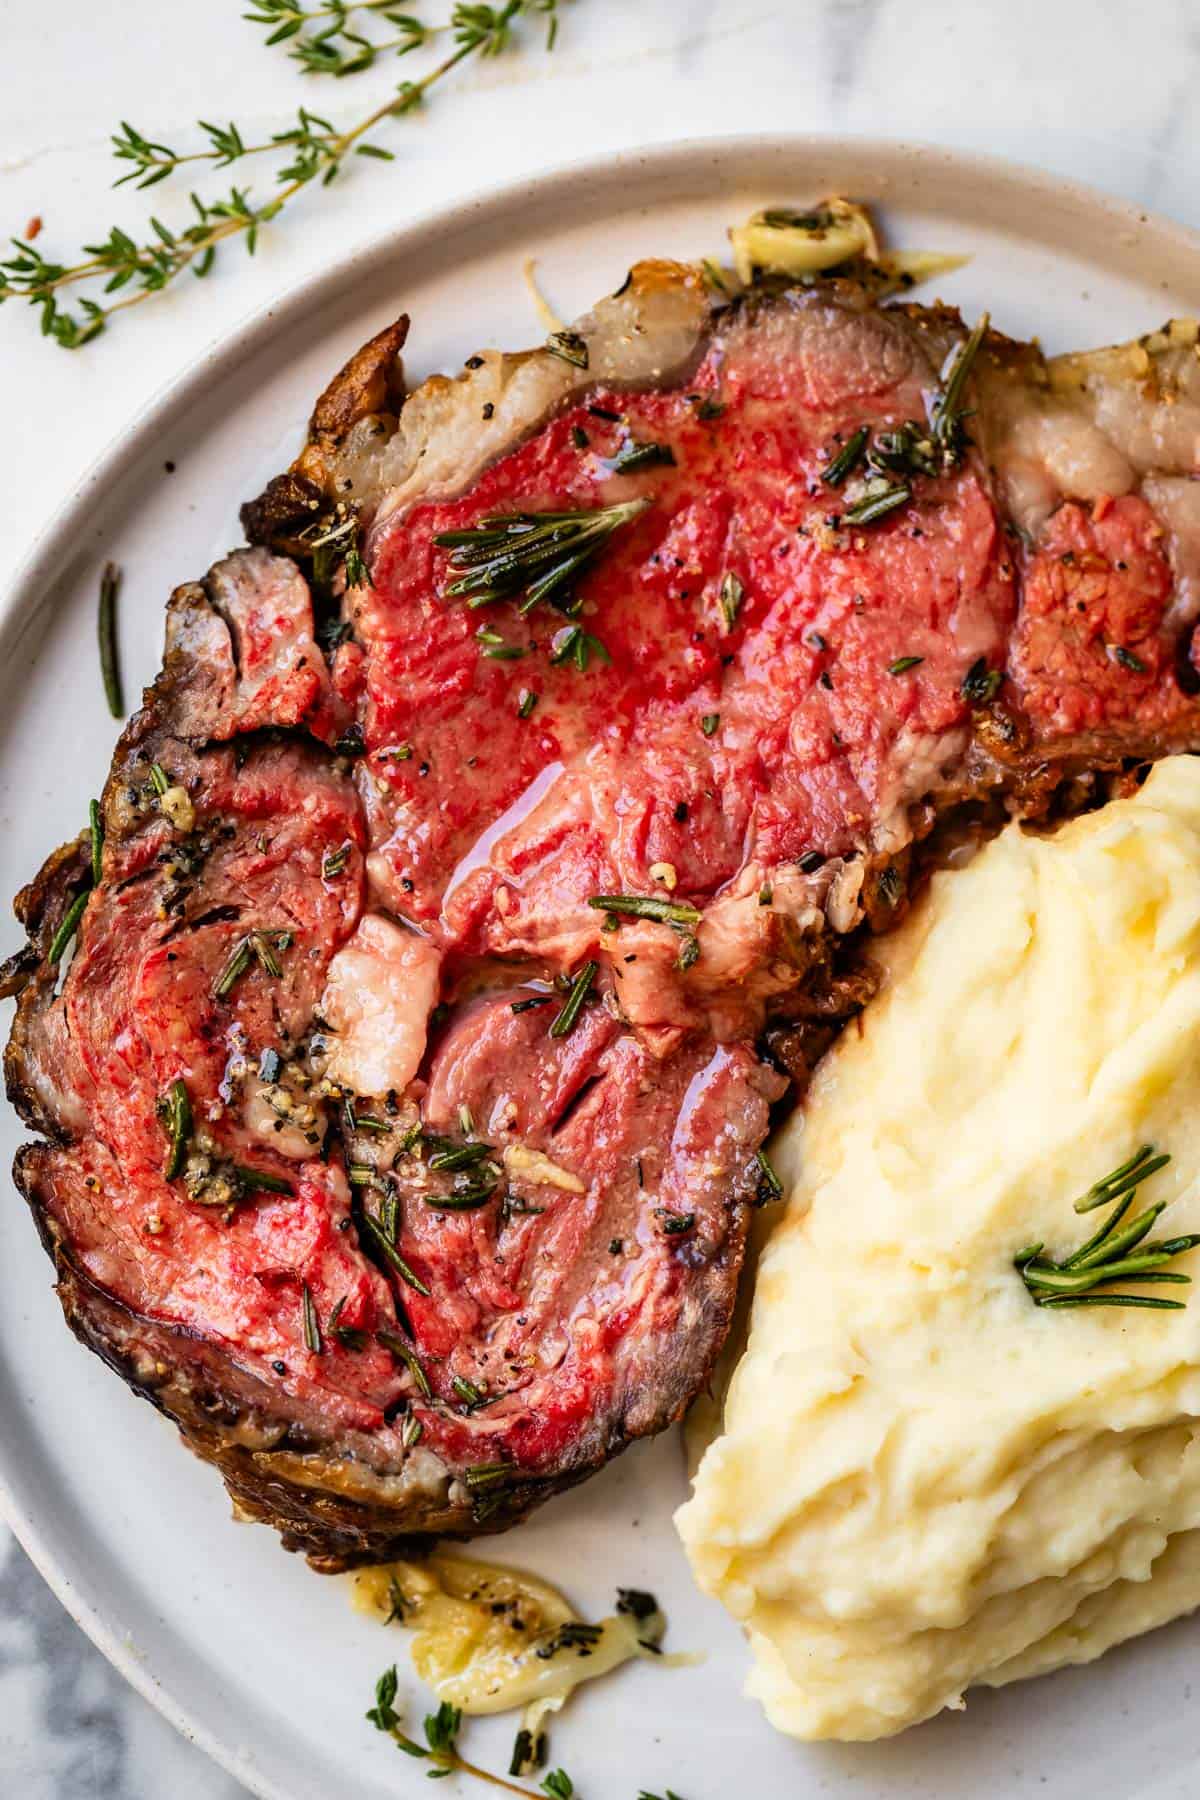
And start carving.
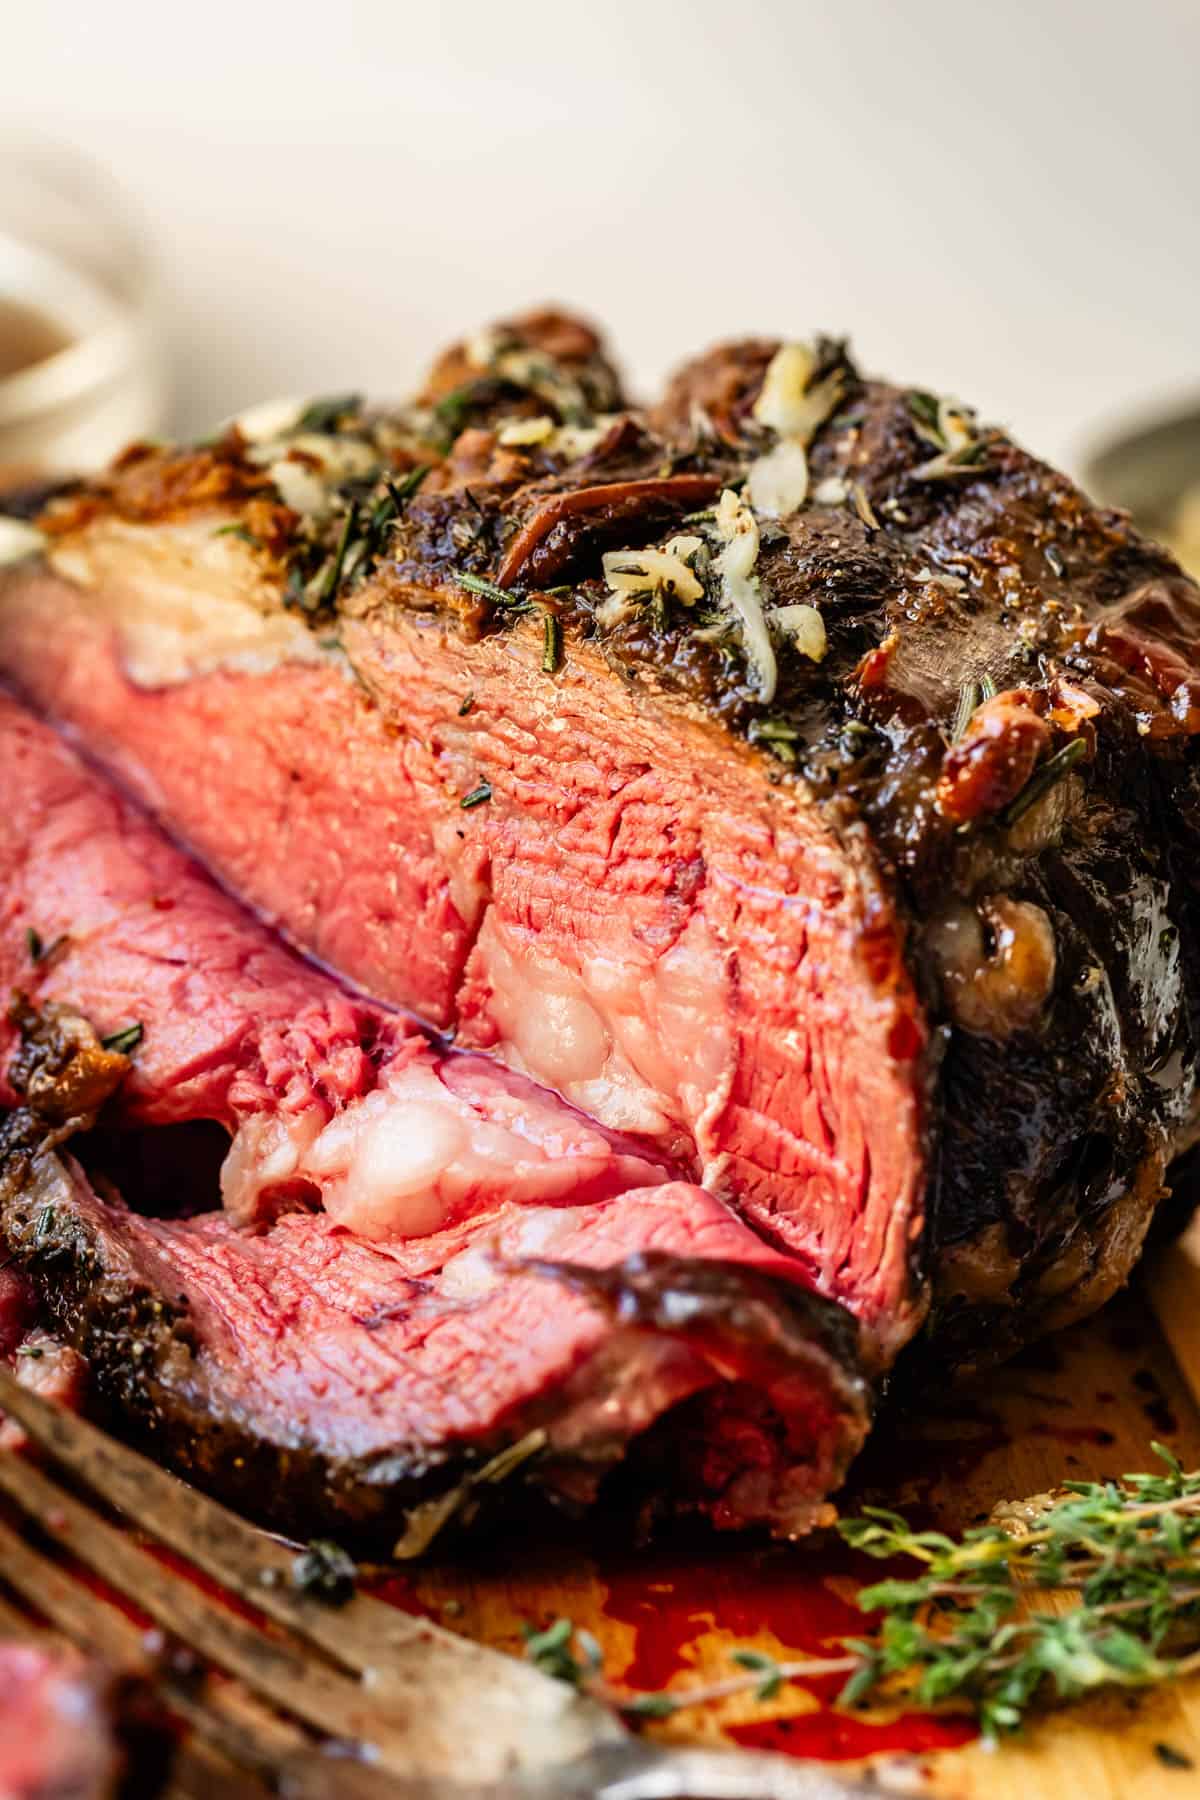
Isn’t she beautiful?? 🤩
What to serve with prime rib roast
Prime rib is one of the ultimate main dishes, so the sides should reflect that – go for the best! I’m a sucker for traditional sides with something so iconic. Here are some of my top choices!
- Aunt Shirley’s Mashed Potatoes Recipe with Cream Cheese >> the best, and my absolute go-to for mashed potatoes any time of year
- Ina Garten Make Ahead Mashed Potatoes >> perfect if you want a make-ahead option. Plus, Ina is a food goddess!
- Best Cranberry Sauce Recipe (Orange Cranberry Sauce) >> perfectly tart-sweet, this would be an excellent choice at either Thanksgiving or Christmas
- Best Roasted Brussel Sprouts and Roasted Sweet Potatoes Recipe >> one of my top vegetable dishes on the blog, and a personal favorite side dish
- Easy Roasted Broccoli Recipe >> my kids’ favorite veggie side of all time and equally liked by adults
- Cornbread Casserole Recipe >> so easy, and a great compliment to any holiday meal
- Easy French Onion Soup >> if you’re wanting to make a super impressive multi-course meal, this soup is the REAL DEAL and would make an amazing starter course!
- Rolls always go perfectly with a meal like prime rib. Some of my favorites are Soft and Fluffy Parker House Rolls, Aunt Shirley’s Famous Homemade Dinner Rolls, or Big Fat Crescent Rolls.
- Dessert! There are SO many options that I highly suggest perusing all the categories on the Dessert Recipes page on the blog. Some of my favorites are Classic Cheesecake, Best Apple Pie, or Homemade Peach Cobbler.
- Yorkshire Pudding from Simple and Savory
How to store and reheat leftover prime rib
Wait for the prime rib to completely cool to room temperature, then wrap it tightly in plastic wrap, put it in an airtight container, or place in a gallon or two gallon ziplock bag. If you have any pan drippings leftover, you can pour them over the top of the roast before sealing to add in extra moisture for reheating. Once sealed or wrapped, prime rib will be good in the refrigerator for 5-7 days.
How to reheat leftover prime rib (don’t screw this up)
All that expensive, buttery, tender meat will be ruined if you toss it in the microwave and blast it on high heat. Don’t do it! The goal is to preserve as much pinkness (= tenderness) as possible. The BEST way to reheat is the same way you cooked it the first time: low and slow in the oven.
Oven reheat:
Place the remaining standing roast in a 9×13 pan or a roasting pan, with some drippings, broth, or water in the bottom. Cover with foil and reheat at 200 or 225 degrees until heated through, it will take 60-90 minutes.
Microwave reheat:
I do NOT recommend rewarming in the microwave. It makes your precious prime rib dry and chewy, so sad.
But, if you must: Place the prime rib on a plate by itself (NOT next to your mashed potatoes, for heaven’s sake. They take eons to reheat.) Cover the plate of prime rib and set the power level on your microwave to at least half power (level 5) or even better, level 2 or 3. You will have to stick around to check it, as all microwaves are different. Start with 1 minute and add more time from there.
Stove top reheat:
Be careful here. This method will brown your meat pretty fast. Only use low, low, low heat. It’s worth the wait, I promise.
Can you freeze prime rib?
Heck yes, I still have some in my freezer from all the testing! Thank goodness for freezers, right? Make sure the roast is completely cooled, then wrap really well in plastic wrap. Place the wrapped roast in a ziplock freezer bag big enough to hold the whole roast. If you have only a bit leftover, a gallon size will probably do. I really like using these large two gallon bags as well. The prime rib will keep in the freezer for up to 6 months! To reheat, let it thaw overnight or 24 hours in the refrigerator, then follow the warming instructions above.
Frequently Asked Questions
The short answer is, plan for several hours. The long answer, of course, is that it depends. There are lots of variables: how many pounds of meat there are, the shape of the roast, how chilled your roast still is when it goes into the oven, and your particular oven’s temperament and mood swings. 😉
Because prime rib is such an expensive dish, invest in a good probe meat thermometer to help you determine when it’s to the degree of doneness you like! You want the internal temperature to land at about 120 degrees for rare meat, and 125 degrees for medium rare. The best estimate is to allow about 11 to 12 minutes per pound for rare and 13 to 15 minutes per pound for medium rare. The actual cooking time will vary within those estimates. I would not make this recipe without an insert meat thermometer.
Neither, don’t be a fool. For the most tender prime rib, low and slow is the game. My preferred cooking temperature is 200 degrees, and will go up to 225 degrees in a pinch if I really want it to go faster. Do not go above 300 degrees or you will miss out on having a buttery soft prime rib! Don’t do itttttt!!!
The same way we’re doing it today :) The key to that melt-in-your-mouth tenderness is cooking the roast at a really low temperature for a long time. This process allows the collagen to break down, retain its natural juices, and gives the roast time to develop flavor. No chef required: you’ve got this, in your very own oven at home!
More centerpiece main dishes to impress
The holidays are the perfect time to showcase a main dish that will impress your family, your friends, and even yourself! If prime rib is outside your wheelhouse for whatever reason, there are so many other options that can be the star of the show.
- Cuban Roasted Mojo Pork >> if you’re looking for something outside the norm that is still a show stopper, this is it!!
- Easy Fall-Apart Crock Pot Roast with Carrots (Slow Cooker) >> so stupid easy, and will still impress everyone who eats it
- Honey Baked Ham Recipe (Copycat) >> glazed and roasted, with crispy edges you’ll be fighting over
- Sage Butter Roasted Turkey >> it’s the easiest and best turkey to serve at a holiday meal
- Tri Tip Steak (Grilled or Oven-Roasted) >> a classic that my family ate on Christmas Day growing up!
- Roast Leg of Lamb with Blackened Honey Dijon Crust >> another unforgettably impressive main dish
- Oven-Roasted Cranberry-Dijon Glazed Ham >> pretty much the perfect winter holiday ham with the cranberry glaze
- Beef Wellington from Fifteen Spatulas
- Stuffed Cornish Game Hens from Zestful Kitchen
Facebook | Pinterest | Instagram
The Best Prime Rib Recipe
Ingredients
- 1 8-pound prime rib roast , (3 ribs)
- 2 and 1/2 tablespoons kosher salt, see note for subs
- 1/4 cup vegetable oil, divided for searing (I used light olive oil)
For the gravy
- 2 cups water
- 1 tablespoon Better than bouillon Beef Base
- 2 cups drippings
- 1 and 1/2 cups water
- 1/3 cup flour
- 1/2 teaspoon black pepper
- 2 tablespoons butter, optional
For the Garlic Butter Sauce:
- 1 cup butter, (2 sticks)
- 15 cloves garlic
- 2 teapoons granulated garlic
- 3/4 teaspoon kosher salt
- 2 teaspoons fresh black pepper
- 1 and 1/2 tablespoons fresh rosemary
- 1 and 1/2 tablespoon fresh thyme
Instructions
- Gather your tools: Don't make this recipe without a meat thermometer. I'm serious. This cut of meat is too expensive to mess around with guessing. I prefer a probe meat thermometer that stays inserted into the meat while it's cooking.
- Choose your prime rib: For the best of the best, ask your butcher for prime-grade "first cut" prime rib. These are ribs 10, 11, and 12.
- Talk to your butcher: Ask your butcher to remove the rib bones from the roast and tie them back on with kitchen twine. This is how prime rib is most often sold, so it might already be done, but it doesn't hurt to double check.
- Prep your roast: Gather your ingredients and materials. You need a roasting pan (a cooling rack set over a half baking sheet will do in a pinch), kitchen twine, and kosher salt.
- Cut off the bones: If your butcher didn't cut the bones from the roast, that's the first step. Use a very sharp serrated knife and run it down the length of the bones, staying as close to the bone as you can, following the rounded bottom of the roast. See photos.
- If your butcher already cut off the rib bones: Your roast will be tied to the rack of bones with twine. Cut the twine and separate the roast from the bones. Take note of which way the roast is sitting on the bones! Set the bones aside.
- Score the fat. Place the roast fat-cap-side-up on a cutting board. Use a sharp serrated knife to score the fat cap in a crosshatch pattern. Do not cut into the meat itself. See photos. These cuts help the salt to penetrate into the muscle below, tenderizing it before it even hits the oven.
- Salt the roast. Rub 2 and 1/2 tablespoons of kosher salt all over the roast. Get it in every nook and cranny! Rub it over the side that you cut the ribs from. Get your fingers in there and rub the salt into the crosshatch slits you just made in the fat cap. Use a little extra salt and rub the bones top to bottom, as well.
- Place the roast on a rack. You need your roast to sit on a rack, so that the juices don't pool at the bottom while it chills. A cooling rack set over a half baking sheet is fine, or if you can fit your whole roasting pan in your oven, that works too. Set the bones down first, then set the roast on top. There is no need to tie them together with twine right now; we will be separating them again to sear the roast.
- Refrigerate the salted roast, completely uncovered, for 24 hours. (or up to 48 hours.)
- Bring to room temperature. Let the roast sit on the counter for about 2 hours on the day you are cooking it. If you roast a cold prime rib, it will cook unevenly.
- Preheat your oven to 200 degrees F.*
- Sear the roast. Heat a high-sided 12-inch stainless steel pan over medium high heat. Preheat the pan for about 3 minutes. When the pan is very hot, add about 1/4 cup vegetable oil to the pan and swirl it around. Place the roast (not the bones) in the pan, any side is fine. Sear for 2-3 minutes, until crispy brown on the edge. Use sturdy tongs to flip the roast over and sear another 2-3 minutes. Use the tongs to lift up the roast to sear the edges, holding in place with the tongs for a couple minutes. Remove the roast back to the rack.
- Sear the bones. This is optional. Remove from the pan.
- Make a broth. Add 2 cups of water and 1 tablespoon Better Than Beef Bouillon paste to the pan that you seared the roast in. Turn the heat to high and bring the mixture to a boil, scraping up the browned bits. Pour the broth into the pan that you are cooking the roast in.
- Reassemble and tie the roast. Place the bones on the rack of your roasting pan. (Or, if you don't have one, continue using the cooling rack placed on the rimmed baking sheet. You don't want the roast sitting on a flat surface in it's own juices.) Place the seared roast on top of the bones, situated in the position they were in before they were cut. Use kitchen twine to tie the roast to the bones. You don't want to skip this step! Cooking with the bones insulates your roast and brings a deep, juicy flavor.
- Insert your probe meat thermometer. If you have one, insert the probe of your meat thermometer into the thickest part of the roast in the center. Set the alarm to ring when the internal temperature reaches 110 degrees F.
- Cook your roast. Place the roast on a lower rack of the 200 degree F oven. See notes for cook times if you don't have a probe meat thermometer.
- When the roast registers 115 degrees F, turn off the oven but don't take the roast out. Crack open the oven door. Stick a wooden spoon in it if it won't stay cracked open on its own. The internal temperature of the roast will keep rising.
- When the internal temperature reaches 120, it is quite rare. (Too rare for me, but you can take it out now if you are into that.)
- When the internal temperature reaches 125 degrees in the turned off oven, take it out. 125 is still considered rare.
- Wait until 130 if you like it medium-rare.
- Remove the roasting pan from the oven. Remove the rack with the prime rib on it to a cutting board with a juice groove. Tent with foil and rest for 30 mins (or up to one hour.) Tuck the foil in around the edges so it doesn't lose too much heat.
- Make the gravy. If there is a lot of fat in the pan of gravy, pour the gravy into a fat separator. (If you don't mind a little fat, then just leave it in the pan. Pour the broth from the fat separator back into the roasting pan (Or into a saucepan). Bring the liquid to a boil over high heat.
- Add 1 and 1/2 cups water to a glass measuring cup. Use a small whisk to thoroughly stir in 1/3 cup of flour. Make sure there are no lumps. Once the drippings are boiling, SLOWLY pour in the flour mixture while whisking the drippings constantly. Turn the heat down to medium and let the gravy simmer for about 5 minutes. Add 2 tablespoons of butter and 1/2 teaspoon black pepper. Taste it and add kosher salt if it needs it. If it is not very flavorful, add in 1 teaspoon Better Than Bouillon Beef Base. Pour the gravy into a gravy boat or small pitcher and keep warm (you need the roasting pan to go back in the oven soon for one last broil.)
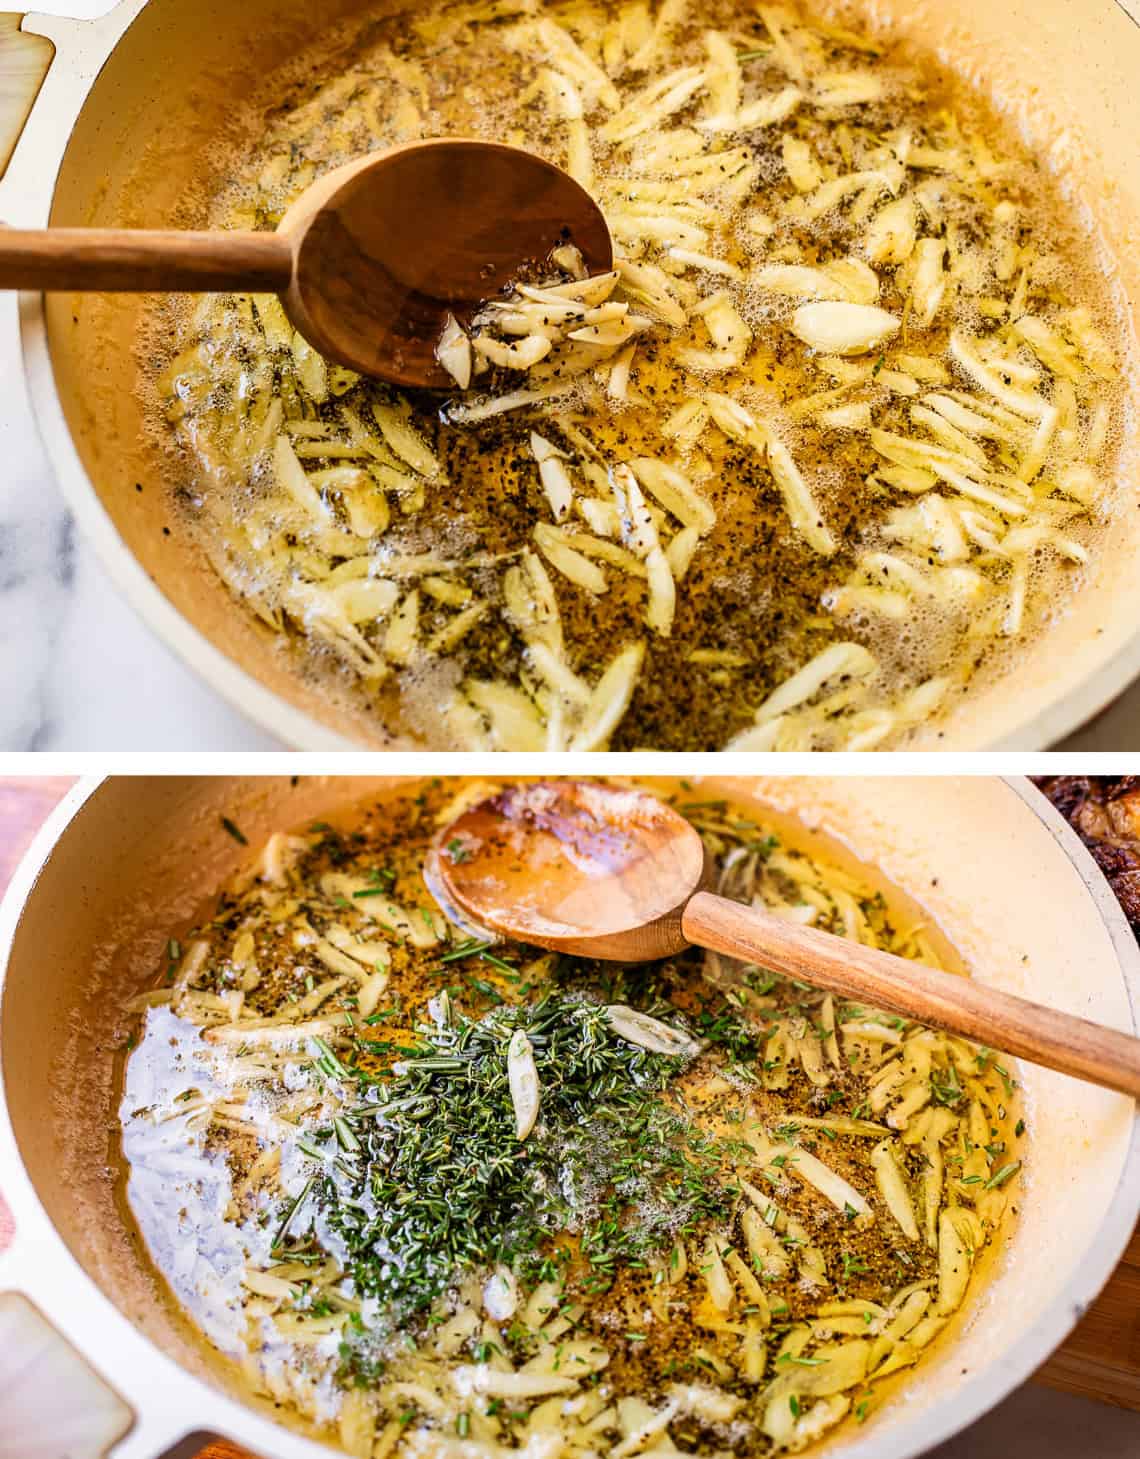
- Make the garlic butter sauce: Melt 1 cup butter in a small saucepan over medium heat. Thinly slice 15 cloves of garlic. Once the butter is melted, add the sliced garlic, 2 teaspoons granulated garlic, 3/4 teaspoon kosher salt, and 2 teaspoons freshly cracked black pepper.
- Stir over medium heat for 2-5 minutes, until the garlic is fragrant and barely starts to turn golden. Remove from the heat right away. Add 1 and 1/2 tablespoons finely chopped rosemary, and 1 and 1/2 tablespoons thyme leaves. Set aside.
- Broil the prime rib. Once the prime rib has rested 30-60 minutes and you are ready to serve, place the rack with the prime rib back into the roasting pan (there should be no gravy in it!) Remove the foil that is tented, and crumple it into a loose ball. Use tongs to lift the narrow end of the roast, and tuck the ball of foil underneath so that the top of the roast is horizontal to the broiler. See photos.
- Turn the broiler to high heat. Broil for 2-5 minutes, until browned and crispy on top.
- Cut away the kitchen twine. Use tongs to lift the roast away from the rib bones. Transfer the roast (without the ribs) to a carving board. Drizzle the roast with the garlic butter sauce.
- Carve the prime rib against the grain into 1/2 inch slices. Serve with remaining butter sauce, gravy, and Mashed Potatoes.
- Storage: Wait for the prime rib to completely cool to room temperature, put it in an airtight container. Prime rib will be good in the refrigerator for 5-7 days!
- Reheating: Place the remaining standing roast in a 9×13 pan or a roasting pan, with some drippings, broth, or water in the bottom. Cover with foil and reheat at 200 or 225 degrees until heated through, it will take 60-90 minutes.Microwave reheat:I do NOT recommend rewarming in the microwave. It makes your precious prime rib dry and chewy, so sad. But, if you must: Place the prime rib on a plate by itself (NOT next to your mashed potatoes, for heaven's sake. They take eons to reheat.) Cover the plate of prime rib and set the power level on your microwave to at least half power (level 5) or even better, level 2 or 3. You will have to stick around to check it, as all microwaves are different. Start with 1 minute and add more time from there.


Hi Karen! I’m so happy that you finally attempted the prime rib. Isn’t it fantastic?! Our family has been making prime rib for the holidays for generations. It all started with our grandparents as a happy accident. Because my grandmother had done so much canning and baking she didn’t realize that they were just about out of propane for the gas range so the prime rib cooked in a very low oven. We all ended up loving the very rare meat and have been having it for most holidays ever since.
Happy meal planning,
Dianna
Oh my gosh!! I love this holiday story Dianna!! Thank you for sharing! What a happy family memory and tradition ❤️❤️ I hope you enjoy your prime rib this year. Merry Christmas!!