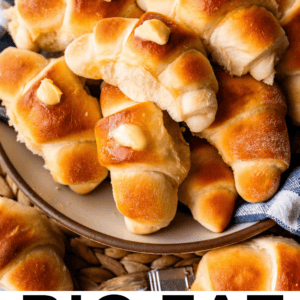

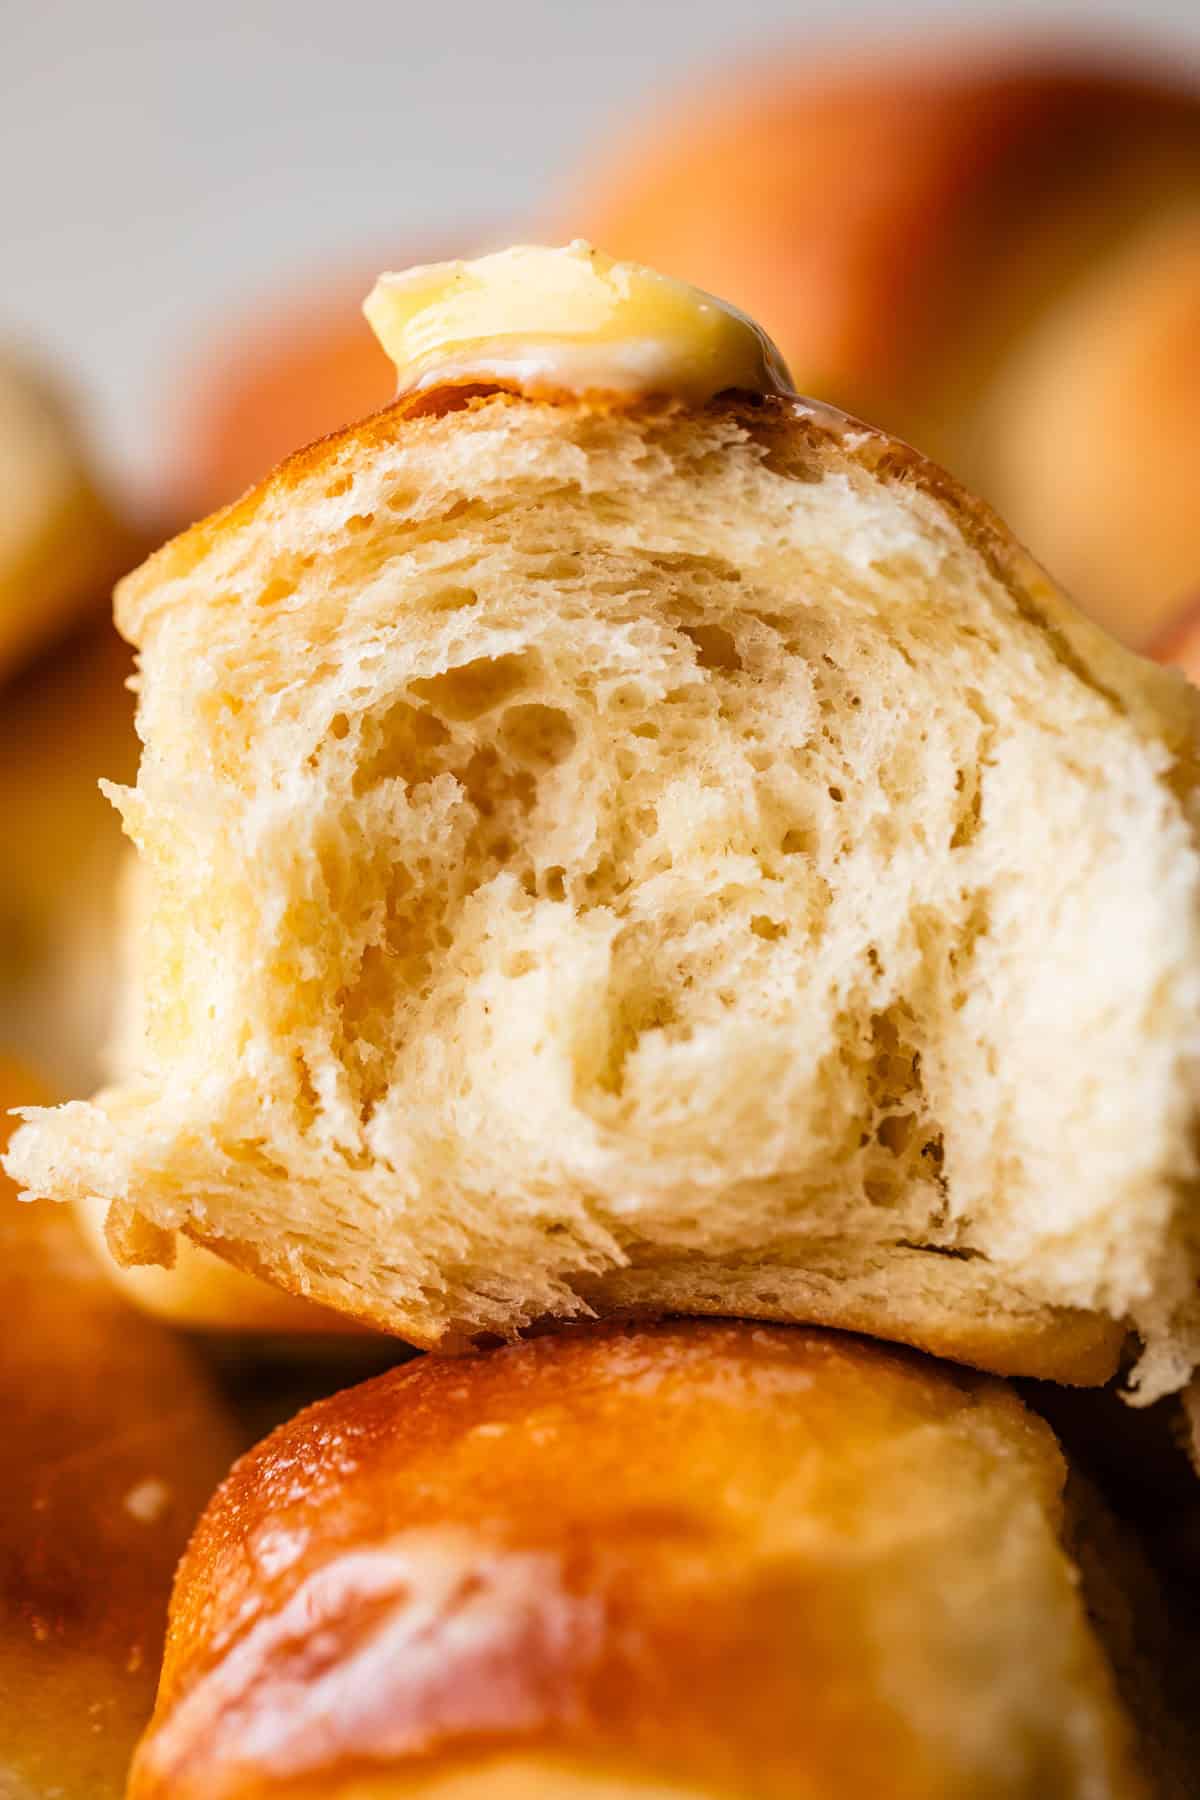
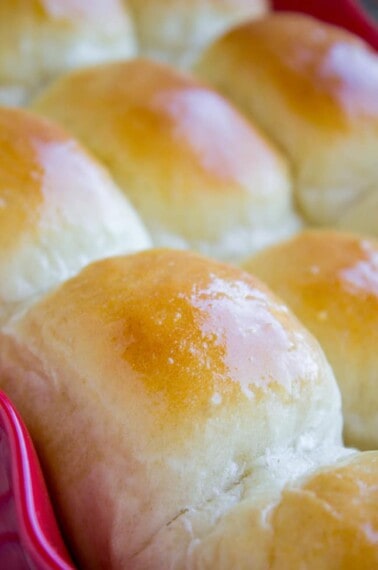
They are big. They are fat. They are the best Crescent Rolls of your life! I’ve been making these rolls for 15 years, and my mother-in-law Kris has been making them for 40. The recipe is tried and true, they always turn out perfect. They are ultra fluffy and light, plus super easy to make! Originally published February 1, 2012.
My son Truman asked for a huge magnifying glass for Christmas this year. Does he sit, examining specimens, Sherlock style? Puh-lease. He’s 12. He’s burning Barbie dolls in the backyard.
This has been going on for a while, apparently. He told me recently that in 5th grade, he and his friends were walking home from school and someone had a magnifying glass. They stopped to burn something, a leaf, I don’t know, and suddenly they realized they weren’t alone.
It was the owner of the house that they had stopped in front of. The guy was walking toward them, arms folded, looking severe and burly. The boys looked up, eyes wide with fear, hands frozen on the enormous magnifying glass making smoke below them.

But suddenly, the man got a goofy grin on his face. He said, “Do you need some more tinder?” He ran back to his house and brought out some actual kindling. I am not making this up. Down on his hands and knees, he showed them the technique to get it lit all the way to the burning stage.
Nothing brings a man more quickly back to his boyhood than fire, you guys. (I mean. I guess maybe Star Wars. Or maybe any time there is a chance to use a laser pointer. Or an axe. Or power tools.)
This was brought home in full force yesterday when I stopped with the boys at McDonald’s for a belated Shamrock Shake (they were out of stock, now we have to go make our own). A full grown man walked in lugging a V8 power unicycle. Yes, a motorized unicycle, I am not making this up. Can you imagine the looks on their faces??
The 12-year-olds then fully engaged this guy in a 10 minute conversation about speed and technique. The guy even let them go outside to try it out (I mean, how many times have you gotten to ride a unicycle on your milkshake run? I had to let them) The funny part is that the guy was just as animated and interested in the conversation as the boys were. Okay, fire, laser pointers, axes, and unicycles.
Big Fat Crescent Rolls, yeah
Have you ever made my homemade Crescent Roll recipe? I posted it in 2012. It is well beloved, both in my family and by Food Charlatan readers alike!
I titled this “Big Fat Crescent Rolls, yeah” because Eric originally wrote the recipe in an email while his mom dictated it to him on the phone, and this is what he called it. I edited out all the other slang in the instructions (mix it in the kitchenaid, yo) but in my mind I can’t call them anything else.
There is nothing more amazing than your house smelling like these yeasty, heavenly rolls. I can throw down at least 5 in one sitting, just talk to my love handles. They are absolutely addictive. They are worth every ounce of effort and every last calorie.
An update
So many of my favorite recipes were posted on the blog when I first started, before any of you were here! That’s why I updated the post with new photos in 2018. Today is my 3rd time updating the post, and this time I’m updating the actual recipe.
Eric’s mom Kris gave us this recipe the year we were married. (I just went and found the email from 2008. Bless you, Gmail.) Kris has been making these rolls since 1987, the year I was born.
But recently (in 2026), I went to a Relief Society event and my friend Kelly brought Crescent Rolls. They were SO good, and they had a taller rise than my recipe. So I got to work to see if I could get these puffy rolls EVEN PUFFIER and more flavorful. I’ve learned a few things in the last 14 years of food blogging, and thought the recipe could use a revisit.
Any recipe that you are making over and over again, you are bound to try variations on eventually. At least I always do!! That’s what makes baking so fun!
I’m so happy with the result. I didn’t think it was possible for me to love these rolls any more, but here I am.
Important rules to get the best Crescent rolls:
- Use this dough recipe that has a higher ratio of butter, egg, and milk to flour (more fat, more flavor, please!)
- DON’T skimp on the salt. This will make or break your roll!
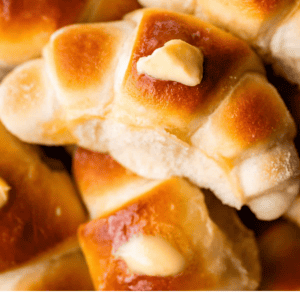
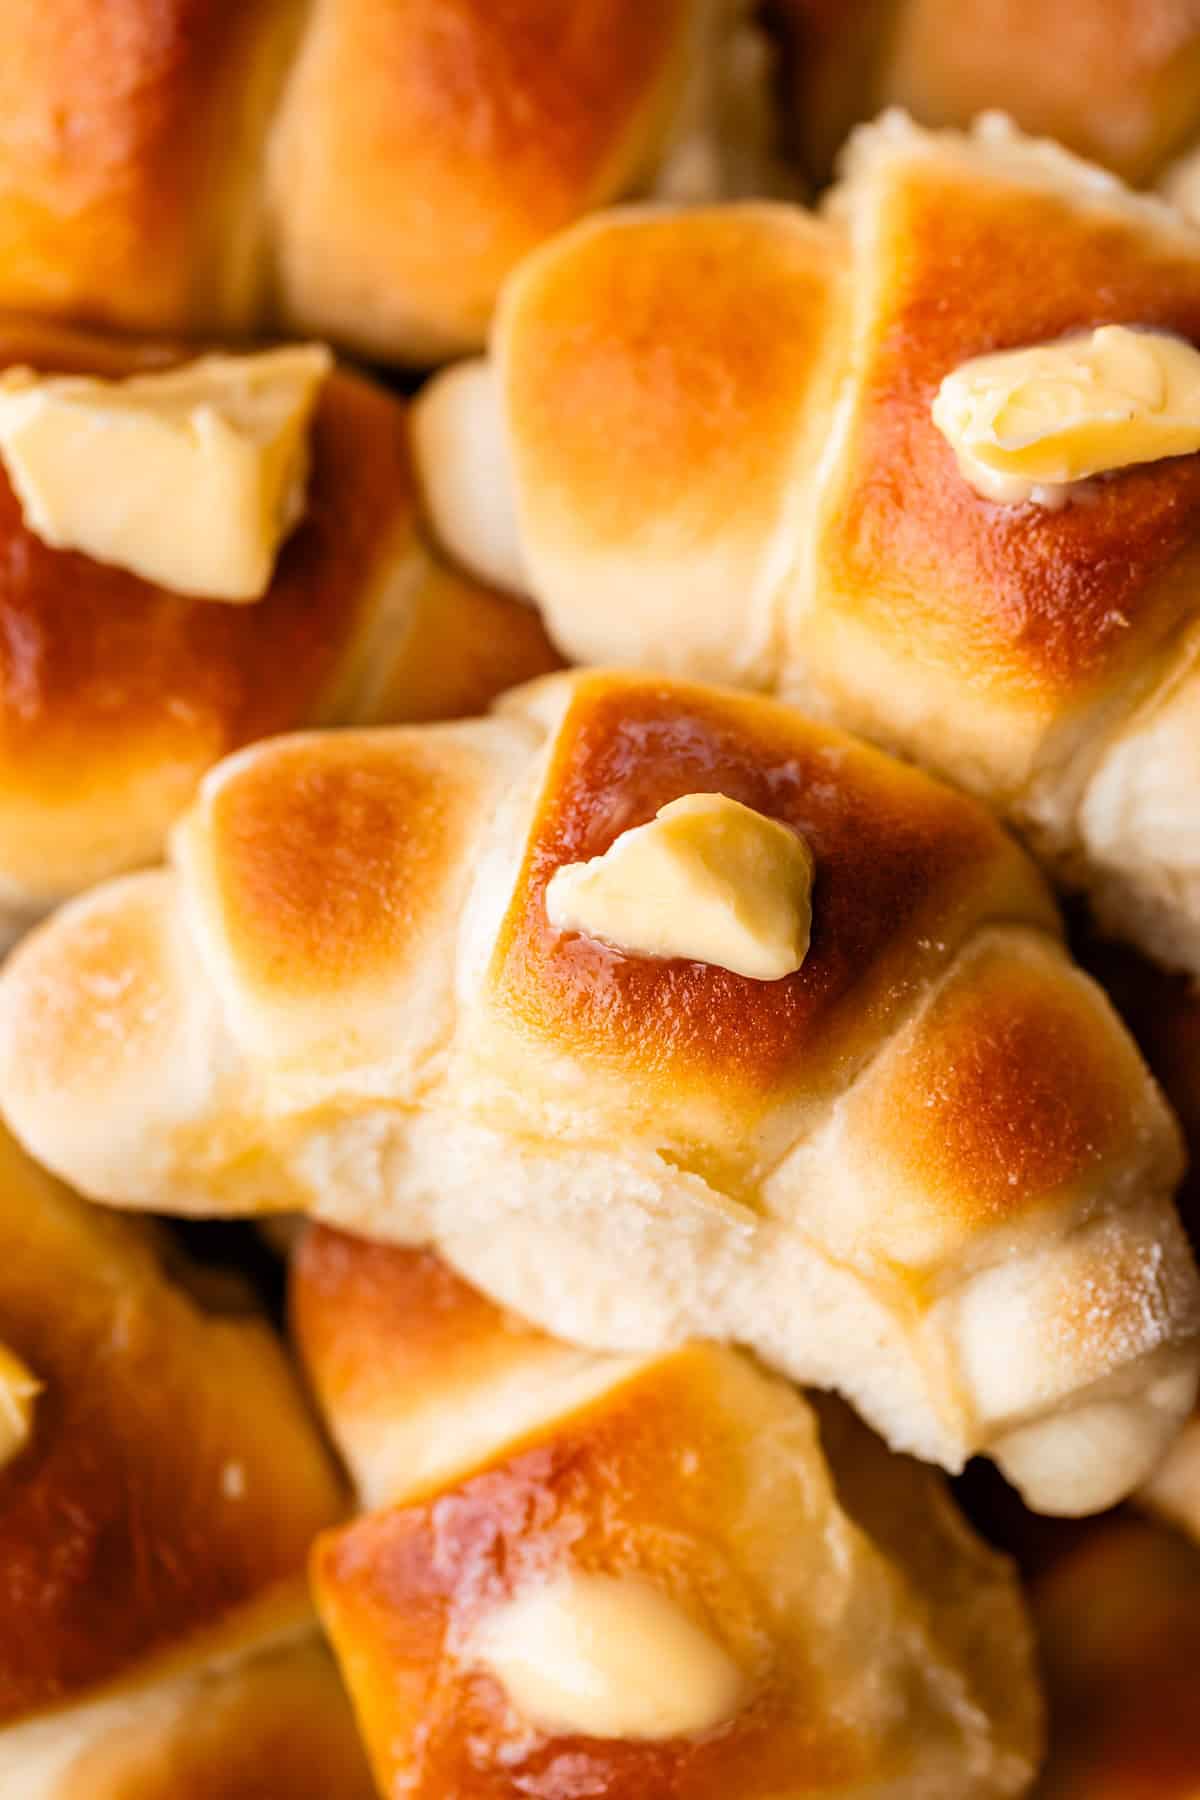
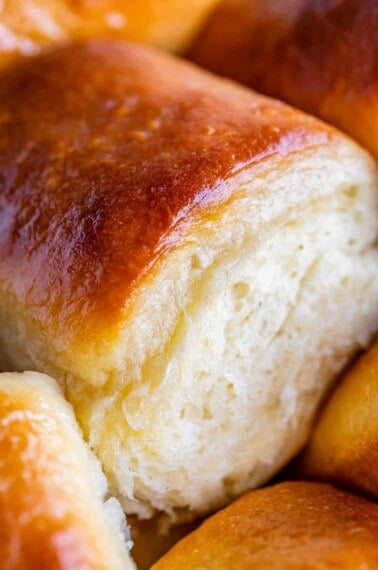
- Use the “snip and fold” method when rolling your crescent rolls. See photos below. This gives you tall, puffy rolls that still have lots of pretty layers but don’t end up like a long hot dog.
- For the highest rise: Do not brush the dough with butter before rolling, as many recipes call for, and as my previous recipe called for. The extra fat impacts the rise, and makes the rolls less puffy. I tested this method side-by-side, and you can’t taste the difference in the one that has the butter brushed inside the roll. But you can definitely see that the ones brushed with butter before baking don’t rise as much. (Skipping the butter brushing step makes these rolls even easier to make!)
The butter brushed on the roll AFTER baking has a much bigger impact on flavor.

The ingredients
In my research, I figured out that Kris’s original recipe had a higher ratio of liquid than others, which necessitated a higher amount of flour to make the dough come together. I haven’t changed any ingredients, but I have changed some of the amounts. Because we are using less flour, there is a higher ratio of the other, tastier ingredients—I’m looking at you whole milk, butter, and eggs—and the rolls are just buttery, soft and FULL of that yeasty, salty dinner roll flavor. I thought I loved these rolls before, but now I REALLY love them!!
- Butter: This recipe has a whole stick of butter in it. This is for flavor and FAT. More on this right now when I preach to you about whole milk:
- Whole milk: 🎶 Whole milks got the fat, got the fat 🎶 I don’t know what song this is trying to be, but probably someone should write one because it’s the TRUTH. You can use skim milk, sure. Or 2% or whatever. You could even use water and get a roll at the end of the day, but they won’t taste as good. Because FAT=FLAVOR, sing it with me now folks. Whole milks got the fat. That means it’s got the flavor. If you only have skim milk, replace some of the milk with heavy cream or half and half.
- SALT: don’t skimp on the salt in your roll my friend. It is THEE most underused ingredient in dinner rolls and bread in general. Kosher salt is best. If you only have table salt, use a little less than the recipe calls for.
How to make crescent rolls
Here’s everything you’re going to need! I’m pretty sure you have all of this in your fridge and pantry right now…which means that you are dangerously close to being able to make 24 crescent rolls on a random Thursday afternoon. (you’re welcome)
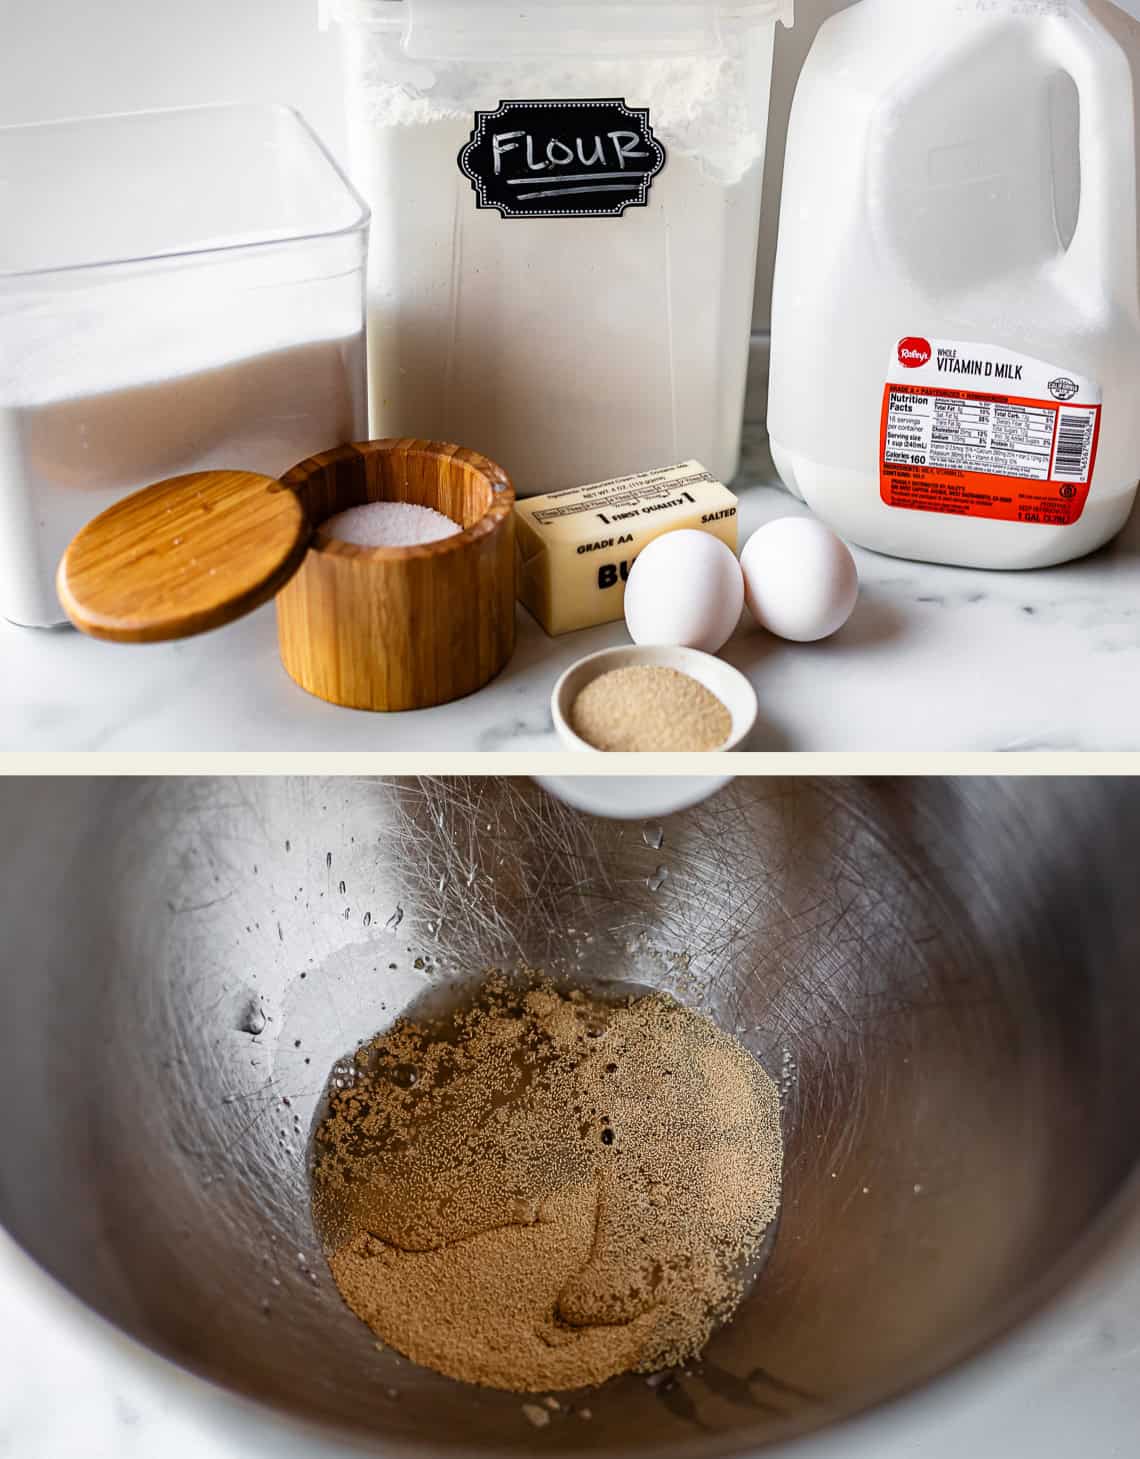
First, make a yeast baby. And by that I mean add a bit of warm water to your yeast to activate it. But DON’T kill it!! You need warm water, not hot. Imagine you are giving a newborn baby a bath. If you would not dump this water over a newborn baby’s face, then it’s too hot! Warm tap water is just fine. Touch it with your wrist, not your fingers, to check temperature.
See? ↓ Just look how happy our yeast baby is. Waking up and getting all bubbly and foamy. This is perfect. If your water is flat with no bubbles or movement at all, you killed your baby with too-hot water. Dump it and start over!
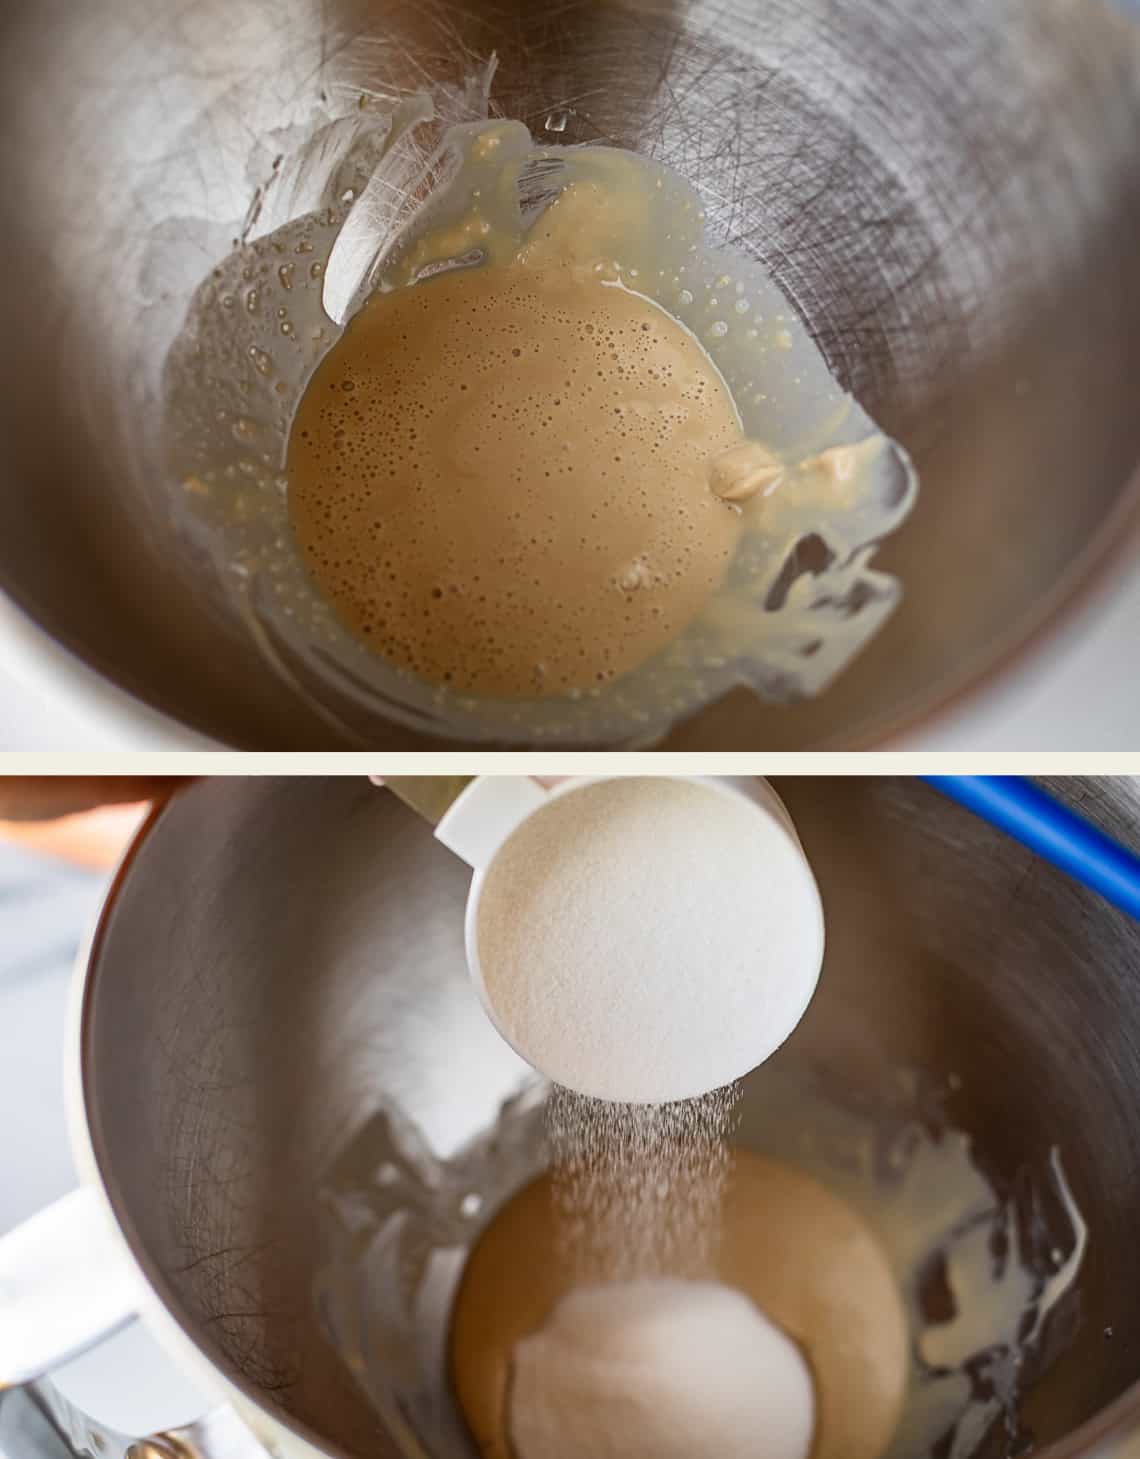
Add in some sugar. We are using a full half cup. It doesn’t make the rolls taste like sweet rolls or anything, just pleasantly flavorful and ready for a giant pat of salty butter. Mmm.
Okay next up, microwave some milk and butter.
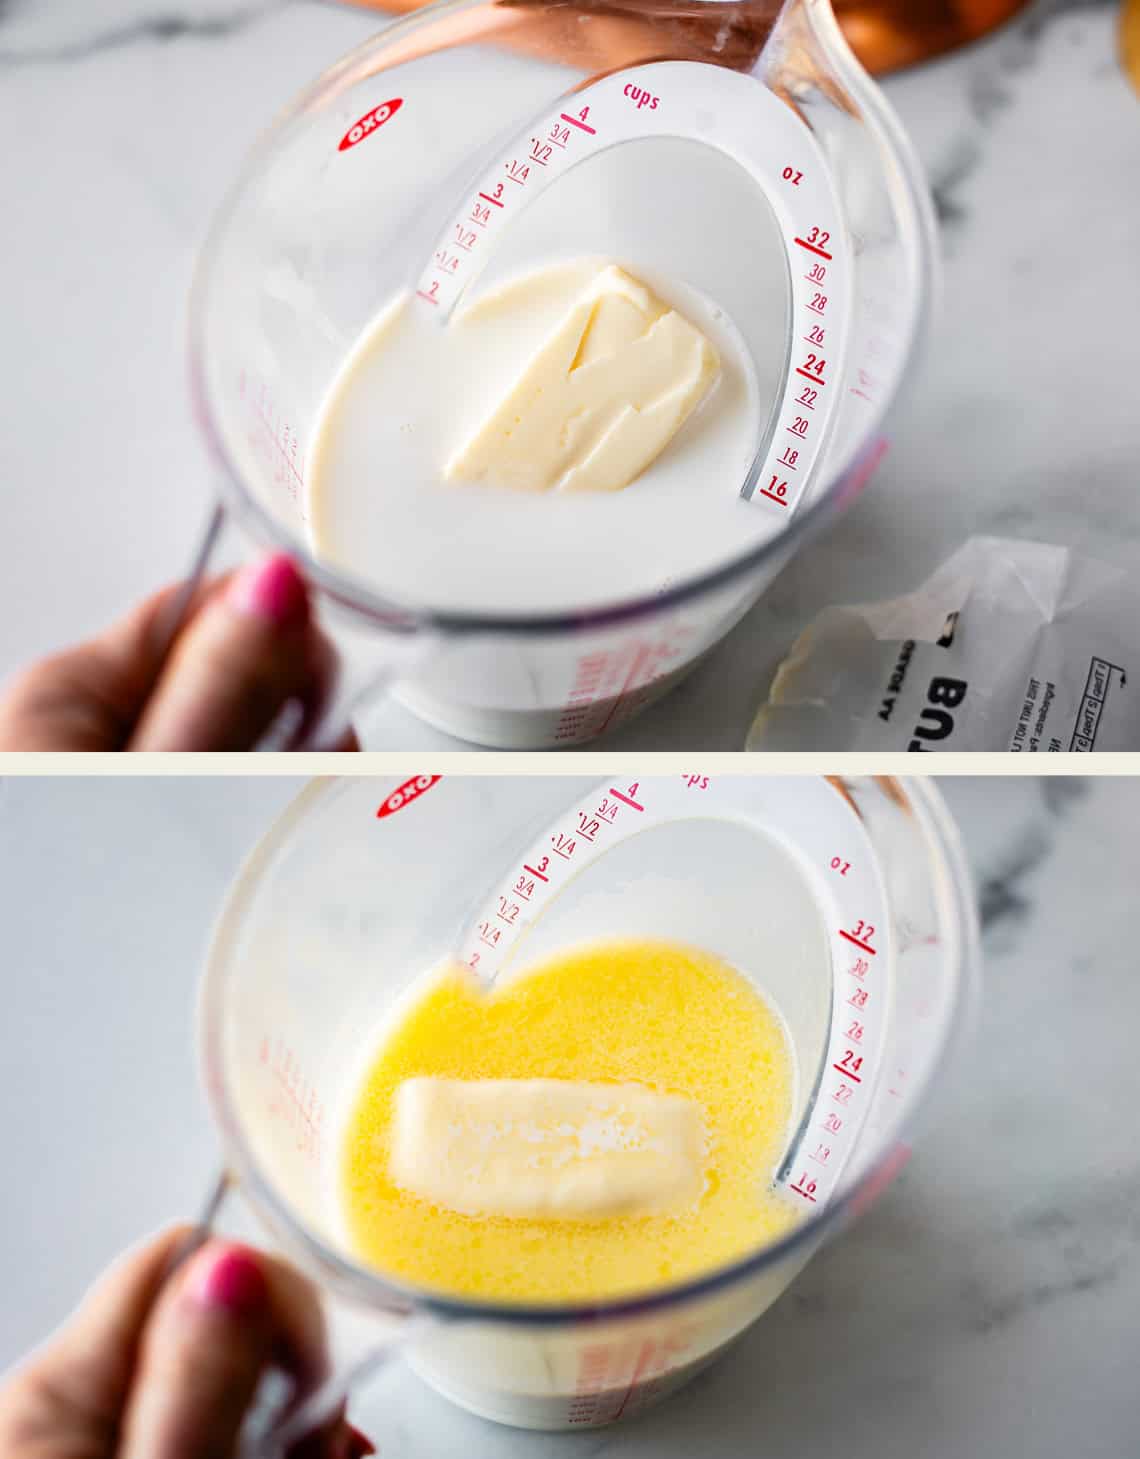
Not too much. Remember, if this gets too hot, you can still kill your yeast. Heat it in 30 second increments and stir to check the temperature. If you’ve heated it so much that the cold butter from your fridge melts all the way, then it’s too hot! The half-melted butter will be easily stirred in once we get going. Add it to the yeast:
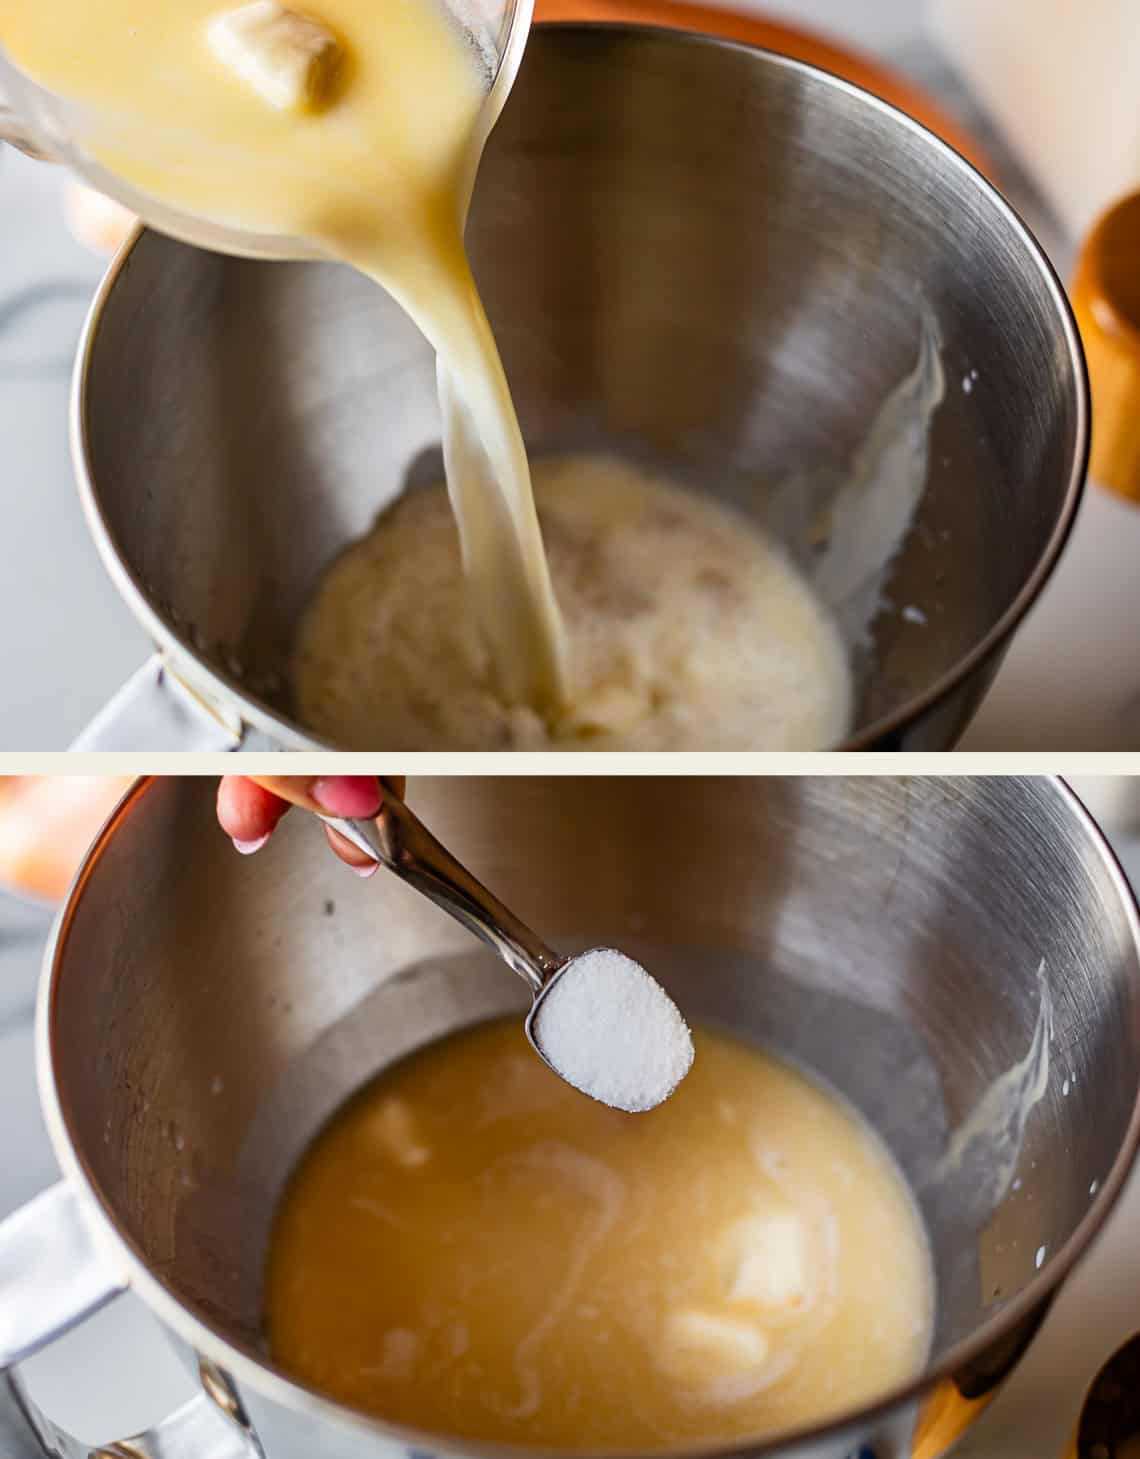
Add in some salt, 2 teaspoons! Use a little less if all you have is table salt. Add in a couple eggs:
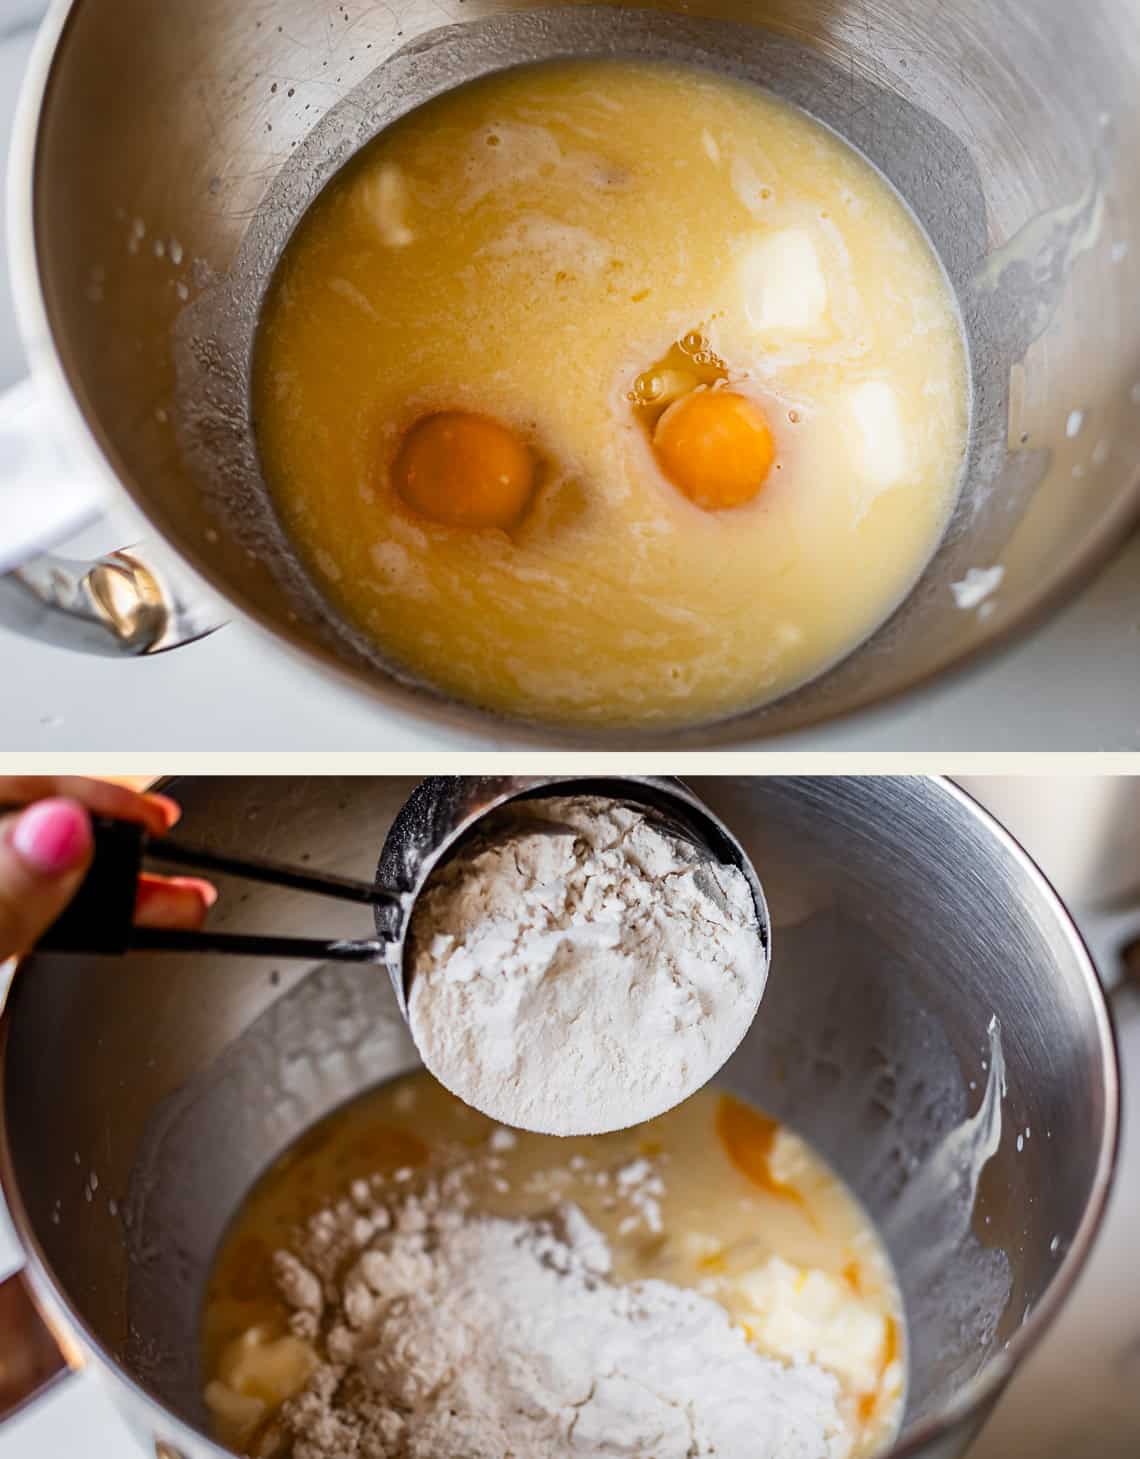
And your first cup of flour. Stir that together with a spatula, then switch to the dough hook.
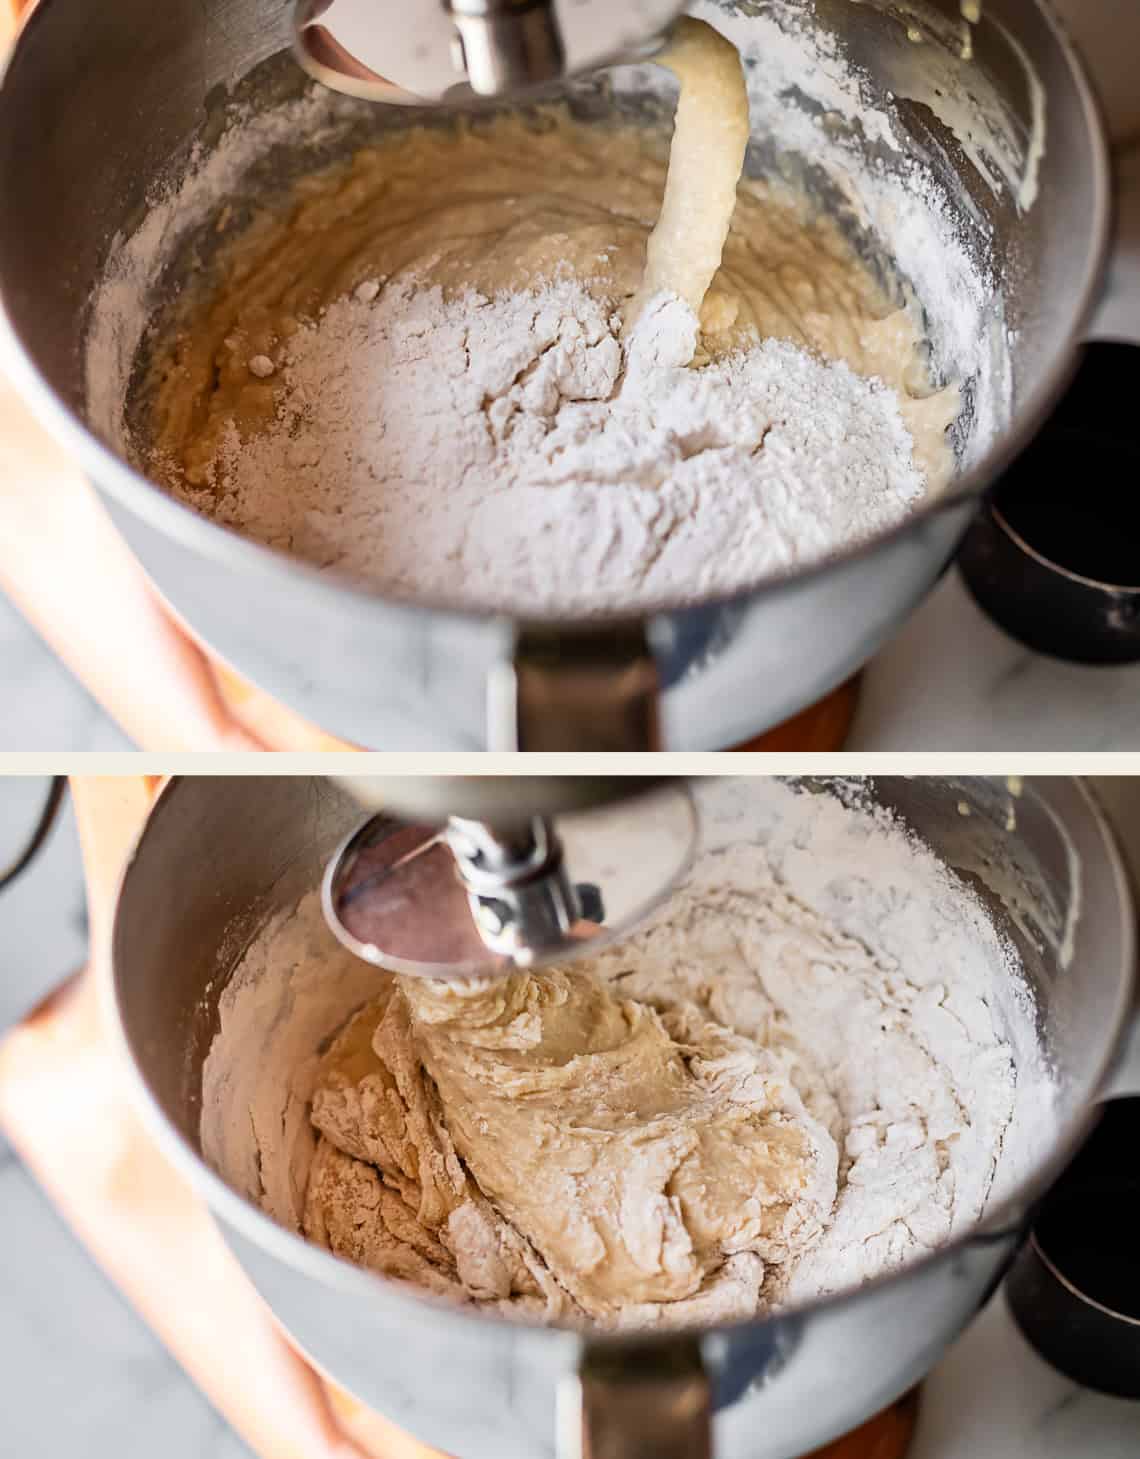
Keep adding flour one cup at a time…
And knead for a few minutes until you have a pretty soft dough. Try not to add too much flour! You need it to start coming together a little bit toward the center, but it will still be sticking to the sides and will not have formed a ball.
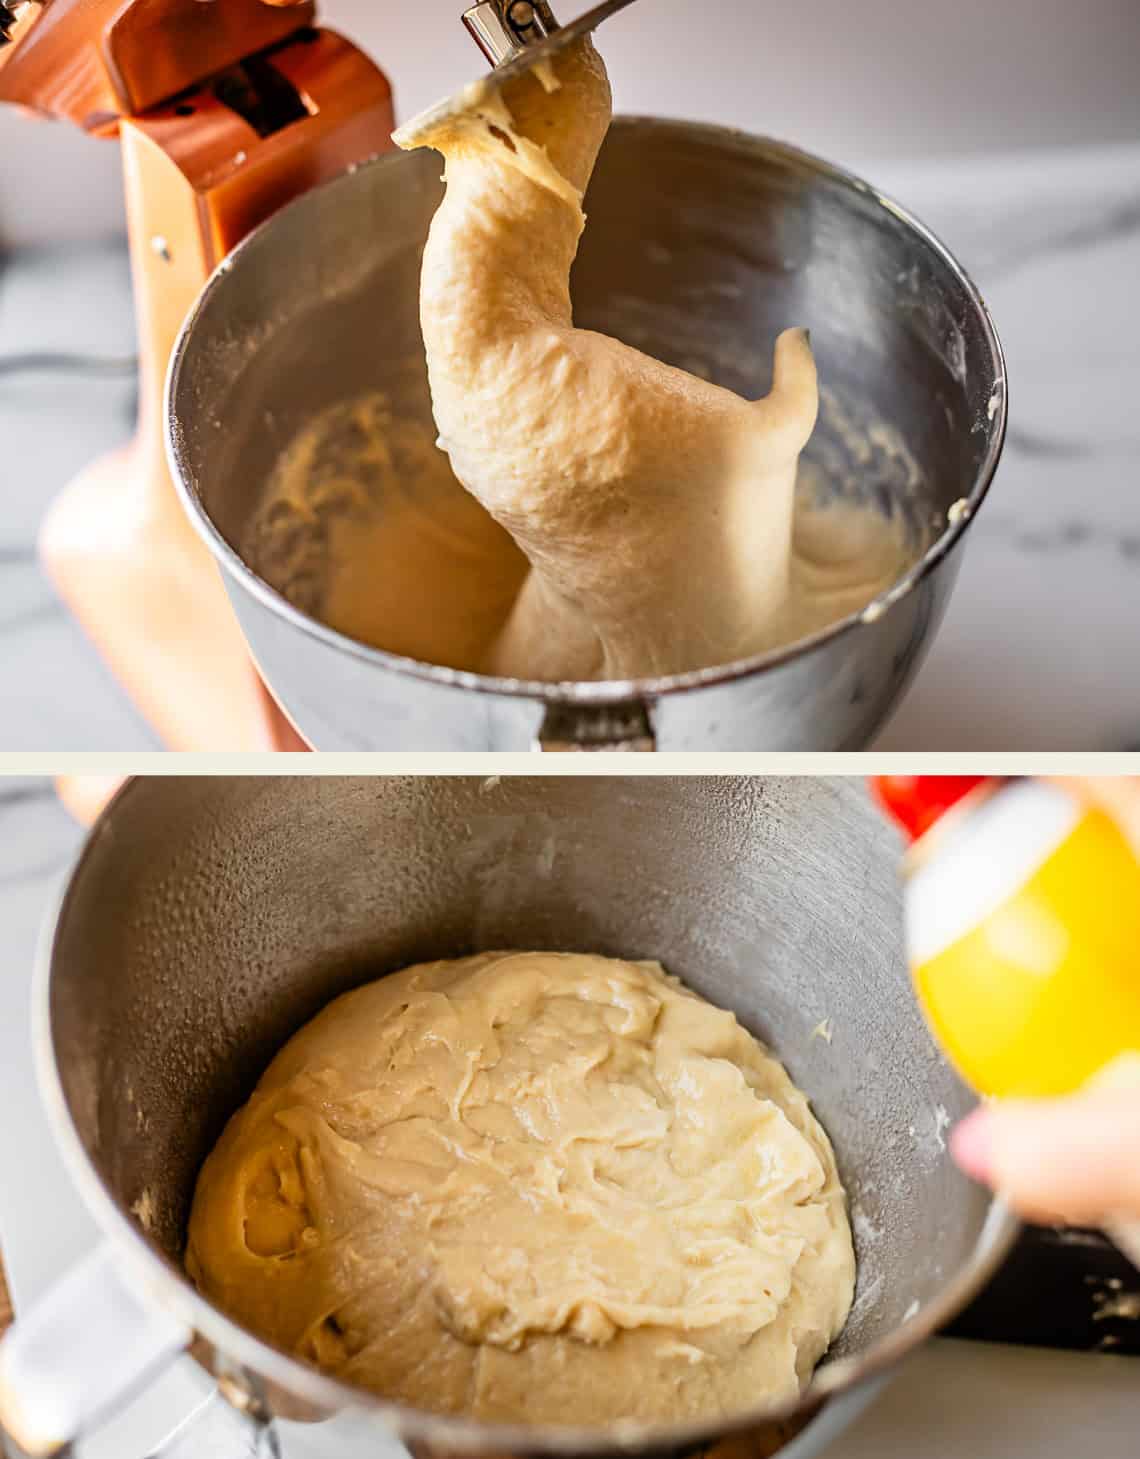
Now it’s time to rise. I’m super lazy about this step. 😂 Instead of moving to another bowl, I just leave it. Scrape the dough down from the sides of the bowl and shape the dough a bit so it’s rounded on top. Then spray the top of the dough and the sides of the bowl really well with nonstick spray, or drizzle with oil and rub it in.
Spray the plastic wrap too:
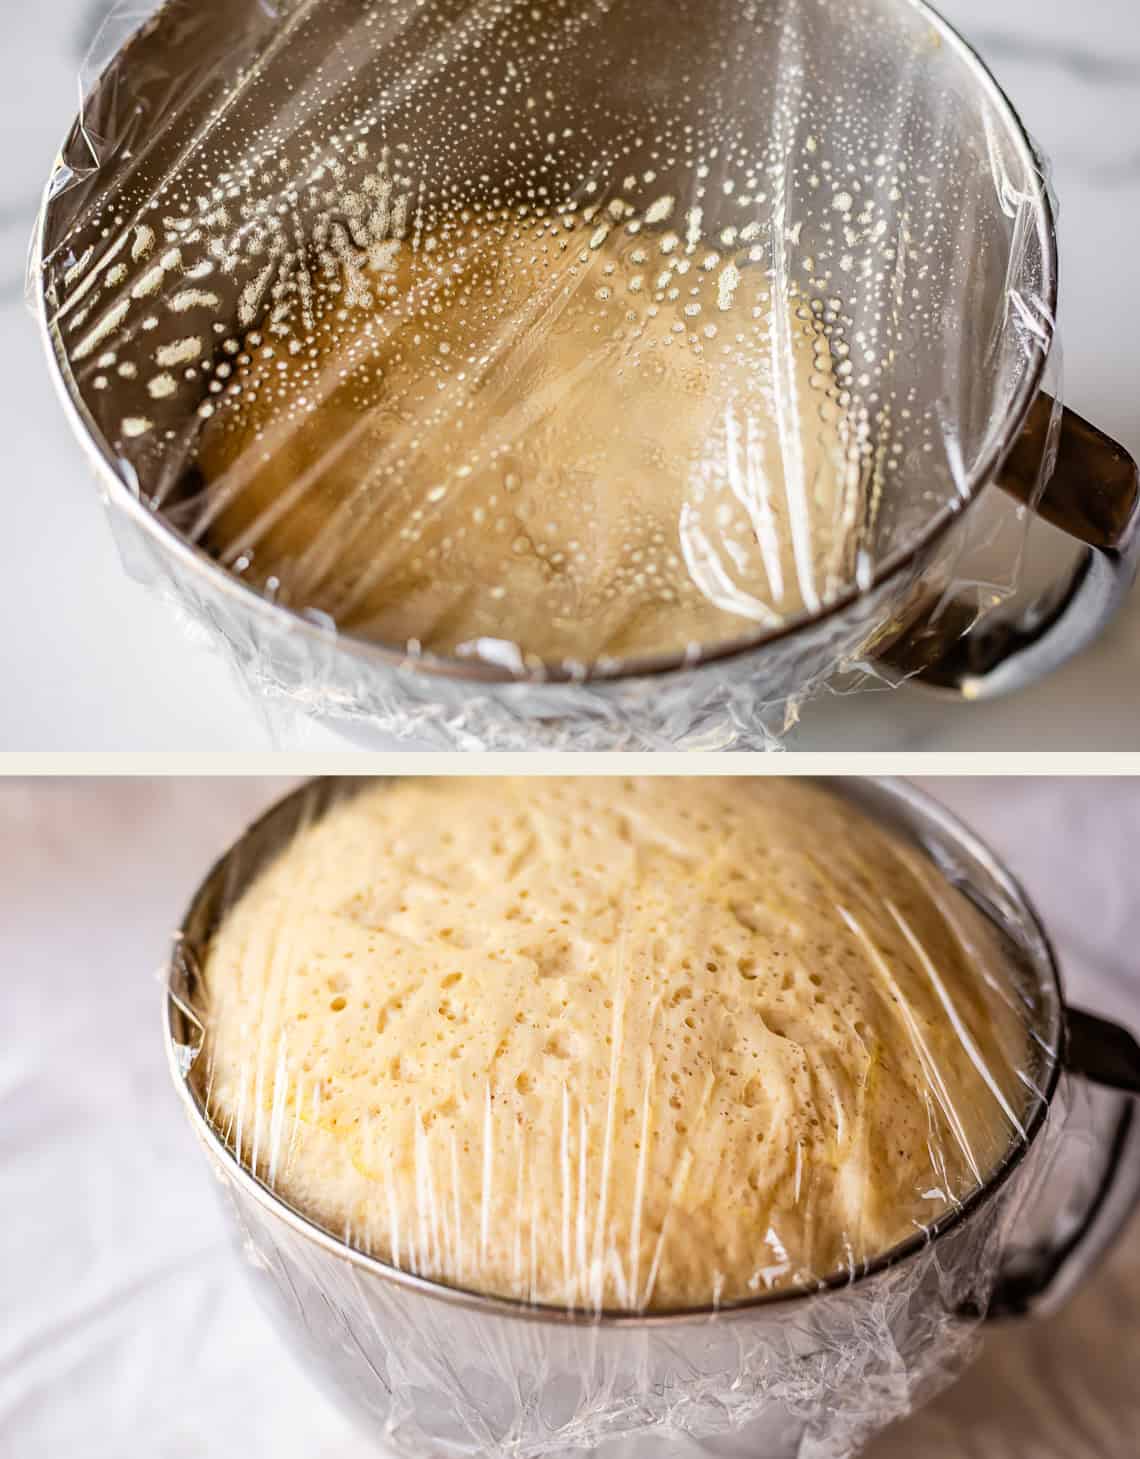
And let it rise for about an hour. I highly recomment rising in the heated-up-then-turned-off-oven, as I’ve described in the notes. The journey to “doubled in size” might take a bit longer than an hour if you don’t place the dough in a warm and cozy spot.
Once doubled, you don’t need to punch the dough. I feel like people get a little excited about the punching part of bread making. 😂 But we want to keep this dough a little puffy. I don’t punch at all, just use a spatula to scrape the dough onto a floured surface. Of course most of the gas in the dough will escape as you roll it out. But I say, just be a little gentle with it. It doesn’t need to be flattened into oblivion.
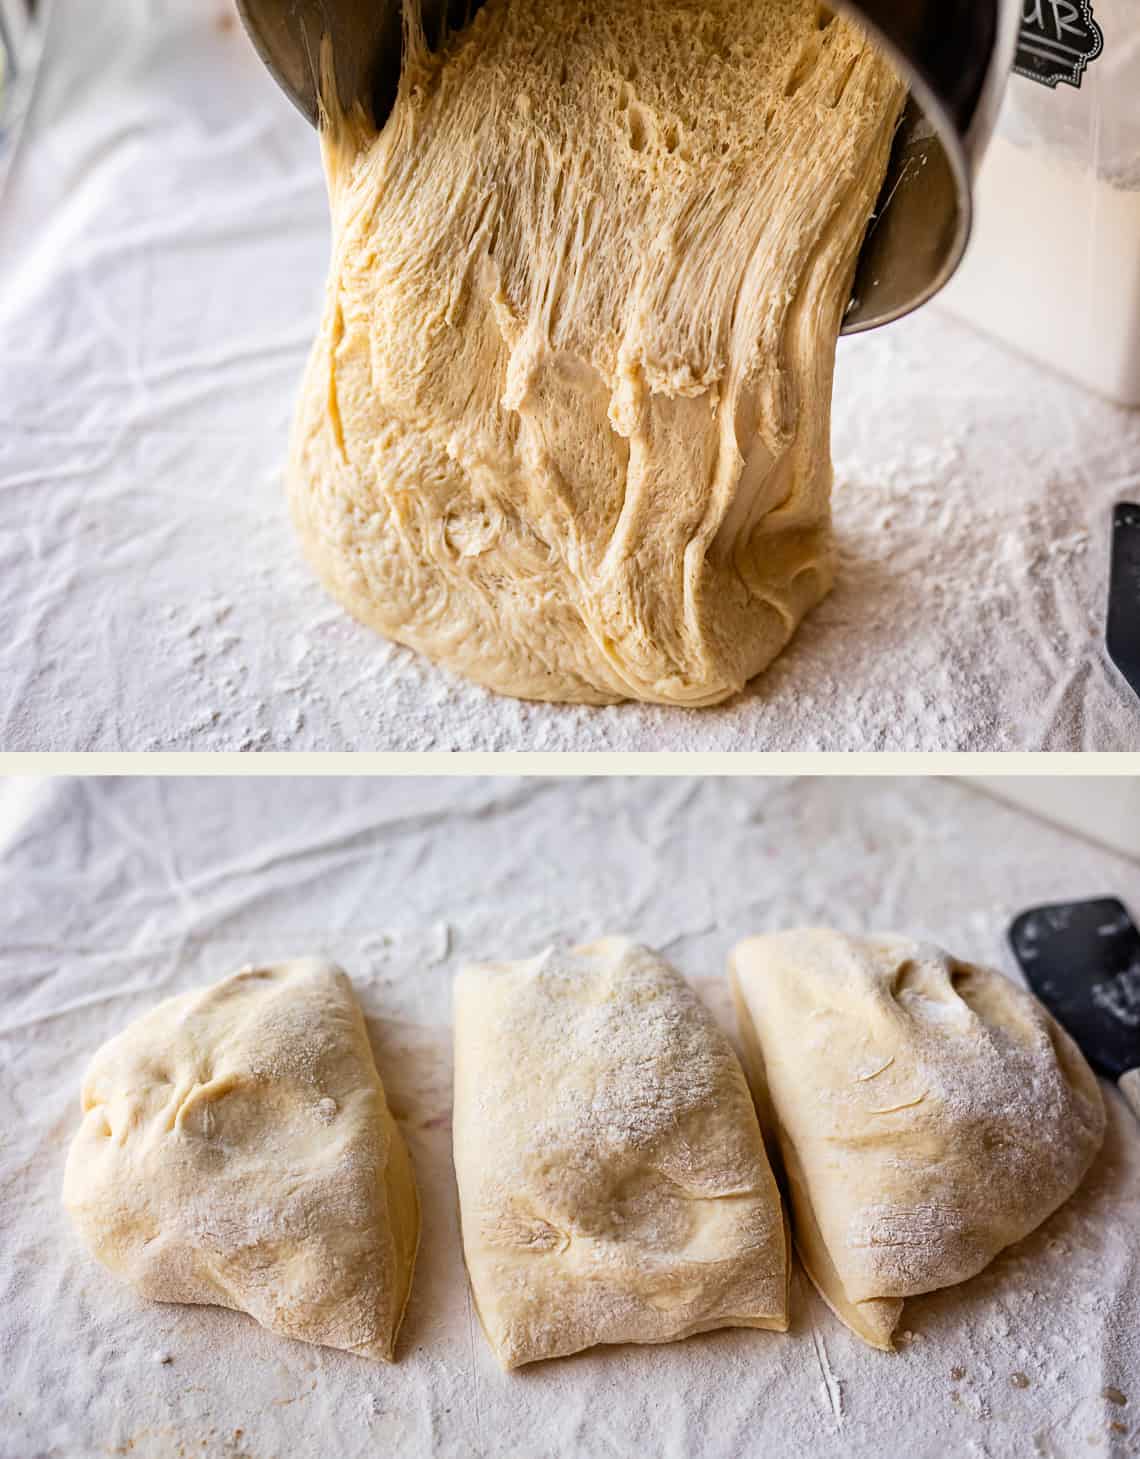
Divide up the dough using a knife or a bench scraper. Now we’re ready to roll 😎
How to roll crescent rolls
Take a third of your dough and smooth it out.
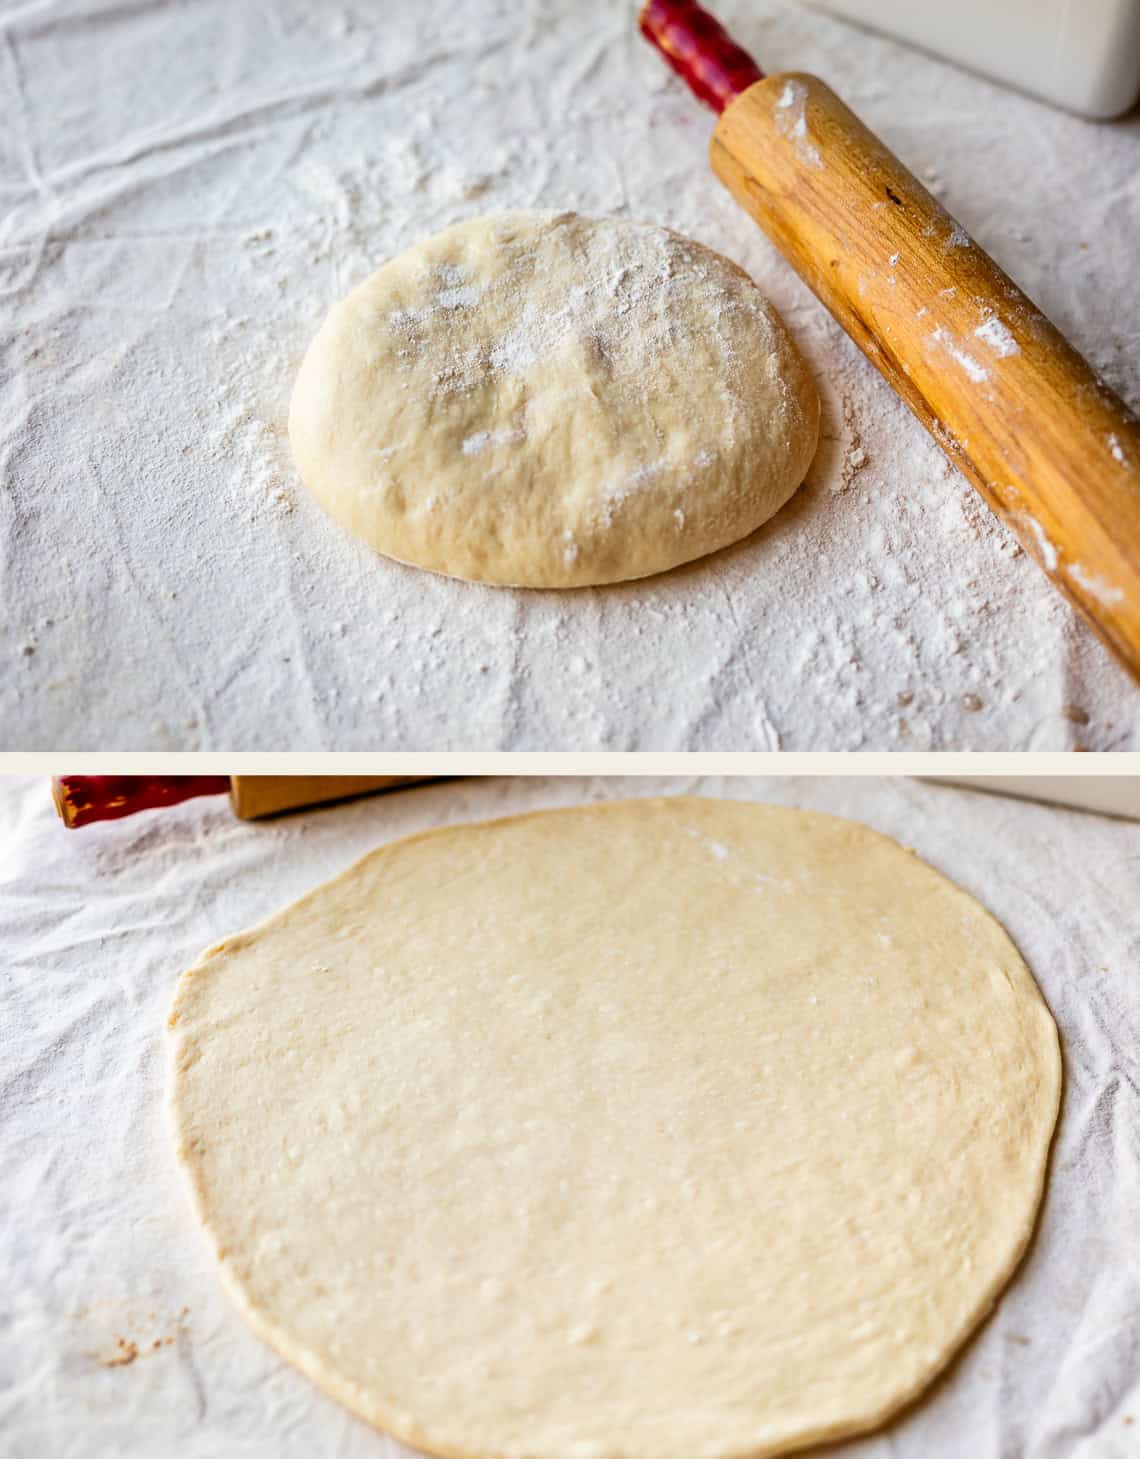
Roll it out using a rolling pin, into a circle about 12-13 inches.
Then use a pizza cutter or a floured knife to slice into 8 pizza pieces.
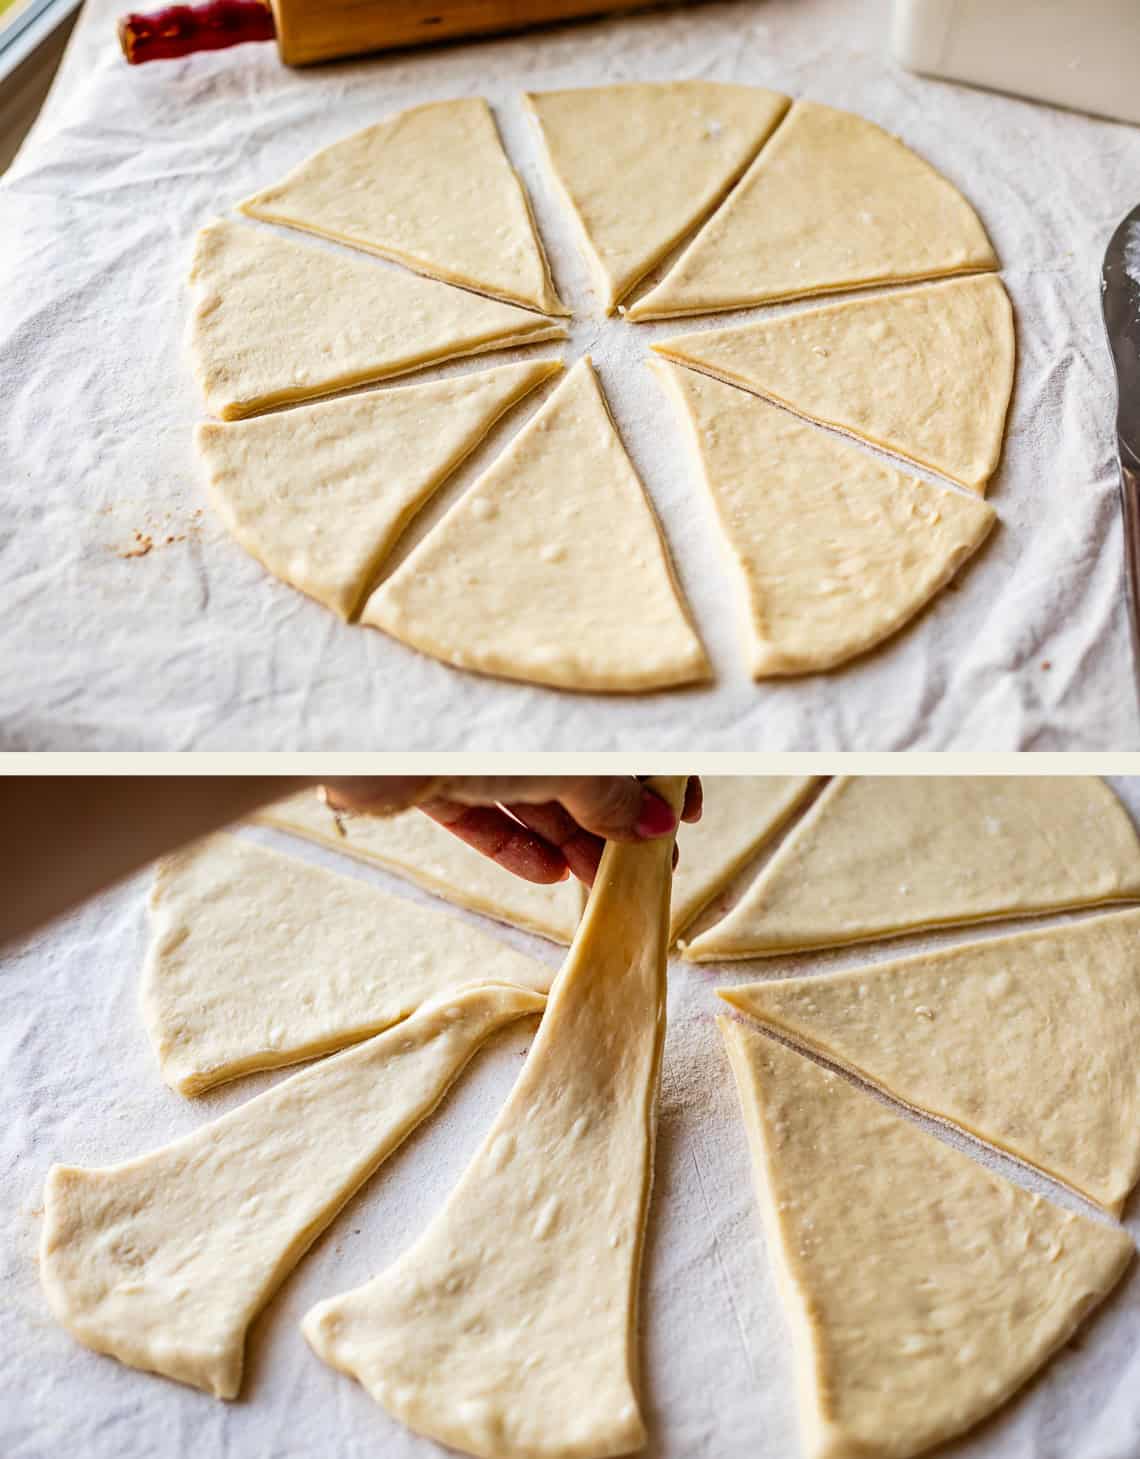
I like to stretch my triangles before rolling them up. It gives you lots of pretty layers!
Sometimes, the wide end of the triangle can get a little too wide. So I use this snip-and-fold-over technique:
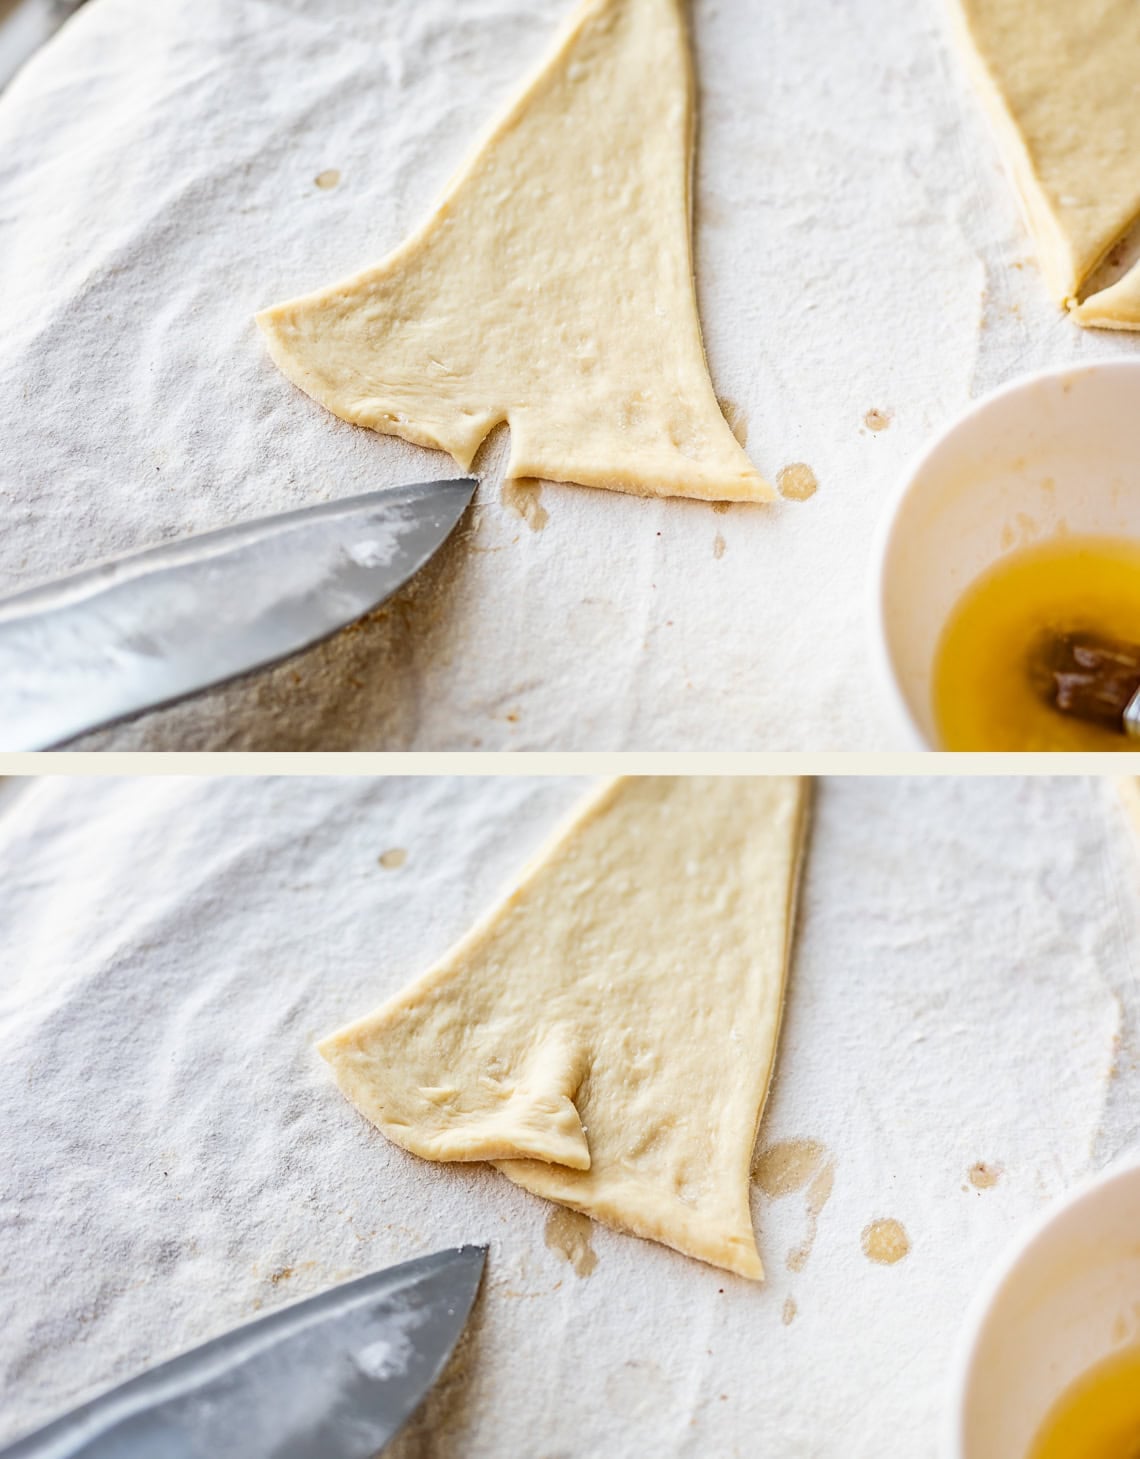
This is how to get nice puffy rolls, instead of ones that are overly long and skinny. Snip the center of the fat end of your triangle and pull it in on itself. Then when you roll it up, the crescent roll will be tall and fat, rather than long and skinny. Tall, fat, roundy rolls please.
Stretch, snip, roll:
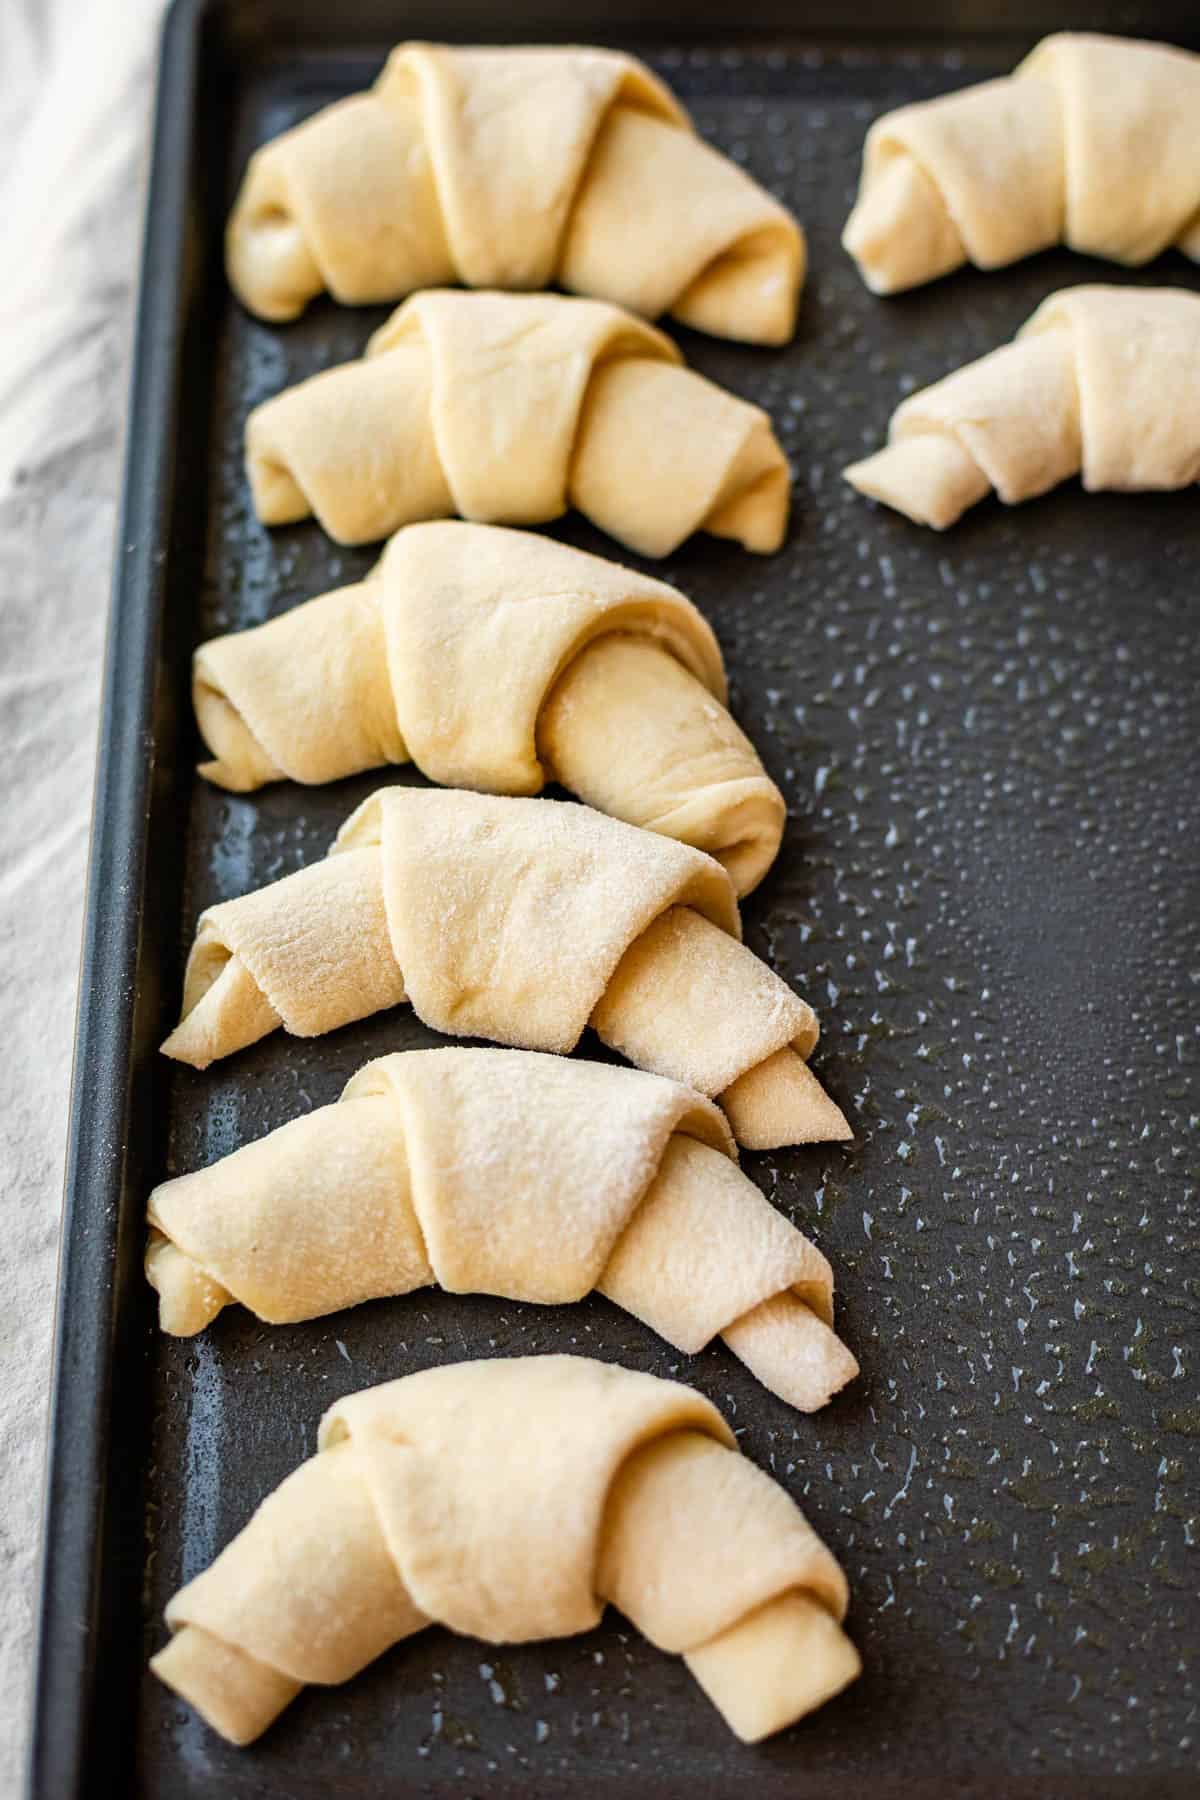
When you place the rolls on the baking sheet for the rise, you want to curl the edges so that it is a crescent shape. You also want the tip of the triangle to be on the bottom, tucked in and touching the pan.
Don’t put the rolls RIGHT next to each other, but don’t spread them out too much either. The rolls will rise taller if they have a buddy to lean on in the oven. (Forcing them UP instead of spreading OUT. This makes tall, puffy rolls.) I like to leave about an inch between each roll.
Pan sizes
I am in the middle of a kitchen renovation right now, so I’m baking everything in my air fryer!! I have the biggest kind, it looks like a toaster oven. I can fit a 9×13 inch pan in it! And that’s what this pan you see is, a 9×13 inch sheet pan. It’s not a typical size but I actually think I will keep using them even in my regular oven. I can fit 4 perfect rows of 6 rolls on two pans this size.
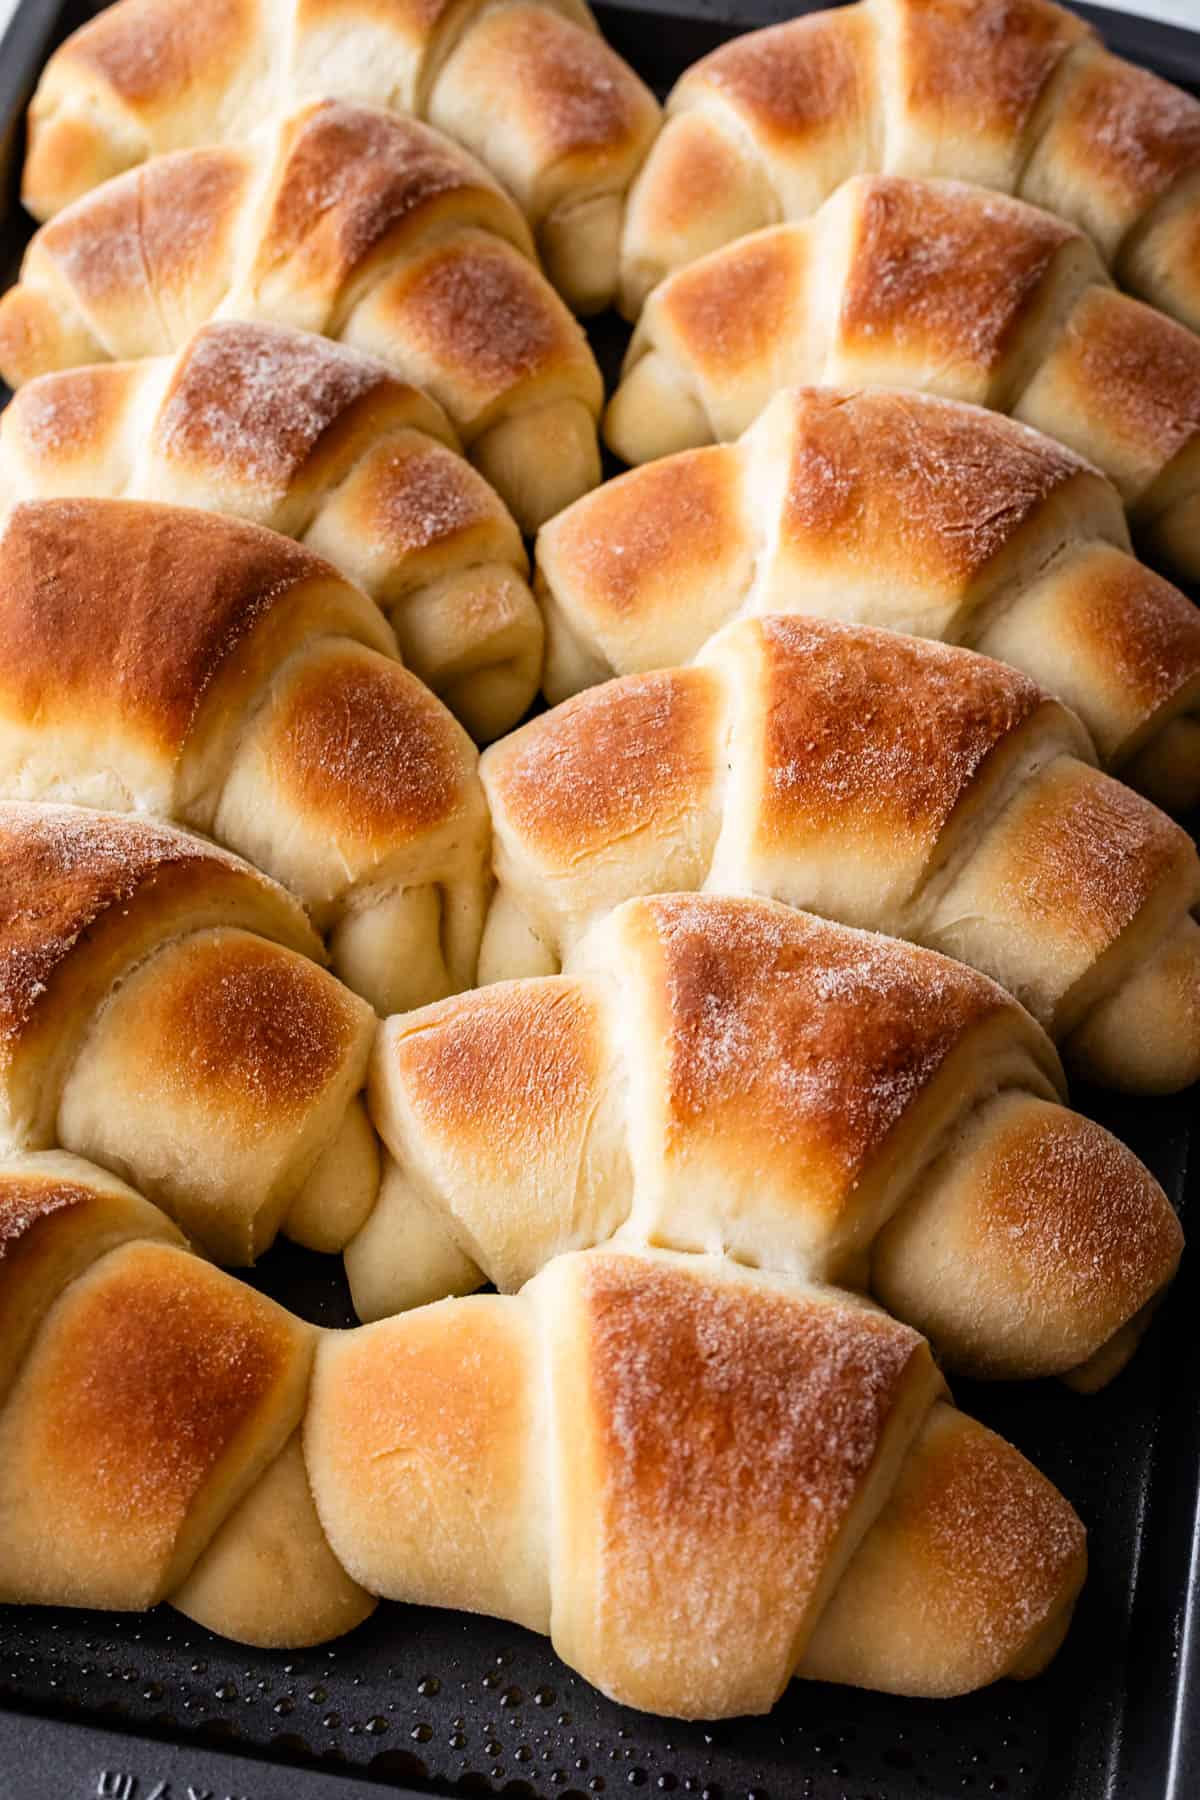
If you are using half baking sheets, it’s going to be a little tight fitting 24 rolls on one pan. You will probably be able to fill 1 and 1/2 pans of that size. OR you could just use two 9×13 inch cake or casserole pans!
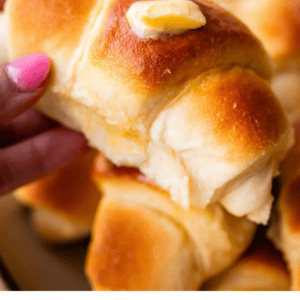
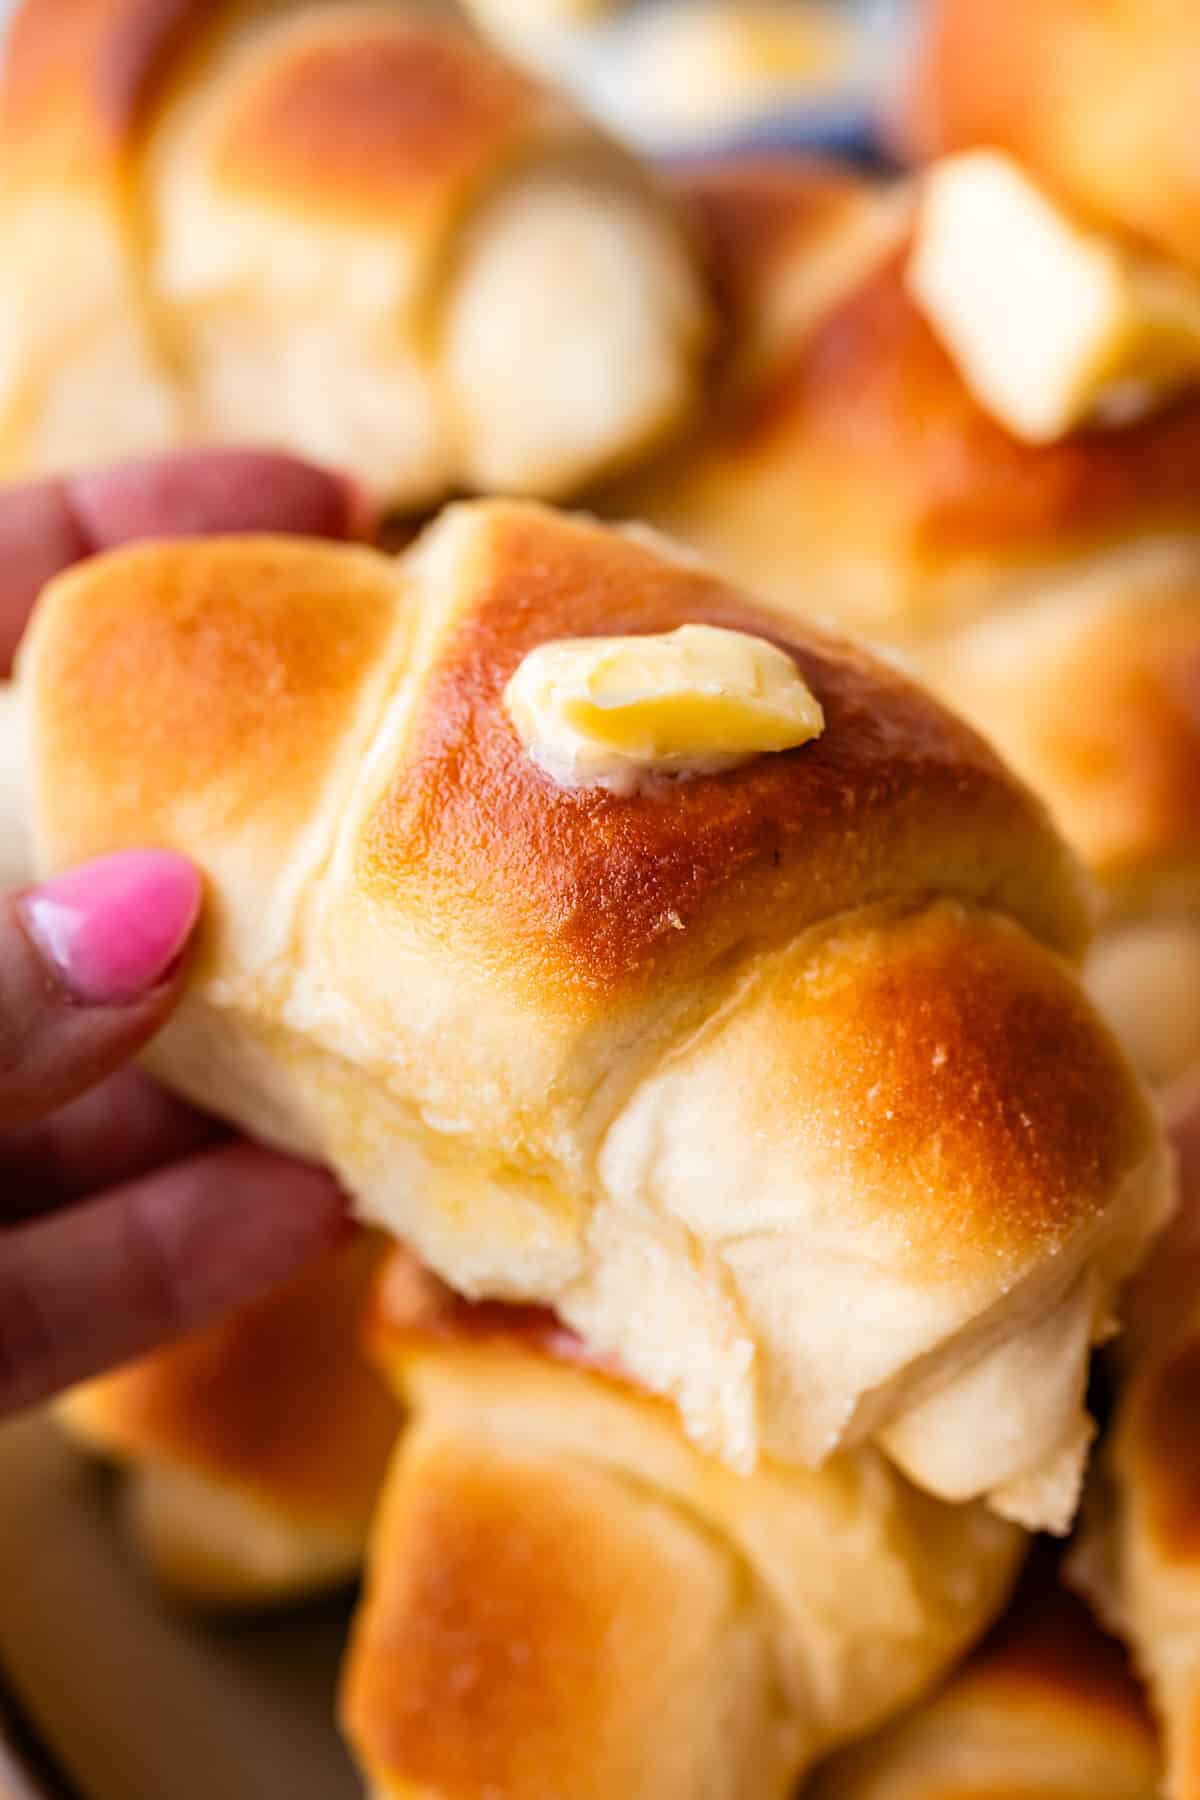
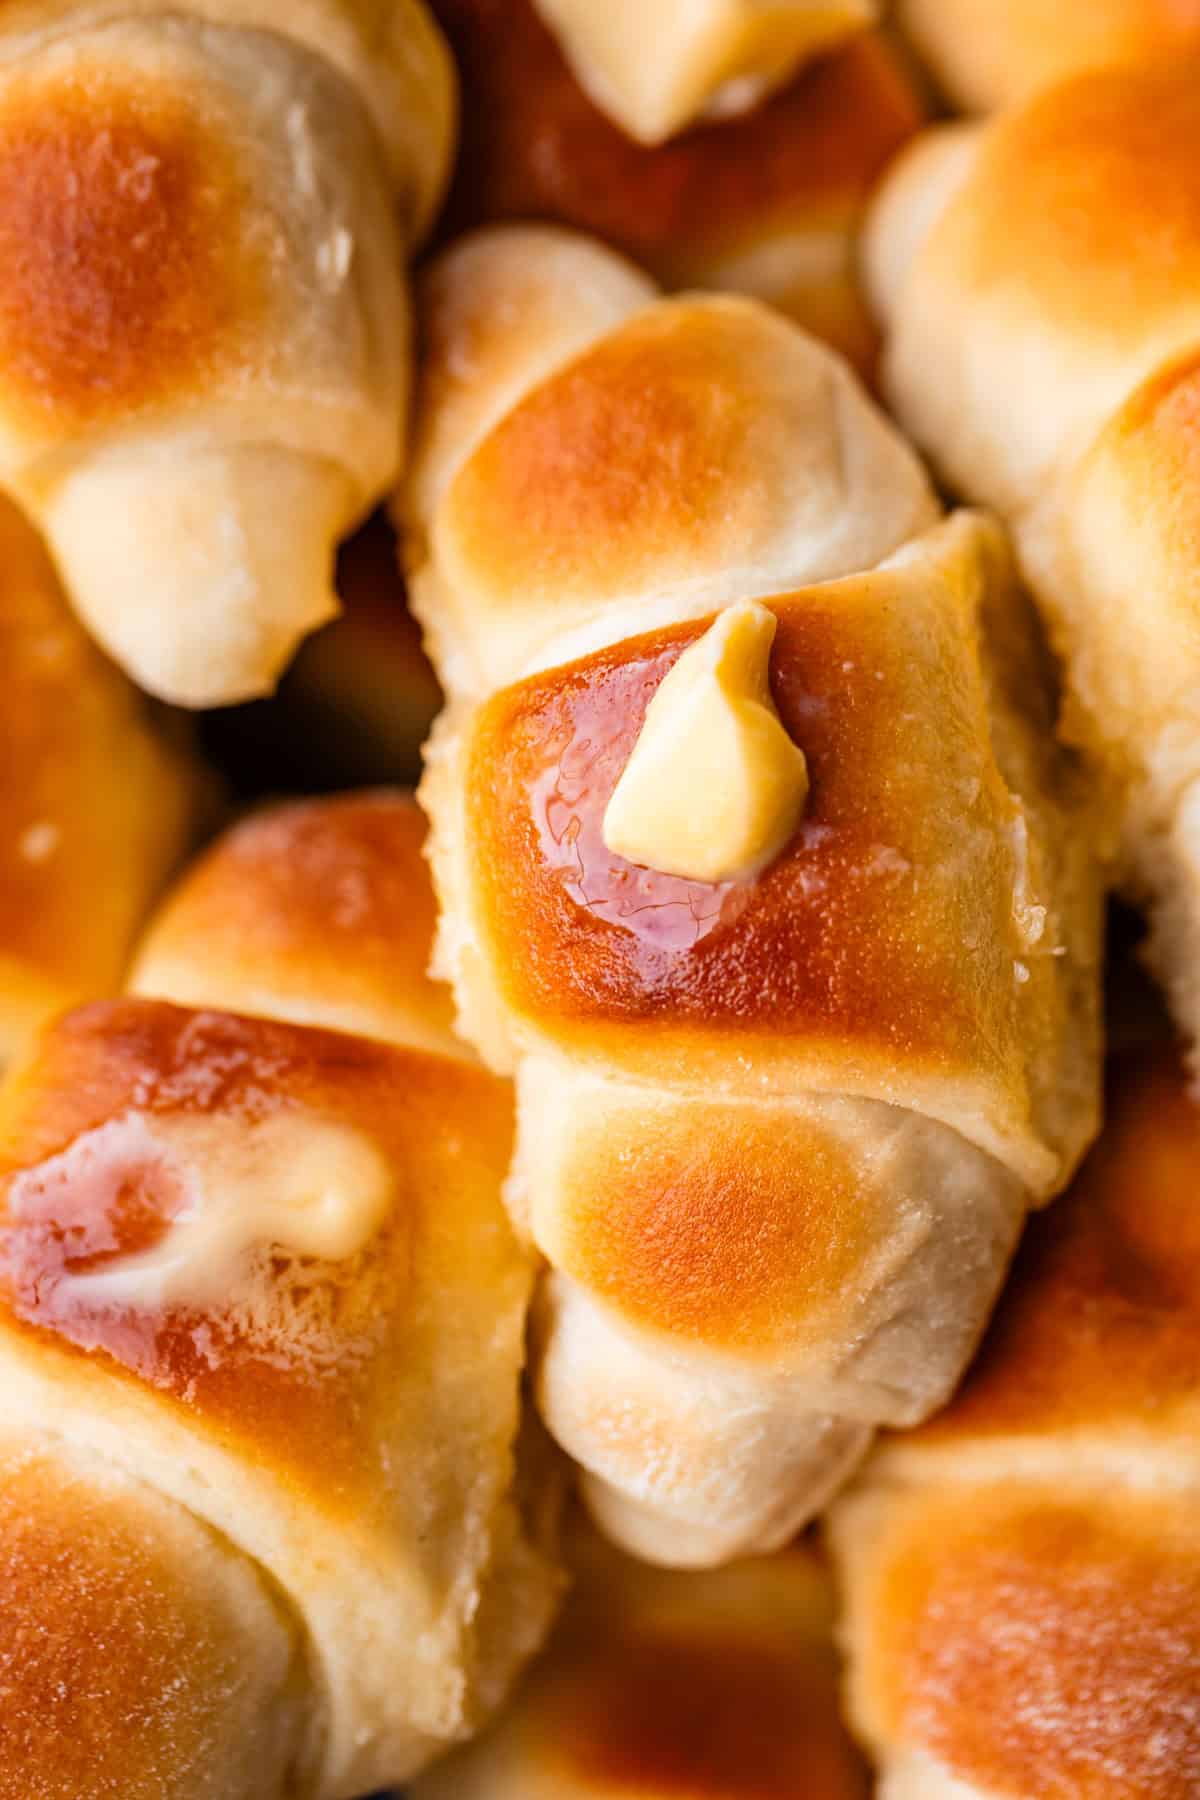
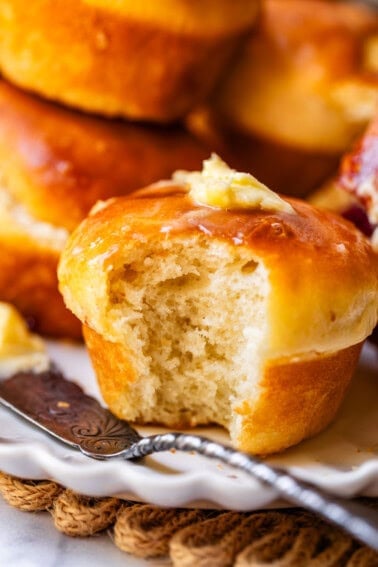
As soon as they come out of the oven, rub a little butter on the tops of each roll, if you are serving them right away.
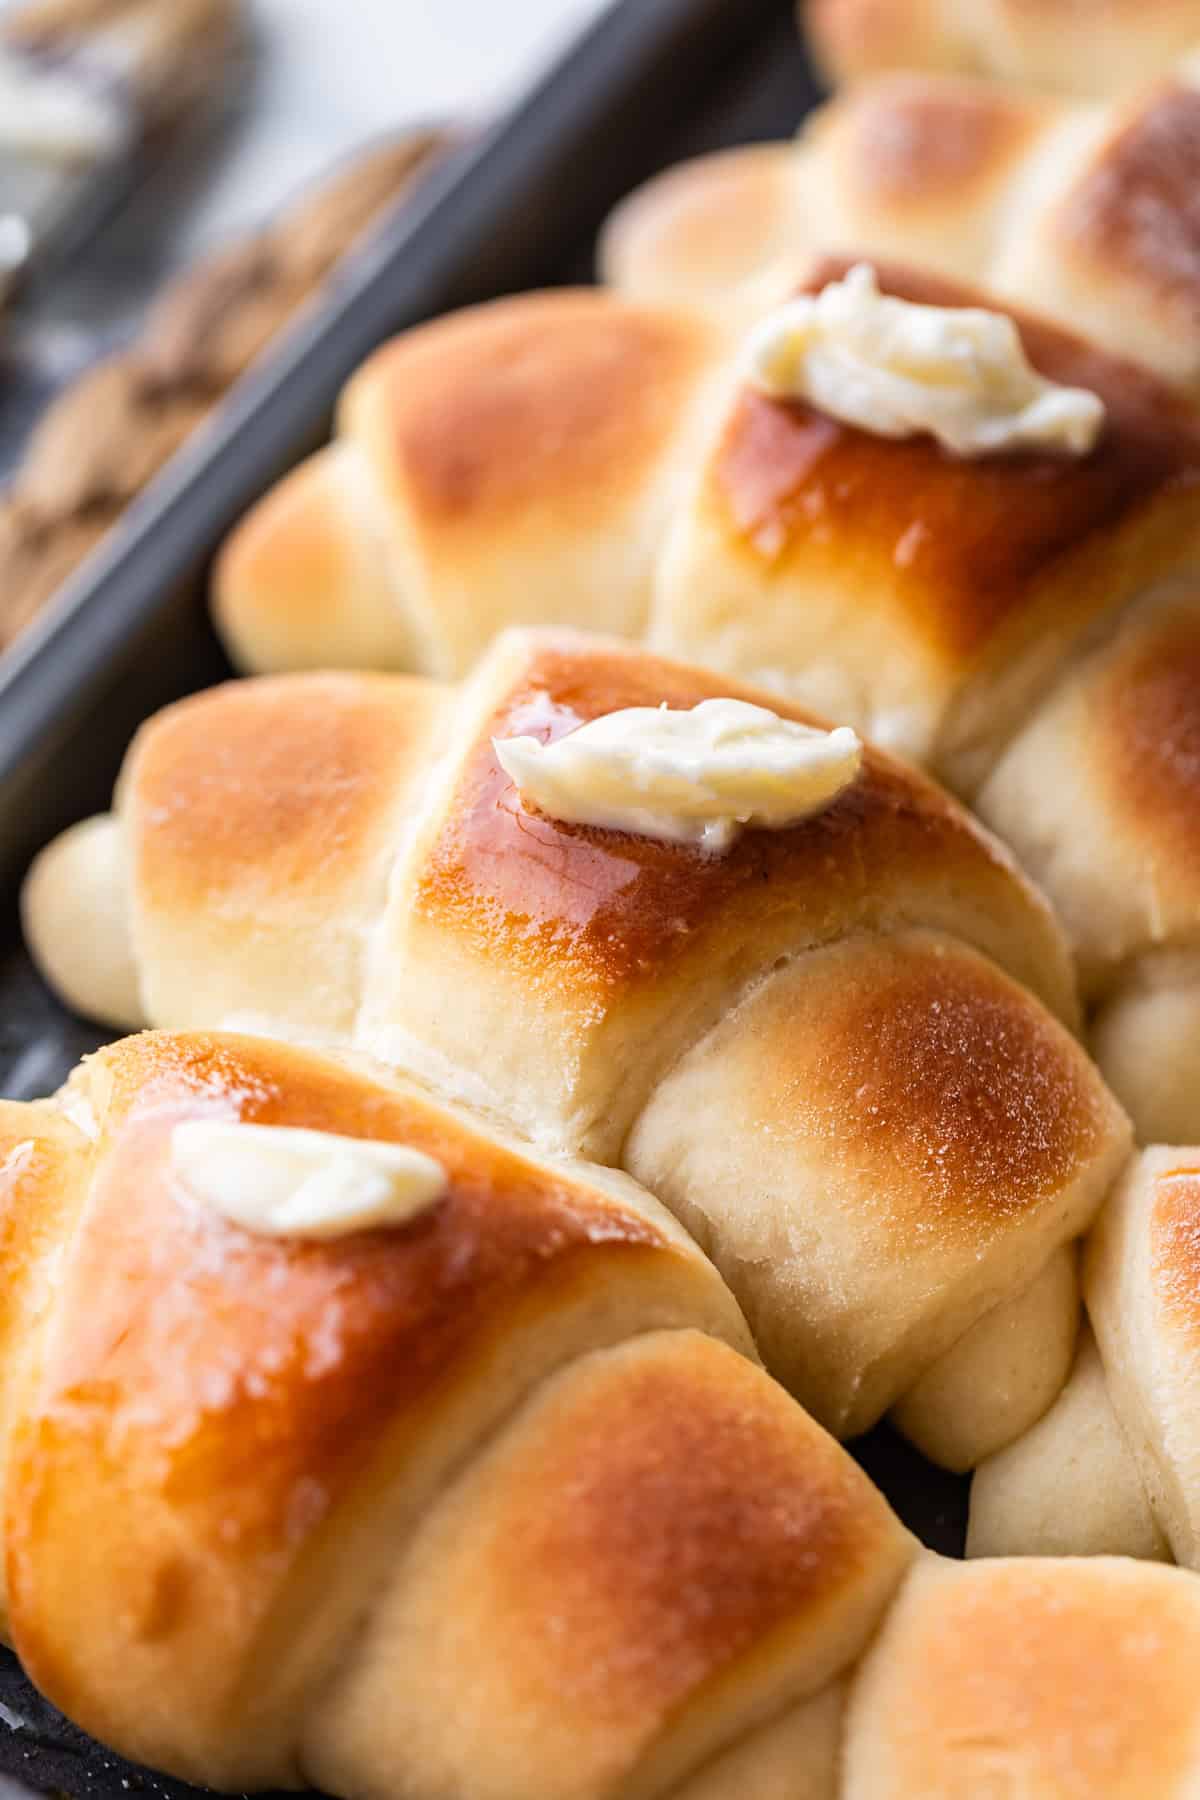
If you are wanting to serve the rolls later and plan to reheat them, I wouldn’t add the butter right away. It makes the rolls a little wrinkly as it cools. Only add the butter to the tops RIGHT before you are ready to serve them.
Whatever you do, don’t forget to jam one of these in your mouth as soon as they are cool enough. You deserve this!!
I know you are going to love this recipe! Let me know if you try them out! They are perfect for Easter or Thanksgiving…or like a said, a random Thursday afternoon 😝 Make them ahead of time and freeze them so you have one less thing to do on the big day!
Holiday dishes I love with these rolls
These rolls can go with any meal, of course, but I especially love to make them for holidays. Here are a few of my favorite holiday main dishes that would be great with these big, fat crescent rolls!
- Best Honey Baked Ham Recipe >> so simple, but so insanely good. Perfect for any holiday!
- Prime Rib Recipe To Impress Your Guests >> a good prime rib roast really does live up to they hype, and I show you how to make it step-by-step
- Pot Roast in Crock Pot >> impressive and delicious enough for Easter or Christmas, easy enough for a Sunday dinner
- Herb Roasted Turkey >> the easiest and best turkey recipe around
How to store leftover rolls
Easy peasy! Just add the rolls to a ziplock bag or container with an airtight lid and keep them on the counter. Do NOT put them in the refrigerator, please! They are much more likely to get dried out and stale, and that is a crime against good bread everywhere. In fact, if I know I won’t eat these rolls within 12 hours of baking, I always freeze them. Even if I plan to serve them for dinner again the very next night! They just maintain their moisture and tall rise so much better that way. To reheat, put the rolls on a baking sheet into a 170 degree oven for about 5-10 minutes.
If you want to freeze the rolls (even for dinner tomorrow night!), put them in freezer ziplock bags and store them in the freezer for up to 3 months. Let thaw in the closed ziplock bag on the counter, and then follow reheating instructions listed in the paragraph above or in the recipe card. If you know you are planning to freeze them, wait to brush the tops with melted butter until just before serving.
More of the best dinner rolls to try
Rolls are like cookies, you can never have too many recipes to make and love!
Christmas Recipes
Aunt Shirley’s Famous Homemade Dinner Rolls
Breads, Muffins & Rolls
Soft and Fluffy Parker House Roll Recipe

Christmas Recipes
Best Recipe for Garlic Knots
Breads, Muffins & Rolls
Easy Yeast Dinner Rolls (Muffin Tin!)
Facebook | Pinterest | Instagram
Crescent Rolls Recipe (Big Fat Rolls!)
Ingredients
- 2 tablespoons active dry yeast
- 1/4 cup water, warm, not hot
- 1/2 cup granulated sugar
- 1 and 1/2 cups whole milk, warm, not hot
- 1/2 cup butter, 1 stick
- 2 teaspoons kosher salt, if you are using table salt, use 1.5 teaspoons
- 2 large eggs
- 5 and 1/4 cups all purpose flour, plus more, divided
- 1/4 cup butter, for rubbing on baked rolls
Instructions
- Make the dough: In a large bowl or stand mixer, combine 2 tablespoons yeast and 1/4 cup warm water. Touch the water with your wrist. It should feel like lukewarm bath water, about 105 degrees F. (Do not use HOT water, it will kill your yeast!)
- Proof the yeast. Let the water and yeast sit for about 5 minutes. Check to make sure it's getting bubbly and foamy. See photos! (If not, you've killed your yeast with too hot water. Dump it and start over!)
- Add 1/2 cup granulated sugar to the yeast and water mixture.
- In a glass measuring cup, add 1 and 1/2 cups whole milk and 1/2 cup (1 stick) of butter. Warm in the microwave in 30 second intervals until the milk is warm (not hot!) It should be about the same temperature as the water. The butter will not melt completely, but will be soft enough to stir in. If you heat it up too much, no problem, stick it in the fridge or freezer until it is baby-bath warm. Don't add it to the yeast when it's hot.
- Add the warm milk and butter to the yeast and sugar.
- Add 2 teaspoons kosher salt.
- Add 2 large eggs.
- Add 1 cup of the flour. Use a spoon to add flour to the 1 cup measurement, then level ot off. Stir it all together with a rubber spatula.
- At this point, if you are using a stand mixer, switch to stirring with the dough hook attachment. (If you are making this by hand, use a sturdy wooden spoon to stir in the flour.)
- Add the remaining 4 and 1/4 cups flour, 1 cup at a time, stirring thoroughly after each cup of flour is added. Use a spoon to add flour to each 1 cup measurement, then level it off. The dough will be very loose and sticky. Add up to another 1/2 cup of flour, but don't go much over 5 and 3/4 cup flour total. This dough is not going to form a ball as it mixes, as you may have seen with other recipes. See photos for guidance.
- Knead the dough for 5 minutes, until is has come together a little bit. It will still be sticking to the sides of the bowl a bit.
- Prepare the dough for rising. Scrape down the edges of the bowl with a spatula, shape the dough so that it is slightly rounded on top, and spray the heck out of the top with nonstick spray. Spray the edges of the bowl all the way to the top. Spray one side of a sheet of plastic wrap and cover the bowl.
- Let the dough rise in a warm spot for at least 1 hour, until doubled in size. It might take a few minutes longer if your kitchen is cold. (Stick it on top of the fridge!)*
- Prepare 2 baking sheets with silicone baking mats or parchment paper, or spray well with nonstick spray.
- Use a rubber spatula to scrape the dough onto a very well floured work surface. (I love to use my pastry cloth).
- Use a serrated knife or bench scraper to divide the dough into 3 equal pieces. Set aside 2 of the pieces on a floured surface and cover with the plastic wrap from the first rise (or a tea towel).
- Roll one piece of the divided dough into a circle that is about 12-13 inches.
- Use a pizza cutter or chef's knife to cut the dough (like a pizza) into 8 equal triangles. (see photos)
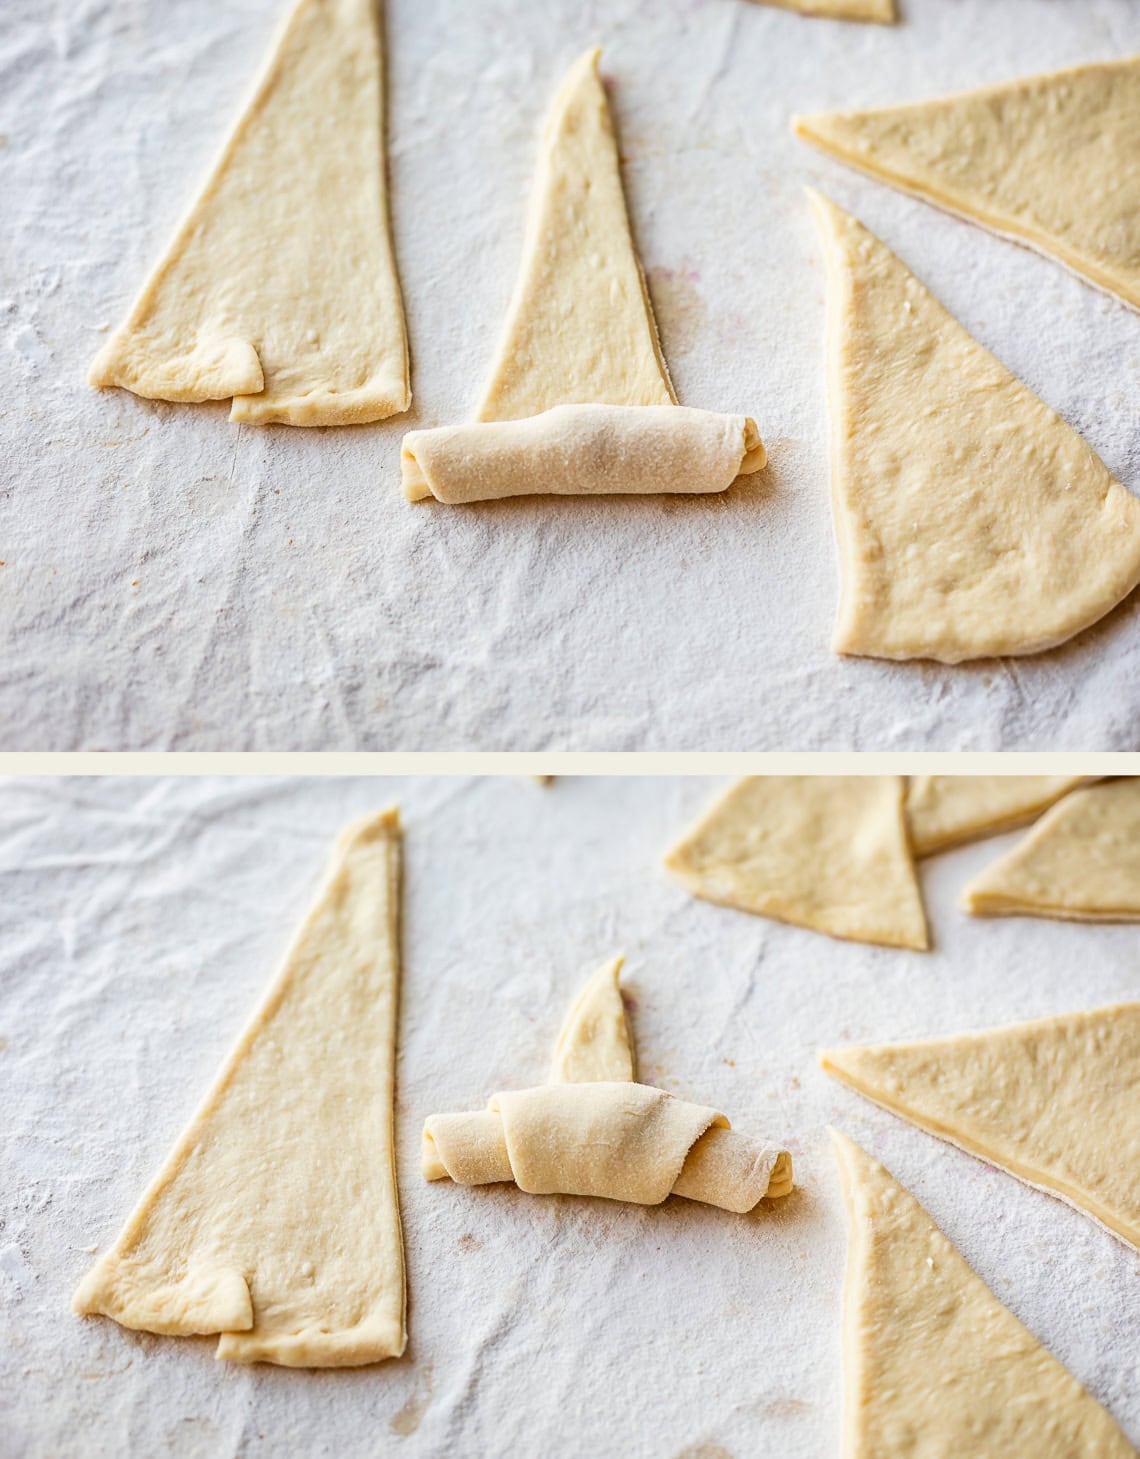
- Shape the dough. Stretch out the skinny end of the triangle of dough with your hands, so it is like a long piece of pizza. Starting from the flat end, roll the dough into a tight crescent. (see photos) This will give you pretty layers when your roll is baked.
- If the large end of your triangle is overly long (which will make a really wide roll), you can make a snip in the middle of the large end, and fold it in on itself. This will make the roll fatter in the middle instead of long and skinny. (see photos)
- Shape each roll into a crescent shape, bending the edges in toward itself.
- Place each roll on the prepared baking sheets, with each roll curved into a crescent shape. The tip of the triangle should be on the bottom. Place the rolls fairly close to each other, with about 1 inch of space or less between them. The rolls will rise higher if they have other rolls to lean on, forcing them to rise up rather than spreading out.
- Cover with a tea towel (or with plastic wrap sprayed with nonstick spray) and let rise at least 30-45 minutes, until about doubled in size. See note to make your own "proofing box."
- Continue shaping the rest of the dough.
- Preheat the oven to 375 degrees F when your rolls are about half way done with this second rise.
- Bake each pan of rolls at 375 for 12-15 minutes.**To quote Kris, They puff up real nice :)
- Test for doneness: You want the tops of the rolls to reach a nice golden brown color. The bottom of each roll should also be golden. A thermometer put into the center of the roll should read at least 190 degrees. If the rolls are browning on top but not browning on the bottom, cover the rolls loosely with foil for the last few minutes of baking.
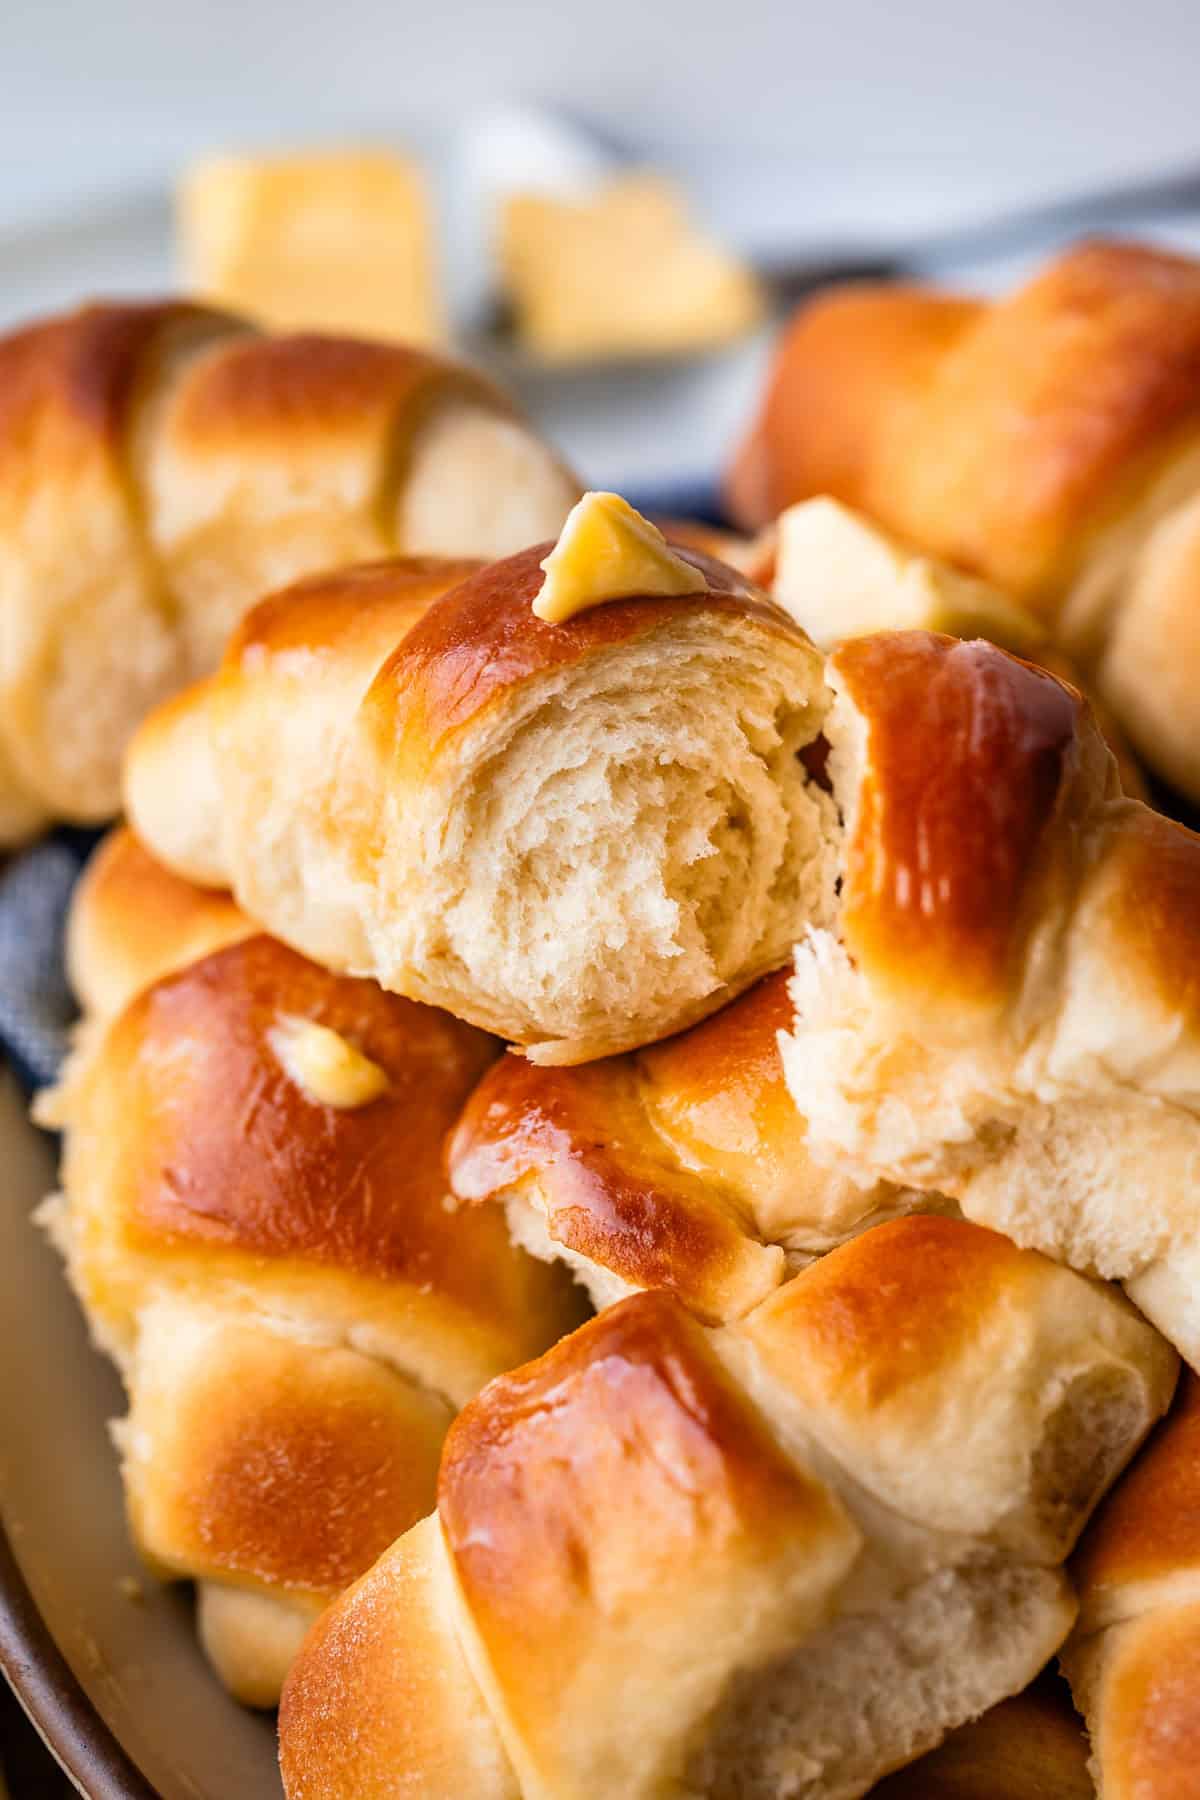
- Top with butter. As soon as they are out of the oven, rub a stick of butter over the top of each roll, or top with a pat of butter and let it melt. Use a pastry brush to spread it around. At this point, it's important to jam one in your mouth as fast as you can.
- Cool. Remove the rolls from the pan to a cooling rack just a couple minutes after taking them out of the oven. This helps the bottom of the rolls stay golden and crisp, instead of getting soggy-sad from condensation.
- Reheating: To reheat these rolls, preheat the oven to 170 degrees F (Keep warm setting). Place on a baking sheet and warm for 5-10 minutes. Or, microwave individual rolls for 10-15 seconds.
- Storage: Store these rolls covered or in a ziplock, right on the counter. Don't refrigerate them! They will just dry out. If you aren't eating them in the next 12 hours, freeze them. I will freeze rolls I am planning to serve just the next evening for dinner. It's the best way to preserve them and keep them fluffy.
- Freezing: You can freeze these rolls in ziplock bags, for up to 3 months. Let thaw in the closed ziplock bag on the counter, and then follow reheating instructions. If you know you are panning to freeze them, I would wait to brush the tops with melted butter until just before serving.
Notes
Nutrition
I posted this recipe in 2012!
Here’s what was going on back then. My 15 year old was just a lil baby!
How do you like Charlotte’s mohawk? Her hair is actually looking way better these days. She was born with a full head of hair, but by 4 months had developed a lovely combination of long side wings with the classic bald spot in the back, above a rockin’ mullet. A true backstache.

We were blinded by being adoring parents. It took my sister-in-law Sandi to come into town with a pair of fresh eyes to finally wake us up. She said that Charlotte looked like an infant combination of Benjamin Franklin and Smeagol from Lord of the Rings.
Sandi was totally right, Charlotte’s hair was atrocious. Isn’t it crazy how parents always think their babies are beautiful, and then even 6 months later you look back and think, wow, my kid is way cuter than that now. That newborn looks just as ugly as all the other newborns I’ve seen. I think it’s God’s way of helping us propagate the species.
And just for fun, here is one of the original photos of this recipe, back from 2012. You can see that I brushed it with butter, as my original recipe instructed, and the layers are slightly separated.

I updated this recipe on November 7, 2018. It’s one of those family recipes that I make regularly, so it’s always going to get revisited! Here is one of the 2018 photos:

This one is better, but you can still see that layer of butter separating the layers of dough. Crazy how much this impacts the rise!!
See you in another 10 years for the next Crescent Roll update! 🤣


Since I’m a novice when it comes to baking with yeast, I wasn’t sure what to expect—but these turned out wonderfully! They rose nicely and had a soft texture. I still need practice with shaping, but the flavor was absolutely a 10. I couldn’t resist eating two right out of the oven.
I’m so happy you got a chance to try these out Maria!! Now you know the secret to yeast – it’s really not that hard! Here’s to many more baking projects in your future!
These rolls are amazing! My 8 year old granddaughter Kiah and I made them into bunny shaped rolls for Easter! Turned out so super cute and delicious! I wish I could upload a picture to show everyone!
These look amazing! And OMG it’s so true about being blind when you’re a parent. I look back at some pictures of my Truman and YIKES. 😅
Right April?? We can’t take our parent goggles off! Our kids are always adorable in the present, even if no one else thinks so ;)
OMGOSH…..FINALLY FINALLY…THESE ROLLS SHOULD BE ILLEGAL…..FINALLY THE TEXTURE, THE TASTE,. I made these on a whim to go with my “pull out whatever is in the freezer dinner”..Little did i know these rolls would turn out perfect. Third time in the last 2 weeks I’ve made rolls from scratch. Different recipes of course…However, this one….baby..listen…i didn’t even eat the rest of my dinner…a couple bites of broccoli, mashed potato and chicken. But the rolls…..I’m speechless..never had them turn out like this…I put two on my plate….went back for another…so the rest of the dinner got set aside. Grabbed another later and then got up out of the bed to grab one more. Today…guess what’s for lunch…yep. There even good room temp. I halved the recipe. I love…..you wiil need therapy after eating these….Thank you so much for sharing the recipe. So…good🦋😋🦋🤪
“You will need therapy after eating these” haha!! I’m dying Rolaco! So glad you enjoyed the rolls. They are definitely worth giving up dinner for. Thanks for reviewing!!
I made them yesterday. They are great! Both my wife and I love them. Thank you!
I have made many recipes from the internet of all kinds of food and never left a review. Short and sweet “ LOVE THIS ONE” The quantity, the taste, the size. I see why this has been in the family for many years. Thank you for sharing!!!
Hey Kelly, thanks so much for taking the time to comment! I’m so glad you loved the recipe! I’ve been craving these lately :)
I made this recipe, but used freshly ground 100% whole wheat flour. The crescents turned out very good.
Wow that is awesome Teresa! So glad it worked out! Thanks for reviewing :)
These croissants were everything as advertised. I’m a new wannabe cook and they are absolutely great. You weren’t kidding when you said don’t leave the rising dough alone it will rise to the top of bowl. Thank you again!
That’s so great James! So glad it worked out, it’s a pretty good recipe for newbies! Thanks for commenting!
Could you please add a “Jump to Recipe” button at the top of your posts? Thanks!
Once you make the dough, can you freeze the 4 individual dough balls (like pizza dough) and then make them into crescent rolls another day?
8 at a time is sufficient for just me.
Hi John! Yes, you can. Actually, it’s probably best to shape the dough into crescent roll shapes, set on a baking sheet to freeze, and then put the formed (but not yet risen) crescent rolls in a bag to rise and bake another day. Enjoy!
Can these be made without the sugar?
Hey Jules! You sure could but they won’t taste as good! Try reducing by half and see how that goes.
Yes, I’ve made these again and again. Making them for the Fourth, and then at end of month making them for a baby shower, at the mom’s request. These are perfect!!!! Thank you!
So happy to hear that Liz! It’s hard to say no to a big fat crescent roll right? Thanks so much for the recipe review!