Hallelujah I’ve found it! She’s the one, guys, the only homemade bread recipe you will ever need for the rest of your life! This fluffy white bread rises so tall and has a tons of buttery flavor. Did I mention that it’s super fast and easy to put together? Even for bread-making dummies, I promise. You can have this bread done start to finish in just 1 hour. I will show you how to make it step by step! Originally published Aug 23, 2023.
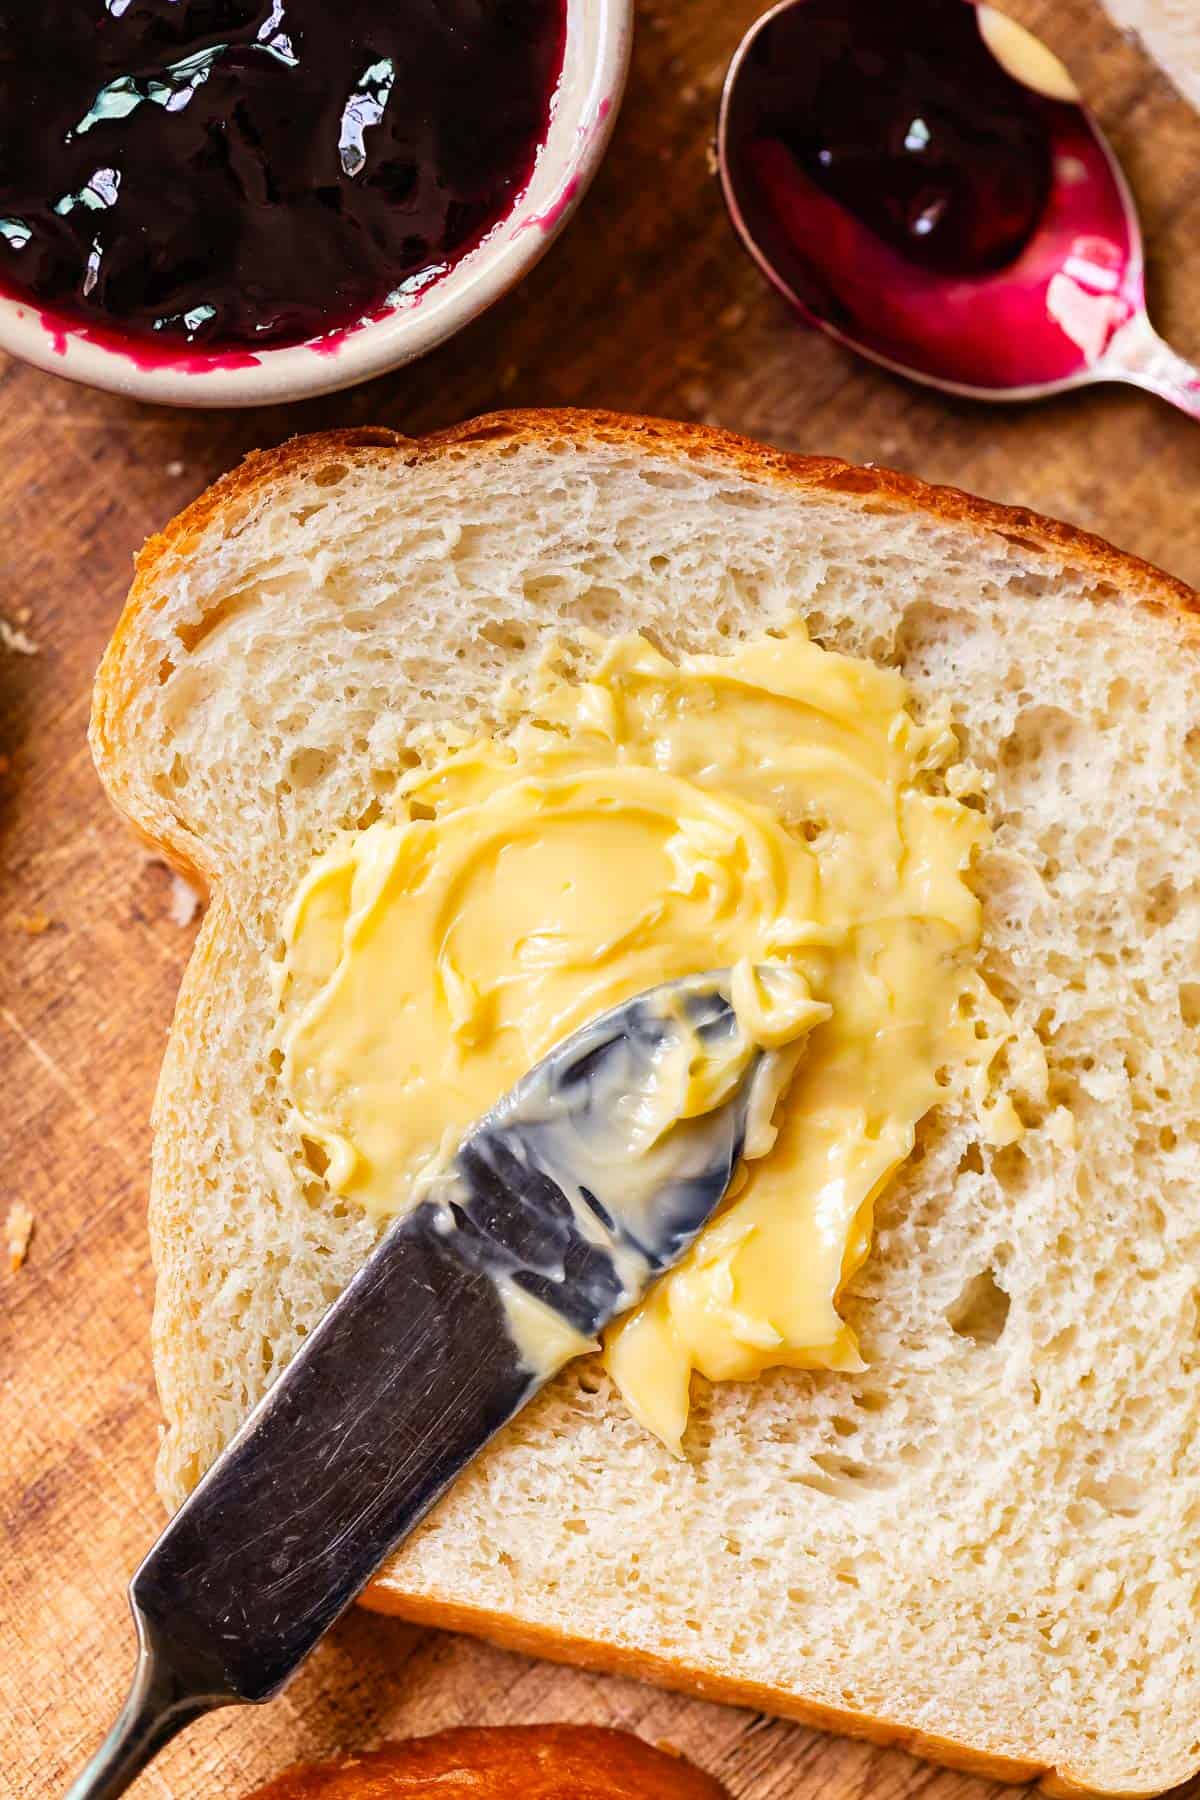
Table of Contents
- The Best Homemade White Bread of all time
- Ingredients for homemade bread
- How to make the best bread recipe
- How to make the best bread recipe even better
- Why rise?
- Rising options
- How to use white bread
- How to store homemade bread
- Can you freeze white bread?
- Can you double a bread recipe?
- Can you halve this recipe?
- More super easy bread recipes to flex your skills
- Easy Homemade White Bread Recipe Recipe
The other day I pulled up the calendar app on my phone to check the months of the year, to remind myself what month is in between August and October, besides September. Because OBVIOUSLY there had to be another month there. No way on earth that all the things I’ve been putting off “until fall” or “when school is really in full swing” are happening exactly NOW.
Halloweenish things could not be just 7 weeks away. My brain simply could not comprehend this. I started to feel really dumb, but that did not stop me from continually scrolling up and down on my calendar, confused. Where’s the other “ber” month??
My daughter Charlotte started playing Christmas music the other day and Eric went berserk. We’ve been pranking him ever since by blasting Mariah Carey (the most offensive, obviously) out of nowhere at random times. It’s a hoot.
One time a friend at church told us that in the Philippines where he is from, “any month that ends in “ber” is a Christmas month.” Ha! They know how to do it. (I’ve also heard that Europeans don’t understand all the American fuss about a time limit on Christmas festivities, because they have no Thanksgiving bookend at the beginning. European friends, what say you? Is Mariah Carey in August a go? Just kidding!!)
Okay okay sorry I’ll stop freaking you out with all the holiday talk. We’ve got plenty of time and space for it all, and even a holiday-less September to revel in! Well, besides Labor Day. My sister Laura and her husband have been telling their kids for years that Labor Day is a day for work, so they always schedule huge family house projects. When their kids grow up and realize it’s supposed to be a day OFF from work they are going to be livid.
As our thoughts turn less toward Mariah Carey and more toward sane things like Back-to-School, I have the perfect recipe for you. It’s always the right time of year for homemade bread, but homemade white bread that is perfect for making the Most Amazing Peanut Butter And Jelly Sandwich Of Your Life? Or how about The Perfect Slice of Buttered Toast? Oh yeah.
I most recently made this bread with our young women group at church. Here they are with their beautifully rising bread!

Charlotte is in the middle, for those of you who have been around a while and want to be shocked about her tweenhood and braces. What even, right??
We made the bread for our mid-week activity, and gave some of it to the church to be used as our sacrament bread on Sunday. Completely unrelated to this, our bishop received a request from a member of our congregation to “please ask the priests to stop breaking the sacrament bread into tiny minuscule pieces, it’s weird.” (our priests are young men, 16-18 years old, and this sounds like a snarky request to make…but it was kind of accurate 😂)
So the bishop told them, and that Sunday our dear priests broke the biggest sacrament bread pieces of all time, giant hunks of our delicious homemade fresh bread. It was a great Sunday. The Lord provides, amen.
The Best Homemade White Bread of all time
You can find a million homemade white bread recipes out there. The ingredients are all quite similar: flour, water, yeast, salt, sugar/sweetener, and a fat of some kind. Unfortunately they all have similar problems: if you are a beginner, sometimes these loaves tend to be a little tough, they don’t rise very high, and the flavor can be a bit bland.
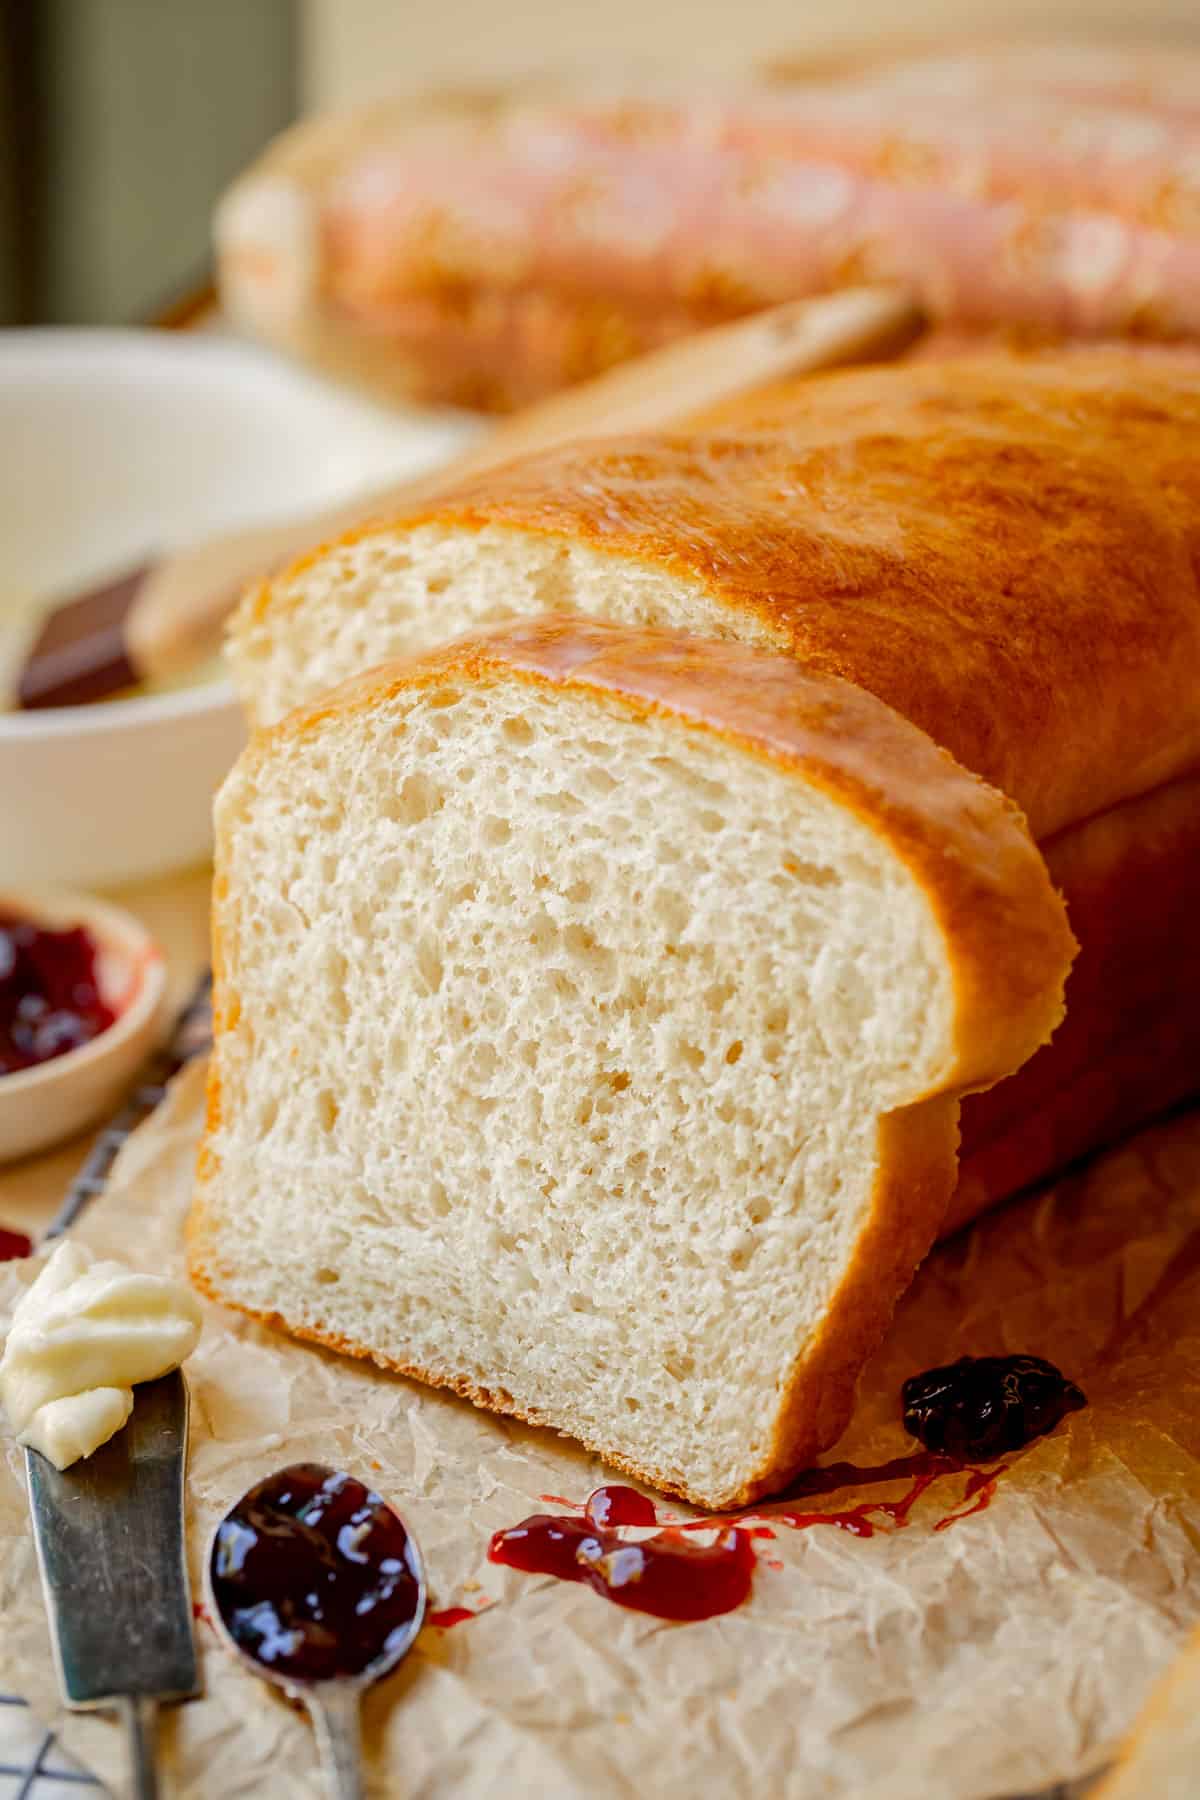
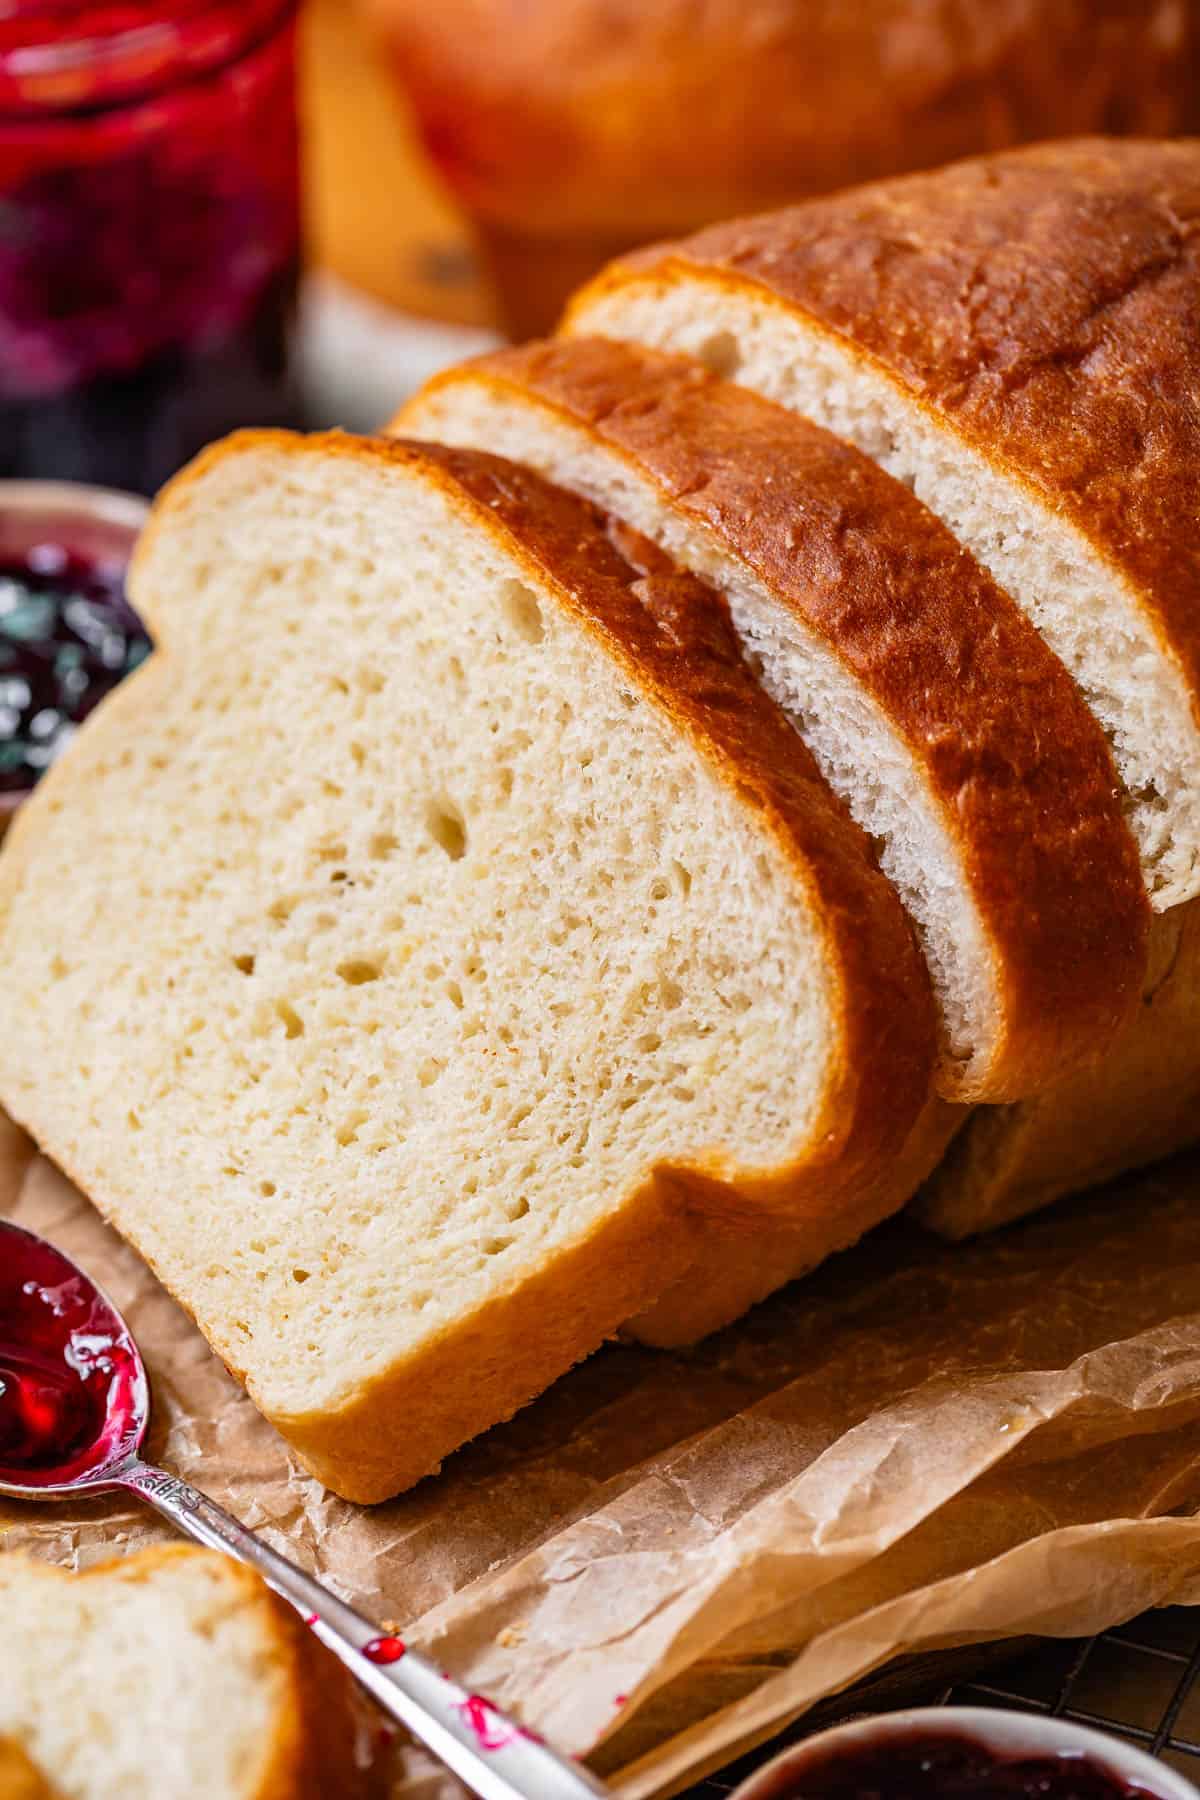
NOT TODAY FOLKS! This recipe has secrets that I will tell you all about. The resulting bread is perfectly fluffy, with the best texture. The special ingredient (vital wheat gluten) not only provides great flavor, but also improves our bread’s elasticity and creates a better crumb and chewiness in the final product. The resulting bread is soft and tender, perfect for sandwich-making. The dough is beautiful and easy to work with, the flavor robust.
And get this…the finished bread can be done in just about ONE HOUR (maybe an hour and 10). Yes you read that right, only ONE rise required for this bread. Say whaaaa?

And did I mention it rises TALL TALL TALL? It’s kind of amazing actually, since we are not even giving it the traditional hour-long rise. All you need are a couple special ingredients that work like magic to make this bread rise sky high, lickety split.
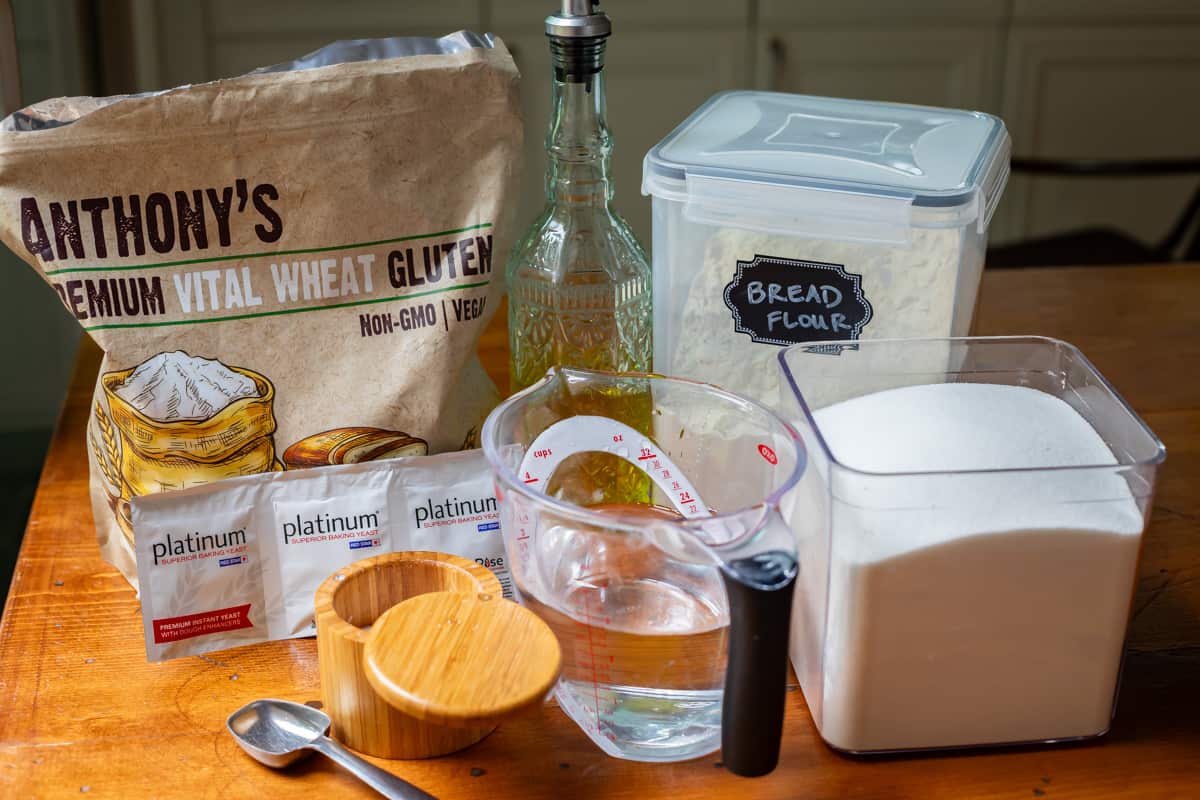
Ingredients for homemade bread
We’re diggin in folks. Buckle up. You ready for some larnin?
- Instant yeast. The magic maker! Instant yeast bubbles and activates a lot faster than active dry yeast, so it’s great if you are in a hurry. Regular yeast will work just fine though! Put on your patience pants!
- Bread flour. Bread flour is made for bread! It has higher protein levels than all-purpose flour. This protein is what makes gluten. Gluten is the magical thing that forms when you knead flour and water together. Long strands of gluten form a grid that traps and holds gases made by yeast. It is the framework that allows our bread to rise. Without the framework of gluten, the gas (carbon dioxide) released from your yeast will escape and float away, and your bread won’t rise.
- Vital Wheat Gluten. Bread flour has lots of protein in it. Vital Wheat Gluten IS protein. Some genius took the important part of flour (the important part for rising, anyway) and isolated it. When you add a little of this to your dough, you get bread that is even better at building the framework I mentioned, sometimes called dough structure. Your yeast will have LOTS of space to grow and rise with all the extra gluten you’ve given it! This will make your bread rise sky-high, giving it an airy, light texture. I love to add a lil vital wheat gluten to all my bread, but it’s especially important to use it in a one-hour cheater bread recipe like this one, where we are skipping a rise. Not only that, it is a flavor booster as well. I’m a little obsessed with it.
- Lotsa salt, I only use Diamond Crystal kosher salt. This recipe makes 2 loaves and calls for 7 teaspoons kosher salt. Yes 7 teaspoons, for real. It might sound like a lot, but I promise you it’s perfect. Under-salted bread is one of life’s greatest tragedies. It doesn’t matter how perfectly your bread rises, how golden your crust is; if you forgot the salt, it will taste like cardboard.
- Warm water activates our yeast
- Oil (I like olive oil, any type of oil will do) provides fat and flavor for our bread.
- Sugar makes our bread delicious, and helps with browning. I use 1/3 cup because I like my bread a little sweet. You can decrease this amount to 1/4 cup if you want!
How to make the best bread recipe
This is going to take you 10 minutes to put together, tops. You literally just dump it all in and mix.
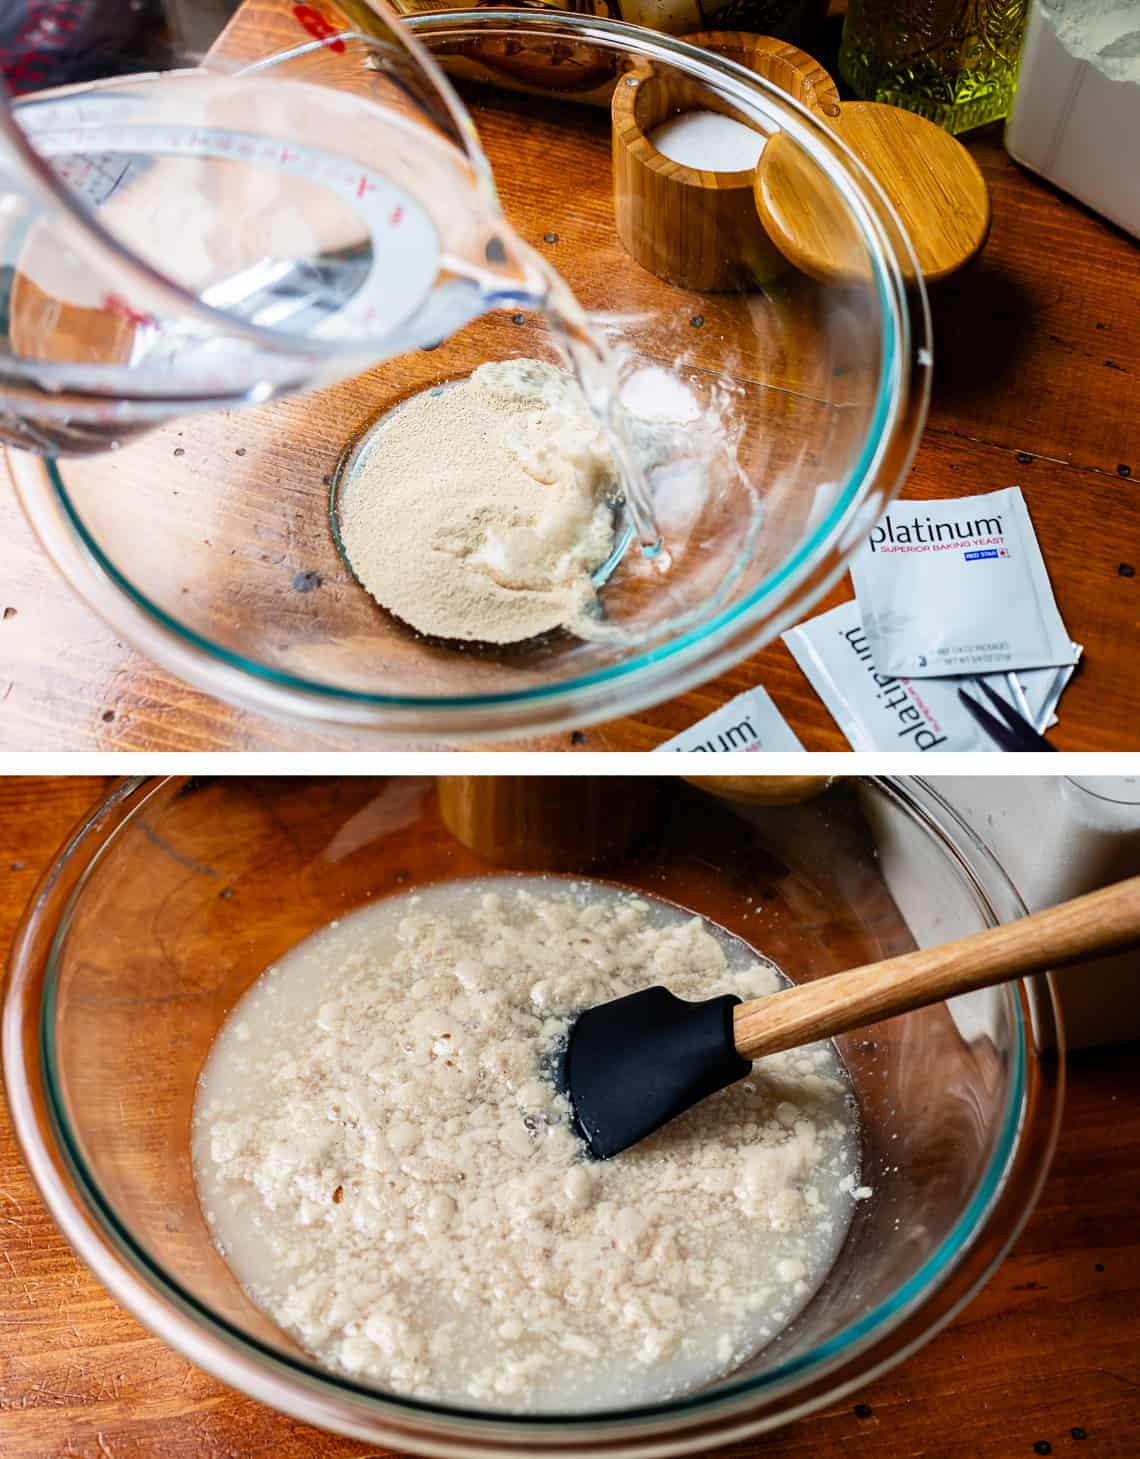
First combine your water, sugar, and yeast (in your stand mixer, if you have one). I love to use this Platinum yeast from Red Star. It’s instant yeast and it bubbles SUPER fast. This brand also has dough enhancers that make for a really nice loaf, I highly recommend it (although it is a little pricey.) Any instant yeast will do ya just fine.
I tried this recipe many times with both instant and regular active dry yeast; there is a pretty significant difference. Instant yeast (any brand) proofs faster and rises faster. So if you are in a rush it’s definitely worth using. But either one will work great!
If you are new to bread making, wait just a minute to make sure your yeast bubbles or foams. If your water was too hot, the mixture will stay flat and won’t foam, and it’s time for a little funeral because you’ve killed the yeast. But once you see those little bubbles, any amount at all, you can move forward with the recipe.
If you only have packets of yeast, don’t worry about how much is in there: just dump the packet into a measuring spoon. Usually each packet contains 2 1/4 teaspoons of yeast, but, just to be sure!
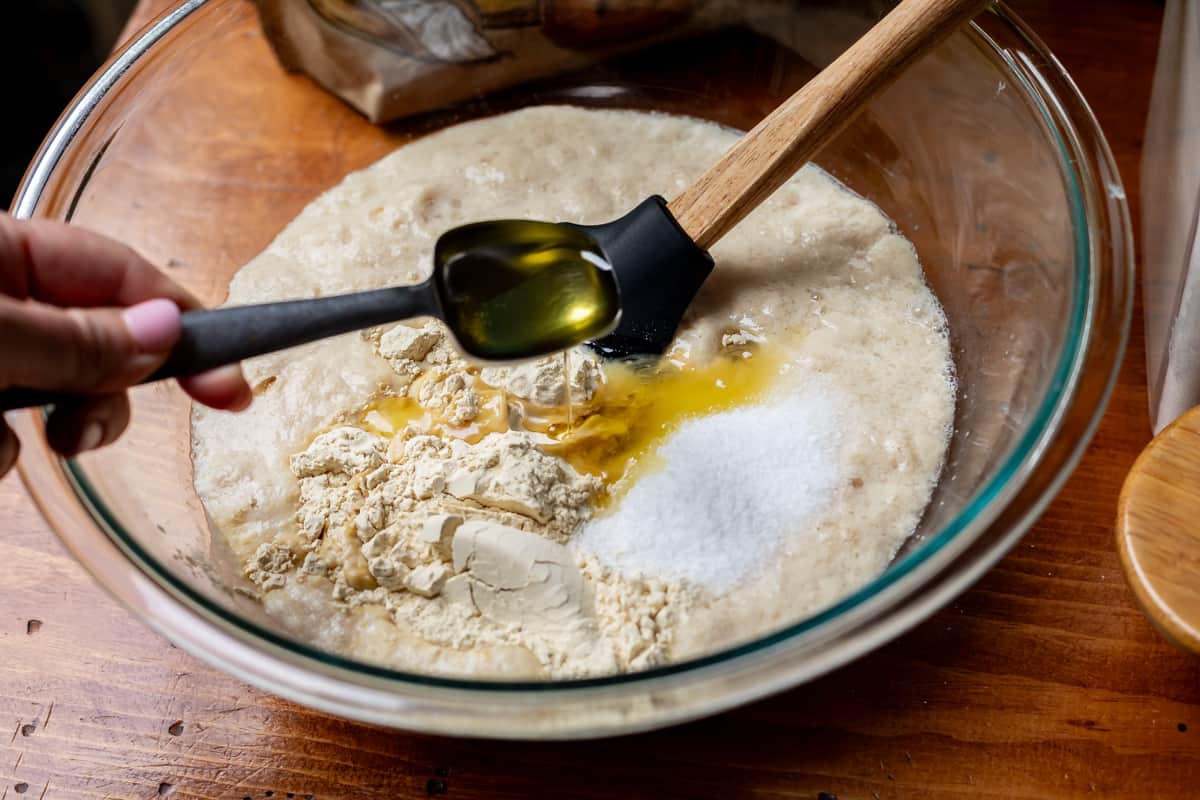
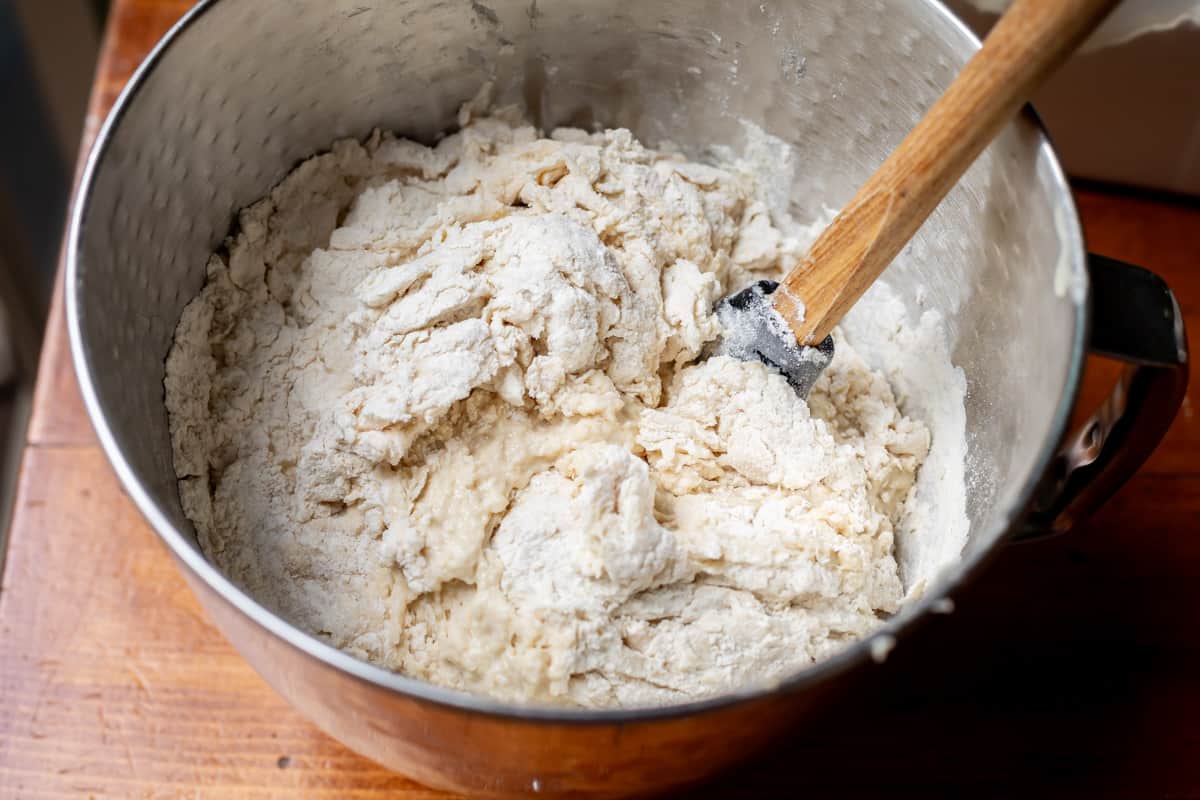
Next add your vital wheat gluten, olive oil, and kosher salt. Do you see that big pile of white stuff? It’s not the sugar. IT’S THE SALT. And there is a ton of it, 7 teaspoons to be exact. Don’t be a scaredy cat. This bread has a little over 1 teaspoon of Diamond Crystal kosher salt per cup of flour and it’s glorious. So many people are overly cautious when it comes to salting. Over salted food can be awful, for sure, but I promise, this is not too much salt. (If you are not using this exact brand of salt, use less! Morton’s coarse kosher salt is NOT the same.)
The last ingredient is bread flour! Here’s how I like to measure flour:
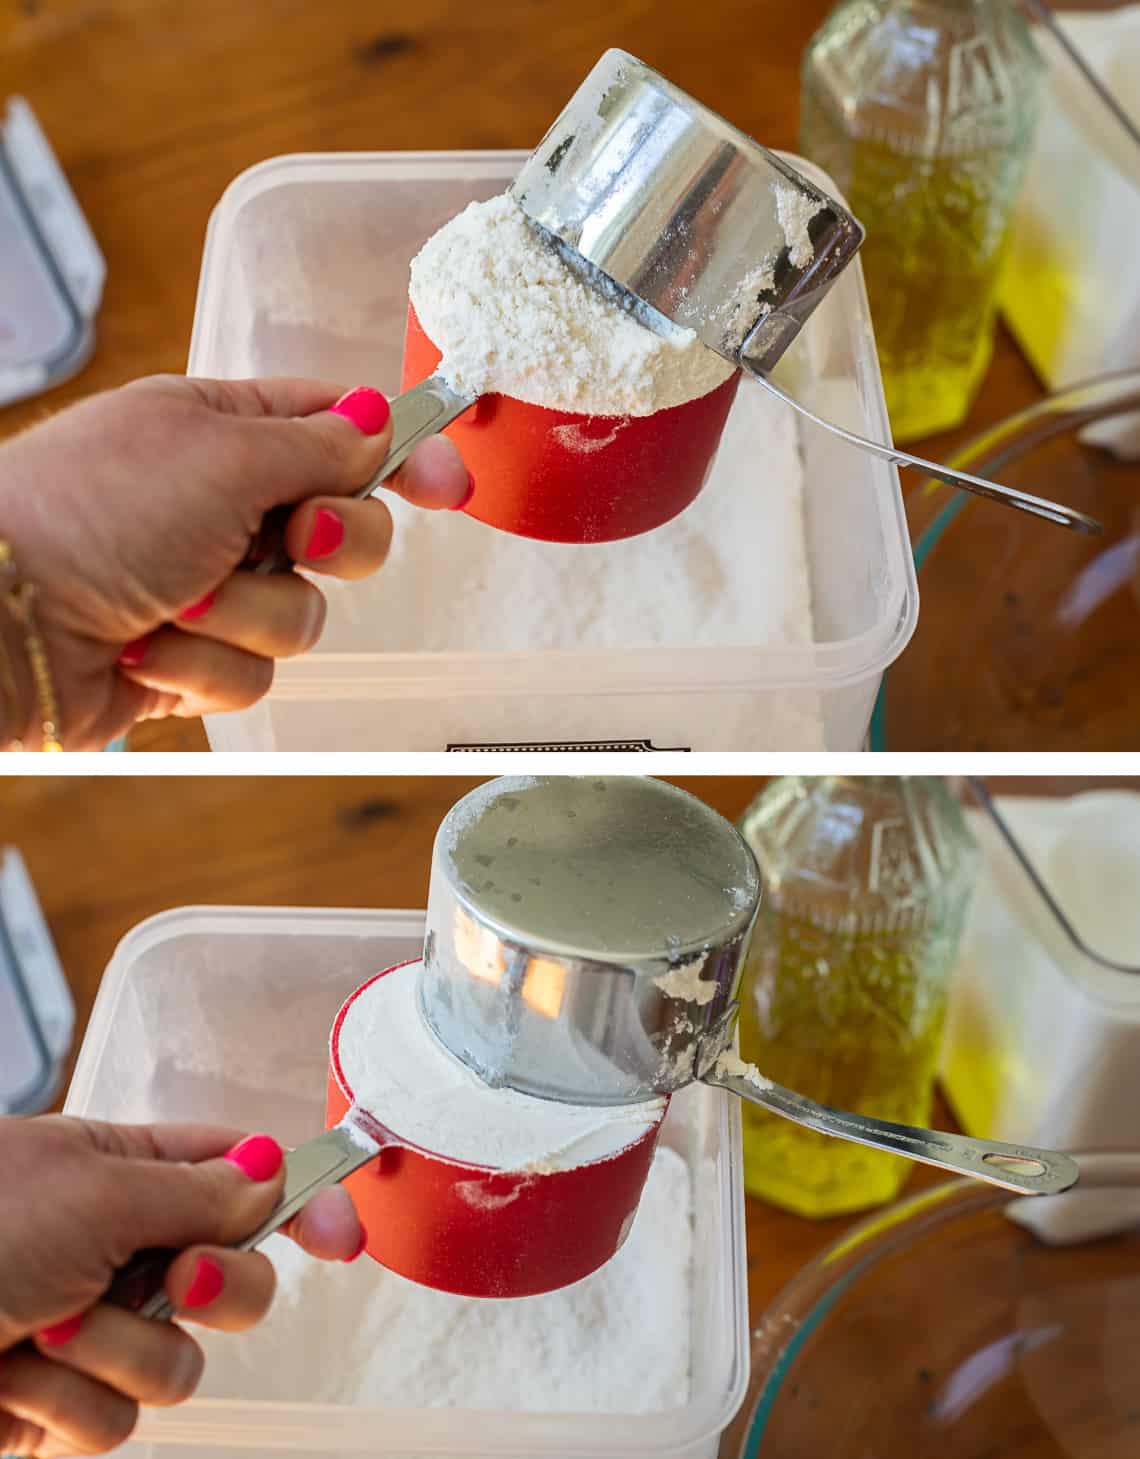
Use a cup to fill another cup, then level off. This way you make sure you are not packing in your flour, which could result in a tough, heavy bread. I always measure my flour this way, it’s much more accurate (not as accurate as weighing it, but I’m still American for heaven’s sake. I have some boundaries.)
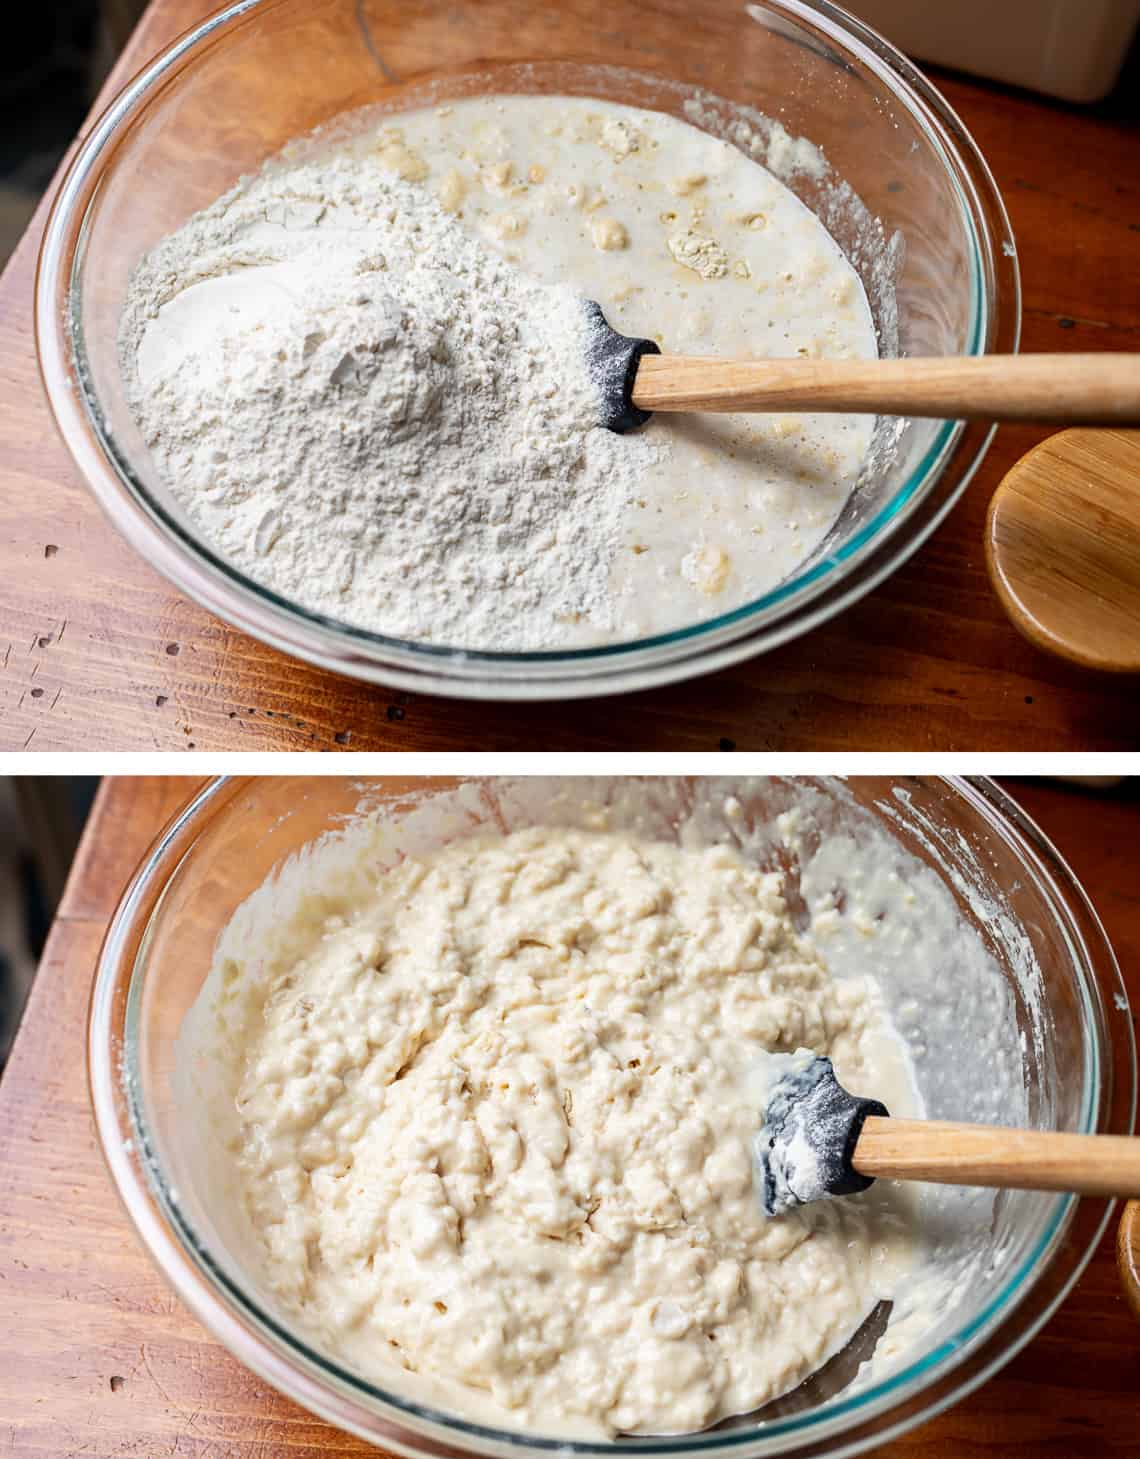
At this point I switched to my stand mixer bowl. Start the whole project in your stand mixer if you have one. I only used the glass one so you could see in the bowl better.
When you get to about this point, switch to using your dough hook, or if you are kneading by hand, set your spoon aside, flour your hands and get ready to get jiggy wit it.
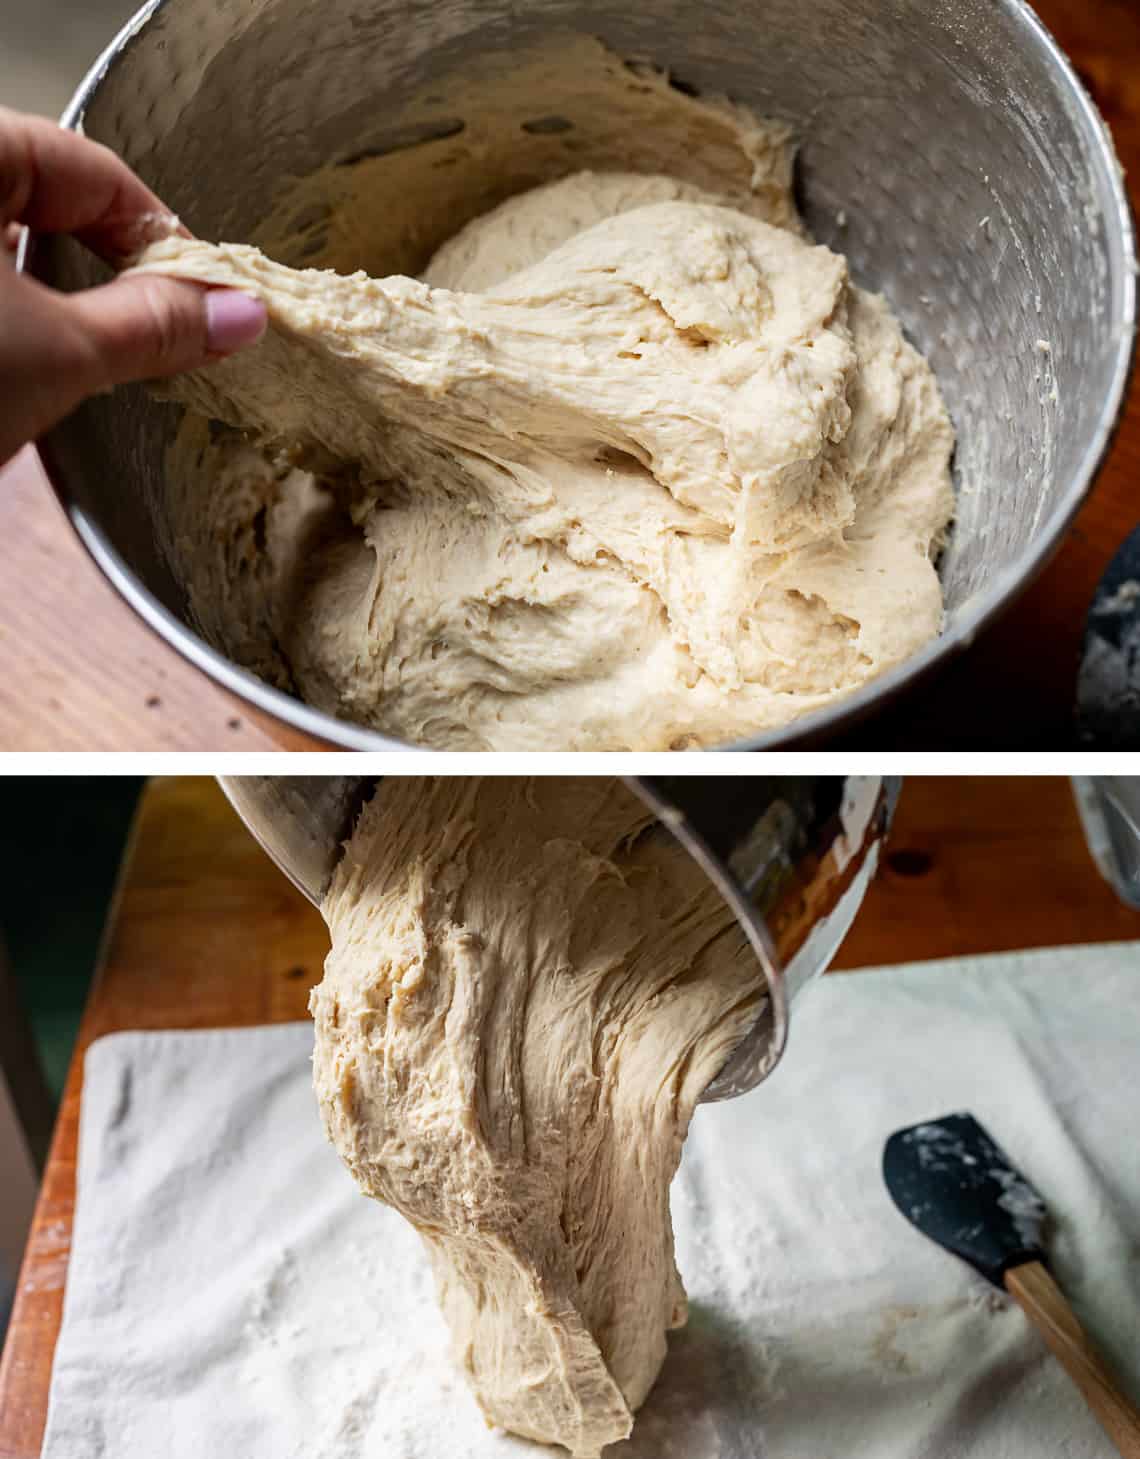
Here is my dough after 5 minutes of kneading. It’s still pretty tacky. Knowing when to stop adding flour is a bit of an art that comes with practice, but have confidence. You want enough flour that your dough has enough structure to rise, but not so much that it becomes dried out and heavy. I stopped adding flour right BEFORE my dough had formed a shapely ball inside the mixer.
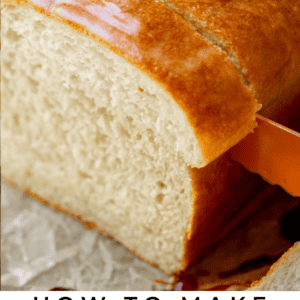
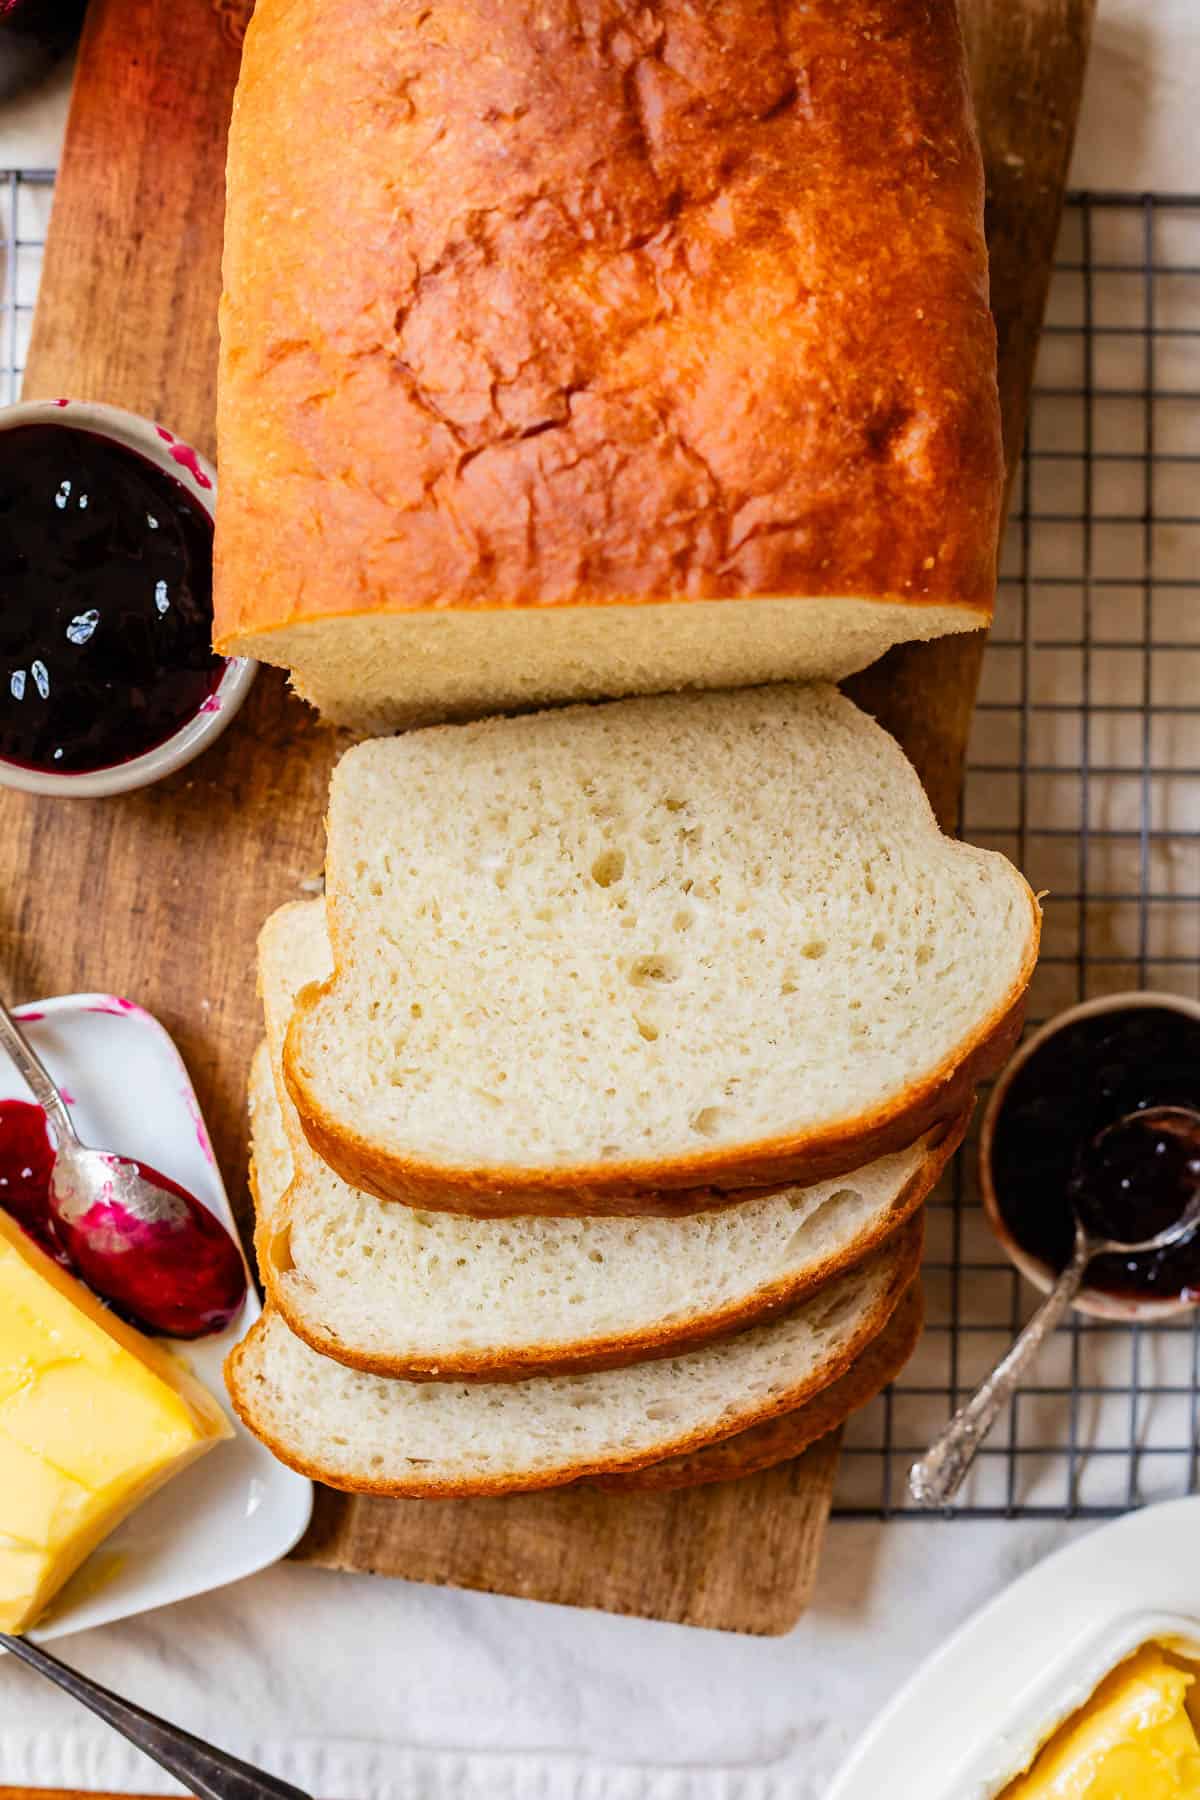
Scrape it onto a work surface and knead a couple times to form a ball. Then use a serrated knife to cut the dough in half.
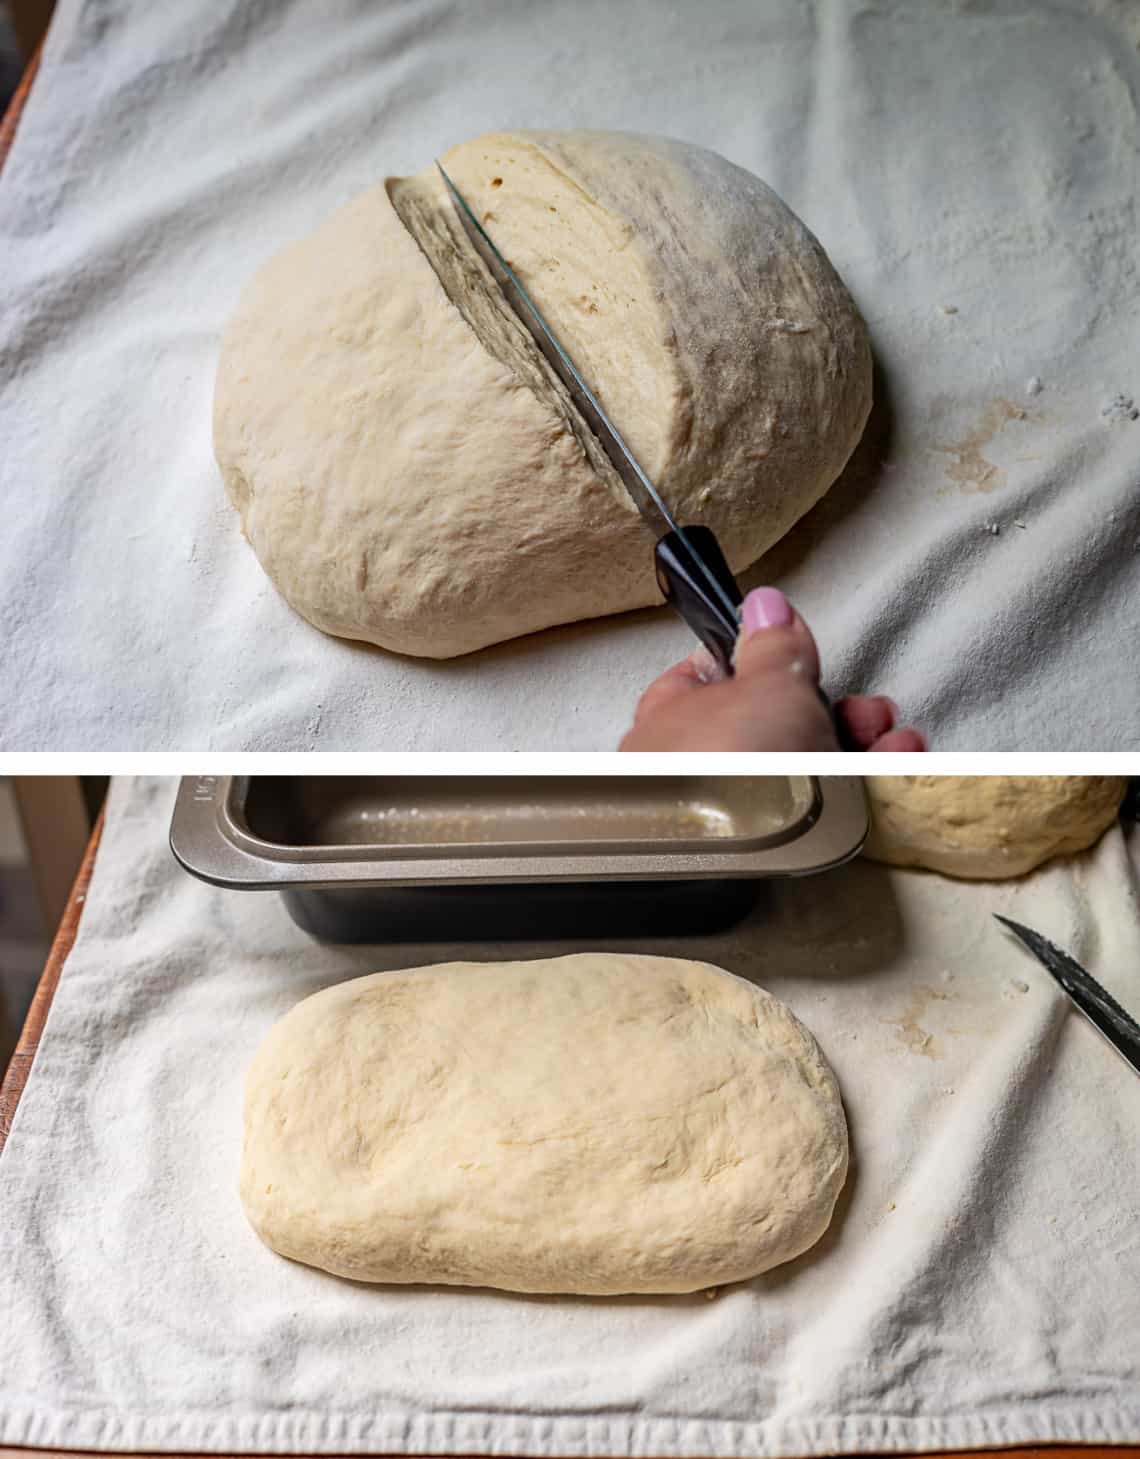
Use your hands to shape one half of the dough into a rectangle that’s about the size of your loaf pan, about 9×5 inches.
Make sure the smoothest side of your dough is on the bottom, I usually turn my dough over. Roll it up from the long end.
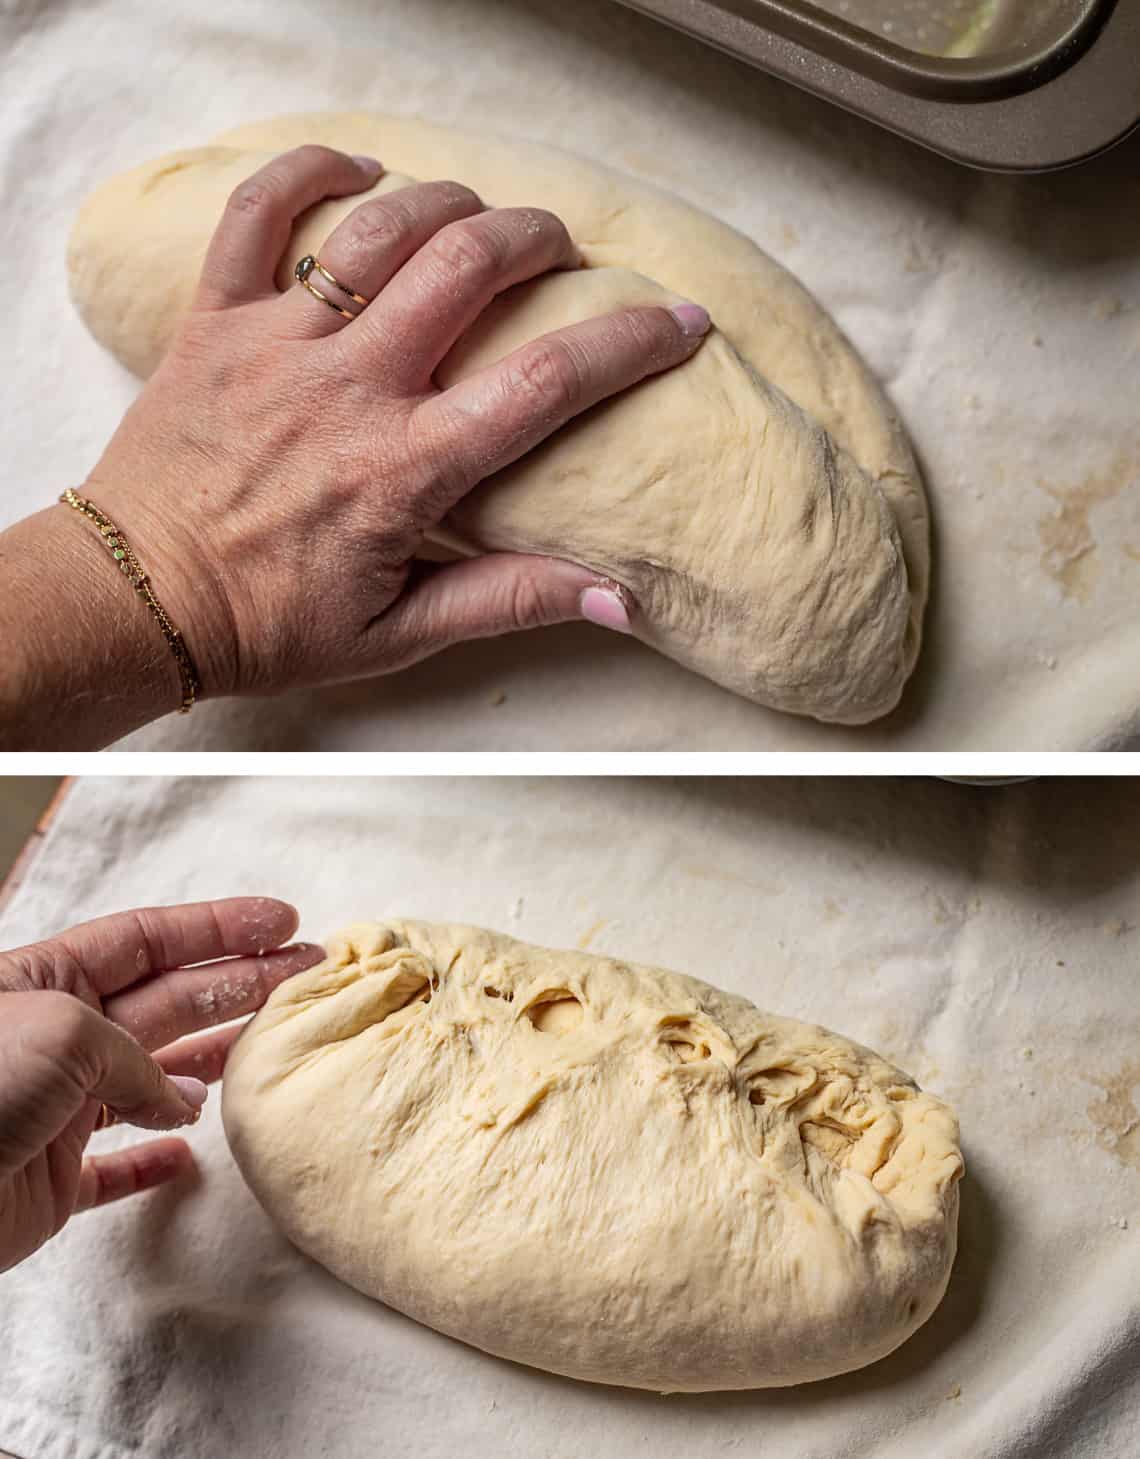
Use your fingers to pinch the dough, then your hands to fold each end underneath slightly, and place in a greased 9×5 pan.
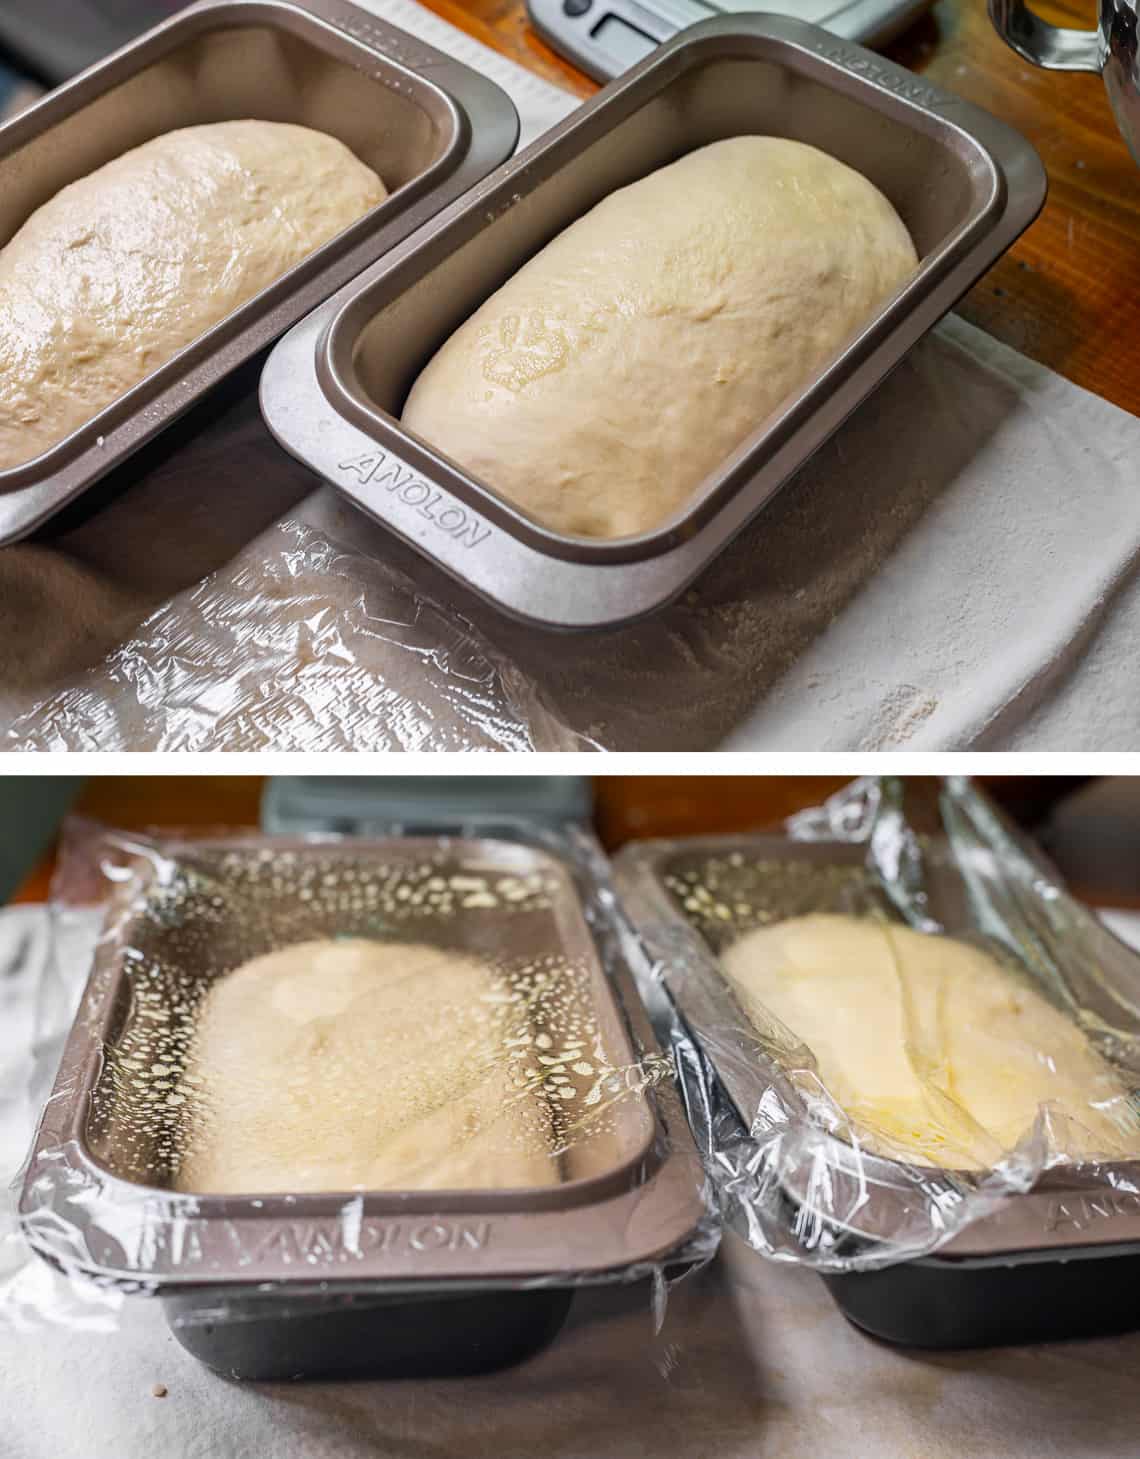
Cover with plastic wrap that you have absolutely drenched with non stick spray. Trust me, you do not want to have to tear ungreased plastic off the top of your dough when it’s ready for the oven, it will ruin your rise and you will cry real tears. Not that I would know.
Here she is after just 15 minutes in the slightly-warmed oven.

And again after another 10-15 minutes while the oven preheats. Just look at this puffy beast!!!
Note that if you’re at a high altitude, your bread is going to rise EVEN FASTER. It’s important to keep an eye on it, because if the dough over-rises, it will deflate. Just a huge bummer! So don’t walk away and get distracted.
And now, we bake about 25-30 minutes. You will know your bread is done when it is well-browned on top, the sides are pulling away from the edge of the pan, and the bottom and edges of the bread are browned. I always use a thermometer, which should measure about 200 degrees F.
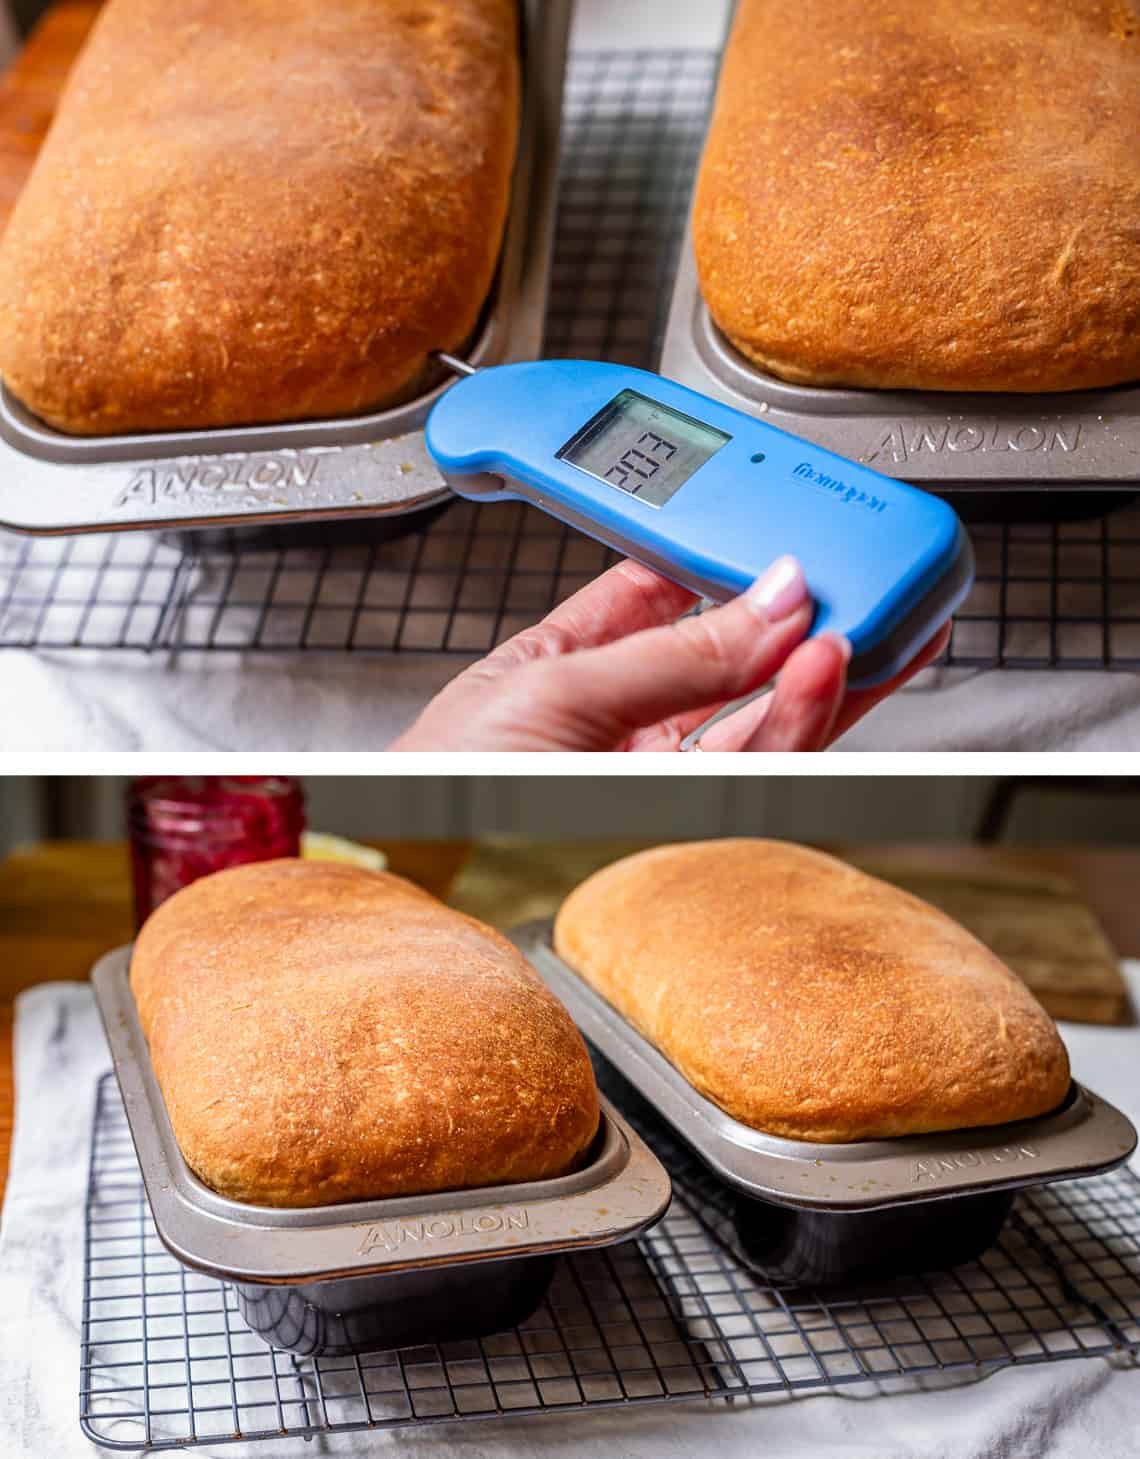
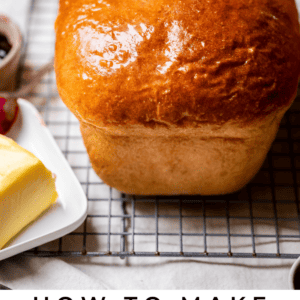
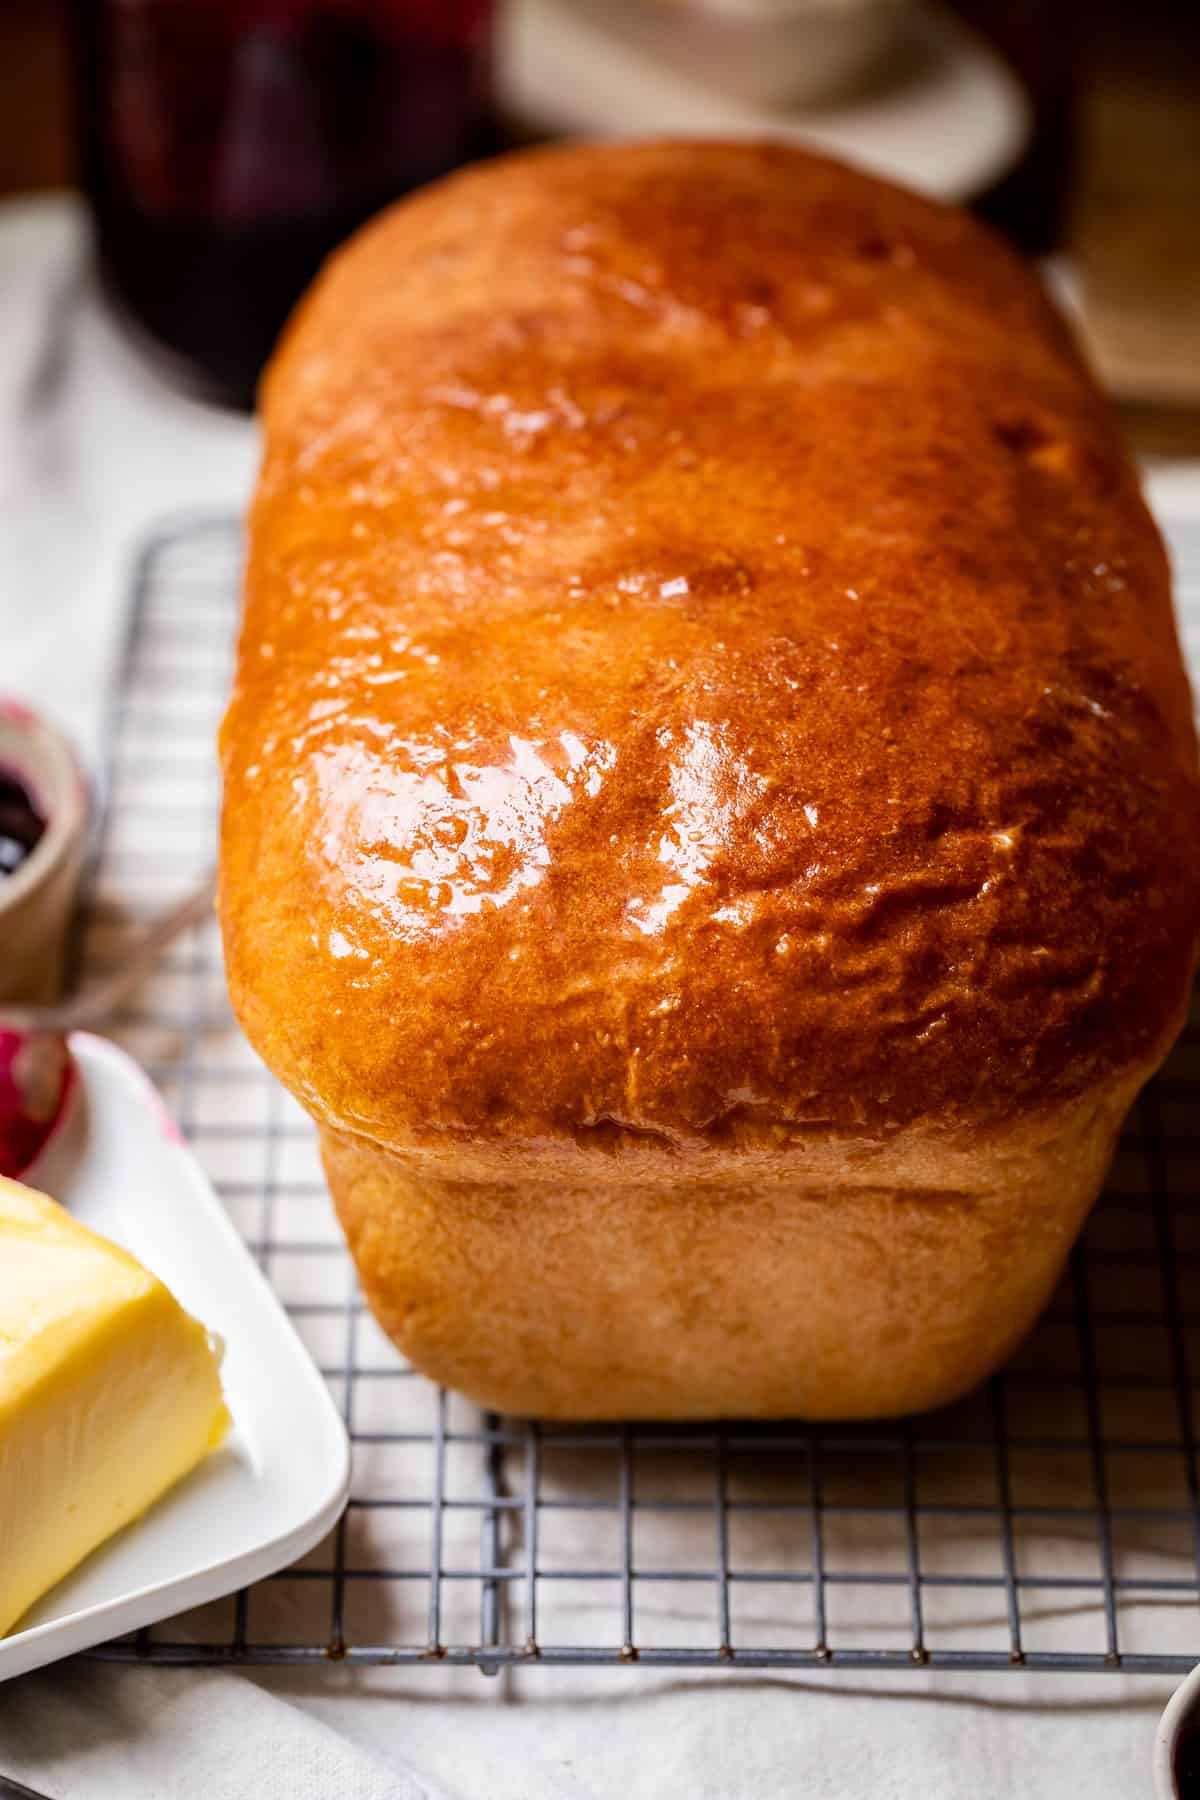
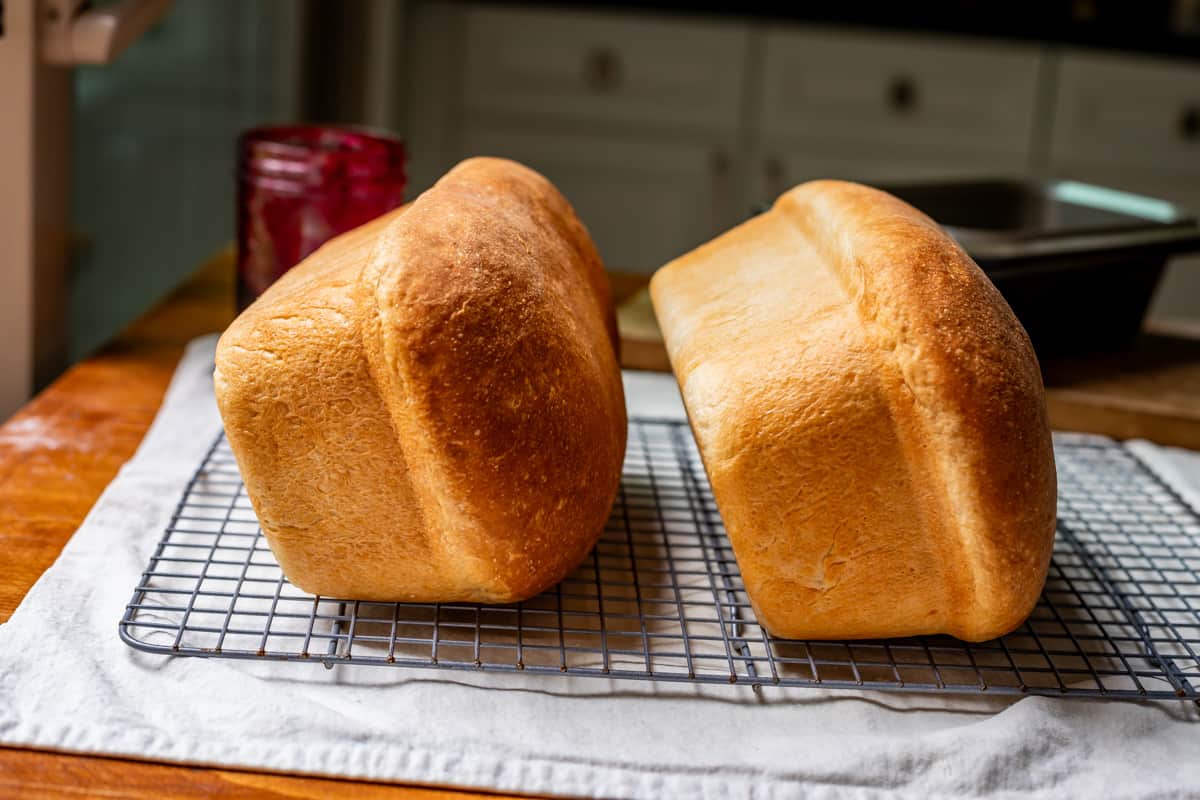
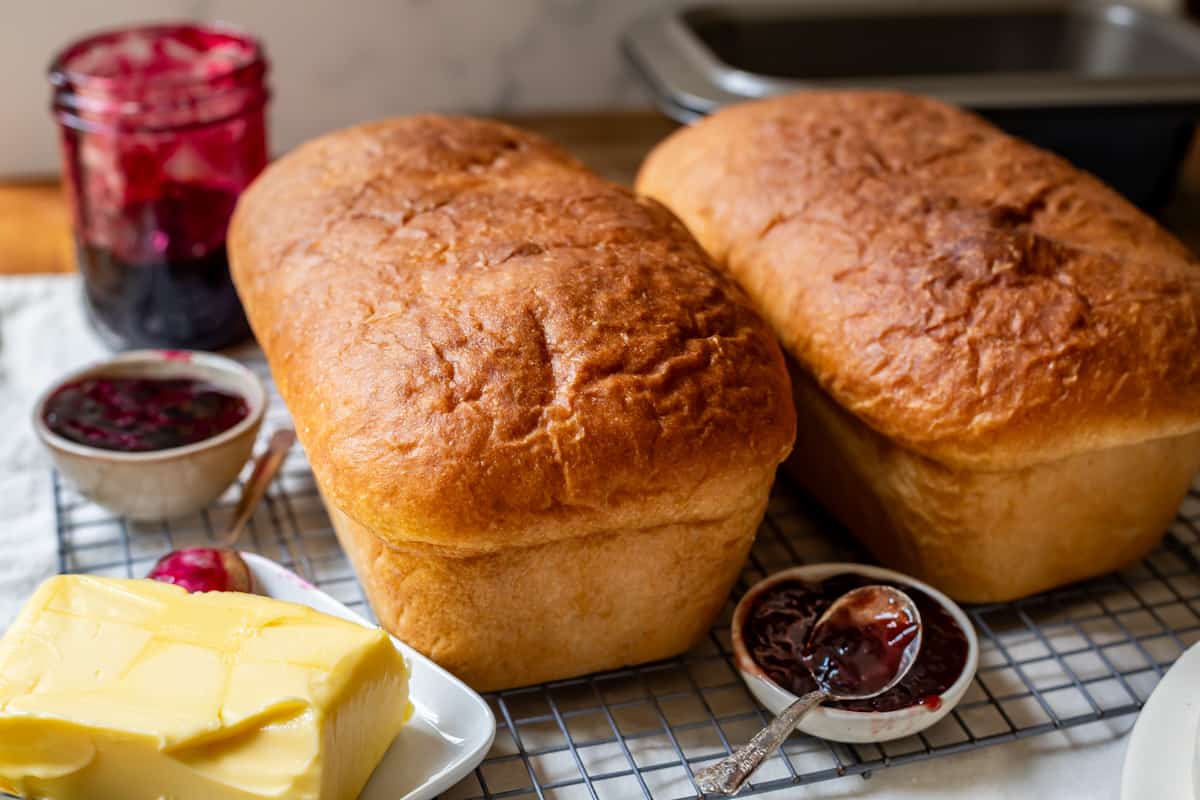
When you take your bread out of the oven, let it rest in the pan for about 1 minute, then use hot pads to invert and remove the bread to a cooling rack. I like to cool my bread on its side. This helps the bread stay nice and tall. We worked so hard for this beautiful rise, we don’t want to let gravity get the last word here.
If you pop your bread out of the pan and are horrified to realize that the bottom has not browned, never fear. Put the loaf right back into the pan and stick it back in the oven. This is one of the benefits of removing the bread from the pan immediately after taking it out of the oven. (If you wait more than a minute or two, it’s pretty hopeless if your bread is under baked.)
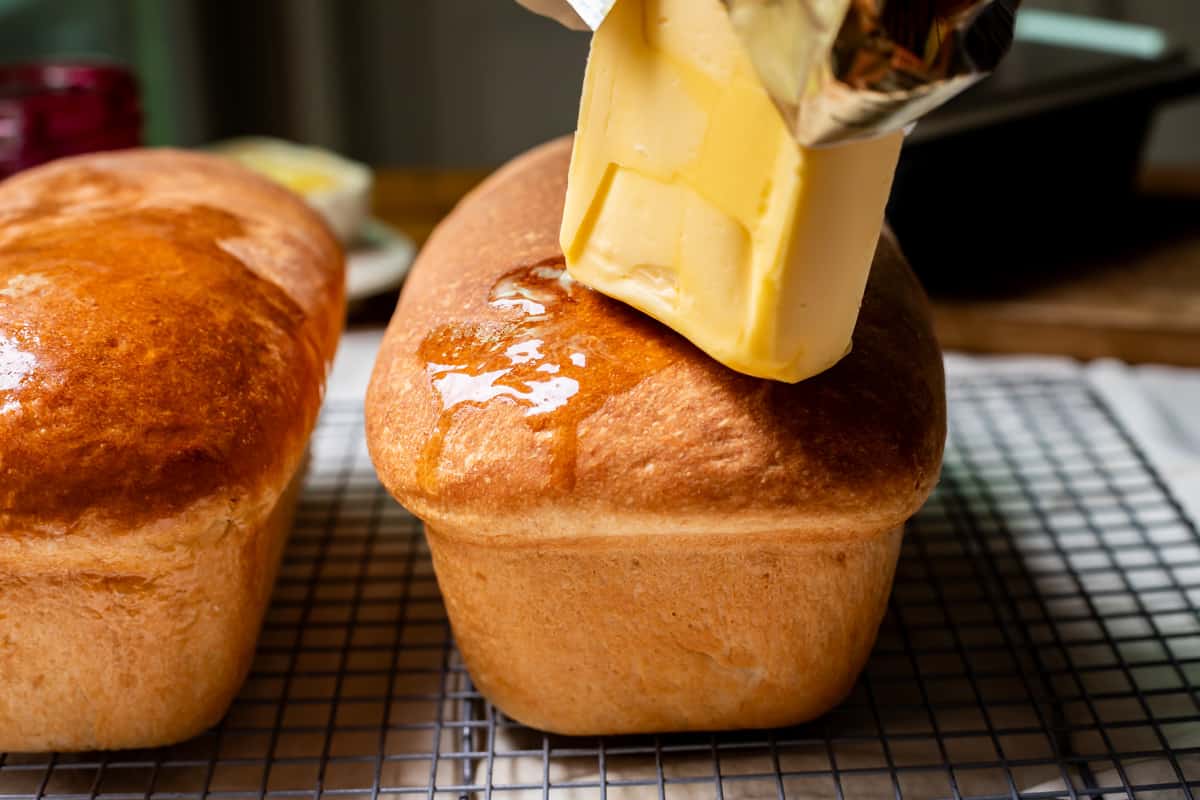
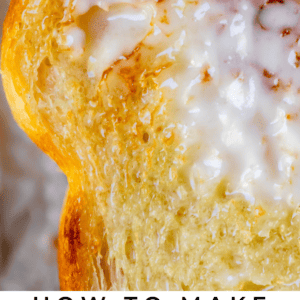
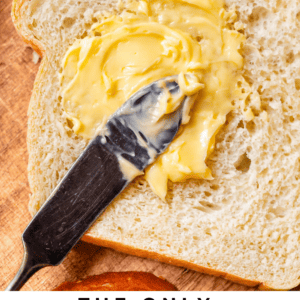
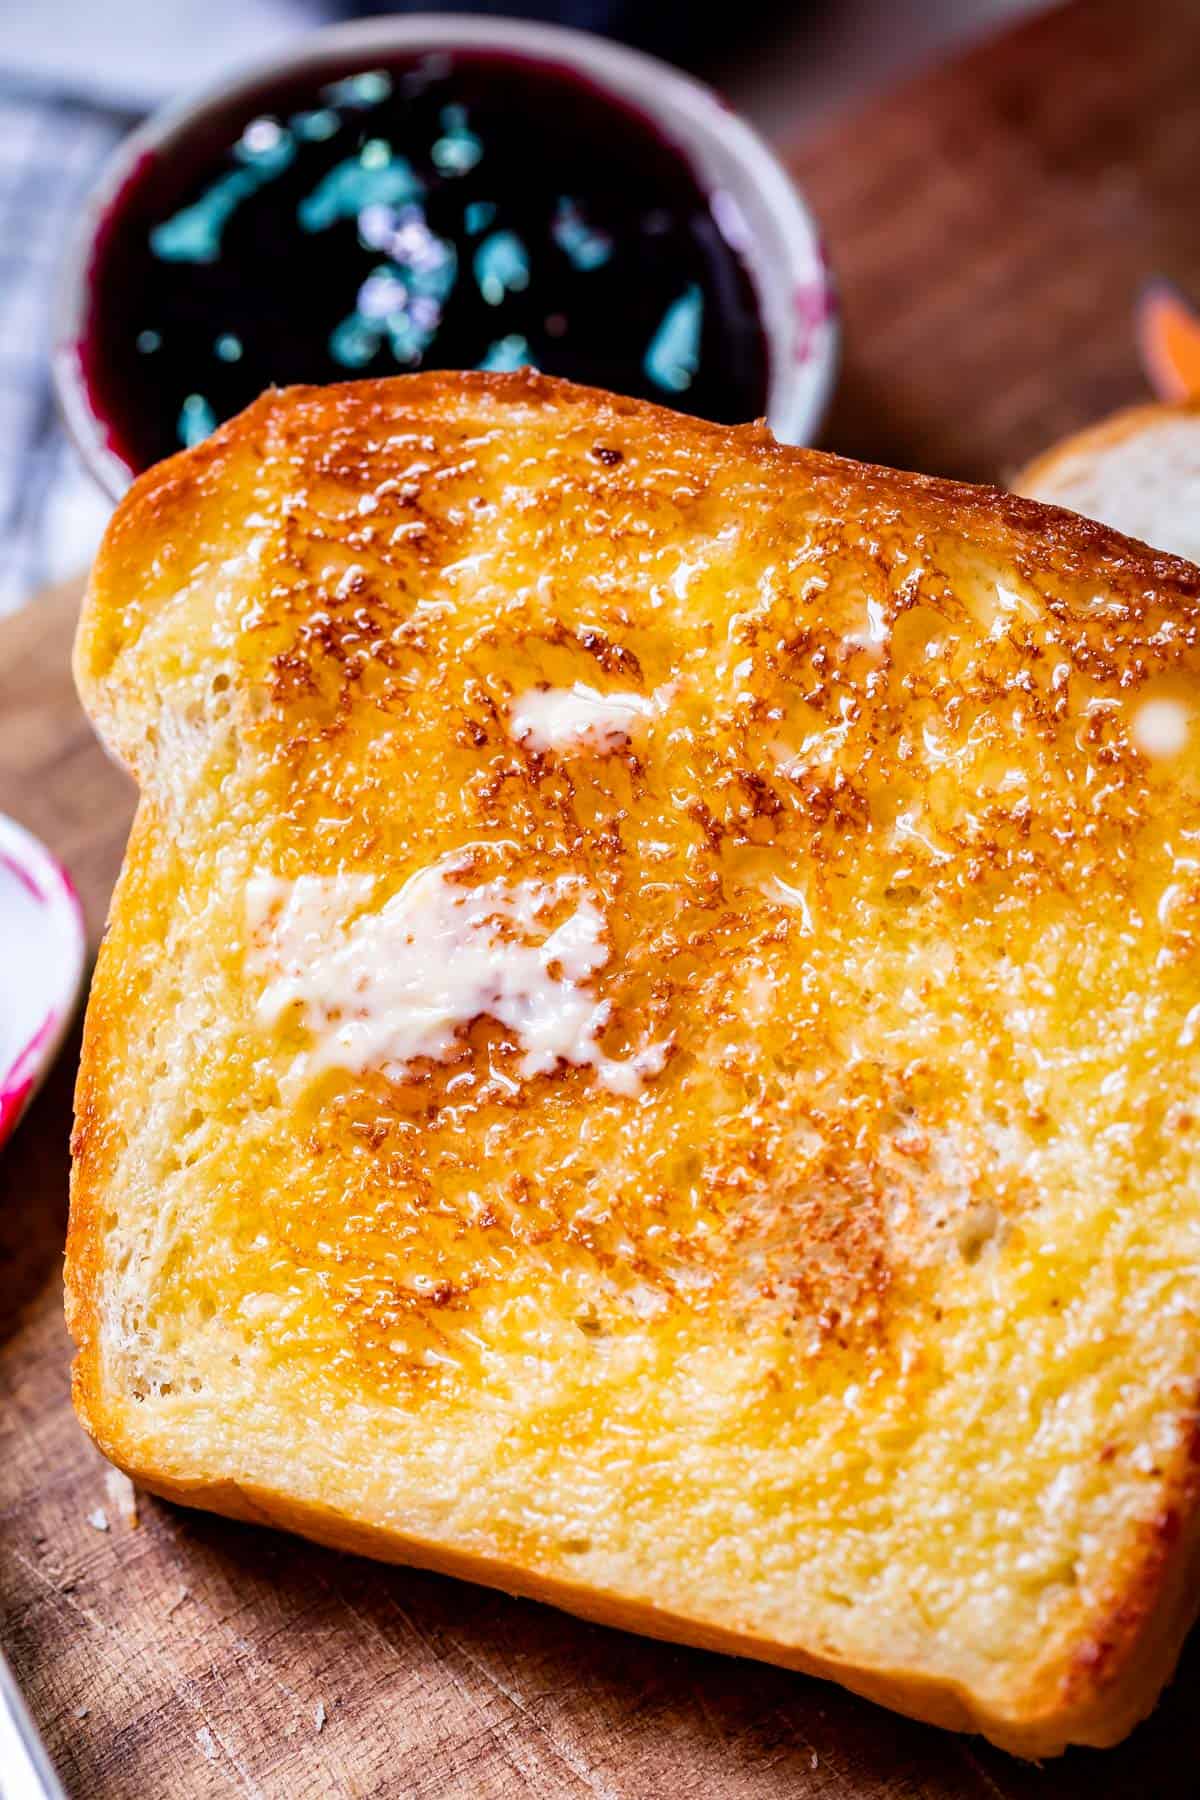
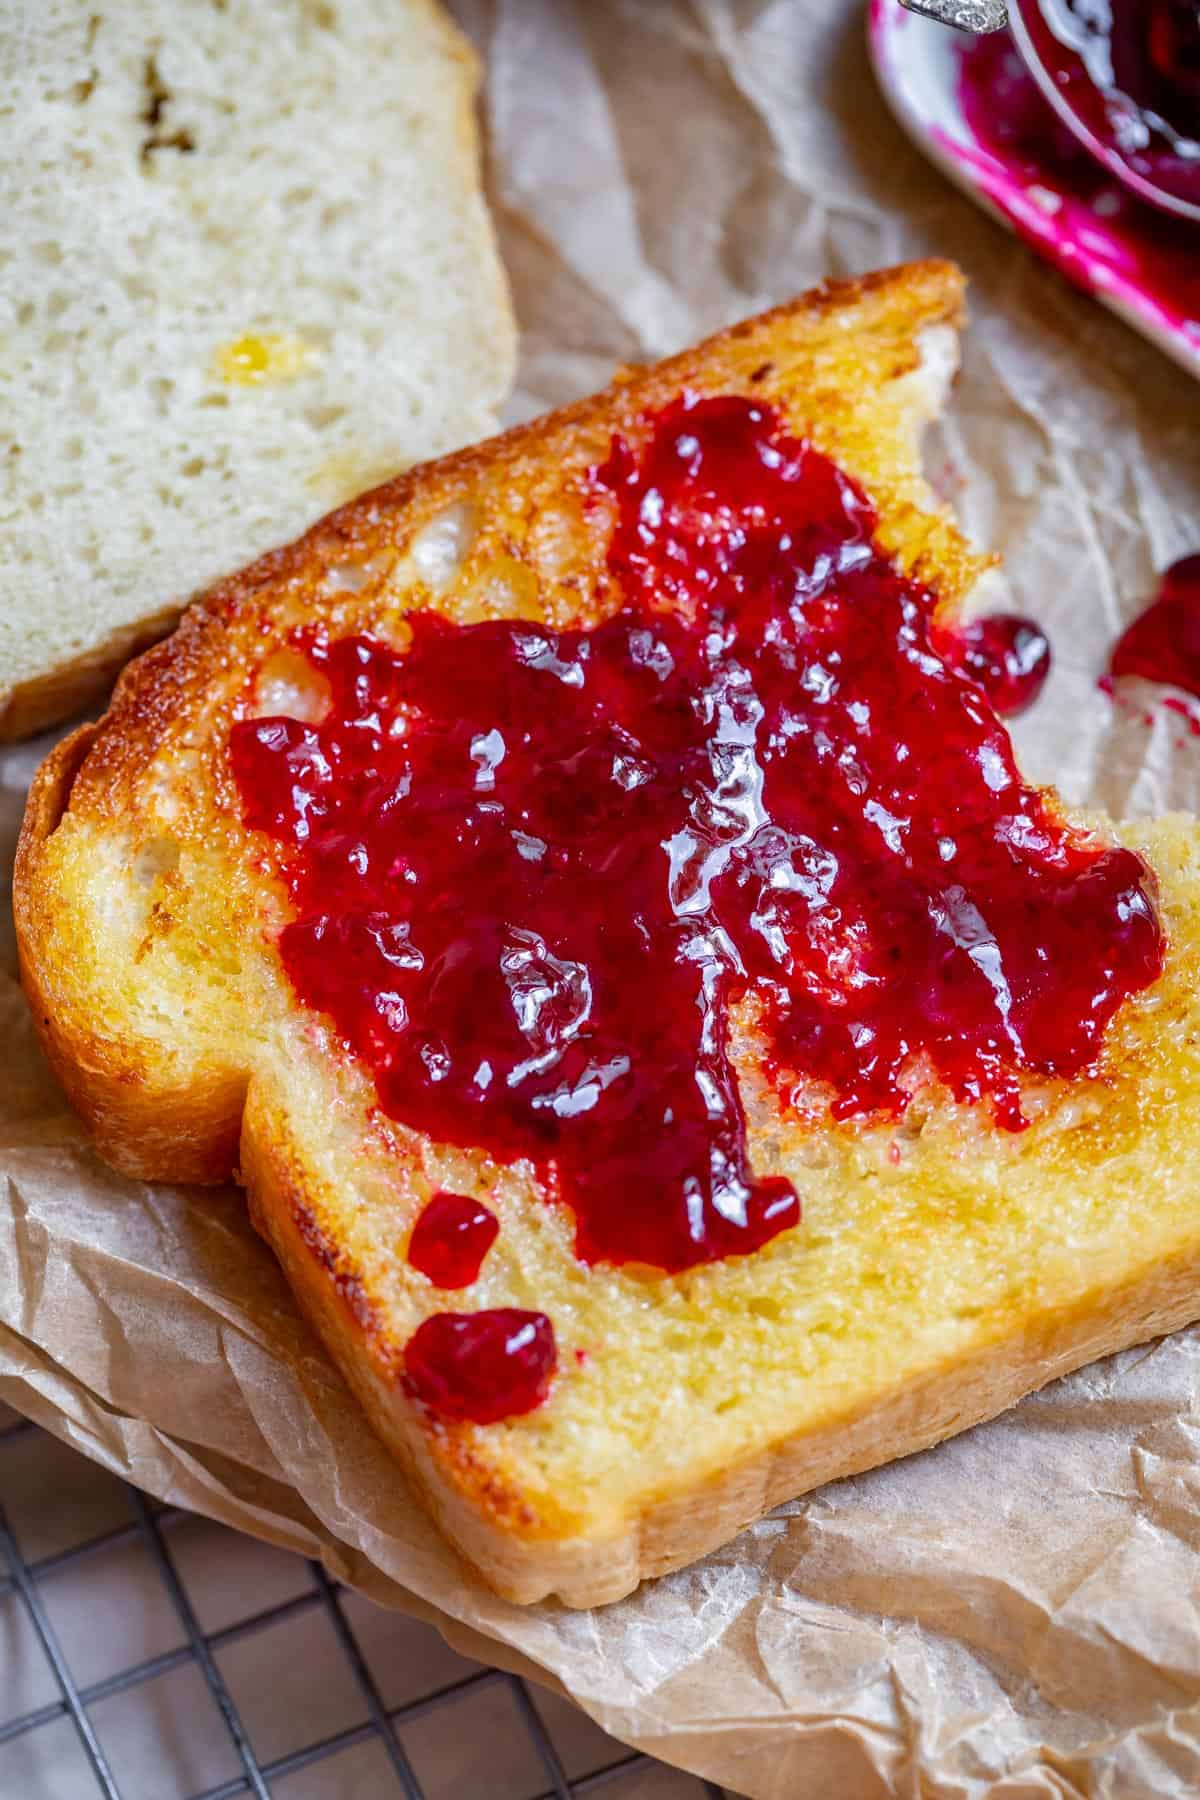
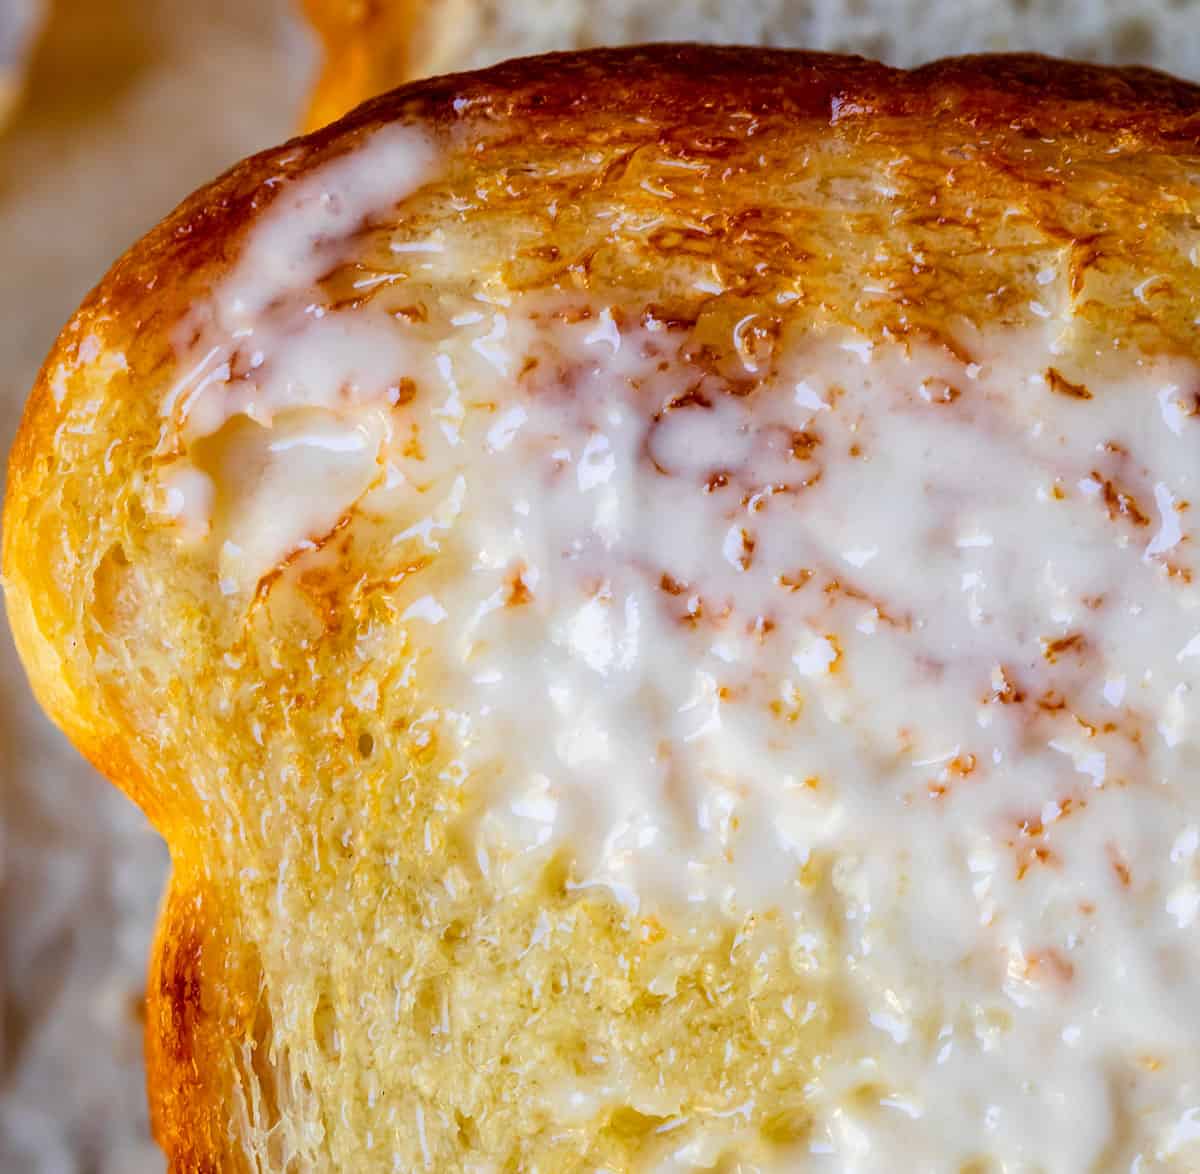
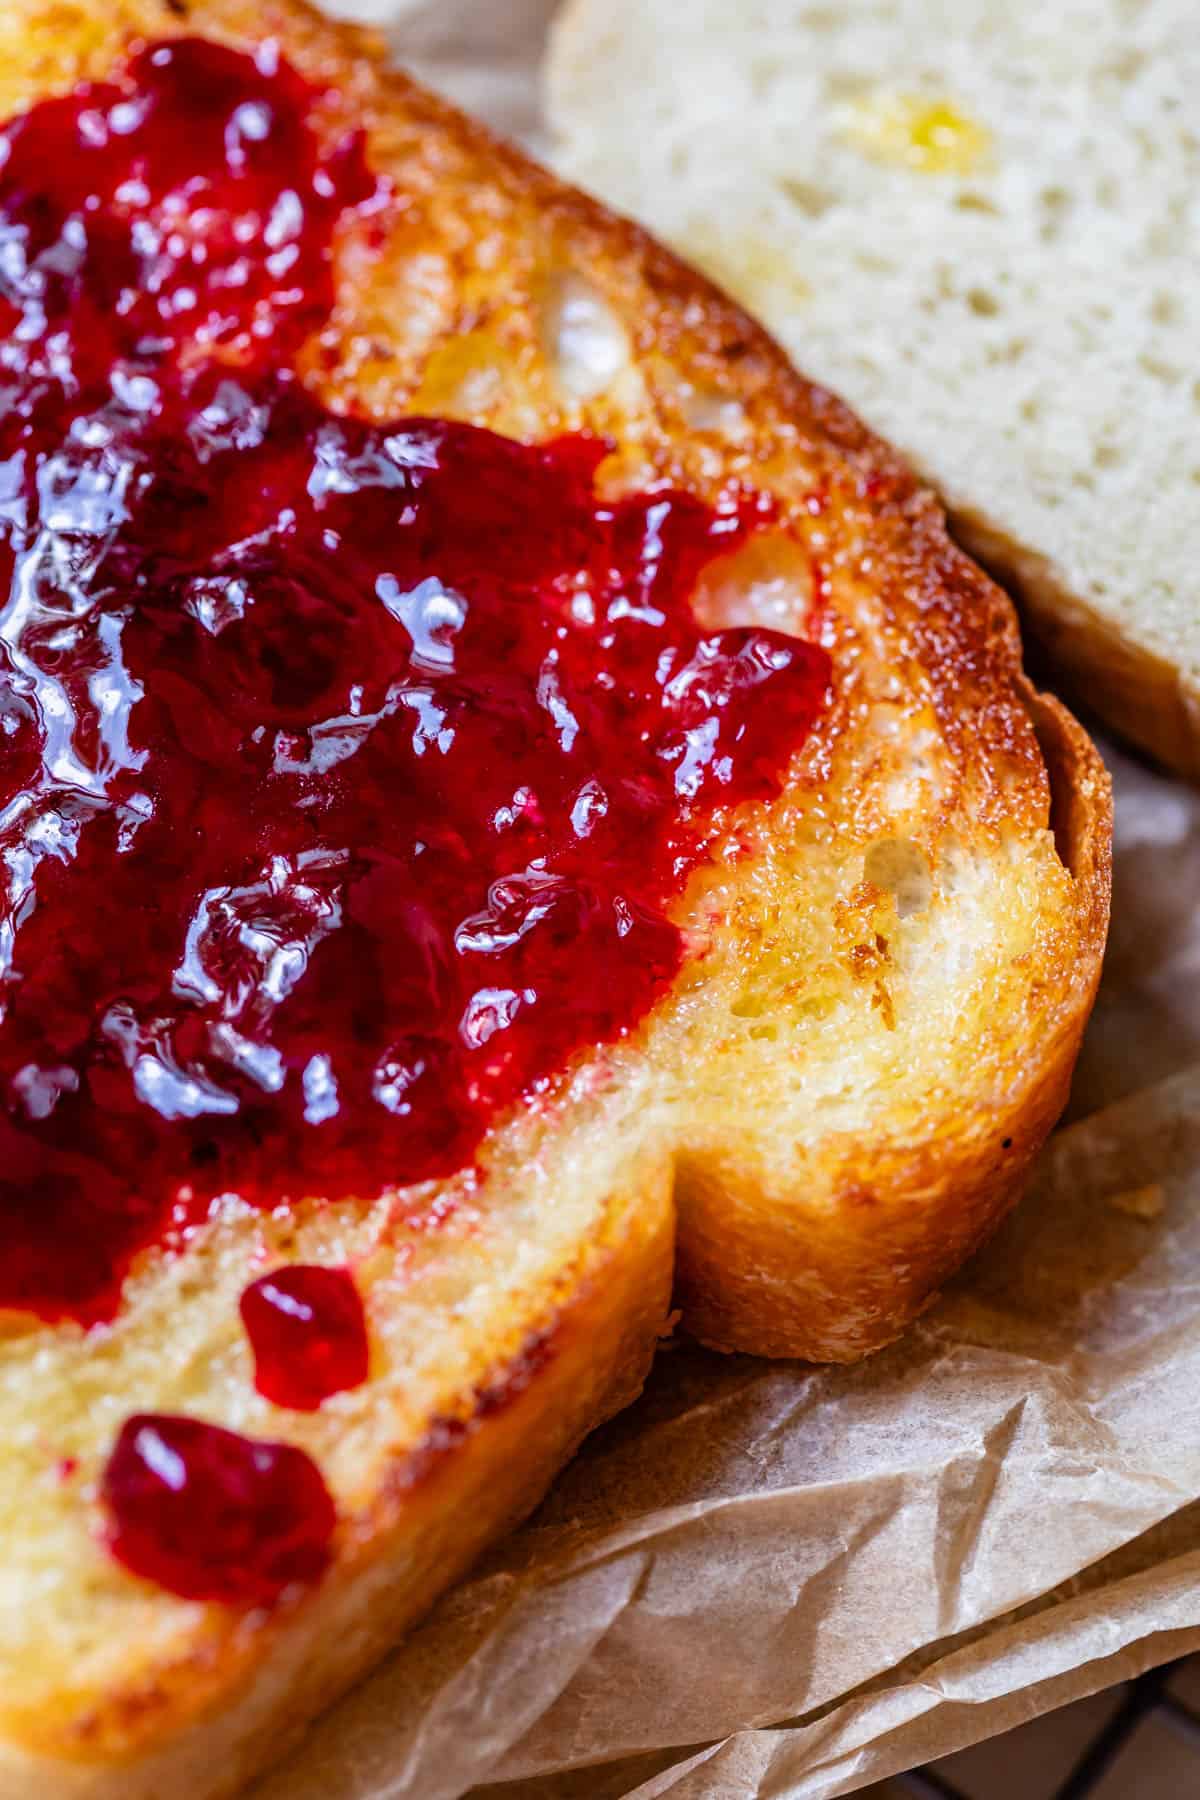
Then, if you know what’s good for you, take a stick of butter while your bread is still hot, and smear it all over the top. Yesssss, drip my buttery queen.
And then the final, hardest step: wait. You HAVE to wait for your bread to cool, for at least 30 minutes, or you risk smashing your bread into oblivion. Don’t be that guy.
And that’s it guys! It really is so easy, and takes just about an hour start to finish!
How to make the best bread recipe even better
I’ve written this recipe for the modern cook; most of us don’t usually have all day to spend in the kitchen. You can get a great loaf of bread in about an hour, and I stand by the recipe as written.
That said, there is an easy way to make this bread more complex, meaning it tastes even better: let the dough rise longer, even multiple times.
Why rise?
Rising transforms a dough from bland to zinging with flavor. Why? Acids and esters, baby. This is going to be the name of my next band.
The longer your dough has a chance to sit and ferment (at any point before baking), the more flavor it will develop. This slower fermentation (rising) gives the dough a chance to develop acids and esters, which give the final bread a rich, wheat-y aroma, as well as a slight tang. The acid also serves to strengthen the gluten strands in your dough, encouraging your bread to rise up instead of out to the side.
And it’s easy. It just takes time.
Rising options
Today’s recipe has a really short rise time as written, and while I love it dearly, an extra rise will definitely give your bread a lil somethin’ somethin’.
Here are some rising options you can use for this bread recipe:
- Make the dough as instructed and let rise for 1 hour in a greased bowl. Punch down, shape loaves, and proceed with the recipe as written, waiting to bake your loaves until they have more than crowned the top of the pan.
- Make the dough as instructed and let rise for 1 hour. Punch down and let rise 1 more hour. Proceed with the recipe as written, waiting to bake your loaves until they have more than crowned the top of the pan.
- Let the dough rest overnight. If you choose this method, you need to decrease the amount of yeast in the recipe to 1 tablespoon, otherwise your chilling dough will explode all over your fridge! Place in a very large bowl with a loose lid (so the carbon dioxide created by the yeast can escape), and refrigerate overnight, about 8-12 hours. Punch down the dough and shape immediately into loaves. Let the loaves rise for at least 60 minutes, until they have come to room temperature and have risen enough to reach past the top of the pan. Then bake as instructed.
How to use white bread
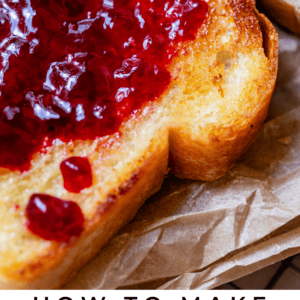
- Duh. Eat it freshly baked and still warm, or my personal favorite, toasted with LOTS of salted butter and jam. There is probably no snack more deliciously nostalgic and homey-feeling, amiright?
- ANY sandwich, from simple ones like pb&j and turkey & cheese to more complex ones like The Best BLT Sandwich or The Best Grilled Cheese of Your Life! Any flavor combo you try will be improved with homemade bread, pinky promise.
- Avocado toast, Nutella & banana toast, or any other kind of spruced up toast. Live your best Millennial life.
- I normally use challah, but I’m definitely not going to say no to The Best French Toast Recipe I’ve Ever Made (Caramelized) using some thick slices of homemade bread!
- Tear it up and give it new life as part of a Savory Breakfast Bread Pudding with Ham and Asparagus or this Caramel Apple Upside Down French Toast Bake
- Turn into homemade croutons or bread crumbs
- Some people swear by using white bread in their meatballs, like this recipe for How to Make Freaking Great Meatballs from Fox Valley Foodie
- Try a delicious Strawberry Panzanella Salad. Give me fried bread any day!
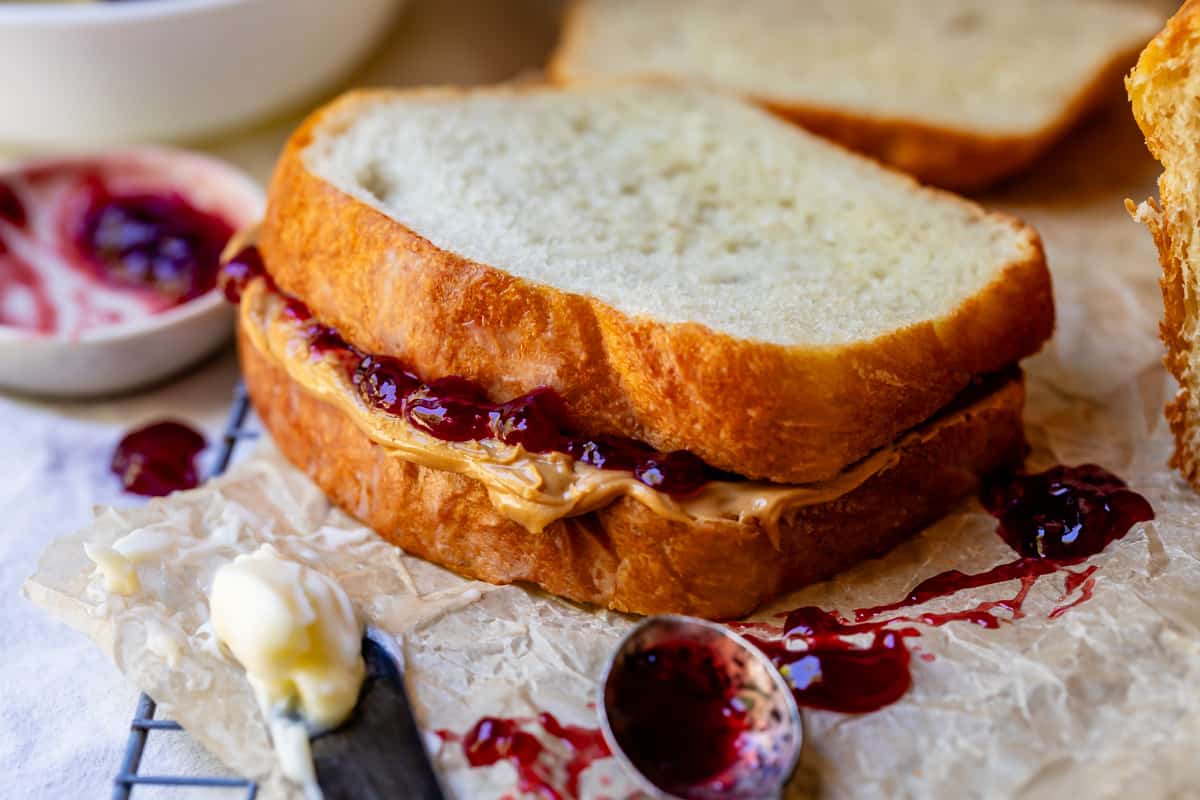
Tell me you don’t want a bite of this sandwich right now.
How to store homemade bread
The key to keeping leftover bread good is to prevent it from drying out. Keep it in a well-sealed ziplock bag or tupperware, and it should last up to 2 days at room temperature.
Because there are no preservatives in homemade bread, it will not last as long on your counter as store bought sandwich bread. Mold on homemade bread is shocking and incredibly offensive after all that work, like for real, so don’t let this happen to you! You can put it in the refrigerator to help it last longer (6-7 days), but I don’t like to do this; the fridge dries out bread because of the air constantly circulating. Instead, pop it in the freezer! ↓
Can you freeze white bread?
Yes! Homemade bread is SO easy to freeze and use later! And you get great results. I freeze ANY bread that I’m not planning to eat within about 12 hours. It freezes at exactly the freshness level of when you put it in the freezer, and it’s so easy to thaw.
Make sure your bread is completely cool. Toss it in a gallon ziplock bag, get as much air out as you can, and toss it in. I love to use these 2 gallon ziplock bags and fit 2 loaves in.
If you don’t have a ziplock, wrap once tightly in plastic wrap, then again in foil. This will help prevent freezer burn or frost build up on the bread. If you want to be extra safe, add one more layer of plastic wrap over the foil.
To thaw, set it out on the counter overnight (or for a few hours), still inside the wrapping/bag to keep all the moisture in. Air is bread’s worst enemy and if you open up the bag to defrost, your bread will go stale quicker than you can say tough crust.
Can you double a bread recipe?
Yes, but only if you have an extra large mixer to be able to handle all the dough. (Or you could certainly double it and knead it by hand! If you have Luisa Madrigal level strength!) You have to think about the power in your mixer as well, as many may not be powerful enough to knead through 4 loaves of bread. I would say just do one batch at a time, especially since one batch makes two good sized loaves.
If you really want to double the recipe, try a single batch the first time you make it and see how your mixer performs and if it takes up slightly less than half the bowl. If you feel confident after that, try a double batch! I have a 6 quart Kitchenaid and would not be able to double this recipe. If you have a 12-cup capacity Bosch mixer or similar, go for it.
Can you halve this recipe?
Yes! It’s so easy. You can make half the recipe and bake in one 9×5 inch loaf pan. All instructions are the same. Here are the measurements you need, it’s repeated in the recipe card notes too:
- 1 and 1/3 cups warm water
- 1 tablespoon instant yeast
- 3 tablespoons sugar
- 1 and 1/2 tablespoons olive oil
- 1/4 cup vital wheat gluten
- 3 and 1/2 teaspoons Diamond Crystal kosher salt
- 3 cups bread flour, plus 2-3 tablespoons
While they do have similar ingredients, the structure of French bread vs White Sandwich bread is different. The extra yeast and vital wheat gluten make sandwich bread much springier and softer, whereas French bread tends to be more dense and chewy, with a harder crust. This is also amplified by the shape of the breads. French bread is typically in a baguette style form, and the long and thin loaf lends itself to extra crispness.
Bread is chemistry in action! In this case, the gluten and yeast work together. The yeast creates bubbles of carbon dioxide as it grows: all those beautiful little pockets you see once baked. And gluten provides the long protein strands that hold the bread up and allow it to rise nice and tall. The combined effect of a tall rise with lots of bubbles = light and fluffy bread. You should have seen some of my reject loaves in my testing for this post. Some of them were SO dense, and you could tell not only from eating it, but also visually, because they didn’t have those air pockets.
I don’t like to call foods good or bad. I just think there’s a right time and amount for all foods! White bread can be considered “bad” by some because the flour used has parts removed from the wheatberry – parts that happen to have a lot of the vitamins and minerals naturally found in wheat. But, homemade white bread lacks all the preservatives and chemicals used in store bought white bread and tastes about a thousand times better. So, think of this recipe as a nice middle ground, something I like to achieve in many areas of my life.
White flour is generally made by removing the natural oils in wheat by discarding the bran and wheatgerm parts of the wheatberry during the milling process (which makes it more shelf stable). The white flour in bread is often bleached even further using agents such as potassium bromate, azodicarbonamide, or chlorine dioxide gas to remove any slight natural yellow shade and make its baking properties more predictable.
It is often cheaper to make your own bread at home when looking at just the price per loaf. But, you should also factor in whether you have the right equipment and the time to invest in making bread regularly enough to replace any store bought bread. For my family, we make it occasionally and enjoy it, but still depend on store bought bread for most of our day to day needs. Some people end up loving the process of making homemade bread and hardly ever buy store bought. Try it out and see what’s best for you!
White sandwich bread always includes flour, water, and yeast (unless it’s sourdough and you’re using a starter for leavening instead of yeast). Sugar and oil make for a soft and flavorful loaf. I also recommend adding vital wheat gluten, which helps the bread rise high.
I recommend using bread flour. Compared to regular all purpose flour, bread flour has more gluten and gives you a higher rising loaf with amazing chewy texture. Some have asked about using whole wheat flour. You can try substituting some whole wheat for bread flour, but whole wheat flour has LESS gluten than all purpose and your bread won’t rise as high, nor be as chewy.
Well hopefully I’ve inspired you to make homemade bread sometime soon! I texted my girlfriends to let them know I had a freezer full of bread if they wanted to pick some up, before remembering that all those loaves were the ones that weren’t quite right before I landed on my final recipe. Hi, welcome to my house, here is my reject bread 😅 life of a food blogger.
Show me pics of your bread on Instagram, I’d love to see them! @thefoodcharlatan Also I made the pomegranate jelly you see in the photos with my mom on one of the days I tested this bread, you can see our shenanigans here! She’s the cutest!
More super easy bread recipes to flex your skills
- Quick and Easy French Bread Recipe >> tried and true! I have been making this recipe for YEARS and it always turns out
- Easy Fluffy One Hour Dinner Rolls >> super easy, super fluffy, and done in an hour
- Garlic Bread Recipe >> this is the onnneeeee
- Big Fat Crescent Rolls, yeah >> the best crescent rolls of your life, promise!
- Garlic and Rosemary Skillet Bread >> if you love a super flavorful bread with the best crust, this is the bread for you
- Pizza Dough Recipe for Beginners >> Not like the other breads, but still an essential yeast experience to learn. I teach you how to make it step by step!
- My Favorite Go-to Sourdough Bread Recipe from Bless this Mess
- Easy White Gluten Free Bread Recipe for Sandwiches from Gluten Free on a Shoestring
Facebook | Pinterest | Instagram
Easy Homemade White Bread Recipe
Equipment
- nonstick spray
- plastic wrap
Ingredients
- 2 & 2/3 cups very warm water, 105-110 degrees F
- 2 tablespoons instant yeast*, active dry yeast works too, see note
- 1/3 cup granulated sugar
- 3 tablespoons oil, olive oil or vegetable oil
- 1/2 cup vital wheat gluten**, you can replace this with an equal amount of bread flour, see notes
- 7 teaspoons Diamond Crystal kosher salt***, use 4 teaspoons total if using table salt
- 6 and 1/4 cups bread flour****, spooned and leveled, plus more
Instructions
- In a large bowl or stand mixer, add 2 and 2/3 cup very warm water. I use water straight from the tap, and let it run until it's nice and warm like a baby's bath. If it feels so hot that you want to pull your finger away, it's too hot. If you want to bust out the thermometer, we're looking for a temperature between 105-110 degrees F.
- Add 2 tablespoons instant yeast* to the water. Add 1/3 cup sugar to the water. Stir this together and wait a minute or two, to make sure that your yeast is starting to bubble. See photos. You don't need to wait a long time, you just want to make sure the yeast is starting to bloom (and that you didn't kill it with too-hot water) Once you see any measure of foaming or bubbling, move to the next step. (If the water is flat and unmoving, ya done killed it. Toss it and start again.)
- Add 3 tablespoons oil. Add 1/2 cup vital wheat gluten. (If you don't have vital wheat gluten, use bread flour in it's place.)
- Add 7 teaspoons Diamond Crystal kosher salt. Yes you read that right. 7 teaspoons. (If you do not have kosher salt, add 4 teaspoons table salt. If you have Morton's coarse kosher salt, use 5 teaspoons.)
- Use a cup to add bread flour to a 1 cup measuring cup. Level off the top and add it to the bowl. Repeat. Add 6 cups total bread flour to the bowl with the yeast.
- If you are using a stand mixer,***** use the dough hook and mix on medium low speed until the flour is mostly incorporated. Scrape the sides of the bowl with a spatula and continue mixing with the hook on low speed. Add the remaining 1/4 cup flour as the dough mixes, if necessary (see next step).
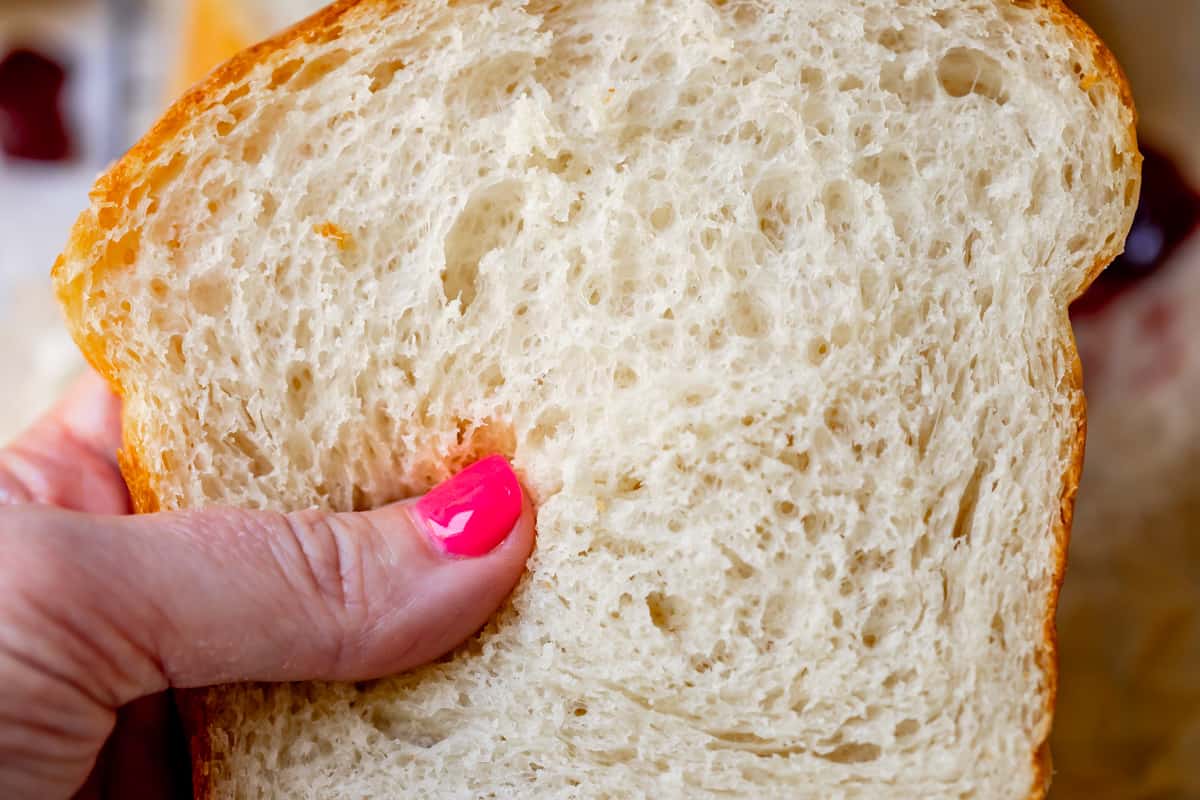
- At this point you need to decide if you should add more flour to your dough or not. You do not want to add too much flour or your dough will be stiff and your bread too heavy. If you don't have enough flour, your bread won't rise well. You want your dough to be smooth, elastic, and slightly sticky. If you need more flour, add it a few tablespoons at a time. This dough will NOT QUITE form into a ball in the mixer. It is pretty tacky. Do not over flour. If you reach your finger in and press the dough, your finger should come away glossy but with no dough stuck to it. But if you take two fingers and pinch it harder, you will have dough stuck to your fingers.
- Once all the flour has been added, continue kneading for a total time of at least 5-6 minutes.
- Spray two 9×5 inch loaf pans with nonstick spray. Grease them really well! Rub with oil if you don't have nonstick spray.
- Remove the dough hook and scrape the dough onto a work surface lightly sprayed with nonstick spray, or you can use a lightly floured surface like a pastry cloth.
- Use a serrated knife to split the dough in half.
- Gently pat one half of the dough into a rectangle that is about the length of your loaf pan, about 9×5 inches. Roll up the long end of the dough to form a loaf, and pinch the edges together, smoothing as best you can. Lift the dough from the ends, folding them slightly underneath, and place your dough baby in the loaf pan. Your loaf should be nice and smooth on top. Repeat with the other half of dough.
- Spray the top of the dough with non stick spray and cover with plastic wrap that you have also coated with nonstick spray. You do not want your dough sticking to the plastic, it will ruin your beautiful rise!
- Turn your oven on to 350 and set a timer for 30 seconds. Turn the oven off when it is nice and warm inside, but not hot. You should still be able to comfortably place your fingers on the oven rack. Place your two pans of covered dough in the oven and shut the door. Set a timer for 15 minutes. (If your oven got too hot because you turned it on for too long (literally this is the story of my life), leave the oven door open, place a hot pad on top of the open door, and place the bread pans on top. Make sure there are no toddlers running around who like to climb inside hot ovens.)
- After 15 minutes of rising in the warm oven, remove the pans to another warm spot in your kitchen. The top of the fridge is a good spot, or on top of the preheating oven. Turn the oven on to 350 degrees F.
- Let the oven preheat and the dough continue rising for another 10-15 minutes, or longer if necessary (this depends on a number of variables, kitchen temperature being one.) You will know your dough is ready for the oven when the tops have risen at least 1 inch above the edge of the pan. They should look puffy and dome-y. A technical term.******
- Remove the plastic wrap and bake at 350 F for 25-30 minutes. You will know the bread is done when it is brown on top, and the edge of the bread is pulling away from the pan. I always use a thermometer to check my bread; this bread should measure about 200 degrees F in the center. The bottom and sides of the bread should be brown.
- Place the two bread pans on a cooling rack and let sit for about 1 minute. Then, with a hot pad on each hand, place one hand on the bottom of the pan, one hand on the top of your loaf, and invert. The bread should come right out of the pan, if not, loosen sides with a butter knife.*******
- This step is optional, but now is a good time to butter the top of your loaves if you like. It adds a ton of delicious, buttery flavor, but it will wrinkle the top of your loaf. You can try buttering one loaf and leaving the other to see which way you prefer!
- Place the loaf on a cooling rack on it's side to cool. (this helps the risen bread stay nice and tall; bread is naturally a little top-heavy). Repeat with the other loaf. Let the loaves cool completely; at least 30 minutes to an hour. (I know, I know)
- Slice with a serrated knife, using a sawing motion and being careful not to smash the bread. Serve with lots of butter and jam! I love to toast mine first.
- How to Store: Store the loaves of bread in gallon ziplock bags, or you can fit both loaves into a 2-gallon ziplock. I like to leave my loaves unsliced (slice as needed) to keep them from getting dried out. Your bread will keep on the counter for up to 2 days. I'm always shocked at how quickly homemade bread goes moldy; we are all accustomed to store bread with lots of preservatives. Don't forget about it! If you won't eat it on day 1 or 2, freeze it.
- Freezing instructions: Bread freezes beautifully. If you are not planning to eat the bread right away, freeze it as soon as possible after cooling. Thawed out frozen bread is just as fresh as the moment you froze it (for a few months, anyway.) You can slice all the bread before freezing to make it easy to thaw just what you need for a slice of morning toast, or you can freeze it as a loaf.
- If you have a slice of frozen bread, you can place it frozen into your toaster on a low setting. Toast it twice on low, or as many times as you need to thaw it/ toast it.
- Traditional 1-hour rise method: Most bread recipes have a 1-hour rise in a bowl before the dough is shaped into loaves. The special ingredients in this recipe allow us to skip this rise and still get tender, fluffy, puffy bread. But the longer amount of time yeast has to ferment before baking, the more flavor you will have. If you want extra flavorful bread and have time, follow the recipe as written, but allow the dough to rise in the bowl for 1 hour after kneading. Then continue with shaping the loaves. No other changes.
- Overnight instructions: You can let this bread rise overnight in the fridge. Reduce the yeast to 1 tablespoon, otherwise make the dough as instructed. Place in a large covered bowl in the fridge. Let chill for 8-12 hours, keeping an eye on it toward the end to make sure it doesn't overflow. Divide the dough, shape into loaves, and let rise at least 1 hour (possibly more), until they are room temperature and have risen well above the edge of the pan. Bake as directed.
Notes
-
- 1 and 1/3 cups warm water
-
- 1 tablespoon instant yeast
-
- 3 tablespoons sugar
-
- 1 and 1/2 tablespoons olive oil
-
- 1/4 cup vital wheat gluten
-
- 3 and 1/2 teaspoons Diamond Crystal kosher salt
-
- 3 cups bread flour, plus 2-3 tablespoons


I have a question before I make this. When I make bread, I never use bread flour – I use AP, but add the vital wheat gluten to make it bread flour (1T per cup of flour). In this recipe, do I do that in addition to the VWG called for in the recipe? I don’t want to put too much in and ruin the recipe!
Hi Marlene! I’m not sure as I haven’t tried it. I designed this recipe to replace some of the flour with vital wheat gluten. So the work is done for you! If you use all purpose flour plus the VWG called for, I’m sure it will still turn out great. You will just be missing a bit of the protein from the bread flour. I hope it works out! Enjoy!
Absolutely the best white bread recipe ever, and I’m pretty sure I’ve tried just about all the internet has to offer. You will not find a better home made bread for morning toast. It’s also great for dinner rolls, dog buns, etc..(I switch the oil to butter for buns)
It’s the gluten. If all is followed to the letter, you can see the impact the extra gluten has on this great dough. It’s practically fail proof, even when doubled. The salt is not an issue if you do just as Karen has spelled it out. I’ve used all three options & comes out perfect every time. Today’s batch will be at least the 20th. Thank you Karen.
First time bread maker here! This is probably SO dumb to ask but you don’t know what you don’t know right?
How many packets of Platinum Star Instant yeast for one loaf, two loaves? I have no idea how much yeast is in a packet!
Hi heather!! Not a dumb question at all! I would just dump the packet into the teaspoons or tablespoon measuring spoon! One packet usually has about 2 and 1/4 teaspoons of yeast, but I always measure to make sure. Enjoy!! Tell me how it goes!
Can you substitute some Einkorn wheat flour for the bread flour? Would you just substitute 1 cup Einkorn wheat for the bread flour or could you substitute 2 cups of Einkorn wheat flour? Einkorn wheat flour is the oldest wheat flour according to the organic farm where I purchased it. This recipe is very tasty and easy to make. I also made your Grandma Prudy’s rye bread recipe. I cured a brisket and smoked it to make pastrami. I had pastrami Rueben’s. Very good.
Woah Kevin, that is next level! Making your own rye bread AND pastrami?? I mean come on. As for the Einkorn wheat flour, we haven’t tried this recipe with wheat flour instead of white, but it will definitely affect the rise. I’d start experimenting with 1 cup and going from there. Come back and let us know how it turns out!
Terrible!! It’s so salty! I used Kosher salt and even did less than the recipe says with 5tsp. I have throw it all away. What a waste of time and ingredients.
Hi Mike! I’m so sad you had a bad experience. I’ve updated the post to specify that this recipe absolutely needs Diamond Crystal Kosher salt to be successful. I did mention it, but perhaps didn’t emphasize that enough, so thank you for the feedback. I’m guessing that you used Morton’s coarse kosher salt, which is calculated a little differently. You need to use about 5 teaspoons Morton’s kosher salt, and I’ve updated the recipe to reflect this.
This bread is near and dear to my heart, and I stand by the recipe as written. I have a meltdown and retest it after every bad review 😂 The reason I insist on so much salt is because it is such a powerhouse of flavor. In my opinion, under salted bread is not even worth eating, and I want everyone to experience that bakery-level flavor at home. The way to get it is by adding the right amount of salt. It’s tricky though, because home cooks want things to be easy, and that means common ingredients. (Table salt will not give you great results.) I almost always have to get my Diamond Crystal salt on Amazon, my grocery doesn’t carry it.
I started experimenting with adding slightly-uncomfortable-sounding levels of salt to my baking after reading Samin Nosrat’s great work, Salt Fat Acid Heat. You can read an except of the salt chapter in this NY times article. You can also see a table for types of salt and the recommended amounts to use for baking projects here. Samin recommends starting with 1 and 1/8 teaspoon salt Diamond Crystal Kosher salt for every cup of flour. There is 6 and 3/4 cup flour/gluten in this recipe, hence the 7 teaspoons kosher salt called for.
Thank you for coming to my Ted talk about salt, and I’m sorry again that your bread did not work out! I do hope you will try it again.
Way too salty and I didn’t like the flavor.
Hi Tina! I’m so sorry this recipe wasn’t for you. I have tested this recipe literally dozens of times, and made it again one more time after your comment, just in case 😂 I used 4 and 3/4 teaspoons table salt this time, just in case that was what you used instead of the recommended 7 teaspoons kosher salt. (I certainly hope you didn’t use 7 teaspoons table salt! That would definitely be the problem!) I enjoyed the bread with 4 and 3/4 teaspoons table salt, but it does make the bread a little savory. My family enjoyed the two loaves all week as our sandwich bread. To make the recipe more versatile I changed the recommended table salt amount to 4 teaspoons. Let me know if you try it again!
Hi, me again (David),
Just had a slice of the Wonderful Bread,
WOW, SOOOO GOOO!!!!!
I am definitely going to make this again,
I fact I’ll start now!!! Thank You Again!!
Hi, my name is David, just baked your Bread recipe. I love it!! SOOOO soft,
great rise. It’s just out of the oven, so I have not tasted it yet, patience must have patience!! Lol!! But it Smells really good!! Thank You!!
Delicious go-to white bread recipe and super easy to make. The detailed instructions and various methods are helpful and clear. I modified the salt a bit due to dietary restrictions for some in my home and it was still a winner and has a perfect texture. It makes a killer grilled cheese sandwich!
Adrienne I’m so happy to hear it was a hit for you! Thank you so much for reporting back on how it went, that is so helpful. And now I’m dying to make this into a grilled cheese!! yum
I made this bread earlier today and found that I didn’t measure the yeast right. Way too much. And mine deflated. But I saw your comments above with how I probably left it too long to rise. Will try again soon!
I’m so sorry it didn’t work our Danicia! I just added a couple more tips in the recipe on how to tell when your bread is done rising – you can do the finger poke test to see when it’s ready for the oven. I hope this helps!!
I cannot wait to try this out! Specifically for grilled cheese sandwiches and tomato soup! I will get my ingredients tomorrow and report back as soon as I can, so excited!😁🤤
Yay I’m so excited you’re trying it! Tell me how it goes!
I make bread all the time. This recipe was going great until I put it in the oven after a few minutes it deflated. Do you have any suggestions as to what could have happened. This has never happened to me before.
Hi Patty! Is it possible you let it rise too long? When bread rises for too long, it grows to the point that it can no longer support itself and falls when it hits the oven. this recipe has a REALLY fast rise from all the yeast, so it’s important to not let it over rise. I’m also wondering if you are at a higher elevation? This recipe was tested at sea level. If you are at a very high elevation, your bread will rise even fast because of the lower air pressure. I’m so sorry it didn’t work out! Please report back if you try it again!
I’m stumped…
Let me first say that I’m a very experienced bread baker.
After adding the 6.25 cups flour, I have so far added at least another .75 cup, and my dough is still too sticky, in that it’s sticking to my finger and not coming close to leaving the sides of the bowl.
I realize that this dough will not form a ball as is typical, but my dough looks mor like pancake batter. I use a scale for precise measurements, so I’m not sure what the issue could possibly be. Thoughts?
Pancake batter! That’s definitely not enough flour Michele! I tested this bread many times. You know the drill – keep adding more flour until it’s workable! I did not use a scale to measure my flour. I used the scoop and level method. It might be as simple as that! I see you commented yesterday, how did it turn out?
I’m wondering if this is an elevation related issue.
This bread is easy and delicious. It gets a big thumbs up from Chip, the most bread obsessed man I know. He’s been making toast out of it multiple times a day. Unfortunately I think it’s gone now. I got one piece. 😕
I have not made this yet – but plan to very soon. However I live in Colorado at 6,000 feet. What modifications will I need for high altitude baking? Thanks!
Hi Maureen! When you’re baking bread at a high altitude, your bread will rise much faster, and you may need less yeast. I recommend planning on using about 1 1/2 tablespoons of yeast instead of the full 2. Also, you may not need to use the warm oven for the quick rise. I would experiment with just letting the dough rise in the pan at room temperature–and keep an eye on it, it may be ready in less than the half hour rise called for!