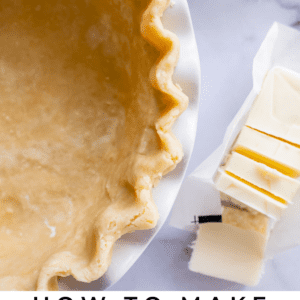

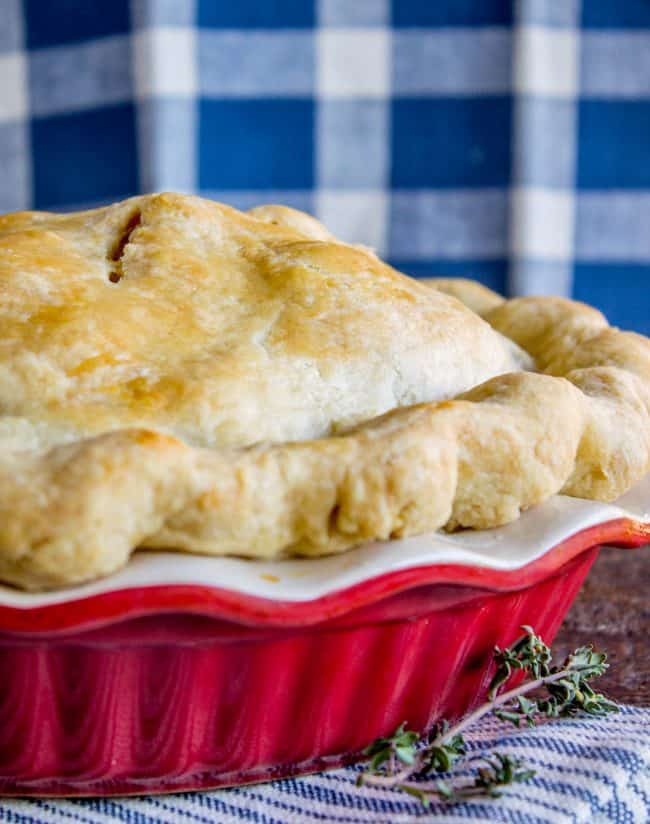
I will show you exactly how to make the BEST Homemade Flaky Pie Crust of your life! It is so buttery and tender, it just melts in your mouth. I will explain everything you need to know, with tons of step-by-step photos to guide you through the recipe. It’s not as hard as you think, it just takes some practice and remembering a few key steps (like keeping everything cold!) It never fails! Originally posted October 7, 2020.
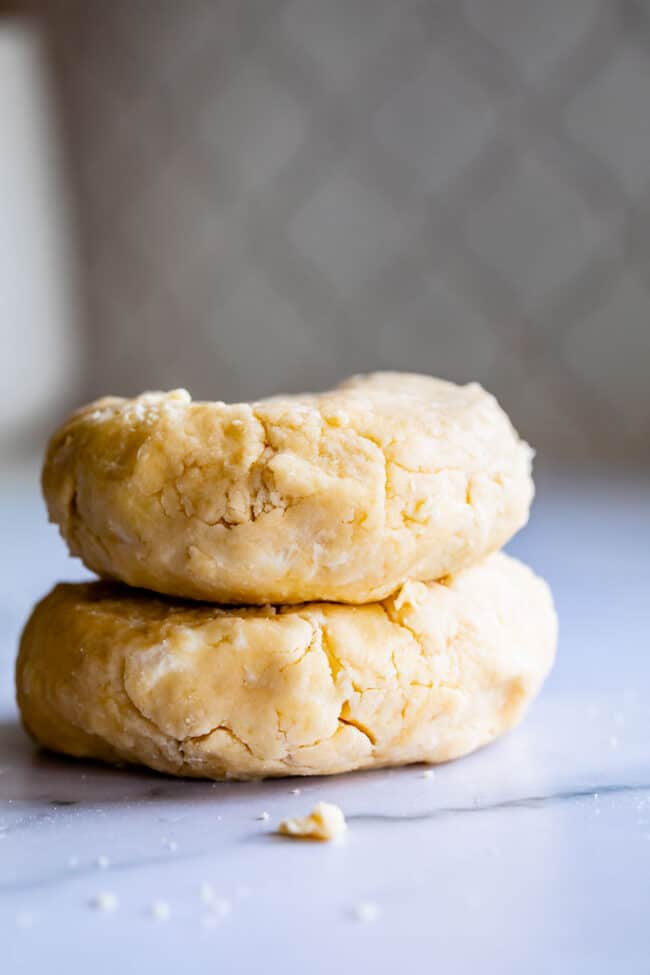
Table of Contents
- What is the secret to flaky pie crust?
- Flaky Pie Crust Ingredients
- How to make Pie Crust from Scratch
- Cut the shortening and butter into the flour mixture
- Use egg as some of your liquid
- Knead your flaky pie crust together
- Keep Everything Chilled, Especially Yourself!
- Best Pie Crust Recipe Tips
- How to roll out Pie Crust from Scratch
- How to flute a Flaky Pie Crust
- Preparing to Bake a Pie with Homemade Crust
- Bake your pie
- Homemade Pie Crust Recipe FAQ
- Flaky Pie Crust Recipe Tools
- Delicious double crust pies to make!
- Single Crust Pies that require no pre-baking (no Blind Baking):
- Single Crust Pies that require Blind Baking
- And don’t forget savory pies made with a buttery Flaky Pie Crust!
- Homemade Flaky Pie Crust Recipe Recipe
My brother was helping with dishes after dinner the other day, and was dismayed to see two pie plates in the sink. “How is it possible that you made two pies and I didn’t get any??” I explained that I was using the pie plates to dredge chicken that I was frying, when I made this Ultra Crispy Chicken Parmesan. He was mollified.
I can understand his indignation though. There is no rage quite like missing-out-on-pie-rage.
Those two pie plates (that didn’t even contain pie) are nothing compared to the dishes I’ve produced this week. I’ve dubbed it Pie Week. I’ve used every pie plate I own making and testing pies. I’ve baked pies and removed them immediately to different containers just because I needed that particular pie plate for the next pie. SO MUCH PIE.

But I’ve finally done it. After nine years of blogging (9 years, y’all!!!! Anniversary post coming soon. I always bake myself a Food Charlatan birthday cake. This year it’s a spice cake, get ready it’s legit.) (UPDATE, Spice Cake is live!)
Anyway, after 9 years of blogging I’ve finally written down all the steps (and taken a bajillion photos) of my beloved pie crust recipe. I’ve written this recipe and the basic instructions out for every pie on my site, but it’s time to dive deep and get into all the details of how to get the perfect pie crust! It really does deserve it’s own post. Let’s get into it!
What is the secret to flaky pie crust?
The melting point of lard is lower than butter, which means that more air and steam are released during the bake time. This gives a flakier texture in your pie crust, exactly what we want!
So why use butter at all? Because FLAVOR. Nothing tastes quite as delicious as butter. So the answer is to use both! I like to use 8 tablespoons of shortening to 12 tablespoons of butter.
Why I don’t make my Flaky Pie Crust with only butter
The short answer is because I don’t hate myself. Just kidding! Lately it seems really trendy in the food world to use all butter for everything baked, because shortening will kill you, or whatever. I just say moderation in all things. (Plus, I’m never going to stop eating Oreos, and those are made with shortening, sooo…)
Here’s the thing: butter melts. If you put a pat of butter in your hand, how long would it take to melt completely? Just a couple minutes probably. Well, the same thing will happen to the butter in your pie crust as you’re rolling it out. Melty butter= melty crust= angry baker.
Flaky Pie Crust Ingredients
Here’s a quick list of what you need to make pie crust. Pretty basic stuff!
- flour
- granulated sugar
- kosher salt
- butter flavored shortening
- butter
- egg
How to make Pie Crust from Scratch
First we’re going to start by adding some flour, sugar, and salt to a large bowl. I use 2 tablespoons of sugar for sweet pies, and 1 tablespoon of sugar for savory pies like this Chicken Pot Pie.
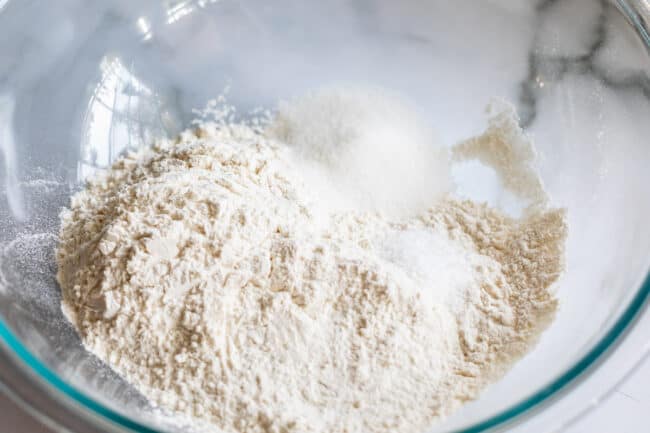
Whisk it together and then add in your fat. I like to use a mix of shortening and butter. We’re going to take a hot minute to talk about these glorious lipids.
American butter is only 80% fat. Lard and shortening are 100% fat. Lard is 100% made from animals (and I hear it adds tons of flavor, though I’ve never tried it) whereas shortening, such as Crisco, is made from vegetable oil.
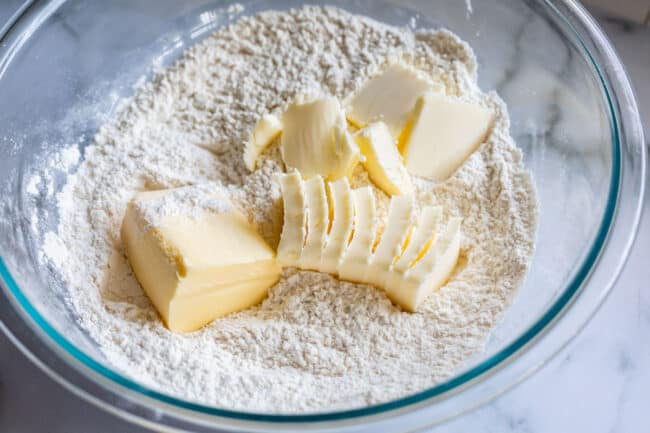
Cut the shortening and butter into the flour mixture
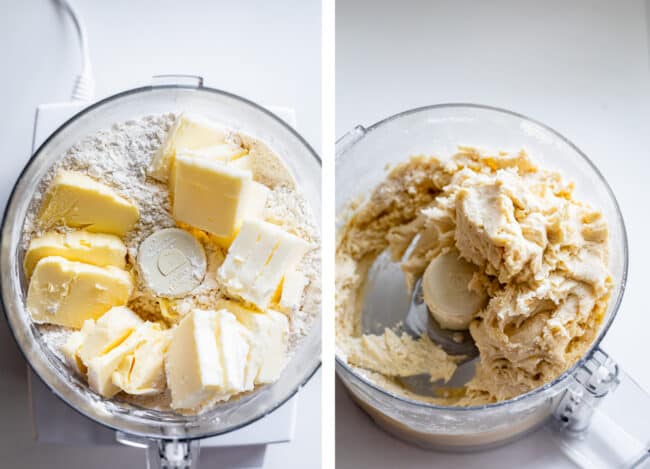
So now that I’ve explained a little bit about the fats used in pie crust, it’s time to add it into the flour mixture. Use a pastry cutter to CUT the butter and shortening into the flour. We are not creaming. We are not mixing. We are cutting and don’t you forget it. Your mixture should look like this:

You want various sized pieces of fat, about the size of a pea, or even bigger. Little pockets of fat in your pie is what makes it tender and flaky.
Use egg as some of your liquid
So now that we’ve got all our fat cut into our flour, it’s time to bring it all together with a little bit of liquid. Some recipes use just ice water (again, butter melts; so cold water is essential to keep everything chilled). Some recipes call for vodka or other liquor. But I like to use a mixture of egg and ice water.

Why egg? Because eggs taste amazing. They add a richness to your pie crust that you won’t get with just water, and result in a super tender crust. Also, eggs are binders. There is a reason we add eggs to meatloaf: it keeps everything held together. Eggs do the same thing in pie crust.

You don’t need much. A large egg is about 4 tablespoons of liquid. I only use 2 tablespoons of beaten egg in my crust. Save the rest for brushing on top of your pie right before baking.
Knead your flaky pie crust together
Now that we’ve got the liquid in, it’s time to knead. Use a spatula for the first part, trying to mix together the flour and the wet part together. But at some point your going to have to dig in there with your hands.
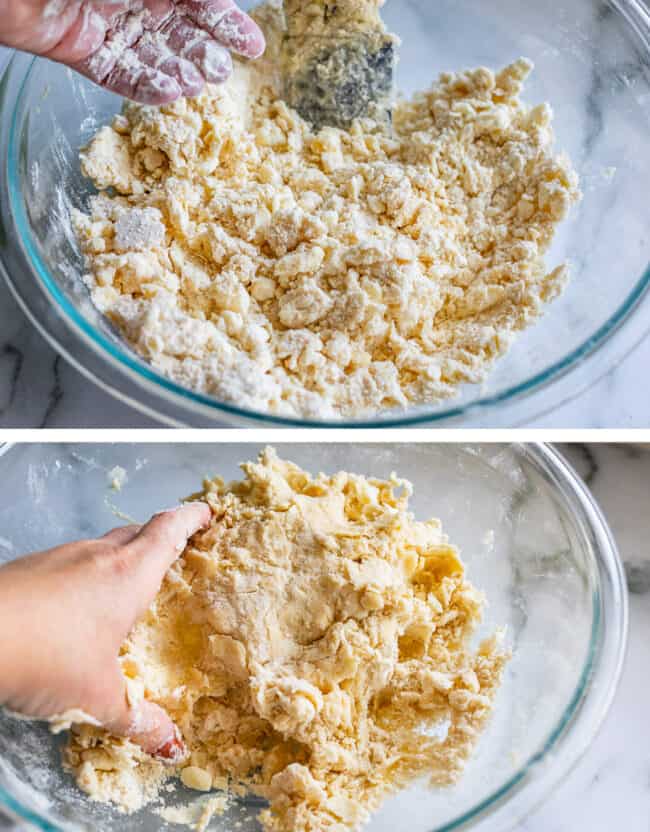
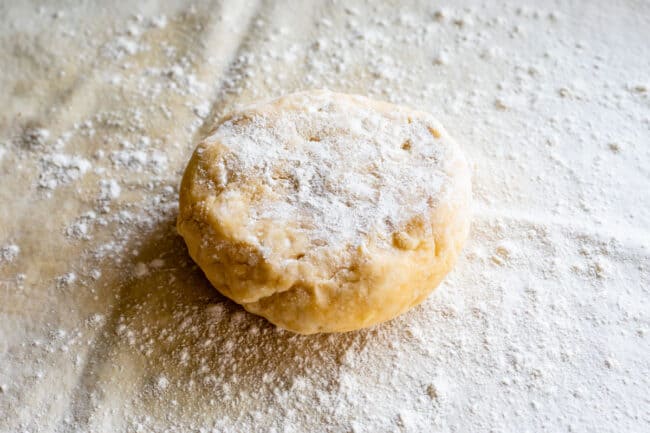
I like to do it right there in the bowl. Coat your hand with flour and start pressing the dough together. Keep working it, gathering up the little bits of flour and butter from the bottom, and kneading it until it comes together in a ball. If you have kneaded 8-10 times and it’s still not coming together, add more ice water about 1-2 teaspoons at a time. I hardly ever add extra ice water, but this does depend on climate. The point is, don’t add too much, or you will make your pie dough too sticky.
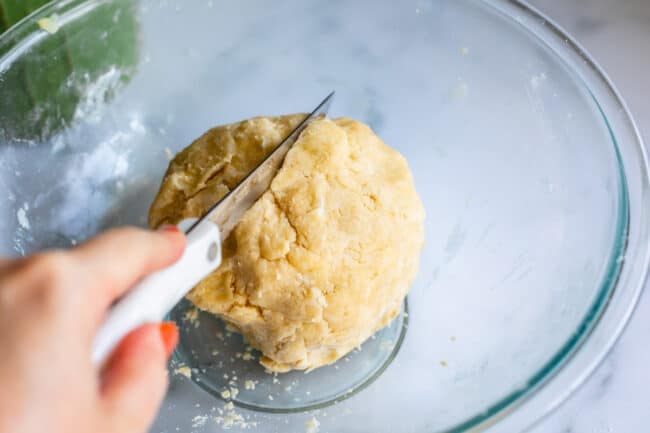
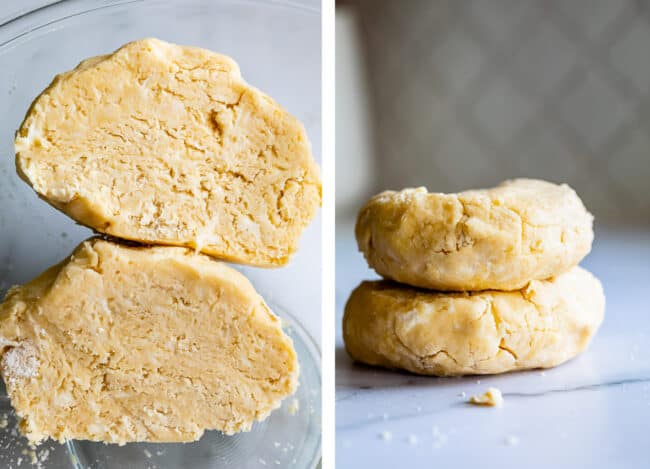
Shape it into a ball and then cut it in half, then shape each half into a disc. This is what you need to make one double-crust pie. If you only need a single pie crust, put the other one in a ziplock and toss it in the freezer for your next pie. It will keep for 3 months. (Thaw on the counter or in the fridge, still in the sealed bag to retain moisture.) See my post for How to Blind Bake a Pie Crust for tips on pre baking and fluting a single crust pie.
Keep Everything Chilled, Especially Yourself!
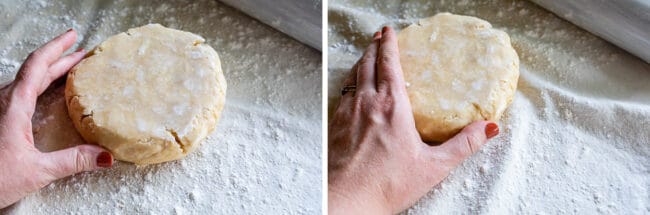
Now it’s time to chill for about 30 minutes. As Kate from Art of the Pie says, “Keep Everything Chilled, Especially Yourself!” I love this! Pie making is a learning process, and you will have more fun if you keep yourself a little chilled out! It’s also imperative that you take the time to chill your dough throughout the process. Rolling out and shaping your pie crust is SO much easier with slightly chilled dough. If you are having trouble rolling out your crust, or if your lattice is falling apart, clear out some space in your fridge or freezer and toss the whole thing in to chill out.
Best Pie Crust Recipe Tips
How to roll out Pie Crust from Scratch
Prepare a work surface with plenty of flour. You can do it straight on your counter, or use a pastry cloth (my preference) or roll it out on a sheet of parchment paper.
Let the dough sit at room temperature for just a couple minutes to take the chill off. Start rolling from the center moving out. If you notice cracks forming on the edge, use your fingers to mold them back together.
Rotate your rolling pin a quarter turn every time you roll. This will create a circle shape instead of a lopsided pie dough.
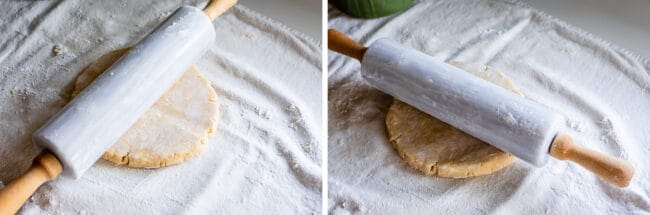
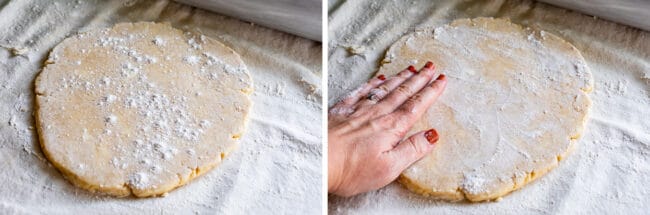
Take the time to dust the pie dough with flour whenever things start getting sticky. Before the circle gets too large, flip the dough over and dust your work surface again, to make sure nothing is sticking. You can do this a couple times throughout the rolling process if needed. There is really nothing sadder than rolling out a perfect circle and then realizing it’s stuck to the counter.
Another tip to avoid tearing your dough is to use your fingers to rub excess butter and flour off of your rolling pin. A clean rolling pin is essential for rolling out the dough.
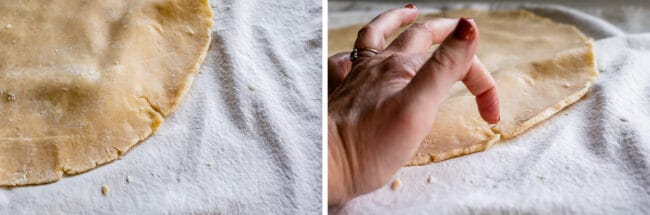
A general rule for rolling out pie crust is that when things are too sticky, add a bit of flour. When things are cracking and dry or won’t come together, add a bit of ice water. You can see in the photo above how I’m am fixing that crack with a drop of ice water. Rub some flour on it after you fix the crack, to make sure it doesn’t stick.
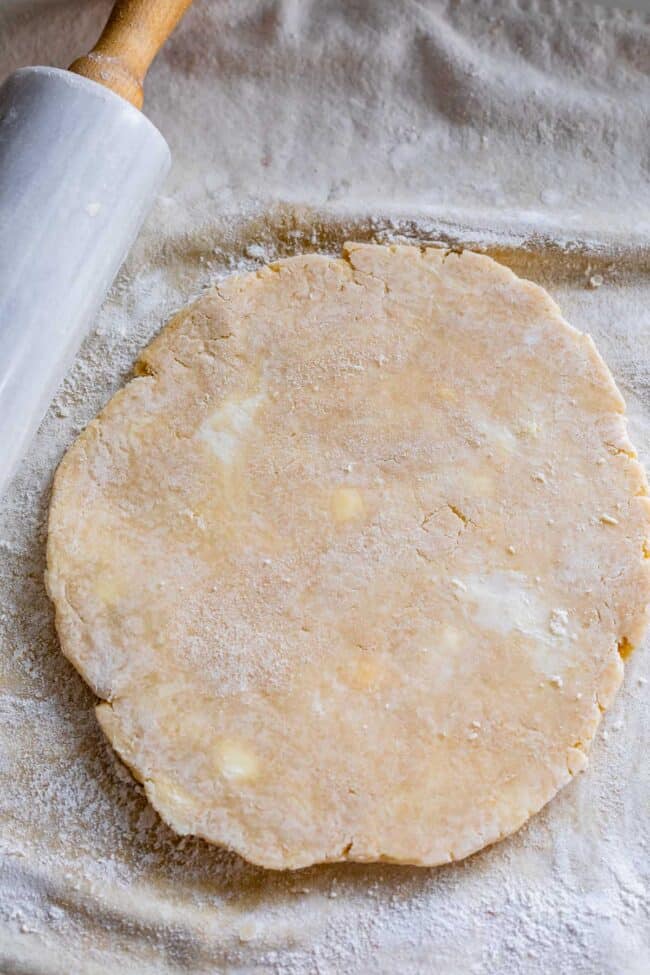
You should be able to see visible pieces of butter and shortening in your pie crust dough as you roll it out.

Roll your pie dough out to about 13 inches if you are using a 9 inch pie plate.
Transfer your pie dough to a pie plate
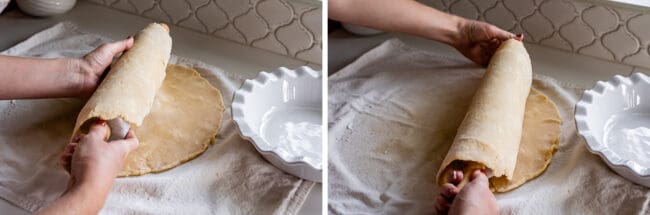
- I like to use my rolling pin to transfer the pie crust into the pie plate. Gently roll it on…
- And then roll it out on top of the pie plate. Call someone to help move the pie plate into position underneath your rolled crust, if available. Also, you are gonna need moral support. I’ve probably made over 100 pies and this part is still a little nerve-racking. Just remember, if it tears, you can heal those cracks with ice water and flour. It will be okay!
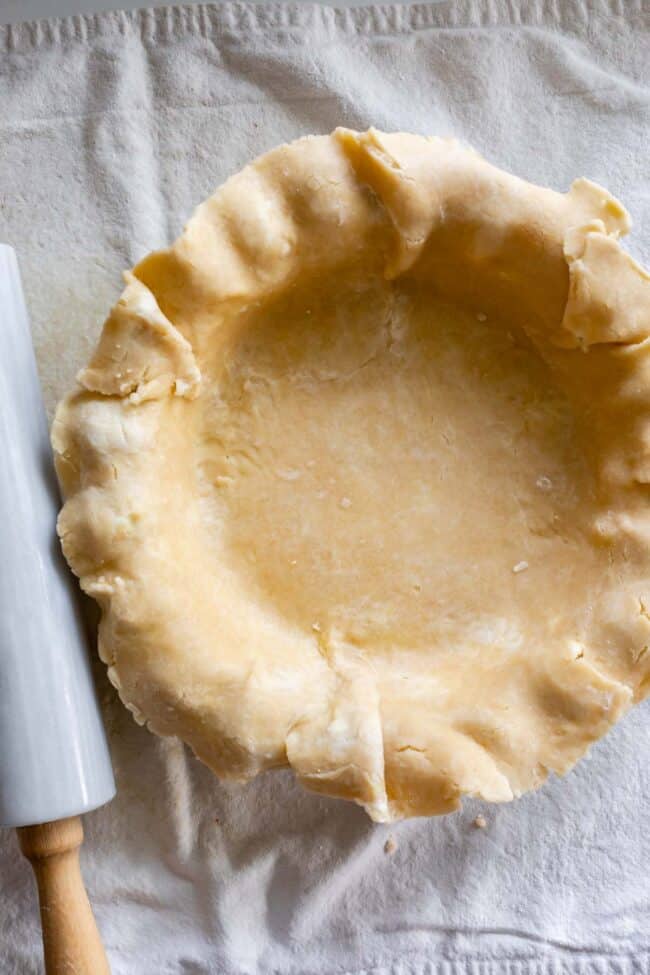
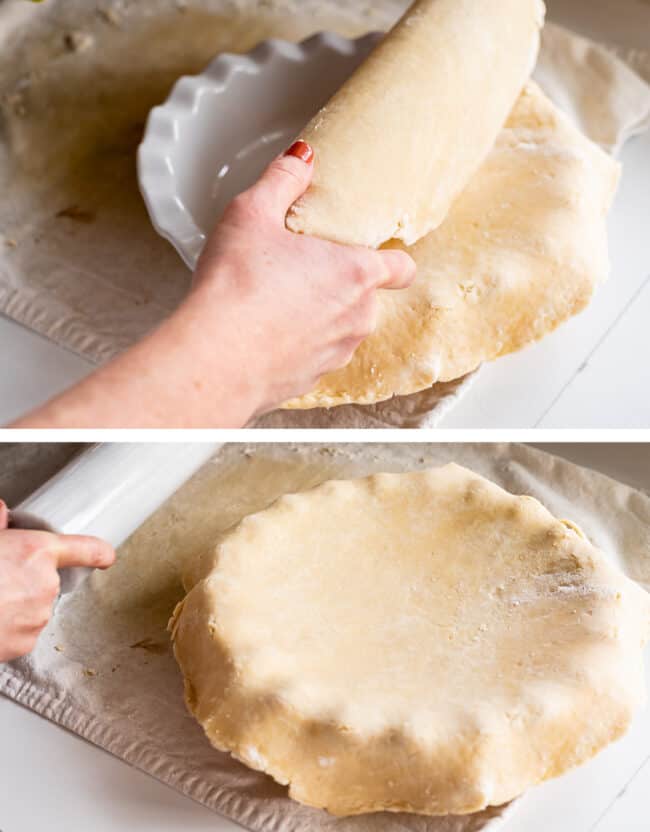
- And here she is. Gently ease the dough into the corners of the pie plate, and press and fold the dough together where it overlaps on itself.
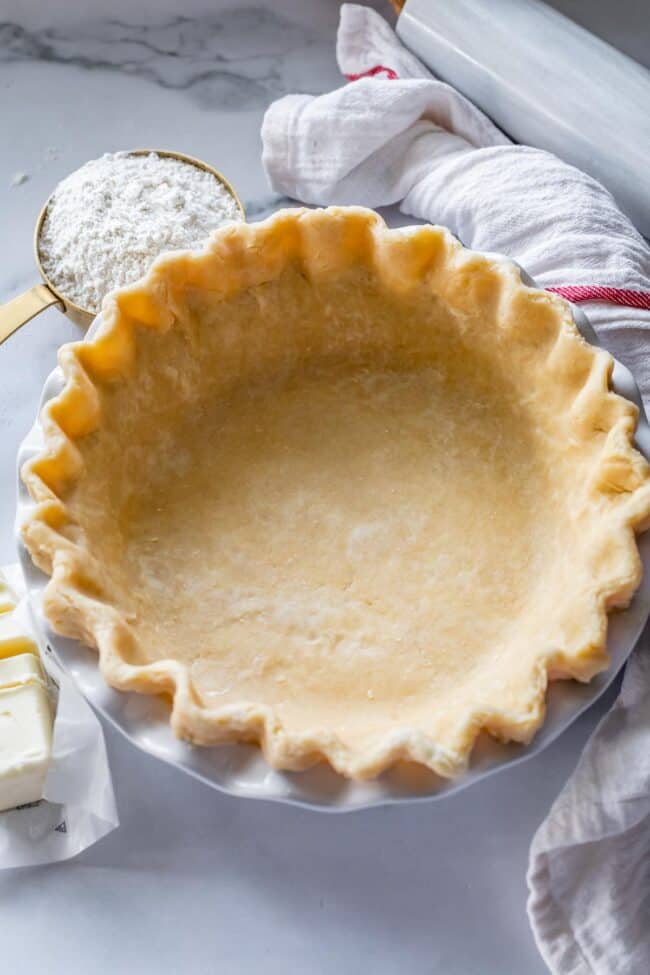
At this point, you can flute the edges for a single crust pie. See my post on How to Blind Bake a Pie Crust for more details on how to flute a single pie crust, and how to blind bake pie crust for cream pies and fresh fruit pies. I will show you how to bake it with weights so that is doesn’t bubble in the middle and slump on the edges.
Fill your pie

If you are making a double crust pie, now it’s time to fill ‘er up. You can just leave the dough hanging over the edge of the pie pan. Tuck it over or under if the edges are hanging down long enough that it looks like it’s going to tear. If your filling is not ready, put the whole pie pan in the fridge or freezer.
It’s best to fill a pie with chilled or at least cooled (read: not hot) filling.

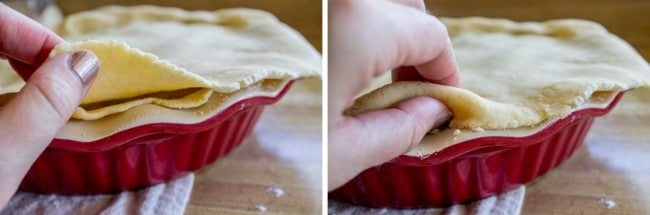
Once your filling is in, roll out the other chilled crust to about 10-11 inches. Use the rolling pin to transfer the slightly smaller crust on top of the filled pie. OR follow these instructions for How to Make a Lattice Pie Crust! It is so fun.
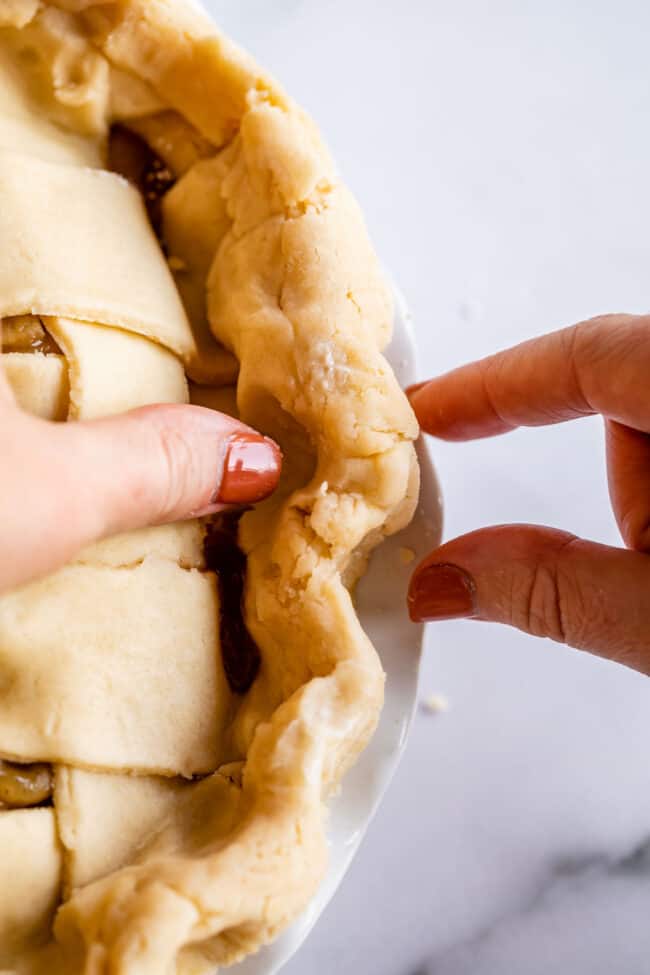
How to flute a Flaky Pie Crust
- Fold your two edges underneath themselves, like so. I know these pie crusts aren’t hanging over as much as the photos above. They are different pies! I told you I made a lot of pies. Anyway, get both edges tucked under nice and neat. (For a lattice pie crust, I like to fold the edges up and over instead of under. See the full lattice post for more details.)
Lots of people will tell you to trim your pie crust. Like, use scissors to cut off little bits of your precious pie crust baby that you just spent forever rolling out, and throw it in the GARBAGE. I say heck no. Fold it under.
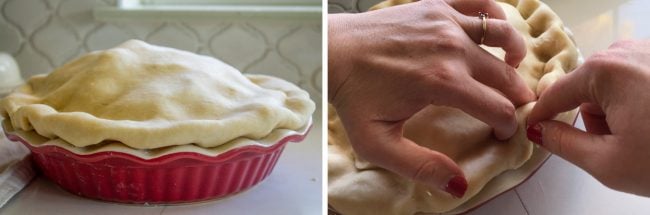
- Press the edges together.
- Then flute the edges of the pie however you like! You can use a fork to press the edges. I like to use this 3 finger method, or some people do this same thing with their knuckles.
Don’t stress too much about it. Practice makes perfect, so don’t expect it to look amazing the first time! Also remember that it still has to bake, and it will look good no matter what once you take it out of the oven.
Preparing to Bake a Pie with Homemade Crust
If your pie crust is starting to feel warm or overly soft at this point, take a few minutes (15-30) to chill the whole pie in the fridge or freezer. Cold cold pie dough going into a hot hot oven is what makes a flaky, tender crust!
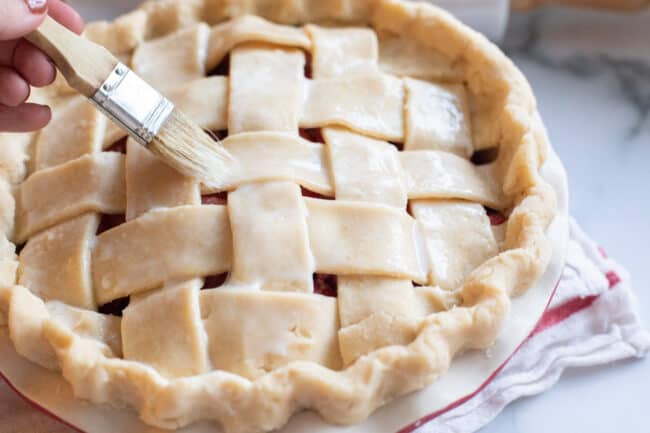
Just before going into the oven, brush the pie with liquid. You can use milk, buttermilk, cream, beaten egg white, beaten egg yolk, a whole beaten egg, or any combination you like. I prefer to use the beaten egg (yolk and white) leftover from what I used in the pie crust, mixed with milk. I do a 1:1 ratio, usually 1 tablespoon beaten egg to 1 tablespoon milk. Beat it up and brush it all over the top of the pie and over the edges of the crust.
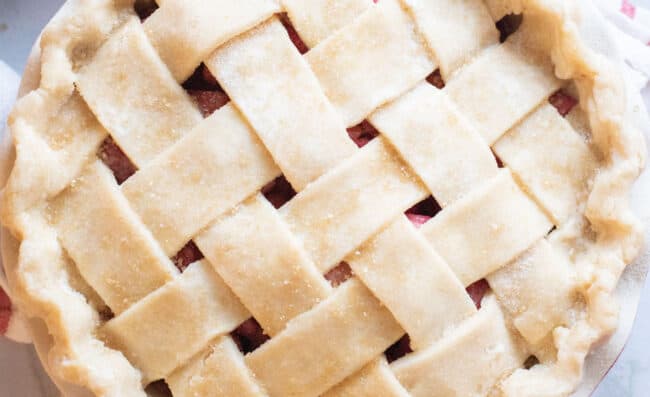
For sweet pies, I like to sprinkle sugar over the top of the pie crust just after brushing. Raw sugar is my favorite because I like how big the crystals are, but regular white sugar adds a nice crunch too.
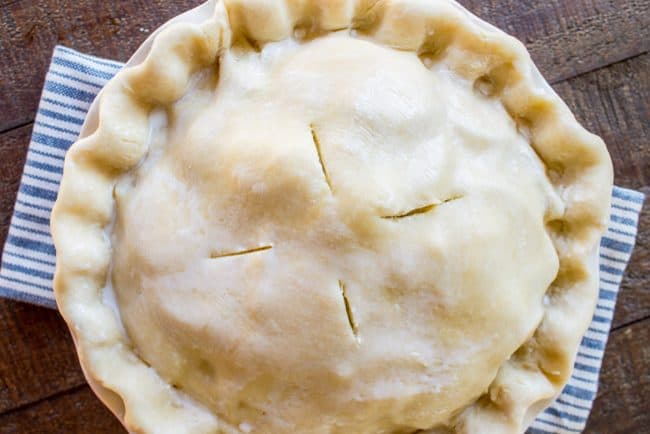
If you did not lattice your pie crust, use a sharp knife to vent the top of your pie. This allows steam to escape. Make any kind of design you like!
Bake your pie
Most pies take about 45-60 minutes to bake. Of course this depends on the recipe you’re using, but generally speaking that’s how long it takes to get your pie crust nice and brown on top. I highly recommend doing an initial bake at a high temperature (I like 425), to get the crust nice and brown, and then lowering the temperature to 350 after about 20 minutes to finish it off.
Cover your buttery Flaky Pie Crust partway through the bake time
Use foil to create a pie crust cover during the second half of your bake time. This will prevent the edges of the crust from burning, while allowing the center of the pie to continue browning. You can buy pie crust shields, but I actually don’t like them. They are usually made of silicone and sometimes they are heavy enough to damage your beautiful fluting job. Tin foil is super light, can be molded around the crust, and cheap!

I feel like this Cherry Pie for 4th of July looks like it’s heading for outer space. That crust is safe from burning though! Get a square of aluminum foil a little bigger than the size of your pie. Fold it in half, then in half again so that it’s in quarters. Then use scissors to cut out the middle section. When you open it, you will have a square of foil with a circle cut out from the center. Mold this around the edges of your pie about halfway through your bake time. I usually add the tin foil shield at the same time that I lower the oven temperature to 350.
Homemade Pie Crust Recipe FAQ
Nobody wants a soggy bottom pie. My favorite trick for avoiding this is to always bake your pie directly on a screaming hot sheet pan. Put the pan in the oven when you start preheating it, so that it is super hot when you put your pie in. The heat from the metal will cook your pie from the bottom, creating a nice cooked and flaky bottom crust. This also serves the double purpose of catching any juices that may bubble over during the bake time.
Short answer: yes, but I really don’t recommend it. I find that it’s really hard to get various sizes of butter throughout the flour. And then if you add the liquid to the processor, it will create more of a cookie dough texture than a pie dough texture.
See how it looks all homogenous? Meh. Lots of famous chefs say you can do it in the food processor, though, so what do I know. Maybe I just need more practice. For now, I’m sticking with a pastry cutter.
All-purpose flour is the best flour to use in flaky pie crust. It creates that light, flaky texture that’s key for the perfect texture. I don’t recommend using another type of flour. The medium amount of protein in all-purpose flour makes for a tender crust; using high-protein bread flour leads to a tough, chewy crust.
Blind baking means that you pre-bake the pie crust before you add in any filling. I have a whole post explaining How to Blind Bake a Pie Crust. Some pie fillings, like custard or fruit, would be ruined by baking them, so the crust needs to get baked before they’re added. Blind baking can also serve to firm the crust up a bit so that it doesn’t get soggy once filling is added.
Absolutely. Pie dough freezes beautifully, so you could make a couple batches of crust, then freeze some for any time you want to whip up a pie.
To freeze your pie dough, follow the steps until you have two discs of dough, then wrap them tightly in plastic wrap and put it in a ziplock bag. They can be stored in the freezer for up to 6 months. When you’re ready to use it, simply thaw it in the fridge and then pick up with the steps for rolling out your pie.
Flaky Pie Crust Recipe Tools
- Pastry cutter. This tool is perfect for cutting butter into flour! I use mine all the time for streusel, biscuits, scones, etc.
- Pastry cloth. This is not necessary but I find them so handy. You just dust the flour right onto them, and don’t have to worry about your pie crust sticking to the counter. The extra flour absorbs into the cloth instead of into your dough.
- Rolling pin. I love my marble rolling pin, but any kind will do!
- Pie plate. Any 9-inch pie plate will do for this recipe.
- Tin foil for covering the edges of the crust partway through the bake time.
And that’s it! Pie making is so satisfying. It’s nice to have these skills for when you need them. Remember to check out my How to Blind Bake a Pie Crust for all your pudding and fresh fruit pies, and here is a tutorial for How to Make a Lattice Pie Crust.
And now, let’s eat some pie! Here are some recipes:
Delicious double crust pies to make!
- Cranberry Custard Pie << This is one of my favorite pies to make during the holidays!
- Rhubarb Custard Pie << Probably my favorite pie of all time. No lie. Rhubarb, you precious thing you.
- Cranberry Cherry Pie << cherry pie filling with cranberries. What could be better than this sweet tart combo?
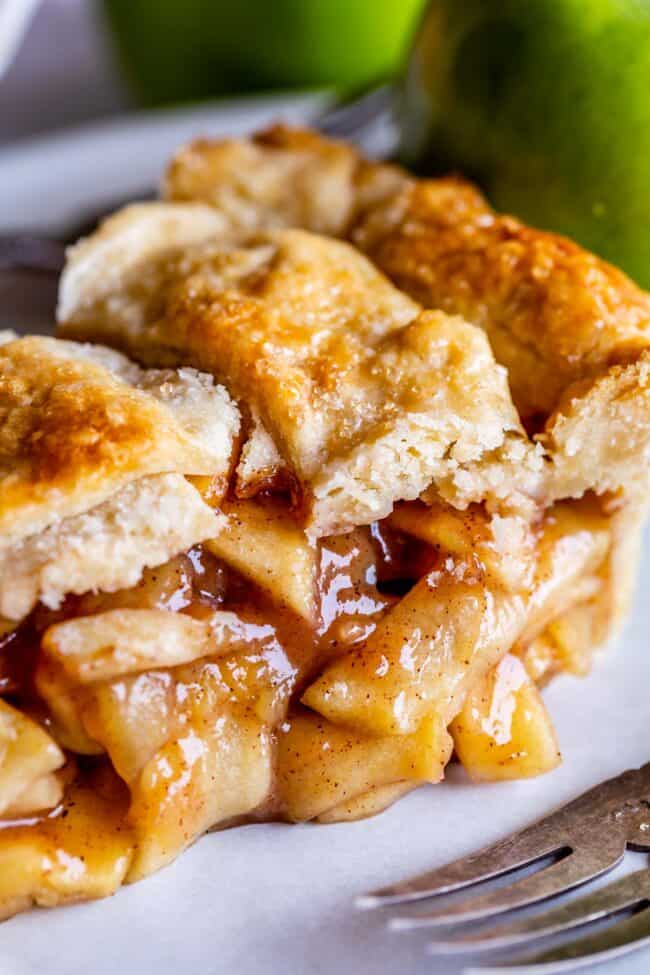
- Apple Pie << This is the only double crust apple pie I will eat. So good!
- Cherry Pie for 4th of July! << This pie is so pretty, it looks like a flag!
- Blackberry Pie << my mom’s recipe. I probably ate this more than any other pie growing up!
- Peach Pie from Lil Luna
- Fresh Pear Pie from Garnish and Glaze
Single Crust Pies that require no pre-baking (no Blind Baking):
Just pour the filling right into the shaped pie crust while it’s raw. Save the other half of the pie dough in the freezer for another day.
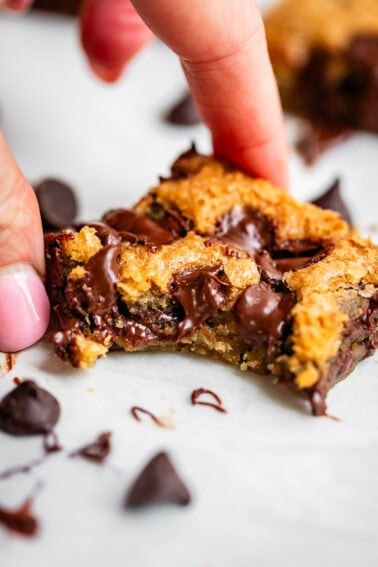
- THE Chocolate Chip Pie << Like a chocolate chip cookie, but in pie form. So amazing with ice cream.
- Pecan Pie Recipe with Buttery Streusel Topping << this is baked with toffee bits in it and Browned butter. YAS!!
- Crème Brulée Pumpkin Pie << I will never eat pumpkin pie without torching the top again. Ever.
Single Crust Pies that require Blind Baking
This means you bake the crust while it’s empty, then pour the filling in afterward. I’ve got a whole post that shows you How to Blind Bake a Pie Crust. Save the other half of the pie dough in the freezer for another day.
- Butterscotch Pie with Meringue Topping << Pudding pies are so amazing on a hot day.
- Lemon Meringue Pie << I need to update these photos, but this is a family favorite!
- Fresh Strawberry Glace Pie << This is one of the best summer pies out there!
- Fresh Blackberry Glace Pie << just like the strawberry version, but with blackberries!
And don’t forget savory pies made with a buttery Flaky Pie Crust!
- Classic Double Crust Chicken Pot Pie << The best comfort food out there, I say!
- Roast Beef, Carrot, and Creamy Potato Pie << It’s like a roast beef dinner, all wrapped up in a pie crust. YUM!
- Easy Italian Savory Rustic Pie from An Italian in My Kitchen
Facebook | Pinterest | Instagram
Homemade Flaky Pie Crust Recipe

Ingredients
- 2 & 1/2 cups all purpose flour, spooned and leveled*
- 2 tablespoons granulated sugar for sweet pies**
- 1 teaspoon kosher salt
- 8 tablespoons butter-flavored shortening***, (1/2 cup)
- 12 tablespoons butter****, cold (1 and 1/2 sticks)
- 2 tablespoons beaten egg, half a large egg
- 1/4 cup ice water, plus more if necessary.
Instructions
- Make the pie dough. Get a small bowl of ice water ready so that it's nice and cold when you need it.
- In a large bowl, whisk together 2 and 1/2 cups flour* (measured correctly; see note), 2 tablespoons sugar (1 tablespoon for savory pies), and 1 teaspoon kosher salt.
- Add 1/2 cup butter-flavored shortening or fat of your choice. You can use lard or butter for this step if you want.
- Chop up 12 tablespoons (1 and 1/2 sticks) cold butter into chunks. Add the butter to the bowl.
- Use a pastry cutter to cut the butter and shortening into the flour, pressing down firmly with the pastry cutter. Scrape out the pastry cutter with a butter knife and continue until the flour is mostly incorporated, but don't go overboard. There should be pea-sized bits of butter or even bigger chunks are okay. Various sizes of butter is what you are looking for. See photos!
- Crack an egg in a small bowl and whisk it together until it’s a little frothy. Poor half of it into another small bowl, leaving about 2 tablespoons. (Save the other half of the beaten egg for brushing the finished pie.)
- Add 1/4 cup ice water to 2 tablespoons beaten egg. Beat it together.
- Add the mixture to the bowl with the flour. Use a rubber spatula to mix it together, hydrating the flour as much as you can.
- Cover your hands with flour. Use your hands to knead the dough right in the bowl. Press the dough together and keep gathering up the dry bits to incorporate it into the mass. If the dough is not coming together, add ice water sparingly, 1-3 teaspoons at a time to moisten it. (I hardly ever add more water, but this does depend on climate.) Use extra water sparingly, you don't want to make your dough too wet. Stop kneading the moment that it has come together and is able to be shaped into a ball. Over working your dough results in a tough pie crust.
- Use a knife or your hands to divide the dough in half. Use your hands to shape each half into a disc. Cover or wrap in plastic, and chill for at least 30 minutes.
- Roll out the pie dough. Dust a work surface with plenty of flour. I love to use my pastry cloth for rolling out dough. (Another trick is to roll out the dough on a square of parchment paper; then you can invert the dough directly into the pie pan instead of having to lift the fragile dough.) Get out one of the discs of pie dough, leaving the other one to keep chilling.
- Let the dough sit on the floured surface for 5 minutes or so, to warm up a bit.
- Dust the pie dough with flour. Use your rolling pin to gently press the dough in the center, rolling outward. Rotate the rolling pin a quarter turn and gently press outward again. Check for cracks on the edges, and use your hands to press them and heal them a bit, adding a drop of ice water if necessary.
- Dust with flour and continue rolling, rotating a quarter turn every time. Dust with flour again, and before it gets too large, lift the dough and turn it over (you can do this multiple times), dusting your surface with flour as you go. This is to make sure the pie dough is not sticking to your work surface. Continue dusting, rotating, and rolling.
- Take the time to press together cracks at the edges, moistening with a drop of water and then dusting with flour as necessary. Continue rolling until the pie dough is about 13 inches across, making sure that it is not sticking on the bottom.
- Place your rolling pin along the edge of the pie dough. Lift the edge of the pie dough and place it on top of the rolling pin. Roll the dough onto the rolling pin and carefully transfer it to a 9 inch pie plate. See photos. (If you rolled out your dough on parchment paper, you can invert the pie dough into the pie plate.)
- Gently press the dough into the corners of the pie plate, fixing any cracks or tears as you go. There should be an overhang of dough along the edge. Leave it as is for a double crust pie.
- If you are baking a single pie crust, fold the overhang underneath itself and flute the edges using your knuckles or fingers (see photos). If you are baking the crust before filling, follow this tutorial on How to Blind Bake a Pie Crust.
- Place your pie plate in the fridge while you roll out the second pie disc. Roll the dough out to about 11-12 inches, a little smaller than the first one.
- Fill your pie. Don’t forget to dot with butter if your recipe calls for it. I always forget to do that!
- Follow this tutorial for How to Lattice a Pie Crust if you want. It's so pretty!
- For a traditional double crust, roll out the second pie crust, wrap it onto the rolling pin, and transfer to the top of your filled pie.
- Now you should have two pie crusts overhanging the edge of your pie pan. Use your fingers to gently press the dough together on the edges. Fold both crusts underneath themselves so they are nicely lined up with the edge of the pie pan.
- Use your thumbs or knuckles to flute the pie crust however you like. See photos.
- Chill your pie in the fridge for another 30 minutes if the dough has gotten soft.
- Just before putting your pie in the oven, remember to brush with milk or egg. I like to beat together 1 tablespoon beaten egg with 1 tablespoon milk. Sprinkle your pie with granulated or raw sugar, if it is a sweet pie.
- Follow your pie recipe for instructions on how to bake. I like to bake my pies at a high temperature (425 degrees F) for about 15-20 minutes, them lower the temperature to 350 and bake for another 25-50 minutes. I always bake my pies on a baking sheet that has been preheated in the oven, to help bake the bottom of the crust and make it super flaky.
- Don’t forget to use a tin foil pie shield to cover your crust for the last half of the bake time. See photos. This will keep your crust from burning.
- I know it’s difficult, but for most sweet pies (especially fruit pies), it’s important to let your pie cool to room temperature (2-4 hours) before cutting into them, so that the juices have a chance to set up.
How to make pie crust in a food processor
I will be honest, I do not like making pie dough in the food processor. I feel like I can't ever get the texture right. But it is doable with practice (apparently I need to practice more!), here are the instructions if you want to try it:
- Whir flour, sugar, and salt together, then add shortening and chopped butter. Pulse in one second intervals until a shaggy dough forms.
- Scrape the mixture into a bowl and continue with step 6 above. (Adding the mixture of 2 tablespoons egg and 1/4 cup ice water.) If you are determined, you can try adding the wet ingredients to the food processor and pulse. But be careful! Do not over mix! Turn out onto a floured surface and finish kneading by hand. Split in half and continue with the rolling process.


Howdy! I just tried rolling out the pie crust and it is a disaster!
I followed your recipe, froze the dough in wax paper and a ziploc for a few days then defrosted in the fridge.
I let the dough sit on a floured counter for a few minutes then had at it. From the get go, it just kept cracking and splitting apart.
I alternated between ice water and flour, constantly smushing it back together until I got it to size.
It just fell apart as I tried to roll it over the pin and lay it on the dish.
Now all the pieces keep sticking to my fingers as I try to smoosh it back together.
What am I doing wrong?
Hi Marty! Oh man, nothing sadder than a cracking, breaking pie crust. It’s hard to know exactly what went wrong with your crust without being there, but I’m guessing that it might have been too much flour. To measure flour correctly, use a spoon to filling a 1 cup measuring cup with flour, until it is overflowing. Then use a knife to level off the surface to get exactly one cup. If you dig your cup into a bucket of flour and scoop it out, it will pack the flour in, and you will get too much. This is a super common issue, and I hope your pie crust turns out perfectly next time :-)
This is fabulous! I made it twice during Christmas breaks with rave reviews from family and friends. I’ll be making this a lot in the years to come! Also, the crust is AMAZING!!!
I made this for my family for Thanksgiving (first time I ever made a pie from scratch) and combined it with your Dutch Apple Pie recipe. OMGoodness… I only used half the pie crust because I made the crumble and then I froze the other half (without baking). Did I mess up? I can’t find instructions on the best way to thaw the crust. I’m wanting to make the Dutch Apple again. Don’t get me wrong, I’ll make the crust again if I need to, but I do already have one in the freezer. Advice?
Hi Tasha! Thank you so much for sharing how much you loved this. So fun that this was your first time making a pie from scratch! You didn’t mess up at all, and you can definitely use the single crust you put in the freezer for making another Dutch Apple pie. Hope you enjoy it as much as you did the first time :-)
I don’t have butter flavored shortening I only have Criston vegetable shortening. Will that make a difference???
Yes Whit! totally use regular shortening! I like the flavor of the butter kind, but my aunt Shirley (who is a fabulous cook) just told me recently she doesn’t like the flavor of the butter kind and now I’m rethinking my whole life 😂 sometimes I make my pies with Lard instead of shortening, that works really well too. enjoy!
I just have regular shortening but I wanted more butter flavor. So, I used 14 tbsp on butter and 6 tbsp on shortening. Yikes! I’m hoping this will work! If I just want one pie crust for pumpkin pie, should I just half this recipe?
Hello Lynn! The math you did on butter and shortening works out great – you need 20 total tablespoons of fat, so 14 tbsp butter and 6 tbsp shortening should be just fine. You CAN half the recipe, but you can also save the other single crust, tightly wrapped in plastic and placed in a ziplock bag, in the freezer for the next time a pie craving strikes :-)
Crust was tasty and people loved it. It required more ice water than I expected and was not easy to work with (which is why I only gave it 4 stars), but the end result was very, very good.
Oh my goodness your Apple Pie recipe is absolutely amazing! I made your pie for Thanksgiving and got rave reviews from all! My adult son who makes and loves apple pie said it was the best apple pie he has ever had! My husband said the same.
This is the first pie crust I have made from scratch in twenty years! I used all butter and the only thing I changed in the process was when I divided the dough in half, I put one half ( the top) in the fridge and rolled the bottom half out and put it in the pie plate before putting it in the fridge because it’s much more difficult working with the very cold dough with arthritic hands.
Thank you so much! This recipe will e handed down to my granddaughters who love making pies too.
Your Apple Pie recipe deserves 10 STARS! Somehow in my earlier comment the rating only showed 2 stars. I’m sorry that was my mistake but the site wouldn’t allow me to change it to the 10 stars it should have!
I will definitely be subscribing for further recipes!
I just want to say I’ve been trying different pie crust recipes, and, while they have all been good, this has been the best one so far! Made the apple pie for Thanksgiving and it was pretty amazing.
Updating my review now that I’ve actually made your crust recipe. I wish I could give it more than five stars. This was perfect in every way—looks, taste, and texture. What’s more, the dough was very easy to handle and work with. I used organic red palm oil in place of crisco because it has the same properties but is healthier. Also, I used unsalted butter. With the tsp. of salt in the recipe, I found it to be just the right level of saltiness for my taste.
Bravo! I’m deleting all of my other pie crust … and some of them were very good!
I’m so happy you’ve found the one Dvorah! Thanks so much for sharing the tip about red palm oil, that is a great idea and so glad it worked out. Happy Thanksgiving! Thanks for coming back to review!
I haven’t made this yet so I probably shouldn’t be commenting, but I’m going ahead with five stars because it looks and sounds fab. You’ve shamed me into making it with a pastry cutter and my hands and leaving my food processor out of it! You’re absolutely right that using all butter doesn’t give you the right texture, but I’m strongly anti-Crisco (not judging, to each their own) and lard is out of the question for me because we don’t eat pork. What’s a baker to do?Here’s a bit of advice for those who are in the no-Crisco camp: Organic Red Palm Oil. It’s solid, like Crisco, at room temperature but it’s a healthy fat. It may sound exotic, but even my crummy supermarket carries it (on the bottom shelf in a corner!), and of course it can be found online. So, I’m off to make my Thanksgiving pies and I’m going to make your crust with this one substitution.
Hey, I was just wondering, If I want to make the crust the night before I make the pies (I want to make two pies, both uncovered ones) is it ok to just leave it in the refrigerator? At what point should I freeze it instead?
Hi Grace! Yes, it’s definitely ok to refrigerate well-wrapped pie crust dough overnight, or even for a couple days. If you’re going to wait more than 3 days before making your pie, then it’s best to freeze it. Enjoy your pies!
Does this crust use salted or unsalted utter?
Hi Kim! Salted butter was used in this recipe, but you can use unsalted if you prefer. Both will work great! Enjoy :-)
Do you have a recipe for gluten free apple pie that actually tastes good?
Hi Lorie! We haven’t tested a gluten free apple pie yet. If you try modifying this crust to make it gluten free, let us know how it turns out!
Hi!
In step 27 it says to lower the temperature of the oven and bake for another 25-50 minutes. This seems like a very big difference in time. Is this accurate?
Thanks!
Hi Noreen! Thank you for commenting. Yes, the big time range is accurate. Depending on the filling you’re using, a shorter or longer period of time may be necessary to correctly cook the pie in question. I recommend following your specific pie recipe for instructions on how long to bake and at what temperature. Enjoy!
Hi! Wanting to try this recipe but do I use salted or unsalted butter? And I’m assuming you don’t melt the butter before your put it in the flour ?
Hi D! I use salted butter. And no, definitely don’t melt the butter! Be sure to read all the instructions carefully about keeping the dough as cold as possible.
Can I make a few days in advance and refrigerate until I’m ready to make filling and bake?
Hi Jj! I wouldn’t refrigerate for longer than 24 hours, or they will just start to dry out. Freezing is the way to go! If they are well sealed, you can keep them in the freezer for about 3 months, or just a few days, whatever you need. Let thaw completely in the fridge, then sit at room temperature for a couple minutes to make rolling out easier. Enjoy!