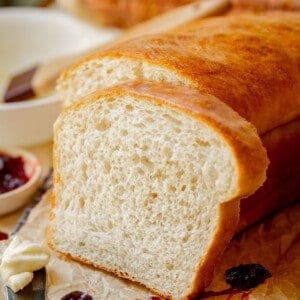
Easy Homemade White Bread Recipe
Hallelujah I've found it! She's the one, guys, the only homemade bread recipe you will ever need for the rest of your life! This fluffy white bread rises so tall and has a tons of buttery flavor. Did I mention that it's super fast and easy to put together? Even for bread-making dummies, I promise. You can have this bread done start to finish in just 1 hour. I will just you how to make it step by step!
Servings: 2 loaves
Calories: 1391kcal
Equipment
- nonstick spray
- plastic wrap
Ingredients
- 2 & 2/3 cups very warm water 105-110 degrees F
- 2 tablespoons instant yeast* active dry yeast works too, see note
- 1/3 cup granulated sugar
- 3 tablespoons oil olive oil or vegetable oil
- 1/2 cup vital wheat gluten** you can replace this with an equal amount of bread flour, see notes
- 7 teaspoons Diamond Crystal kosher salt*** use 4 teaspoons total if using table salt
- 6 and 1/4 cups bread flour**** spooned and leveled, plus more
Instructions
- In a large bowl or stand mixer, add 2 and 2/3 cup very warm water. I use water straight from the tap, and let it run until it's nice and warm like a baby's bath. If it feels so hot that you want to pull your finger away, it's too hot. If you want to bust out the thermometer, we're looking for a temperature between 105-110 degrees F.
- Add 2 tablespoons instant yeast* to the water. Add 1/3 cup sugar to the water. Stir this together and wait a minute or two, to make sure that your yeast is starting to bubble. See photos. You don't need to wait a long time, you just want to make sure the yeast is starting to bloom (and that you didn't kill it with too-hot water) Once you see any measure of foaming or bubbling, move to the next step. (If the water is flat and unmoving, ya done killed it. Toss it and start again.)
- Add 3 tablespoons oil. Add 1/2 cup vital wheat gluten. (If you don't have vital wheat gluten, use bread flour in it's place.)
- Add 7 teaspoons Diamond Crystal kosher salt. Yes you read that right. 7 teaspoons. (If you do not have kosher salt, add 4 teaspoons table salt. If you have Morton's coarse kosher salt, use 5 teaspoons.)
- Use a cup to add bread flour to a 1 cup measuring cup. Level off the top and add it to the bowl. Repeat. Add 6 cups total bread flour to the bowl with the yeast.
- If you are using a stand mixer,***** use the dough hook and mix on medium low speed until the flour is mostly incorporated. Scrape the sides of the bowl with a spatula and continue mixing with the hook on low speed. Add the remaining 1/4 cup flour as the dough mixes, if necessary (see next step).
- At this point you need to decide if you should add more flour to your dough or not. You do not want to add too much flour or your dough will be stiff and your bread too heavy. If you don't have enough flour, your bread won't rise well. You want your dough to be smooth, elastic, and slightly sticky. If you need more flour, add it a few tablespoons at a time. This dough will NOT QUITE form into a ball in the mixer. It is pretty tacky. Do not over flour. If you reach your finger in and press the dough, your finger should come away glossy but with no dough stuck to it. But if you take two fingers and pinch it harder, you will have dough stuck to your fingers.
- Once all the flour has been added, continue kneading for a total time of at least 5-6 minutes.
- Spray two 9x5 inch loaf pans with nonstick spray. Grease them really well! Rub with oil if you don't have nonstick spray.
- Remove the dough hook and scrape the dough onto a work surface lightly sprayed with nonstick spray, or you can use a lightly floured surface like a pastry cloth.
- Use a serrated knife to split the dough in half.
- Gently pat one half of the dough into a rectangle that is about the length of your loaf pan, about 9x5 inches. Roll up the long end of the dough to form a loaf, and pinch the edges together, smoothing as best you can. Lift the dough from the ends, folding them slightly underneath, and place your dough baby in the loaf pan. Your loaf should be nice and smooth on top. Repeat with the other half of dough.
- Spray the top of the dough with non stick spray and cover with plastic wrap that you have also coated with nonstick spray. You do not want your dough sticking to the plastic, it will ruin your beautiful rise!
- Turn your oven on to 350 and set a timer for 30 seconds. Turn the oven off when it is nice and warm inside, but not hot. You should still be able to comfortably place your fingers on the oven rack. Place your two pans of covered dough in the oven and shut the door. Set a timer for 15 minutes. (If your oven got too hot because you turned it on for too long (literally this is the story of my life), leave the oven door open, place a hot pad on top of the open door, and place the bread pans on top. Make sure there are no toddlers running around who like to climb inside hot ovens.)
- After 15 minutes of rising in the warm oven, remove the pans to another warm spot in your kitchen. The top of the fridge is a good spot, or on top of the preheating oven. Turn the oven on to 350 degrees F.
- Let the oven preheat and the dough continue rising for another 10-15 minutes, or longer if necessary (this depends on a number of variables, kitchen temperature being one.) You will know your dough is ready for the oven when the tops have risen at least 1 inch above the edge of the pan. They should look puffy and dome-y. A technical term.******
- Remove the plastic wrap and bake at 350 F for 25-30 minutes. You will know the bread is done when it is brown on top, and the edge of the bread is pulling away from the pan. I always use a thermometer to check my bread; this bread should measure about 200 degrees F in the center. The bottom and sides of the bread should be brown.
- Place the two bread pans on a cooling rack and let sit for about 1 minute. Then, with a hot pad on each hand, place one hand on the bottom of the pan, one hand on the top of your loaf, and invert. The bread should come right out of the pan, if not, loosen sides with a butter knife.*******
- This step is optional, but now is a good time to butter the top of your loaves if you like. It adds a ton of delicious, buttery flavor, but it will wrinkle the top of your loaf. You can try buttering one loaf and leaving the other to see which way you prefer!
- Place the loaf on a cooling rack on it's side to cool. (this helps the risen bread stay nice and tall; bread is naturally a little top-heavy). Repeat with the other loaf. Let the loaves cool completely; at least 30 minutes to an hour. (I know, I know)
- Slice with a serrated knife, using a sawing motion and being careful not to smash the bread. Serve with lots of butter and jam! I love to toast mine first.
- How to Store: Store the loaves of bread in gallon ziplock bags, or you can fit both loaves into a 2-gallon ziplock. I like to leave my loaves unsliced (slice as needed) to keep them from getting dried out. Your bread will keep on the counter for up to 2 days. I'm always shocked at how quickly homemade bread goes moldy; we are all accustomed to store bread with lots of preservatives. Don't forget about it! If you won't eat it on day 1 or 2, freeze it.
- Freezing instructions: Bread freezes beautifully. If you are not planning to eat the bread right away, freeze it as soon as possible after cooling. Thawed out frozen bread is just as fresh as the moment you froze it (for a few months, anyway.) You can slice all the bread before freezing to make it easy to thaw just what you need for a slice of morning toast, or you can freeze it as a loaf.
- If you have a slice of frozen bread, you can place it frozen into your toaster on a low setting. Toast it twice on low, or as many times as you need to thaw it/ toast it.
- Traditional 1-hour rise method: Most bread recipes have a 1-hour rise in a bowl before the dough is shaped into loaves. The special ingredients in this recipe allow us to skip this rise and still get tender, fluffy, puffy bread. But the longer amount of time yeast has to ferment before baking, the more flavor you will have. If you want extra flavorful bread and have time, follow the recipe as written, but allow the dough to rise in the bowl for 1 hour after kneading. Then continue with shaping the loaves. No other changes.
- Overnight instructions: You can let this bread rise overnight in the fridge. Reduce the yeast to 1 tablespoon, otherwise make the dough as instructed. Place in a large covered bowl in the fridge. Let chill for 8-12 hours, keeping an eye on it toward the end to make sure it doesn't overflow. Divide the dough, shape into loaves, and let rise at least 1 hour (possibly more), until they are room temperature and have risen well above the edge of the pan. Bake as directed.
Notes
*Instant yeast: Instant yeast is going to work a little faster than active dry yeast, from blooming to rising. If you are in a hurry it's definitely worth it to use instant yeast. Regular active dry yeast will still work for this recipe! Your bread could take up to 20 more minutes to rise.
**Vital Wheat Gluten: Vital wheat gluten is the gluten-y part of flour. Gluten are the long protein strands that form the structure that holds up bread and allows it to rise. There is gluten in flour; there is even more gluten in bread flour (which is what we're using in today's recipe.) And there is even MORE gluten in vital wheat gluten, giving our bread lots of structure and power to hold itself up. I love to add a lil vital wheat gluten to all my bread, but it's especially important to us it in a one-hour cheater bread recipe like this one, where we are skipping a rise. If you really can't get your hands on it, replace what's called for in the recipe with an equal amount of bread flour (best) or all-purpose flour (okay). If you don't use the vital wheat gluten, you may need to let your bread rise for a longer time.
***Salt content in this bread recipe: Under salting your bread is one of life's greatest missed opportunities. The salt in this recipe was calculated to have a ratio of about 1 and 1/8 teaspoon Diamond Crystal Kosher salt for every 1 cup of flour/gluten. For table salt, aim for about 2/3 teaspoon per cup of flour. It gets tricky because you don't know exactly how much flour you are adding until the end of kneading, of course. Add more salt accordingly if you add extra flour beyond 6 and 3/4 cups. (the wheat gluten counts as flour in this calculation.) Diamond Crystal Kosher salt really is worth searching for, by the way. Its amplifies flavor magnificently without adding too much salty flavor. If you are using Morton's coarse kosher salt, use about 5 teaspoons salt for this recipe.
****Bread Flour: You can replace bread flour with all purpose flour. Your bread may not rise quite as high but it will still be delicious! You will likely need more than the 6 and 1/4 cups flour called for (add more salt accordingly). You also will need to let your bread rise for closer to 45 minutes instead of 30. I also found in my tests that bread made with all-purpose flour took longer to bake, up to 5-10 minutes longer.
*****No stand mixer? You can mix this bread by hand if you don't have a stand mixer! Use a wooden spoon to mix everything together, and when as it starts to become difficult to mix, set the spoon aside and flour your hands. Knead the flour into the dough in the bowl, until it has come together. Turn the dough out onto a lightly floured surface. Knead with your hands, using minimal flour, for a full 7-8 minutes. Press the heels of your hands in, stretch the dough onto itself, then repeat. Return to the bowl to rise and continue with the recipe.
******Rising tips: Don't let your bread rise for too long! Or it will deflate when it hits the oven. Sadly this happened to a couple people in the comments (updated one week after posting). If you are nervous about knowing when to put it in the oven, use the poke test: poke your bread with a finger to make a 1-inch indentation. If it starts springing back, it's still rising. If the poke stays put, it's ready for the oven. The poke you made will rise up in the oven and disappear as it bakes.
*******If you underbaked: If you take your bread out of the pans within a minute of removing from the oven, and suspect that it might be under baked (if the bottom of the bread is still white and not browned, for example), it's not too late. Pop the bread right back in the pan and keep baking another 5-10 minutes. Cover the top with foil if it looks over-brown.
How to halve this recipe: Make as directed, but shape the bread into one loaf and use one 9x5 inch pan! Here are the measurements you need:
-
- 1 and 1/3 cups warm water
-
- 1 tablespoon instant yeast
-
- 3 tablespoons sugar
-
- 1 and 1/2 tablespoons olive oil
-
- 1/4 cup vital wheat gluten
-
- 3 and 1/2 teaspoons Diamond Crystal kosher salt
-
- 3 cups bread flour, plus 2-3 tablespoons
Nutrition
Calories: 1391kcal | Carbohydrates: 243g | Protein: 58g | Fat: 20g | Saturated Fat: 2g | Polyunsaturated Fat: 6g | Monounsaturated Fat: 9g | Trans Fat: 0.1g | Potassium: 351mg | Fiber: 8g | Sugar: 34g | Vitamin A: 6IU | Vitamin C: 0.01mg | Calcium: 96mg | Iron: 4mg
