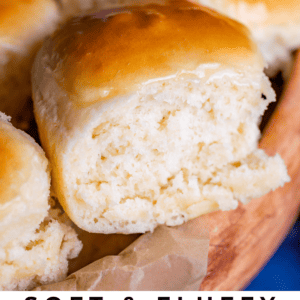


Super easy, fluffy dinner rolls done in ONE hour! And no instant yeast is necessary, regular active dry yeast is what I use. These rolls are soft and pillowy and full of buttery flavor! This is my favorite recipe to make for dinner on a weeknight because it is so easy to put together! Originally published April 9, 2020.

Table of Contents
- Quick one-hour rolls recipe
- Ingredients for one hour dinner rolls
- Quick rolls: active dry yeast vs. instant yeast
- How to make quick dinner rolls
- One hour dinner roll recipe tips
- 1 hour quick roll storage
- One hour quick yeast rolls FAQs
- More dinner roll recipes you will love!
- One Hour Quick Dinner Rolls Recipe
Last night I was using a towel to pull my whistling teakettle off the burner, and it lit ON FIRE. After a moment of shock, I threw it in the sink, and here I am, alive to tell the tale. Here’s my poor tea towel now:

It looks pretty pathetic, right?? The holes and frayed edges have nothing to do with the recent fire incident. This towel is at least 80 or 90 years old. I use it all the time.

My grandma Georgia embroidered this tea towel when she was 10 years old, when she had tuberculosis and was sent away from her family to be quarantined. It was 1930. She was there for a year and a half. She wasn’t getting better, and finally they sent her sister, Pauline, to be with her (they were Irish twins, only 11 months apart), and once Pauline arrived, Georgia recovered quickly.

(Complain about the COVID-19 quarantine all you want. I know I do! But just be grateful you’re not a scared 10-year-old with a deadly disease and have to go to a facility all by yourself, where you don’t know anyone. For 18 months. I seriously can’t even imagine!)
Grandma Georgia embroidered dozens and dozens of these tea towels in quarantine, made from the softest flour-sack material you’ve ever felt. I have a whole set of them, as do all my siblings.

I texted my family that I had burned one of my tea towels, and they shared stories about how they are the best towels ever and how sad it is that they are fraying. I mentioned that I don’t believe in not using heirlooms, and my sister Nikki told me why. The sentiment comes from Grandma herself:
“While moving grandpa to a nursing home, Grandma found 50-year-old towels that she had gotten brand new for her wedding and had saved for a special occasion. They had rotted. That’s why she told us all to use the towels she made for us right away. She didn’t want us to never use them. I loved mine until their deaths.”

I think it’s pretty funny that I internalized the message about using heirlooms instead of saving them for “a special occasion,” but didn’t know the story about my Grandma and the 50-year-old towels. I guess that’s how legends get started!

My brother mentioned that when his towels get too frayed to use in the kitchen, he uses them in the garage. He said he doesn’t think he’s ever thrown one away. After I took the picture of the burned towel, I intended to throw it in the trash. But I realized when he said that, it’s still there on my counter. I guess I’m having a hard time, too! Maybe I’ll take it out to the garage for a second life? What do you guys think about using heirlooms vs. packing them away?
Quick one-hour rolls recipe
Raise your hand if you love yourself some homemade dinner rolls! It really doesn’t get any better than a hot, fresh, buttery roll, right?

This recipe is adapted from my Aunt Shirley’s Famous Buttery Dinner Rolls, which are truly the most amazing rolls of your life.
Today’s version is similar, but can be made in half the time. We’re just skipping that first rise and moving straight to shaping the rolls after a short rest.
Featured Comment
“These. Are. The. Best! They were soft, fluffy, fast, and easy. I will definitely be making these again.” –Sarah
Ingredients for one hour dinner rolls
Here’s a quick shopping list to help you gather your ingredients. Jump to the recipe card below for the full ingredients and instructions!
- active dry yeast (or instant – see notes!)
- sugar
- shortening
- kosher salt
- milk
- egg
- all-purpose flour
- butter
Is it better to use milk or water for yeast rolls?
I prefer to use milk in yeast rolls for texture, flavor, and appearance. First, milk makes rolls softer. Ain’t nothin’ better than a fluffy, soft, melt-in-your-mouth dinner roll! Second, milk naturally includes sugar and fat, which give your roll incredible flavor. Third, the sugars in milk help your rolls brown more than water would, so the tops are golden brown and beautiful. No contest, right??
Quick rolls: active dry yeast vs. instant yeast
So, what should you use for these rolls: active dry yeast or instant yeast? Let’s break it down.
Active dry yeast
Active dry yeast is the most common kind of yeast you will see at the store. It needs to be “proofed” in warm (NOT hot!) water before you add the rest of the ingredients. It “takes longer” than instant yeast, but not that much – less than 5 minutes. To me, it’s more annoying to have to keep two kinds of yeast on hand all the time than to just add active dry yeast to some warm water and call it good.
I always get nervous mixing yeast straight into the dry ingredients anyway, because what if the liquid you add to the recipe is too hot and kills your yeast? You wouldn’t know until hours later when your bread didn’t rise. For that reason, I always think it’s worth it to “proof” the yeast in a bit of warm water, just to make sure everything is going to turn out in the end. Baking bread takes a while, and I’d rather know right away if I’ve killed my yeast!

Instant yeast
Instant yeast (or sometimes called bread machine yeast, rapid rise yeast, quick yeast, etc.) is made in a similar way to active dry yeast, but yields a yeast with even finer grains than active dry yeast. Because of this, it dissolves faster than active dry yeast, resulting in a slightly quicker rise. It can also be stirred directly into dry ingredients without dissolving in liquid first. As I’ve mentioned, I don’t really keep it on hand, but if it’s cheaper at the store, already in your cupboard (and not expired), or you have a personal preference, it will work just fine in these rolls. Also, even though it’s not technically required, you can still proof it to make sure that it’s working!
You can use active dry yeast OR instant yeast for this recipe. I promise it will work either way. Active dry yeast is the most common kind of yeast you will see at the store. Instant yeast (or sometimes called bread machine yeast, rapid rise yeast, quick yeast, etc.) is made in a similar way to active dry yeast, but yields a yeast with even finer grains than active dry yeast. Because of this, it dissolves faster than active dry yeast, resulting in a slightly quicker rise. It can also be stirred directly into dry ingredients without dissolving in liquid first.
How to make quick dinner rolls
Let’s make some rolls!! They are really so easy. This is the dough AFTER a 5-minute knead. It is pretty sticky! It will not shape into a ball. You are going to have to use your best judgment on how much flour to add. The less you add, the more tender your rolls will be. I added 2 and 1/2 cups.

Scrape the dough onto a well-floured work surface and shape into a ball. Cover with your grandma’s burnt tea towel, or a regular one will do, I suppose. Let rest 5-10 minutes.

Divide the dough into 12 pieces, about 2 ounces each. Round one end with your fingers, pinching on the other end.

And voila. A cute little roll. Place them in the pan with a bit of space in between.

Here’s what they look like after rising. You can totally make these rolls in a 9×13-inch pan if you don’t have a cast iron skillet.

Should you brush rolls with butter before baking?
I like to brush my rolls with butter after baking. This makes for a nice, shiny top and softens the crust. You can brush them before baking, if you like. Brushing with butter won’t create nearly as much browning as, say, an egg wash, but it does add great flavor.

One hour dinner roll recipe tips
Want the most delicious rolls ever? Here are my tips for getting perfectly light and fluffy dinner rolls, every single time.
- Use the “fluff and scoop” method for measuring flour. First, take a spoon and fluff the flour in your bag or container. Then gently scoop the flour into your measuring cup and level off the top. Make sure you don’t compress the flour!
- Use fresh yeast. If your yeast is expired (or just dead), your rolls won’t rise. Did you know you can keep your yeast in the freezer so it’ll last longer? Do it. Also, check the expiration date, and buy smaller amounts of yeast if you don’t go through it quickly/
- Use the right flour. Bread flour is great for pizza and crusty loaves, but it has no place in these rolls. All-purpose is your best friend for soft and tender.
- Let your rolls rise in a warm oven. It speeds up the rising process and makes this roll recipe into the kind of last-minute dinner-saver I’m all about.
1 hour quick roll storage
I like to keep these rolls on the counter, where they rapidly disappear (some of them into my mouth). Since these rolls have a fairly high amount of yeast, as well as butter and milk, they won’t stay fresh much longer than a day or two. I also don’t recommend refrigerating them. If you want to save some for another day, let them cool completely and then pop them in a ziploc or Tupperware and keep them in the freezer. They’ll stay good for 2-3 months.
If you want to make these rolls ahead and then bake them up fresh, it’s best to shape them as described in step 13, but instead of placing them in a hot pan, place them in a room-temperature pan (it should still be greased). Cover them with plastic wrap (make sure it’s tight, so the rolls don’t dry out). You can place them in the fridge for 2 hours up to 24 hours. The rolls will rise some, but will need an additional 30-60 minutes on the counter to rise more while you’re preheating the oven.
Can you refrigerate dinner rolls before baking?
Yes! Shape the rolls, place them in a cool or room temperature greased pan, cover them tightly, and refrigerate them until you’re ready to preheat your oven. Let them sit on the counter for 30-60 minutes to warm up and get a little puffier before actually baking.
How long can yeast rolls be refrigerated before baking?
Once you’ve shaped your rolls, they can stay in the fridge for a couple of hours or for a whole day. You might even be able to push it a little longer, but at some point your yeast won’t be active anymore and your rolls will deflate (sad). I don’t recommend leaving them in the fridge for more than 24 hours for the best results.
One hour quick yeast rolls FAQs
You’ve probably seen people wrap rolls in tinfoil and keep them in a warm oven (like, 200 degrees) until they’re ready to serve them. This keeps rolls warm until the meal, but it doesn’t keep them warm during the meal. What you can do is take a cloth napkin, clean sock, or tea towel, pour some dry beans or uncooked rice into it, microwave it for a minute or so, and then put it in the bottom of your basket. Lay a clean tea towel on top and wrap the rolls in it. Your rolls will stay warm throughout the meal, like magic!
100 degrees isn’t going to bake your bread; 700 degrees is going to turn your bread into a pile of ashes (also, what kind of crazy oven do you have??). The truth is that “bread” isn’t just one thing, so this question doesn’t have just one answer. If you’re baking a crusty loaf of sourdough, only a temperature hotter than 475 is going to get you the chewy, rustic bread of your dreams. Rolls? Different story. These are supposed to be light, fluffy, and definitely NOT crusty. That’s why we’re baking them at 375, the perfect temperature for tender and soft.
There are a few common reasons why yeast rolls don’t turn out light and fluffy.
You added too much flour. It’s easy to pack too much flour into a measuring cup if you’re not using the “fluff and scoop” method. First, take a spoon and fluff the flour in your bag or container. Then gently scoop the flour into your measuring cup and level off the top. Don’t try to compress the flour!
Your yeast is expired. If your yeast is dead, it can’t do its job. This is why checking the expiration date, keeping your yeast in the freezer, and proofing the yeast before going on with the recipe is so important.
You used the wrong kind of flour. Bread flour is perfect for pizza dough, sourdough, and crusty breads of all kinds, but it has too much gluten for rolls. Use all-purpose.
You didn’t leave enough time for rising. Obviously these rolls are all about the speed! Notice that we’re doing some special things here, like heating up the pan and letting the rolls rise in a warm (not hot) oven. Normally, if a roll recipe calls for an hour or even 90 minutes for a rise, you need to follow it (unless you like dense, gummy rolls).
Hard dinner rolls? Yeah, I bet that wasn’t your plan. Yeast rolls will be hard, instead of light and fluffy, if you add too much flour (or the wrong kind), use expired yeast, or don’t leave enough time for rising. See more details in the question above, “Why aren’t my yeast rolls light and fluffy?” (Also, I’m so sorry. This has definitely happened to me, and it is such a bummer.)

Gah just look at the center of this roll. It’s SO tender and fluffy. It is like eating a buttery cloud. This is the stuff dreams are made of, people. Happy Easter, everyone!! Enjoy feasting and celebrating the resurrection of Christ!
More dinner roll recipes you will love!
- Aunt Shirley’s Famous Dinner Rolls >> do not question Aunt Shirley. Her rolls are THE BEST.
- Big Fat Crescent Rolls >> these are the easiest crescent rolls. They are so soft and buttery!
- Buttery Sweet Potato Rolls >> these are fun to make for Thanksgiving.
- Cinnamon Honey Butter >> this is the best thing to put on a homemade dinner roll. SO good.
- Samoan Coconut Rolls (Pani Popo) >> if you’ve never tried these, run to the kitchen!
- Garlic Knots Recipe >> you dip these in garlic butter. Yes please.
- Garlic and Rosemary Skillet Bread >> the flavor of this bread is so rich. You will love it.
- Olive Oil and Rosemary Rolls from Recipe Girl
- Sea Salt and Herb Skillet Rolls from Sally’s Baking Addiction
- Easy Skillet Rolls from Crunchy Creamy Sweet
Facebook | Pinterest | Instagram
One Hour Quick Dinner Rolls
Ingredients
- 3 tablespoons warm water
- 1 tablespoon active dry yeast*
- 1 teaspoon sugar, to activate yeast
- 3 tablespoons sugar
- 1 teaspoon kosher salt
- 3 tablespoons shortening
- 3/4 cup milk
- 1 large egg
- 2 & 1/2 cups all purpose flour, spooned and leveled
- 1 tablespoon butter, to grease pan
- 1 tablespoon butter, to top finished rolls
Instructions
- To proof the yeast: In a small bowl or coffee mug, add 3 tablespoons warm water. It should be lukewarm but not hot. It should feel like pleasant bathwater and not sting your finger at all. If you want to get technical, it should be between 105-110 degrees F.
- Add 1 tablespoon yeast and 1 teaspoon sugar and stir. Let this mixture sit for 5 minutes. The yeast should dissolve and start to bubble.**
- To make the dough: Meanwhile, in a large bowl or stand mixer, add 3 tablespoons sugar, 1 teaspoon kosher salt, 3 tablespoons shortening, and 1 cup of the flour called for in the recipe.
- In a glass measuring cup, microwave 3/4 cup milk in 30 second increments until it is warm but not hot, the same temperature as the water. Add it to the flour mixture.
- Stir together with a wooden spoon or beat with the paddle attachment. (I actually just use my hand to stir using the dough attachment because I’m a weirdo and don’t like getting 2 attachments dirty.)
- At this point the yeast should be dissolved and bubbly. Add it to the flour mixture.
- Add 1 large egg and beat well until combined.
- Add the remaining flour in increments, mixing in between. You might not need all the flour, and you might need a bit more. Bread is finicky like that. Use your best judgment to continue adding flour until the dough is smooth and soft, but still sticky. It will not pull away from the sides of the bowl completely. You need to add enough flour so that the dough comes together, but the less flour you use, the more tender your rolls will turn out. See photos.
- Once all the flour is incorporated, use the dough attachment to knead the dough for 5 minutes. (If you are doing this by hand, you will need to knead for about 8 minutes on a floured work surface.) The dough is still quite sticky at this point. See photos.
- Scrape the dough onto a well floured work surface, shape into a ball, and cover with your grandmother’s 90 year old tea towel. (Or any tea towel will do I suppose). Let rest 5-10 minutes.
- To prepare the pan/skillet: Meanwhile, turn your oven on 375 degrees F. It’s only going to be on for 2-3 minutes.
- Add 1 tablespoon butter to a 10-inch cast iron skillet OR a 9×13 inch baking pan. Place in the preheating oven until the butter is melted and the skillet/pan is hot. Turn the oven off. Use a pastry brush to swirl the butter around to coat the interior, making sure you grease the sides. Leave the pan in the hot oven until you are ready to shape your rolls.
- To shape the rolls: Press down the resting dough and get out any air bubbles. Divide the dough in halves until you have 12 equal pieces (They should be about 2 ounces each if you want to measure.) Shape each piece into a roll shape by rounding the dough with your fingers on one side, then bring them around to pinch the dough on the other side. See photos. Place in the hot pan/skillet, pinched side down. There should be a little bit of space between each roll.
- Cover the rolls with a tea towel. Open your turned-off oven and gauge the temperature. It should be warm but not too hot. If you can put your finger on the rack without burning yourself, then put your covered rolls in the oven and shut the door. If the rack is too hot to touch, place the rolls in the oven but leave the door open so that it continues cooling off a bit. We don’t want the rolls baking yet.
- Leave the rolls in the warm oven for 15 minutes. After 15 minutes, remove from the oven (place on top of the oven or in another warm place to continue rising) and preheat the oven back up to 375 degrees F.
- Let the oven preheat and the rolls continue rising for another 10-15 minutes. The rolls should have doubled in size, and the total rising time after the rolls have been shaped should be at least 25 minutes.
- Remove the towel and bake the rolls at 375 for about 12 minutes. The tops should be a deep golden brown all across the top. A thermometer should read at least 190 degrees at the center of a roll.
- Remove the rolls from the oven and immediately melt 1 tablespoon of butter on top of the rolls, using a pastry brush to spread it around.
- Let the rolls set for about 5 minutes before digging in! Eat with lots of melty butter! Or even better, this Cinnamon Honey Butter!


These rolls are delicious! Love the idea to proof them in a warm pan and warm oven. Love your recipes! Thank you!
Hi
Sorry about your teatowel. Why not cut off the burned part and just rehem by sewing machine the raw edge. Doesnt matter the finished shape of the towel. It will still be useable.
These are the first yeast rolls I’ve made that turned out. This is attempt number 4. I still think they could be fluffier and a little more tasty. One comment about possibly leaving it to rise for much longer was helpful. Made me think if they didn’t double their size in a the 10-15 min I could wait longer. Any suggestions on what I could do differently to increase flavor a bit and make them a bit fluffier. Thank you for this shortened, detailed recipe.
What a wonderful story about your grandmother! (And no, I can’t imagine how scary and sad it must have been for her to be away from her family while also battling a frightening, painful disease.) As far as the heirloom question, I would save one or two of the towels—maybe put them in a shadow box or frame—and use the rest. If you ask me, your having burned one just adds another chapter to their story.
Thank you for the recipe, which I’m about to make for our dinner, but thank you for sharing your family’s memories, as well.
Thank you so much for this comment Nicole! I think it’s good to hold on to these memories and heirlooms :) I’ve saved my “Friday” towel, which was in the best condition, and tucked it away. I like the shadow box idea, maybe I’ll do that! I hope you and your family enjoy the rolls, thank you so much for taking the time to respond! I love hearing from you :)
Thank you, dear, for including the history of your heirloom tea towels – how wonderful it is that you have them!
I am elderly but still miss that I never had a grandmother to love and stories like this always both warm and pinch my heart. Please do not discard your burned towel – please! If too burned to use, cut off burned area, wash and iron the rest of it, place carefully in a simple picture frame, and hang it in your kitchen – it deserves to be used and/or lovingly displayed. What beautiful legacies you and your family own…please love and cherish them.
Amen to Carolyn’s wonderful idea! I love it:)
We love these dinner rolls. So fluffy & delicious. However, it did take me 1.5 hrs just to get them to the baking point. And my oven took 20 min. I’m going to work on getting through it in less time. My house always smells so yummy. Thanks for the recipe!!