I’ve had my fair share of ho-hum Caramel Candy. Caramel is all about the texture, and too often, wrapped caramels are hard to bite into, locking your jaw in place, pausing all conversation. Even if the flavor is good, it doesn’t make up for the unpleasant chewing experience. THIS recipe, however, is absolute perfection. My homemade caramel candies are made with dark brown sugar, which is a little counter-culture in the caramel world. The flavor is exceptional. The best part? The texture and softness of these caramels will knock. you. out. I’ll show you how to make them!
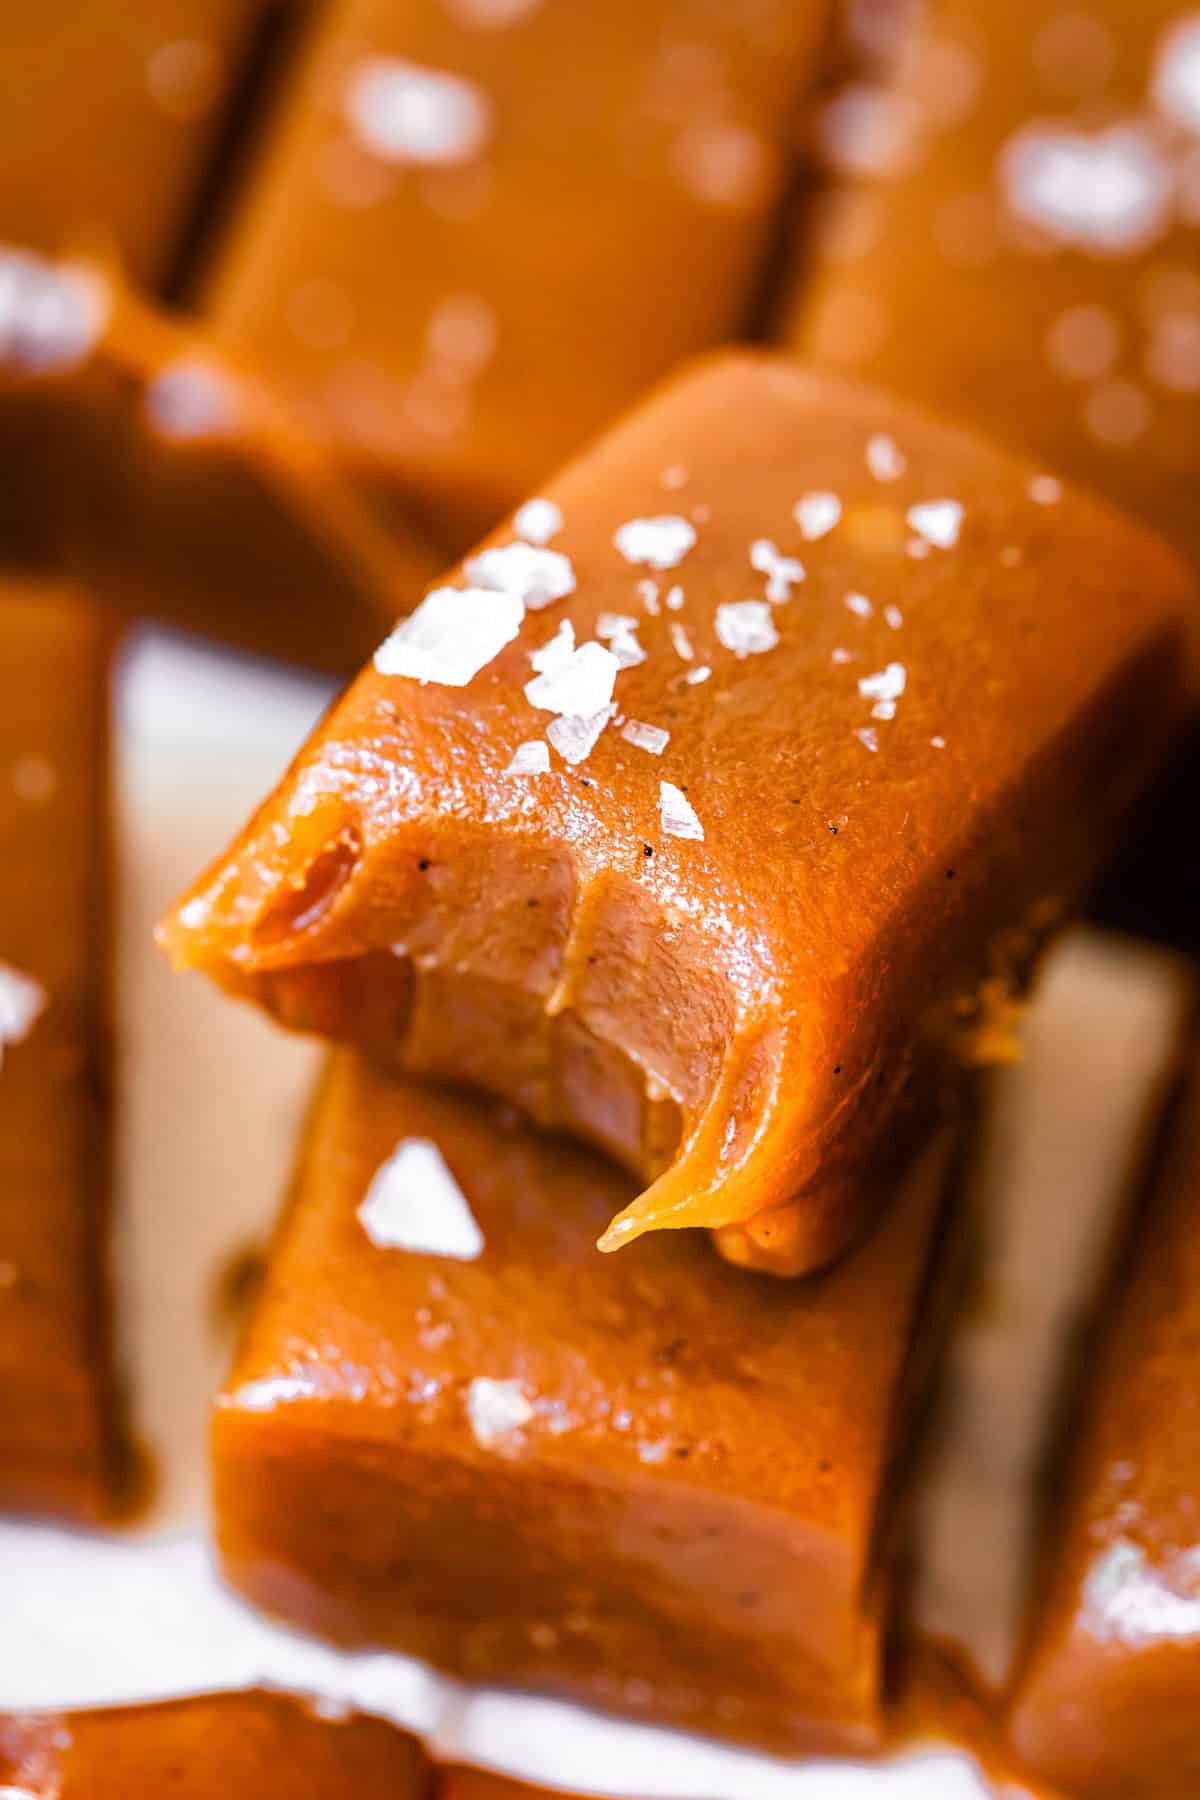
Table of Contents
- The caramel rabbit hole
- Homemade caramels x1000
- The best caramel: smooth, rich, and deep
- Caramelizing brown sugar
- Evaporated milk vs Heavy Cream
- TL;DR
- Caramel candy recipe ingredients
- How to make homemade caramels
- What’s the best way to cut homemade caramels
- How to store caramel candies
- Can you freeze homemade caramel candies?
- Caramel candy frequently asked questions
- More candy you’ll love
- Extra caramel, yes please!
- Soft Homemade Caramels Recipe
We took our older kids to see Weezer a few weeks ago, it was their first concert ever. It was also their first time witnessing their mother at a live music event, which might have been just as shocking. I’m a little obsessed with Weezer, especially when they play the entire Blue Album start to finish. It was basically a teenage dream come true. I was obsessed with that album for years, I may have gone a little crazy!
It made me realize that I have been doing a terrible job educating my kids about proper 90s music. The kids were glad to be there, but in a sit-back-with-their-arms-folded kind of way. (Nothing like the flailing and air guitar-ing that was going on in my corner.)
The next day my son Truman, who is 11, was telling his friend Eli about the concert.
Truman: “You know Weezer?”
Eli: “No.”
Truman:”Really? Africa?” [THIS is the song my son most identifies with Weezer?? WHAT IN THE ACTUALLLL]
Eli: “Nope.”
Truman: “Well it was cool. They spelled out ‘F-yeah-Sacramento’ in balloons.”

Really? REALLY?? THIS is the most memorable moment from seeing one of the greatest rock bands of all time? Their cover of an 80s song and some balloons?? ARE YOU KIDDING ME RIGHT NOW.
Okay, fine, I guess the balloons were pretty fantastic, just look at the scale. They were huge. I was busting up. It wasn’t even Weezer that pulled out the balloons, it was the opening band, The Flaming Lips. (Whom I also adore. If you have never heard their song “Do you Realize??” go, now.)
Ah well, so much for my children’s musical education. I may be falling behind in this facet of life, but at least I’ve still got the dessert education going strong.
The caramel rabbit hole
My obsession with caramel continues. Sometimes when you go down the rabbit hole, you never come out, apparently. Honestly, it’s just that sometimes I go so deep in researching and testing a recipe that I figure out the tips and tricks to make adjacent recipes, and then I just have to share them all. Check out my recent posts for my favorite Salted Caramel Sauce, Caramel Apples, Salted Caramel Sandwich Cookies and of course my OG recipe for traditional Caramel Sauce…I think my manic obsessive caramel moment has reached it’s peak.
Homemade caramels x1000
This recipe is coming at you after making the rounds in my kitchen for WAY too long. I have been shoving pans of caramel off on my friends for weeks. I made yet another batch this morning and my friend Sarah stopped by. She said, “what’s that amazing smell,” I said “caramel again,” and she just busted up laughing. It’s been weeks and weeks you guys. (Sarah personally has taken at least 3 batches off my hands already. True friendship right there.)
I always test my recipes several times before publishing them on the blog. But since hiring out a team to help me build my content (it’s not just me over here behind the curtain anymore), it means that I have to work on my recipes well in advance, so that we can all stay organized. I might be developing a recipe today that won’t be published for 3 months.
Do you know what this means? That I have 3 MONTHS of potentially changing a recipe if it’s not exactly exactly exactly the way I want it. 3 months of me second guessing myself. I drive myself insane making recipes for the umpteenth time, even when it’s already had my own stamp of approval. Gosh, I’m so annoying.
But it’s all worth it guys. At least I hope it is, for you 😂 All this testing means you don’t have to do any at all!
The best caramel: smooth, rich, and deep
Have you heard of Bequet Caramels? They are local to Montana, where Eric is from, and we always buy some while passing through Bozeman on the way to his parent’s house. They are insanely good. Eric’s sister Reesy, who is quite the caramel connoisseur, introduced them to us years ago. She is obsessed with them. The Bequet brand has exploded in the last 5 years. You can find their caramels all over the country now, and they have won multiple national awards. They have the richest, most unique flavor, while being incredibly soft and a dream to bite through.
When I set out to make yet another caramel — the kind of caramel candy that you wrap and give away at Christmas — I knew I wanted them to be exactly like Bequet caramels. Could I crack the code??
It took me 32,000 tries, but we got there in the end!
What makes Bequet so special? It’s the brown sugar.
Caramelizing brown sugar
Almost ALL caramel recipes start out with white sugar. You heat the sugar in a pan until it turns yellow, then amber, then caramel color. (See photos of this process here.) The color change is how you know it has caramelized.
Can you see the problem? Brown sugar is already dark. How can you tell when it has caramelized without burning it?
On top of that, brown sugar is a little less stable than white sugar. Brown sugar is regular sugar + molasses. (Did you know that?? Molasses is the syrup leftover after they boil sugar beets to make white sugar…then they add the molasses back in, and that makes brown sugar. Read all about it here, it’s kind of fascinating.)
Because of the molasses, brown sugar is more prone to burning and hot spots. So we do have to be a little more careful. BUT IT CAN BE DONE!

I love the flavor of brown sugar and don’t feel it can be easily duplicated. I sneak brown sugar into all kinds of recipes that don’t traditionally have it, like my most recent Biscotti post, or my famous Snickerdoodles. Brown sugar is just so good.
There are lot of recipes for “fake” caramel using brown sugar, like my 10 Minute Caramel Popcorn recipe. But most of them don’t call for the pivotal step of caramelizing the brown sugar all on it’s own before adding in the other caramel ingredients. That’s what today’s recipe is.
The key to caramelizing brown sugar is
- stirring consistently with a whisk,
- watching for the first sign of smoke, and
- using a candy thermometer to make sure you don’t go too far and burn it.
Taking these steps to caramelize the brown sugar gives us the most unique, deepest caramel I’ve ever had! I’m obsessed.
Evaporated milk vs Heavy Cream
Most caramel sauce recipes call for heavy cream. Most wrapped candy caramel recipes call for evaporated milk. Why?
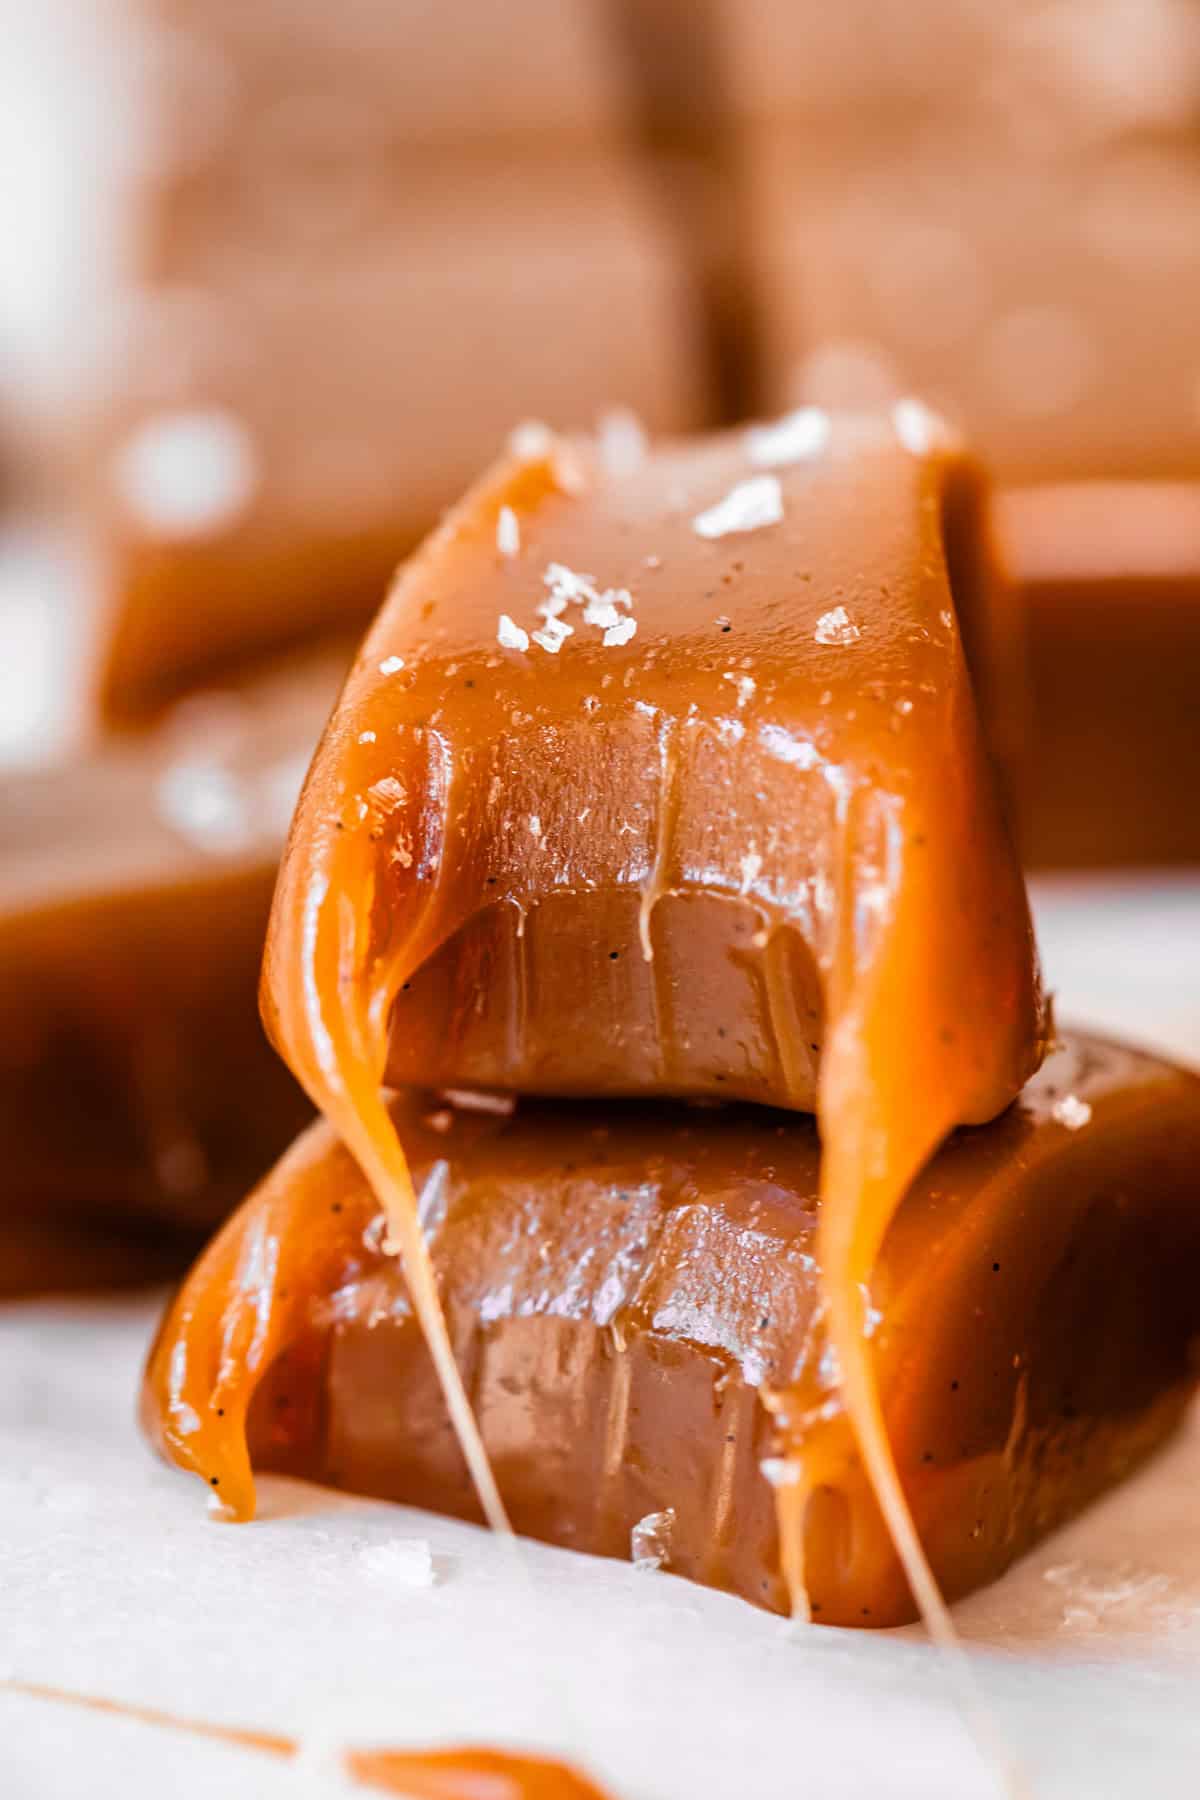
Cream is fresh, and not shelf stable. When you add it to caramel, it makes your caramel incredibly smooth and stretchy. Like this:
Evaporated milk is regular cow’s milk that has been heated up until about 60% of the water content has evaporated. It comes in a can and you can keep it on the shelf for years before using it. It is not made from cream, and naturally has less fat than cream.
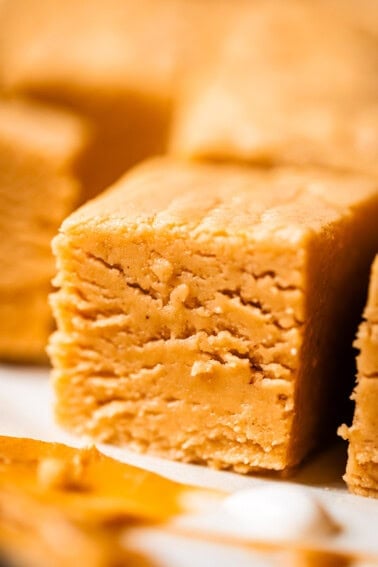
I did a lot of testing for this recipe comparing the results between cream and evap milk. (Look, we’re even on a nickname basis over here.) Evaporated milk produces a caramel that is a little more “grainy” and “fudgy,” (because there is less fat in it.)
Don’t let the word grainy scare you; both types of caramel are absolutely delicious. You will understand the texture nuance when you taste it. You can even see it in this picture compared with the one above:
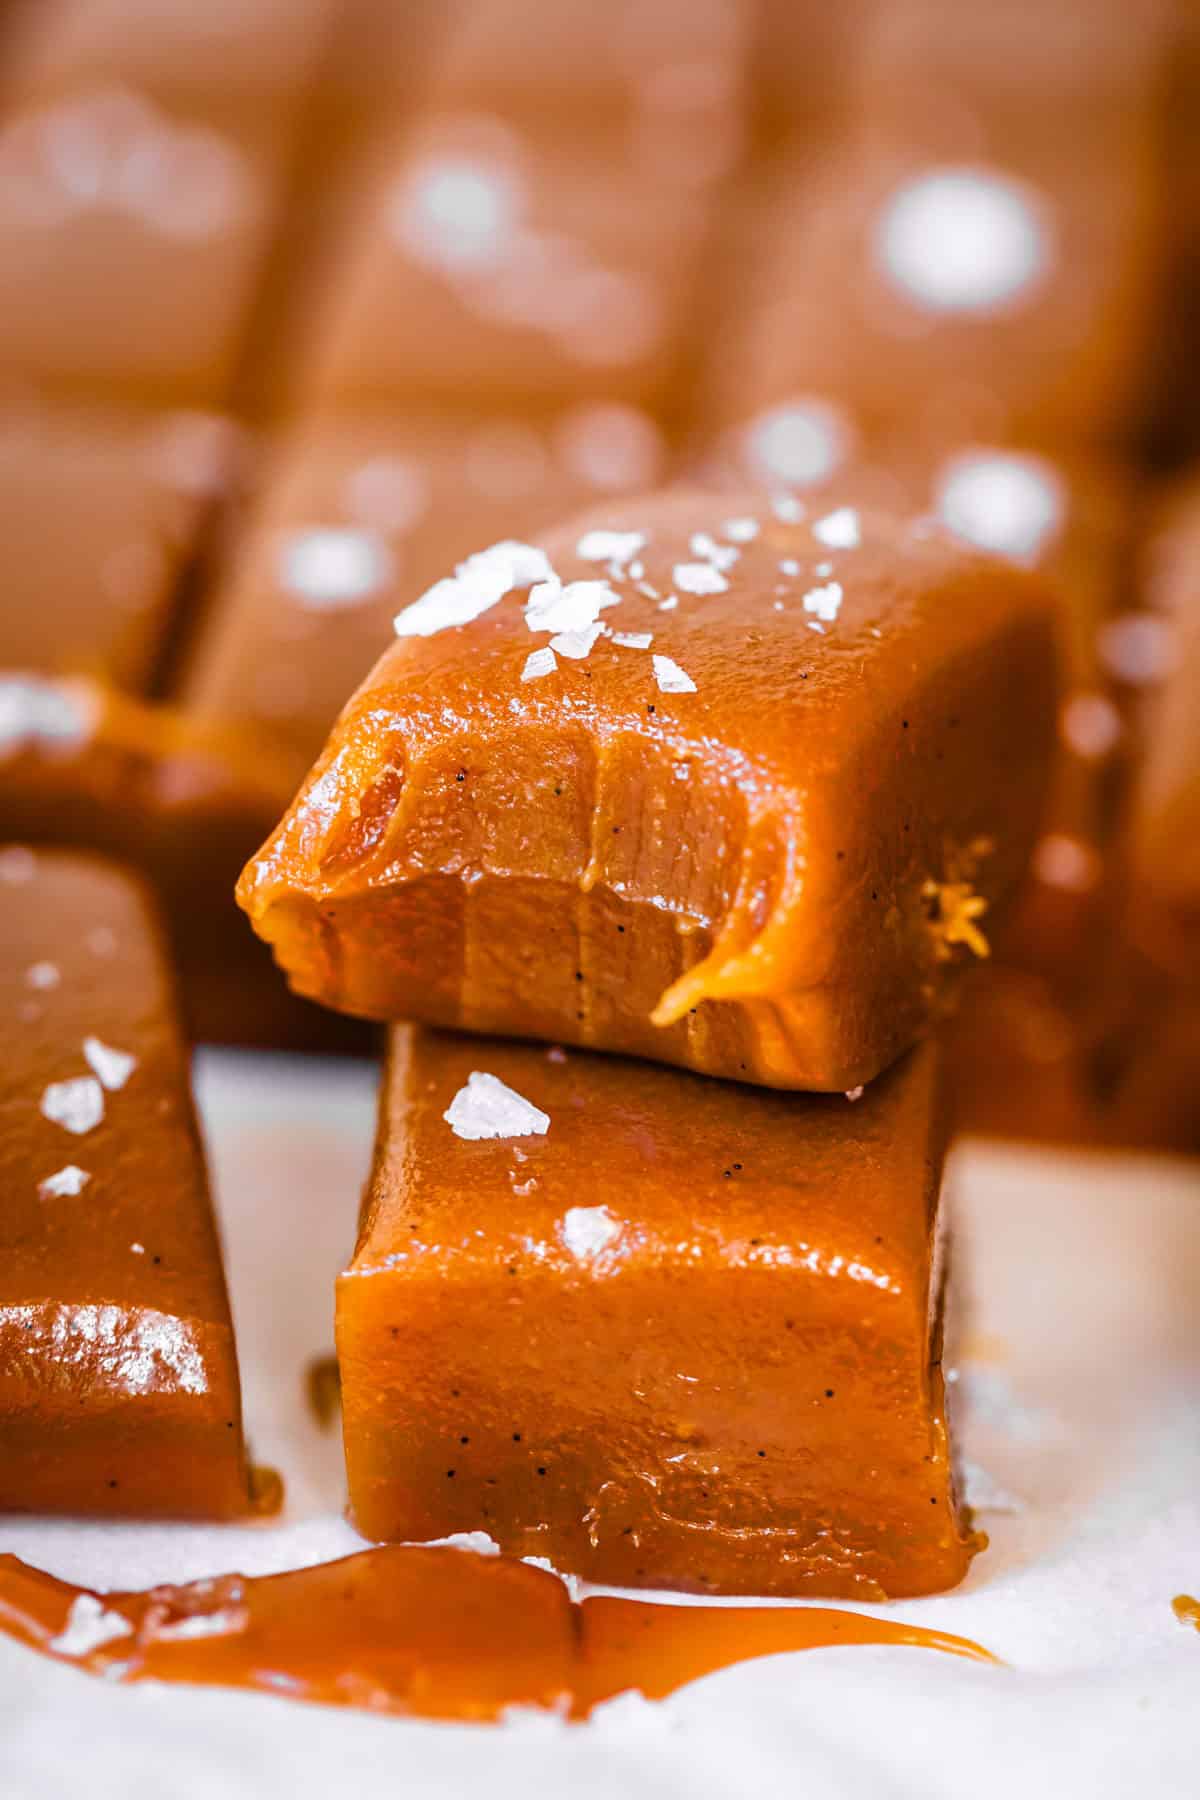
Can you see it? Can you taste it by just looking? Do I sound like an absolute psycho right now?? I’ve been staring at caramel so long that the two photos above look totally different to me, and not just because of the obvious pull and stretch difference.
This “evap milk” caramel is not going to “pull” as far. Your grandma almost surely used evaporated milk to make her homemade caramels, so it will likely taste very nostalgic. Caramel made with cream feels a little more “professional,” like the caramel you will find at See’s or any other candy shop (like Bequet. They are definitely using cream, not evap.)

TL;DR
Here’s how to get the BEST caramels of your life:
- use brown sugar instead of white sugar. It lends a rich and deep flavor profile to these caramels
- caramelizing the brown sugar before adding the rest of the caramel ingredients (dairy and corn syrup) makes the caramel flavor even more rich and unique
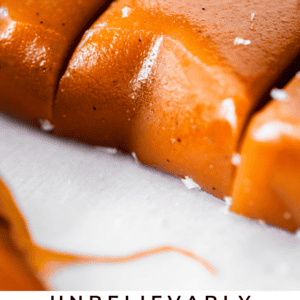
- These caramels are darker in color compared to a regular caramel (think of how light Kraft caramels are) because brown sugar is brown. And then we go and caramelize it until it’s not quite burned. It’s not a chocolate caramel, I promise. Just a super deep caramel flavor.
- You can choose to use cream OR evaporated milk for your caramels. Cream will produce a smoother, stretchier caramel. Evap milk will give you a slightly grainier “fudgy” caramel. (Not a bad thing)
Now a few housekeeping items:
Why corn syrup?
Corn syrup is nonnegotiable in this recipe! But wait. Isn’t corn syrup bad for you?? I know the food campaigns of the past still make everyone feel a little wiggly about using corn syrup, but it’s time to let it go. Read this defense of corn syrup and you will learn why pastry chef’s the world over adore corn syrup. For today’s recipe, we need the corn syrup to help prevent the caramel from forming back into sugar crystals. It keeps the caramel smooth, creamy, and just the right texture.
Heavy bottom pot
You need a heavy 3-quart pot for this recipe. No exceptions! When you pick it up, it should feel HEAVY. Give it a swing!
A cheap thin pan will heat your caramel unevenly, creating “hot spots” and causing it to scald. This is especially important when caramelizing brown sugar, which is already prone to uneven cooking. The pan quality really can be the difference between perfect caramel and a burned sticky mess. Trust me!
Caramel candy recipe ingredients
It really doesn’t take much to make this caramel! These are all ingredients I have stocked regularly at my house, but look through the list to see if there is anything you will need to buy special to make this recipe. As always, the full ingredient amounts and instructions are below in the recipe card!
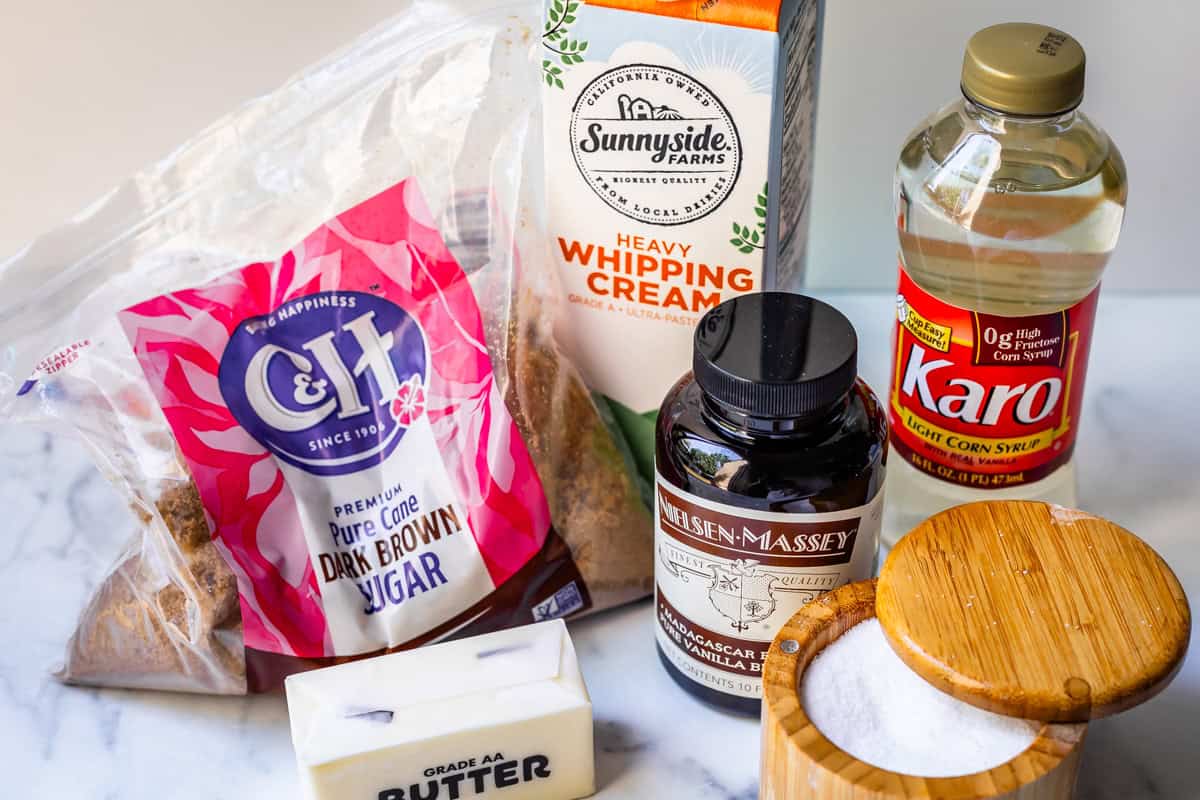
- dark brown sugar
- light corn syrup
- butter
- heavy cream
- vanilla, or vanilla bean
- kosher salt, or sea salt
How to make homemade caramels
Are you ready?? I know I’ve talked for approximately 12 hours so far, but I promise, this recipe is actually super easy to make. Takes about a half hour, then of course you need to wait for it to cool before you can cut it.
Start out with some water in the pot. Swirl it around and get the edges wet; this will help prevent any errant sugar crystals from burning on the sides.
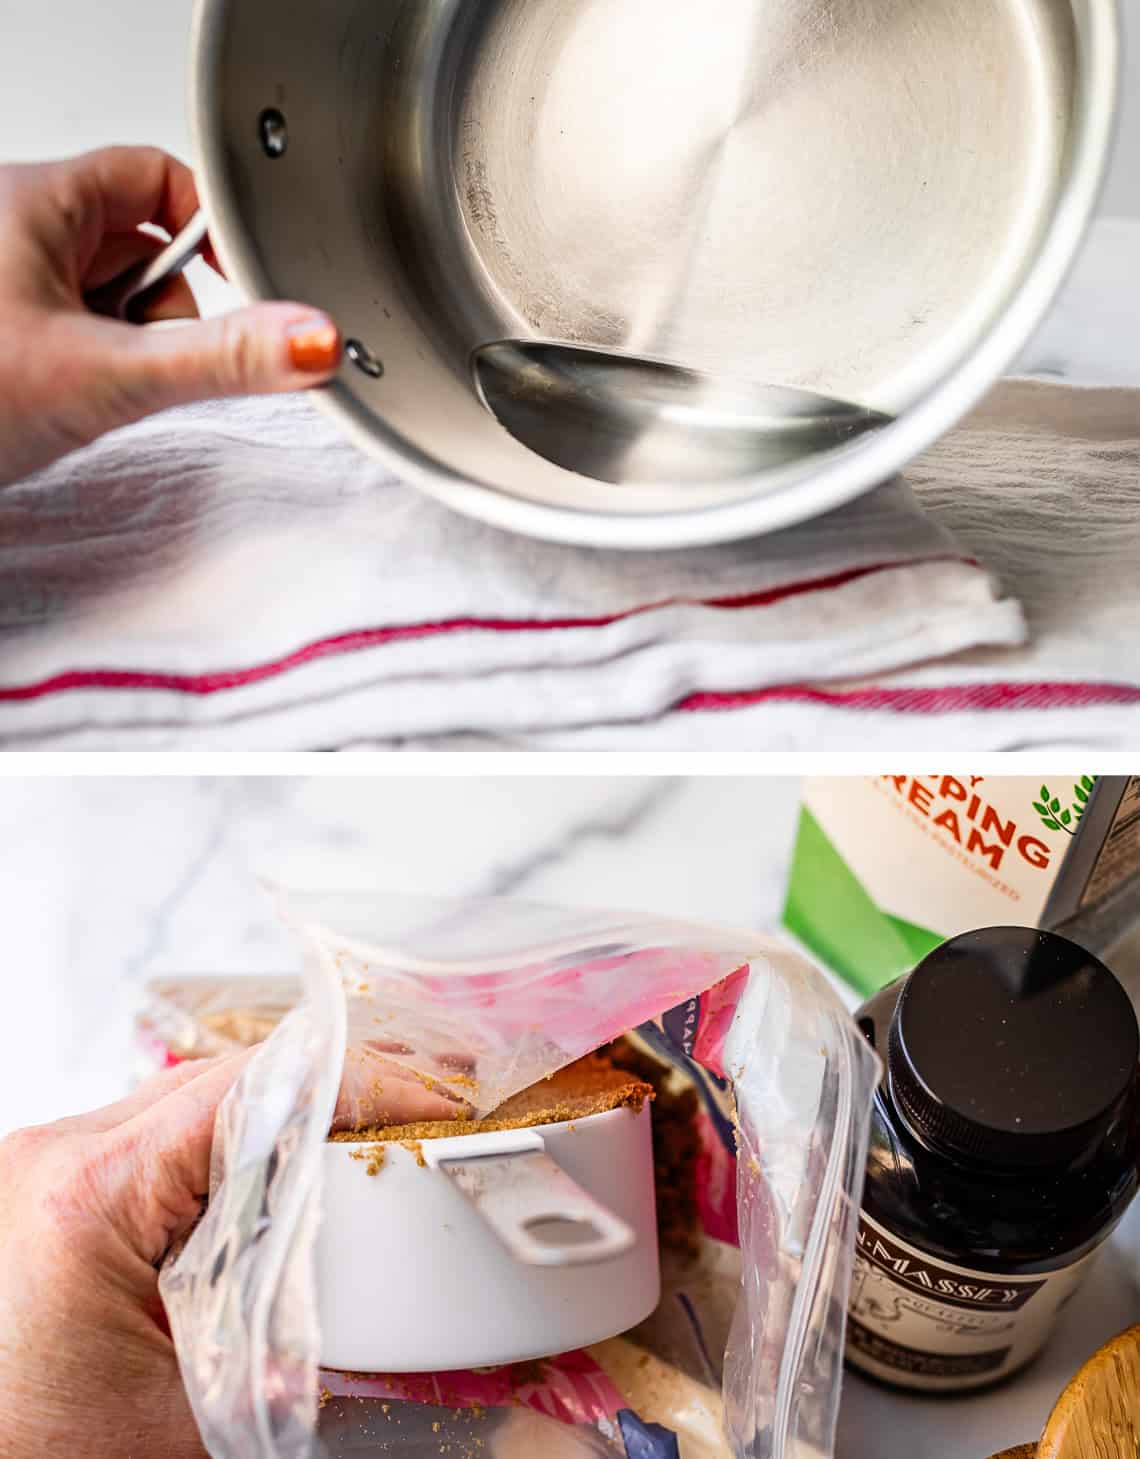
I feel a little silly including this picture, but I just want to make sure you know what I mean when I say to “pack” your brown sugar. It’s super important for this recipe. I like to put my measuring cup in the bag, then press the sugar into the cup using the bag, to keep my hands clean.
Dump your brown sugar in the pot, making sure to carefully place it right in the center. Don’t get any sugar crystals on the edge of the pot. If you do, swipe them with some water. All of the water will evaporate in the caramelizing process, so if you need to add an extra tablespoon or so, that’s fine.
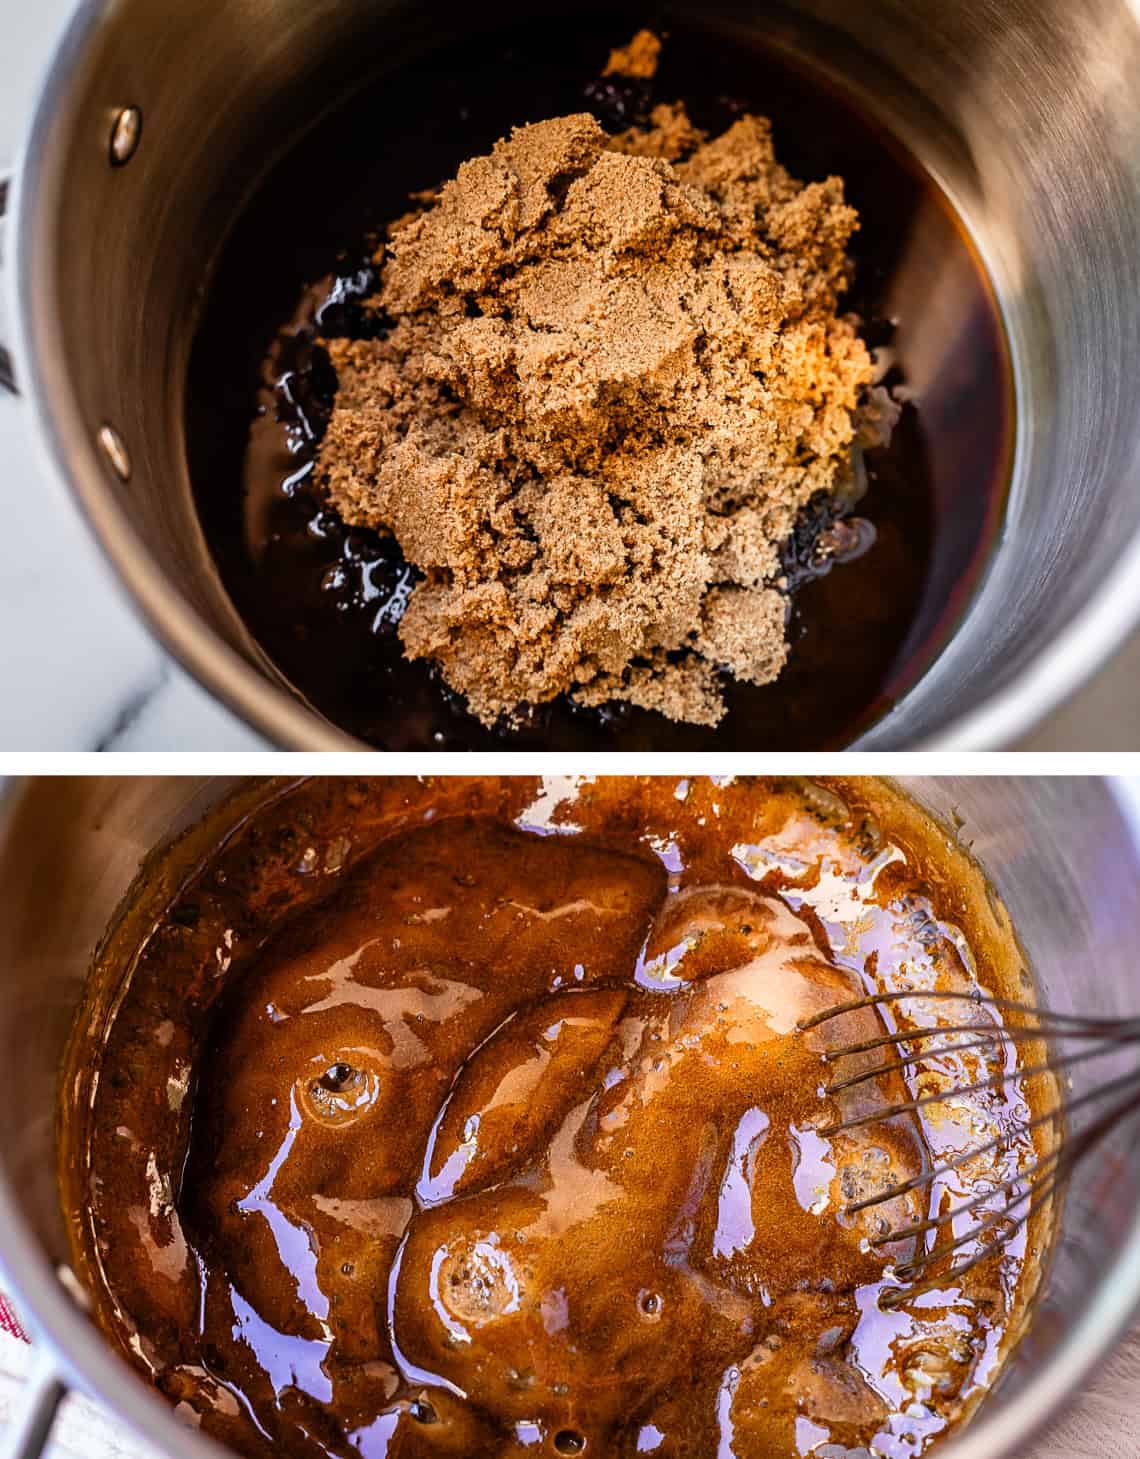
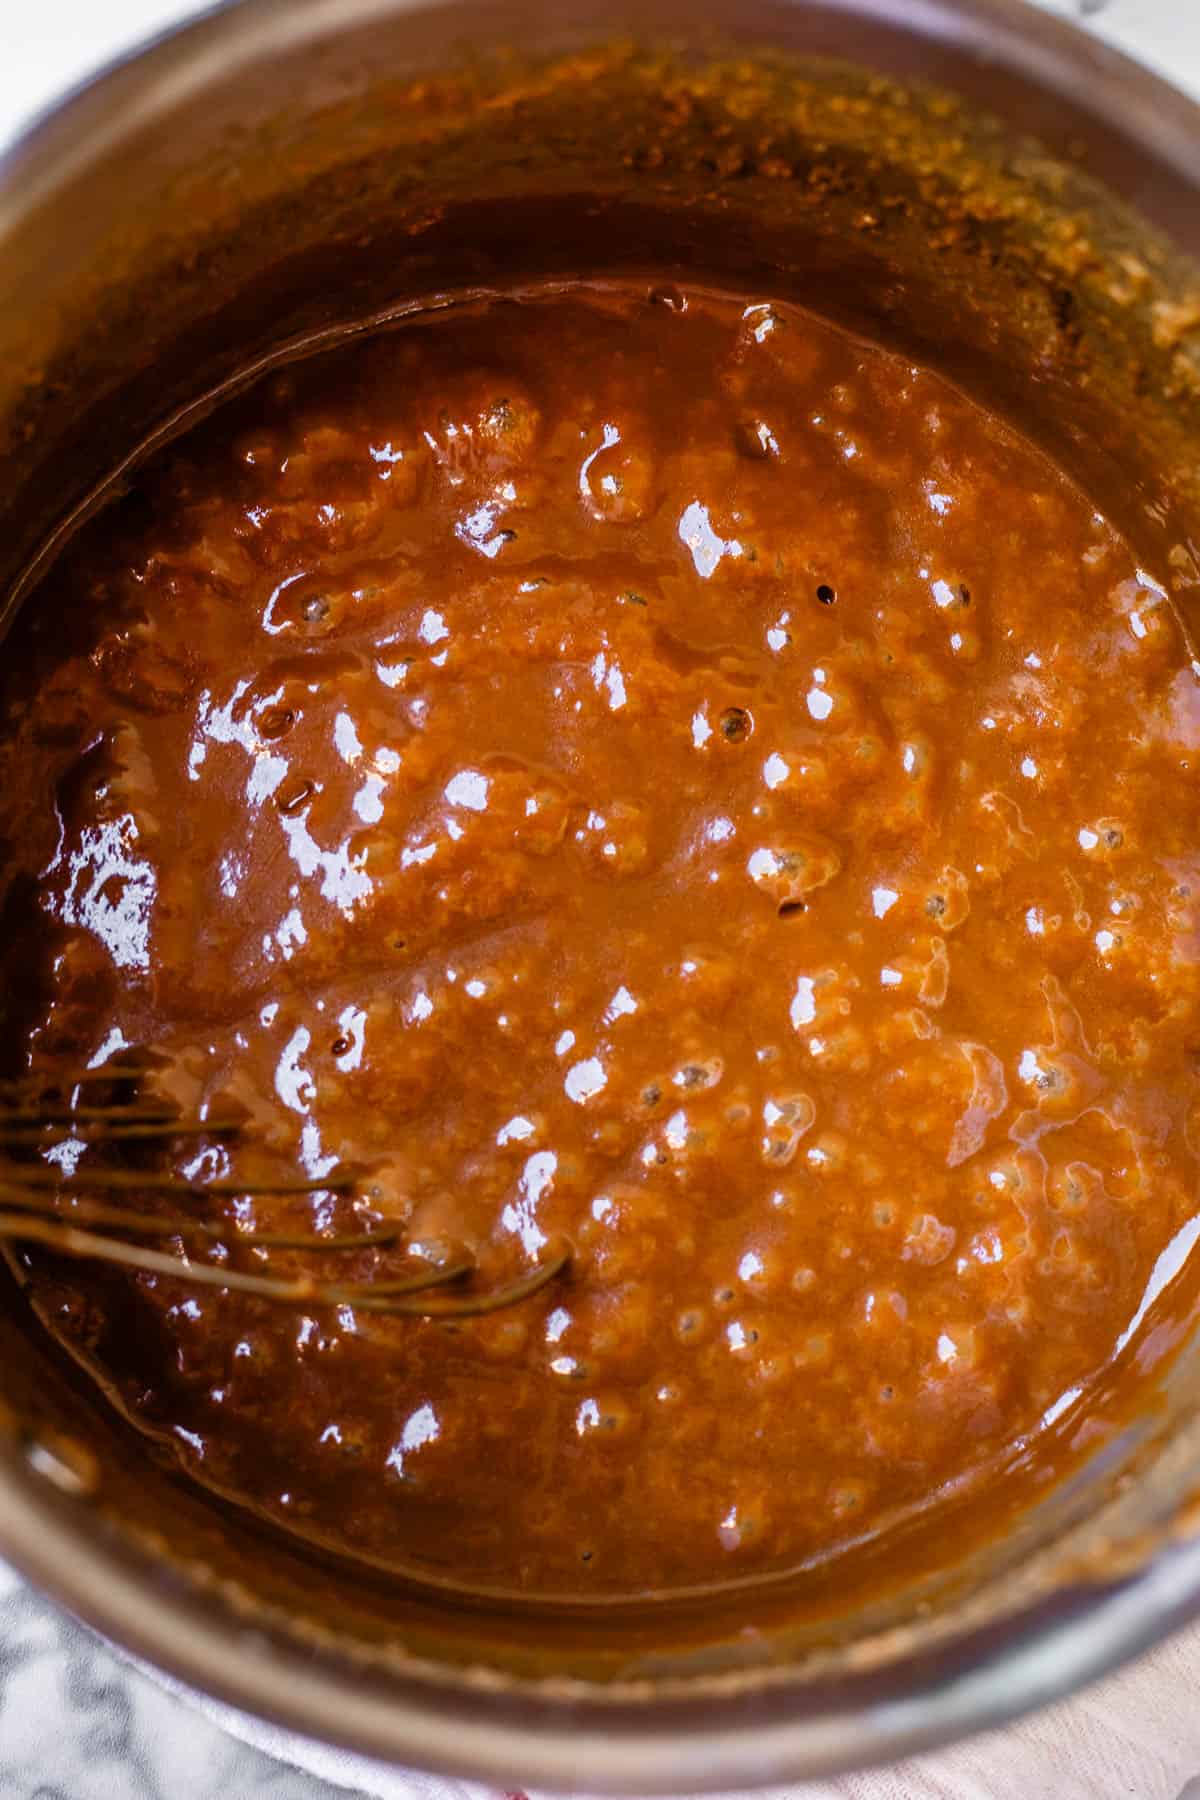
Turn the heat to medium and whisk is all together. Eventually the water will evaporate and you will be left with a hot molten mess of bubbly brown sugar that looks like an absolute science experiment. See, isn’t this fun!!
Cook the brown sugar for about 6-8 minutes, until you see puffs of smoke coming up consistently when you stir. The mixture will rise to the top of the pan. A thermometer should read between 260-265 degrees. BE CAREFUL! Don’t go too far, or you will end up burning it. Once you see the first puff of smoke, watch very carefully. Don’t take it off right away; you want consistent smoke coming in gentle puffs. Check the temperature. If the smoke starts coming fast and feels angry and you start panicking, that’s when it’s time to take it off the heat 😂 If you have burned it (you will smell it) toss it and start over. There is no going back.
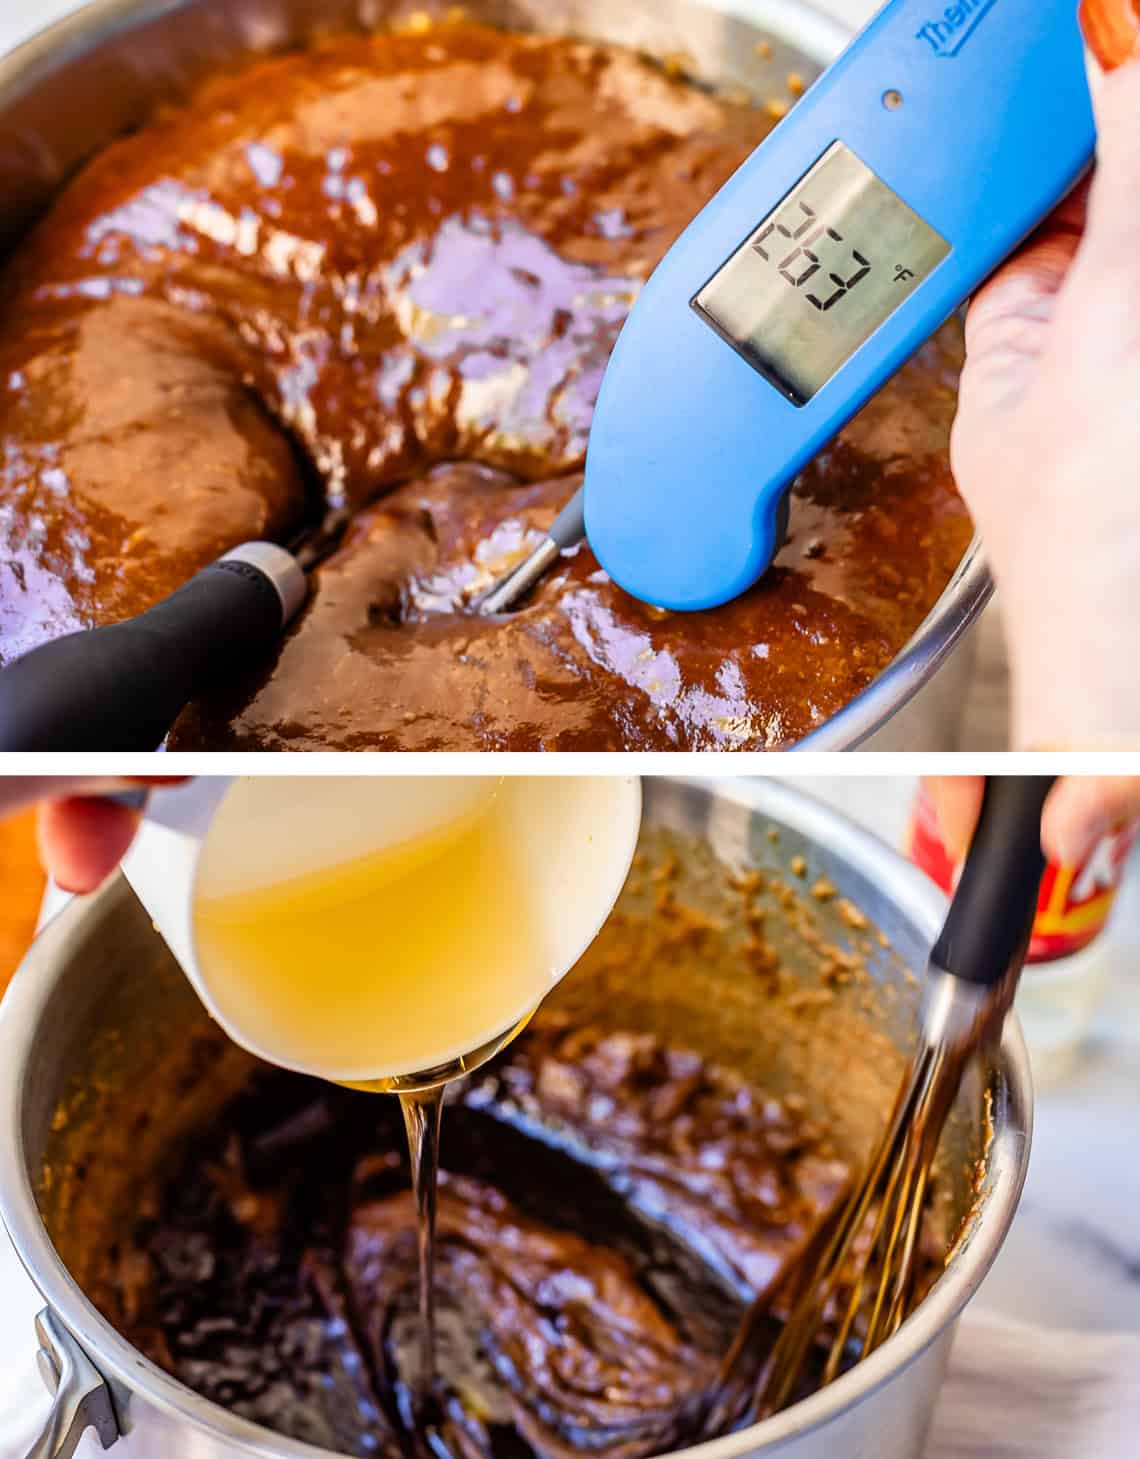
And then, this is SUPER important, as soon as you decide it’s caramelized and you take it off the heat, you need to add the corn syrup RIGHT AWAY. This step will stop the cooking process. If you wait too long, the caramel is so hot that the pan will keep cooking it, and it could burn. Get help if you need it! Holler at your kids!
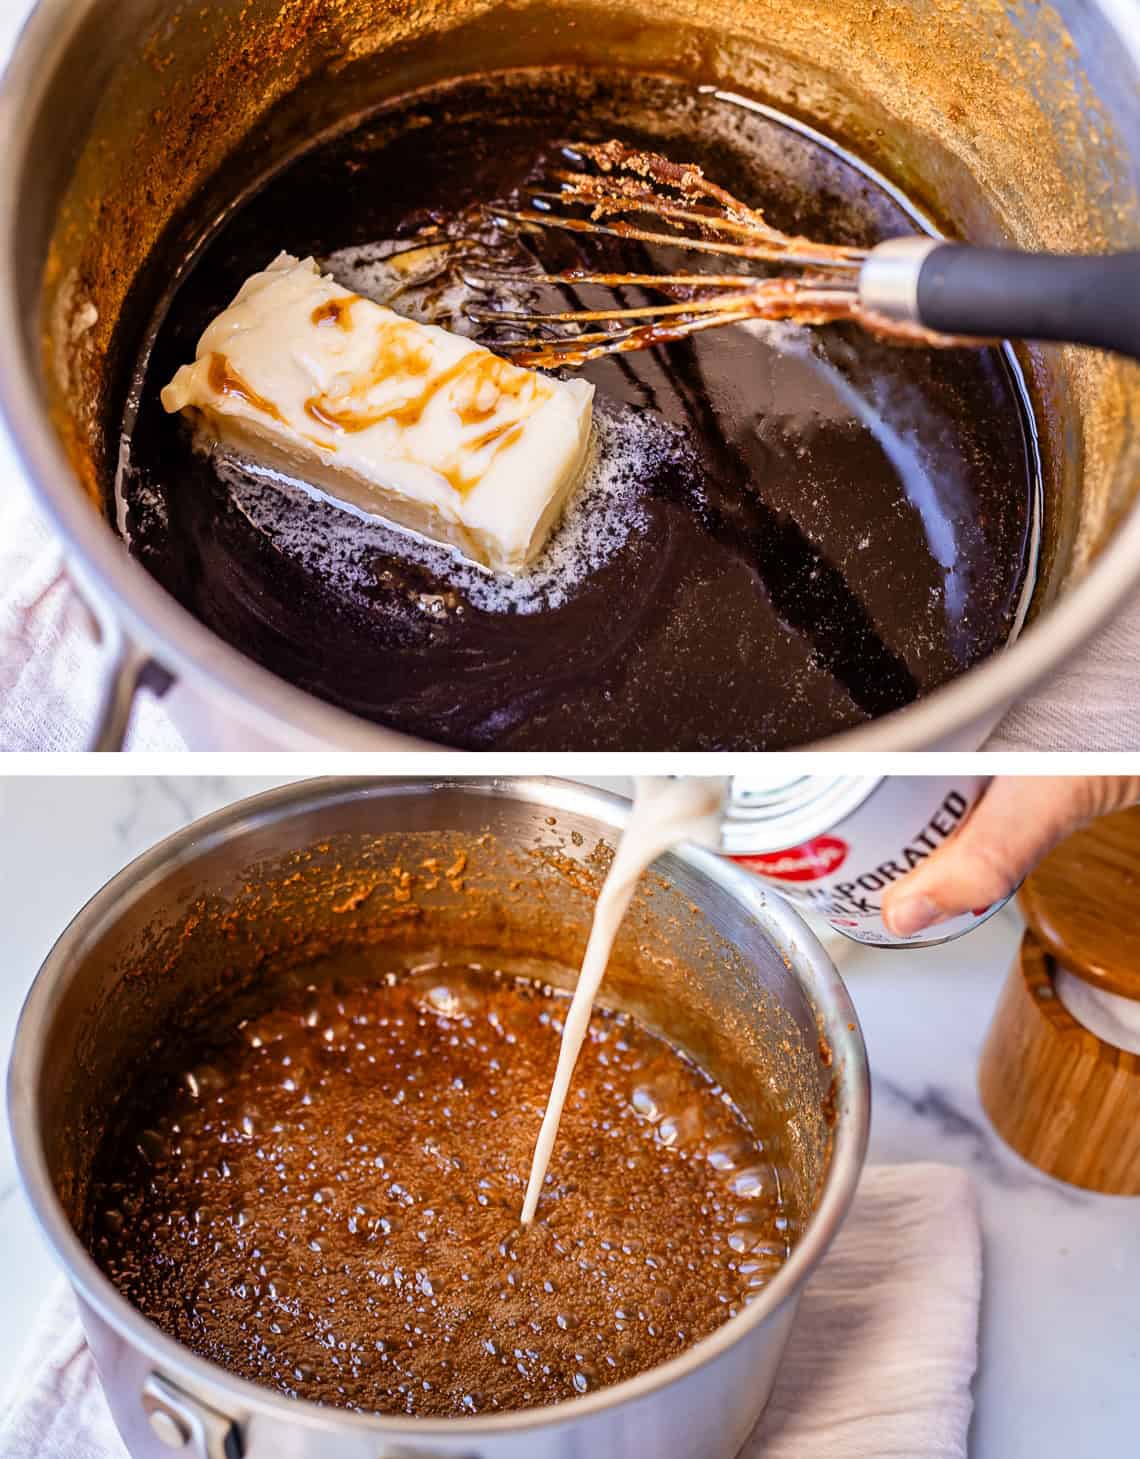
Add in the butter, then move the pan back onto the burner, medium heat.
For this test, I was using evaporated milk. You don’t need a whole can. Use 1 cup of evap milk or 1 cup of cream. (Evap=fudgy caramel. Cream=smooth stretchy) Whichever one you choose, make sure to take about 5 minutes to slooooowly add it in. If you add it too quickly, it can make your caramel separate and it will have a grainy texture, the wrong kind of grainy. Stay with me now 😂
Let the caramel cook for another 5-10 minutes. Then bust out the candy thermometer again. Once it reaches 240 degrees, take it off the heat right away. (If you are trying to capture a picture and only get it t 239, I forgive you. 😉)
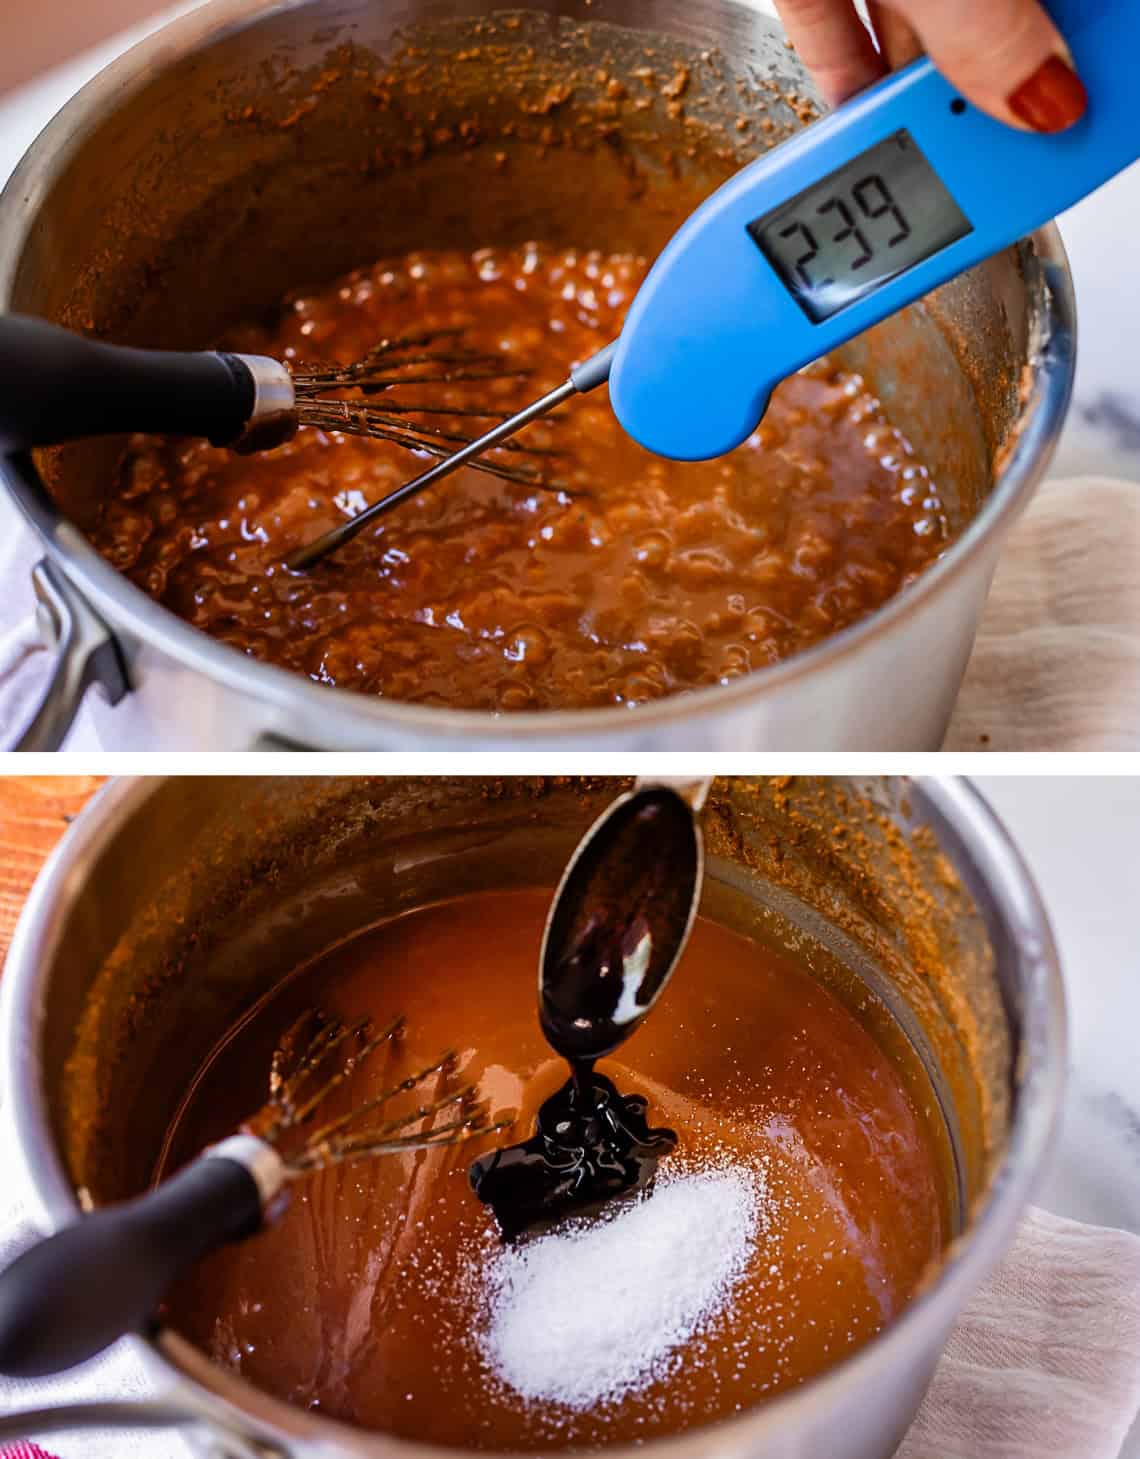
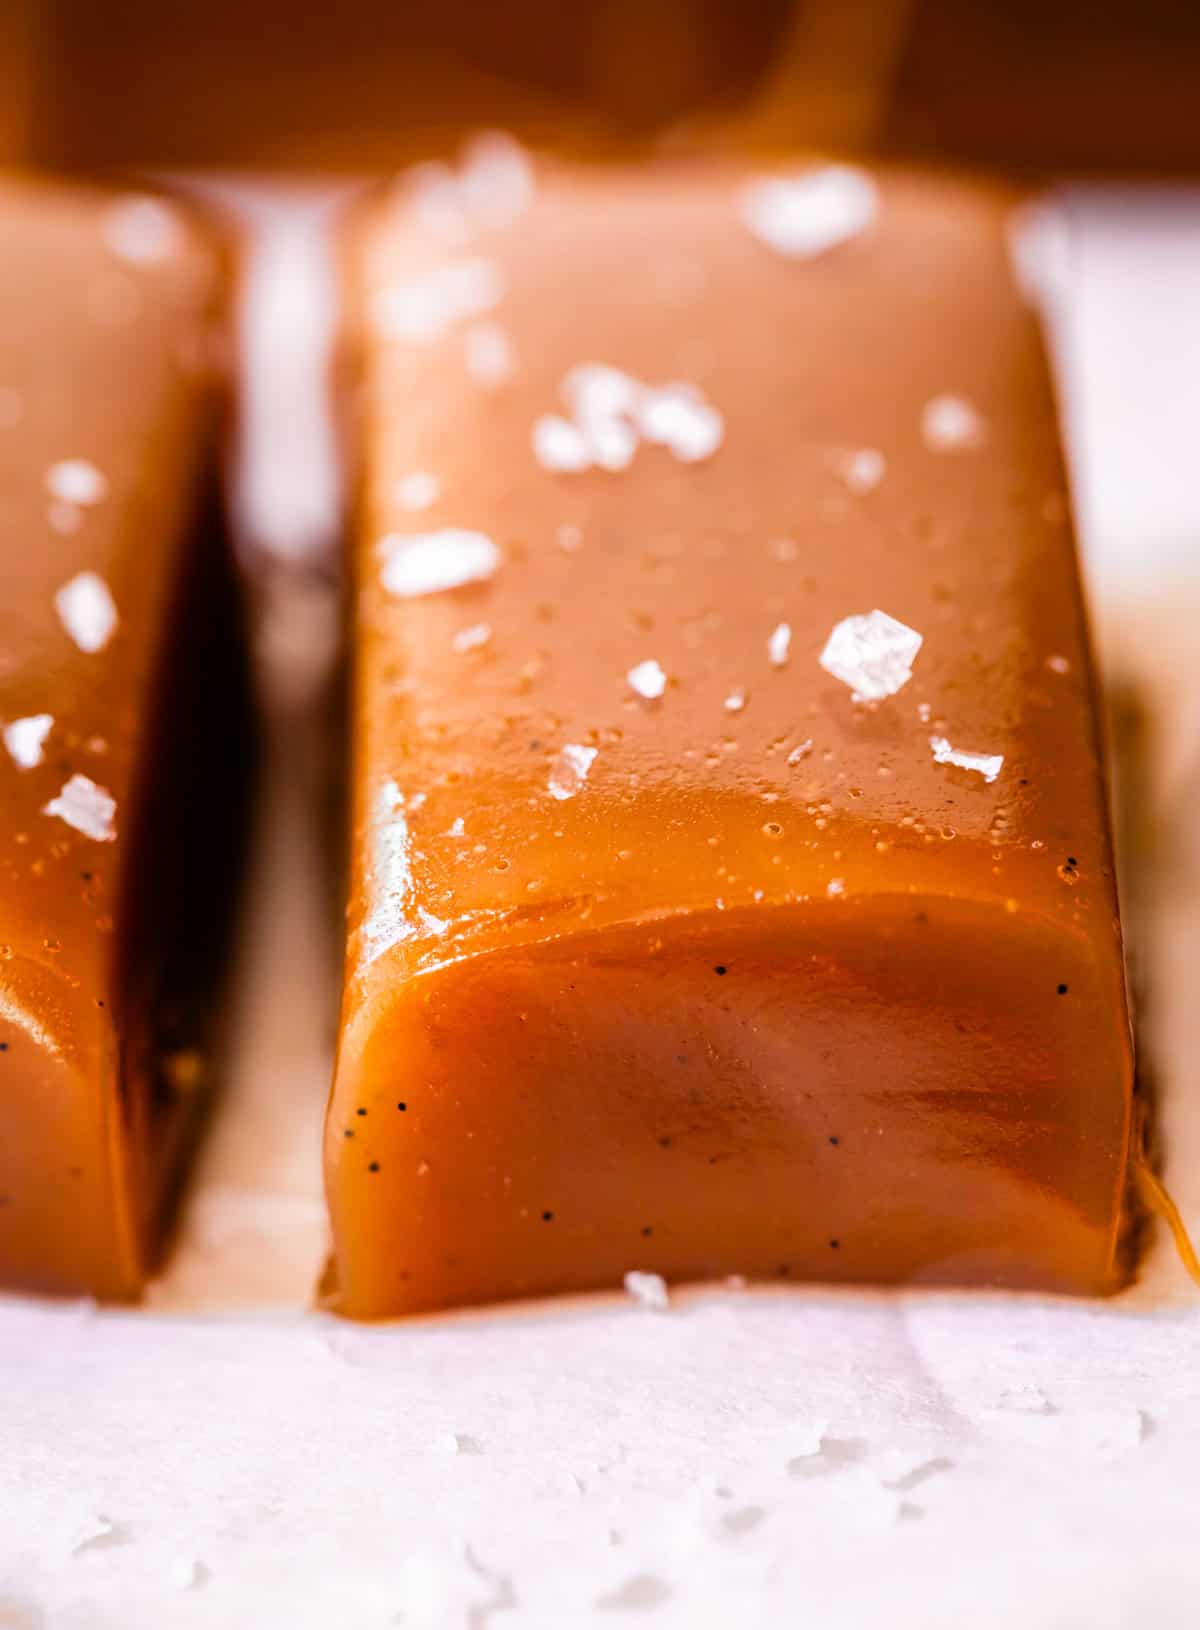
Let the bubbles calm down a little bit off heat, then add the salt and vanilla. You can add as much or as little salt as you want. If you don’t have kosher salt, add less than 1 and 1/2 teaspoons for sure.
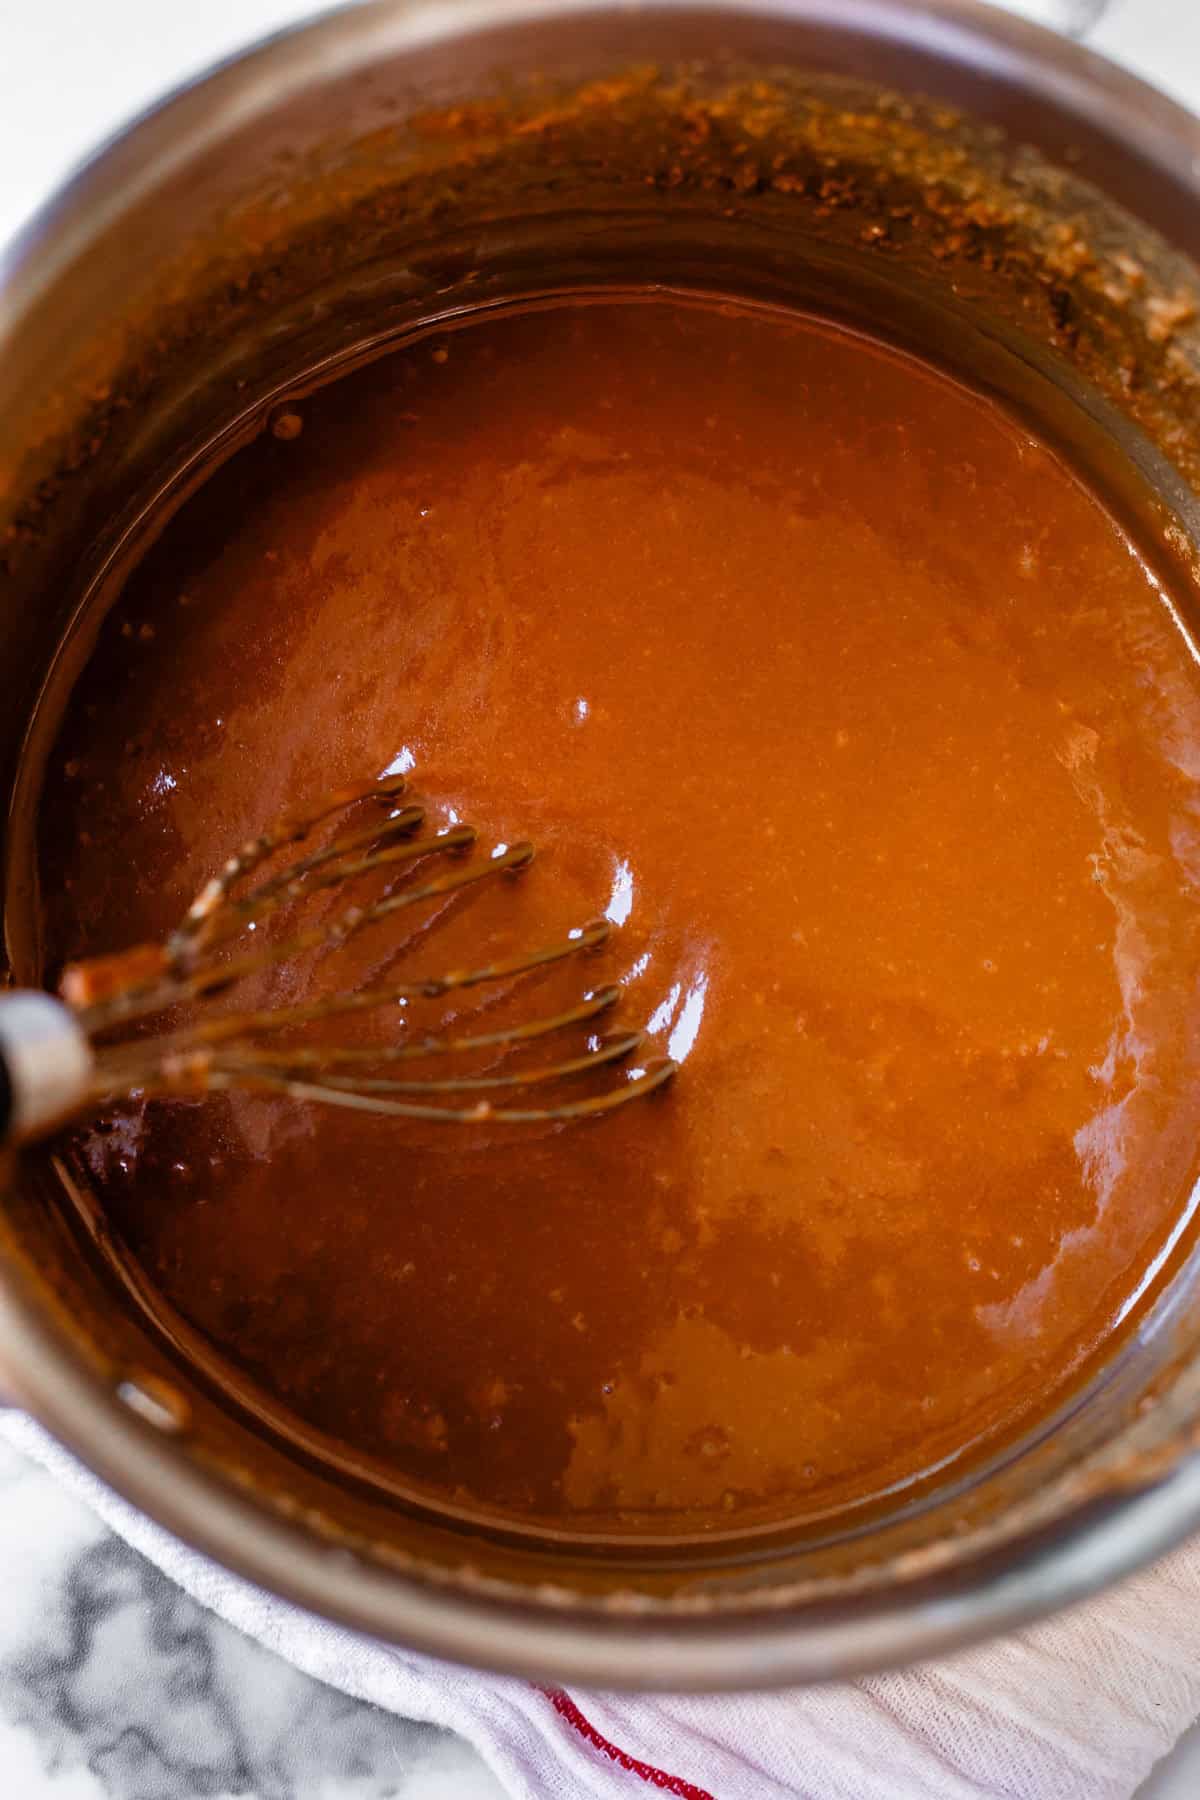
Here she is, all finished! (Who can tell that this batch was made with evap milk?) Behold:
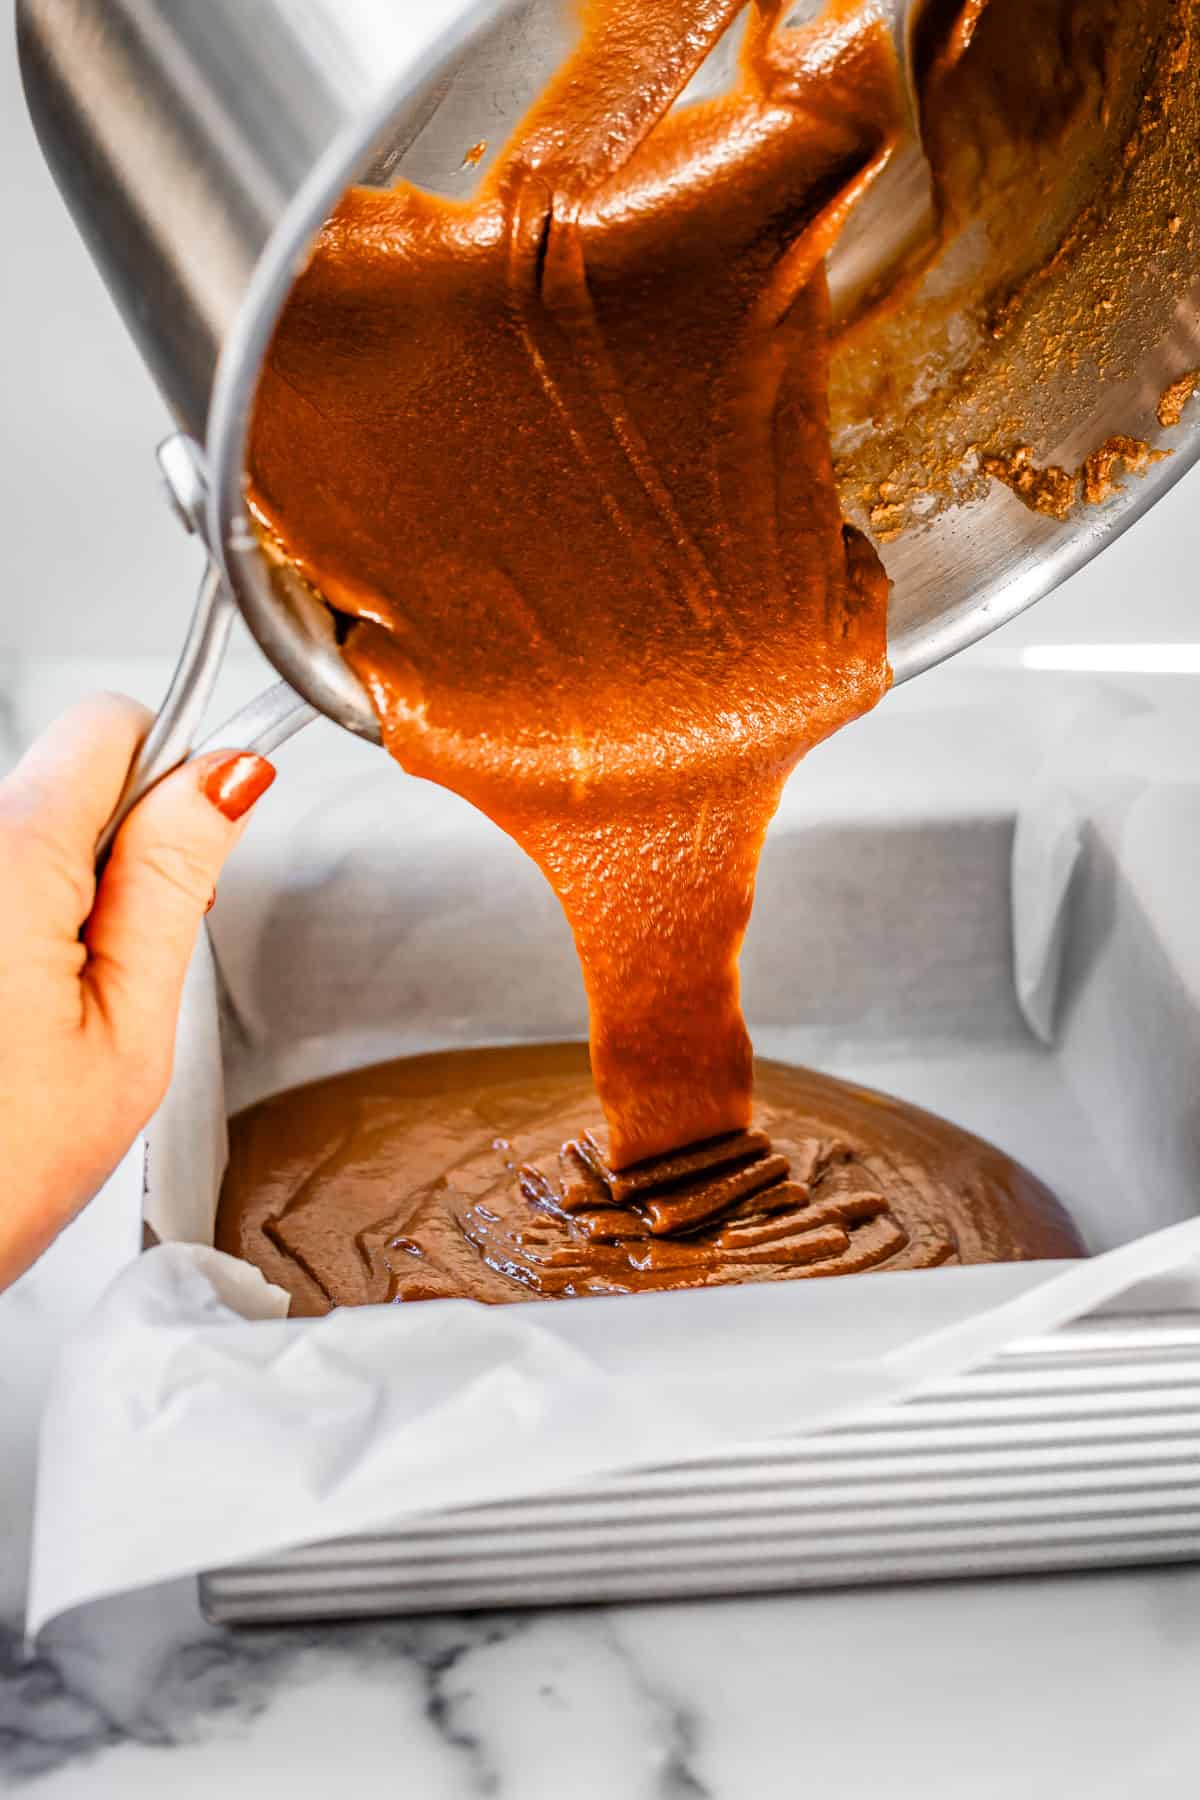
Pour it into a pan and voila. That’s it. Wait for it to cool, then it’s time to cut.
What’s the best way to cut homemade caramels
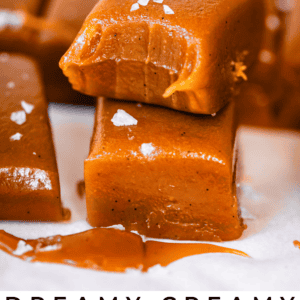
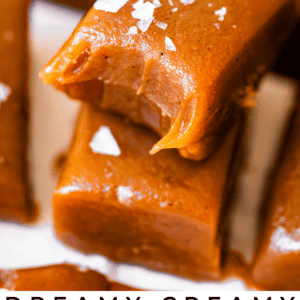
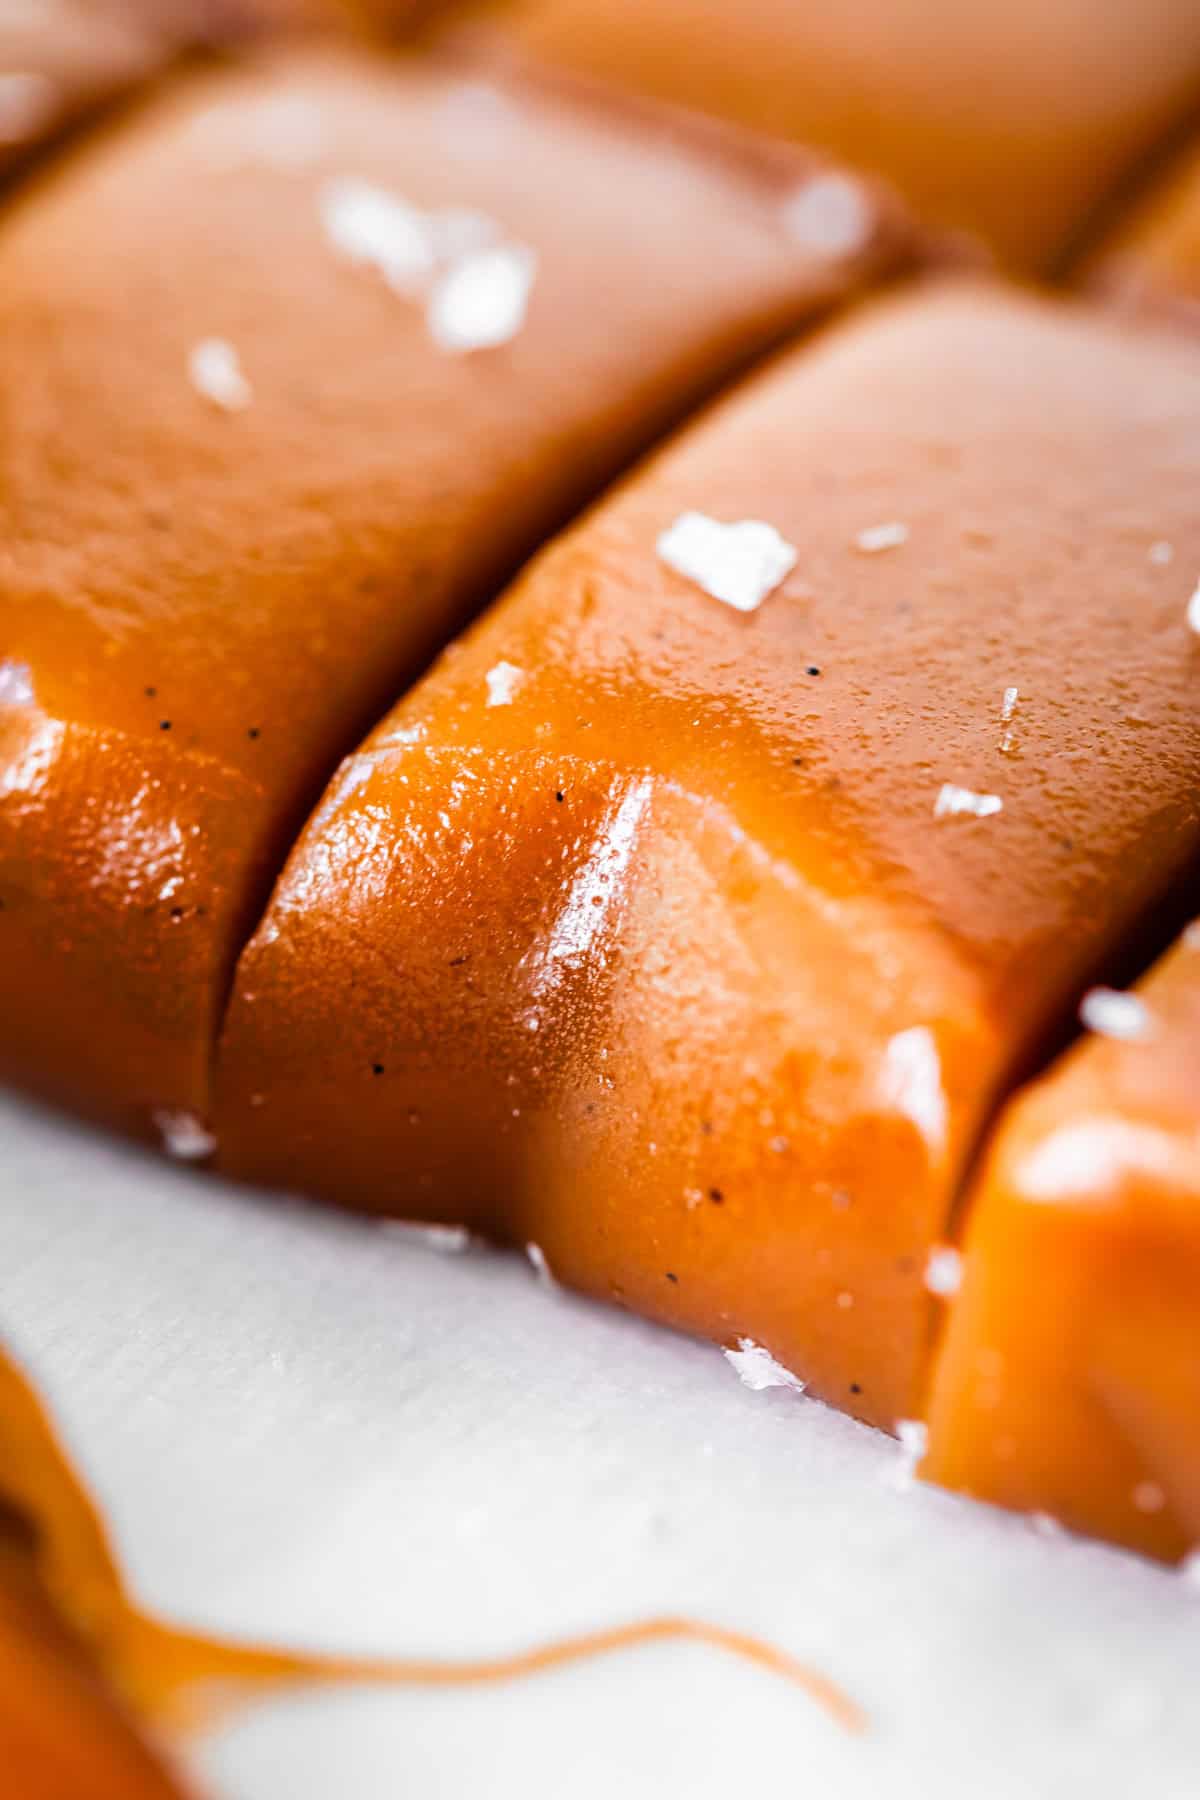
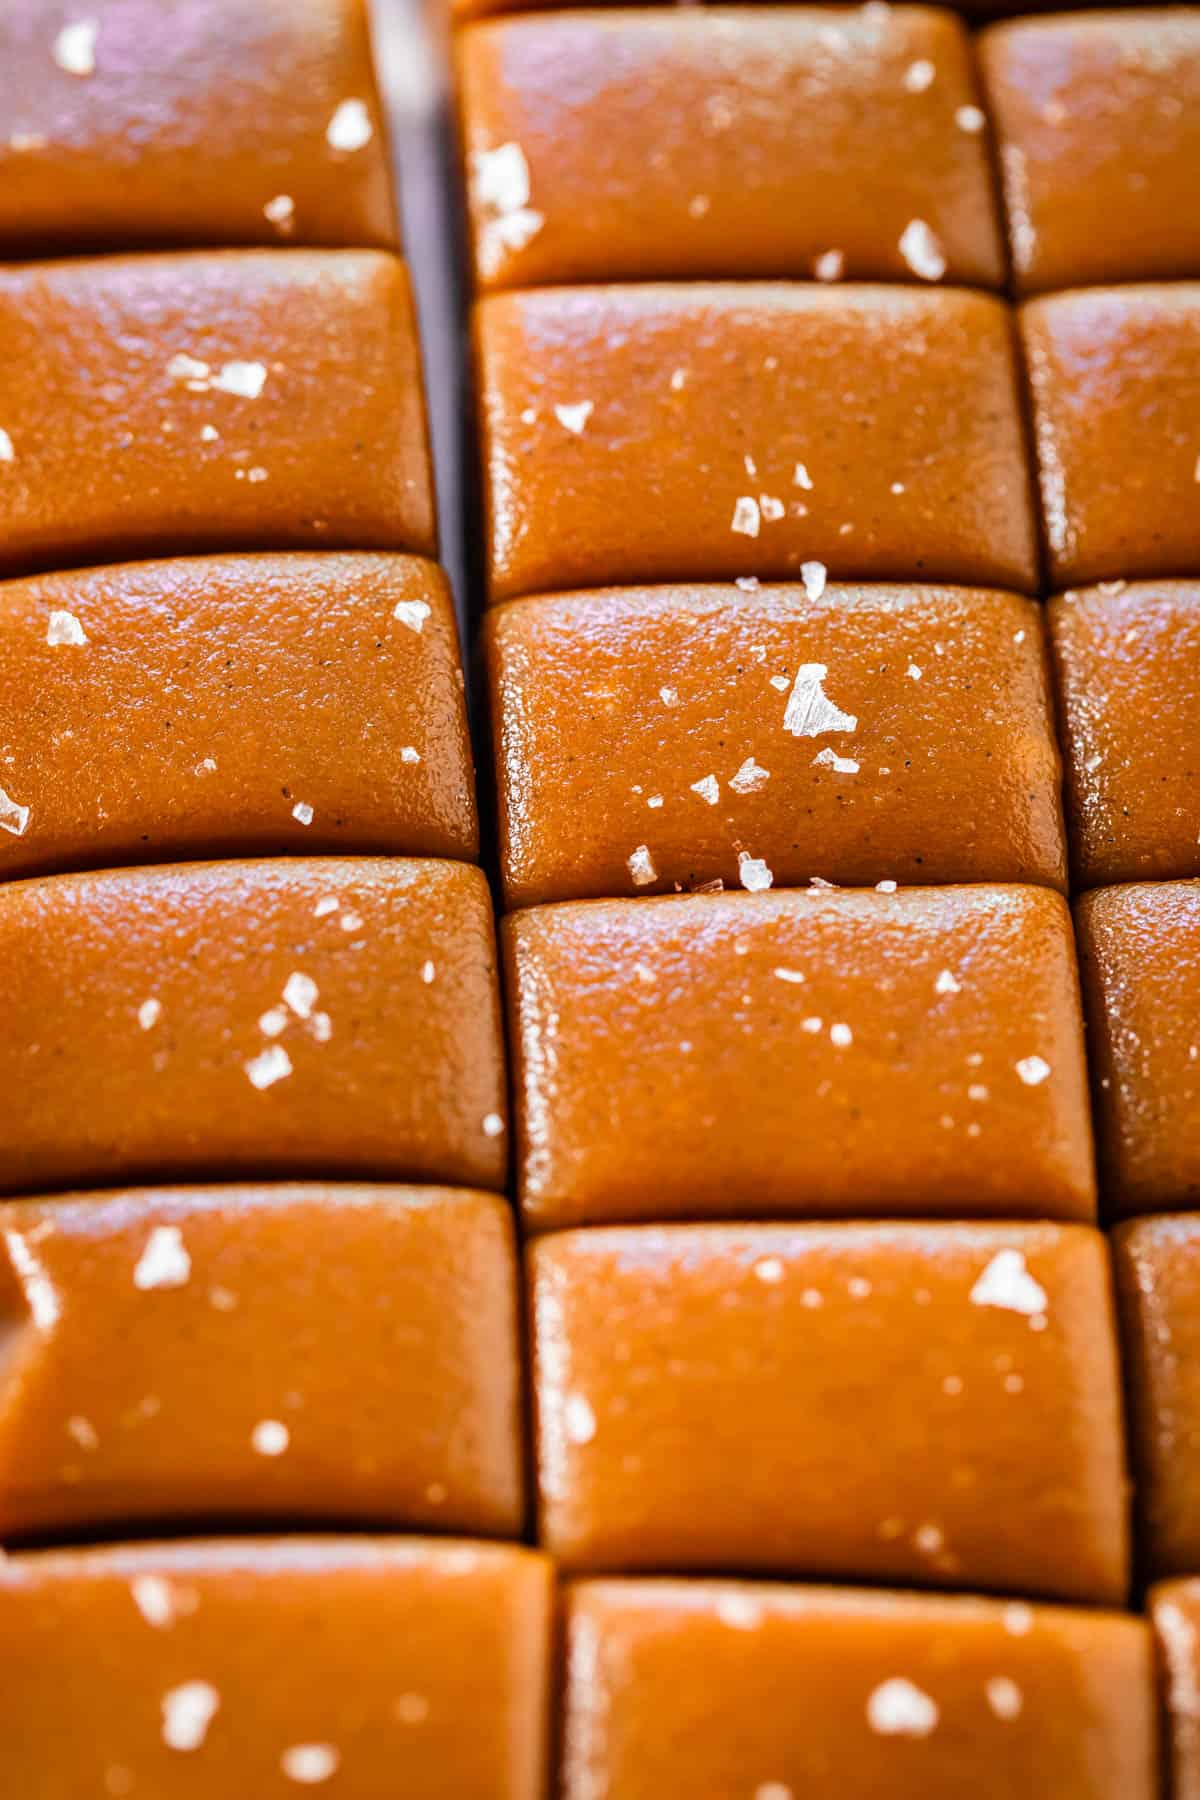
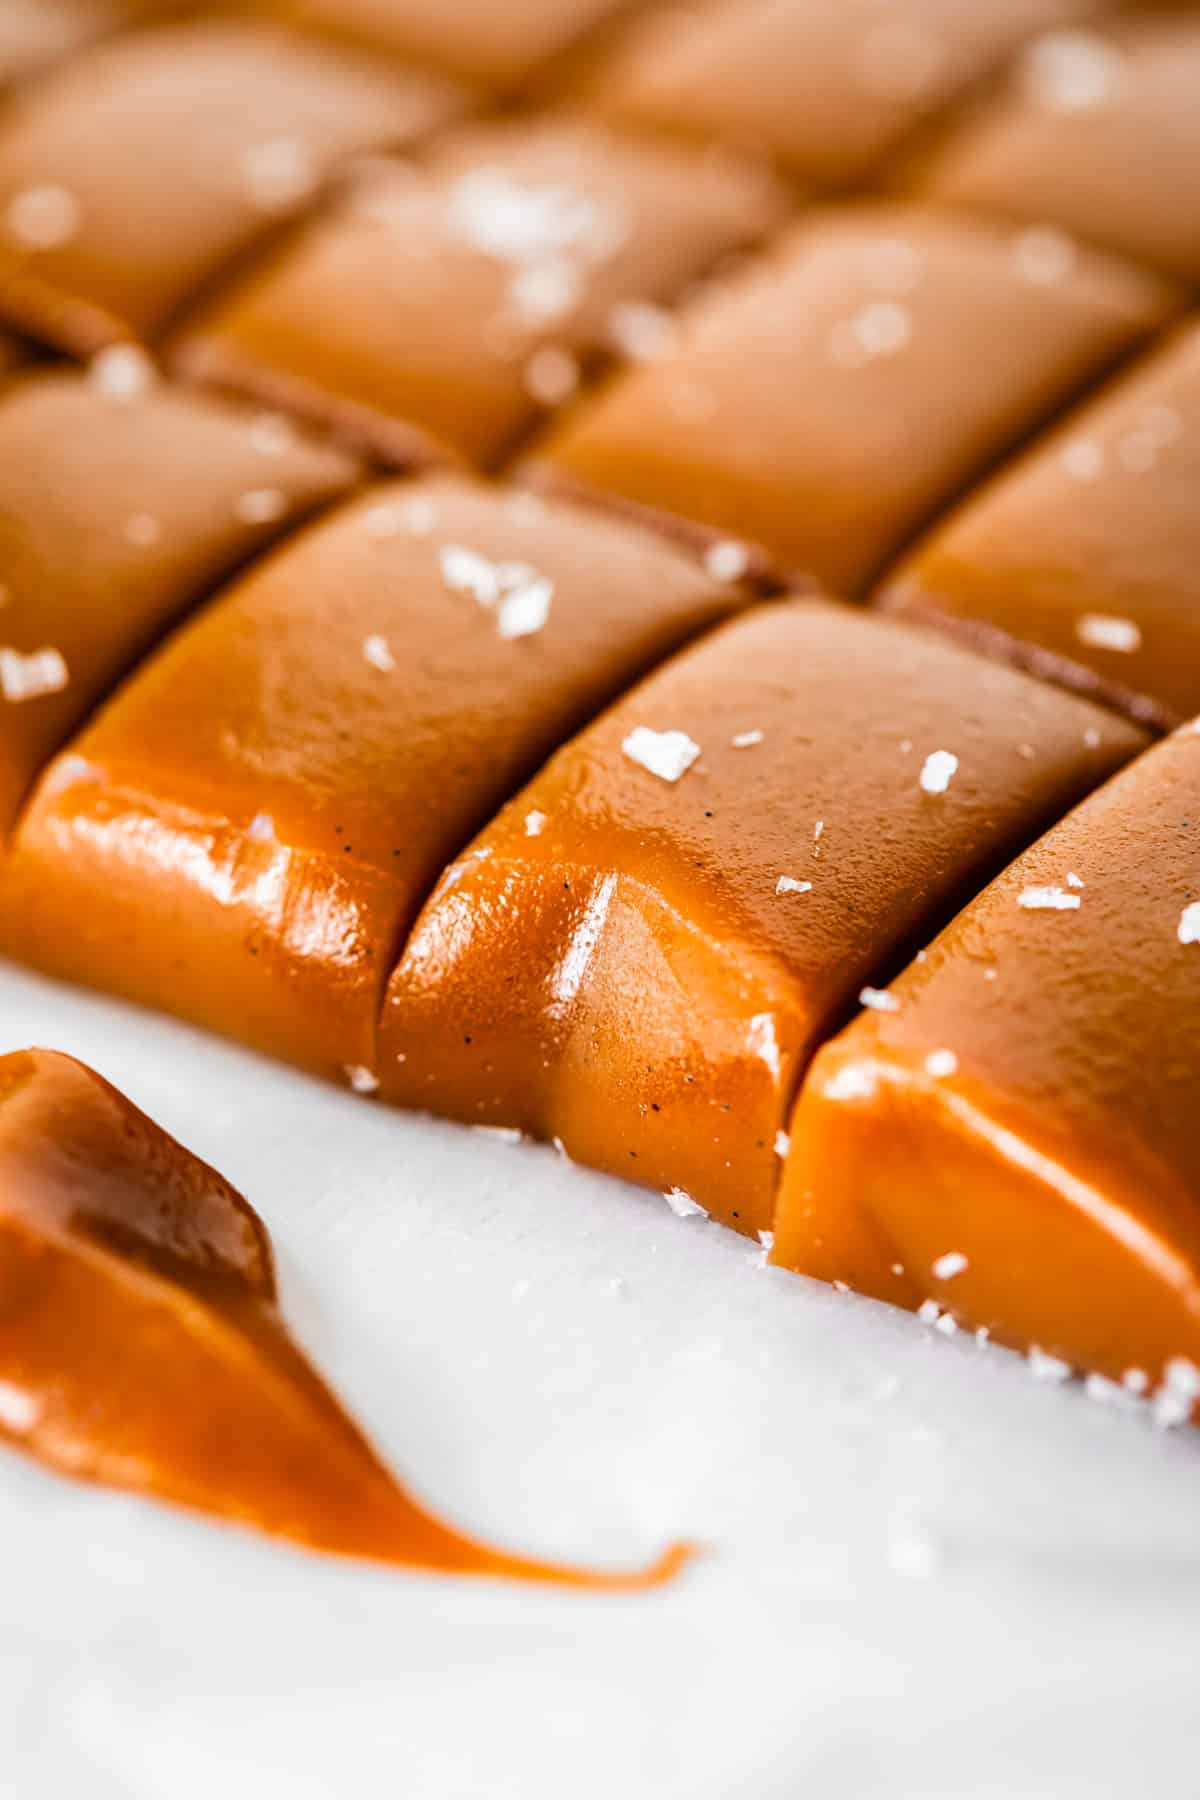
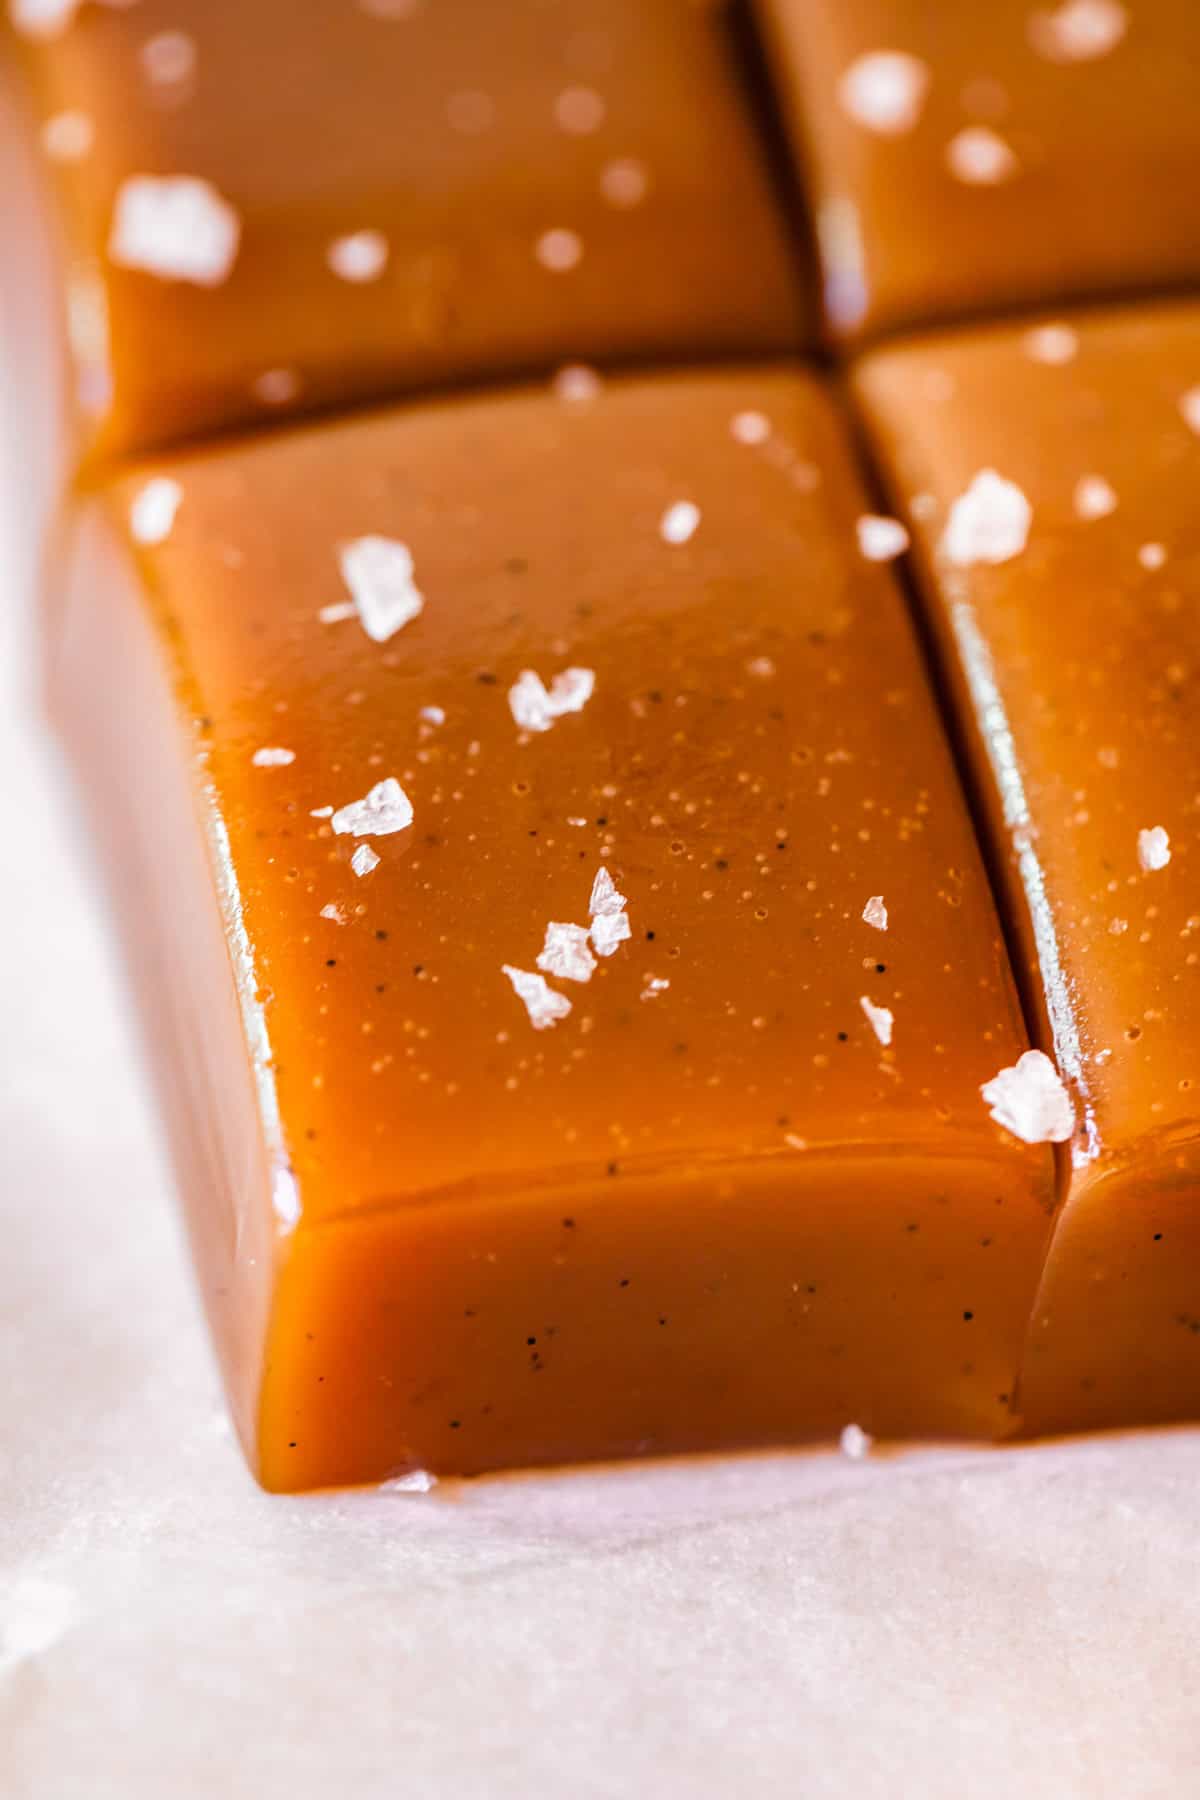
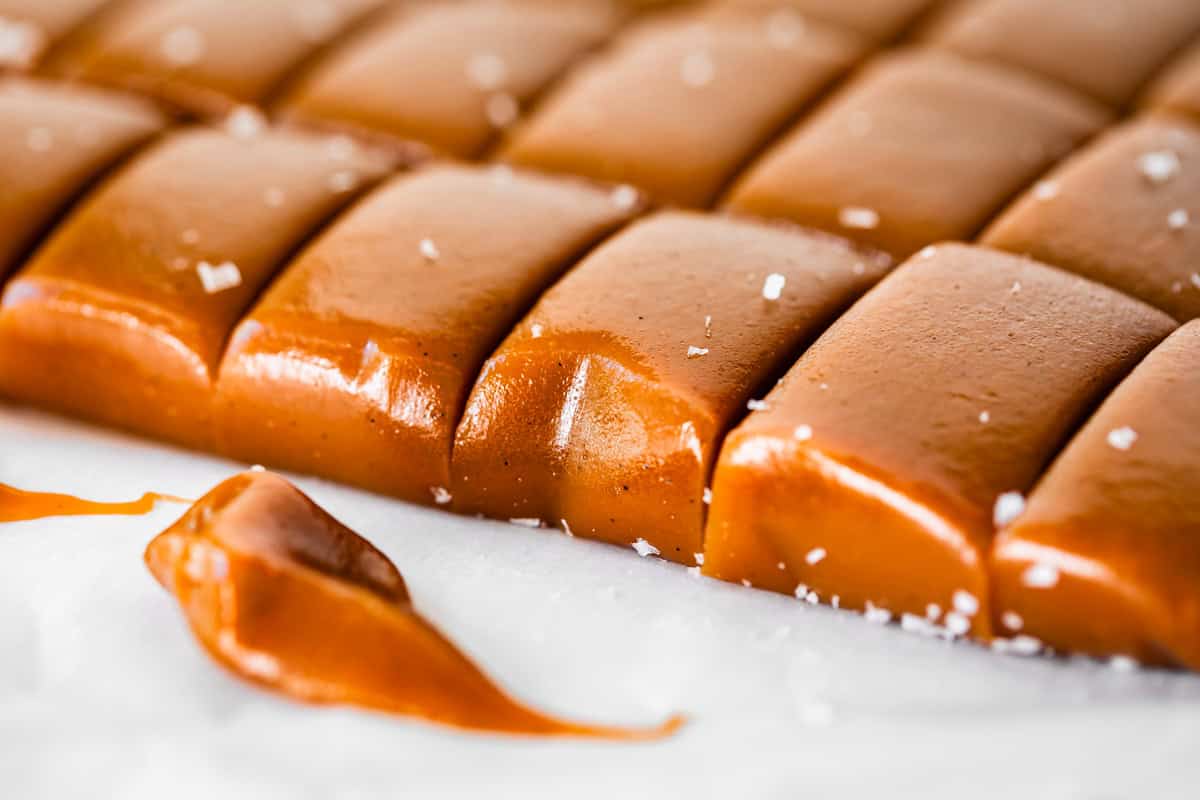
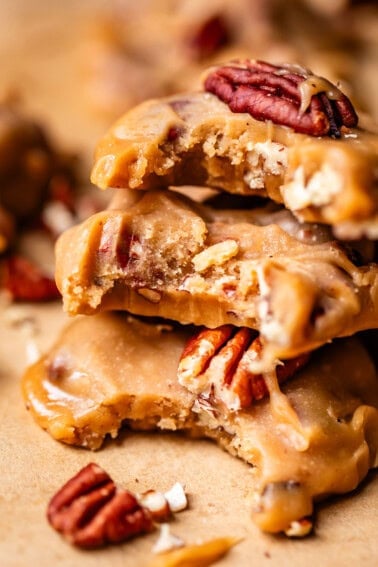
A sharp chef’s knife is all you need! The real trick is chilling the caramel a little bit to make sure it doesn’t stick so much. These are sticky caramels, because that’s how we keep that soft and tender texture. But I promise, if you chill for just a hot minute, they will slice up just fine.
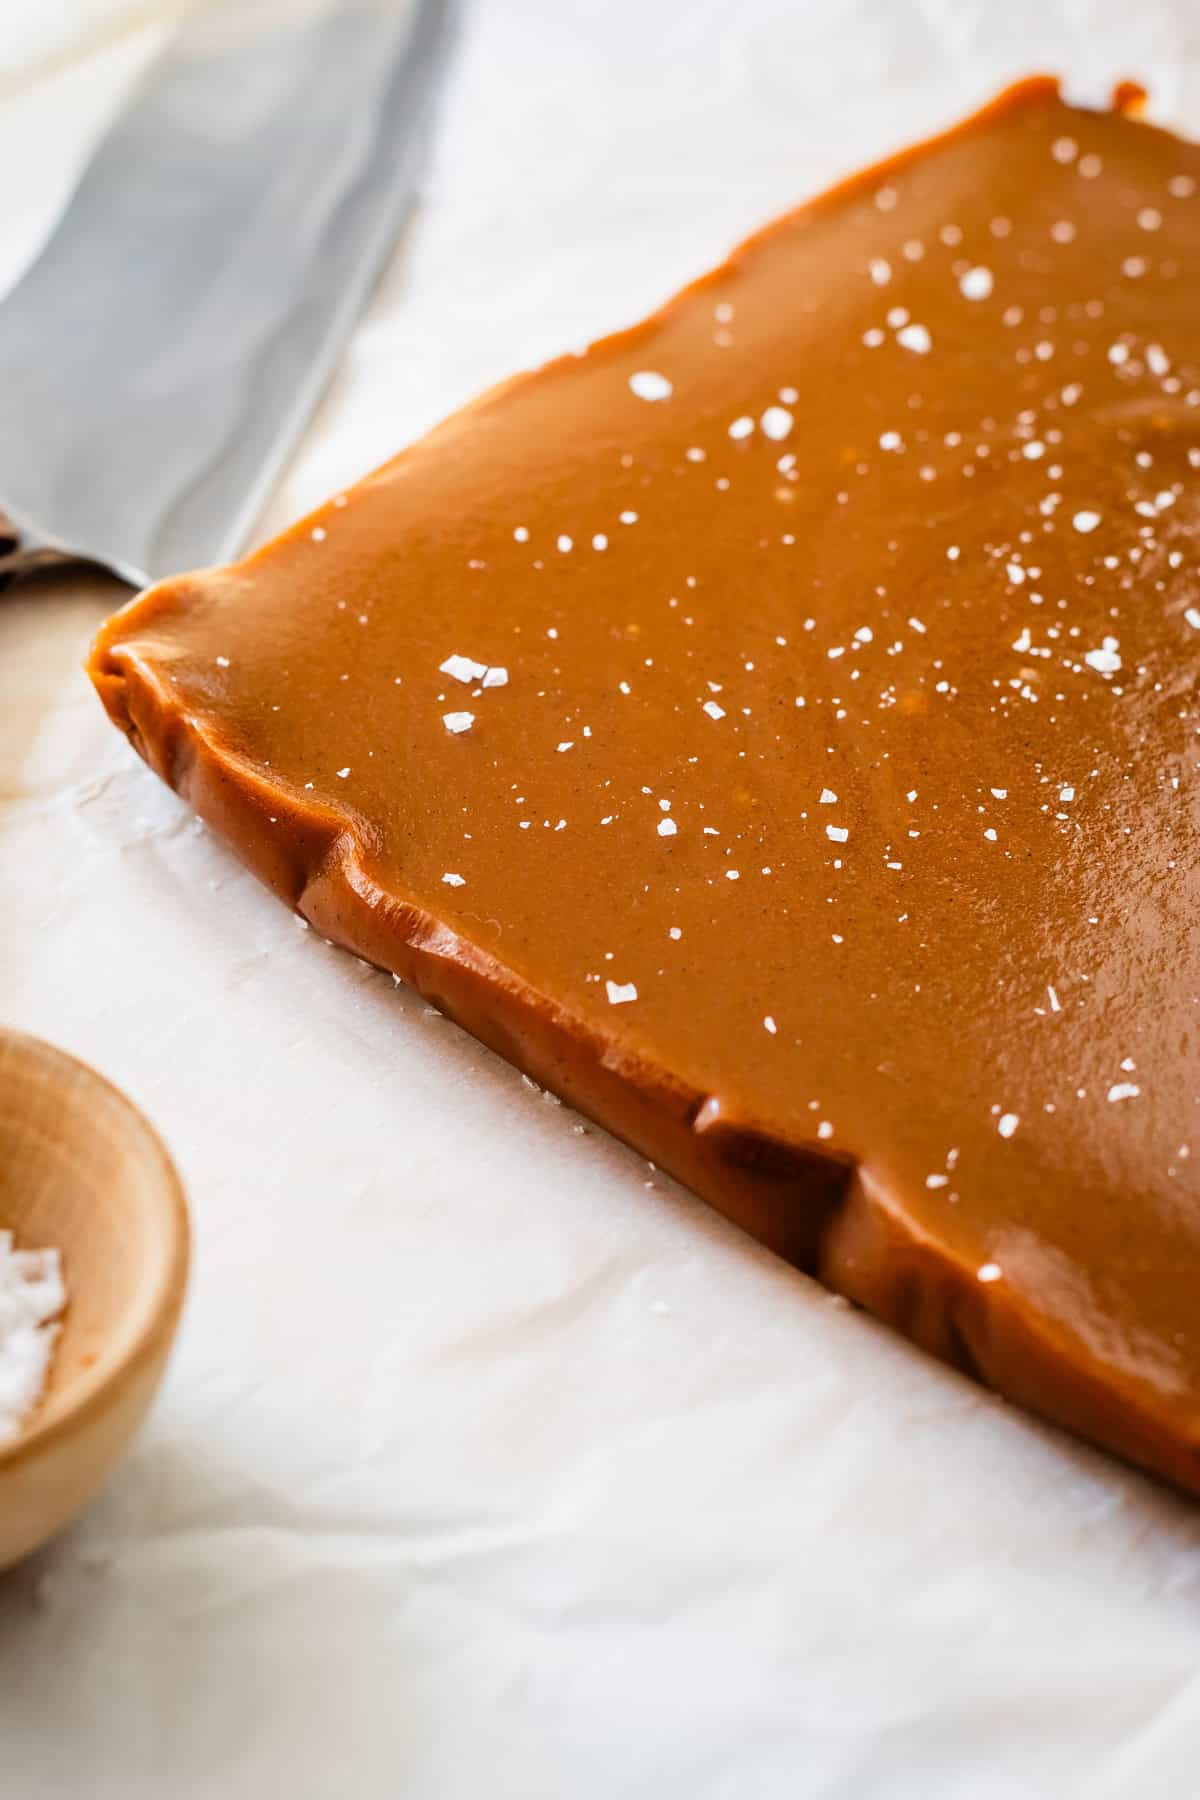
Lift the caramel out of the pan using the parchment paper. Set it on a cutting board. Cut off the uneven edges, if you want really clean lines.
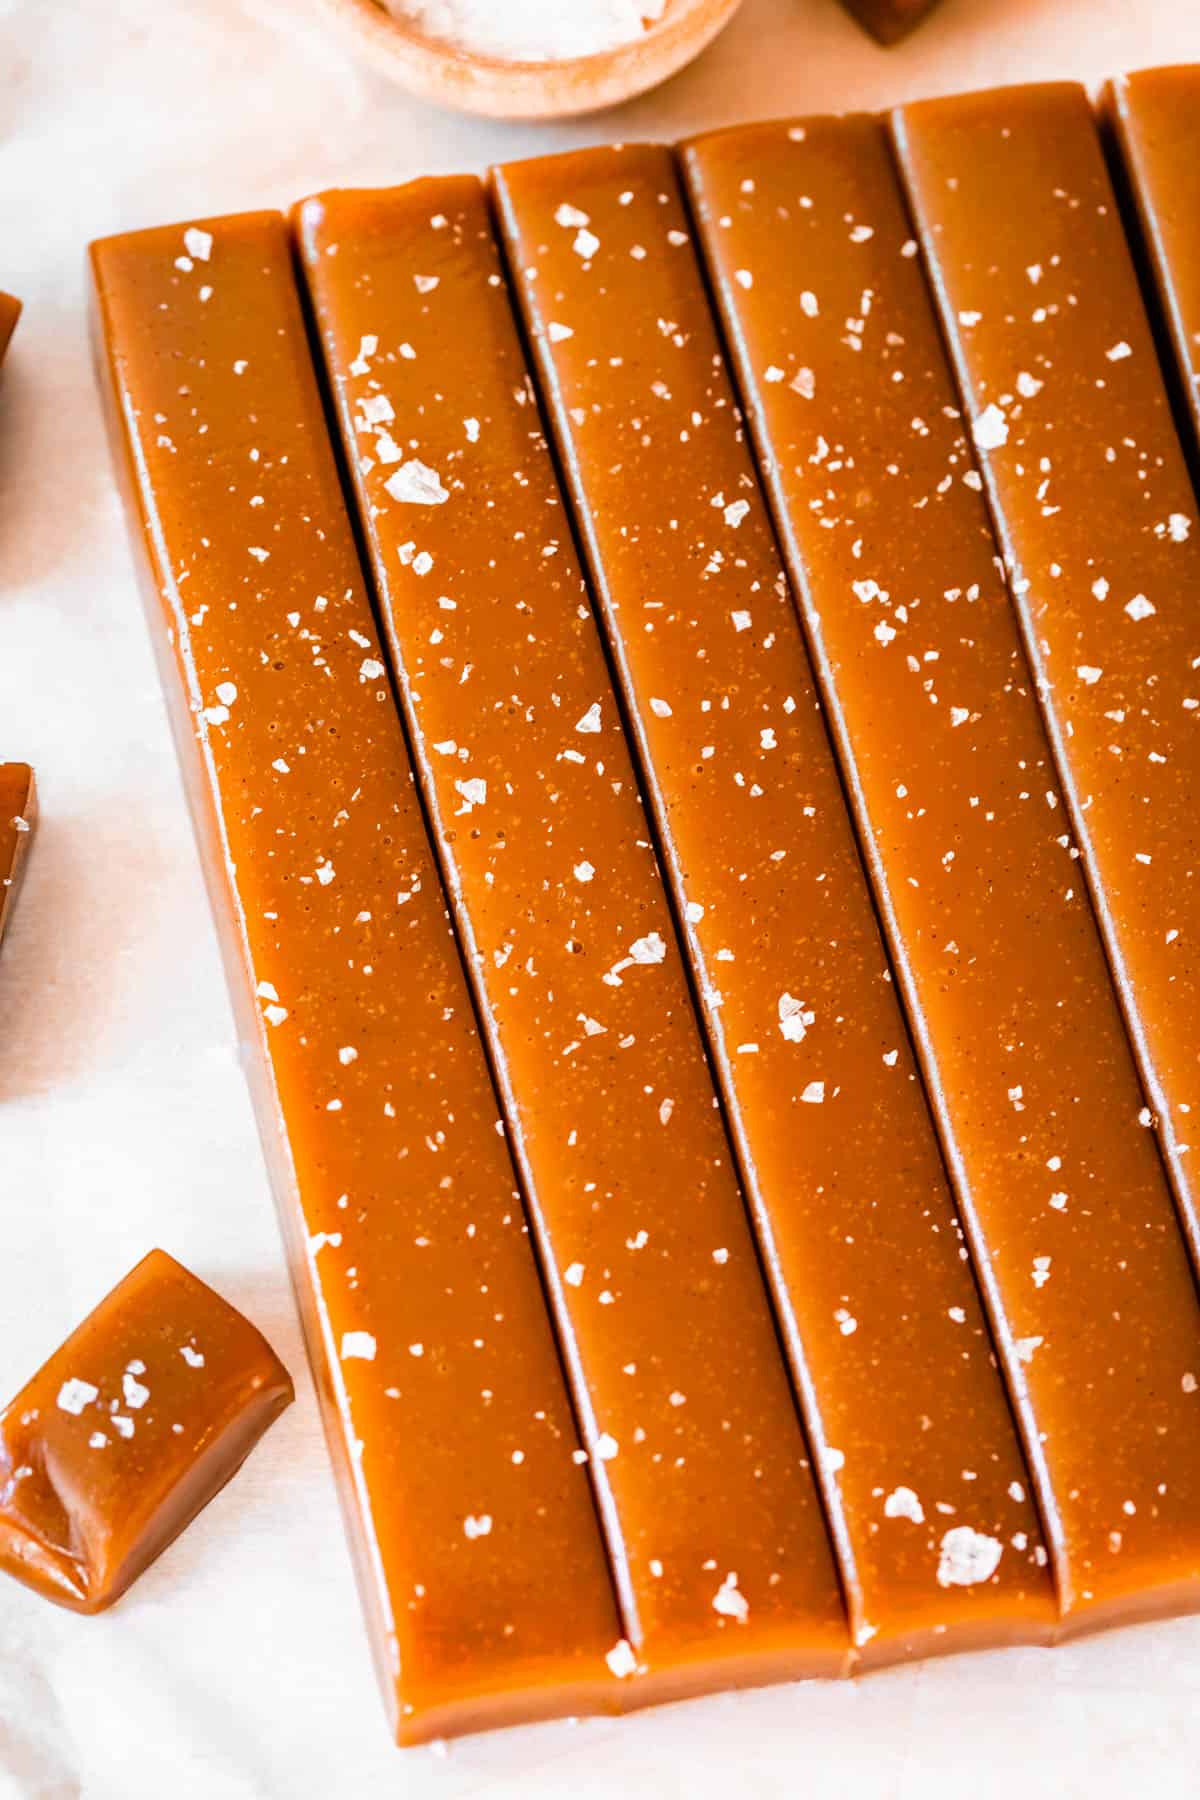
Use that chef’s knife to slice into rows. I did this batch in 6 rows one way, and 8 rows the other way, to get 48 caramels.
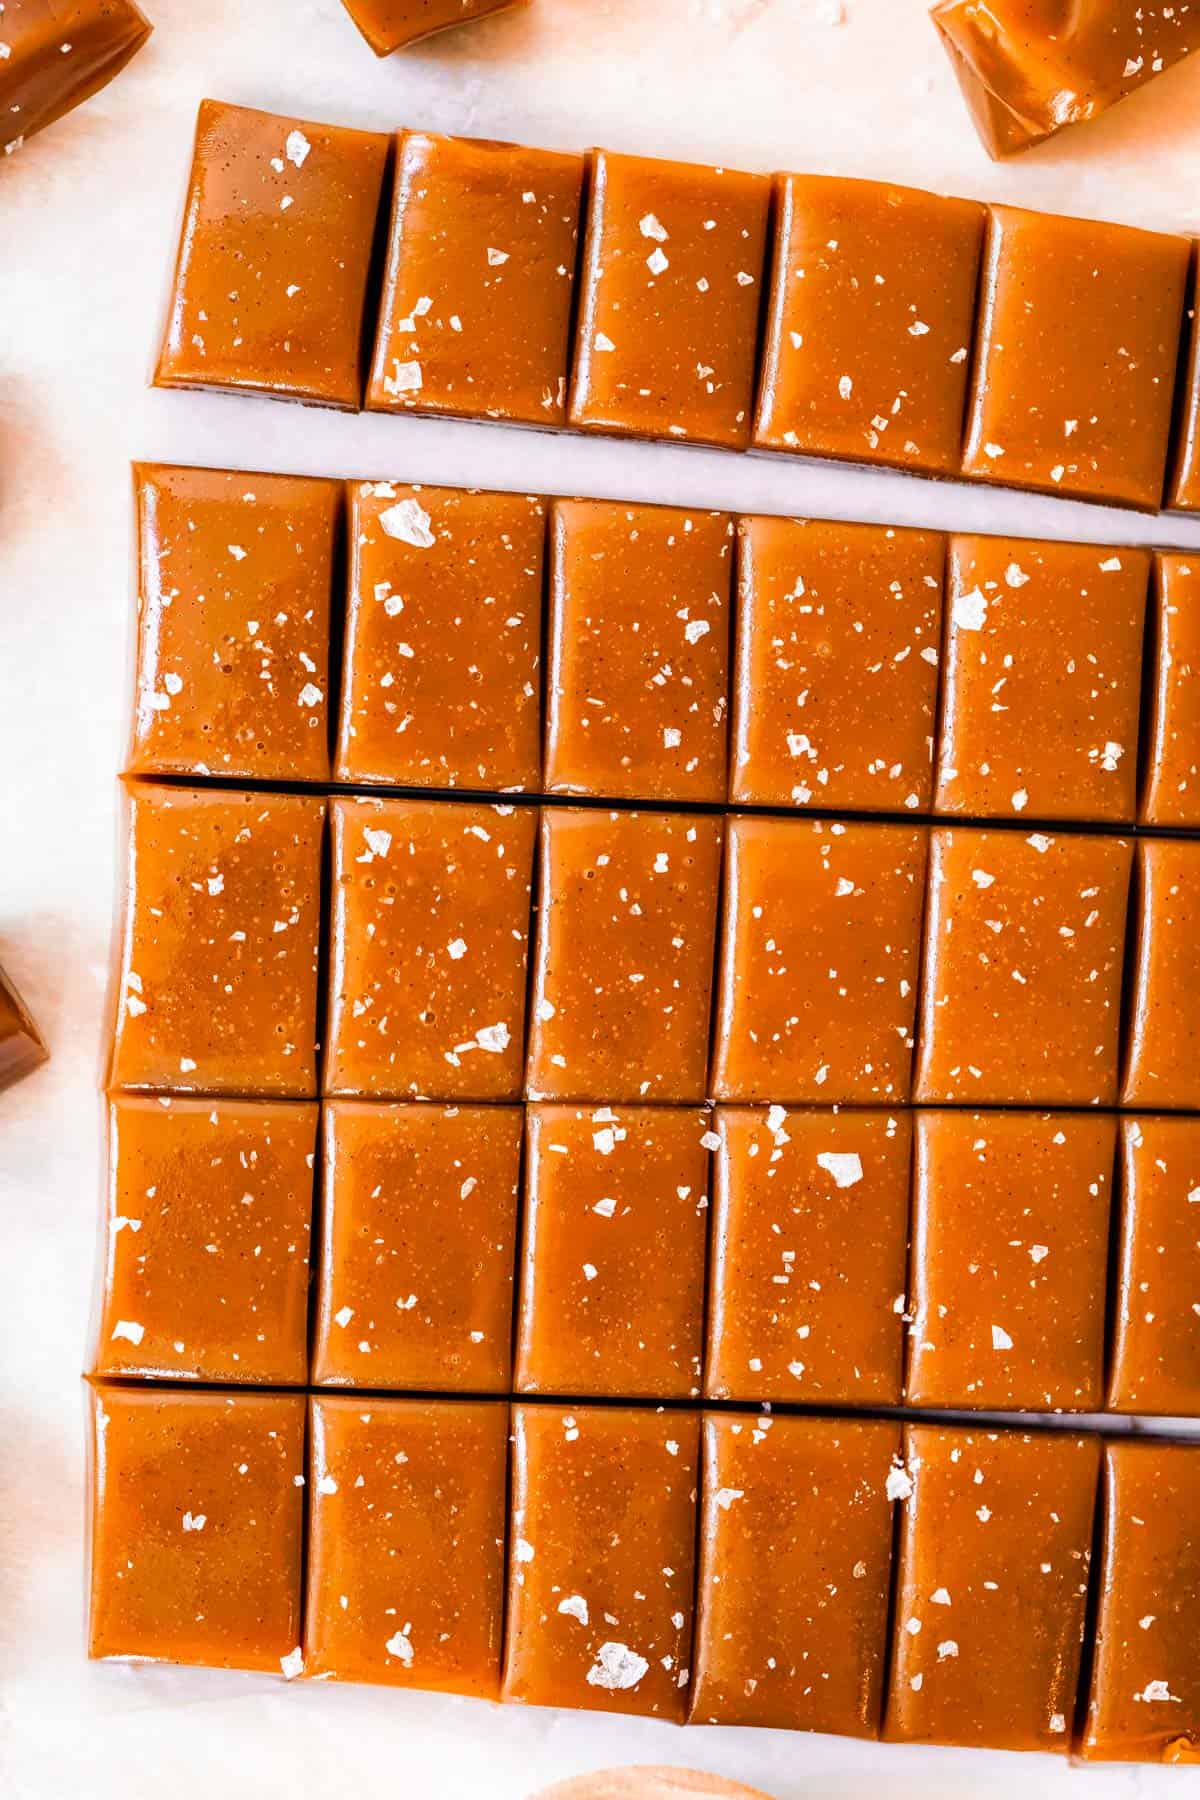
As soon as you slice them, move the caramels away from each other, or they will just start melting back into each other.
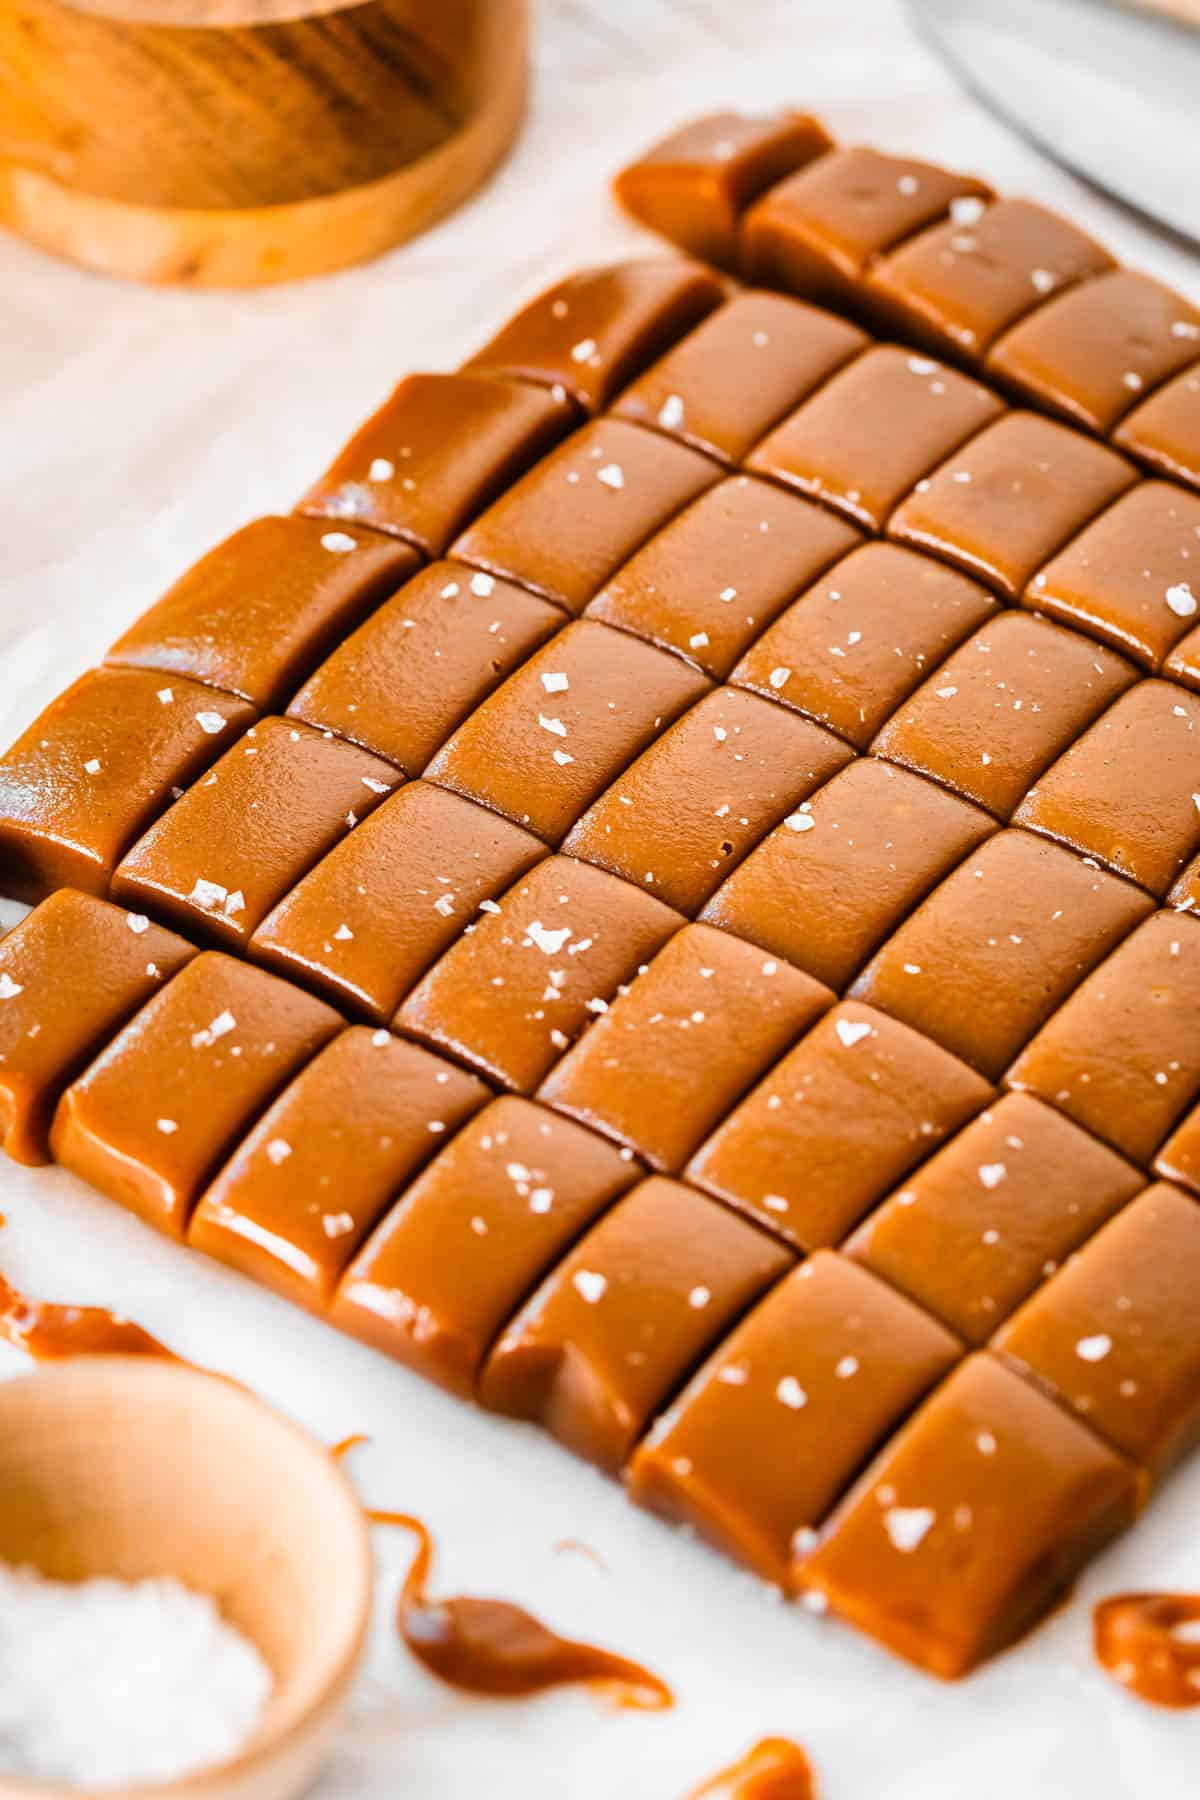
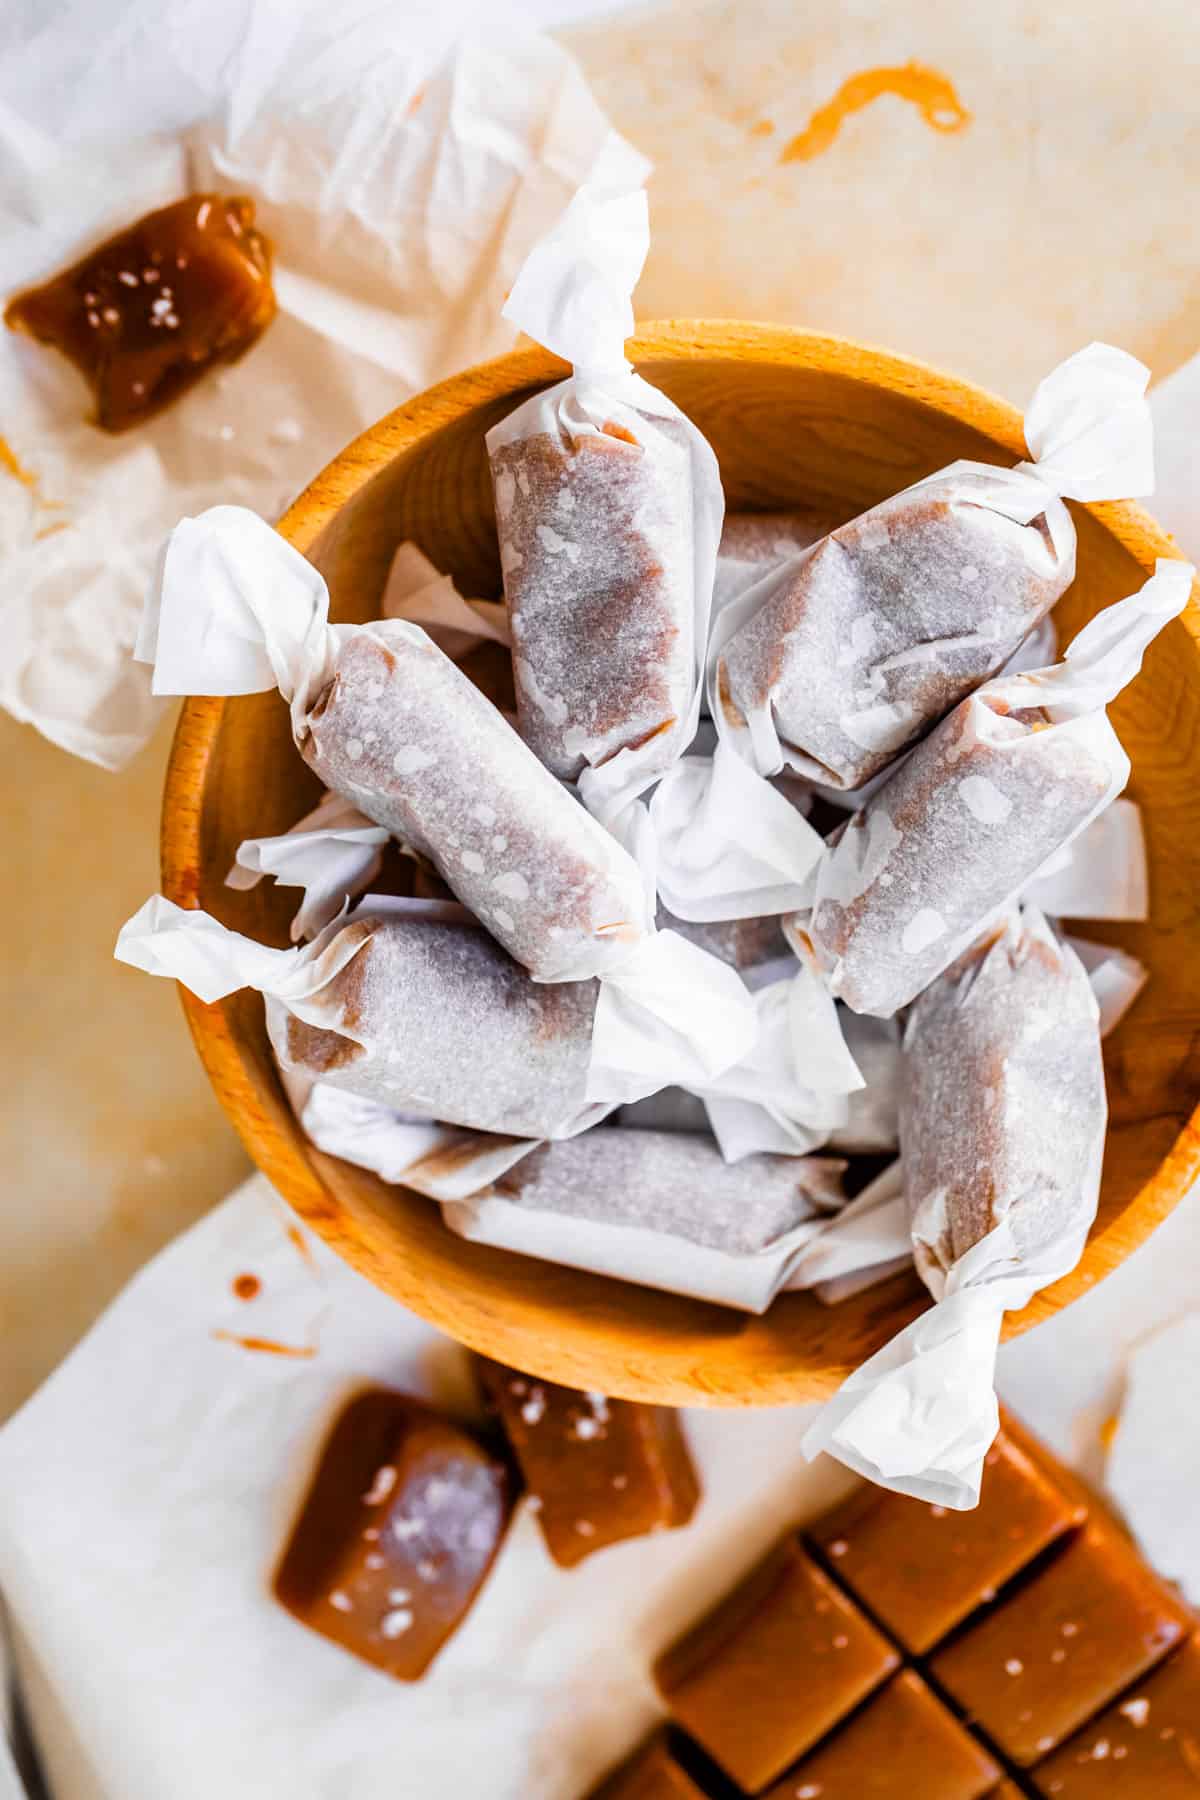
Once the caramels are cut, wrap them in parchment paper right away. (This caramel will stick too much to wax paper). If you leave them out unwrapped, they will start to lose their shape. Pop the caramels back in the fridge or freezer if you have any down time before you wrap them. Once they are wrapped and the ends are twisted, they will hold their shape pretty well. Or store them in the fridge if you are worried about it.
How to store caramel candies
One of the best parts of caramel candies is that you wrap them as part of the process, so they’re already mostly ready to go! I do like to stick my wrapped caramels in an airtight container to make sure they don’t dry out. They will last for a long time, up to 2 weeks just sitting right on the counter.
The cooking process and all that sugar makes the caramel shelf stable so you don’t have to put them in the refrigerator. That being said, they will last even longer if kept in a cool, dry place like the fridge. I actually love to toss a ziplock of caramels in the freezer. Just make sure the seal on your container is tight. Caramel candies can be finicky with moisture, so the most important thing to help caramel candies last is to make sure they’re kept in an environment that isn’t too dry or too humid (so they don’t dry out or become a gooey, soggy mess).
Can you freeze homemade caramel candies?
Oh heck yes, you think I made all these caramels and didn’t freeze any?? My freezer is STUFFED, haha! With sooo many versions of this recipe.
Here’s how it’s done: Place the wrapped caramel candies in a ziplock freezer bag, remove as much air as possible, and seal. They will last in the freezer for several months. When you’re ready to eat one (or the whole bag…) let them sit out on the counter until they come to room temperature. I swear, they are just as good as when you first made them. Magic! I love to make my Christmas caramels in, like, October. Then I just whip them out for my cookie plates and high five Martha Stewart on the way.
Caramel candy frequently asked questions
At it’s most basic, caramel is just sugar heated to its melting point. Because of that, caramel is really an umbrella term and there are so many variations depending on what you add to the recipe and how long you cook it! In this recipe, we use dark brown sugar, butter, heavy cream, corn syrup, vanilla, water, and salt, and cook just long enough to make it firm at room temperature, but not hard (see more in the question below).
The word caramel is most often used to describe the thick, syrupy type of caramel usually cooked to the “thread stage” (215-235 degrees) or even the “soft ball” stage (235-240 degrees). That just means that at colder temperatures it will be firmer, but at room temperature it’s more liquid like. It’s a sauce poured over ice cream, pie, or your tongue.
Soft caramel candy refers to caramel that is cooked longer than syrupy caramel, usually to the “firm ball” stage (245-250 degrees F). When cooked to this point, the caramel stays firm in or out of cool temperatures. That perfect stage is what allows caramel to be cooled and cut into candies that hold their shape but are still soft. (My recipe only cooks to 240, we are breaking the rules 😆 I told you, they are the SOFTEST!)
If you’re trying to make soft caramel candies like this recipe, it really all comes down to the temperature you cook the caramel to. As the caramel cooks, more and more moisture evaporates from it, making it harder. Simply put, if your caramel is hard, it cooked too long and went past the sweet spot for this recipe, 238-240 degrees F.
Not all caramel works well for caramel apples, trust me I have walked this road! It’s a whole thing. You need it to be hard enough to not drip off the apple, but soft enough to actually enjoy biting through. I have a whole other post with the perfect caramel recipe for Caramel Apples! I’m actually so in love with this recipe! A recent convert. I used to hate caramel apples.
More candy you’ll love
Do you love candy-making? It’s one of the most special things about the holidays for me. It’s just so much fun and you get to feel like a mad scientist 🤣 So many to choose from. Here are some of my favorites.
- Mom’s Easy Fudge Recipe >> one of my top recipes all time, and my number one candy to make at Christmas
- Homemade English Toffee Recipe >> this toffee turns out every time, no thermometer needed! Thanks Aunt Shirley!
- Buckeye Candy Recipe >> peanut butter and chocolate are the ultimate combo, this recipe is from my BFF’s mom, Anne
- Caramel Nougat Pecan Rolls >> what’s not to love about vanilla nougat wrapped in soft caramel and pecans?! People always ask for this recipe.
- Homemade Peppermint Bark >> it just isn’t Christmas without some amazing peppermint bark!
- Brown Sugar Fudge Recipe (Penuche) >> if you’ve never had this brown sugar white chocolate fudge, you are absolutely missing out
- 10 Minute Microwave Caramel Corn >> this is so stupid easy and totally worth it
- Easy Christmas Gumdrop Nougat Candy from That Oven Feelin
- Dalgona Candy (Korean Honeycomb Toffee) from My Korean Kitchen, doesn’t this sound amazing?
Extra caramel, yes please!
I told you before, I definitely went down the caramel rabbit hole over the last few months. There are so many ways to caramel, I just can’t apologize. Here are all my favorite caramel recipes, rounded up!
- The Only Caramel Apples I Will Eat >> no lie. they are the stuff of dreams I tell you, DREAMS
- The Salted Caramel Sauce of my Dreams >> thicker, richer, and fudgier than most salted caramels!
- The Best Homemade Caramel Sauce >> the original caramel sauce on my site, and my favorite on ice cream or pie
- Dulce de Leche from Condensed Milk >> thick, caramel-butterscotch flavor you will love
- Caramel Cake with Caramel Icing Recipe >> I’m not sure it can get better than caramel on caramel
- Homemade Salted Caramel Brownies >> ok, maybe thick gooey caramel on top of fudgy brownies is the best
- Salted Caramel Sandwich Cookies >> the salted caramel from above but sandwiched between two brown butter cookies, YES please
- Brown Sugar Caramel Crunch Ice Cream from Displaced Housewife
Facebook | Pinterest | Instagram
Soft Homemade Caramels
Equipment
- 5×5 parchment squares
Ingredients
- 1/4 cup water
- 2 cups dark brown sugar, packed
- 1 cup light corn syrup
- 1/2 cup butter, (1 stick)
- 1 cup heavy cream*, OR 1 cup evaporated milk, see note
- 1 and 1/2 teaspoons kosher salt, or sea salt. Use half the amount of salt if you have table salt or fine salt.
- 1 tablespoon vanilla extract, or vanilla bean paste; or scrape out seeds of 1 vanilla bean
- large flake sea salt, to top caramels, optional
Instructions
- Line an 8×8 or 9×9 inch square pan with parchment paper, creasing and folding the corners as necessary to make it fit. Set aside.
- Get all your ingredients set up and ready to go before you start. Caramel moves slow, and then really fast! So buckle up. Pour 1 cup light corn syrup into a measuring cup. Pour 1 cup heavy cream into another measuring cup. Get out a stick of butter and unwrap it. Set the kosher salt and vanilla nearby.
- Add 1/4 cup water to a heavy 3-quart saucepan. (Do NOT use a cheap pan to make candy! And don't use an enameled pot. Stainless steel is best.) Swirl the water around the pan to get the sides of the pan wet.
- Add 2 cups packed dark brown sugar to the center of the pot. Try not to get any sugar on the edges of the pot.
- Turn the heat to medium. Use a flat whisk to draw the water toward the center of the pot to moisten all the sugar. Continue whisking gently in the center until smooth.
- The brown sugar and water mixture will start to bubble and boil. Place a candy thermometer on the edge of the pot, if you have one that attaches.
- Caramelize the brown sugar: Whisk the brown sugar nearly constantly for about 6-8 minutes. The sugar will start to foam and bubble up. You are looking for the first signs of smoke. Once you see the first wisp of smoke, stay alert. Continue whisking until smoke is being emitted consistently in puffs, even when stirring constantly. Double check with an instant read thermometer; the temperature should read between 260 and 265 degrees F. Once you have consistent puffs of smoke AND the 260-265 reading, remove the pot from the heat immediately. If you go too far, you will burn your caramel and there is no going back.
- Once the pan is off the heat, immediately pour in 1 cup of corn syrup while whisking (enlist help if you can!!) This will halt the cooking process. If you don't add the corn syrup right away, the caramel will keep cooking, even off heat, and could burn.
- Add 1/2 cup (1 stick) of butter to the pot and continue whisking.
- When the butter is mostly melted, return the pan to the burner and turn the heat back to medium. The mixture will start bubbling again shortly. Stir until the butter is completely melted.
- Take about 5 minutes to slowly add 1 cup of cream to the bubbling caramel, still over medium heat. Just pour in a little at a time. If you add it all at once, it could separate on you and your caramel will turn out grainy.
- Once all the cream is added, continue stirring the pot with the heat on medium, until the candy reaches 240 degrees F, not any higher. This could take anywhere from 5-10 minutes. Double check your candy thermometer by using an instant read thermometer, if you have one. 240 degrees is best. Stop at 239 if you are nervous!
- Once you have reached 240 degrees, remove the pot from the heat. Add 1 and 1/2 teaspoons kosher salt. If you don't have kosher salt, start with 3/4 teaspoon table salt and taste it. Add more to taste. The amount of salt you add is completely up to you (you can leave it out entirely if you want, but I feel that caramel always needs salt to balance the sweetness.)
- Add 1 tablespoon vanilla bean paste or vanilla extract, and stir.
- Pour the caramel into the pan lined with parchment paper.
- If you love salted caramel, sprinkle the top of the caramel with flaky sea salt. This is optional!
- Let the caramel cool completely. This takes 2-4 hours usually. You can speed this up buy putting your caramel in the fridge if you like. (Once chilled, let rest at room temperature for 10-30 minutes until it's easy to slice.)
- Chill slightly. If you left your caramel at room temperature, place the pan in the freezer for about 10 minutes (or fridge for 20 minutes) before slicing, so that it doesn't stick so much to the knife.
- Cut the caramels. Lift the caramel out of the pan using the parchment paper and place on a cutting board. Use a large chef's knife to cut the caramel into rows. If the caramel is sticking to the knife too much, put it back in the fridge or freezer for another 10-20 minutes, and clean the knife before starting again.
- Once you have cut the caramel into 6 or 8 rows, immediately turn the caramel and cut the other way. You can make your caramels as small or large as you like. I usually cut anywhere between 48 and 56 caramels (6 rows by 8 rows, or 7 rows by 8 rows.)
- Separate the caramels from each other immediately. If you cut them but leave them touching, they will just melt into each other. Chill the caramel again as necessary to make cutting easier. These caramels are so soft that they will start to lose their nice square shape if you cut them and leave them sitting out. (Once you have wrapped them in parchment paper, they will hold their shape nicely.)
- Wrap the caramels. You can cut your own parchment paper into 4×5 inch rectangles, but it's so much easier to buy pre-cut parchment wrappers made for this. (Wax paper will stick to the caramels.) Place a caramel on the edge of the paper, roll it up completely, then twist the ends.
- Store caramels. Store wrapped caramels in an airtight container. A ziplock is fine, or a large tupperware, or a cookie jar. I like to keep my caramels out at room temperature if I plan to eat them within a week. Chilling them in the fridge is tasty, if you like cold caramel.
- Freeze. If you don't plan to eat them or gift them within a week, freeze the wrapped caramels in a ziplock bag. Pull them out and leave the ziplock out at room temperature for 2-4 hours until they are soft and ready to eat again! Frozen caramels will last at least 6 months.
Notes
- Evaporated milk will give you a “fudgier” texture, similar to the texture of my favorite Salted Caramel Sauce. Most of the photos in this post show caramel made with evap milk.
- Heavy cream will give you a smoother, stretchier caramel, which is a little more traditional like what you would get from See’s candy or a professional shop.


Hello. I am very excited to try this recipe but have one Q. You mentioned that it will rise to the top of the pan. Does it rise to the actual top, or toward the top? I ask b/c I only have a 2Qt saucepan. I was able to make your fudge recipe in my pan without issue but I am nervous about the caramel overflowing.
Hi Amber! I thiiiink you could get away with making this in a 2 quart pan. How high it rises depends on how powerful your burner is too, so there are a lot of variables. Let me know how it goes!
Hi! I have been on the hunt for a homemade caramel to rival Bequet. I buy them occasionally when I shop at The Nugget because they are right at the cash register—but they are $1 per caramel! Yikes! I am going to try these tomorrow! One question—in my other caramel experiments, my 3-quart saucepan is too small in diameter for my stove. I have a gas thermador stove and there are no “small” burners. Weird. So the gas goes too much to the outside of my smaller pots and ends up burning the edges. Turn the flame down and the candy never boils. It’s a conundrum. Wondering if I could double this recipe so I can use a larger pots? (PS: I’ll happily take your next experiment—I’m also in Sacramento area!)
Hi Lisa!! Yay another Bequet lover!! Did you know they sell these in bulk at Costco now?? I was floored when I saw it and so happy for them! But yes, so much cheaper to make at home. this is WEIRD about not having any small burners on your stove! why is there no tiny love, thermador, wth? But yes, I do think you can double this recipe and it will work fine in a larger pot. My Caramel Apple recipe is essentially this recipe doubled (with a few changes), so check that recipe for notes if you want. All the times will take a little bit longer, getting to the smoke point, and then up to temperature later. Follow the cues, not the times. (smoke and temp). make sure you have a good candy thermometer. I love that you are here in Sac!! So fun! Enjoy all the rain, and Happy Thanksgiving! PS I would LOVE to know how your caramel turns out! Thanks Lisa!
Very easy to follow. Will definitely make again
So happy this was a hit for you Domonique! thank you so much for taking the time to be my first review on this recipe! I worked hard on this one and am so happy with how it turned out. Thanks again for chiming in!