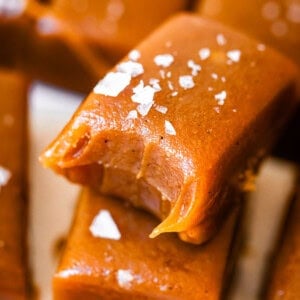
Soft Homemade Caramels
I've had my fair share of ho-hum Caramels. Caramel is all about the texture, and too often, wrapped caramels are hard to bite into, locking your jaw in place, pausing all conversation. Even if the flavor is good, it doesn't make up for the unpleasant chewing experience. THIS recipe, however, is absolute perfection. My homemade caramel candies are made with dark brown sugar, which is a little counter-culture in the caramel world. The flavor is exceptional. The best part? The texture and softness of these caramels will knock. you. out. I'll show you how to make them!
Servings: 48
Calories: 90kcal
Equipment
- 5x5 parchment squares
Ingredients
- 1/4 cup water
- 2 cups dark brown sugar packed
- 1 cup light corn syrup
- 1/2 cup butter (1 stick)
- 1 cup heavy cream* OR 1 cup evaporated milk, see note
- 1 and 1/2 teaspoons kosher salt or sea salt. Use half the amount of salt if you have table salt or fine salt.
- 1 tablespoon vanilla extract or vanilla bean paste; or scrape out seeds of 1 vanilla bean
- large flake sea salt to top caramels, optional
Instructions
- Line an 8x8 or 9x9 inch square pan with parchment paper, creasing and folding the corners as necessary to make it fit. Set aside.
- Get all your ingredients set up and ready to go before you start. Caramel moves slow, and then really fast! So buckle up. Pour 1 cup light corn syrup into a measuring cup. Pour 1 cup heavy cream into another measuring cup. Get out a stick of butter and unwrap it. Set the kosher salt and vanilla nearby.
- Add 1/4 cup water to a heavy 3-quart saucepan. (Do NOT use a cheap pan to make candy! And don't use an enameled pot. Stainless steel is best.) Swirl the water around the pan to get the sides of the pan wet.
- Add 2 cups packed dark brown sugar to the center of the pot. Try not to get any sugar on the edges of the pot.
- Turn the heat to medium. Use a flat whisk to draw the water toward the center of the pot to moisten all the sugar. Continue whisking gently in the center until smooth.
- The brown sugar and water mixture will start to bubble and boil. Place a candy thermometer on the edge of the pot, if you have one that attaches.
- Caramelize the brown sugar: Whisk the brown sugar nearly constantly for about 6-8 minutes. The sugar will start to foam and bubble up. You are looking for the first signs of smoke. Once you see the first wisp of smoke, stay alert. Continue whisking until smoke is being emitted consistently in puffs, even when stirring constantly. Double check with an instant read thermometer; the temperature should read between 260 and 265 degrees F. Once you have consistent puffs of smoke AND the 260-265 reading, remove the pot from the heat immediately. If you go too far, you will burn your caramel and there is no going back.
- Once the pan is off the heat, immediately pour in 1 cup of corn syrup while whisking (enlist help if you can!!) This will halt the cooking process. If you don't add the corn syrup right away, the caramel will keep cooking, even off heat, and could burn.
- Add 1/2 cup (1 stick) of butter to the pot and continue whisking.
- When the butter is mostly melted, return the pan to the burner and turn the heat back to medium. The mixture will start bubbling again shortly. Stir until the butter is completely melted.
- Take about 5 minutes to slowly add 1 cup of cream to the bubbling caramel, still over medium heat. Just pour in a little at a time. If you add it all at once, it could separate on you and your caramel will turn out grainy.
- Once all the cream is added, continue stirring the pot with the heat on medium, until the candy reaches 240 degrees F, not any higher. This could take anywhere from 5-10 minutes. Double check your candy thermometer by using an instant read thermometer, if you have one. 240 degrees is best. Stop at 239 if you are nervous!
- Once you have reached 240 degrees, remove the pot from the heat. Add 1 and 1/2 teaspoons kosher salt. If you don't have kosher salt, start with 3/4 teaspoon table salt and taste it. Add more to taste. The amount of salt you add is completely up to you (you can leave it out entirely if you want, but I feel that caramel always needs salt to balance the sweetness.)
- Add 1 tablespoon vanilla bean paste or vanilla extract, and stir.
- Pour the caramel into the pan lined with parchment paper.
- If you love salted caramel, sprinkle the top of the caramel with flaky sea salt. This is optional!
- Let the caramel cool completely. This takes 2-4 hours usually. You can speed this up buy putting your caramel in the fridge if you like. (Once chilled, let rest at room temperature for 10-30 minutes until it's easy to slice.)
- Chill slightly. If you left your caramel at room temperature, place the pan in the freezer for about 10 minutes (or fridge for 20 minutes) before slicing, so that it doesn't stick so much to the knife.
- Cut the caramels. Lift the caramel out of the pan using the parchment paper and place on a cutting board. Use a large chef's knife to cut the caramel into rows. If the caramel is sticking to the knife too much, put it back in the fridge or freezer for another 10-20 minutes, and clean the knife before starting again.
- Once you have cut the caramel into 6 or 8 rows, immediately turn the caramel and cut the other way. You can make your caramels as small or large as you like. I usually cut anywhere between 48 and 56 caramels (6 rows by 8 rows, or 7 rows by 8 rows.)
- Separate the caramels from each other immediately. If you cut them but leave them touching, they will just melt into each other. Chill the caramel again as necessary to make cutting easier. These caramels are so soft that they will start to lose their nice square shape if you cut them and leave them sitting out. (Once you have wrapped them in parchment paper, they will hold their shape nicely.)
- Wrap the caramels. You can cut your own parchment paper into 4x5 inch rectangles, but it's so much easier to buy pre-cut parchment wrappers made for this. (Wax paper will stick to the caramels.) Place a caramel on the edge of the paper, roll it up completely, then twist the ends.
- Store caramels. Store wrapped caramels in an airtight container. A ziplock is fine, or a large tupperware, or a cookie jar. I like to keep my caramels out at room temperature if I plan to eat them within a week. Chilling them in the fridge is tasty, if you like cold caramel.
- Freeze. If you don't plan to eat them or gift them within a week, freeze the wrapped caramels in a ziplock bag. Pull them out and leave the ziplock out at room temperature for 2-4 hours until they are soft and ready to eat again! Frozen caramels will last at least 6 months.
Notes
*CREAM VS. EVAP MILK: You can use 1 cup evaporated milk in place of the heavy cream. (This is not a full can, you will have to measure it.) I tested this recipe many (many!!) times using different variations of both cream and evap milk.
- Evaporated milk will give you a "fudgier" texture, similar to the texture of my favorite Salted Caramel Sauce. Most of the photos in this post show caramel made with evap milk.
- Heavy cream will give you a smoother, stretchier caramel, which is a little more traditional like what you would get from See's candy or a professional shop.
Nutrition
Calories: 90kcal | Carbohydrates: 15g | Protein: 0.2g | Fat: 4g | Saturated Fat: 2g | Polyunsaturated Fat: 0.1g | Monounsaturated Fat: 1g | Trans Fat: 0.1g | Cholesterol: 11mg | Potassium: 18mg | Sugar: 15g | Vitamin A: 132IU | Vitamin C: 0.03mg | Calcium: 12mg | Iron: 0.1mg
