


I tried my hardest for decades to live a life with no Royal Icing in it, but Instagram finally got me. So many beautiful works of art! I wanted to see if I could make an easy recipe for beginners like me, that actually tastes good. Success! I’ll show you exactly how to make it. It’s really fun to decorate cookies using these techniques! I have all the tips and tricks you need to feel confident making cookies that DON’T look like they were frosted by a 5-year-old. Use this recipe to decorate The Softest Sugar Cookies of Your Life, Gingerbread Cookies, or Chocolate Sugar Cookies.

Table of Contents
- What is royal icing?
- The best recipe for royal icing
- Egg whites vs meringue powder
- Optional royal icing ingredients
- Royal icing recipe ingredients
- How to make royal icing
- Tips and tricks
- Ways to use this easy royal icing recipe
- How to store royal icing for sugar cookies
- Can you freeze royal icing?
- Royal icing frequently asked questions
- More sweet treats you’ll love!
- Royal Icing Recipe For Beginners Recipe
The other day I was tapping my foot over and over again, and my young daughter Valentine comes ups and quietly asks (slightly embarrassed, and maybe a little accusatory), “Mom…do you need to go to the bathroom?”
My foot was asleep 😂 It’s always so funny when your kids try to “Mom” you. Getting a taste of my own medicine!

I felt it was only appropriate to tell you a story about my sweet Valentine on this post covered in cookie Valentines! I know it’s still January but if the seasonal section at Target knows anything (and they do), it’s that Valentine’s Day is the next holiday. I’m here for it!
Okay, by a show of hands, how many of you have spent way more time than you ever could have imagined on Instagram watching cookie decorating videos?? Your eyes glaze over as you speed further down the rabbit hole, nothing happening beyond intermittent mumblings of “Whoa!” and “That’s so cool!” through your slackened jaw?

I can’t be the only one, can I? It’s so mesmerizing!! I always learn something new. I have this Instagram habit firmly placed in the “entertainment” category of my life. No way do I think I will ever put in the hours required to be an amazing cookie decorator, creating works of museum-level edible art!
(Funny enough though, sometimes when I meet people in real life, they are surprised by my lack of skill when it comes to cookie and cake decorating. They assume that because I “do food” I can bust out a bakery-level birthday cake. NOPE! Ha! Not even close!)
In fact, I was holding out on sharing my favorite Gingerbread Man Cookies with you for YEARS because of this lack of confidence in decorating. I just didn’t think I would be able to make them look good enough! I was so nervous shooting that post. But I think they turned out okay, and I had a lot more fun than I thought I would.

SO much fun that I decided to dive in to creating a whole post for Royal Icing, even though it’s a very deep and detailed subject, and I am not an expert. But I figured there are a lot of beginners out there like me who might be interested in an overview of how to make passable looking cookies. Your creations might not gain a following on Instagram anytime soon, but they will surely impress your friends and family. And be super fun to make in the process! And did I mention, delicious?? (Tasty flavors will always beat out perfectly straight lines in my book.)
I posted my recipe for The Softest Sugar Cookies of Your Life back in 2017. I can’t believe it’s been 7 years!! Have you made this recipe? It’s a top post of mine, and has brought so many people back to the light, after deciding they hated sugar cookies. I would hate sugar cookies too if I only ever had rock-hard crunchy dry ones. My recipe is SUPER soft, thick, and flavorful!

Ever since I posted that recipe and the Buttercream Frosting to go with it, I’ve gotten constant requests for an icing recipe “that stacks.” My readers want a sugar cookie topper that is dry enough to transport.
They might not have known it, but royal icing is what they are looking for.
What is royal icing?
Royal icing is traditionally made from just egg whites and powdered sugar. (Today we are replacing the eggs with meringue powder; more on that below). It’s an amazing combo because it creates an icing that is liquid while you work with it, but hardens into what is basically candy. Because it hardens completely dry, it allows for easy, stackable transportation. It can also be tinted to just about any color, which is just so much fun! The decorating options are limitless!
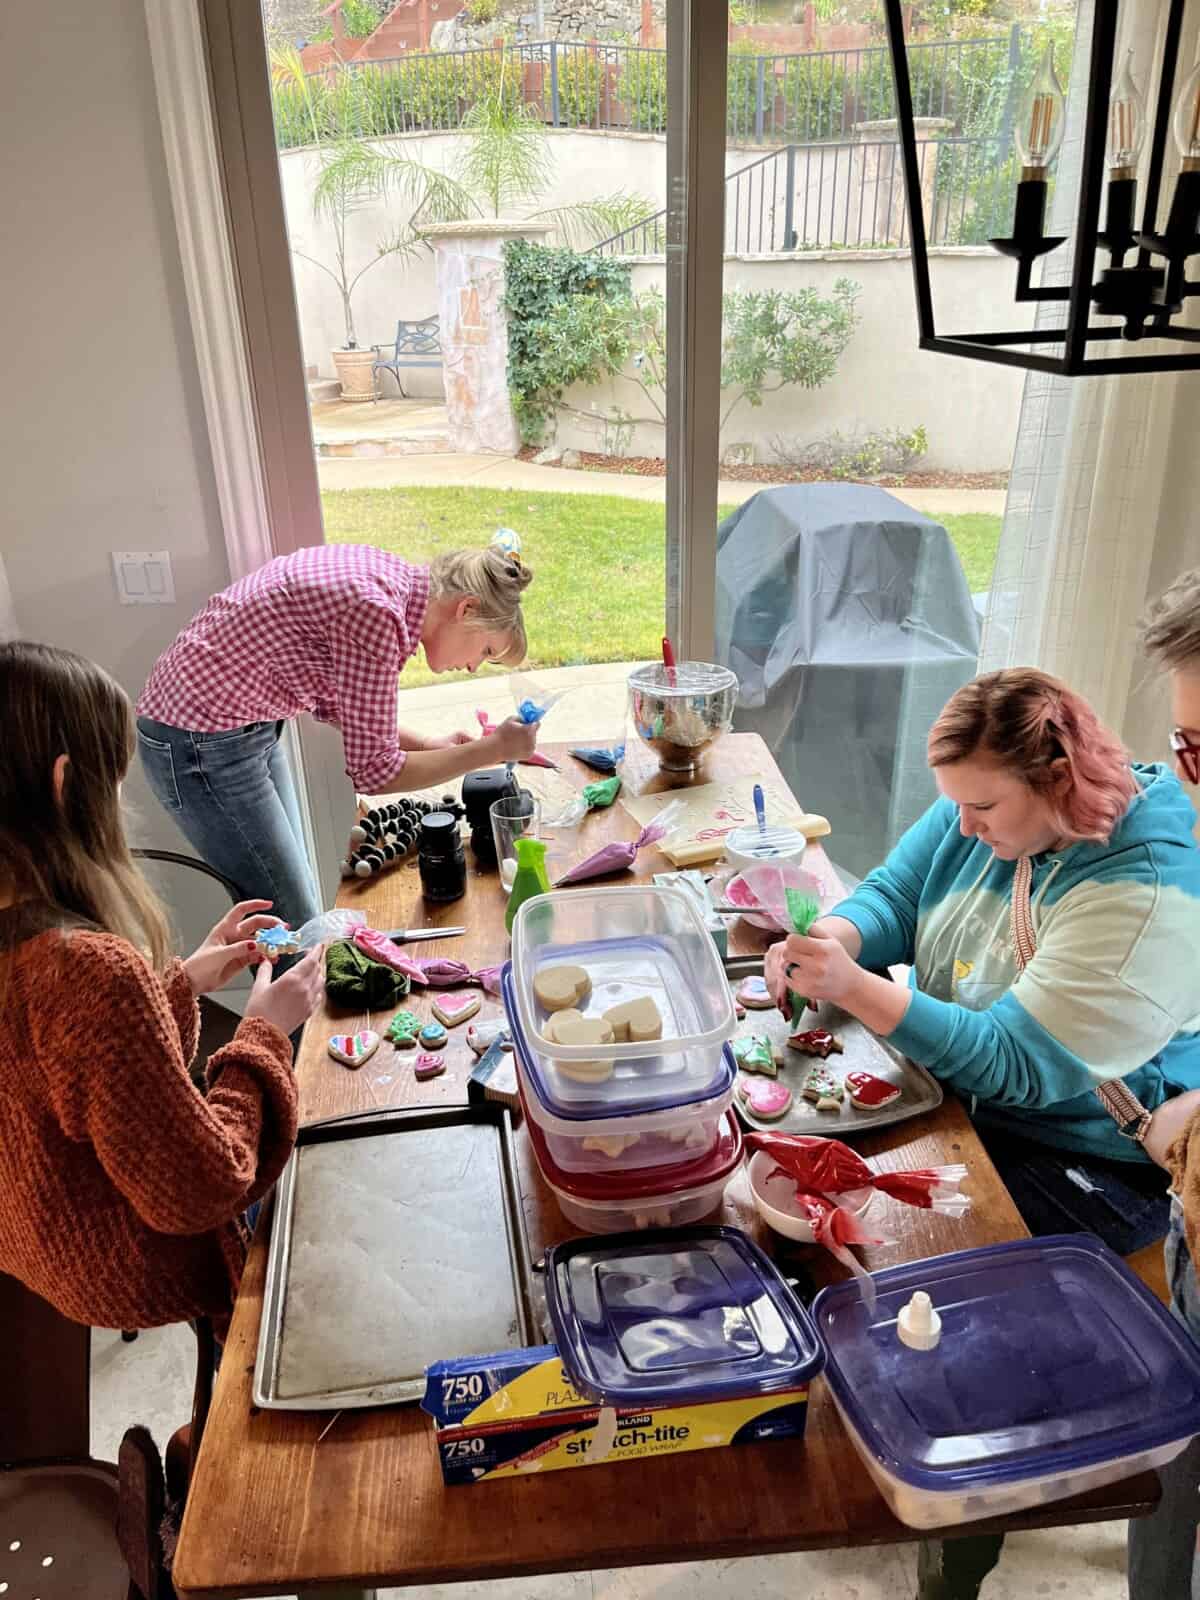
I like to think of royal icing as an arts and crafts project, one that you get to eat at the end. (Who doesn’t want that?) And it really is super fun, especially as a group project. Here I am with my daughter Charlotte and my sister-in-law Britta getting started on the dozens and dozens of cookies I made for this post. We spent hours here!
The best recipe for royal icing
People say royal icing tastes bad…and I was one of those people. Ha! But I’ve changed my opinion on that. It is not the same as buttercream frosting; you are not going to feel like you are eating a cupcake. But there is something simple and delicious about the crackly topping.
My recipe also comes through on the flavor. I don’t know why there are so many overly-simple royal icing recipes out there. It is essentially sugar, so the addition of extracts (vanilla, coconut, and almond) and hello, salt, make this recipe worlds above most others I’ve tried. I honestly have no idea why hardly any recipes add salt to royal icing, it’s essential to balance the sugar.
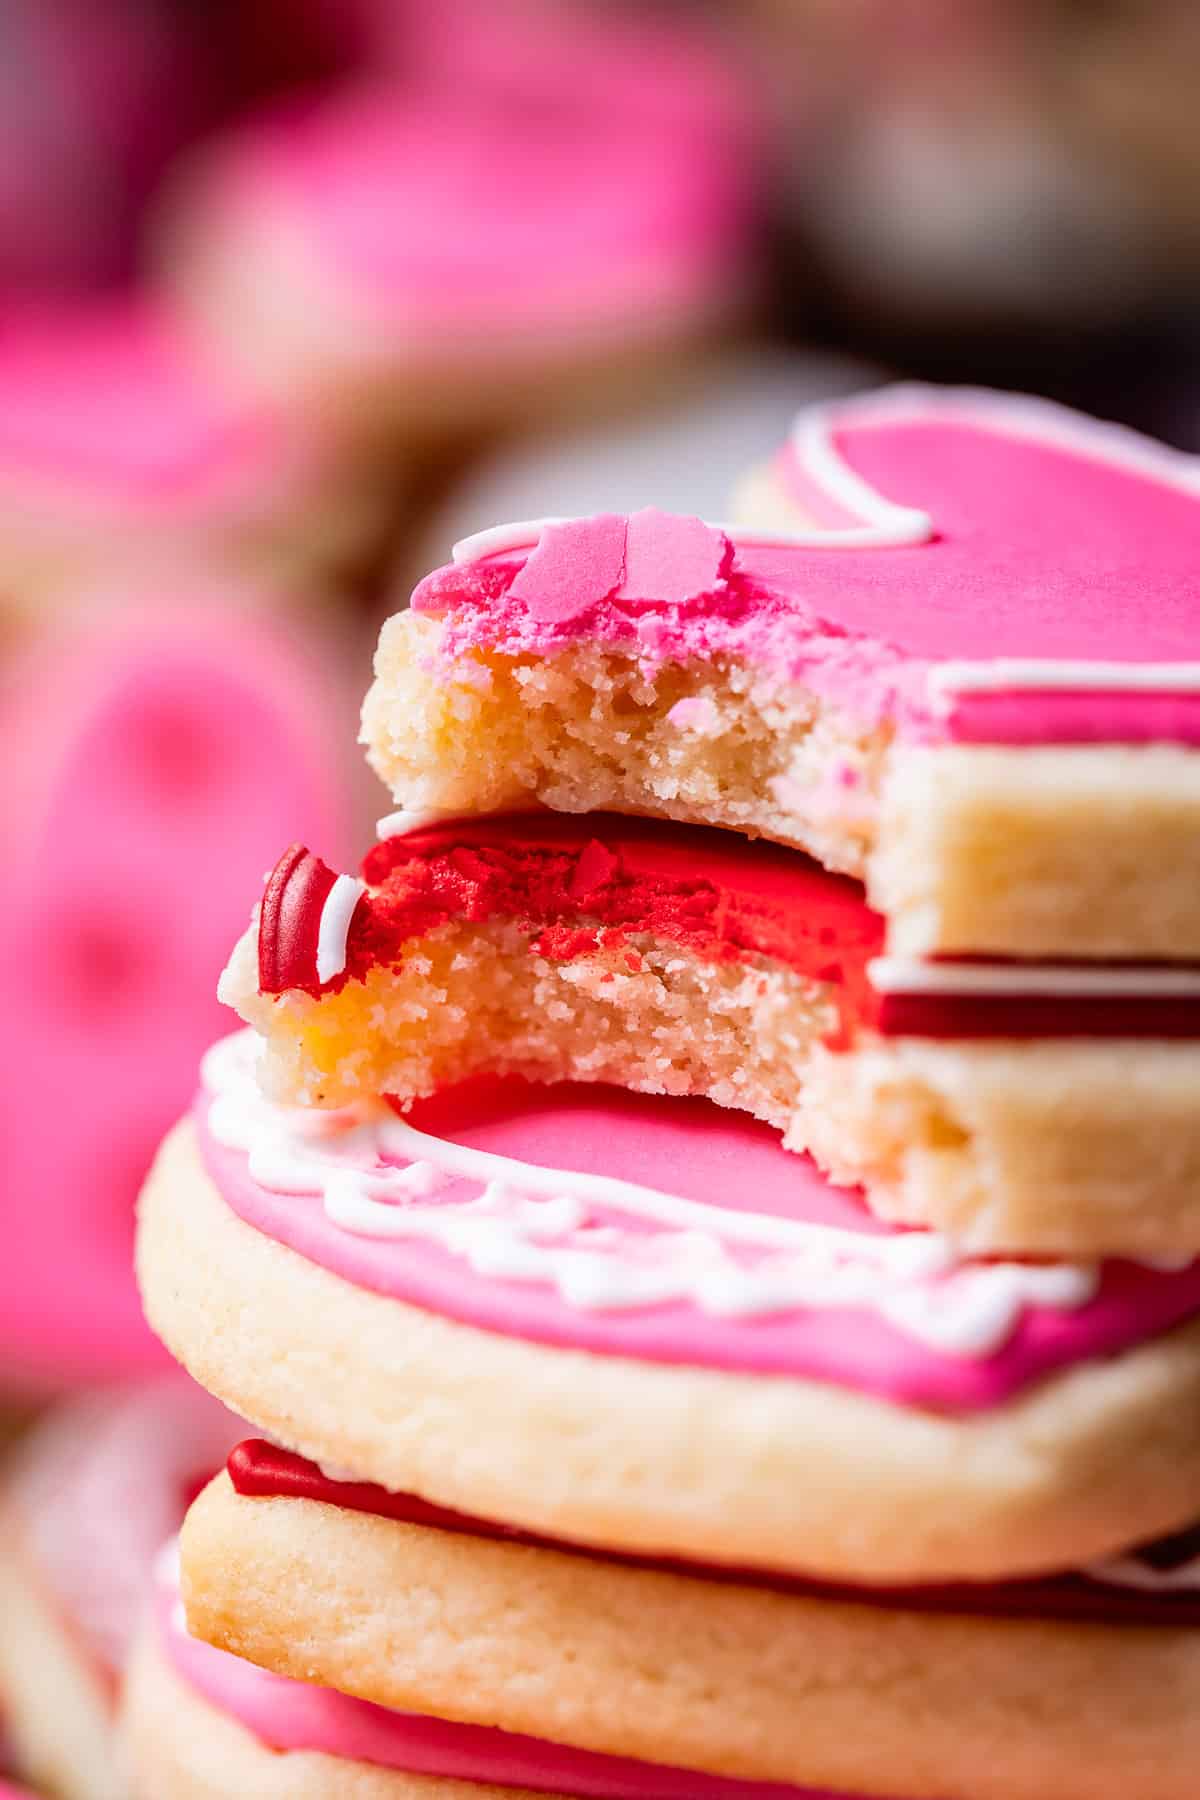
Even with my recipe with extra flavor, it is NOT pleasant eating royal icing on top of a dry cookie, not going to lie. So either make my ultra-thick Sugar Cookies or use a recipe that you trust to give you a very soft cookie.
Egg whites vs meringue powder
I prefer to use meringue powder for royal icing. It’s made of powdered egg white PLUS some cornstarch, sugar, and stabilizers to keep our icing from collapsing. (don’t use powdered egg whites.) Meringue powder is nice because:
- It’s shelf stable.
- There is no risk of salmonella. (I am the hugest hypocrite for even mentioning this because I am a cookie dough addict 🤪)
- Meringue powder allows for an exact measurement, whereas every egg white is a different size.
The best part about using raw egg whites, though, is that they are already in your fridge. Meringue powder is tough to find sometimes. You can almost always get it at Michaels, but they were out of stock when I was shopping for this post. I headed to Walmart and they didn’t have it either, I was so offended lol. Thank goodness for Amazon overnight delivery. Seriously guys, this world we live in. So spoiled! Here is the meringue powder I bought on Amazon. Great value, high quality, and it will last a good long time! You only need 5 tablespoons for a ton of icing.

Optional royal icing ingredients
The only ingredients you REALLY need to make royal icing are meringue powder, water, and powdered sugar (or just egg whites and powdered sugar.) There are a few other optional ingredients that help with flavor and consistency. These extras are how you go from “this cookie tastes like cardboard” to “wow this is surprisingly delicious.”
- Cream of Tartar acts as a stabilizer. This helps your icing from collapsing even in humid weather. It’s kind of like insurance, and I add it every time whether it’s humid or not! It also increases the volume of egg white when you whip them, perfect since we are working with powdered egg whites and they need all the help they can get! Cream of tartar also helps prevent weeping in the final cookie.
- Corn Syrup. Corn syrup softens our final dried icing. Just a tablespoon added to the recipe means that your icing, when fully dry, will still be soft to bite into. You will not crack your teeth or feel like you are biting into cement with this icing!
- Glycerine. I don’t call for this ingredient in today’s recipe, but am curious about experimenting with it next time. Glycerine softens the final icing, just like corn syrup, but it also adds shine. If you want really glossy cookies, consider adding 1 scant tablespoon to today’s recipe in place of the corn syrup.

Royal icing recipe ingredients
This is just a quick look so you can add stuff to your shopping list. See the recipe below for full instructions, and for other equipment you might need. (Toothpicks!! Thousands of toothpicks!!)
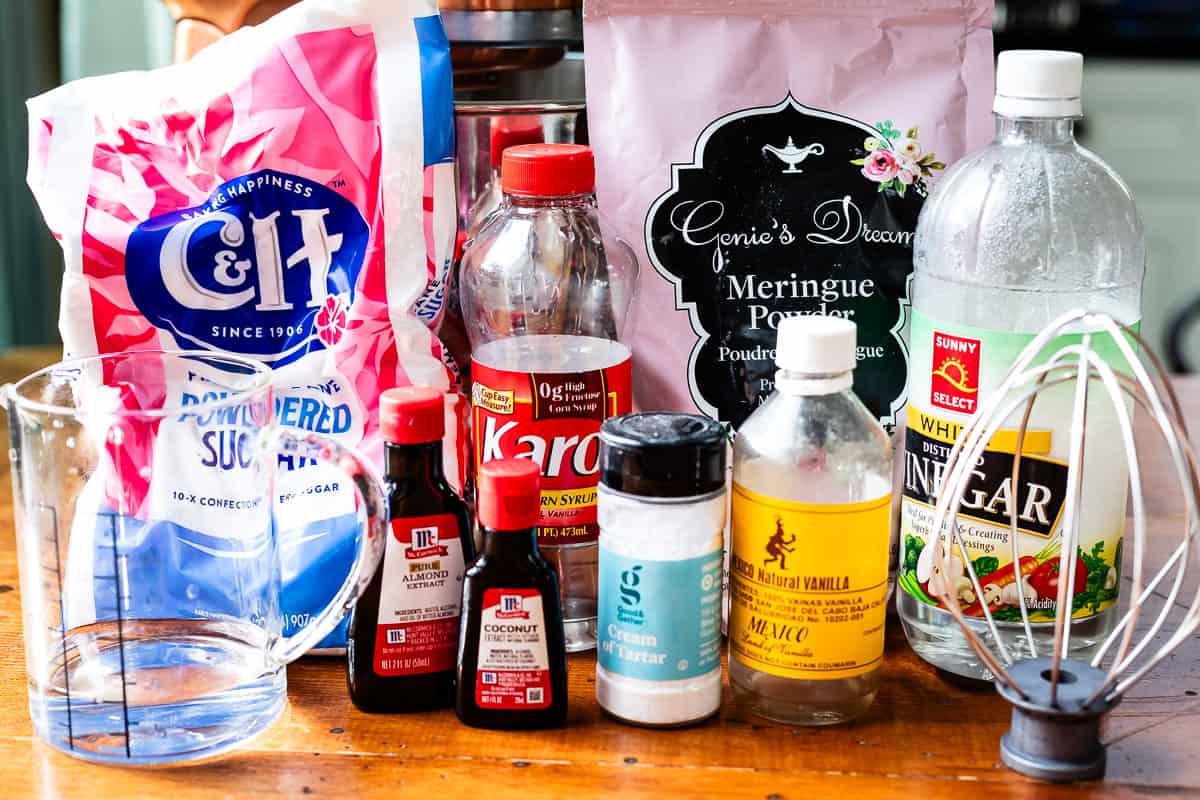
- vinegar; for degreasing, don’t add this to your icing!
- meringue powder (can sub egg whites)
- kosher salt
- cream of tartar
- water
- clear vanilla extract
- almond extract
- coconut extract
- powdered sugar
- corn syrup
How to make royal icing
Royal icing is a little finicky so you better believe we are going to treat her like the princess that she is. First up: cleaning our tools.
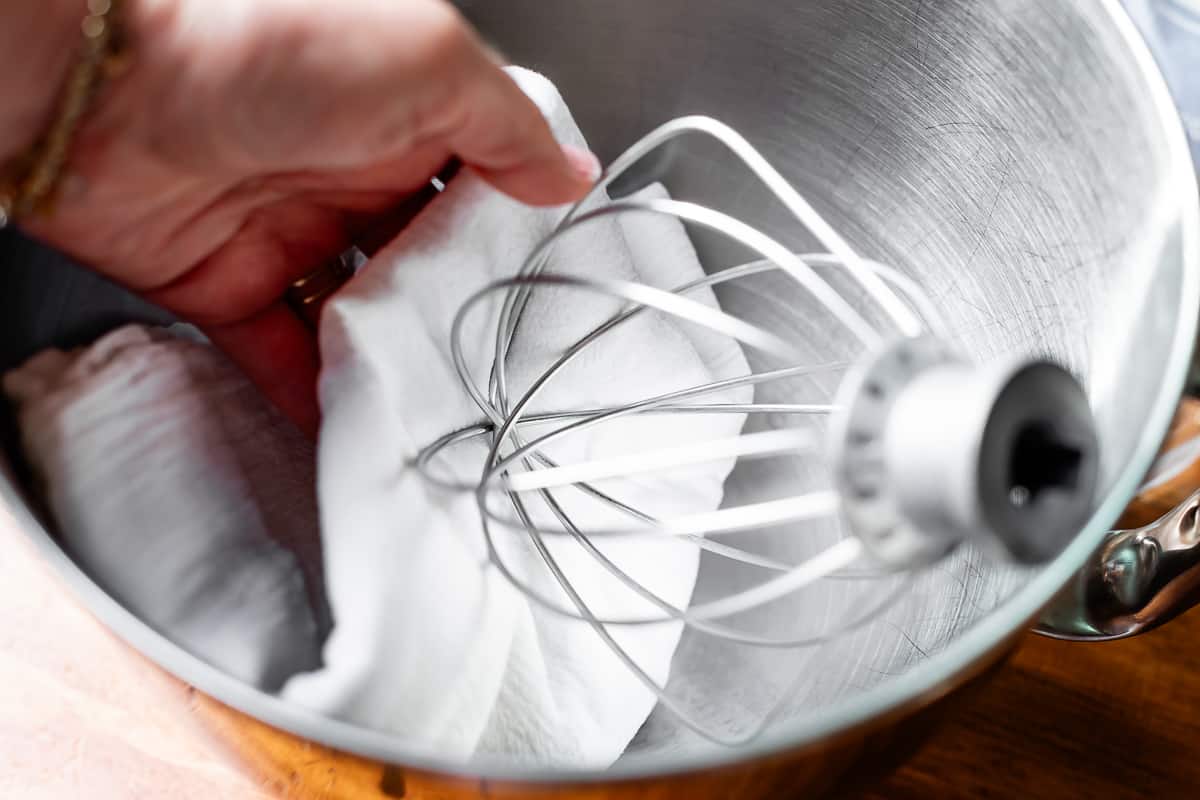
If there is even a speck of grease that gets in your icing, it will not whip properly. I like to use vinegar for degreasing because I always have it on hand. I used a tea towel, but a paper towel is probably easier. Just get it damp and rub the whisk attachment and bowl. I prefer to use my stand mixer, but a hand mixer will work too.
I did this whole royal icing project over the holidays when I had 18 people in my house, and my kitchen was trashed for days: tips and icing and cookies everywhere. We had so much fun! Anyway, my nephew kept telling me that something in my kitchen smelled weird, and the next day I realized I had left this vinegar towel hanging out in the corner of the kitchen. Yup, that was it! Ha. oops.
Add your dry ingredients to the bowl first: meringue powder, a little salt, and cream of tartar.
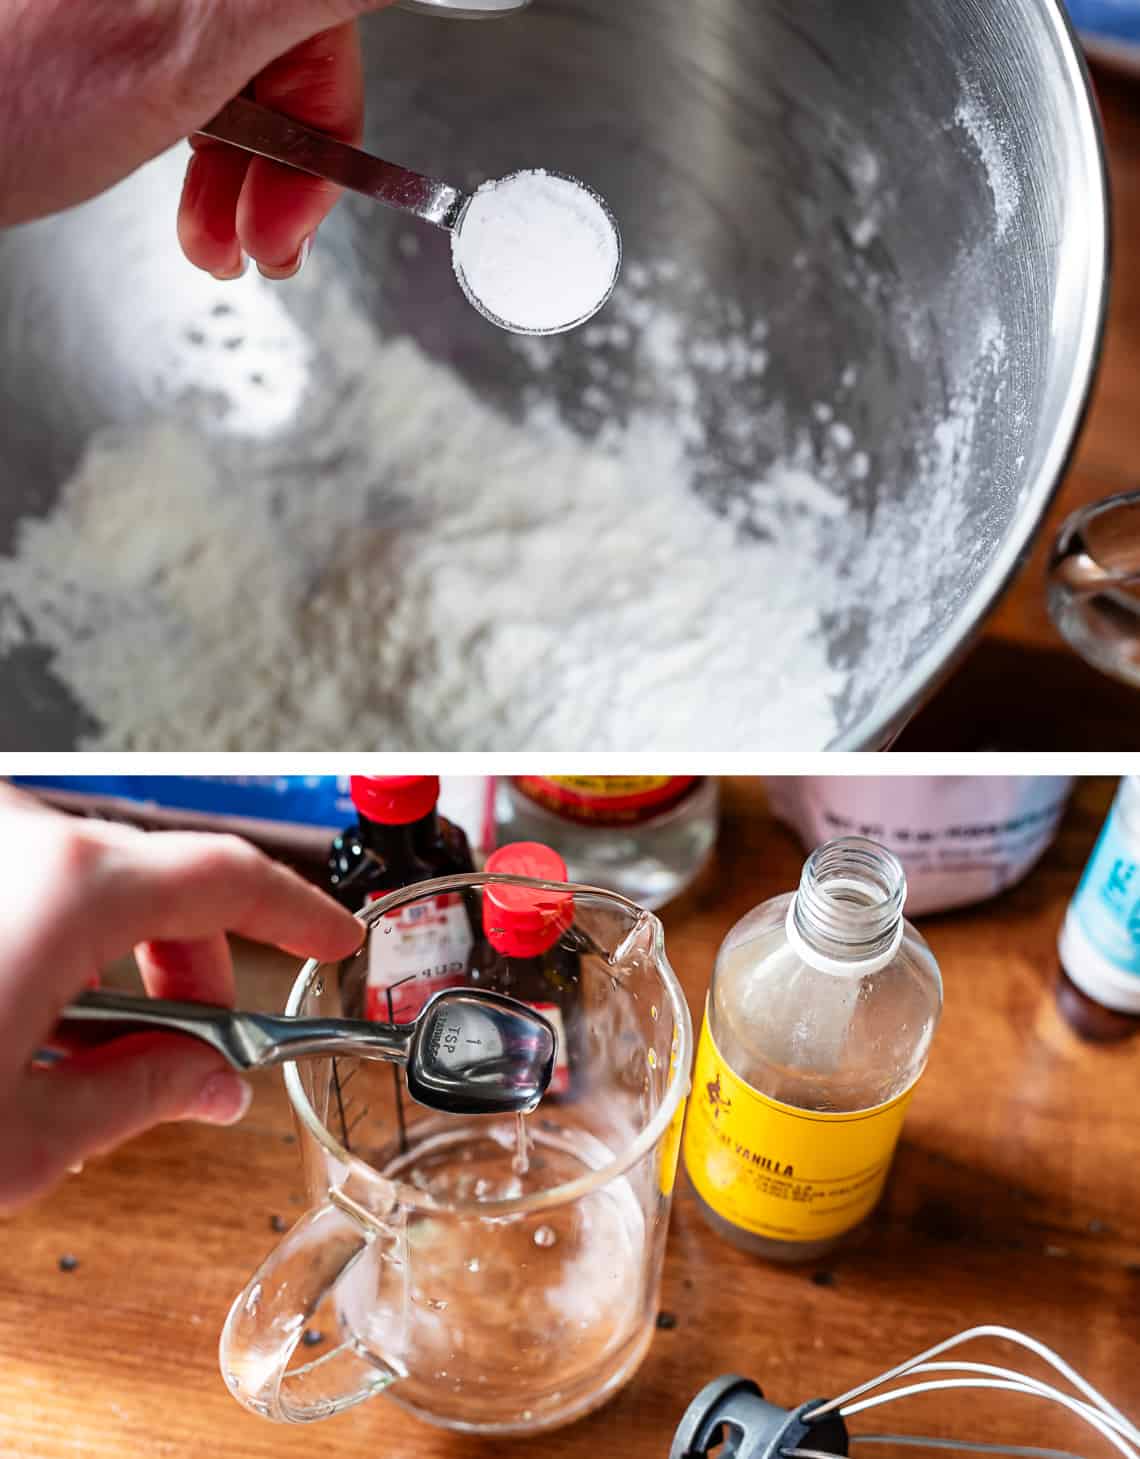
Measure out a 1/2 cup water in a cup, then add the extracts to the water. We are using clear vanilla, almond, and coconut. This is my FAVORITE combo for sugar cookies, I add these 3 extracts to the cookies themselves, but also to the Buttercream Frosting I usually use. It’s so good! If you are making gingerbread, replace the coconut and almond with vanilla.
You need to use clear vanilla, or you risk tinting your icing with the brown vanilla. This might not be a problem if you are using dark colors, but if you want white icing, you should probably get some clear vanilla. Another tip from pro decorators: if you want REALLY white icing, use white food coloring. Yes, that’s a thing! It will also prevent the other colors from bleeding into your white.
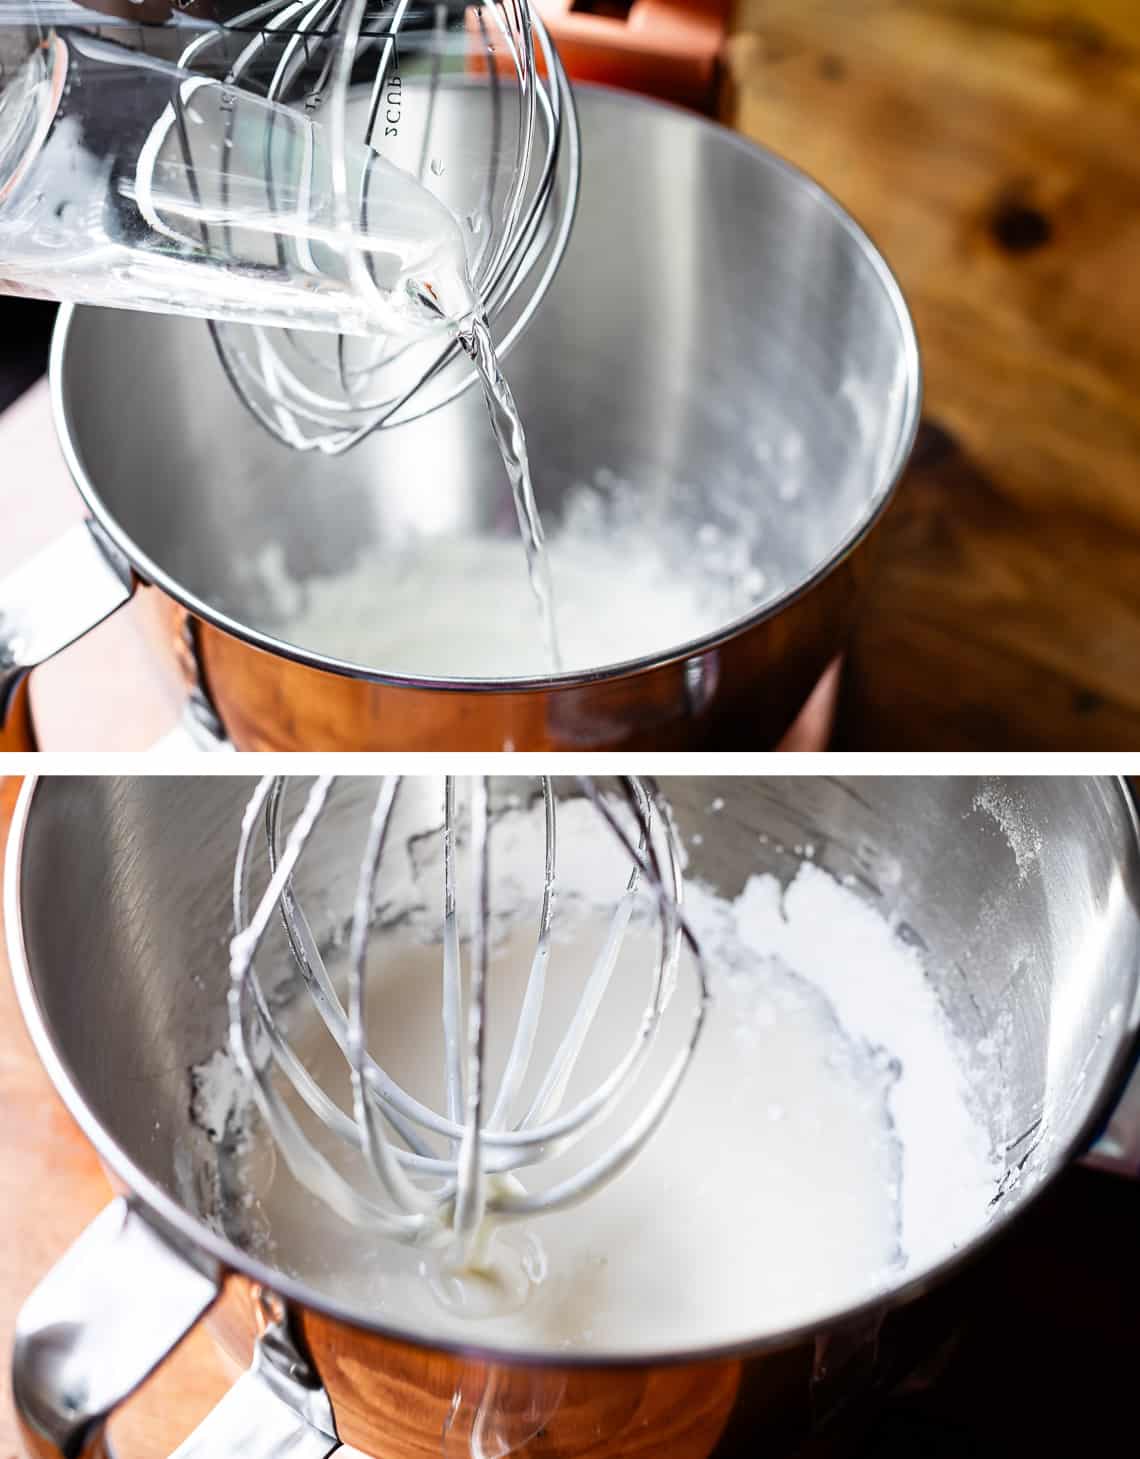
Add the water and extracts to the bowl with the dry ingredients and whisk together. Once it has come together, start adding in your powdered sugar. I add it straight from the bag, no need to sift unless it’s mega-clumpy.
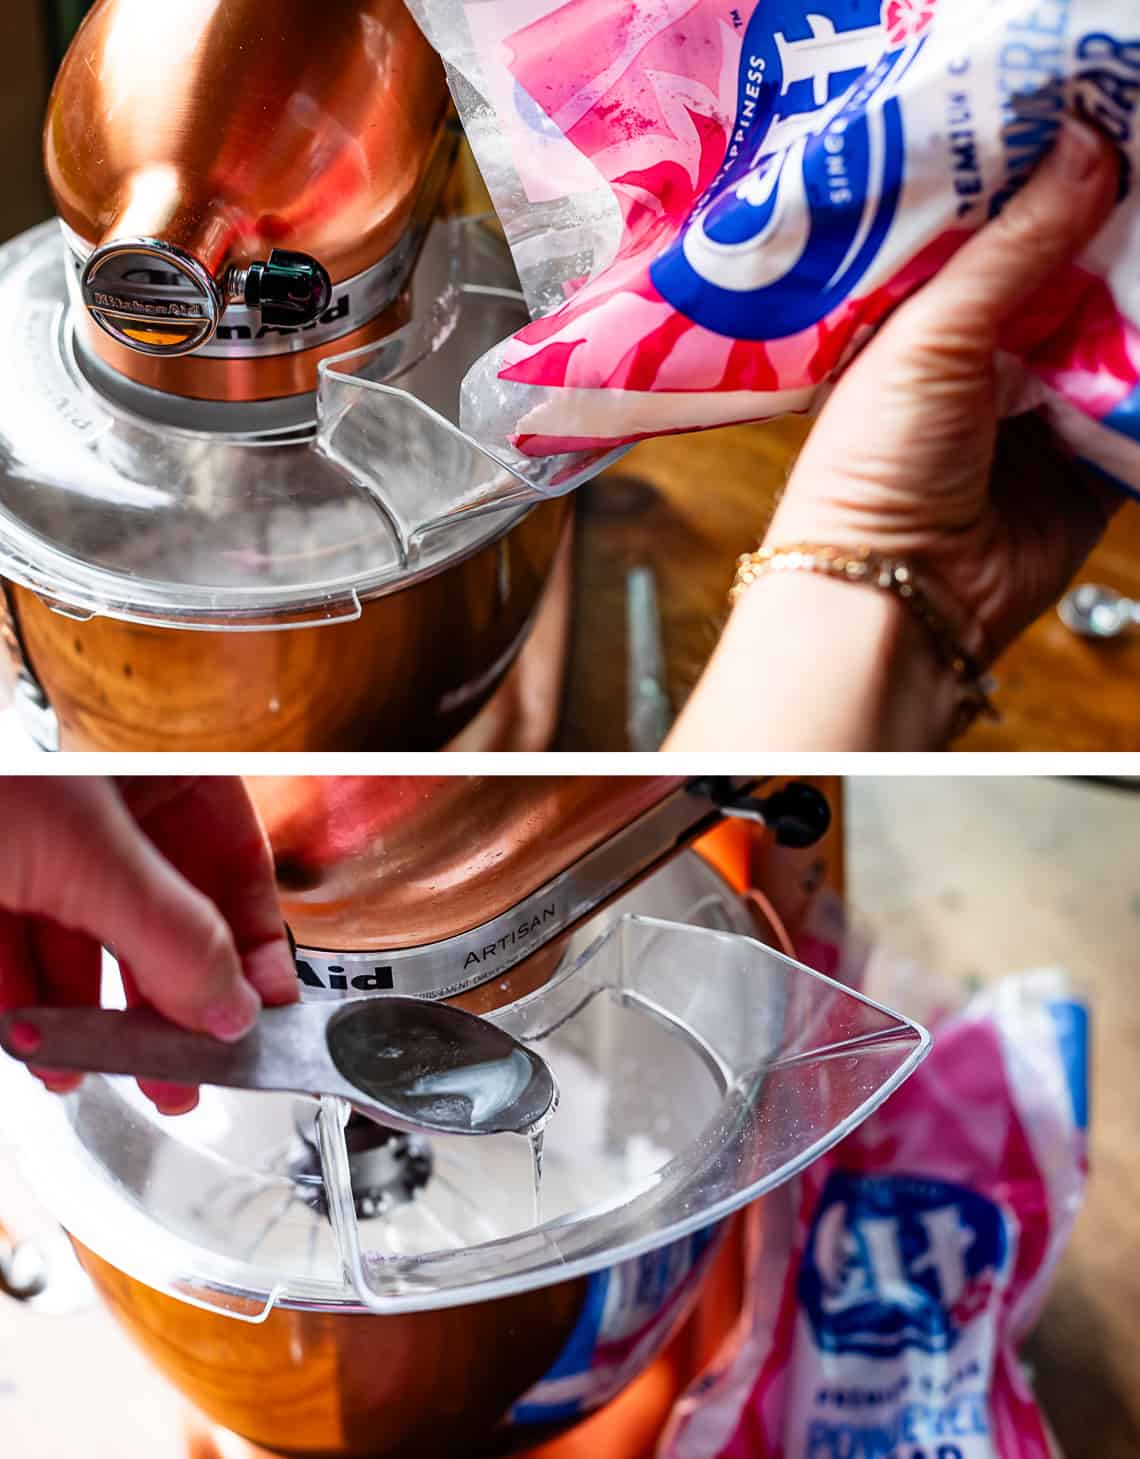
Add in that tablespoon of corn syrup (or glycerine) and keep mixing. Eventually it will start to look like this:
This is when things start to get tricky. Pay attention! You need to add more water but NOT TOO MUCH.

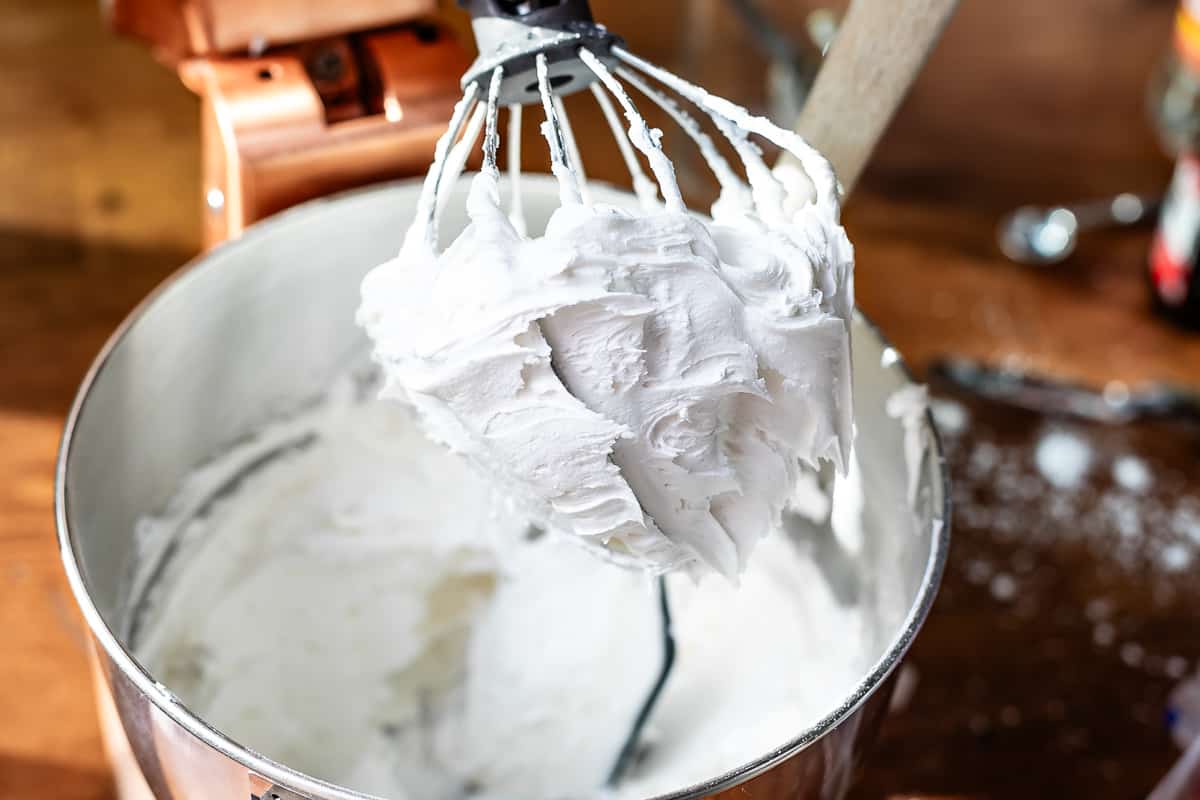
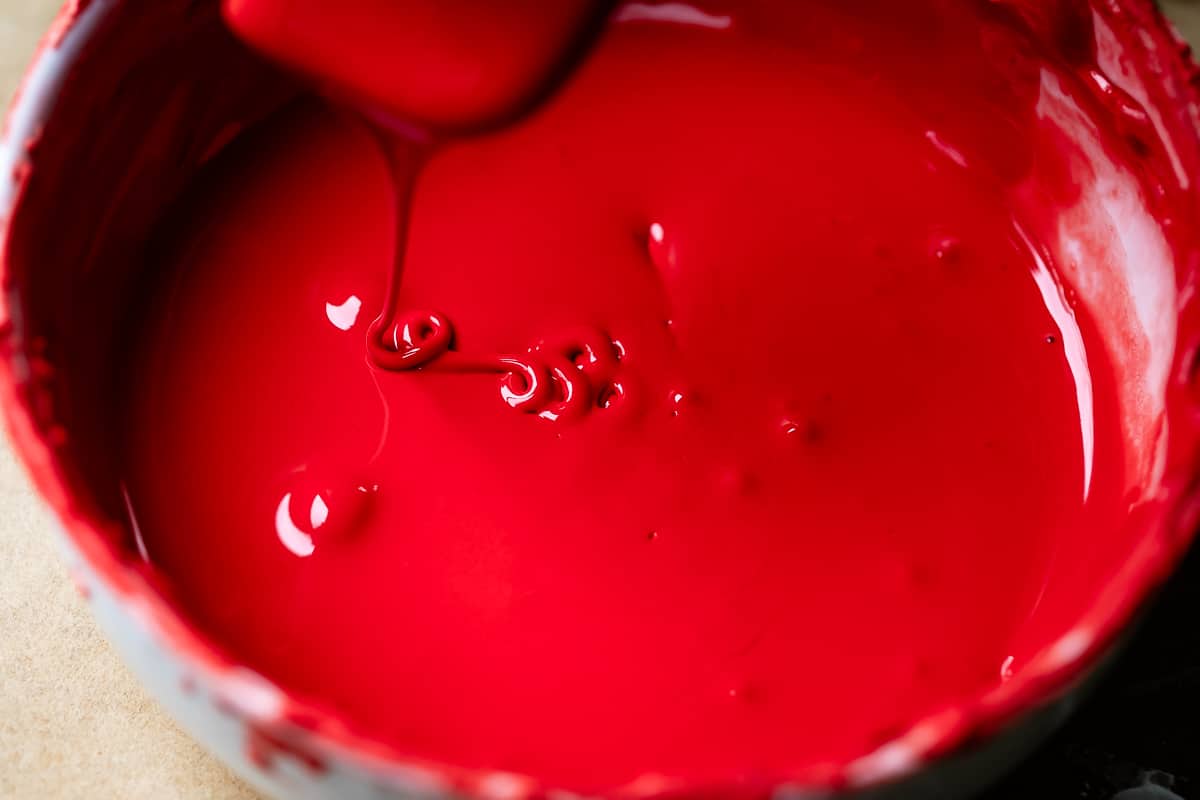
It’s getting closer. I’m going to include a million pictures now since I haven’t made a video of this yet. You want to bring this “base” icing to about the consistency of thick toothpaste, and no thinner.
This toothpaste-frosting is holding its shape pretty well, but will fall into itself eventually.

When you drag your spatula through this frosting, you want to see the mark you’ve made for about 25-30 seconds before it disappears and melts into itself. This is called “piping consistency” and you want a thicker consistency. This thicker icing is what you need for outlining and lettering. Err on the side of too-thick rather than too-thin. I made this recipe several times, and the photo here is a little thicker even than toothpaste:
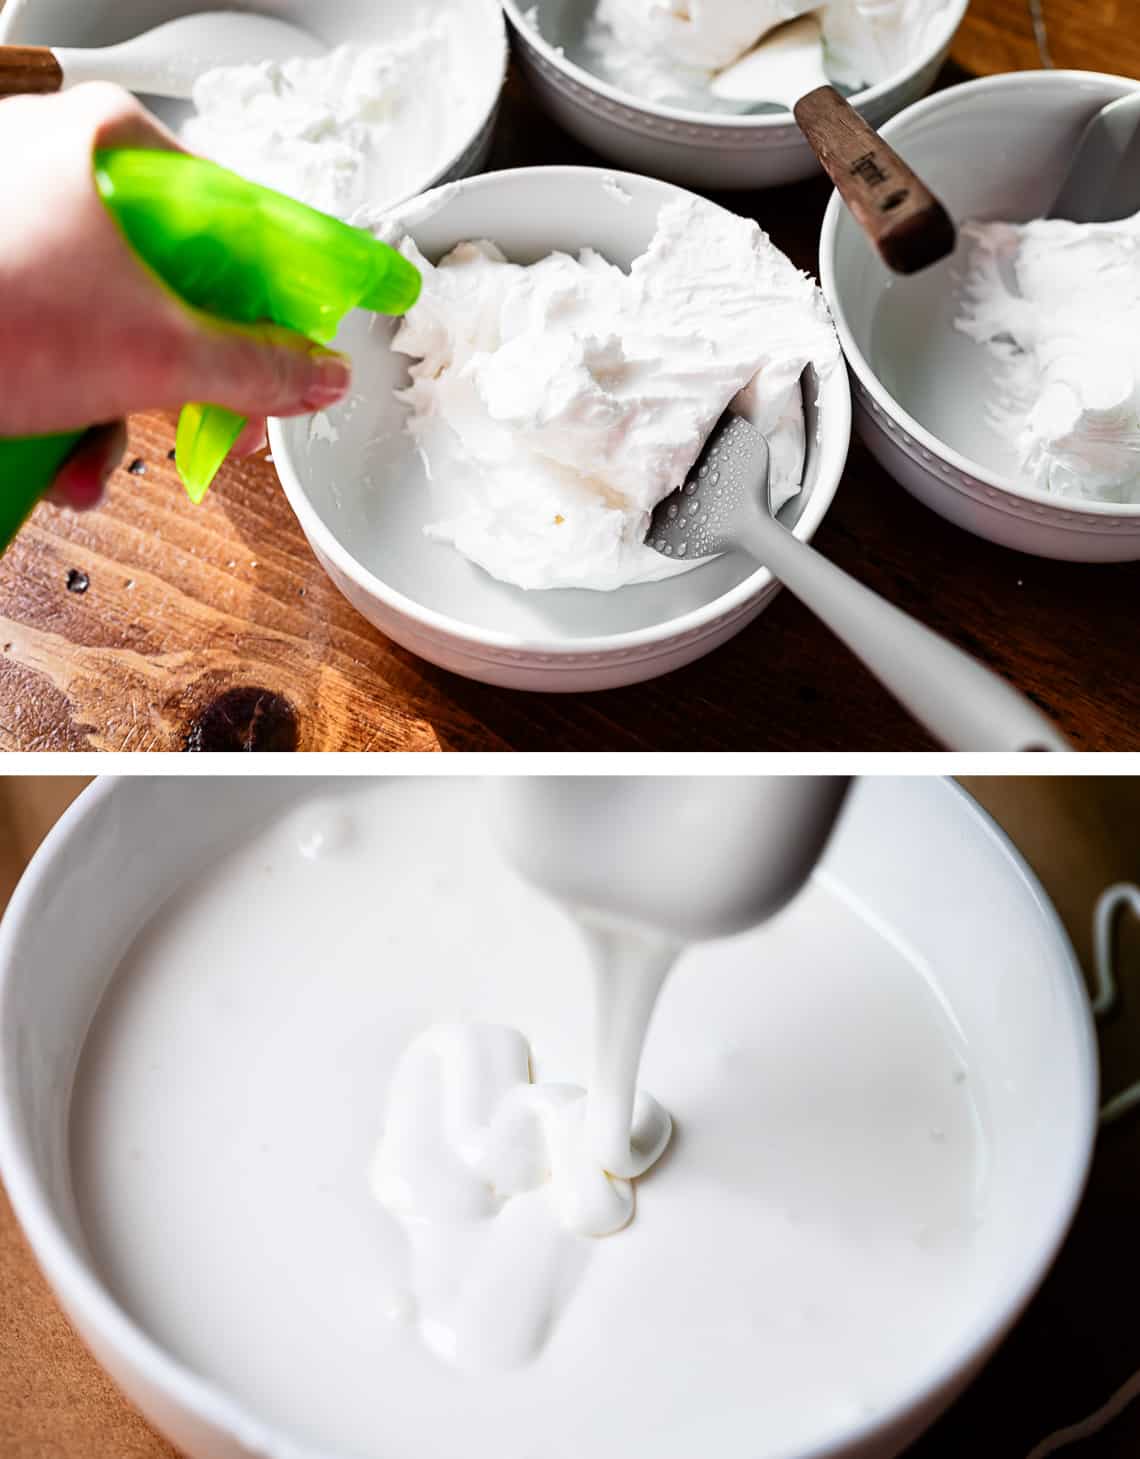
That’s ok. I moved a portion to a bowl and sprayed water on it until it was a “flood consistency”, with a disappearing-mark point closer to 15 seconds. This just means it is a thinner icing than “piping consistency” and is great for filling in large areas quickly.
But I’m getting ahead of myself. Divide your base frosting into different bowls to add gel food coloring:
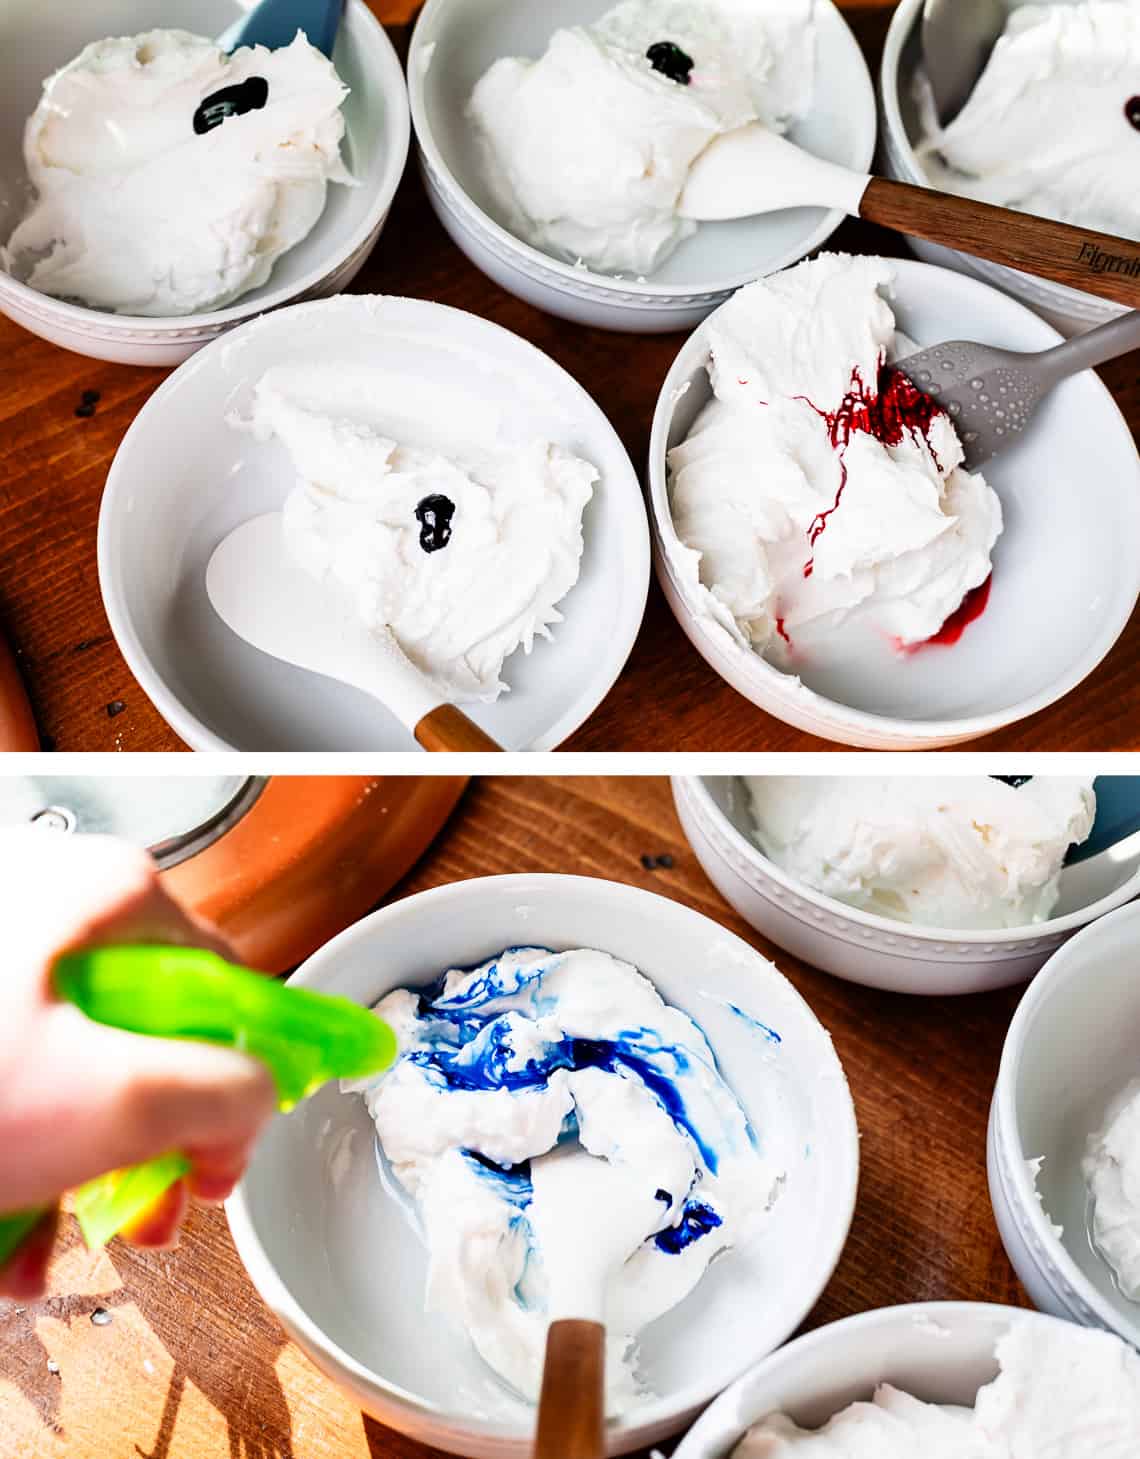
Again, this base is a little thicker than it needed to be. I could have added another tablespoon or two of water to the mixing bowl. But that’s okay, we can add it to the individual bowls too. Use your spray bottle and go carefully, mixing in the color and water until you get the desired consistency.
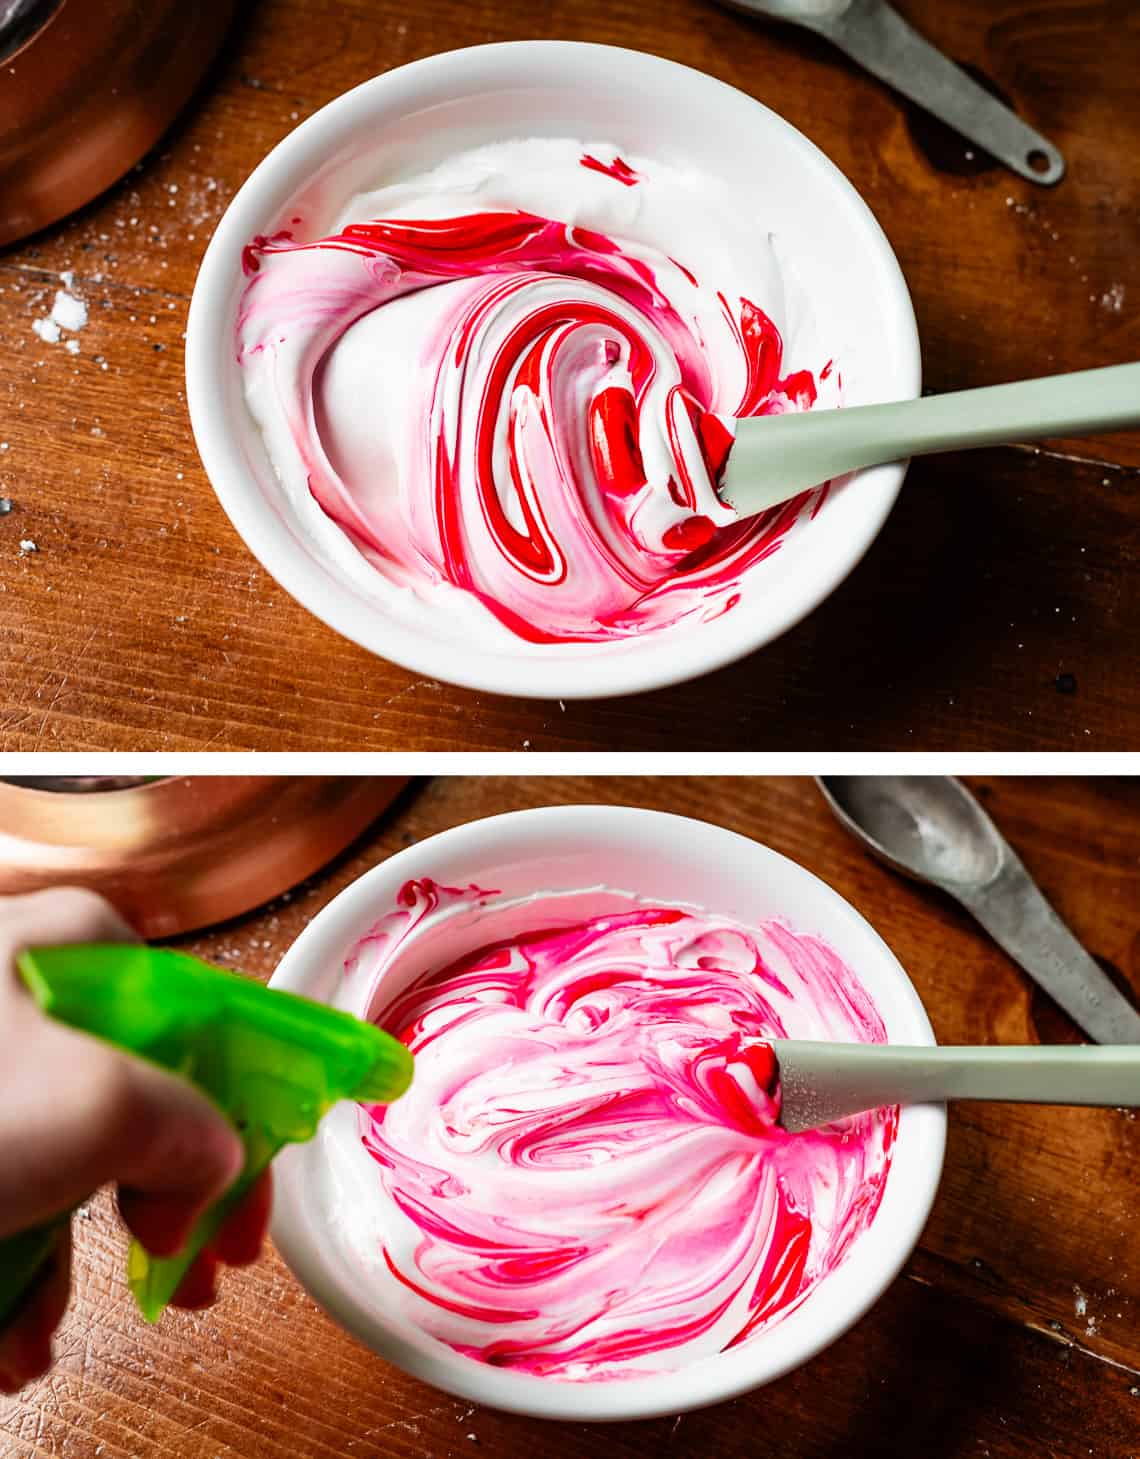
Here is what red looks like. Pretty pink to start, but it darkens and develops over time.
This photo hopefully shows what I mean by the “disappearing point.” You can see on the right where I started to drizzle, that the marks are fading, even by the time I moved over to the left. This is closer to a flood consistency, for filling in large areas. It has a disappearing point between 5-10 seconds. See recipe for all the details for how to tell when to stop adding water for what you want to do.
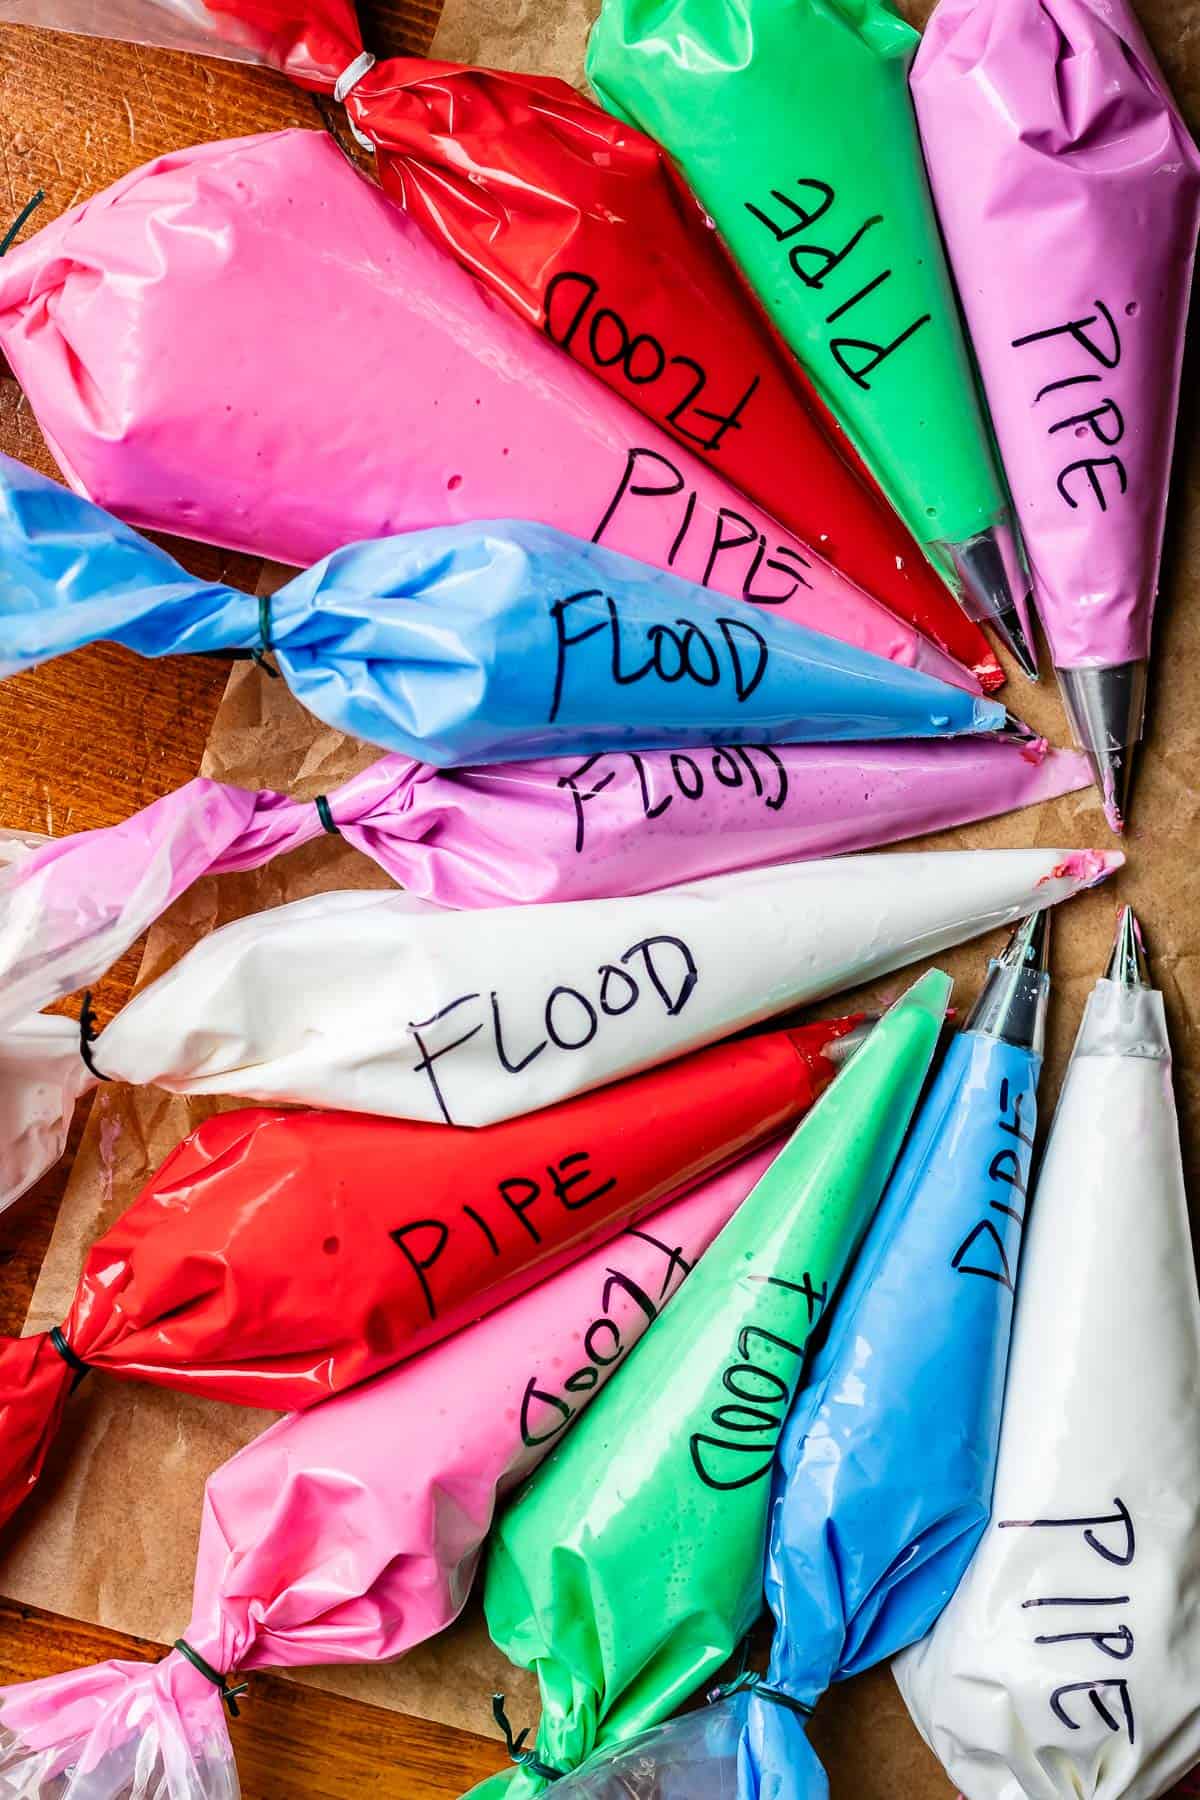
At this point, you can divide each color into two bowls if you like: one as a piping consistency, one as a flood consistency. (OR you can use a medium consistency for both outlining and flooding, see recipe.)
Now it’s time to add the icing to piping bags. For outlining, lettering, and detail work, I like to use piping tips 1 or 2, they are the smallest there on the left. Here are tip sizes 1-5, in order from left to right:

You don’t really need a tip for the flood bags; Flood consistency is for filling in large spaces, so we want it to come out fast and easy.

Here you can see I am using a glass to help give my bag structure so I can fill it easier. I have a damp paper towel at the bottom, to keep the end of my tips from drying out. You can see how thick this frosting is, it’s not the same frosting from the red photo above with the 5-second-drip. This is the thicker piping frosting, more like slightly thinned-out toothpaste.
Now it’s time to decorate! My biggest tip for outlining detailed things is to not put your tip too close to the cookie.
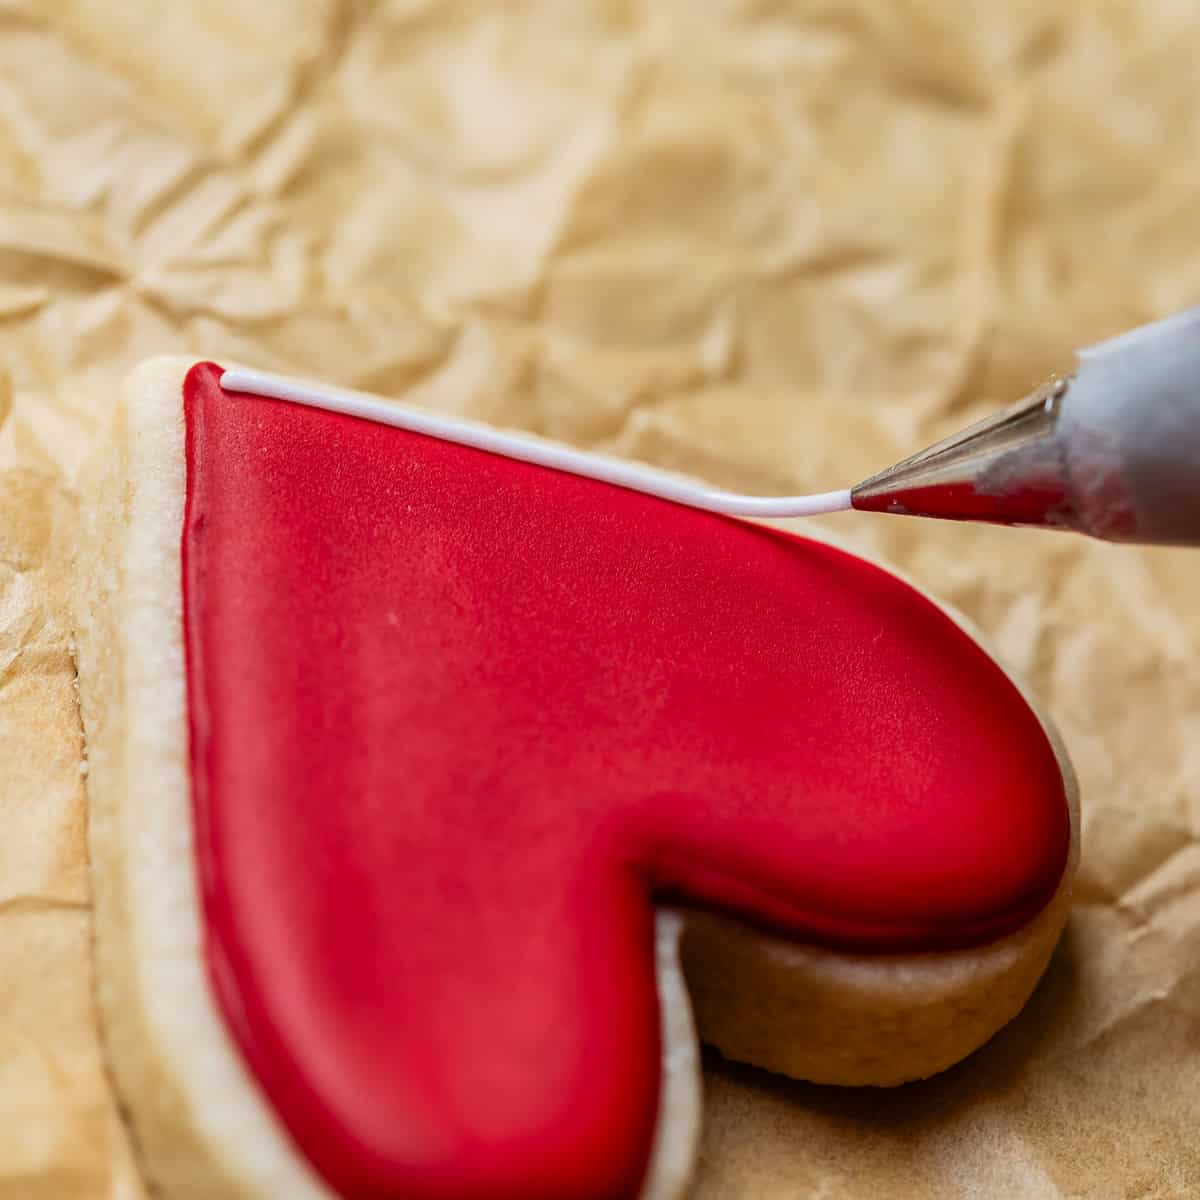
You want the icing to “fall” out of the tip and lay smoothly on the cookie, in order to get clean lines. Do you see how there is a bit of a drag between the tip, the icing, and the cookie? That’s what you want. This takes some practice and a steady hand. Sometimes I use my other arm to help steady my working hand. Don’t freak out. This takes practice.
All that said, I haven’t practiced much and I don’t have a very steady hand and I definitely freaked out😂 So I use toothpicks to fix just about everything.
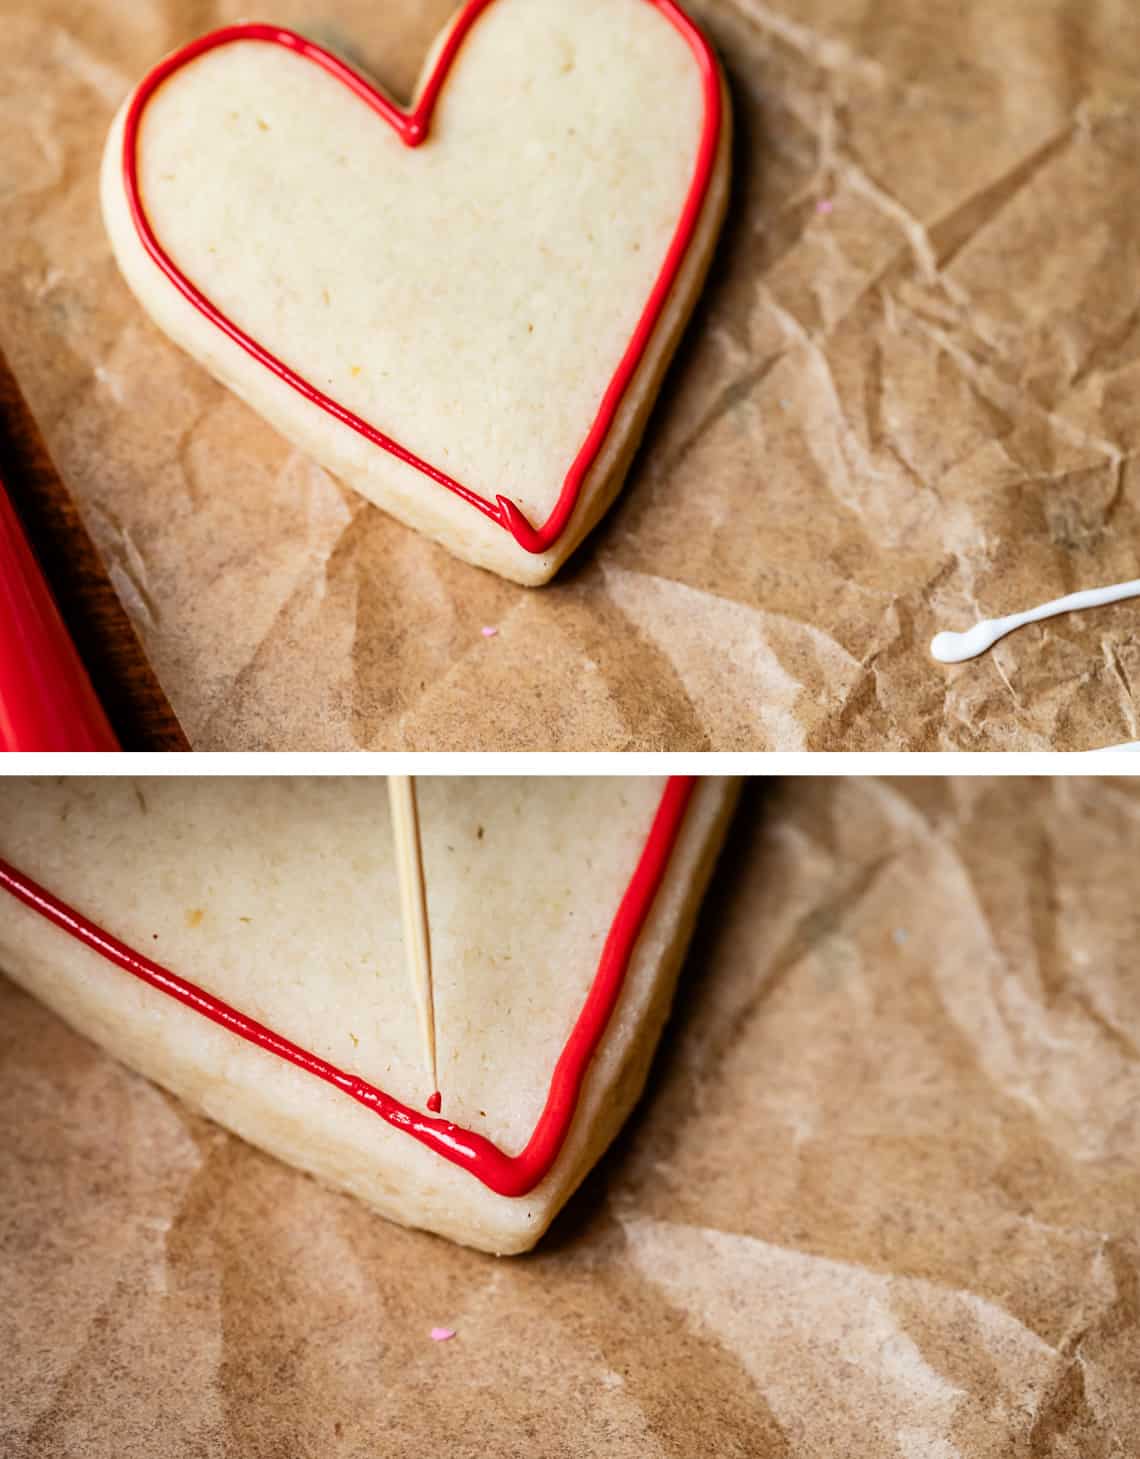
You can see here how with a piping consistency frosting, if you work very quickly before it sets on top, you can move and shape it to how you want (to a point).
I also want to remind you that you have lots of icing (this recipe makes a ton!) so if you are just starting out decorating a cookie and you royally mess up (see what I did there? I kill myself), just use your fingers to wipe off the icing from the cookie and start over. You could even use a damp paper towel. I just want to remind you that you have options! And it’s okay. You are not a professional, you are just having fun.
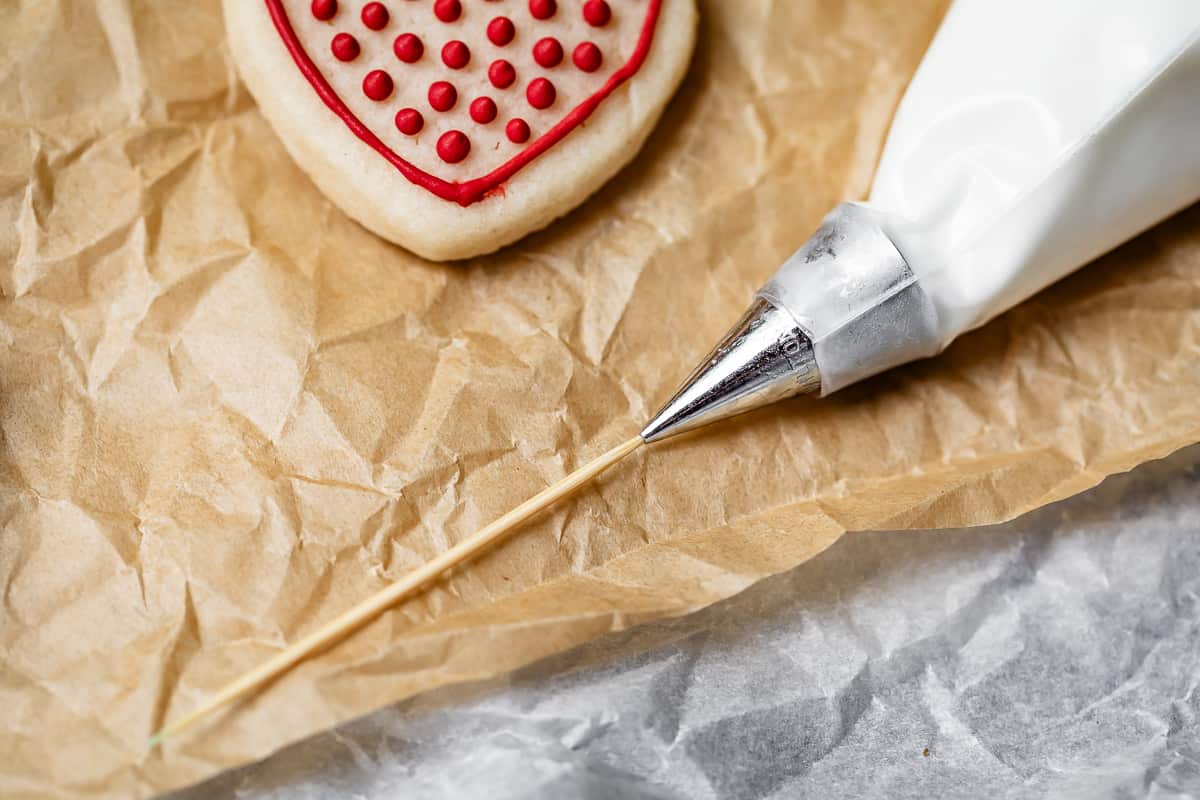
Another toothpick trick, if you forget to put your piping bags back in the glass with the damp paper towel that is supposed to keep the end of the tips from getting clogged with hardened icing (or have too many bags for it to be convenient), just use a toothpick to clean it out.
Here I am using a piping-consistency icing to zigzag over this heart that I want to fill in:
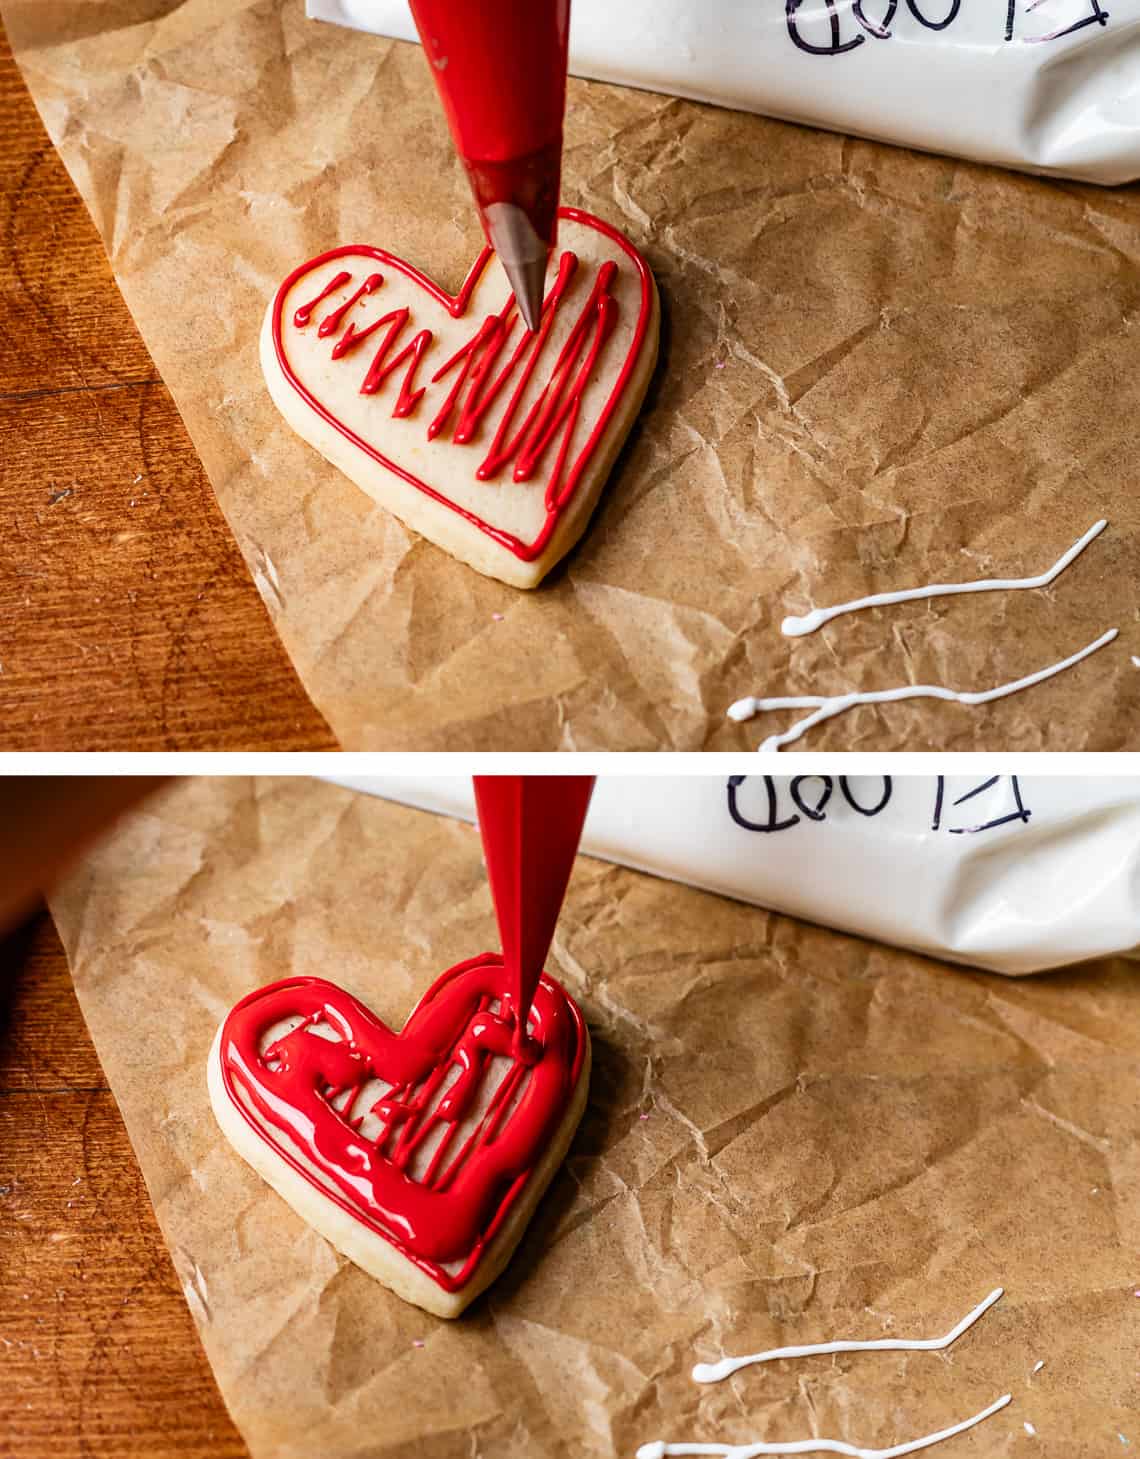
Then I use the flood-red to fill in over the top. The reason I did the zigzag first was to prevent what is called “cratering.” This is when you fill a very large area with flood, but air gets trapped underneath, and as it dries, it collapses and doesn’t look smooth anymore.
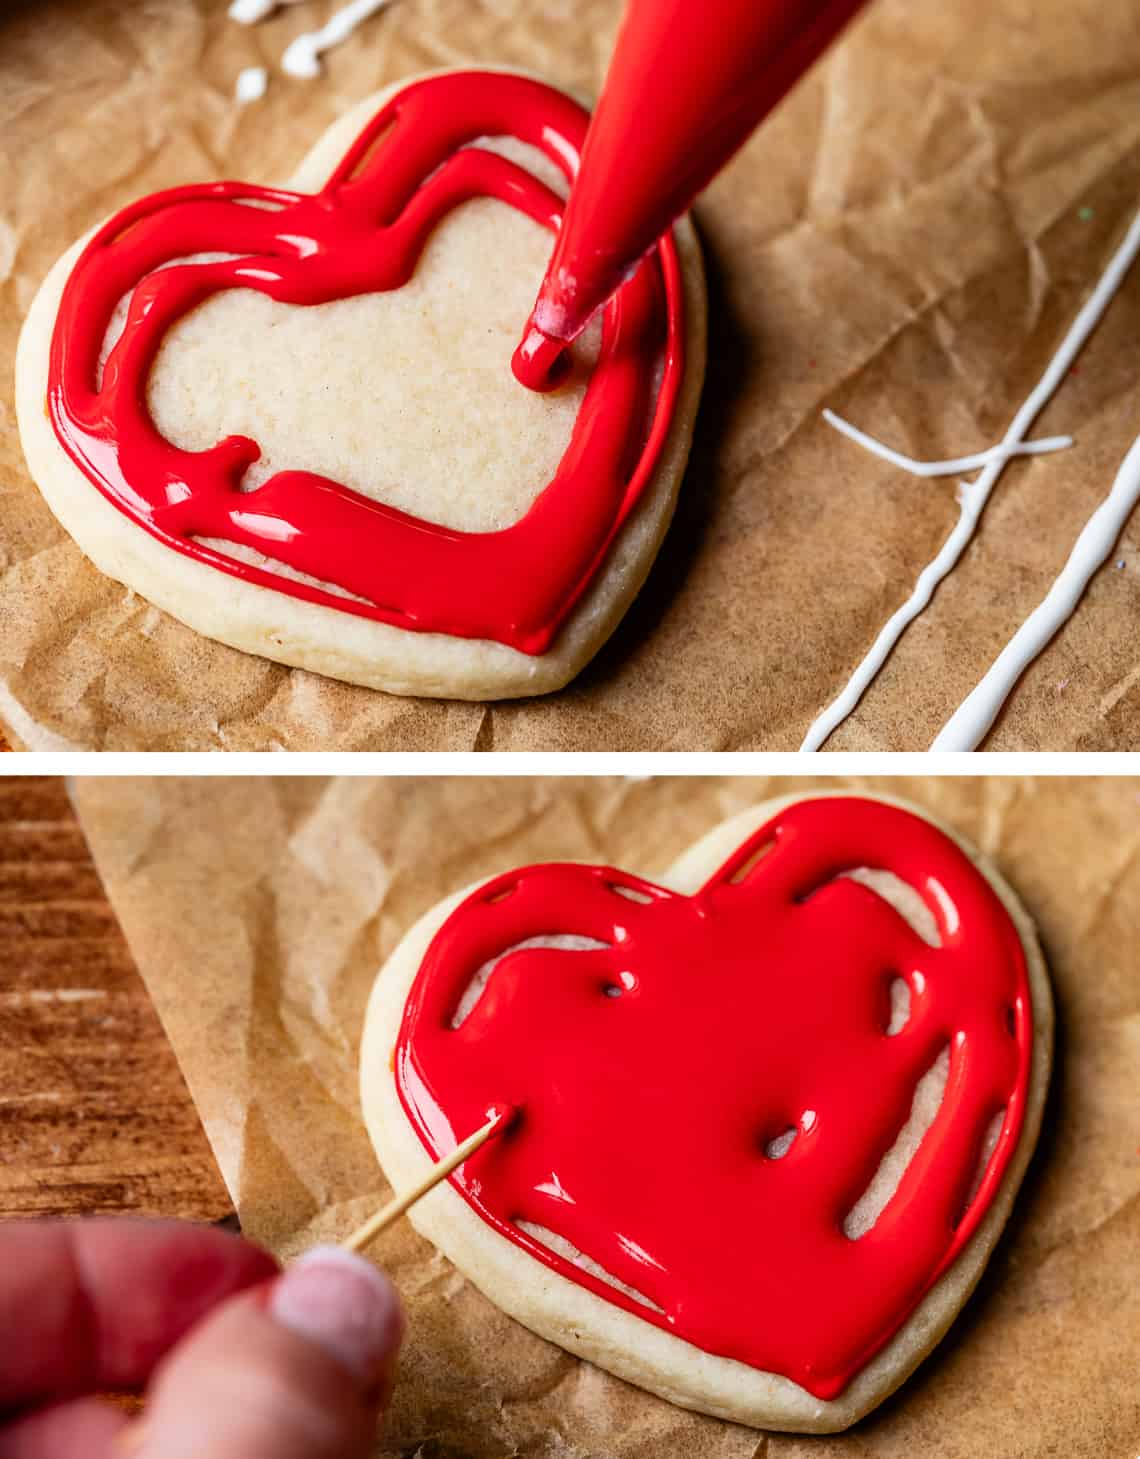
Here is another heart where I didn’t zigzag first. Mine all ended up being okay and didn’t collapse. Just be sure to pop any air bubbles you see with the toothpick!
After filling these hearts, I let them dry overnight.

I saw how to make these cute little doily cookies on Little Penelope’s Cookie Boutique. It’s such a cute idea and SUPER easy. Looks impressive but was not hard to do, and there is room for error. That’s my kind of technique!

First use a white piping icing to outline the heart with little scallops, then right away use a paintbrush to drag each scallop toward the center. Let this dry a little while (just a few minutes, it didn’t take long because it’s so thin) and then add a second heart outline on the inside.
Then after that dries completely, you can either leave it as-is, or fill in with more red or pink or whatever you want.
Here is how I did the star:
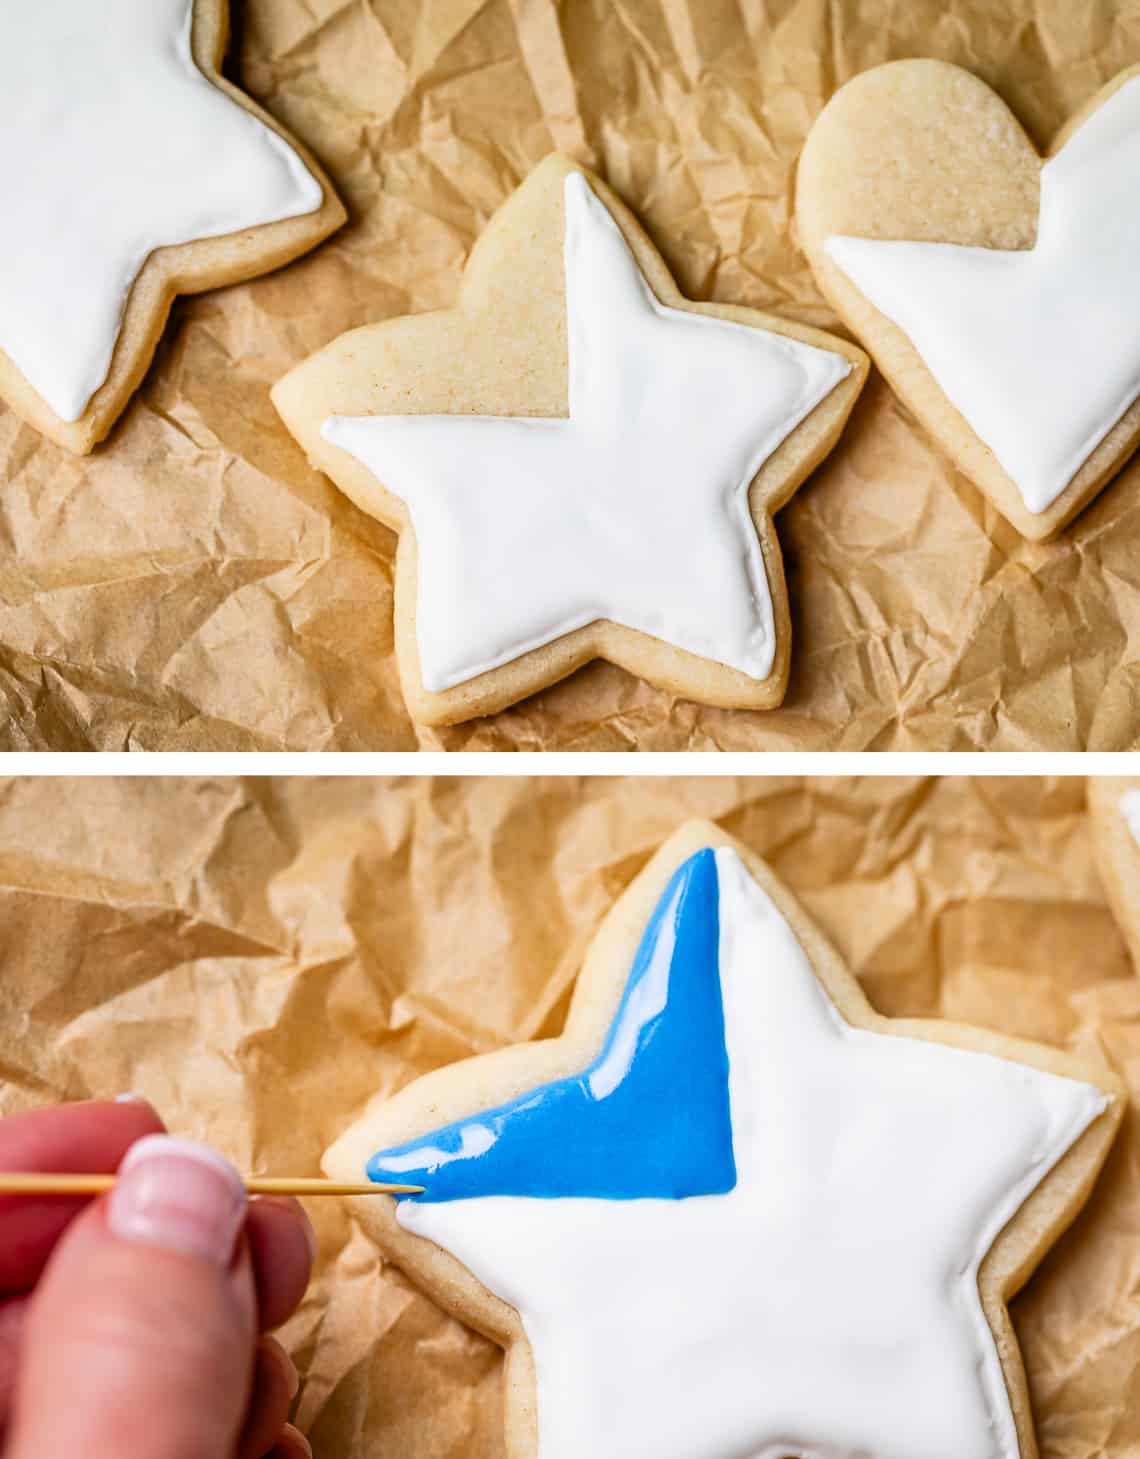
Do the white first and let it dry completely. Then add in the blue and dry. Then add in the red piping stripes. Straight lines are actually kind of a beast, not gonna lie. The dots were way easier.

I just want to remind you that sometimes SIMPLE is best, and can still be really impactful and pretty. Don’t let Instagram get the best of you. I took the time to look up some easy designs I thought I could do. Don’t choose Santa Claus’s face on day one of using royal icing! Remember, have fun! And if they still look like a kid did them, that’s okay, I promise they taste good :)

Tips and tricks
Many of these tips are found throughout the post, but I’m rounding them up here as a quick note:
- If you want, you can use plastic wrap inside of your piping bag. Add your icing to saran wrap, fold over, then add to a piping bag. pull the plastic through the tip and snip. Then when you are done, you can just thow the plastic away and don’t have to clean your bag. (I find it easier to use disposable bags, but they are kind of expensive.)
- Use a wet paper towel for any resting bags you aren’t using. But who am I kidding? I forgot half the time. Dig that toothpick in there to unclog and you’ll be fine.
- Color more of the icing than you think you will need. You will never be able to match the color perfect-perfect if you need more later.
- Make a TON of frosting. Last I checked, a 2 pound bag of powdered sugar costs like 4 bucks, even in this economy (and I live in CA). Then it’s just the gel coloring and the meringue powder. You are making this royal icing to have fun and be creative. You will have more fun if you make a ton of frosting and have lots of extra, instead of being stressed that you don’t have enough.
- Use a high quality brand of gel food coloring. I like Americolors or Chefmasters. Liquid food coloring won’t give you strong colors, and on top of that, the liquid added to the icing can mess with the consistency that you are trying to be so careful about.
- If you accidentally add too much water to your icing and it is too thin for piping, add a spoonful at a time of the thick base icing to the too-thin icing, until it is a more workable consistency. (If you have made both flood and piping consistency icing, add spoonfuls of the same color base (rather than white base) if possible, so that your colors will still match each other perfectly. If you don’t have any thick base frosting left, you can try adding sifted powdered sugar a little at a time, but this is not ideal.)
- Consistency is everything, and this takes some practice. Don’t freak out if you don’t get it right the first time. Royal icing is an advanced technique and takes some time to learn how to get the consistency exactly right. Be patient!

I’m including this photo of the tree because it’s really not my best work. The lines on the tree are too thick, and not uniform. But I added the white dots, tossed the whole thing with sugar, and called it a day. And I still think it looks pretty okay. Like I said, not instagram level, but definitely cute enough to gift to the neighbors!
Ways to use this easy royal icing recipe
Sugar cookies are probably the most popular way to use royal icing! It’s also the “glue” for a gingerbread house, and a great way to decorate Gingerbread Man Cookies. You can also use it for decorating cakes or cupcakes (it’s especially useful for making transfers, a technique where you make a decoration separately on parchment paper, let it dry, then transfer to your cookie or cake), or even making your own sprinkles, how fun is that??
- Thick & SOFT Sugar Cookie Recipe (That Holds Its Shape) >> truly, these are the best sugar cookies I have EVER had, and so easy to cut/decorate
- The Softest Chocolate Sugar Cookies (That Hold Their Shape) >> same as above, but in chocolate. Yes, please!
- Unbelievably Soft and Chewy Gingerbread Man Cookies (No Spread!) >> a gingerbread cookie that actually tastes good, and is still perfect for decorating
- Royal Icing Transfers from Tiny Kitchen Treats
- Homemade Sprinkles from Royal Icing from Really Into This
- As a coating for things like pretzels, Nutter Butters, or Oreos. Just dip them in the icing, let the icing drip off, then lay on parchment paper til dry.
- Use as an icing on top of cupcakes or cakes! You will need to coat the top of the cake or cupcake with something like syrup, marzipan, or buttercream so the royal icing doesn’t dry it out.
How to store royal icing for sugar cookies
Royal icing is pretty forgiving as far as storage goes. The icing doesn’t spoil because it’s basically just sugar; there is no way for bacteria to grow.
Keep the icing in an airtight container, press plastic wrap directly on top, and then add the lid. This will help prevent it from drying out. Once covered, the icing can sit out at room temperature for 2-3 days, but after that, store it in the refrigerator. You will need to let it come to room temperature and give it a stir before using again. You can store royal icing in the fridge for up to 3 weeks. (After that move it to the freezer, see below).
To use, stir carefully to take care of any separation. Add water if necessary to get the consistency is what you want it to be, then add to piping bags. You can add food coloring before or after this storage process.
Can you freeze royal icing?
Yes, it actually stores really well in the freezer! I like to store mine in freezer ziplock bags or even right in the piping bag (and then in a ziplock). It can stay frozen for up to 3 months. To thaw, leave it in the refrigerator over night or for 6-8 hours. Leave the icing out on the counter for about 30 minutes to bring it up to room temperature. Massage the ziplock bag to make sure it’s all mixed well, then add to a piping bag if necessary. You can also put the icing in a bowl, stir to mix, and then add to a piping bag. If your icing is already in a piping bag, massage the bag well to ensure the icing is well mixed.

Royal icing frequently asked questions
Royal icing is a unique icing made of mostly powdered sugar, merengue powder, and water that is specifically used for decorating. It’s liquid while you work with it but then hardens, allowing for a great range of decorating purposes and great transportation. Regular icing is also sometimes called a glaze, and is usually a simple mix of powdered sugar and milk or other liquid. It hardens, but crackles and is not as sturdy or reliable for decorating. Buttercream frosting is made with butter, powdered sugar, and milk or cream. It’s super flavorful! While it can be used for decorating, it does not harden like royal icing and has more limitations because it’s so much softer.
You need to use gel food coloring! Normal food coloring is watered down, so it won’t tint well, and it also waters down the icing the more you add. If you’re really wanting bold colors (especially hard-to-get colors like red or black), it’s a good idea to make the icing a few hours (or days!) ahead of time, tint it, then let it sit. The colors will deepen and mature over time and will be closer to the deep color you’re looking for than on day one. Be careful adding too much of any kind of color, it can cause issues with drying.
All royal icing has some type of egg product in it. This recipe has merengue powder, which is dried egg whites plus some sugar and cornstarch. The stiffness in the whites helps the icing harden over time as the water in the icing evaporates. That is why the thinner the icing, the longer it takes to harden as there is more water to evaporate.
It depends on the consistency of your icing, but to be completely set usually takes about 6-8 hours. It can take up to 24 hours if the cookies are in a sealed container or humid environment. Leave them out at room temperature! The refrigerator does not help them set faster.
First, don’t stress, the icing has not gone bad! The small pool of liquid comes from separation of the liquids and solids as it sits, and is totally normal. All you need to do is remix the icing well until it gets to the right consistency and it will be good as new.
More sweet treats you’ll love!
I’m a sucker for making cookies and cakes for people, however ugly they are 😂 It’s totally my love language! Here are some more ideas that you (and anyone you’re willing to share with) are sure to love.
- The BEST Buttercream Sugar Cookie Frosting Recipe >> fluffy, smooth, and tastes AMAZING
- Buckeye Candy Recipe >> the classic chocolate and peanut butter combo, in an easy to make (and decorate if you like) candy
- The Absolute Best Rice Krispies Treats Recipe >> the gooiest, softest treats around, and so easy to add sprinkles to or dye for fun
- Soft and Chewy Sugar Cookie Bars >> just as tasty as frosted sugar cookies, but without the headache of cutting cookies
- The BEST Snickerdoodle Recipe (Perfectly Soft and Chewy) >> does anyone say no to Snickerdoodles? This recipe is the BEST
- The BEST Cinnamon Roll Cookies >> basically, a cinnamon-lover’s dream come true
- Decorated Chocolate Covered Strawberries from Studio Delicious
Facebook | Pinterest | Instagram
Royal Icing Recipe For Beginners
Equipment
- Piping tip #1 I like to have several on hand for different colors and icing consistencies
- Piping tip #2 I like to have several on hand for different colors and icing consistencies
- toothpicks at least 100. just kidding. kinda.
- spray bottle full of water, optional
Ingredients
- white vinegar, for degreasing; do not add to icing
- 5 tablespoons meringue powder*
- 1/8 teaspoon kosher salt
- 1/2 teaspoon cream of tartar
- 1/2 cup warm water (not hot) , plus an extra 4-5 tablespoons, go slow
- 1 teaspoon clear vanilla extract, dark vanilla will tint your icing
- 1/2 teaspoon almond extract**
- 1/2 teaspoon coconut extract**
- 1 tablespoon corn syrup
- 2 pounds powdered sugar, 7 and 1/2 cups
- gel food coloring, use a decent brand
- drops of water, use a spray bottle, you need tiny baby amounts
Instructions
- Vinegar. Start by degreasing your mixing tools. Dampen a paper towel with some white vinegar and rub it all over the inside of your mixing bowl. Rub it all over your beaters. If you have a stand mixer, use the whisk attachment. This vinegar (or you can use lemon juice) will remove any speck of oil that might be on your tools. Any grease or oil that gets in the icing will ruin it! (It can cause it not to whip properly…and the icing may never dry.) Let your bowl dry completely from the vinegar.
- Make the Icing. Add 5 tablespoons meringue powder*, 1/8 teaspoon kosher salt, and 1/2 teaspoon cream of tartar to the bowl.
- In a glass measuring cup, add 1/2 cup warm water. Add 1 teaspoon clear vanilla extract, 1/2 teaspoon almond extract, and 1/2 teaspoon coconut extract to the water. Pour the water into the bowl, then add 1 tablespoon corn syrup. Beat with the whisk to combine.
- Begin pouring in the 2 pounds of powdered sugar while mixing on low. Go slowly, stopping to let the sugar incorporate before adding more. I pour it straight from the bag and don't bother sifting. (If it is very very clumpy, I would consider it.) Keep adding it slowly until it's all been incorporated! The mixture will be very thick.
- Carefully, 1 tablespoon at a time, add in more water with the mixer on medium speed. Add a tablespoon and let it incorporate completely. Then add in another. I usually add about 4 tablespoons water total (in addition to the initial half cup). You might need up to 5 tablespoons.
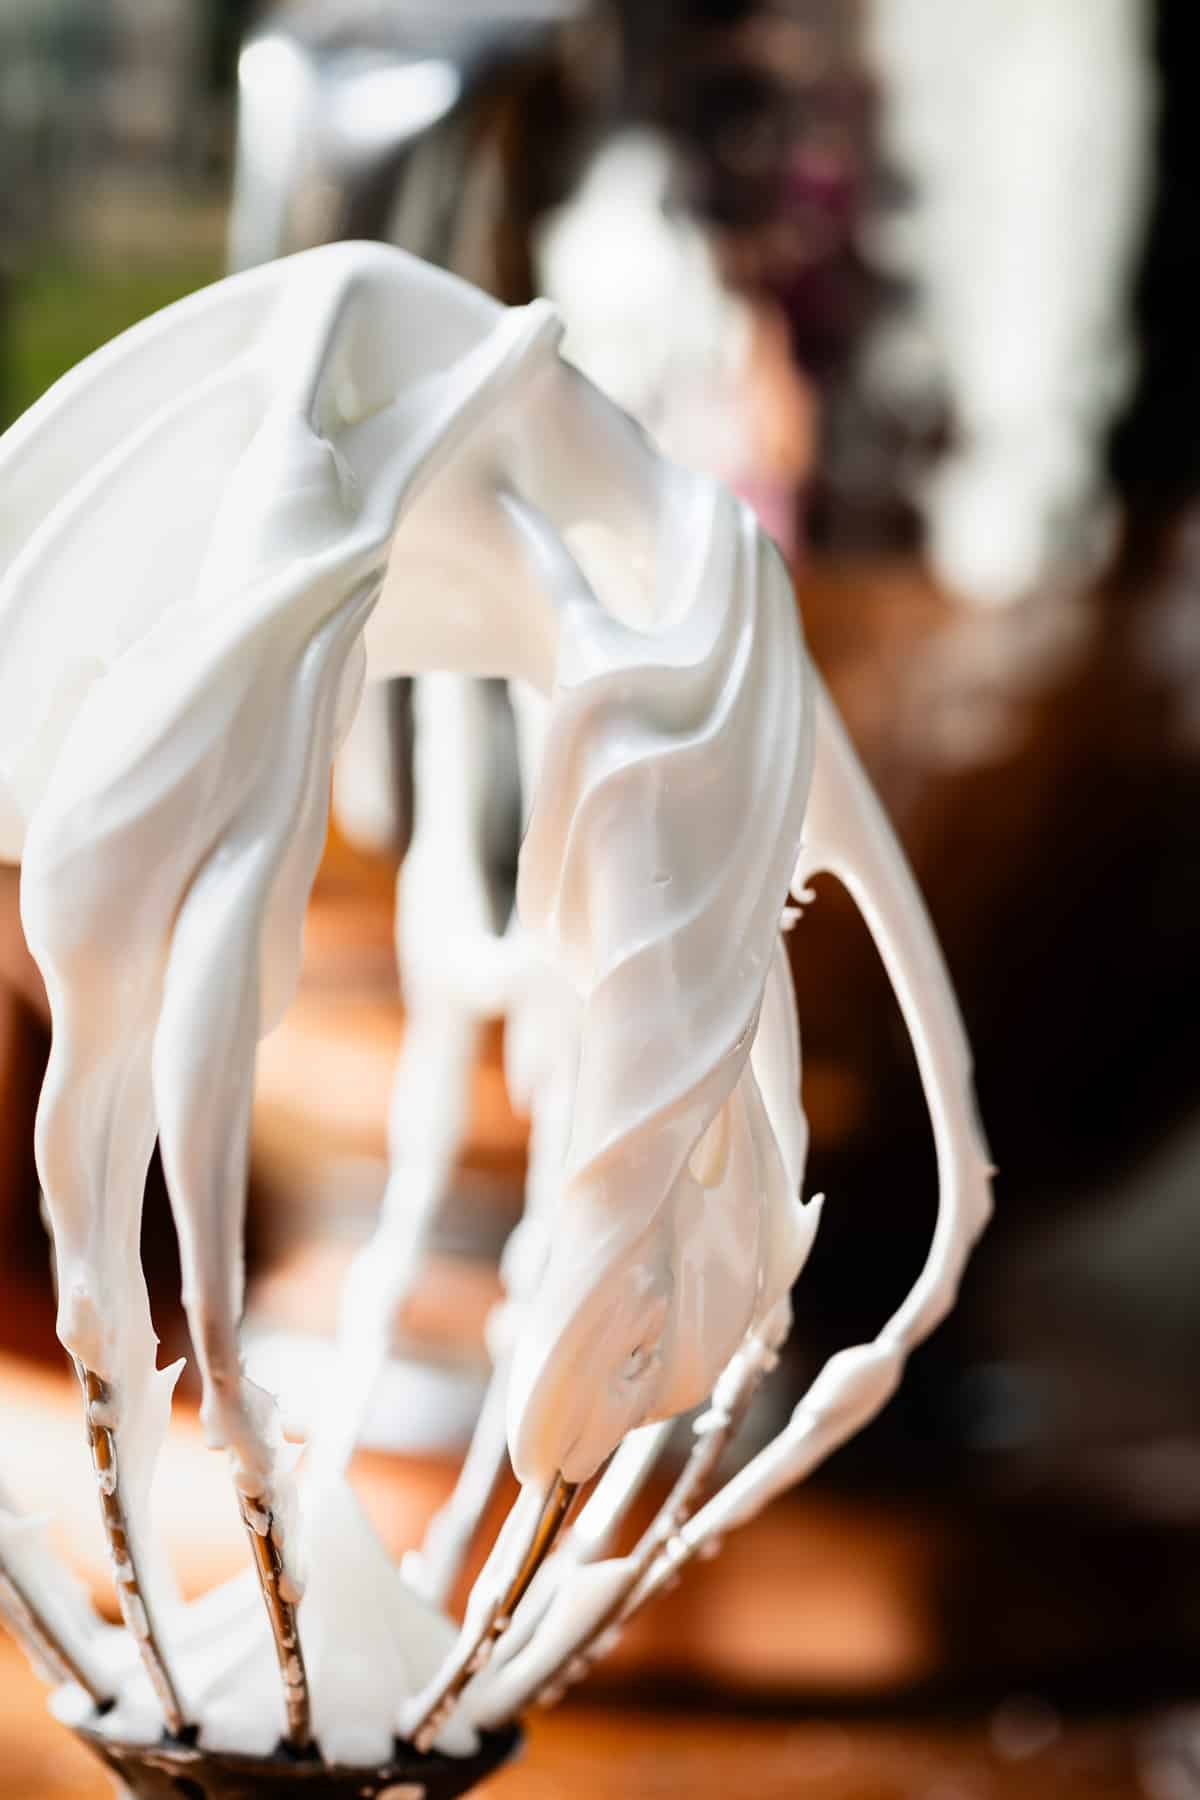
- Keep the mixer on for at least 3-5 minutes. The icing should be thick and sturdy, and not separated at all. Scrape the sides of the bowl and beat again. It should hold a stiff peak when you lift the beater upside down. You need to add bits of water until you have a thick mixture that is the consistency of toothpaste. See photos. When you lift your spatula and drizzle the icing over itself, it should take about 30 seconds for the lines to completely disappear. This is your very thick base frosting.***
- Decide how many colors you will be using, and add a cup or two of the base icing to separate bowls. Use more than you think you need! (Especially if you plan to divide each color again to have a piping consistency and a flood consistency.)
- Color the icing. Use a good brand of gel food coloring to dye your icing. Add a squirt or more of the different colors you want to each bowl, depending on how intense you want the color to be. Stir it in and see what you think. Add more if you want. The thing about gel food coloring is that the colors will keep intensifying over time. It's best to wait at least an hour after tinting your frosting to let the colors develop. Be careful that you don't add TOO much and end up with a color that's deeper than you want. If you want red icing, you are going to have to use a lot! Stop when it's a dark pink and see what it looks like after an hour. (if you have time. If not, just dump in a ton! Call me for more advice on how to be a moderate human!)
- The reason we are tinting the frosting now when it is so thick, is so that you end up with the exact same color even if you choose to separate the icing again (to have a piping-consistency-green and a flood-consistency-green, for example.)
- Divide the colors again if you want both piping and flood icing. (You can skip this if you want! Go to the next step) You should now have a bowl of thick base icing that is each color that you want to use. Get a second bowl for each color. Add half the base frosting to the new bowl. Use a spray bottle or tiny drops of water to thin each bowl to the desired consistency. For piping consistency (outlining or lettering): you want it to be about the consistency of thick toothpaste. You might not need to add any more water, depending on how much water you added to begin with. It should hold a line drawn in the icing for about 25-30 seconds.For a flood consistency (filling large areas, wet-on-wet designs): keep adding sprays or drops of water until the icing has the consistency of honey or shampoo. When you drizzle the icing on itself, you should see the mark for about 6-8 seconds before it disappears. This icing takes the longest to dry, but it dries perfectly smooth and flat, and is quite beautiful.
- Medium consistency frosting: You can skip dividing each color in two, and use the same consistency to both outline and fill in your designs. Use a spray bottle to add water a tiny bit at a time, until the icing is slightly thinner than piping consistency. You don't need a spray bottle, but it's a much easier way to add tiny bits of water at a time. (Once you add too much water, it's difficult to go back. If you do go too far, add a spoonful of the thick base icing to thicken it.)Medium icing is about the consistency of ketchup, ranch dressing, or Elmer's glue. It should not be so thin that it's hard to control. When you draw a line in this icing, it should take about 15 seconds for the mark to disappear. Be sure to cover any icing sitting out with plastic wrap while you are working on another bowl; you don't want it to dry out.
- Add the icing to piping bags. Place piping tip 1 or 2 into a piping bag. Snip the end and press the tip through. I like disposable piping bags (even a ziplock works in a pinch) You can line the bag with plastic wrap if you want to avoid cleaning, but I prefer to just throw them away after! Fold the bag back on itself and place in a tall drinking glass, tip down. Use a spatula or pour the icing to the bag. I like to label each bag with "flood" or "piping" for each color, so that I don't get confused. You do not have to use tips at all if you don't want to. I find that it gives you a lot more control for piping intricate designs (faces, lettering, etc.) But you can also just snip the end of the bag. Start with a tiny snip! You can always cut more. For flood consistency, you don't really need to use tips because you are just filling in the centers and it doesn't need to be perfect. You kind of want it to come out fast anyway to get the job done.
- If you are nervous about having the right consistency, test your icing. Add just a little icing to a bag. Test it out on a piece of parchment paper or a plate, and see how it looks. Design something right there on the paper to see if it holds it's shape. Add water to the bowl of icing if it's too thick, add a spoonful of base frosting if it's too thin, and try again.
- Start decorating. Now the fun begins! I highly recommend finding a picture of a design you would like to copy, especially if you are a beginner. Start by outlining your design with piping consistency icing, then switch to a flood consistency to fill in the center. Use toothpicks to smooth the icing into itself, poke any bubbles, and shift the icing around if you make a mistake. Unless you are doing a wet-on-wet design (which looks cool and marbly) You will need to wait several hours before layering any icing. For the heart cookies you see in the post, I outlined the heart with piping icing, filled it with flood, then waited overnight. Then I added the lace embellishments. You can leave the icing in the bags at room temperature overnight, be sure to cover the tips with a wet paper towel.
- Let the icing dry. Let the icing dry at room temperature, spread out in a single layer. I usually keep them on the counter on wire racks or on a baking sheet. Make sure there is plenty of airflow; don't cover them for the first several hours. This is usually a death sentence for sugar cookies, which tend to dry out (and part of why royal icing cookies have a reputation for being cardboard-ish). You will end up with more moist cookies if you use cream cheese in the dough, the secret ingredient in my favorite Sugar Cookies. My Gingerbread Man recipe is also very thick and soft; the high level of molasses in the recipe means they can sit out overnight and still be soft.
- Storage. Once your cookies are completely dry, you can stack them to your hearts content. I like to store them in a tupperware on the counter. If you are shipping them, wrap individual cookies in parchment paper.
- Freezing. You can freeze cookies with dried royal icing. Add a single layer in a large tupperware, add a sheet of parchment paper, then add another layer of cookies. This will prevent the colors from transferring to the cookie above it. Let thaw overnight in the fridge, or at room temperature. If you thaw at room temperature, I would take them out of the tupperware and spread them out so they are not touching, to avoid any condensation from causing color transfer.
Notes
- 2 and 1/2 tablespoons meringue powder
- pinch salt
- 1/4 teaspoon cream tartar
- 1/4 cup water, plus 2-3 tablespoons more
- 1/2 teaspoon clear vanilla
- 1/4 teaspoon almond
- 1/4 teaspoon coconut
- 1 pound powdered sugar (about 3 and 3/4 cup)
- 1 and 1/2 teaspoons corn syrup


This is an awesome post; I haven’t made the recipe yet, but absolutely will (tomorrow?!). But I’ve had plenty of failed cookie decorating experience and the detail you provide here makes me feel like I will finally crack the decorating nut – thank you!
Thank you so much Lindsay! I hope tomorrow comes soon!! Let me know how it goes! Such a fun project 💕
Karen, you are a gem! I mentioned to my husband my gripe about missing details in most online recipes. Your recipes come with the details necessary to succeed. So many times, it’s in the way you hold your hands or the tool and your instructions are SO worth the read. And you are so funny! Thank you for being a great instructor. It makes my life as a student much more enjoyable.
Great recipe. Great instructions. When I first looked at it I tought, oh my…..why such a long recipe? But, the detail in the instructions is perfect for a beginner. Thanks for this. I’ll try your sugar cookies next.
I’m so glad you are finding the instructions helpful Chris! I like to provide lots of details, yes, for beginners! Thanks for commenting, that’s so helpful! Enjoy the Sugar Cookies!
If using royal icing, it’s necessary to leave the cookies out for the icing to dry. You’re very adamant about not leaving the cookies out, so doesn’t this affect the softness of your sugar cookie recipe?
Hi Victoria! Royal icing will still dry in a sealed container. It just takes longer, up to 24 hours, whereas if you left them uncovered they might be completely dry in 6-8 hours. We love soft sugar cookies over here, so we put our decorated cookies in sealed containers so 1) the cookies can stay soft 2) the royal icing can dry, albeit more slowly. Enjoy your next batch of sugar cookies!
Karen-I truly love your Sugar Cookie and myself have deemed it to be “the best” thus removing all other sugar cookie recipes from my recipe book. They don’t even come close to the deliciousness of your sugar cookie. I want to add that where I live (Pittsburgh, PA) we have “cookie tables” at wedding receptions, because why not have your cake and cookies too! (Look up Pittsburgh cookie table and you will be amazed.) I made your sugar cookies with the best buttercream frosting for my son’s recent wedding. They froze well and I was able to stack them on the cookie tray. A friend of mine has a son getting married this summer and of all of my mouth-watering cookies including a caramel tassie and a filled pizzelle, she selected the sugar cookie for me to make for the reception. I will try this icing sometime in the future because I trust you and your research that goes into each recipe. Thanks for all of your hard work–I so appreciate all you do to help me be a better cook.
Karen, this is just an awesome post with great instructions! (All my friends -especially those that don’t consider themselves great cooks- comment on the excellent detailed instructions on every recipe.). And i can see your practice has really improved your abilities! These cookies are beautiful! It was so fun to do this at Christmas. Thanks for always coming up with fun projects! This was terrific.