This Raspberry Shortbread Thumbprint Cookie recipe is one of my favorite Christmas cookies! They are so easy to make and look very impressive on a cookie plate. All you need is a lot of butter and some raspberry jam. They are a Christmas classic! Originally published December 14, 2017.
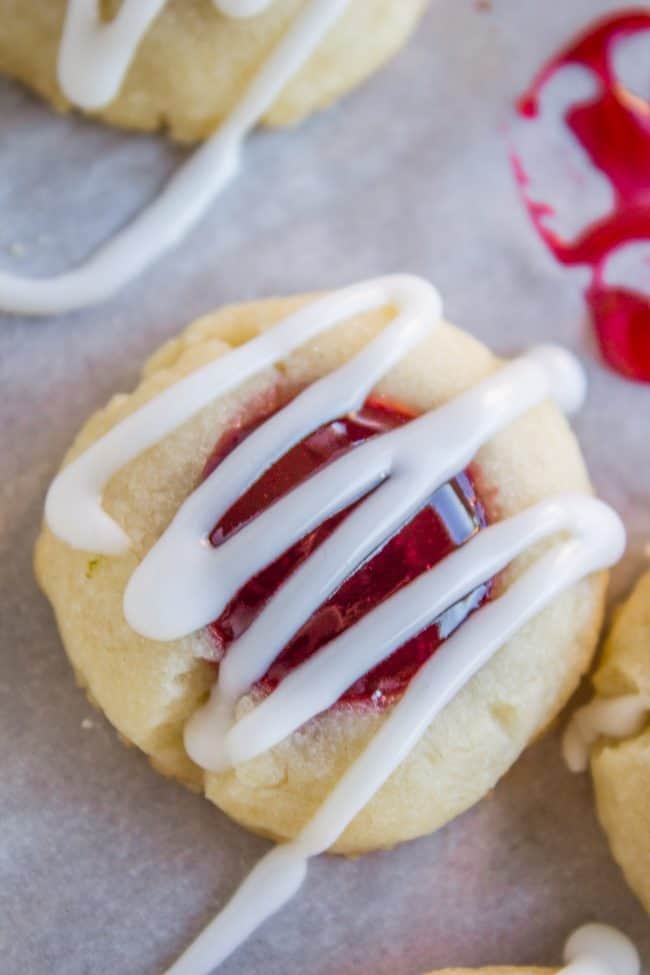
Table of Contents
Raspberry Thumbprint Cookies Recipe
The amount of cookies in my house right now is RIDICULOUS. There are probably like, 20? Maybe? Not even? This is a disturbingly small amount, because I have literally made these Raspberry Almond Thumbprint cookies at least 4 times in the past few days, testing for this post. 35ish cookies per batch = 140 cookies at least. WHERE ARE THEY YOU GUYS? Where??
We also made a double batch of Spritz, some Soft Ginger Cookies, and at least 2-3 batches of Butter Pecans over the last few weeks. (I made a video for the Butter Pecans! Check it out!)
Spritz cookies are a huge classic in Eric’s family. We made them as usual and had a huge tupperware full of Spritz at the end of the night. This morning I ate breakfast, then looked around for breakfast dessert, like any normal person. (Oh, sorry, are you better than me? Get over yourself, breakfast dessert is a THING.)
Thumbprint Cookie ingredients
Here’s a quick shopping list to help you gather your ingredients. See the recipe card below for the full ingredients and instructions!
- Salted butter
- Sugar
- Almond extract
- Flour
- Seedless raspberry jam
- Powdered sugar
- Milk
Almond Raspberry Cookie substitutions and variations
There are endless ways to make these thumbprints your own. Here are a few ideas:
- Switch up the jam. Apricot, peach, strawberry, blackberry, you name it, it’s going to be amazing in these cookies. If you do decide to use a fruit jam that’s not from a berry, consider also switching out the almond extract for vanilla (just a preference, almond is still great if that’s what you prefer).
- Add nuts. A few sliced almonds sprinkled on top of each one of these before baking would be gorgeous. You can also roll the buttery cookie ball in chopped pecans or walnuts before making the thumbprint.
- Use a different filling after baking. Nutella and Biscoff would melt in the oven, so if you want to use them, bake the cookies before adding the filling. You’ll still make the thumbprint before you bake, and you may want to make it a little deeper than usual since the cookies will puff up a bit without jam weighing them down.
How to make Raspberry Thumbprint Cookies
Everybody and their mom makes this Raspberry Thumbprint Cookie recipe, right? I’m sure you’ve had them before. Some call them jam thumbprint cookies. The recipe has been around forever. I feel like everyone I’ve offered these to this week has said, Oh, I LOVE these cookies, my sister/grandma/mom used to make them! They are just a classic and everyone needs to try making them at least once. They are so pretty on a Christmas plate.

1 – Roll: This is about how big you want your cookies to be. About a tablespoon of dough.
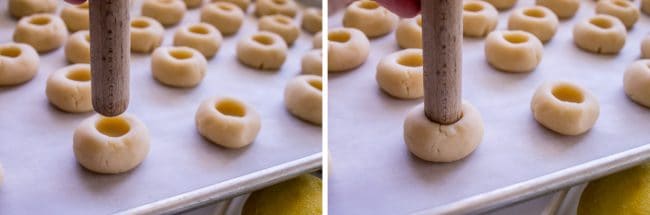
2 – Make the Thumbprint: Use something to press the cookie down in the center. Thumbs are okay, but it’s even better if you find something that’s about the size of a tube of chapstick. (Clean your chapstick off and use it!) I used the handle of a wooden spoon that’s about 3/4 inch across (thicker than most wooden spoon handles I think), and it was perfect. I’ve read about people using corks too. However you want to do it, make a well in the center of the cookie. You want to press about halfway down, don’t press all the way through or your jam will seep through to the baking sheet.

3 – Patch up those cracks now (or the jam will seep out).
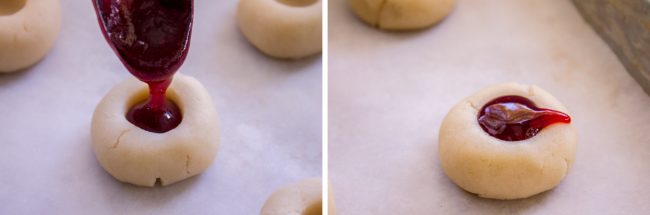
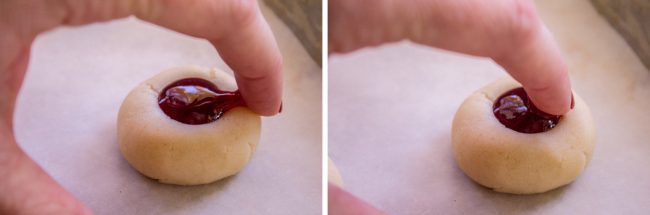
4 – Spills: No problem just swipe it back toward the center

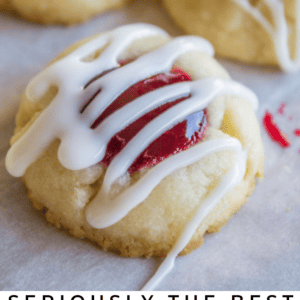
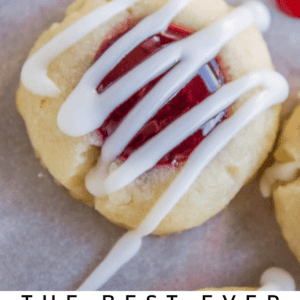
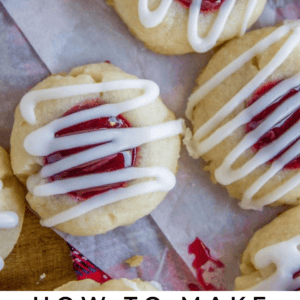
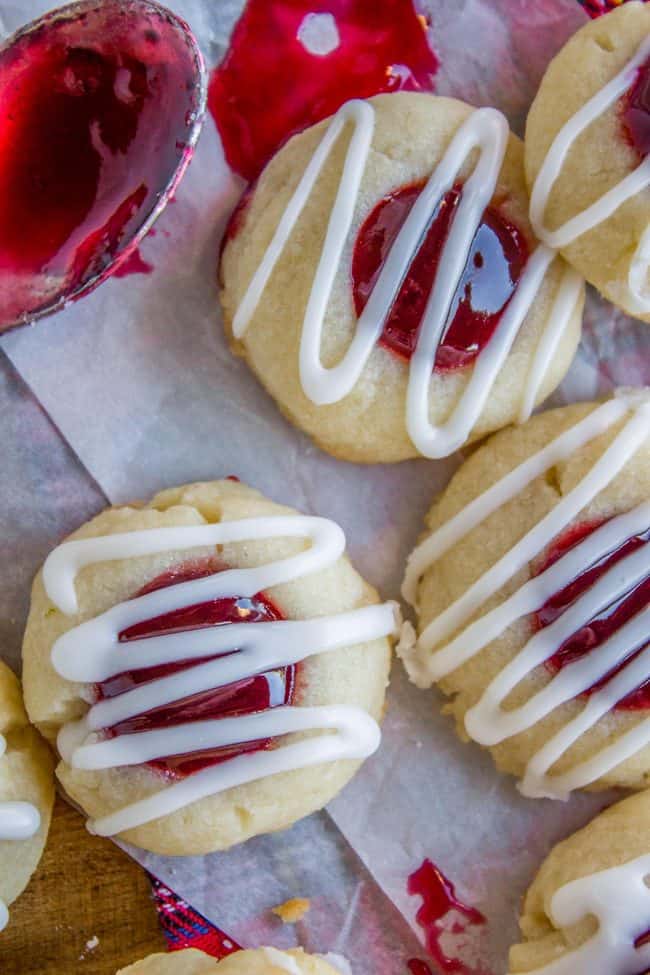
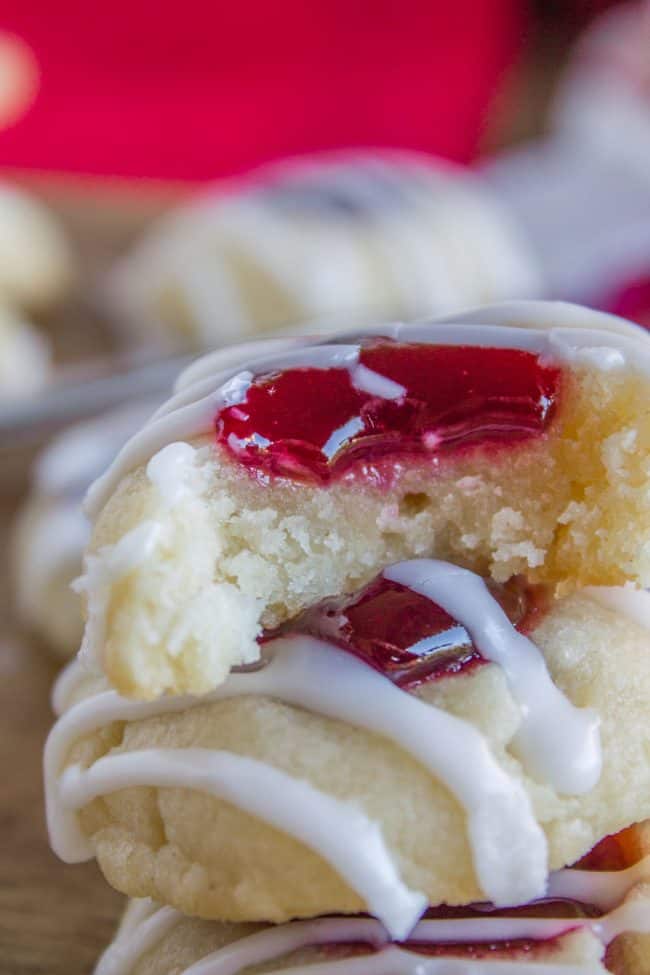
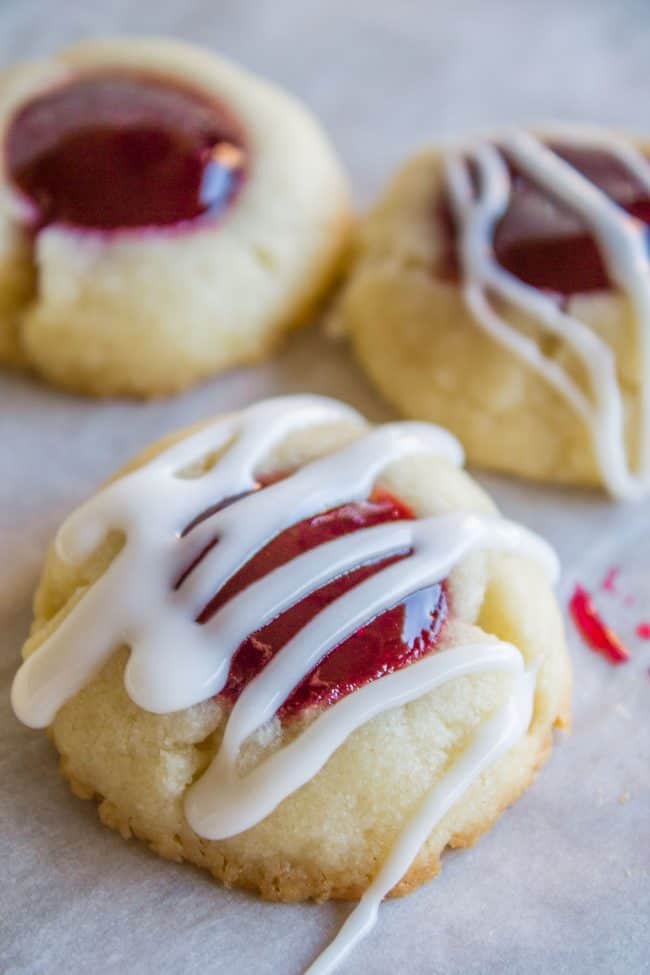
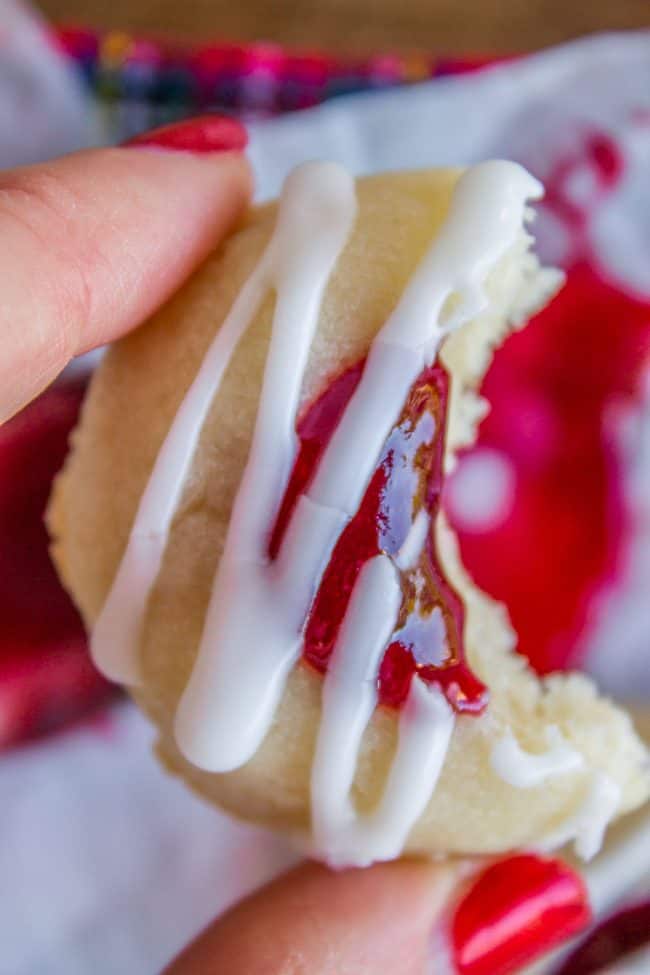
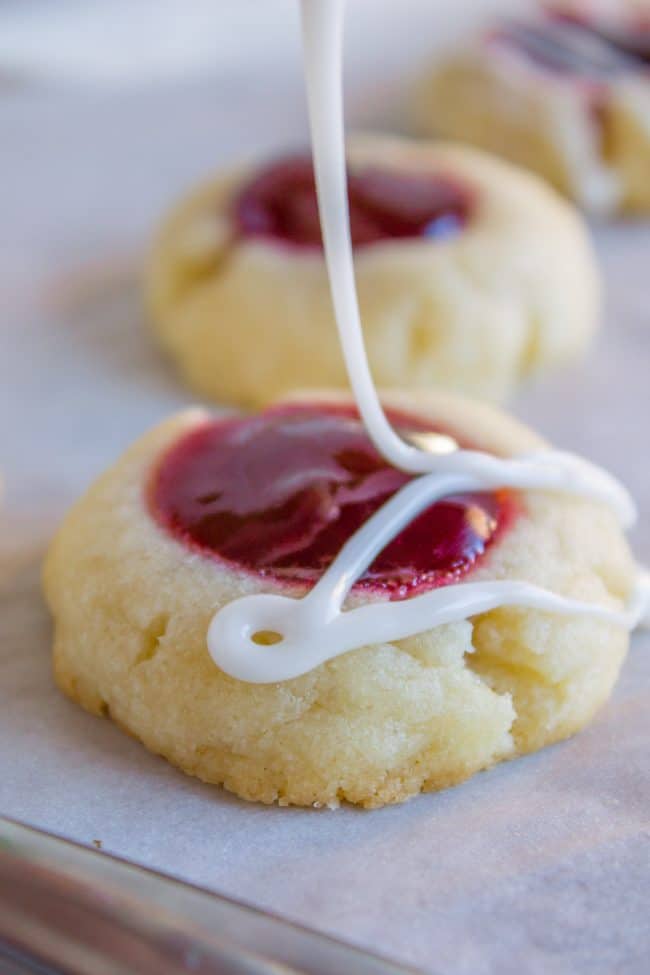
5 – Icing: The third best part about these cookies (number one being the shortbread and number two being the raspberry jam, of course) is the almond icing that we drizzle over the finished cookies! The perfect trifecta.
How to store Raspberry Jam Cookies
These cookies can be stored on the counter for 3-5 days. You can also freeze the cooled cookies. I like to use large, flat, rectangular Tupperware containers and put the cookies in a single layer. You can use sheets of parchment paper or waxed paper in between; they may stick a little but will still be great.
If you’d like to freeze the dough, roll it into balls, then place them on a cookie sheet to freeze for 30 minutes before tossing them in a ziplock bag. The dough will last for 2-3 months.
If Christmas isn’t the perfect time to make a thousand thumbprint cookies, then when is it?? Do it! (…and then maybe get your husband to hide them from you.)
Thumbprint Cookie Recipe FAQs
You might have added too much flour. If you’re thinking “But I measured exactly the amount that the recipe called for!” remember that there are different ways to measure flour. Packing it in will lead to dry, crumbly, fall-apart cookies (sad). Instead, use the “fluff and scoop” method: use a spoon to fluff up the flour, then gently scoop it into your measuring cup until the cup is overfilled. Level it off, and add it to your recipe. The right amount of flour makes a big difference!
Cookies made from soft, buttery dough will spread if you don’t chill the dough. I know it takes so much time, and maybe you wanted cookies NOW, but spread-out cookies are just sad. You need a minimum of 2-4 hours chillin’ in the fridge.
Adding too much flour to the dough is a definite problem; enthusiastically slamming your thumb down into a ball of dough is another. This may be harder to control if you have, say, small children helping you make these. (That’s ok, that’s part of the cookie magic!) You’ll also want to make sure the balls of dough are smooth before you’re placing your thumbprint.
It depends on the cookie dough. The super buttery, soft, tender dough for these thumbprint cookies should absolutely be chilled, otherwise the cookies won’t keep their shape. We’re talking a minimum of 2-4 hours, up to 48 hours in the fridge. I know you want to skip this step, but if you do, the cookies will spread out flat–not the cute little thumbprints you’d planned on.
More holiday cookies you should make this year!
- Perfect Linzer Cookies >> another shortbreadish cookie, with a perfect holiday shape cutout window to reveal delicious jam and equally tasty as these thumbprint cookies
- Buried Cherry Cookies >> here’s another thumbprint cookie you HAVE to try! I’m making these later this week!
- Pariserwafiers (Swedish Cream Wafer Cookies) >> flaky, buttery bites of heaven that get eaten up about as quickly as I can make them
- Caramel Pecan Thumbprint Cookies >> someday I will reshoot these cookies, but until then you are going to have to trust me that they are insanely good
- Butter Pecan Cookies >> you might be tired of me talking about Butter Pecans lately. I’M NOT SORRY, THEY ARE THE BEST.
- Perfectly Soft and Chewy Molasses Cookies >> I can’t make it through the season without making these!!
- The Softest Sugar Cookies of Your Life >> It’s true! These are so fun to decorate for the holidays
- Mexican Wedding Cookies >> Some call them snowballs, too.
- Coconut Raspberry Cookies from Inside BruCrew Life
- Raspberry-Vanilla Double Glazed Sugar Cookies from Boulder Locavore
- Raspberry Filled Butter Cookie from Tidy Mom
Facebook | Pinterest | Instagram
Raspberry Jam Cookies
Ingredients
For the cookies
- 1 cup salted butter, softened (2 sticks)
- 2/3 cup granulated sugar
- 1 teaspoon almond extract
- 1/4 teaspoon kosher salt
- 2 cups all purpose flour + 3 tablespoons, spooned and leveled
- 1/2 cup seedless raspberry jam
For the glaze
- 1 cup powdered sugar
- 1 & 1/4 teaspoons almond extract
- 2-3 teaspoons milk
Instructions
- In a large bowl or stand mixer, beat the butter and sugar until fluffy, at least 2-3 minutes. Don’t forget to scrape the sides and bottom. (If your butter isn’t quite soft, beat it by itself first until you are sure it’s smooth and not lumpy. Then add the sugar and continue beating.)
- Add the almond extract and salt. Beat well.
- Add the flour. Beat until the mixture forms a stiff ball of dough. Once the dough has come together, stop beating, you don’t want to end up with a tough dough.
- Cover and chill at least 2 hours, or 4 is even better.* You can chill it for up to 48 hours. (If you need longer than that, just stick it in a ziplock and freeze it.)
- When you are ready to bake, take it out of the fridge and let it soften on the counter for 10-20 minutes. Line 2 baking sheets with parchment paper or a silicone baking mat.
- After the dough has softened a bit, preheat the oven to 350 degrees F.
- When the dough is malleable but still cold, shape into balls that are about 1 tablespoon worth of dough. It’s a little bigger than a 1-inch ball of dough.
- Place the dough on the baking mat. You can put them pretty close together, you only need about 1 inch of space between them.
- Use something to press the cookie down in the center. Thumbs are okay, but it’s even better if you find something that’s about the size of a tube of chapstick. (Clean your chapstick off and use it!) I used the handle of a wooden spoon that’s about 3/4 inch across (thicker than most wooden spoon handles I think), and it was perfect. I’ve read about people using corks too. However you want to do it, make a well in the center of the cookie. You want to press about halfway down, don’t press all the way through or your jam will seep through to the baking sheet.
- The edges of your cookie will likely crack. You can patch minor cracks with your finger, or if they are small enough leave them. If all of them are cracking pretty badly though, to the point that the jam would likely seep out, then let your dough get a little closer to room temperature by waiting another 10 minutes or so. If you shape them into balls and then wait a few minutes to press, they will warm up even faster.
- Scoop some jam into a bowl and stir it well to get out the lumps.
- Use a small spoon to fill each cookie. You are using a pretty tiny amount of jam. Don’t go crazy. Think between 1/4 and 1/2 teaspoon. Fill it only until it reaches the top of the little well you have made. Don’t let it drip out the sides or your cookie will get destroyed in the oven. See photos above for how I fix a little jam spillage.
- At this point I always take the time (and make room in my fridge) for a little chill. Just like 15 minutes will do. You can skip this step if you think your dough is still cold enough. Remember, cold dough going in the oven=nice and puffy cookies.
- Bake at 350 for about 12-14 minutes. Start with 12. You want to take them out JUST as the edges are starting to turn golden (around 14 minutes) or even before they start browning (By 12 minutes they are usually brown on the bottom but not on the edges). The cookies should not be shiny and the jam should be bubbling.
- Let the cookies set on the baking sheet for about 10 minutes, then remove to a wire rack to cool.
- In a small bowl, stir together the powdered sugar, 1 and 1/4 teaspoon almond extract, and 2 teaspoons milk. Add the extra teaspoon of milk if it seems too thick. (If you accidentally make it too thin, just add a teaspoon of powdered sugar). Drizzle the glaze over the cookies and then let cool completely.
- Try not to each 4 batches all in the same week.
Notes
I think this recipe is from a Pillsbury cookbook that came out a long time ago, but I adapted the recipe from my friend Melanie, who got it from Allrecipes.com.


Thumbprint cookies are my daughter’s favorite, so I’m going to surprise her with these when she comes home for Christmas. My neighbor just gifted me with a trio of Stonewall Kitchen jams; raspberry peach champagne jam, holiday jam, and wild Maine blueberry jam. I’d love to use them but they all have tiny seeds and I know the recipe called for seedless jam. Is there a specific reason you mentioned that in the recipe? I’d also love to be able to give some to the neighbor who gifted me with the jams.
I made these gluten free and they turned out great. I did have to bake them longer than the recipe suggested, but maybe it was because they were gluten free. The icing and the almond flavor were so good!
love these cookies! merry christmas!
Thank you Charlotte!!! 💕💕 You too!
Do you think I could make these with gluten free flour?
Should this recipe have an egg added? Not sure it you accidentally omitted it, or it actually doesn’t call for an egg. My batch is chilling in the refrigerator, and I’m afraid the cookies will fall apart once they’re baked.
Hi Charlene! Nope, no egg in this shortbread style recipe! Enjoy :)
I made these cookies and the first time they turned out beautiful and delicious. This second time, they spread out all over the pan and while still delicious, thy were so ugly. The only difference I used was Kerrygold butter. Could that have had an effect on how they turned out? Im thinking Kerrygold might have more butter fat??????? I just don’t know. I love to give these as gifts and would like to still be able to make them. Thank you. BTW. Merry Christmas 2021
Hi Cheryl! Merry Christmas to you! This is so strange. Kerrygold does indeed have a higher fat content but I can’t imagine it would have this big of an impact! I’m totally surprised. But I can’t think what else it could be. I guess the only way to know is to try it again with regular butter? I’m so sorry it didn’t work out!
I made these cookies and all I can say is “WOW”. These are now everyone’s favorite. I made two batches before Christmas and two more after. Thanks for this incredible recipe!!!
Yay!! That is the best kind of recipe, when you’re happy making it 4 times in one month! Thanks for the feedback Theresa, I’m so glad you commented!
So darned cute! I used the cap end of my food coloring to make the depression. I put them directly into the freezer when they had cooled so I wouldn’t eat them all. I don’t think they need the glaze at all, but it is pretty.
You’re so right Nina, they hardly need the glaze. But my life’s mission is to add frosting whenever possible, so there you have it. ;)
Could I fill with jam after the cookie is baked? Or is there a reason for filling beforebaking?
Hey Dorothy! When you bake the jam it bakes into the cookies a little bit, then sets up after it cools. Baking does change the flavor a little bit. If you did it after it would be tough to transport them although still tasty!
Do you freeze them when there cooled or do you put in Fridg till Christmas?
Hey Maria! I usually eat them right away, eep!! ;) but if you wanted to save these for later I bet you could make them all the way through the glaze and then flash freeze them on a pan (Just put the pan in the freezer) then once they are frozen put them in a tupperware for long term freezing (long terms meaning like a week max.) You can also freeze the dough pre baking, just thaw before using. Hope this helps!
F A B U L O U S ! ! ! Love love love these and love your posts! Thank you!!! Now, if I may ask, which raspberry jam do you prefer? Figured I would ask THE EXPERT!
Haha thank you so much Keely! I don’t know that I’m a jam expert but I personally love smuckers. I get the seedless red raspberry Jam. (not preserves). I hate seeds in my cookies no thank you! they get stuck in my teeth! just smooth jam for me please. But really ANY kind of jam or jelly will work in this recipe! I hope you make them and LOVE them!!! Thansk Keely!
Unfortunately, I can relate! Cookie addicts unite! Hah! These cookies sure look so yummy and I will be making the little beauties for my Christmas Cookie Platter! Thanks for sharing the recipe, Karen!
Right? We should have our own addicts meetings. :) :) I hope you love these ones Deb! Merry Christmas!!
I made these last week and they are delicious 😋
They are the best right Kerry!! Thanks for the back up here, the world needs to know these cookies are amazing ;)