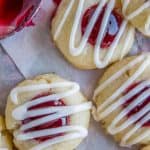
Raspberry Jam Cookies
These Raspberry Almond Shortbread Thumbprint Cookies are one of my favorite Christmas cookies! They are so easy to make and look very impressive on a cookie plate. All you need is a lot of butter and some raspberry jam. They are a Christmas classic!
Servings: 35
Calories: 116kcal
Ingredients
For the cookies
- 1 cup salted butter softened (2 sticks)
- 2/3 cup granulated sugar
- 1 teaspoon almond extract
- 1/4 teaspoon kosher salt
- 2 cups all purpose flour + 3 tablespoons spooned and leveled
- 1/2 cup seedless raspberry jam
For the glaze
- 1 cup powdered sugar
- 1 & 1/4 teaspoons almond extract
- 2-3 teaspoons milk
Instructions
- In a large bowl or stand mixer, beat the butter and sugar until fluffy, at least 2-3 minutes. Don't forget to scrape the sides and bottom. (If your butter isn't quite soft, beat it by itself first until you are sure it's smooth and not lumpy. Then add the sugar and continue beating.)
- Add the almond extract and salt. Beat well.
- Add the flour. Beat until the mixture forms a stiff ball of dough. Once the dough has come together, stop beating, you don't want to end up with a tough dough.
- Cover and chill at least 2 hours, or 4 is even better.* You can chill it for up to 48 hours. (If you need longer than that, just stick it in a ziplock and freeze it.)
- When you are ready to bake, take it out of the fridge and let it soften on the counter for 10-20 minutes. Line 2 baking sheets with parchment paper or a silicone baking mat.
- After the dough has softened a bit, preheat the oven to 350 degrees F.
- When the dough is malleable but still cold, shape into balls that are about 1 tablespoon worth of dough. It's a little bigger than a 1-inch ball of dough.
- Place the dough on the baking mat. You can put them pretty close together, you only need about 1 inch of space between them.
- Use something to press the cookie down in the center. Thumbs are okay, but it's even better if you find something that's about the size of a tube of chapstick. (Clean your chapstick off and use it!) I used the handle of a wooden spoon that's about 3/4 inch across (thicker than most wooden spoon handles I think), and it was perfect. I've read about people using corks too. However you want to do it, make a well in the center of the cookie. You want to press about halfway down, don't press all the way through or your jam will seep through to the baking sheet.
- The edges of your cookie will likely crack. You can patch minor cracks with your finger, or if they are small enough leave them. If all of them are cracking pretty badly though, to the point that the jam would likely seep out, then let your dough get a little closer to room temperature by waiting another 10 minutes or so. If you shape them into balls and then wait a few minutes to press, they will warm up even faster.
- Scoop some jam into a bowl and stir it well to get out the lumps.
- Use a small spoon to fill each cookie. You are using a pretty tiny amount of jam. Don't go crazy. Think between 1/4 and 1/2 teaspoon. Fill it only until it reaches the top of the little well you have made. Don't let it drip out the sides or your cookie will get destroyed in the oven. See photos above for how I fix a little jam spillage.
- At this point I always take the time (and make room in my fridge) for a little chill. Just like 15 minutes will do. You can skip this step if you think your dough is still cold enough. Remember, cold dough going in the oven=nice and puffy cookies.
- Bake at 350 for about 12-14 minutes. Start with 12. You want to take them out JUST as the edges are starting to turn golden (around 14 minutes) or even before they start browning (By 12 minutes they are usually brown on the bottom but not on the edges). The cookies should not be shiny and the jam should be bubbling.
- Let the cookies set on the baking sheet for about 10 minutes, then remove to a wire rack to cool.
- In a small bowl, stir together the powdered sugar, 1 and 1/4 teaspoon almond extract, and 2 teaspoons milk. Add the extra teaspoon of milk if it seems too thick. (If you accidentally make it too thin, just add a teaspoon of powdered sugar). Drizzle the glaze over the cookies and then let cool completely.
- Try not to each 4 batches all in the same week.
Notes
*The reason I tested these cookies so many times was because I was trying to cheat through this pesky 2-4 hour chill step. What a bother. I tried freezing the dough, I tried shaping the cookies right away and then refrigerating/freezing the pan for 30-45 minutes and then baking, but alas, all my tests failed. And by failed I mean you still get great cookies, they just bake a little too flat for my liking. If you want the perfect little button of a cookie, you MUST chill 2-4 hours.
I think this recipe is from a Pillsbury cookbook that came out a long time ago, but I adapted the recipe from my friend Melanie, who got it from Allrecipes.com.
Nutrition
Serving: 1cookie | Calories: 116kcal | Carbohydrates: 16g | Protein: 1g | Fat: 5g | Saturated Fat: 3g | Polyunsaturated Fat: 1g | Monounsaturated Fat: 1g | Trans Fat: 1g | Cholesterol: 14mg | Potassium: 14mg | Fiber: 1g | Sugar: 10g | Vitamin A: 163IU | Vitamin C: 1mg | Calcium: 4mg | Iron: 1mg
