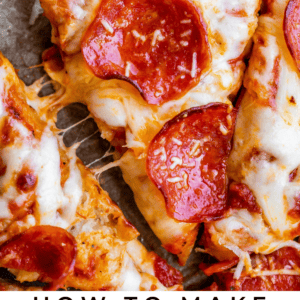
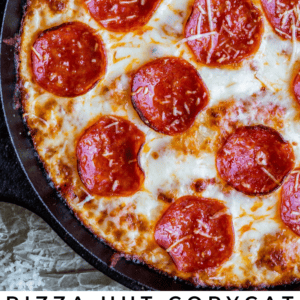
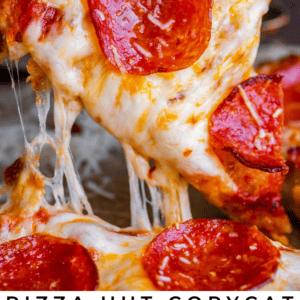
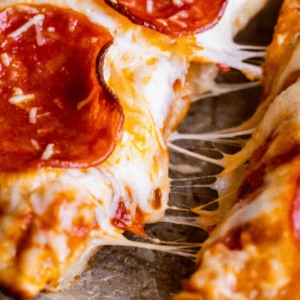
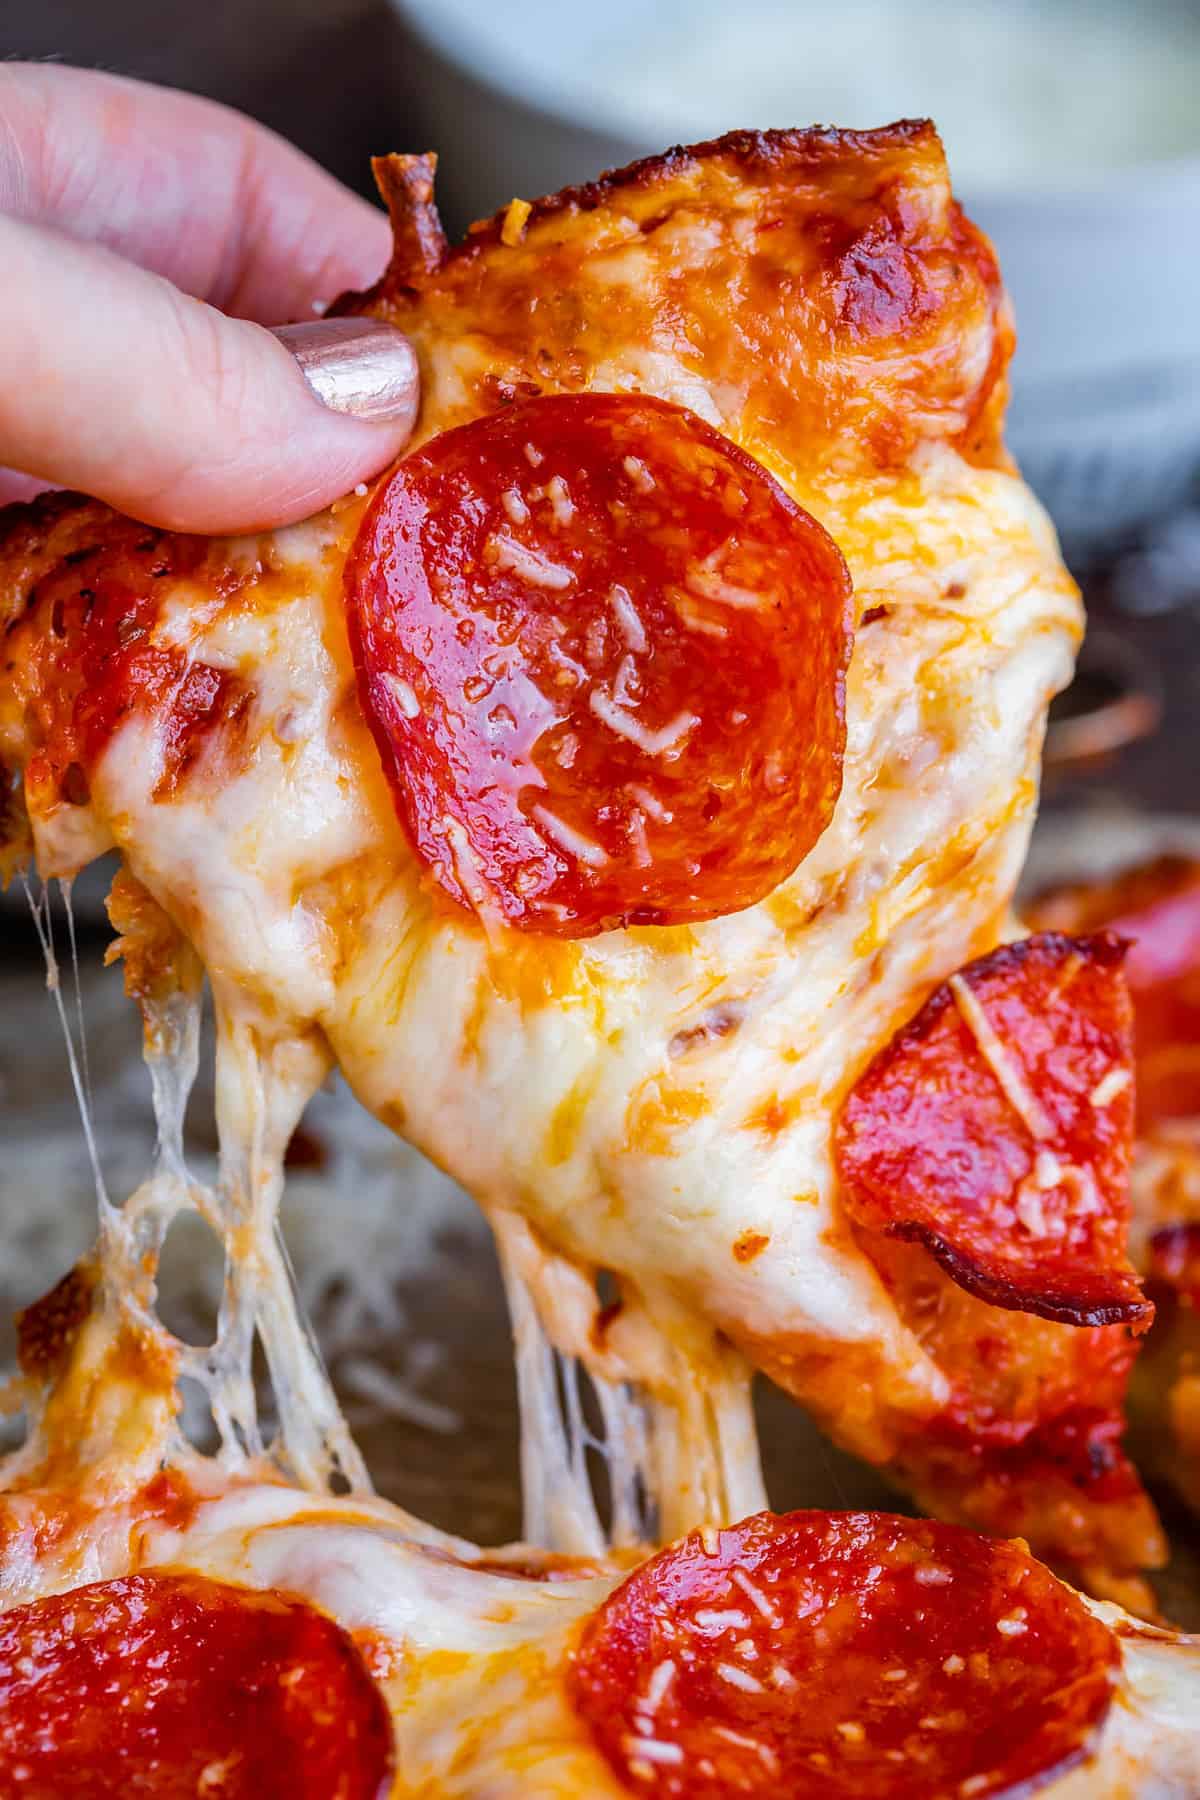
Make pizza at home that tastes just like Pizza Hut!! This pan pizza recipe is unbelievable, you guys. A super thick, ciabatta-like crust with gorgeous crispy edges and a pillowy soft interior. The key to homemade pan pizza is a slow rise time and a heavy cast iron pan. Top with sauce, mozzarella, and pepperoni for pan pizza heaven! Originally published April 30, 2020.
 from The Food Charlatan. Make pizza at home that tastes just like Pizza Hut! This Cast Iron Pan Pizza Recipe is unbelievable, you guys. A super tall, ciabatta-like crust with gorgeous crispy edges and a pillowy soft interior. The key to homemade pan pizza is a slow rise time and a heavy cast iron pan. #pizza #recipe #easy #homemade #fromscratch #panpizza #pizzahut #chewy #pizzadough #dough #yeast #doughrecipe #castiron #copycat #pepperoni #cheese")
Table of Contents
My BFF Sarah and I have been friends since college. She and her husband live in Japan, and Eric and I went to visit them last fall. One day, we talked about maybe getting some pizza. Sarah mentioned a quote I had told her years before: “Pizza is like sex. Even when it’s bad, it’s good!”
 from The Food Charlatan. Make pizza at home that tastes just like Pizza Hut! This Cast Iron Pan Pizza Recipe is unbelievable, you guys. A super tall, ciabatta-like crust with gorgeous crispy edges and a pillowy soft interior. The key to homemade pan pizza is a slow rise time and a heavy cast iron pan. #pizza #recipe #easy #homemade #fromscratch #panpizza #pizzahut #chewy #pizzadough #dough #yeast #doughrecipe #castiron #copycat #pepperoni #cheese")
She said the quote as if I was the one who came up with it. I had to regrettably inform her that no, the pizza-sex analogy is not something I just randomly made up one day, it’s a famous quote from a movie star. Haha!! How did I get credit for this for so long?? Poet and I didn’t know it. Sorry, Sarah, I’m way less cool than you thought I was!!
 from The Food Charlatan. Make pizza at home that tastes just like Pizza Hut! This Cast Iron Pan Pizza Recipe is unbelievable, you guys. A super tall, ciabatta-like crust with gorgeous crispy edges and a pillowy soft interior. The key to homemade pan pizza is a slow rise time and a heavy cast iron pan. #pizza #recipe #easy #homemade #fromscratch #panpizza #pizzahut #chewy #pizzadough #dough #yeast #doughrecipe #castiron #copycat #pepperoni #cheese")
But don’t worry, there is nothing bad about today’s handmade pan pizza recipe. It is simply phenomenal. It’s basically the runway model of pizzas, if we’re going with the sex analogy.
This stuff LITERALLY tastes like it came from Pizza Hut. It is so good! Where are all my pan pizza people? I am a pan pizza girl for life. It is the BEST. The crispy, fried edges. The fluffy interior with the perfect chewy texture. The cheese for days and days. It’s just the best!
 from The Food Charlatan. Make pizza at home that tastes just like Pizza Hut! This Cast Iron Pan Pizza Recipe is unbelievable, you guys. A super tall, ciabatta-like crust with gorgeous crispy edges and a pillowy soft interior. The key to homemade pan pizza is a slow rise time and a heavy cast iron pan. #pizza #recipe #easy #homemade #fromscratch #panpizza #pizzahut #chewy #pizzadough #dough #yeast #doughrecipe #castiron #copycat #pepperoni #cheese")
Regular pizza crust has its place in life, especially for a last-minute homemade pizza situation. But in my opinion, pan-crust always wins. And anything that is so worth the calories is worth putting in the time to get it done right!
What is homemade pan pizza?
Today’s pan pizza recipe is from my friend Rebecca’s new cookbook! Rebecca blogs over at Foodie with Family. I have been following her blog for nearly 10 years! She is one of the bloggers who inspired me to start my own food blog! Her recipes are so fabulous.
 from The Food Charlatan. Make pizza at home that tastes just like Pizza Hut! This Cast Iron Pan Pizza Recipe is unbelievable, you guys. A super tall, ciabatta-like crust with gorgeous crispy edges and a pillowy soft interior. The key to homemade pan pizza is a slow rise time and a heavy cast iron pan. #pizza #recipe #easy #homemade #fromscratch #panpizza #pizzahut #chewy #pizzadough #dough #yeast #doughrecipe #castiron #copycat #pepperoni #cheese")
She recently wrote her second cookbook, Ready, Set, Dough! It is a beginner’s guide to breads for all occasions. It is such a fun book! It is perfect for beginner bread makers but also has tons of new ideas for those who are more experienced with yeast. Click here to purchase your own copy.
 from The Food Charlatan. Make pizza at home that tastes just like Pizza Hut! This Cast Iron Pan Pizza Recipe is unbelievable, you guys. A super tall, ciabatta-like crust with gorgeous crispy edges and a pillowy soft interior. The key to homemade pan pizza is a slow rise time and a heavy cast iron pan. #pizza #recipe #easy #homemade #fromscratch #panpizza #pizzahut #chewy #pizzadough #dough #yeast #doughrecipe #castiron #copycat #pepperoni #cheese")
I flipped through the book, landed almost immediately on this pan pizza recipe, and knew I had to try it out! It is even better than I thought it would be, no joke. Rebecca also has The Best Pan Pizza recipe up on her blog. Click over to check out more pictures!
 from The Food Charlatan. Make pizza at home that tastes just like Pizza Hut! This Cast Iron Pan Pizza Recipe is unbelievable, you guys. A super tall, ciabatta-like crust with gorgeous crispy edges and a pillowy soft interior. The key to homemade pan pizza is a slow rise time and a heavy cast iron pan. #pizza #recipe #easy #homemade #fromscratch #panpizza #pizzahut #chewy #pizzadough #dough #yeast #doughrecipe #castiron #copycat #pepperoni #cheese")
Ingredients
So I´m making pepperoni pizza, but you can make whatever you want. Sausage, pineapple and ham, just cheese….the choice is yours (but pepperoni is really the best IMO). Here’s a quick shopping list to help you gather your ingredients. See the recipe card below for the full ingredients and instructions!
- active dry yeast
- bread flour
- kosher salt
- light olive oil
- pizza sauce (14 oz., jarred or homemade)
- sliced mozzarella cheese (string cheese works too!)
- shredded mozzarella cheese
- pepperoni
- Parmesan cheese
How to make pan pizza
Making homemade pizza hut-style pan pizza is super easy, you will be surprised. All you need is some time to plan ahead. Rebecca’s recipe calls for an initial rise time of 8-24 hours, with an additional 2-hour rise plus bake time.
I am one of those people who usually remembers about dinner when it’s already dinnertime, but when I’m really on my game, I remember to prep for dinner around lunchtime. But definitely not 24 hours in advance! I tested out a few ways to shorten the rise and have found a pretty easy hack to get it done. Today’s recipe can be done in about 6 hours start to finish. Perfect for remembering to start around noon and eating by 6.
 from The Food Charlatan. Make pizza at home that tastes just like Pizza Hut! This Cast Iron Pan Pizza Recipe is unbelievable, you guys. A super tall, ciabatta-like crust with gorgeous crispy edges and a pillowy soft interior. The key to homemade pan pizza is a slow rise time and a heavy cast iron pan. #pizza #recipe #easy #homemade #fromscratch #panpizza #pizzahut #chewy #pizzadough #dough #yeast #doughrecipe #castiron #copycat #pepperoni #cheese")
First up, make the dough. All you need is warm water and a little yeast, then bread flour and salt. You don’t need to knead it. Just mix it together until combined. You can use active dry yeast or instant yeast, just make sure you dissolve the yeast in warm water to get it started.
You need 14 ounces of bread flour for this recipe. Bread flour has more gluten than all-purpose, and makes for a chewier and holier crust. It’s best to use a scale if you have one. Too much flour will make your dough less tender. But if you don’t have a scale, it’s 3 cups plus 1 tablespoon.
 from The Food Charlatan. Make pizza at home that tastes just like Pizza Hut! This Cast Iron Pan Pizza Recipe is unbelievable, you guys. A super tall, ciabatta-like crust with gorgeous crispy edges and a pillowy soft interior. The key to homemade pan pizza is a slow rise time and a heavy cast iron pan. #pizza #recipe #easy #homemade #fromscratch #panpizza #pizzahut #chewy #pizzadough #dough #yeast #doughrecipe #castiron #copycat #pepperoni #cheese")
Here is the dough before and after the rise. Cover it loosely so that the gas has room to escape. The trick to getting it to rise quickly is to preheat your oven, then turn it off so that it is very warm but not hot. At room temperature, this dough needs at least 8 hours to rise. But in a warm oven, you can get the job done in about 4 hours. If you have more time for this initial rise, great. The longer the better. If not, 4 hours works.
 from The Food Charlatan. Make pizza at home that tastes just like Pizza Hut! This Cast Iron Pan Pizza Recipe is unbelievable, you guys. A super tall, ciabatta-like crust with gorgeous crispy edges and a pillowy soft interior. The key to homemade pan pizza is a slow rise time and a heavy cast iron pan. #pizza #recipe #easy #homemade #fromscratch #panpizza #pizzahut #chewy #pizzadough #dough #yeast #doughrecipe #castiron #copycat #pepperoni #cheese")
Split the dough in half with a well-oiled spatula, and divide between two well-oiled cast iron pans.
Cast iron: the only way to get crispy edges
For this recipe, you’ll need two cast iron pans since the dough rises directly in them. If you only have one, you can either halve the recipe or bake the second half in an 8- or 9-inch cake pan. The texture may be slightly different, but it will still be pizza at the end of the day.
A well-seasoned skillet is naturally nonstick, so prepping it is simple—just swirl a little light olive oil around the pan. (Use light olive oil instead of extra virgin, as the latter can get smoky at high oven temperatures.)
To ensure the dough doesn’t stick, you’ll need about two tablespoons of oil per pan. While well-seasoned cast iron already has some nonstick properties, this extra oil guarantees an easy release and a perfect crust.
Now, this recipe is for a 10-12-inch cast iron pan. If you have a larger (or smaller) pan, you can use the process photos below for cues on how thick the dough should be in the pan, more than anything. If it seems like too much, then maybe it is, and take some out. The biggest risk is the crust being doughy in the center.
 from The Food Charlatan. Make pizza at home that tastes just like Pizza Hut! This Cast Iron Pan Pizza Recipe is unbelievable, you guys. A super tall, ciabatta-like crust with gorgeous crispy edges and a pillowy soft interior. The key to homemade pan pizza is a slow rise time and a heavy cast iron pan. #pizza #recipe #easy #homemade #fromscratch #panpizza #pizzahut #chewy #pizzadough #dough #yeast #doughrecipe #castiron #copycat #pepperoni #cheese")
Once you have the dough in the pans, use well-oiled hands to lift one edge of the dough and tuck it into the center.
 from The Food Charlatan. Make pizza at home that tastes just like Pizza Hut! This Cast Iron Pan Pizza Recipe is unbelievable, you guys. A super tall, ciabatta-like crust with gorgeous crispy edges and a pillowy soft interior. The key to homemade pan pizza is a slow rise time and a heavy cast iron pan. #pizza #recipe #easy #homemade #fromscratch #panpizza #pizzahut #chewy #pizzadough #dough #yeast #doughrecipe #castiron #copycat #pepperoni #cheese")
Do this several times until a loose ball has shaped itself. The dough is super sticky. Don’t worry, it’s supposed to be that way!
 from The Food Charlatan. Make pizza at home that tastes just like Pizza Hut! This Cast Iron Pan Pizza Recipe is unbelievable, you guys. A super tall, ciabatta-like crust with gorgeous crispy edges and a pillowy soft interior. The key to homemade pan pizza is a slow rise time and a heavy cast iron pan. #pizza #recipe #easy #homemade #fromscratch #panpizza #pizzahut #chewy #pizzadough #dough #yeast #doughrecipe #castiron #copycat #pepperoni #cheese")
Spread the dough out with your hand until it reaches the edges, or nearly reaches the edges.
 from The Food Charlatan. Make pizza at home that tastes just like Pizza Hut! This Cast Iron Pan Pizza Recipe is unbelievable, you guys. A super tall, ciabatta-like crust with gorgeous crispy edges and a pillowy soft interior. The key to homemade pan pizza is a slow rise time and a heavy cast iron pan. #pizza #recipe #easy #homemade #fromscratch #panpizza #pizzahut #chewy #pizzadough #dough #yeast #doughrecipe #castiron #copycat #pepperoni #cheese")
Then let the dough rise in a warm oven for about an hour and a half, or up to two hours if you have time. The dough should have reached the edges of the pan by now. Top with sauce, but not too much; you don’t want to weigh down the dough.
 from The Food Charlatan. Make pizza at home that tastes just like Pizza Hut! This Cast Iron Pan Pizza Recipe is unbelievable, you guys. A super tall, ciabatta-like crust with gorgeous crispy edges and a pillowy soft interior. The key to homemade pan pizza is a slow rise time and a heavy cast iron pan. #pizza #recipe #easy #homemade #fromscratch #panpizza #pizzahut #chewy #pizzadough #dough #yeast #doughrecipe #castiron #copycat #pepperoni #cheese")
Then cover with cheese. I love to add sliced mozzarella cheese in addition to shredded cheese. It gives your pizza this added element of cheesiness that you don’t get from just shredded cheese. I actually didn’t have any sliced mozzarella the day I made this, so I used my favorite hack of using my kids’ string cheese! Works like a charm.
 from The Food Charlatan. Make pizza at home that tastes just like Pizza Hut! This Cast Iron Pan Pizza Recipe is unbelievable, you guys. A super tall, ciabatta-like crust with gorgeous crispy edges and a pillowy soft interior. The key to homemade pan pizza is a slow rise time and a heavy cast iron pan. #pizza #recipe #easy #homemade #fromscratch #panpizza #pizzahut #chewy #pizzadough #dough #yeast #doughrecipe #castiron #copycat #pepperoni #cheese")
Top with pepperoni and a little bit of parmesan. Again, don’t add too much or it will weigh down your dough.
 from The Food Charlatan. Make pizza at home that tastes just like Pizza Hut! This Cast Iron Pan Pizza Recipe is unbelievable, you guys. A super tall, ciabatta-like crust with gorgeous crispy edges and a pillowy soft interior. The key to homemade pan pizza is a slow rise time and a heavy cast iron pan. #pizza #recipe #easy #homemade #fromscratch #panpizza #pizzahut #chewy #pizzadough #dough #yeast #doughrecipe #castiron #copycat #pepperoni #cheese")
Then bake your pizzas in a SCREAMING hot oven. Turn your oven up as high as it will go, 550 degrees F, if possible. A super hot oven makes your crust nice and crisp on the outside and gives your dough that holey, chewy texture that makes pan pizza so amazing. Observe:
 from The Food Charlatan. Make pizza at home that tastes just like Pizza Hut! This Cast Iron Pan Pizza Recipe is unbelievable, you guys. A super tall, ciabatta-like crust with gorgeous crispy edges and a pillowy soft interior. The key to homemade pan pizza is a slow rise time and a heavy cast iron pan. #pizza #recipe #easy #homemade #fromscratch #panpizza #pizzahut #chewy #pizzadough #dough #yeast #doughrecipe #castiron #copycat #pepperoni #cheese")
I like to slide my pizza out onto a cooling rack within a couple of minutes of taking it out of the oven, to make sure the crust stays super crispy. Then after a few minutes, slice and serve!
Technically these are not personal pan pizzas like the ones at Pizza Hut, but any pizza can be a personal one if you believe in yourself. I can pretty much eat an entire one of these pizzas single handedly. Don’t judge me. Join the dark side. It’s quarantine anyway, calories don’t count.
 from The Food Charlatan. Make pizza at home that tastes just like Pizza Hut! This Cast Iron Pan Pizza Recipe is unbelievable, you guys. A super tall, ciabatta-like crust with gorgeous crispy edges and a pillowy soft interior. The key to homemade pan pizza is a slow rise time and a heavy cast iron pan. #pizza #recipe #easy #homemade #fromscratch #panpizza #pizzahut #chewy #pizzadough #dough #yeast #doughrecipe #castiron #copycat #pepperoni #cheese")
What to serve with this pan pizza
Personally I don’t need anything fancy with my pizza. Like, a paper plate maybe? A napkin, because I eat this pizza like an animal? But if you’re serving a group who gets fussy when there’s nothing green on the table, then try one of the following light and fresh options to balance out all the glorious cheese.
Green Salad with Feta and Beets >> if you hate chopping this salad is for you. Super easy!
Strawberry Cucumber Salad with Honey Balsamic Dressing >> this dressing is so refreshing.
Pineapple Spinach Salad >> a compromise between those who like pineapple on their pizza and those who don’t–just serve it in the side salad.
Spinach Bleu Cheese Salad (with Copycat Zupas Poppyseed Dressing) >> cinnamon candied almonds, fresh berries, and homemade dressing?? Yes, please.
Tomato and Fresh Basil Salad from Hip Hip Gourmet
Caesar Salad from Little Ferraro Kitchen
Italian Chopped Salad from Borrowed Bites
How to store leftovers
You don’t want leftover slices to dry out, AND you don’t want them to get soggy. So here’s the strategy. Get a container that fits your remaining pizza and stack slices with layers of paper towels, parchment paper, or waxed paper in between. Then make sure the lid is on tight. If you don’t have a container that fits the pizza, then you can layer as before, but on a plate. Just wrap the whole thing in plastic wrap when you’re done.
Can this be frozen?
Yes, absolutely. You can wrap the slices in plastic wrap, put them on a baking sheet in a single layer, and freeze them. When they’re frozen, you can transfer them to a Ziploc bag or a leftover container. They’ll be best if you eat them in the first 1-2 months, but are still safe to eat for 3-6.
Best way to reheat pizza
Look, the microwave works. It totally does. But if you want to reheat your pizza to a “fresh” level, you’ll want to use the oven. Just put the slices under the broiler for a couple of minutes (watching them super carefully so they don’t burn, tragic!!).
More pizza ideas you will love!
- Blackberry Ricotta Pizza with Basil >> a really fun pizza for summer!
- Leftover Hot Dog Pizza with Caramelized Onions >> This pizza is SO GOOD. Don’t you turn up your nose at me. ;)
- Easy No Cook Pizza Sauce >> the easiest thing ever to throw together.
- Thai Pizza with Zucchini and Pickled Onions >> I got this idea from a California Pizza Kitchen meal I had one time.
- Zucchini Pizza Bites >> a really fun low carb pizza idea!
- French Bread Pizza, 3 Ways >> if you have a loaf of French bread, dinner is so easy.
- BBQ Chicken Pizza from Tastes Better From Scratch
- How to Grill Pizza from Ambitious Kitchen
- Chicago Style Deep Dish Pizza from Brown Eyed Baker
Also, try out all my best copycat recipes in one place!
Facebook | Pinterest | Instagram
Pizza Hut Pan Pizza Recipe
Ingredients
For the dough
- 1 & 1/2 cups warm water
- 3/4 teaspoon active dry yeast
- 14 ounces bread flour, 3 cups + 1 tablespoon*
- 2 teaspoons kosher salt
To assemble the pizza
- 4 tablespoons light olive oil, to coat cast iron pans**
- 14 ounce jar of pizza sauce, or homemade
- 4 ounces sliced mozzarella cheese
- 3 cups mozzarella cheese, shredded
- 3 ounces pepperoni
- 2 tablespoon parmesan cheese, shredded
Instructions
- In a large bowl, add 1 and 1/2 cups warm water and 3/4 teaspoon active dry yeast. (Instant yeast can also be used.) The water should be warm but not hot, about 105-110 degrees F. Stir in the yeast and let it sit for 5 minutes until it is dissolved. It will not be bubbly, but make sure to stir any lumps of yeast so that the mixture is uniform before moving on.
- Use a scale to add 14 ounces of bread flour* to the bowl. If you don’t have a scale, carefully measure out 3 cups plus 1 tablespoon bread flour by spooning the flour into the measuring cup and leveling off the top. It is important to measure the flour precisely for this recipe. Don’t be tempted to add more.
- Add in 2 teaspoons of kosher salt and stir the mixture together with a spoon. Do not knead it. Mix until it is all combined and no further.
- Use oil or nonstick spray to grease a large bowl or tupperware. Scrape the dough in and spread it out as much as possible. Cover loosely with a lid or with plastic wrap. Make sure the lid is not too tight, you need some of the gases to be able to escape.
- Turn your oven on to 350 degrees F for about 1 minute, then turn the oven off. Open the door and feel the rack. If it is too hot to touch with your fingers, then leave the door open and let the oven cool a bit. You want the oven nice and warm but not so hot that you can’t touch the inside with bare hands.
- Place the rising dough in the oven and shut the door. Let rise for 4 hours. After 2 hours, remove the dough from the oven, turn the oven on again for a minute, and then return the dough to the oven when it has warmed up again. Make sure it is not too hot. After 4 hours, your dough should have at least doubled in size and should be airy and bubbly.
- Divide the 4 tablespoons oil** between two cast iron skillets and swirl to coat. You can use 10 or 12 inch cast iron skillets for this recipe.*** You need two skillets because the dough rises in the pan. If you only have one skillet, you can half the recipe, or see the recipe note about using round cake pans.
- Dip your hands and the end of a rubber spatula into the oiled pans to coat well. Use the oiled spatula to divide the risen dough into two. Scrape half the dough into each oiled pan.
- Use your oiled fingers to lift up an edge of the dough and bring it toward the center. Repeat this process a few times until the dough has formed a loose ball. (see photos) Flip the ball over so the smooth side is on top and everything is completely coated in oil. Press your hand down on top of the dough and gently spread it out as much as you can toward the edges of the pan. Repeat with the other half of the dough.
- Cover each pan loosely with plastic wrap, making sure the plastic does not touch the dough.
- Repeat the oven-warming process for the second rise. Turn the oven on for about a minute, turn it off, and put the pans into the oven when it is warm but not hot.
- Let the dough rise in the warm oven for about an hour and a half. It should have spread to the edges of the pan completely and look bubbly.
- Remove the pans from the oven and keep in a warm place. Preheat your oven as hot as it will go, 550 degrees F if possible. Let the oven preheat for at least 20 minutes to make sure it is seriously hot. Arrange the oven rack in the lower third of the oven. If you have a pizza stone, place it on the rack.
- Meanwhile, top the pizzas. Add about 3/4 cup pizza sauce (half of a 14 ounce jar) to the top of each pizza and spread on top, all the way to the edges.
- Add a few thin slices of mozzarella to the top of each pizza, only about 4 ounces all together. (Or use string cheese if you are weird like me). You don’t want to weigh down the dough too much.
- Sprinkle about 1 and 1/2 cups of shredded mozzarella on top of each pizza.
- Divide the pepperoni between the pizzas. Remember not to add too many so you don’t weigh down the dough.
- Sprinkle each pizza with a tablespoon of shredded parmesan cheese.
- When the oven is super duper hot, put the pizzas into the hot oven, on the pizza stone if you have one. Bake the pizzas for about 9-12 minutes. The pizza is done when the edges are starting to look brown and the cheese on top is becoming golden. The surest way to test for doneness is by lifting the edge of the pizza with a metal spatula to make sure that the bottom of the crust is a deep golden brown.****
- Remove the pizzas from the oven and let set for 2 minutes. Then use a spatula to slide under the pizza and edge them out onto cooling racks. This helps ensure that the crust stays crispy. Let the pizzas cool on the racks for a few minutes, then slide onto cutting boards, slice and serve.


Why you didn’t state the yeast quantity?
Hi Flavio! The recipe card includes an ingredient list with 3/4 teaspoon active dry yeast. Keep scrolling to the bottom of the post for the recipe card :-)
I am making this for tonight’s dinner. I am questioning the ounces for the flour. The recipe says 14 oz. but when I weigh the flour that is definitely not enough. When I measured by cup I think it should read 24 oz.
Hi Dawn! I totally get your confusion. Volume measurement (putting an ingredient into a cup and seeing how much of that cup it fills) works great for liquids; you can’t pack more water into a one cup measuring cup, right? But with dry ingredients it’s trickier because you can pack flour or brown sugar tightly, or just fill a cup more loosely. In this recipe, the 14 oz. measurement is for weight measurement, not volume measurement. 3 cups plus one tablespoon of bread flour weighs 14 oz. I know it’s weird! But getting the amount of flour right is super important for getting a crust that brings the Pizza Hut nostalgia. Hope your pizza was delicious!
I’ve made this recipe several times and it’s so delicious! However, the last few times I made it my dough did not rise. No fault of the recipe – my husband and I suspect that our oven may not be properly calibrated. Anyway, this made me think, is it possible to make this recipe with ready-made dough from the grocery store. Would love your take. Thanks!
Hi Anna! We haven’t tested this with ready made dough, so it’s hard to say. The dough is a really crucial part of creating the classic Pizza Hut taste. So sorry to hear that your oven isn’t behaving itself, and if you do try some ready-made dough, come back and let us know how it turns out!
The total rise time states 4 hours, but that doesn’t appear to include the additional 1.5 hour rise in the skillet before baking it. Please clarify.
Made this today, the crust was absolutely amazing!! OMG it was better than take out!! I even had to rush the rise times but it made no difference!! I used my two 12″ Lodge cast irons and my pizza stone, went with 525° as my oven runs very hot. A definite keeper, thank you!