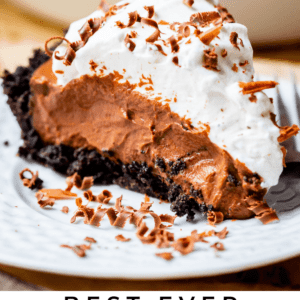
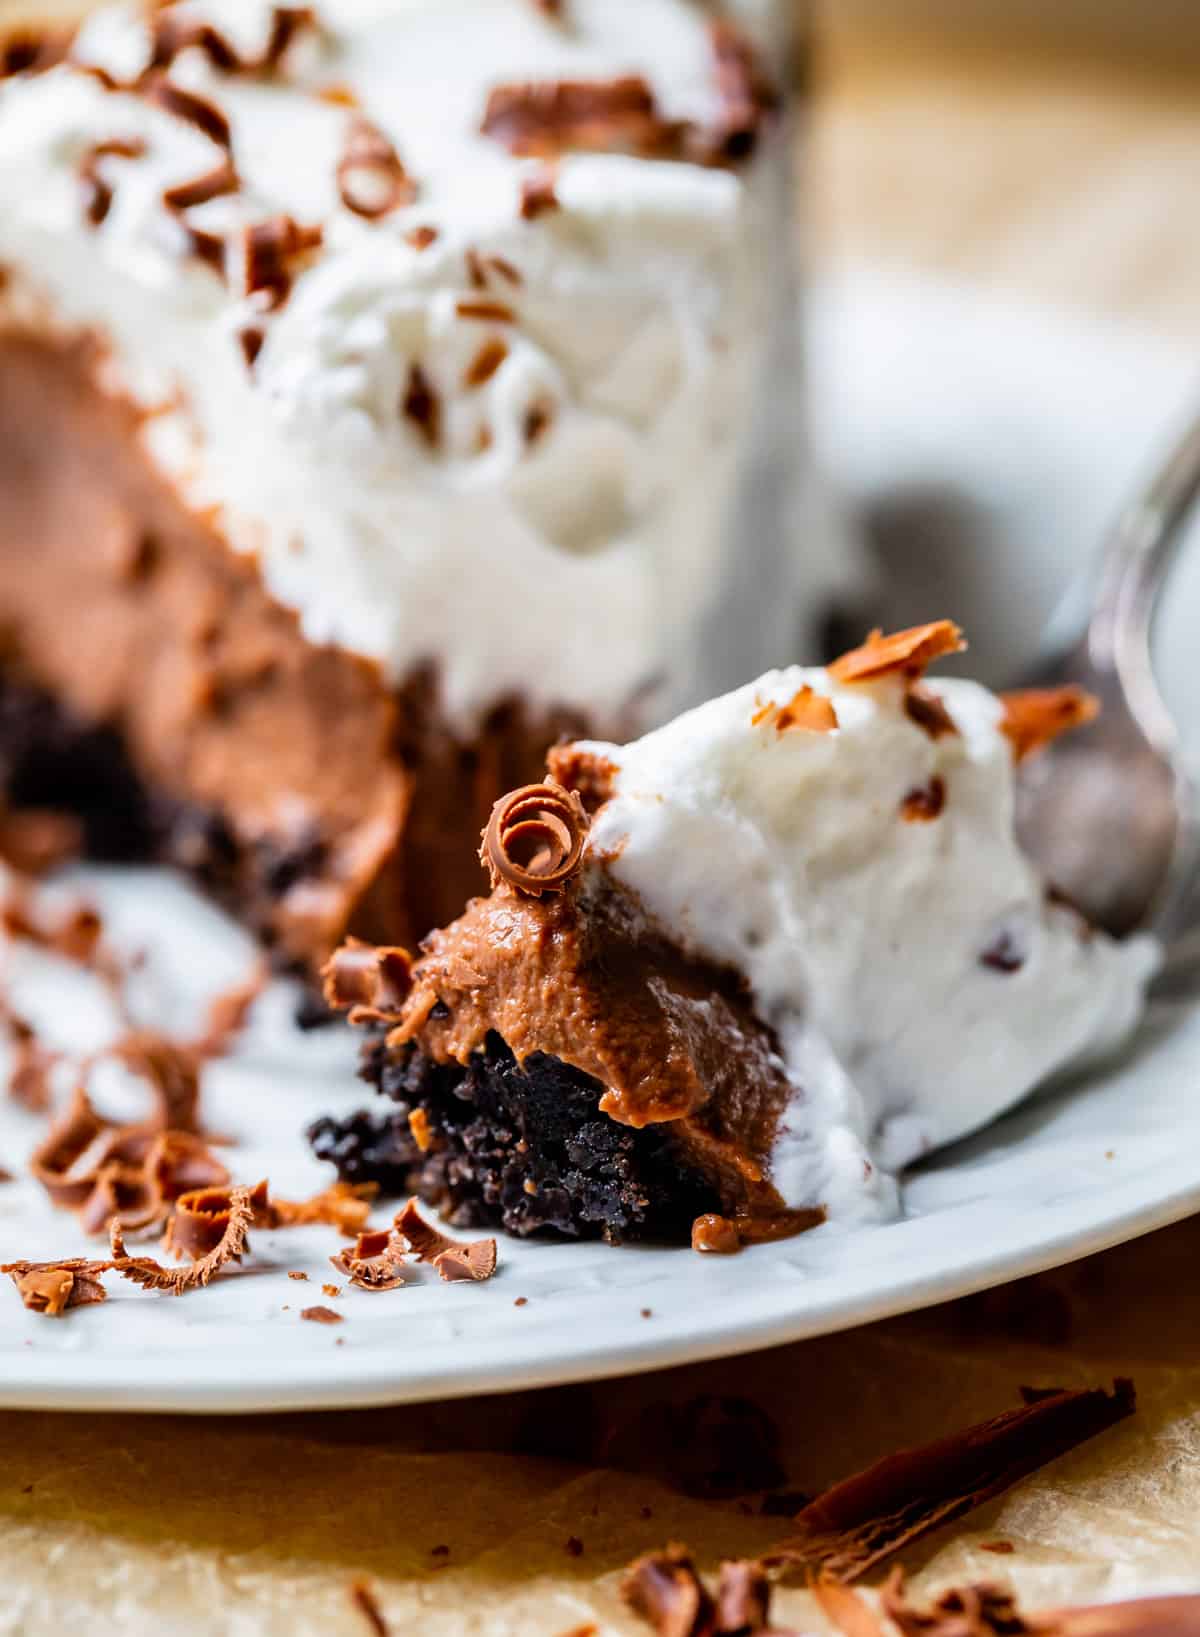
I don’t know about you, but I’ve had a lot of ho-hum chocolate cream pies in my time.. This easy recipe redeems them all. An Oreo or graham cracker crust, a rich and creamy double chocolate pudding, topped with sweetened whipped cream and chocolate curls. This is The One. The only chocolate pie you will ever need, forever and ever amen! It has the PERFECT texture thanks to a special technique you may not have used before. Originally published November 22, 2022.
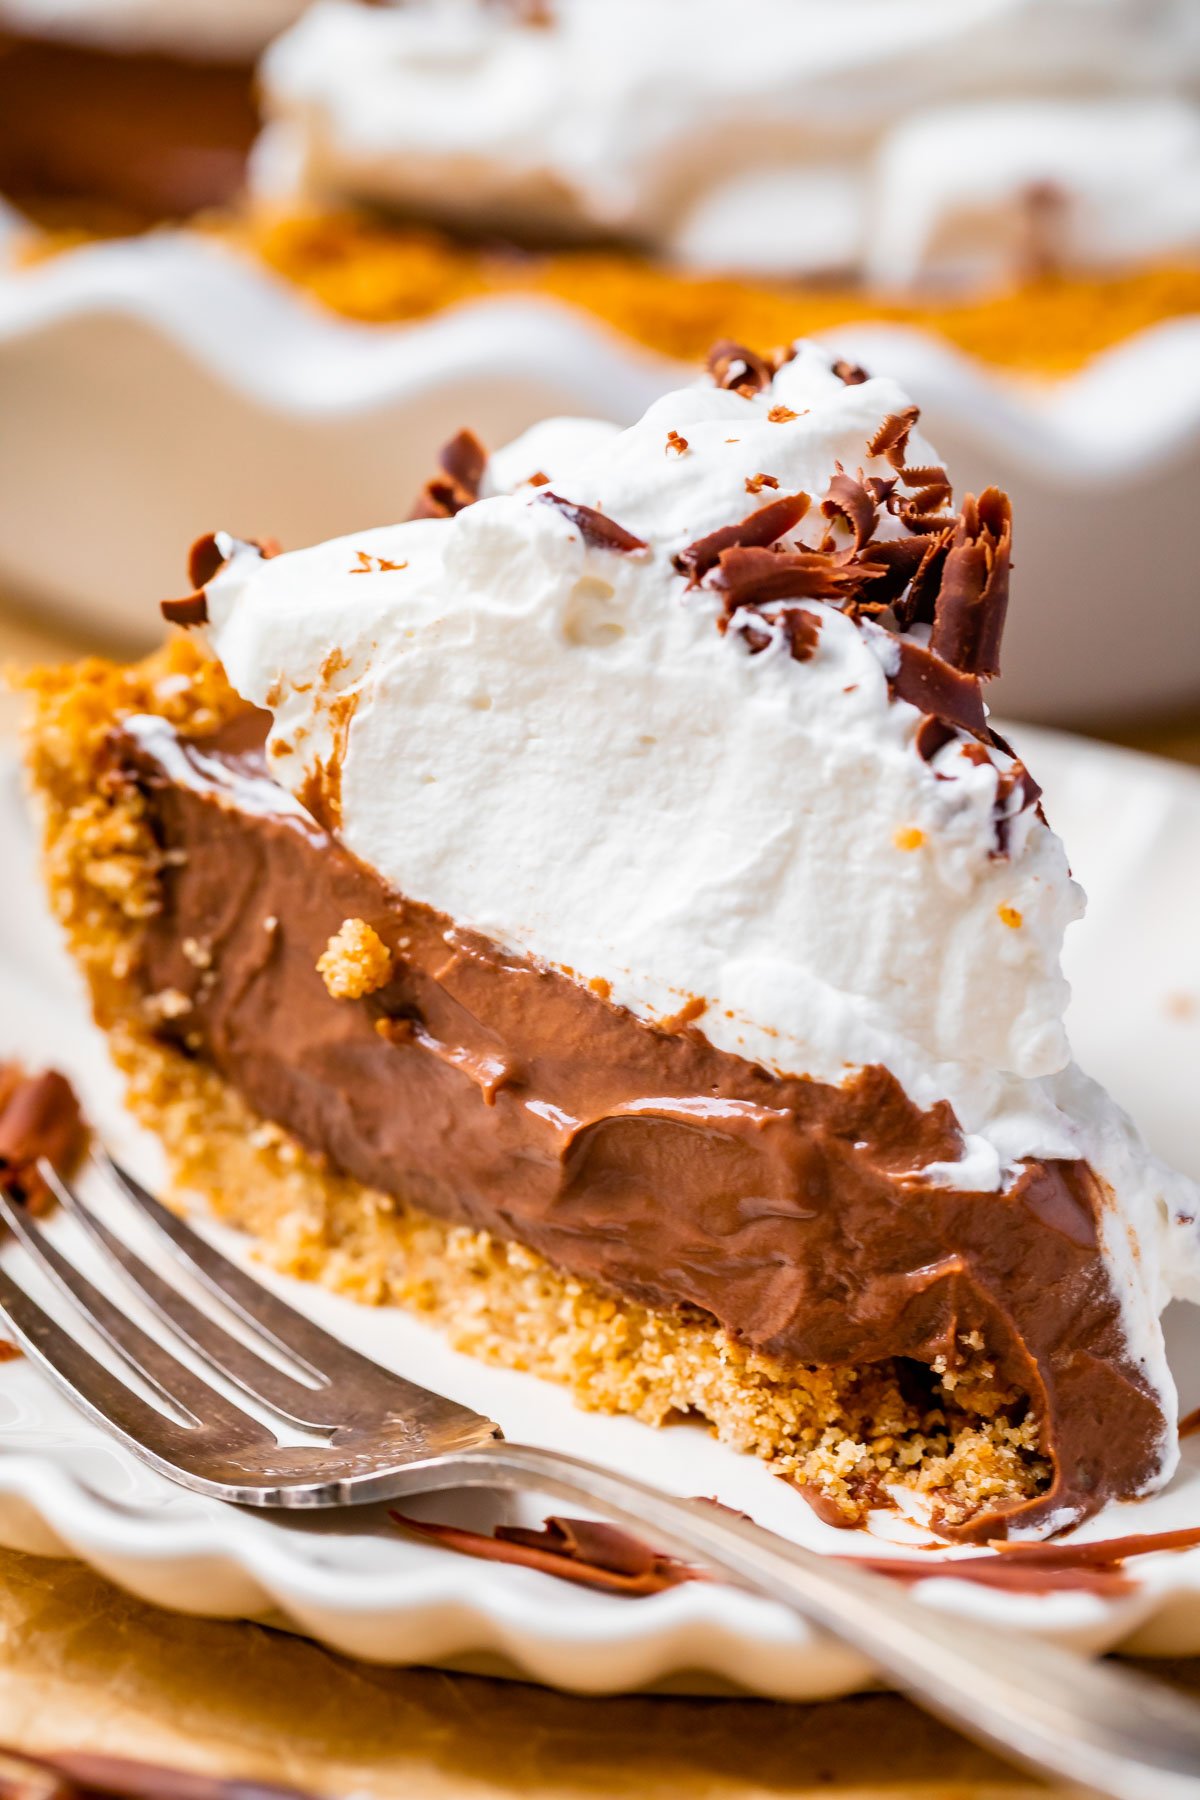
Table of Contents
- This easy chocolate cream pie is what dreams are made of
- Why you’ll love this recipe for chocolate cream pie
- Ingredients for the best chocolate cream pie recipe
- The best crust for this chocolate cream pie recipe
- How to make chocolate cream pie
- Curling chocolate for chocolate cream pie
- How to make easy whipped topping for chocolate cream pie
- Best chocolate cream pie recipe tips
- How to serve
- Do you need to refrigerate it?
- More pies you’re going to love!
- Chocolate Cream Pie Recipe (Easy) Recipe
I spent all of Friday making cream pies, trying to figure out the combination of flavor and texture that would bring me to Creamy-Chocolate-Level-Transcendent. I made so many pies: some too grainy, some too thick, some too fussy to be labeled “easy.” I finally nailed it.
Then my mother-in-law, Kris, arrived from out of town, and all my conclusions were shot to hell. She took one bite at dinner and said, “This pie isn’t sweet enough!”
Many of you know my dear mother-in-law, Kris. Her influence and reputation on this blog precede her. She is one of the best home cooks I know, and my blog owes a lot to her palate. When she talks, I listen.
The rest of the table, including Eric, who saw me work so hard testing a million pies, protested. “I think the pie tastes great, Karen!”
I know that Kris doesn’t like sugary-sweet desserts, so if she thinks my pie needs more umph, I’m interested. I defend her: “Kris is not an overly-sweet person, so if she thinks it needs more sugar, that’s saying something!” My father-in-law erupts in laughter. “Kris is not an overly-sweet person? You can say that again!”
The next day, Kris tried to apologize. She felt bad for being blunt about the pie. I brushed her off. “I’m not offended at all! I value your opinion; you have a very sharp tongue.” She burst into laughter, “You can say that again!”
You guys! Is my subconscious sending over backhanded compliments because someone thought my pie needed work? What is it with me??
Kris ate some more pie later and tried to backtrack. “I think I actually do like the pie, just the way it is!” Sure Kris. Sure. You can’t put the genie back in the bottle.
I made the pie one last time. And I used more sugar, as Kris suggested. OF COURSE, she was right. It was amazing. We crowded around the counter with forks, with moans of, “This is it,” and “I didn’t think it could get better, but it got better.”
Welp, humble pie is going around in every direction over here! It was worth it. Now you know just how much we all owe to Kris and her sharp tongue! 😉
This easy chocolate cream pie is what dreams are made of
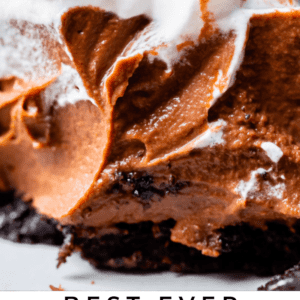
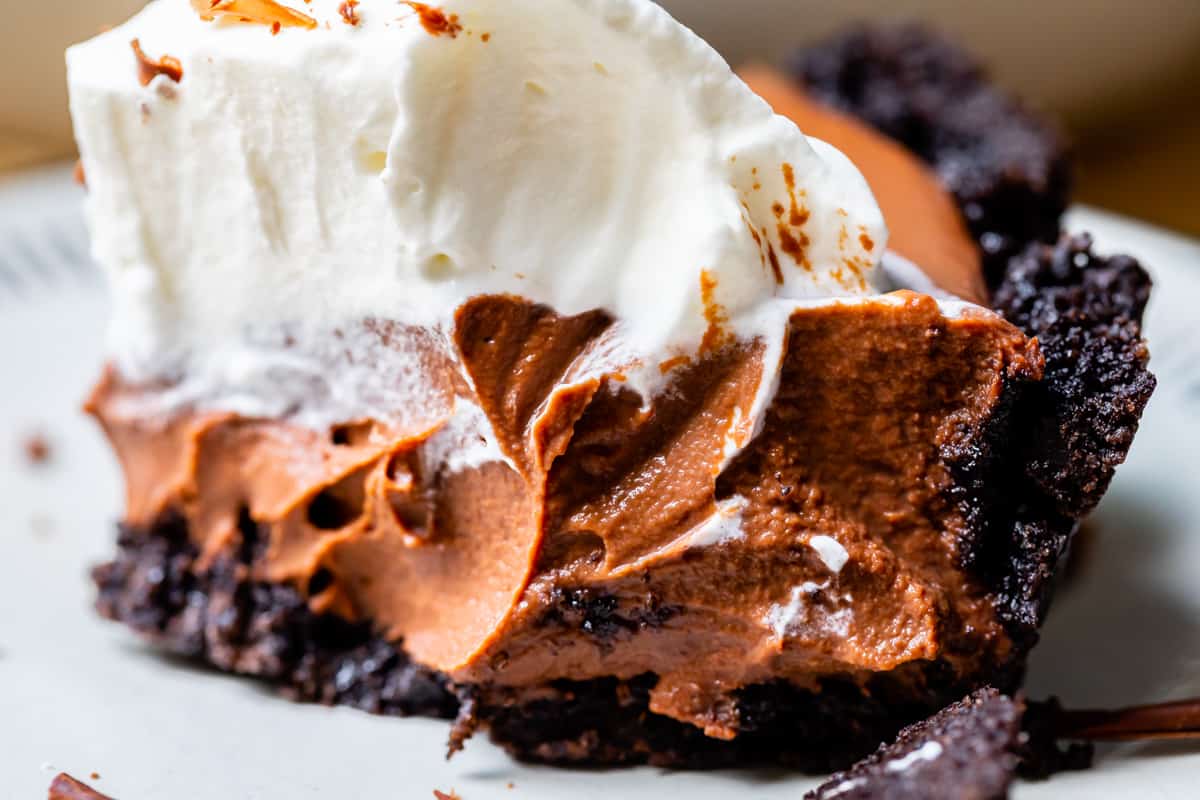
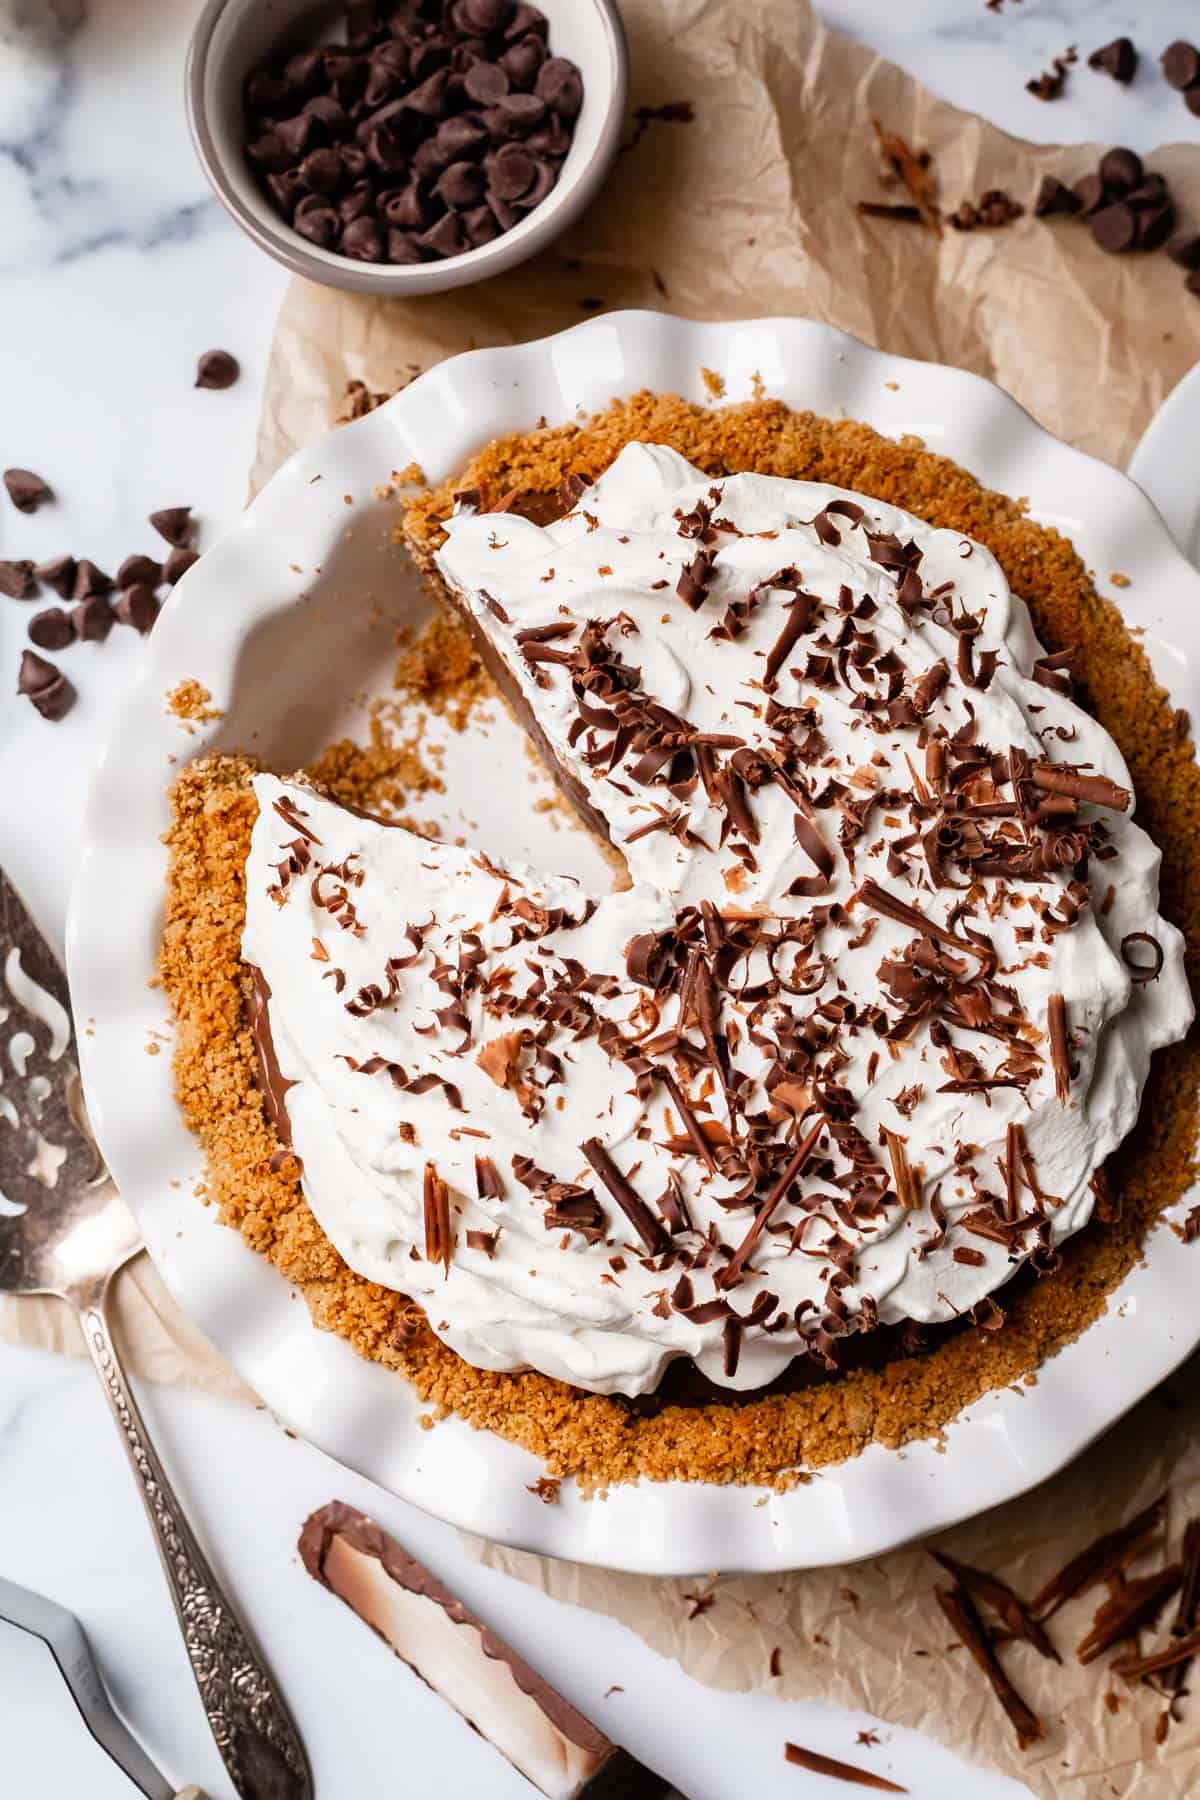
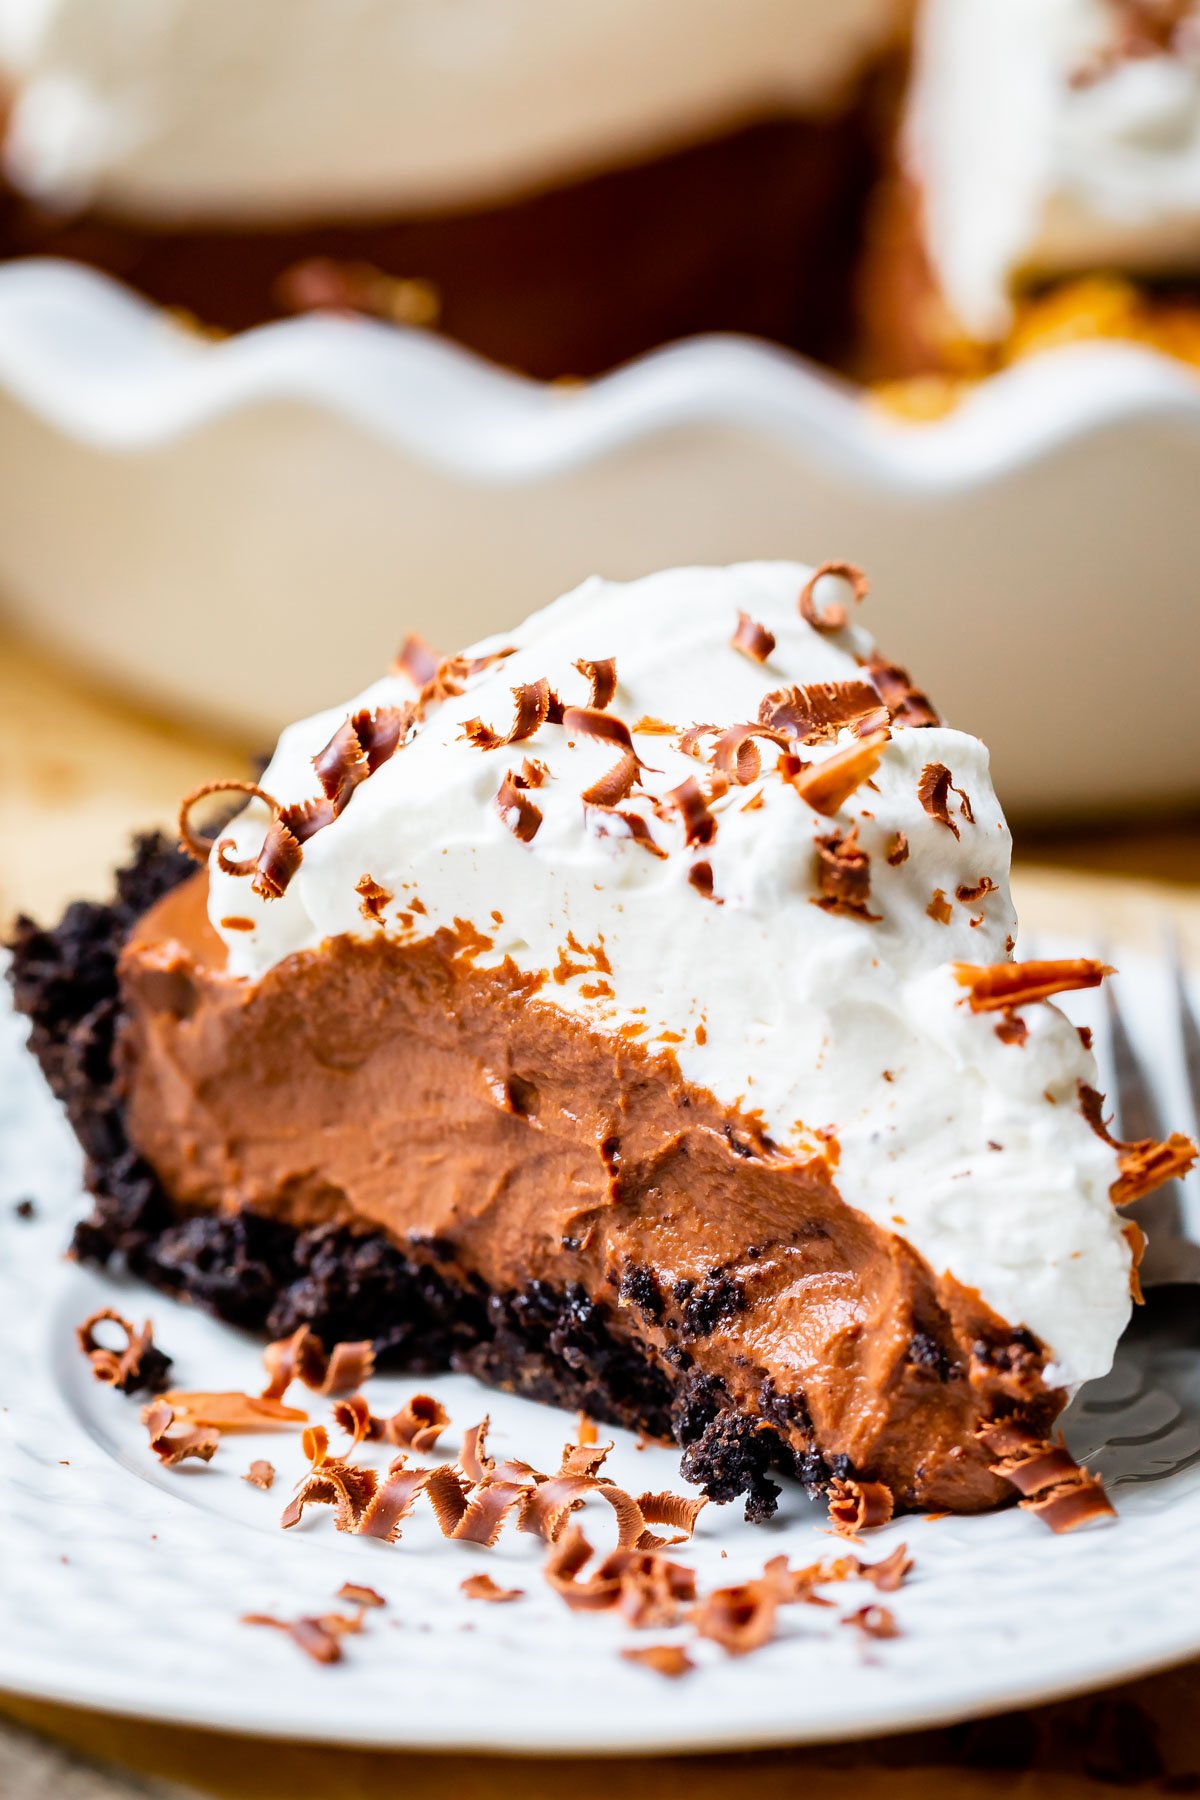
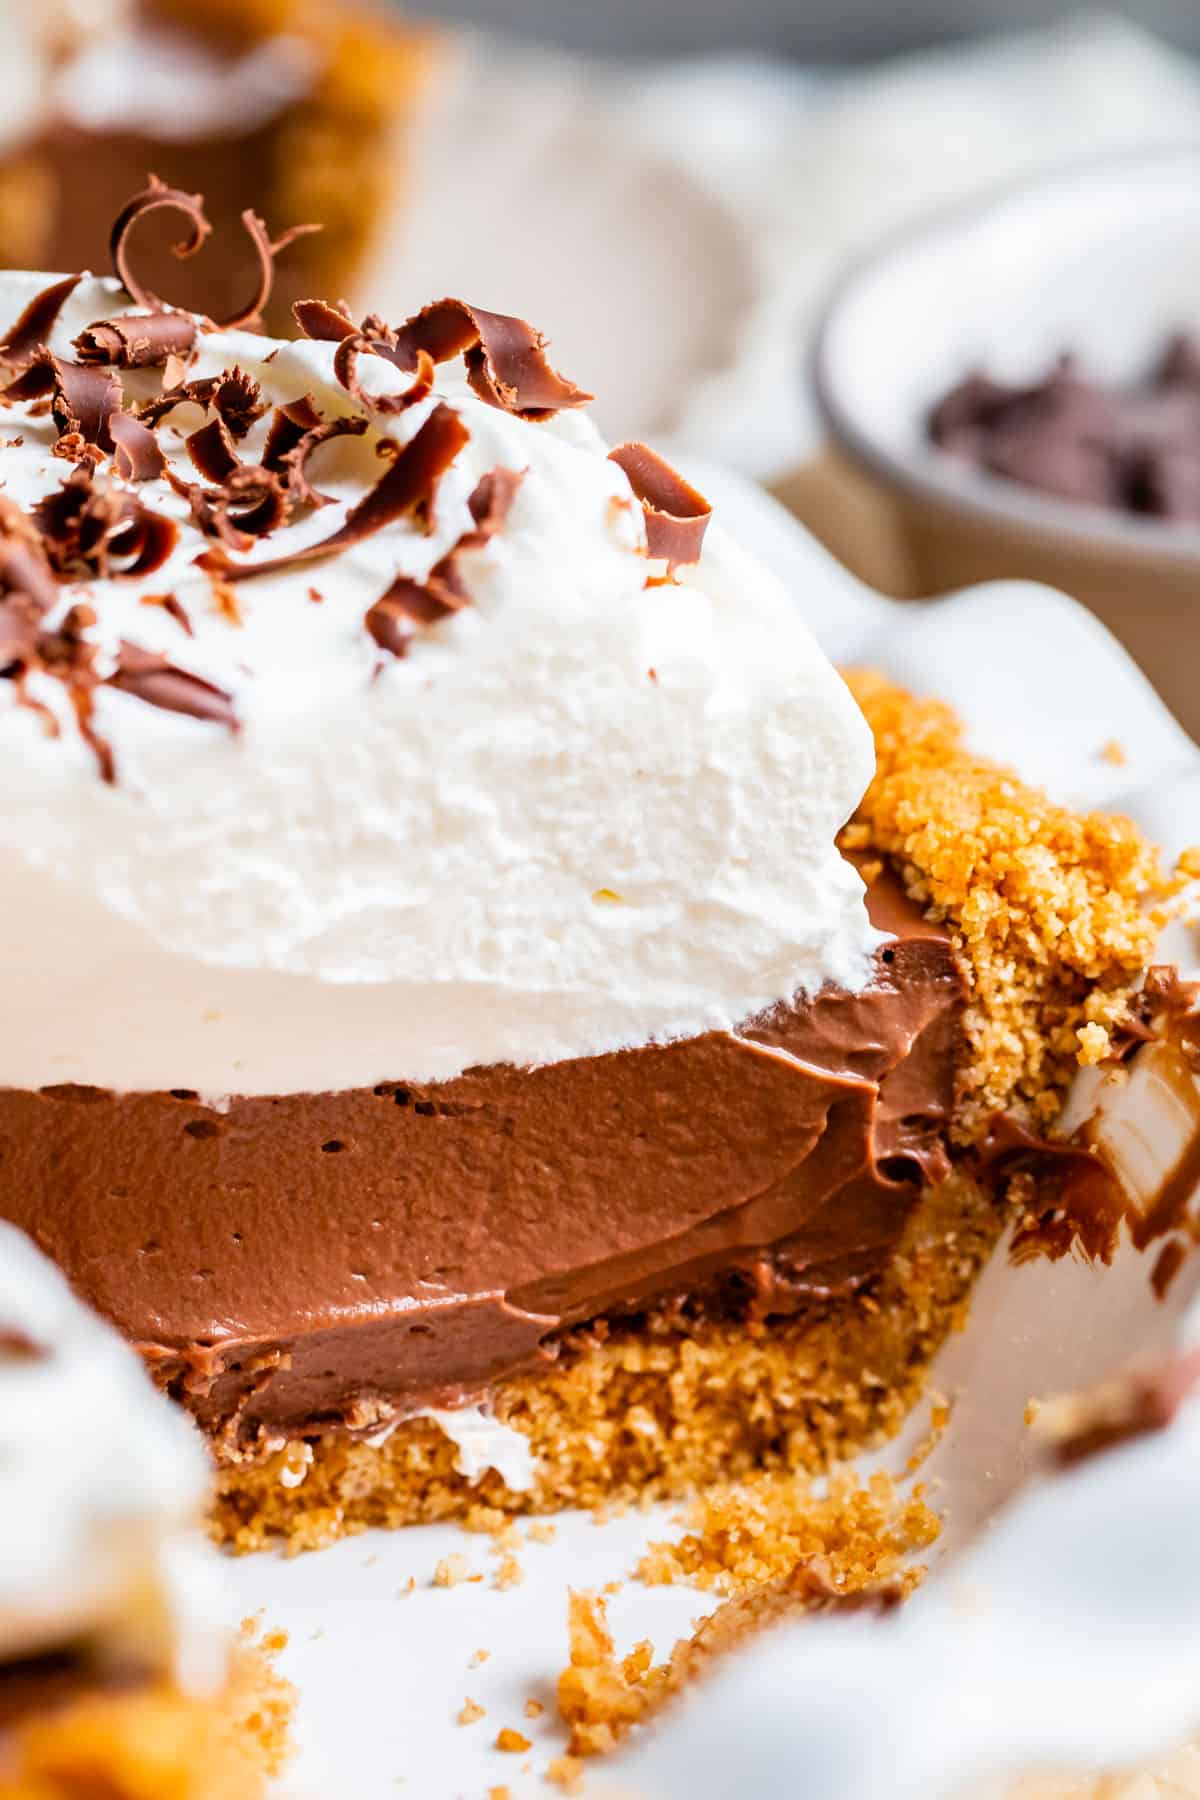
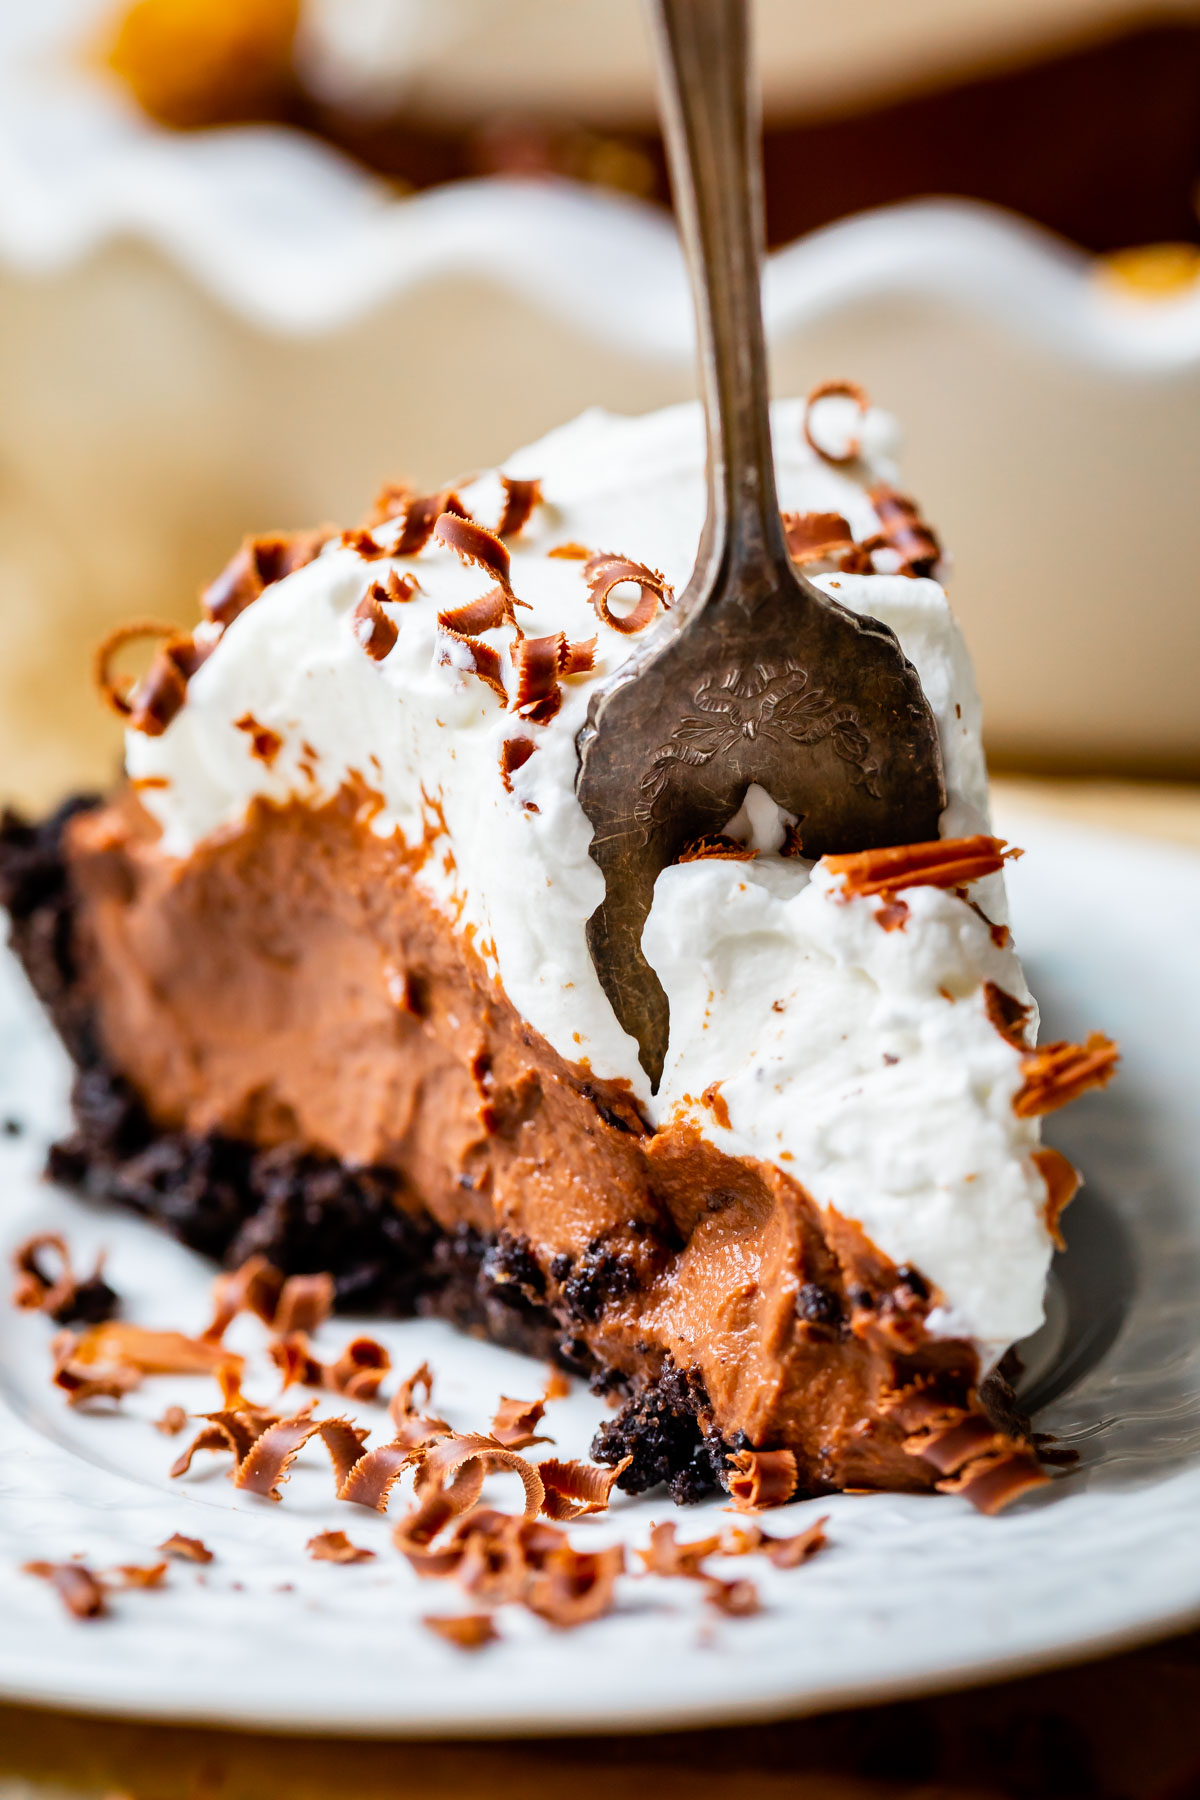
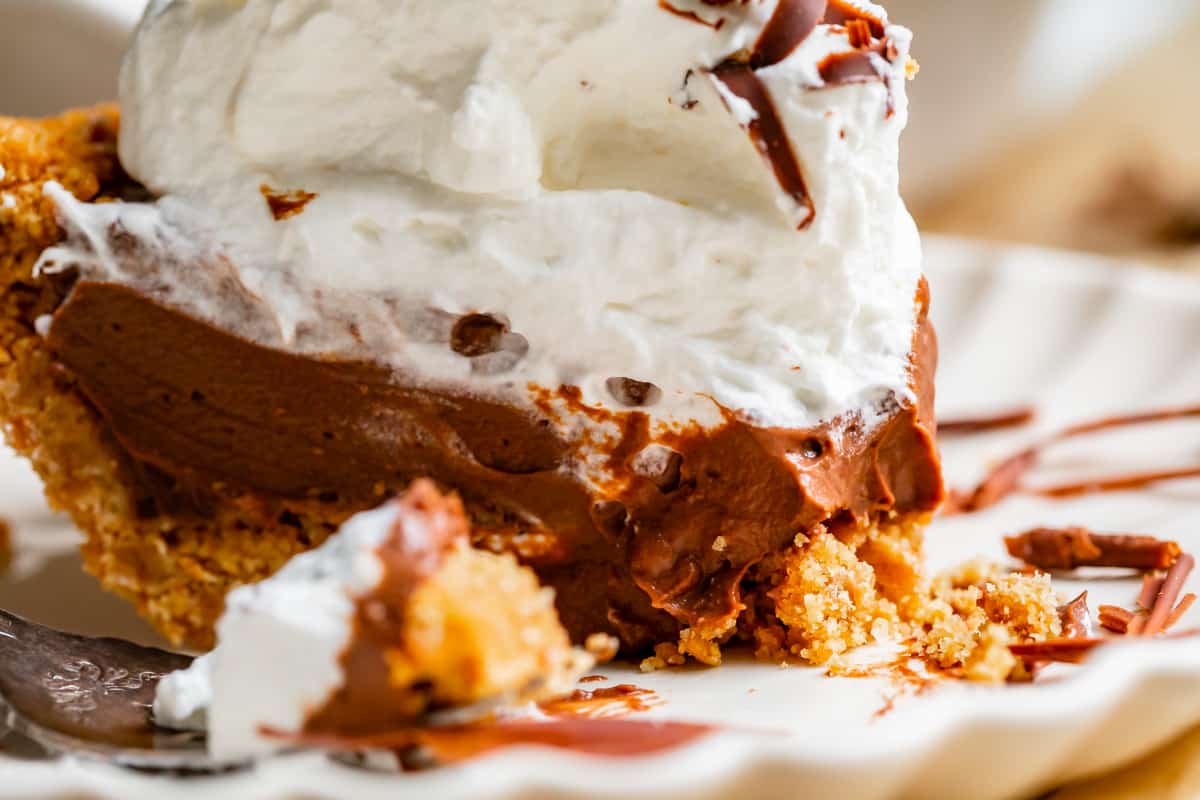
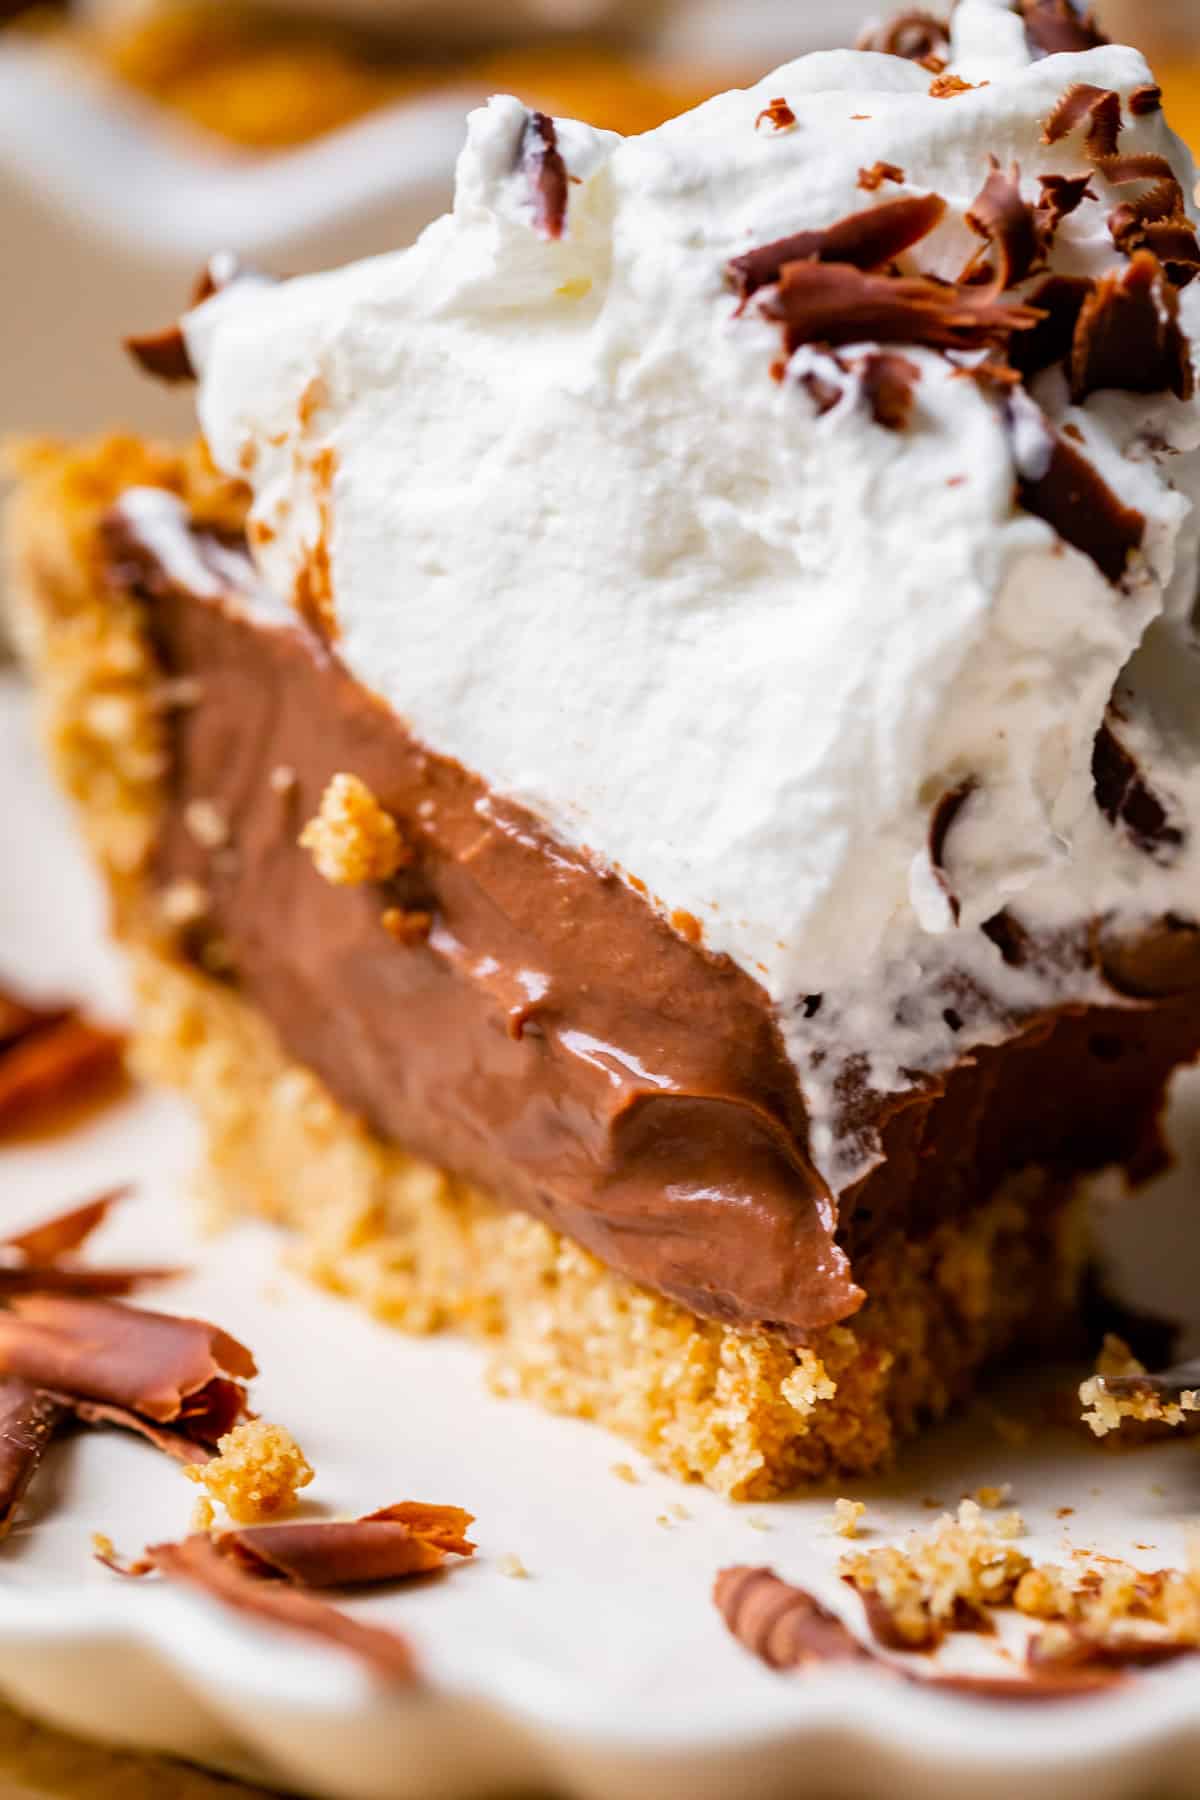
Chocolate cream pie has a crust, a thick layer of homemade chocolate pudding, and is topped with whipped cream and chocolate curls. It’s rich, it’s creamy, it’s dreamy beyond belief!
Even if there is a selection of pies at your event, this one will probably get eaten first. It’s the American way. We’re obsessed with chocolate. I read a quote from a chef once, who was talking about choosing what to include on a dessert menu: “You always have to provide a chocolate option. People will riot if you don’t.”
Featured Comment
“I just made this pie for Thanksgiving, and it truly is an amazing recipe! I did this exactly following the recipe, and it was SOOOOO EASY! This method eliminates the “scrambled egg” happening on the stove!!! I am now fearless lol!!” -Karen
Why you’ll love this recipe for chocolate cream pie
This pie does not disappoint in the chocolate department. Here’s why this recipe produces phenomenal results:
- It’s not made from instant pudding (I have nothing against instant pudding. It’s just not THE BEST).
- We are using 3 kinds of chocolate for max chocolate flavor. I almost called it a “Triple Chocolate Cream Pie.” Cocoa and semi-sweet chocolate are incorporated in the pudding, plus straight chocolate curls on top. (And it’s quadruple-chocolate if you use an Oreo crust!)
- Speaking of chocolate curls. I almost thought about making them optional until I ate the pie without them. They are NOT OPTIONAL! They add the perfect touch! See recipe notes for an easy hack using a chocolate bar, no melting and scraping required.
- This recipe calls for high-quality chocolate. If you cheap out on the chocolate, you will get a cheap-tasting pie, simple as that. You can use chocolate chips for the curls, but use a high-quality chopped chocolate bar for the pudding itself. If you are not feeling a little grouchy about the price, you are buying the wrong chocolate.
- There are lots of egg yolks. Egg yolks are the secret to the BEST, richest texture and flavor. No box of pudding can compete. 🎶 Ain’t nothin like the real thing bay-bay… 🎶
- My big secret: use a hand mixer to beat the pudding together: before, during, and after it’s heated on the stove. This makes the pudding ULTRA creamy and whips a bunch of air in, making your chocolate layer light and fluffy (so that it absolutely melts in your mouth). It’s a game-changer, my friends!
- It’s easy. Set yourself up for about 10 minutes of stirring by the stove, and the tough part is over.
Ingredients for the best chocolate cream pie recipe
Here’s a quick shopping list to help you gather your ingredients. Jump to the recipe card below for the full ingredients and instructions!
- Oreo cookies or graham cracker crust
- kosher salt
- butter
- eggs
- sugar
- whole milk
- cocoa powder
- cornstarch
- heavy cream (not coffee creamer!)
- semi-sweet chocolate (not chocolate chips, splurge and get the good stuff)
- vanilla
- powdered sugar
The best crust for this chocolate cream pie recipe
You can’t have a good pie without a good crust. You have 3 classic options:
- Oreo cookie crust
- Graham cracker crumb crust
- Classic pastry pie crust
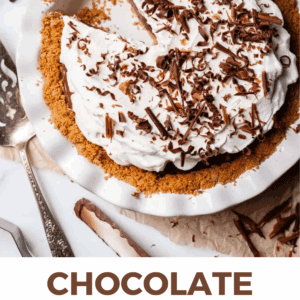
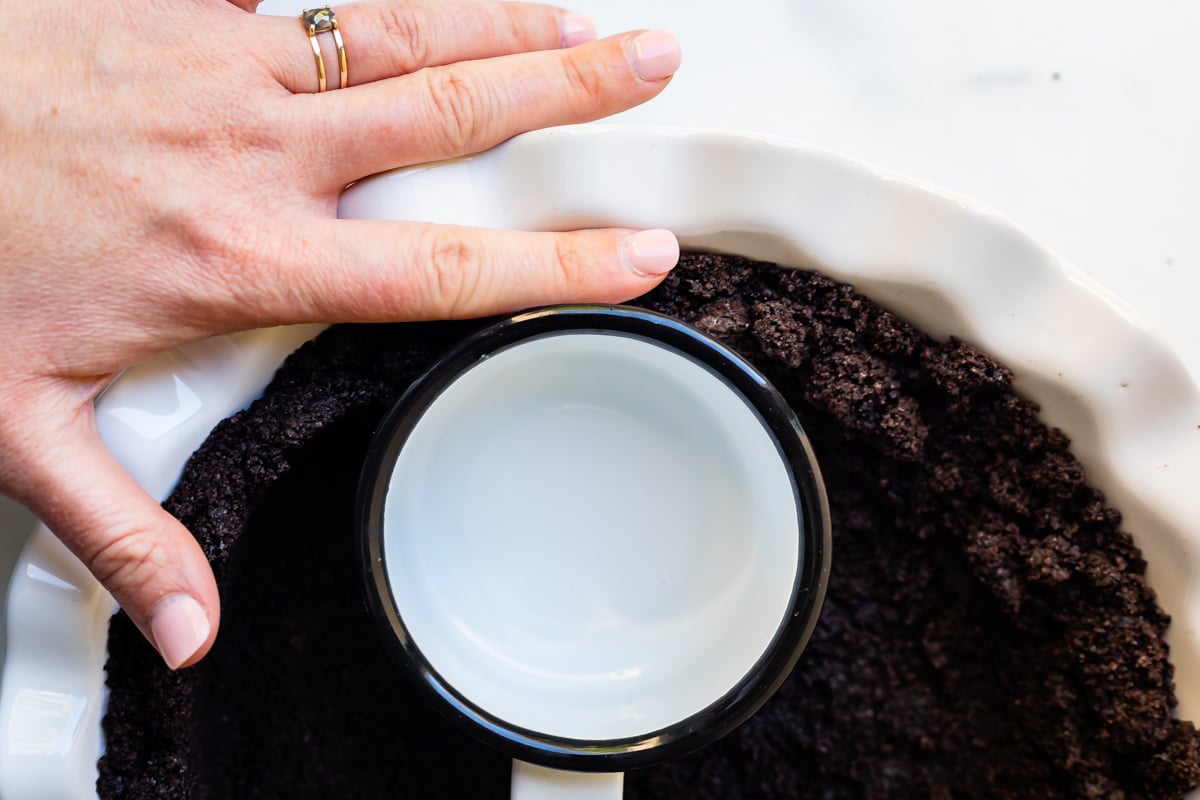
I took a poll on Instagram the day I made this pie, and Oreo crust beat out graham cracker crust by a thin margin. It’s just hard to deny chocolate in crunchy buttery cookie form, right? Graham cracker crust is a close second for me, too. I love them both, but the choice is yours.
I didn’t even include regular pastry pie crust in the poll, because in my opinion, it shouldn’t even be on the list. Chocolate pie is SO much better in a crumb crust. I said what I said, people. I know that tradition says chocolate pie goes in a regular pie crust, but I’m convinced that tradition was started when Oreos weren’t invented yet.
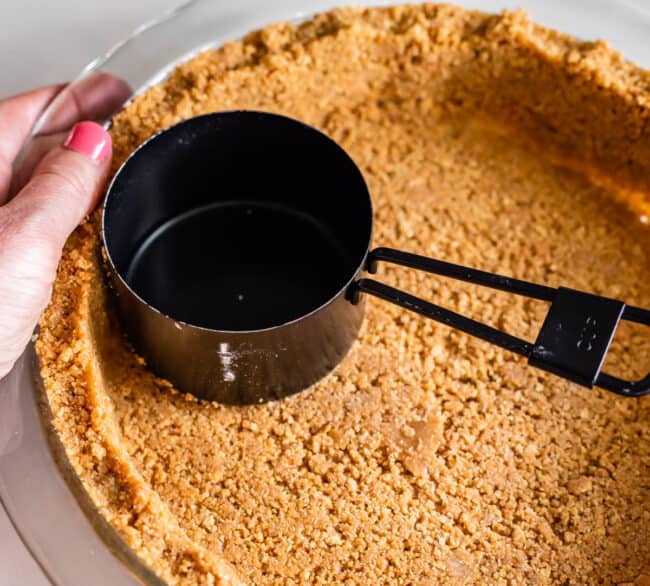
I like to use a measuring cup and my fingers to press the mixture into the pan. Make sure you bake your crumb crust for about 10 minutes to make sure it gets nice and crispy. No soggy crust, please. We need a foil for our creamy pie.
How to make chocolate cream pie
First, you’re going to need an egg and 4 egg yolks. Egg yolks make the world go round when it comes to puddings and custards. They are full of flavor and creamy goodness.
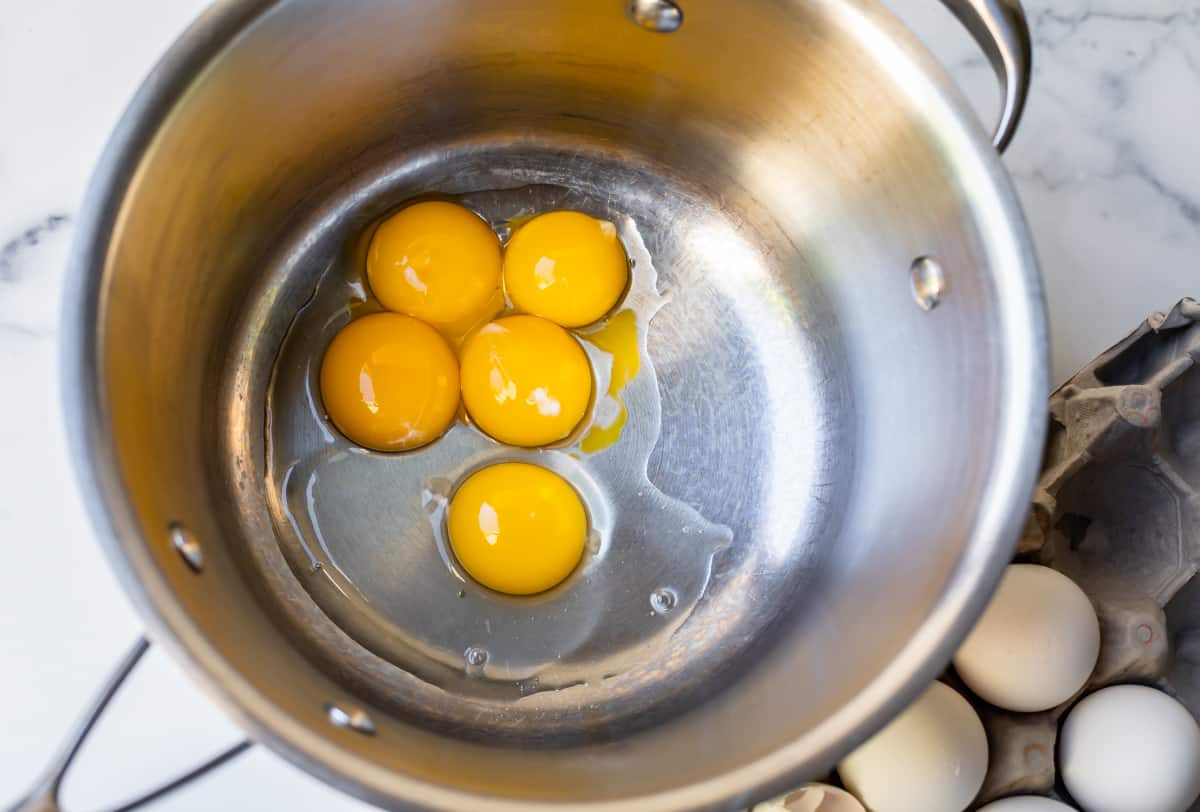
Crack them into a stone-cold 3-quart saucepan. Don’t even think about setting it on the stove yet. We’ve got business to take care of before we heat things up.
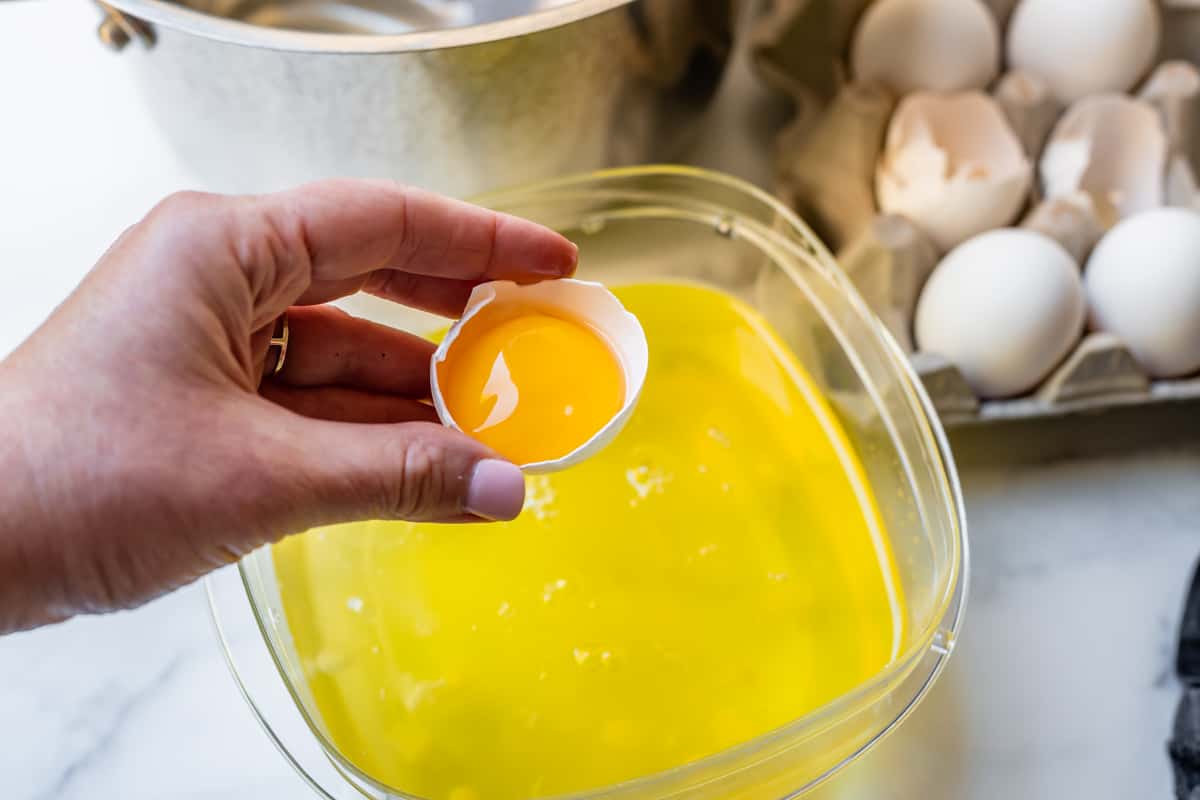
Here are my dozens of egg whites from my million tests on this recipe. Someday, I will come up with an egg white omelette recipe for you all. For now, put them in your fridge and pretend like you will use them later. Ha! Just kidding. I usually add a few whites at a time to my kids’ scrambled eggs.
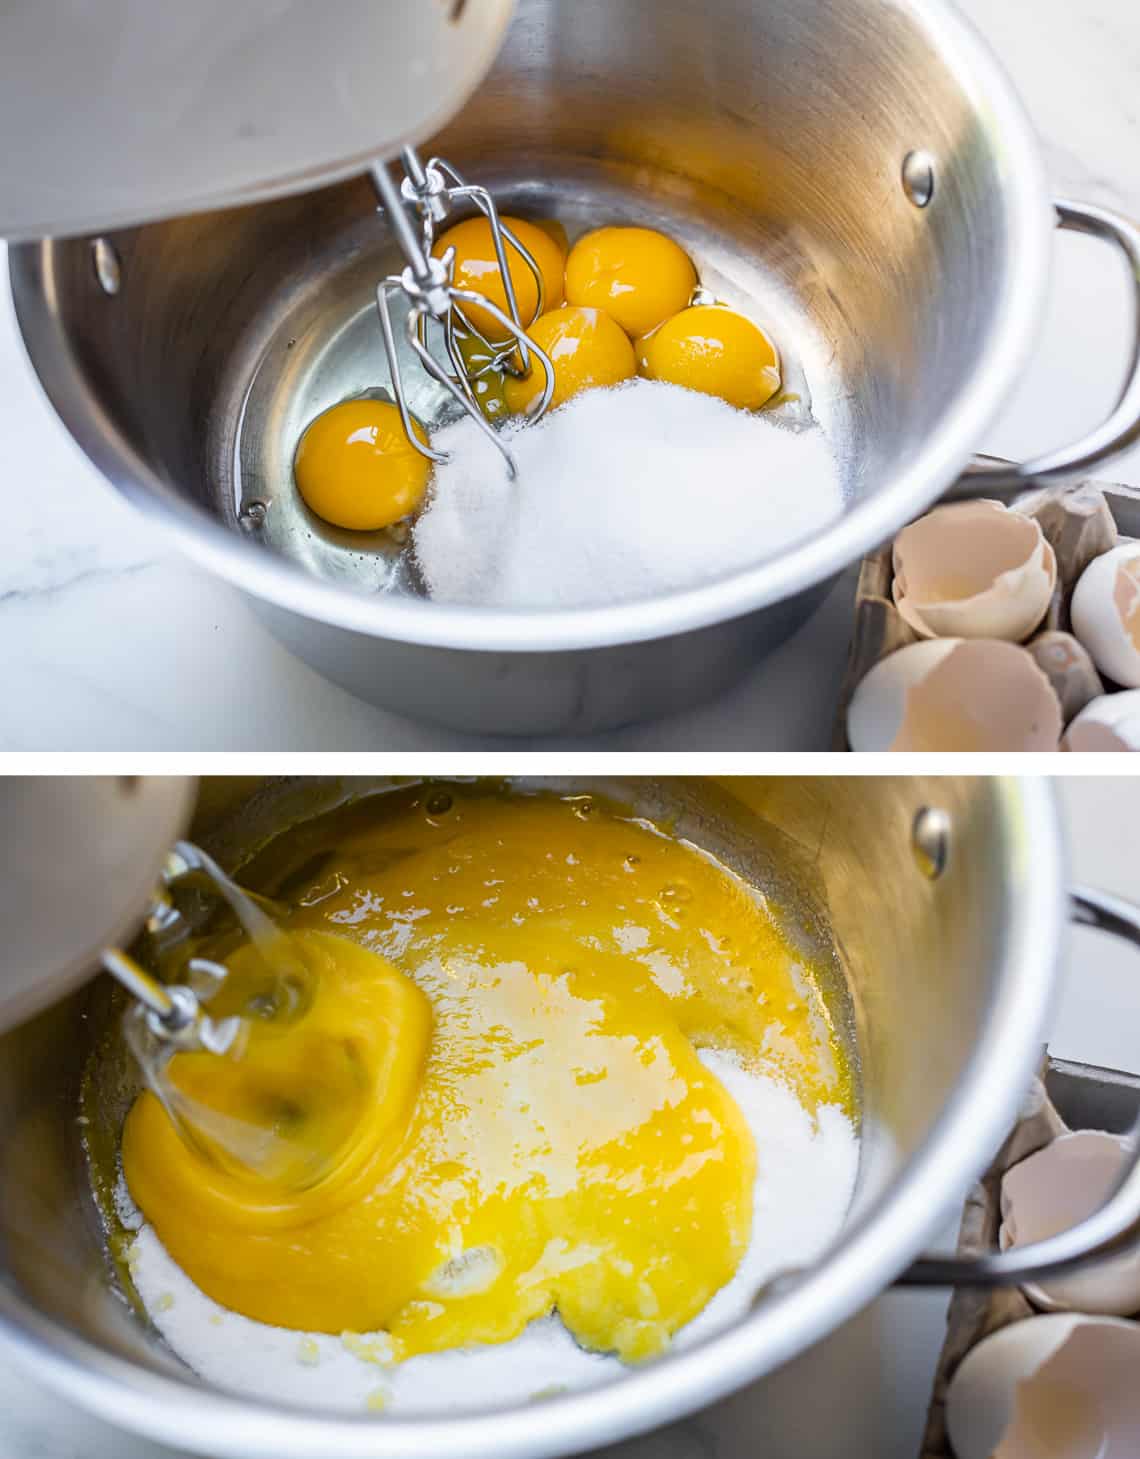
Add in some sugar and bust out your hand mixer. Beat until the mixture has lightened in color, see below. Using an electric mixer is my secret for this recipe. Can you get the job done with a whisk and some elbow grease? Absolutely! Your final product just won’t be as light and fluffy.
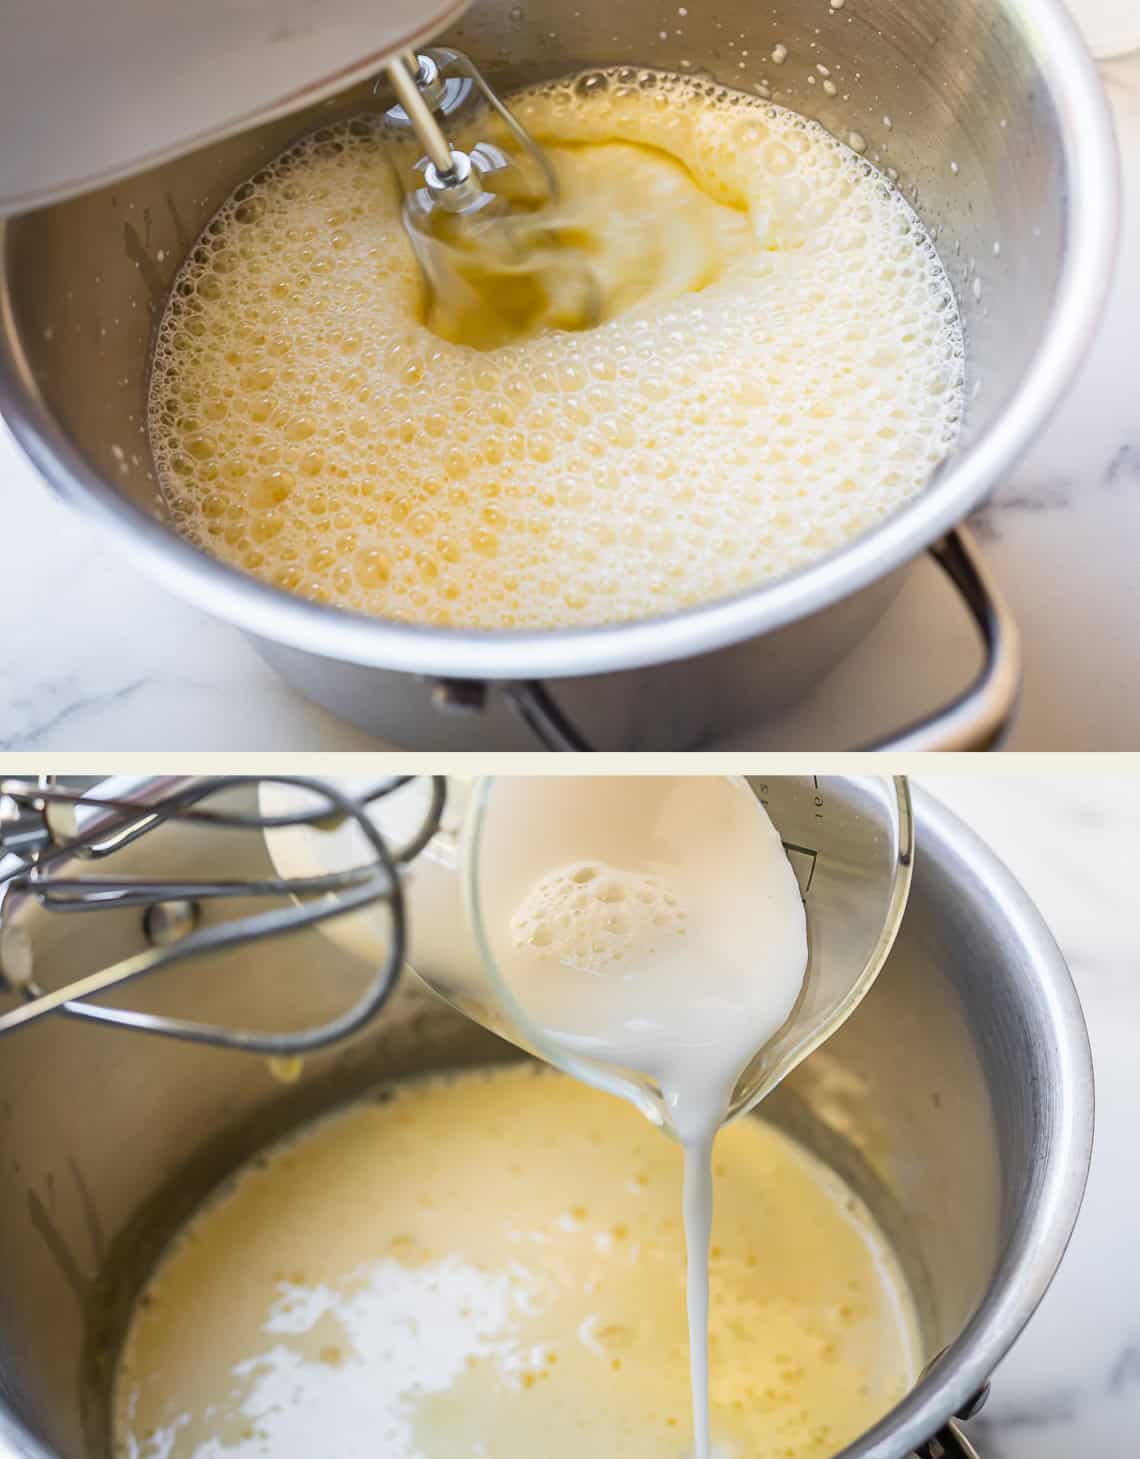
See how light the eggs are now?) Add in some cold milk and continue beating. It will get nice and frothy!
Add in the dry ingredients: cornstarch, high-quality unsweetened cocoa powder, and salt.
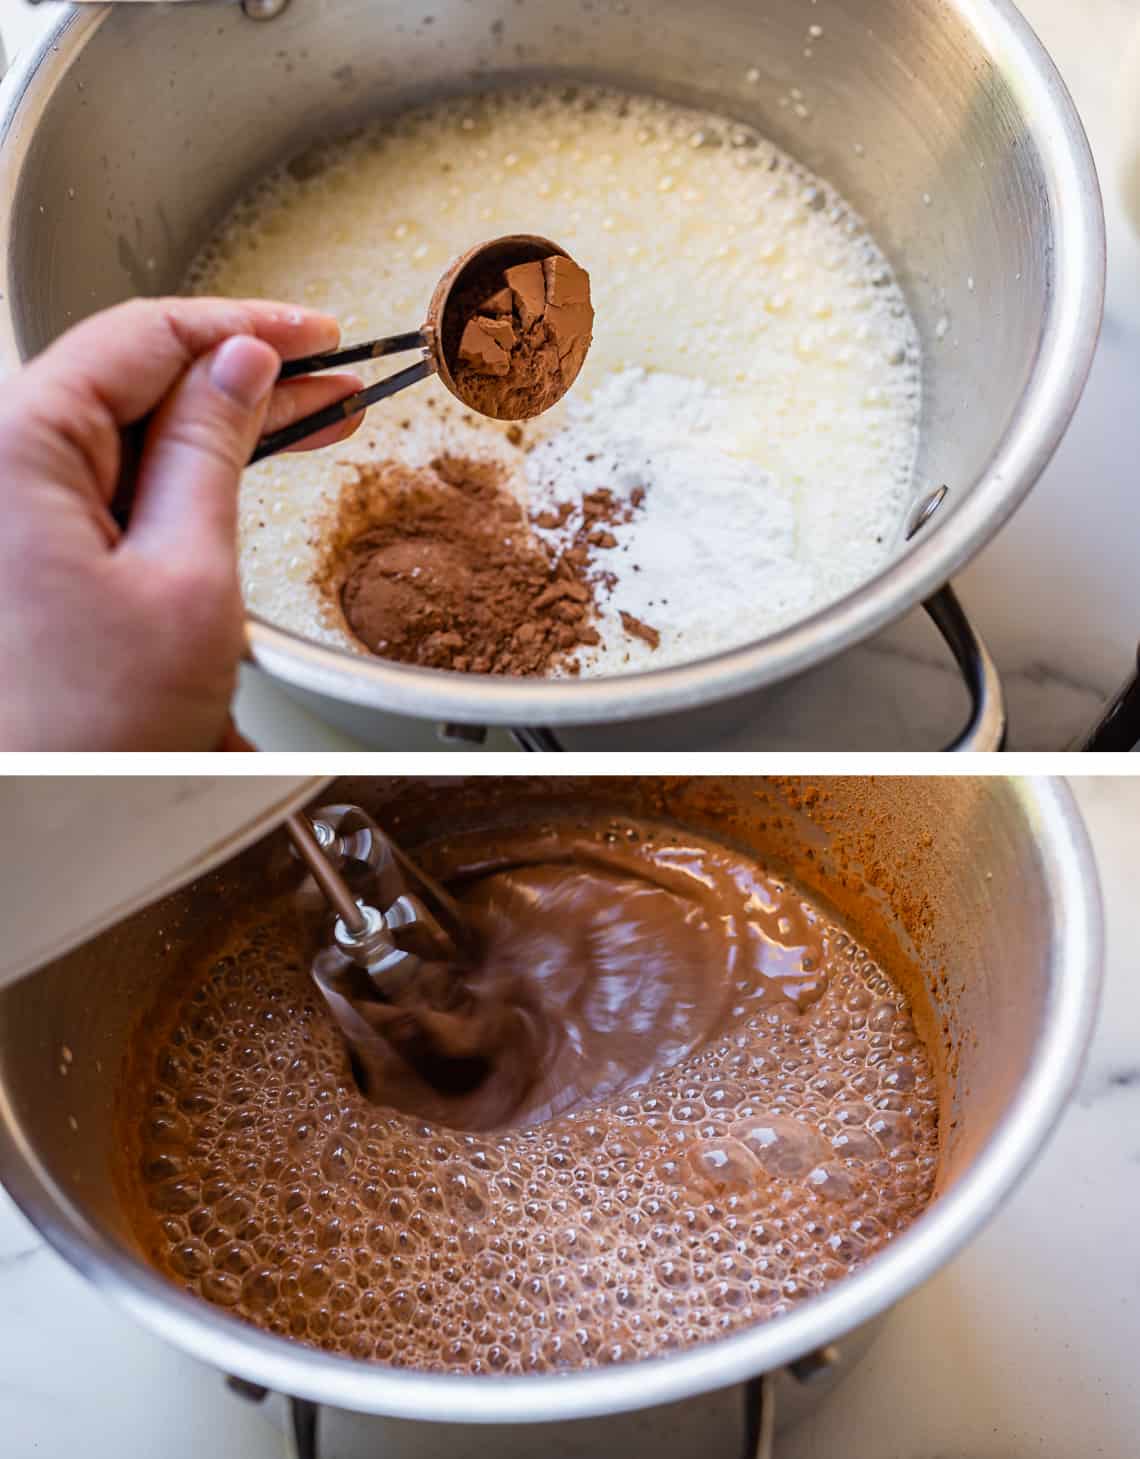
Beat it together and try not to choke on the cocoa dust cloud that’s about to poof in your face. Scrape down the edges!

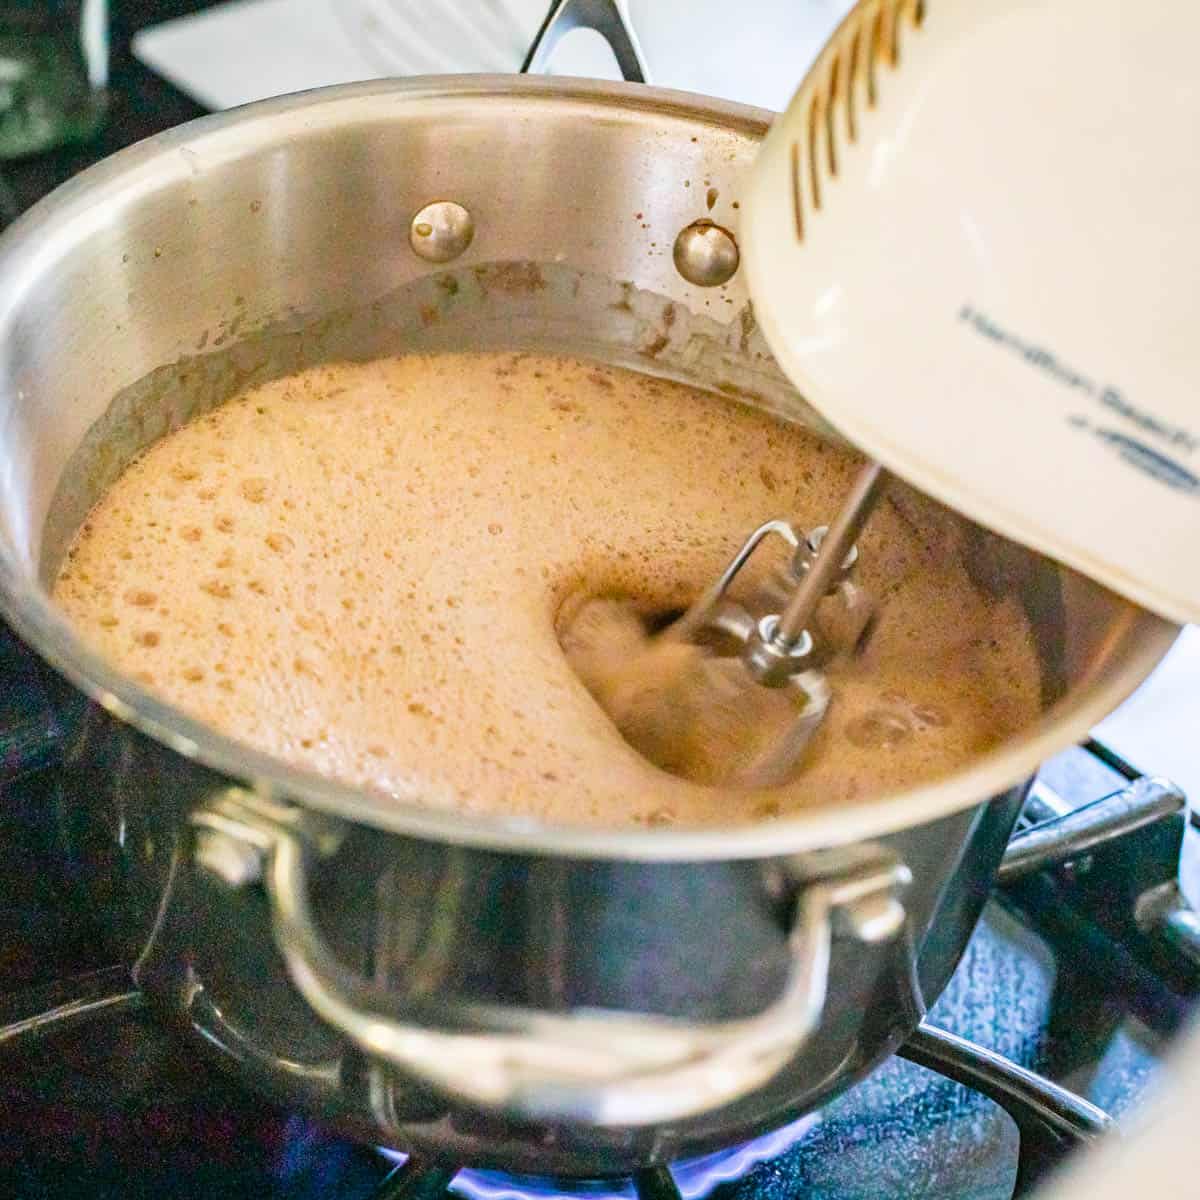
Meanwhile, heat up some milk and cream in the microwave. Get it really hot! I’m showing you my hack for tempering eggs. Usually, with pudding, you have to heat milk on the stove, beat your eggs in a separate bowl, pour some of the hot milk into the eggs while beating, then add the egg mixture back into the hot pan. I’m confused even describing it to you. It’s an annoying step.
Instead, thanks to the beater, we have ultra-whipped eggs already in our pan (which breaks up their proteins so they don’t bunch up. Bunched up proteins = scrambled eggs, exactly what we are trying to avoid, and the whole purpose of tempering).

Then we are adding hot milk/cream to the egg mixture with the beater on low.
Can you see the film on the top of the hot milk that I am pouring into the pot? Usually, this milk-film ends up just sticking to the dish you’re pouring from. No need to scrape it in. We want smooooth pudding. If it ends up in the pot, don’t sweat it.
Finally, finally, you can now move your pot to the stove. Sorry for this terribly grainy photo. It was dark, but I wanted to give you confidence to bring your mixer right onto your stovetop.
Turn the heat to medium and beat with the mixer one last time as it heats up. Turn off the mixer and switch to a whisk. I like these flat whisks better than the traditional style because they can reach into the corners of the pot better.
Keep your heat at medium and don’t walk away. Whisk your mixture every 30 seconds or so, and constantly toward the end. Say no to lumpy pudding. This mixture needs to be on the stove for 7-10 minutes. You are looking for a gradual thickening and a small pop of a bubble or two at the very end, no more.
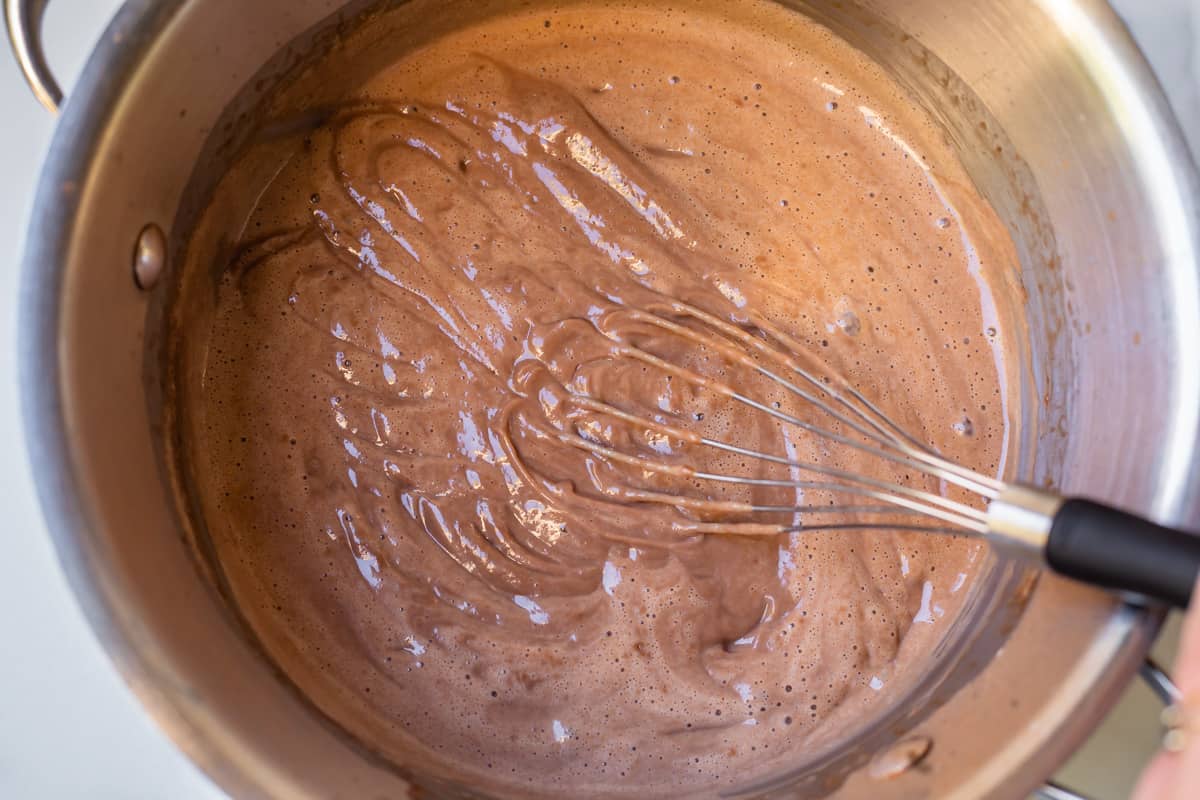
When you can drag your whisk across the top of the pudding and it leaves marks, you’re done. Remove from the heat immediately, and keep whisking whenever you can, as you bustle around adding the next ingredients.
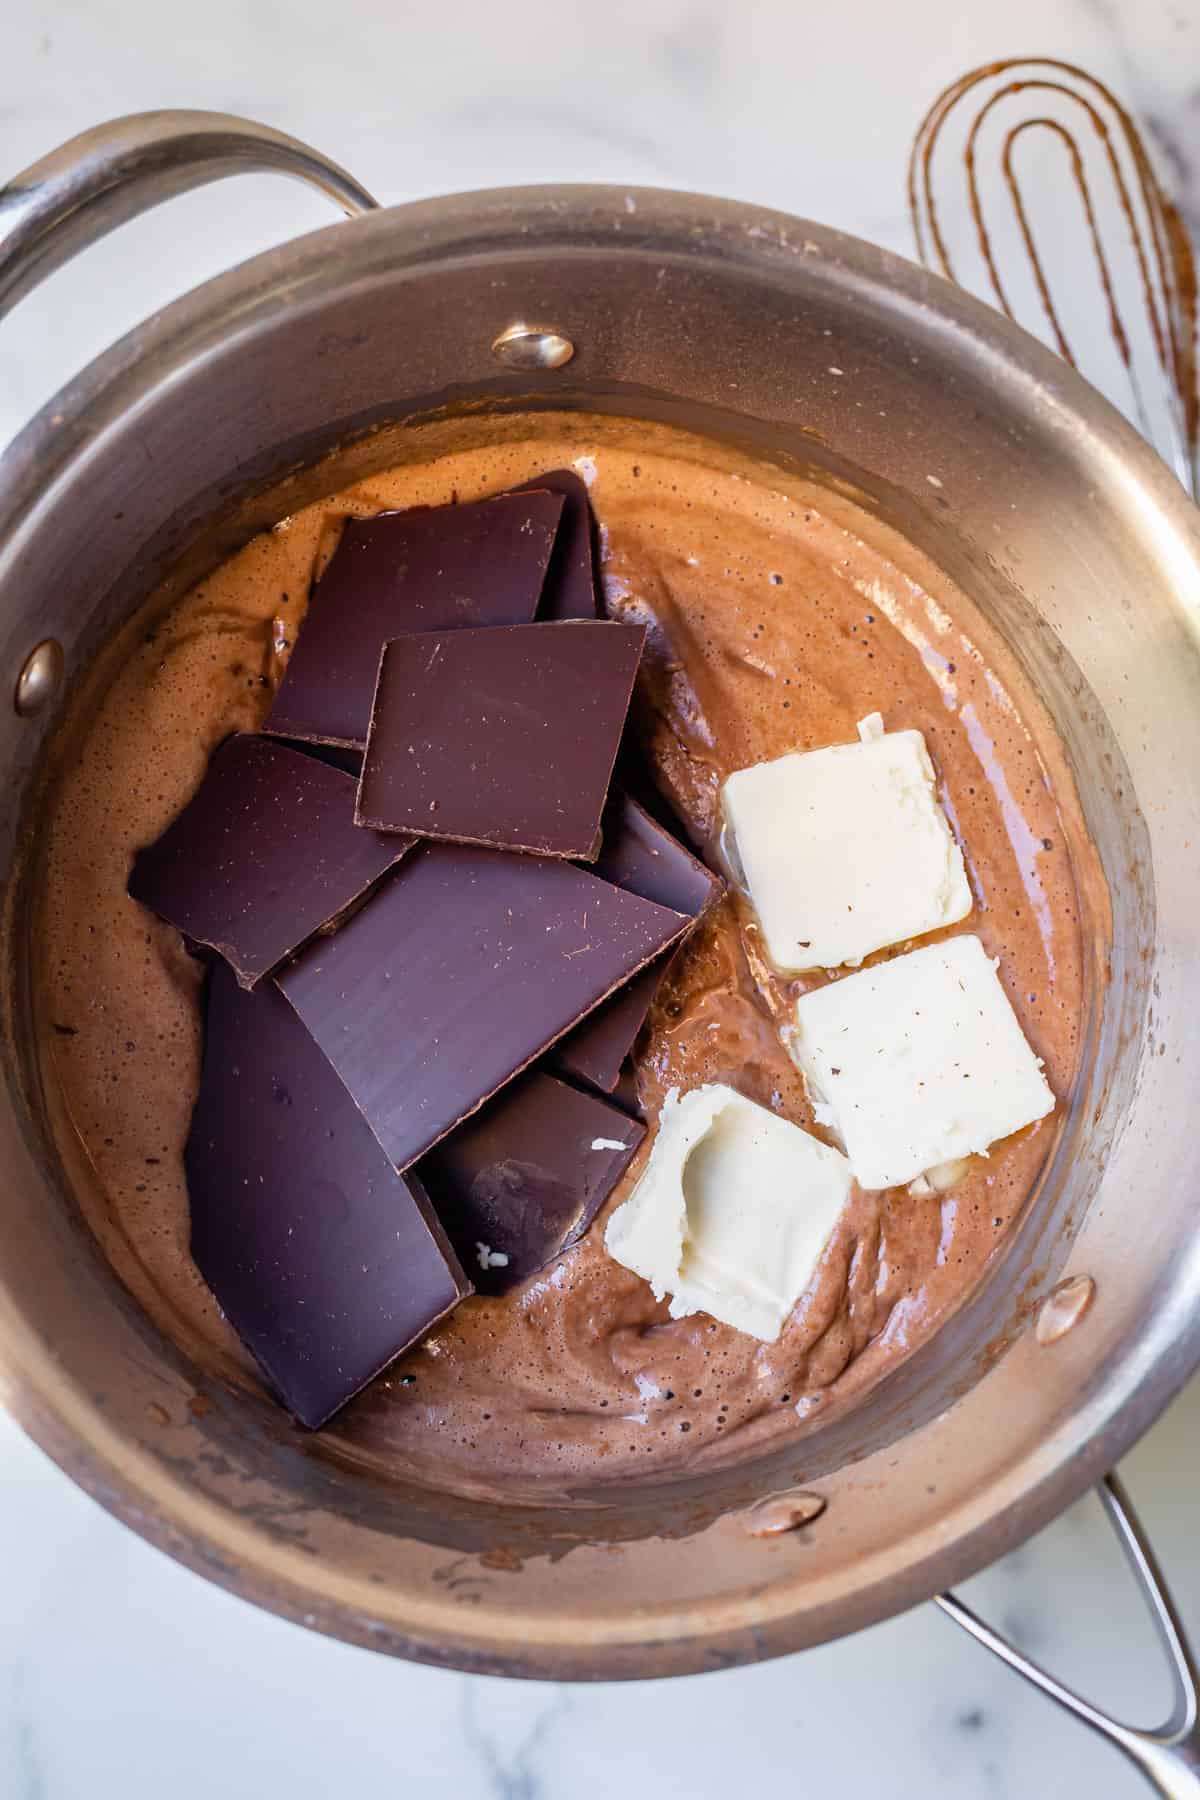
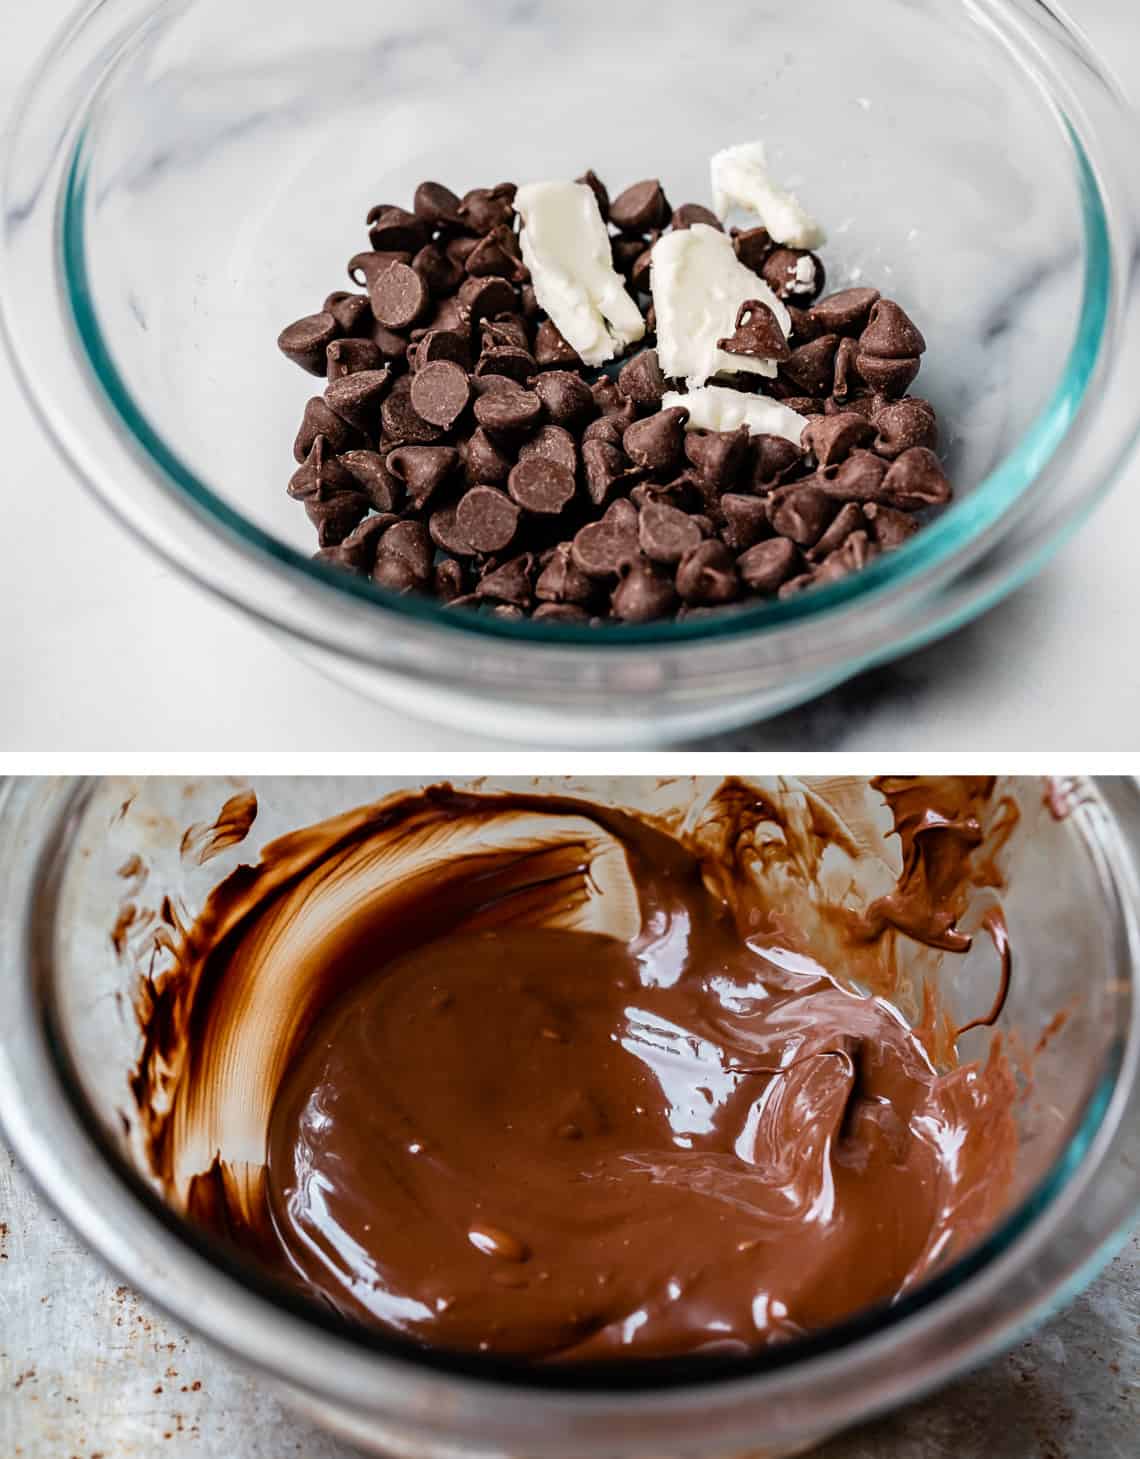
Immediately add 8 ounces of semi-sweet chocolate, a bit of unsalted butter, and some vanilla. Don’t use chocolate chips if you can help it! Buy a nice bar of semi-sweet chocolate; I prefer Ghirardelli. It’s higher quality and will melt more smoothly.
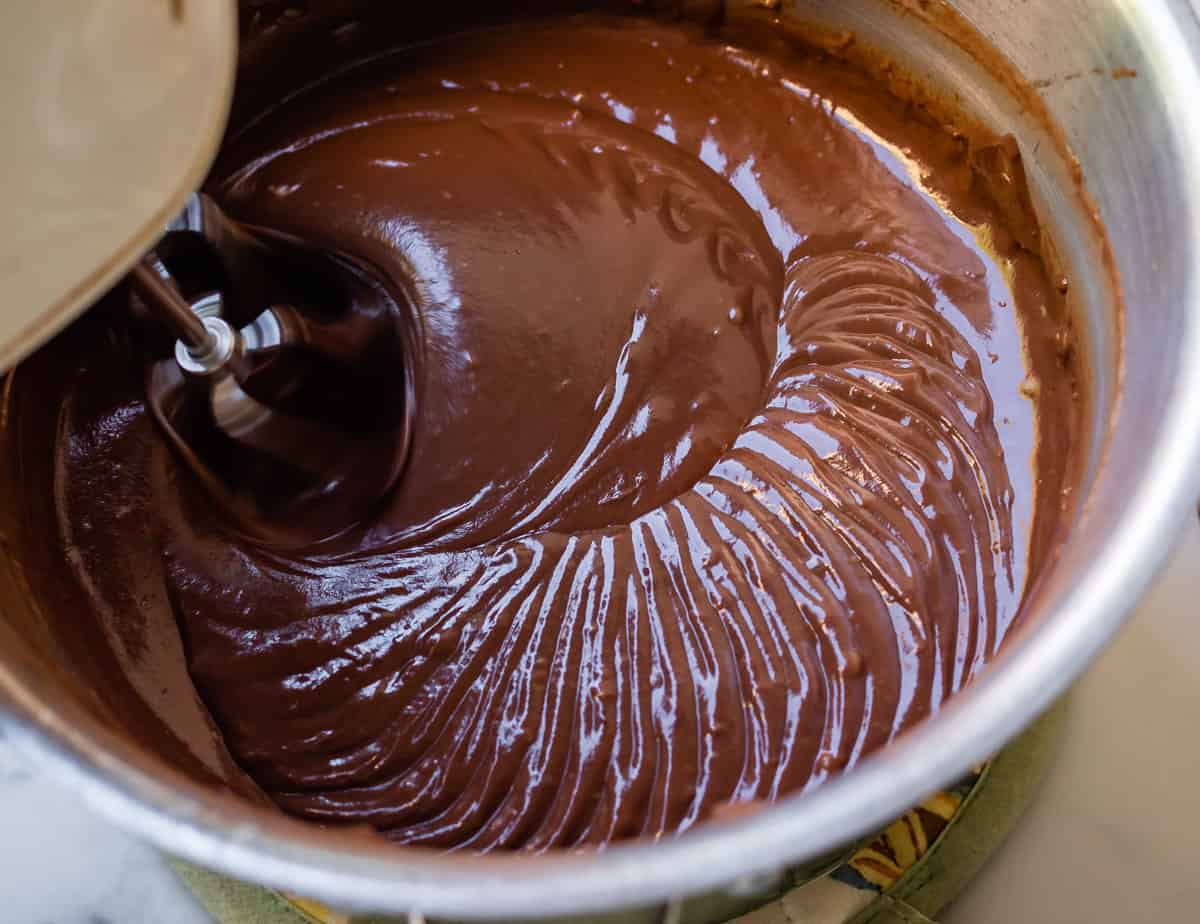
One last step! Bust out that mixer one more time! I know it might seem strange to beat the pudding at this point (it certainly already looks perfect), but I beg of you, don’t skip this step. It whips a bunch of air into your pudding, making it light and fluffy. You can’t get this texture any other way!
(Okay, that’s not true, one recipe I found called for transferring the whole mixture to a food processor and pulsing it, but who wants to do that? It was a huge pain, and beating with a mixer achieves the same effect.)
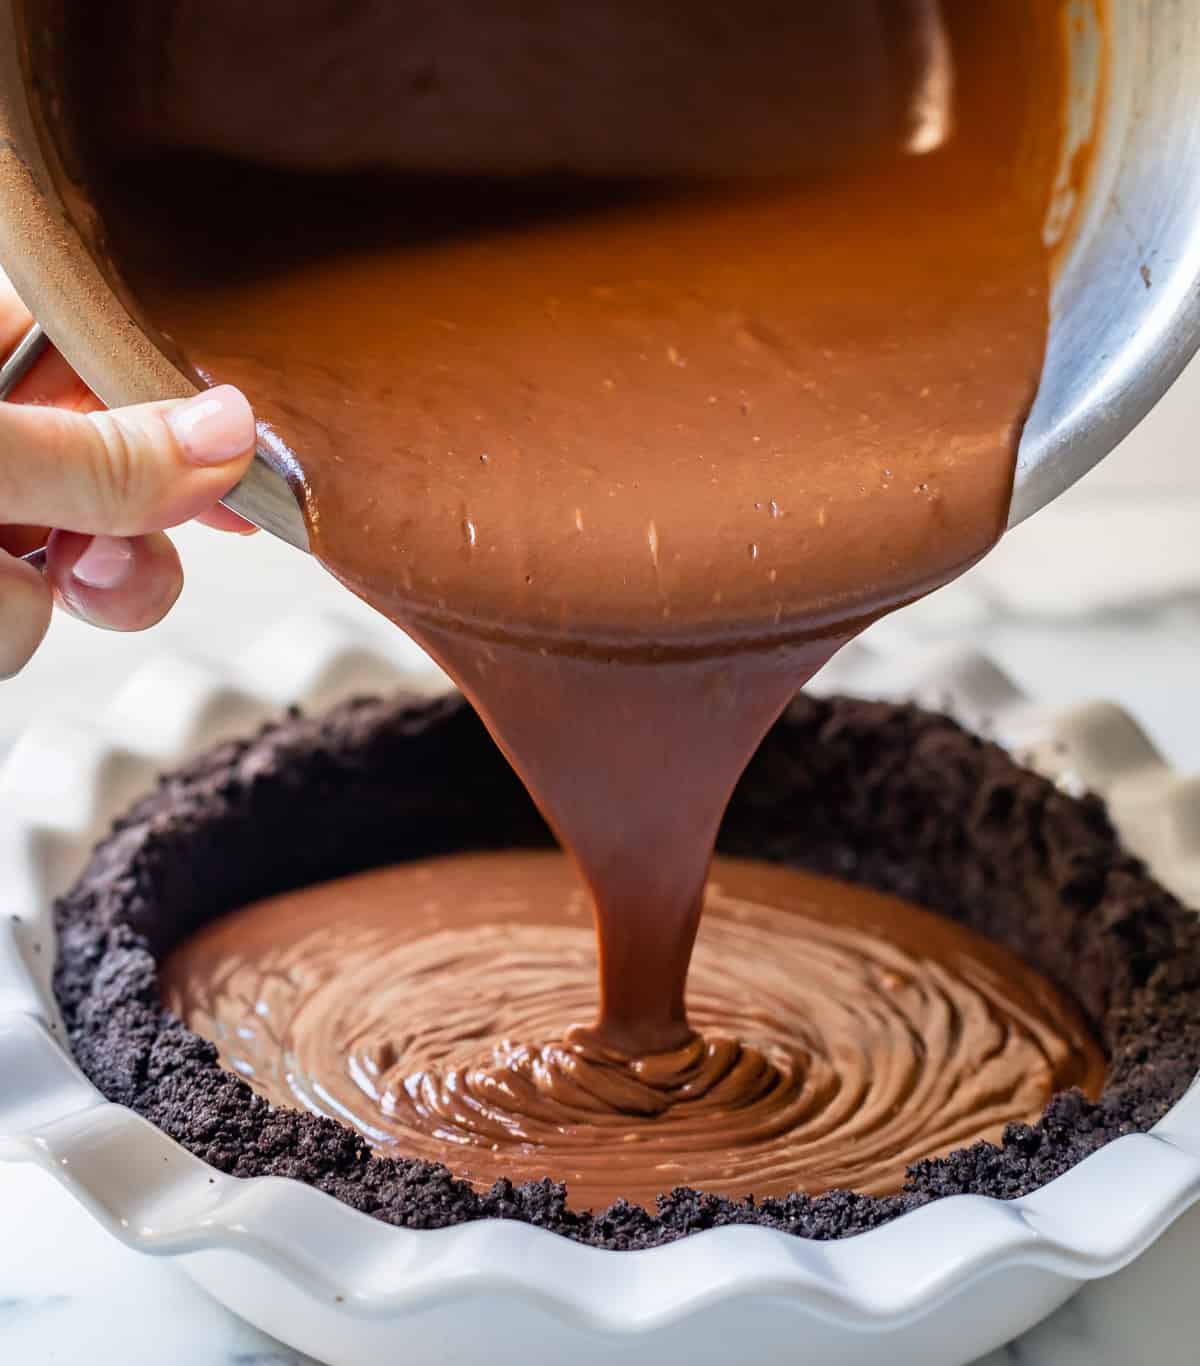
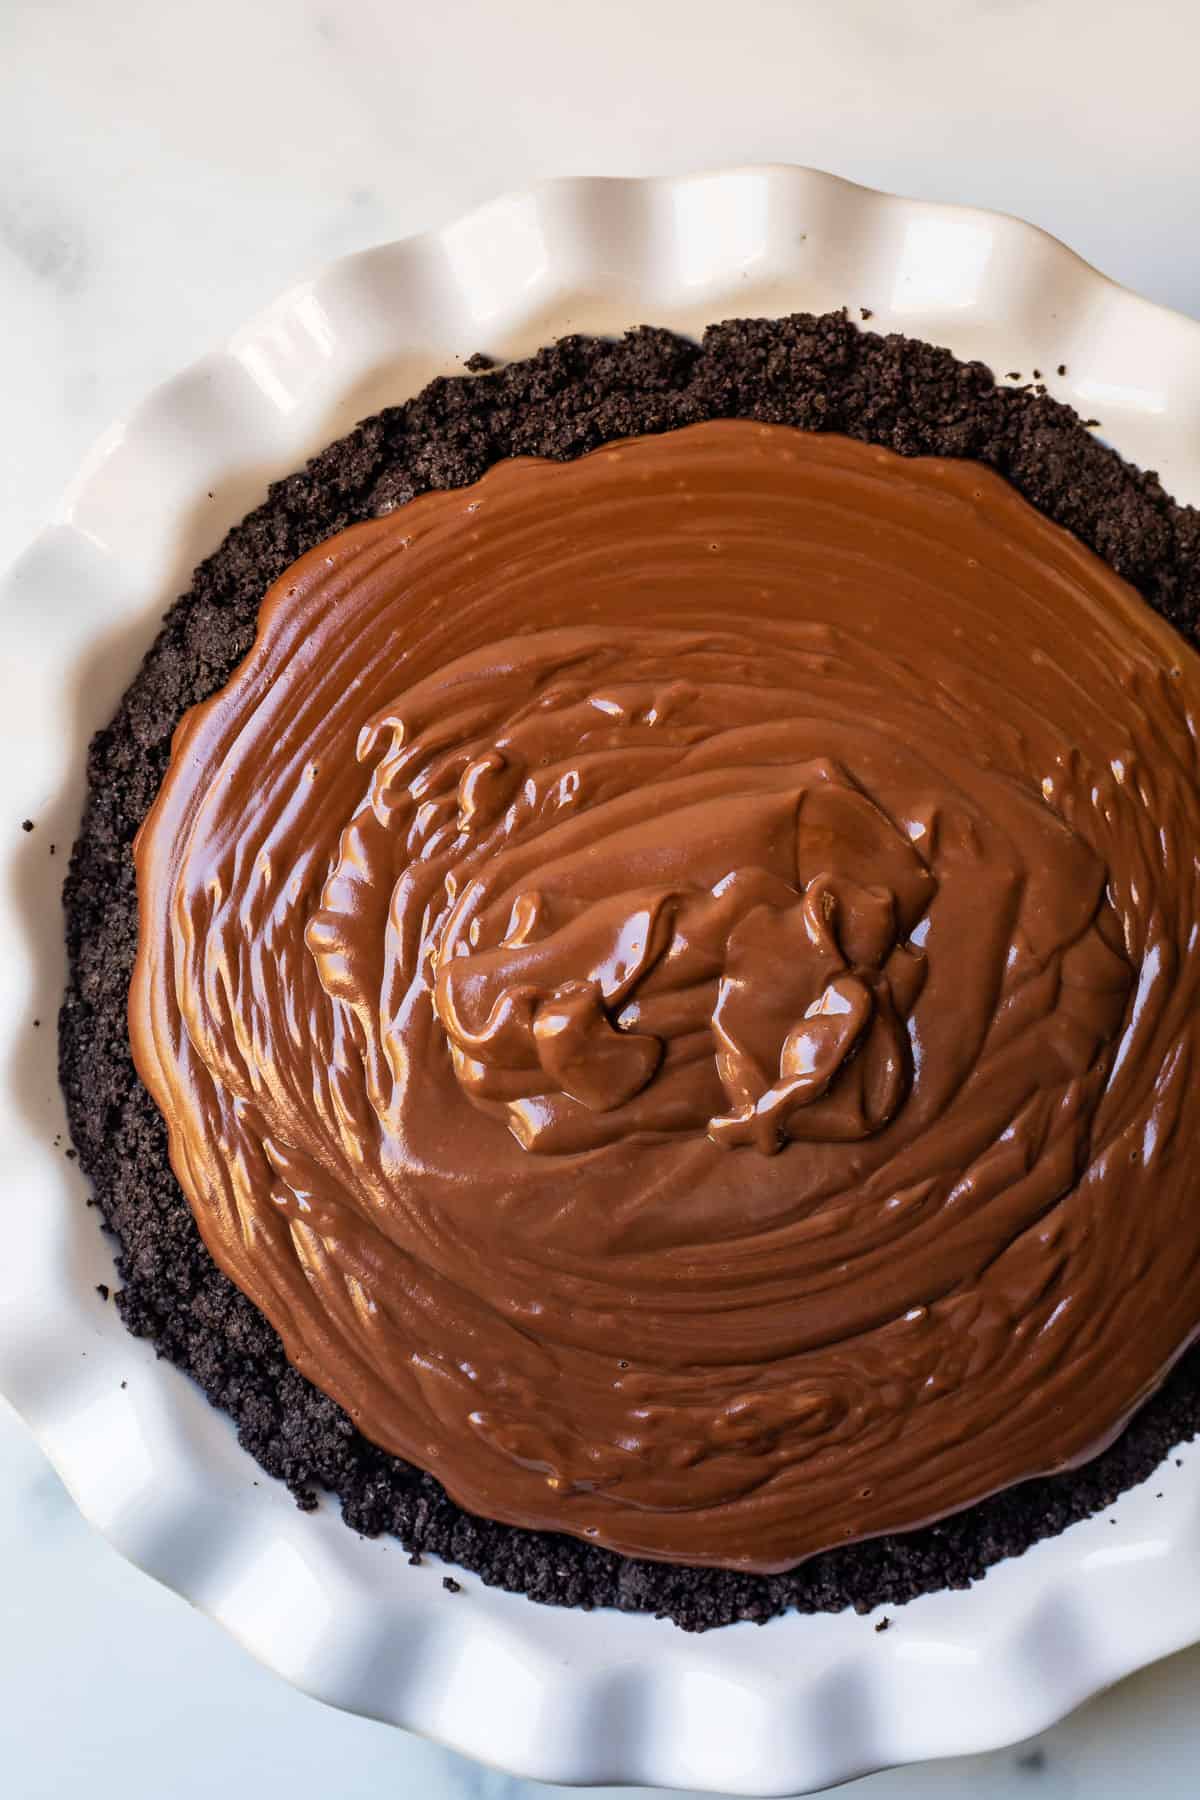
Immediately pour the hot pudding into your prepared pie crust. Don’t wait around. If pudding in the pot sits still for any amount of time, it forms a skin on top, and then when you mix it in (preparing to pour into the pie pan), that skin makes your pudding less creamy. Not the end of the world, but we want to avoid it if we can. Move quickly.
You might think there is too much pudding and it won’t fit in the pie pan. Just keep adding it a little at a time, you will be surprised. If you absolutely cannot fit more, scrape the rest into a small bowl for yourself and don’t tell anyone else about it. That’s an order. You made this pie, Little Red Hen; it’s yours.
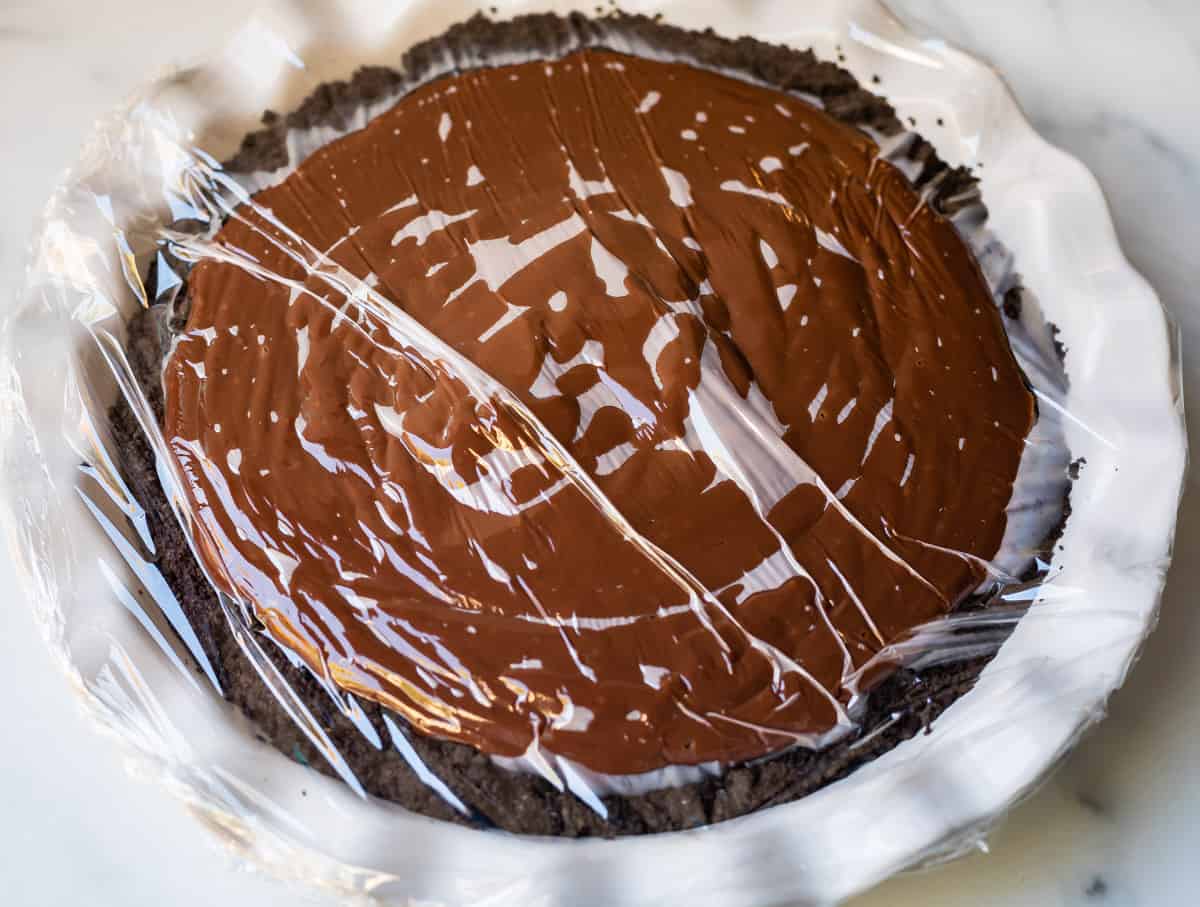
Cover the pie with plastic as soon as you can, pressing it right onto the pudding. This is to avoid the skin or film that forms on top. Then toss it in the fridge for 4 hours at the very least, 8 hours or overnight is even better! It’s the perfect make-ahead pie.
Curling chocolate for chocolate cream pie
While your pie chills, make some chocolate curls. They are super easy, but if you can’t handle one more thing, see recipe notes for a hack using a vegetable peeler and a bar of nice chocolate.
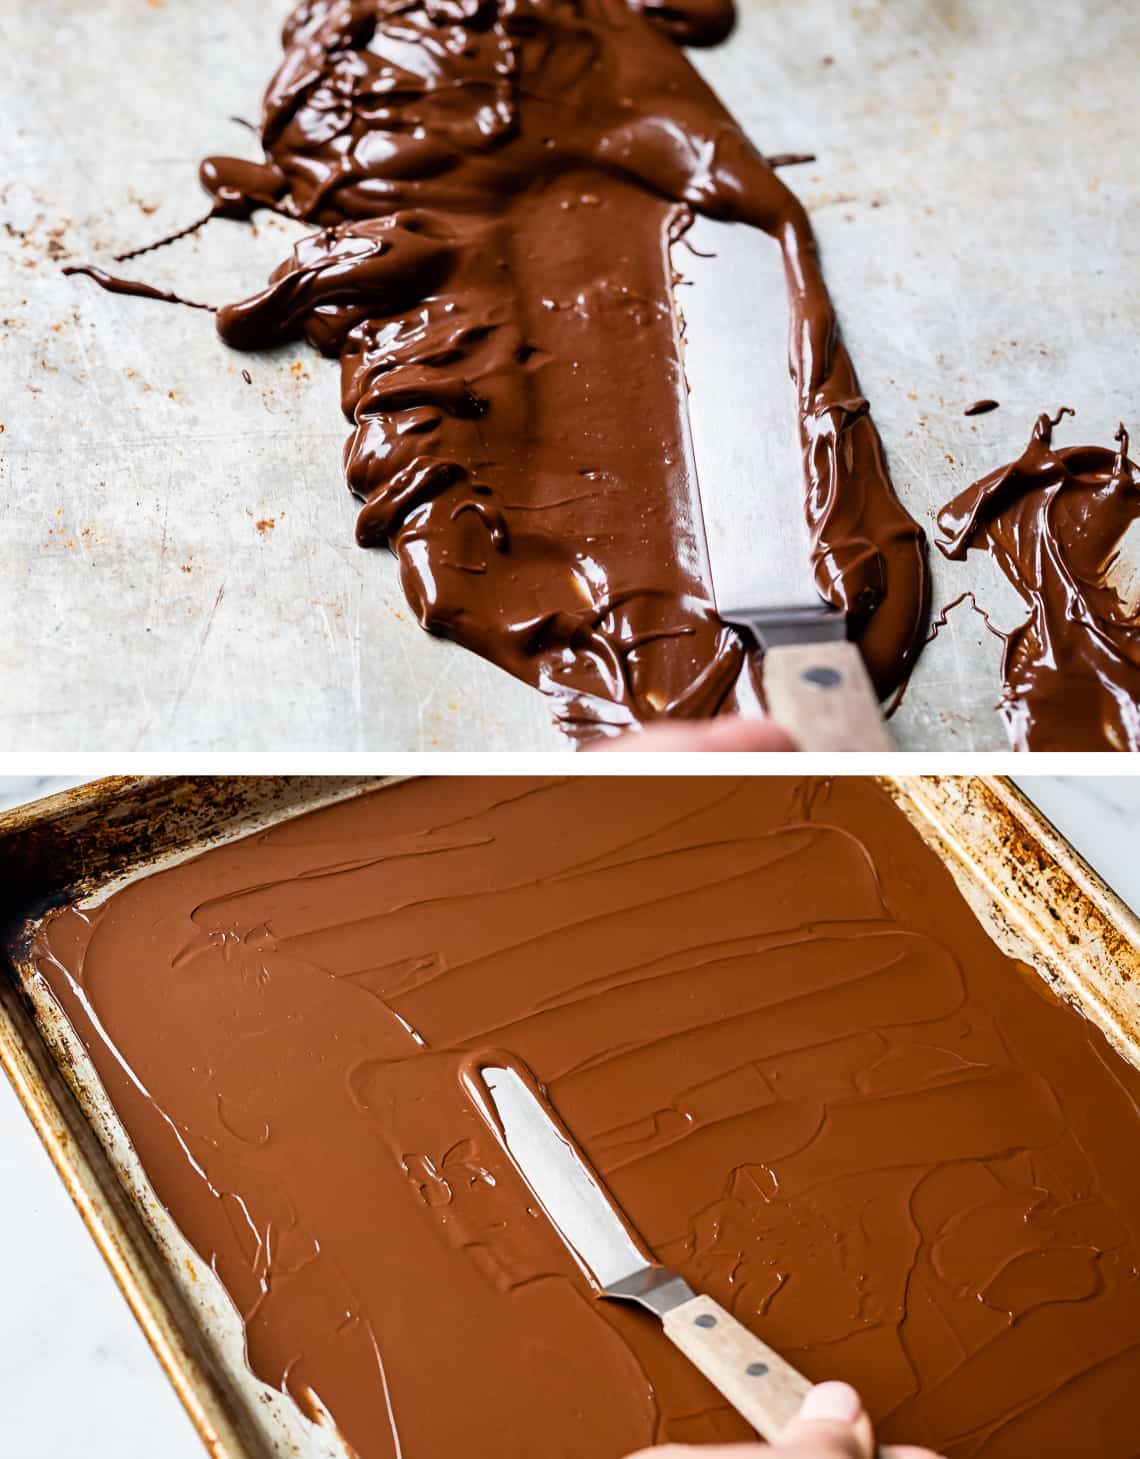
Melt the chocolate in increments in the microwave, stirring in between. When it is smooth, use an offset spatula to spread it onto a baking sheet.
Freeze for just a couple of minutes, it hardens very fast. Take it out and let it rest for a few minutes. If you try to scrape the chocolate now, it will come off in shards. Stick around and try again in one minute.
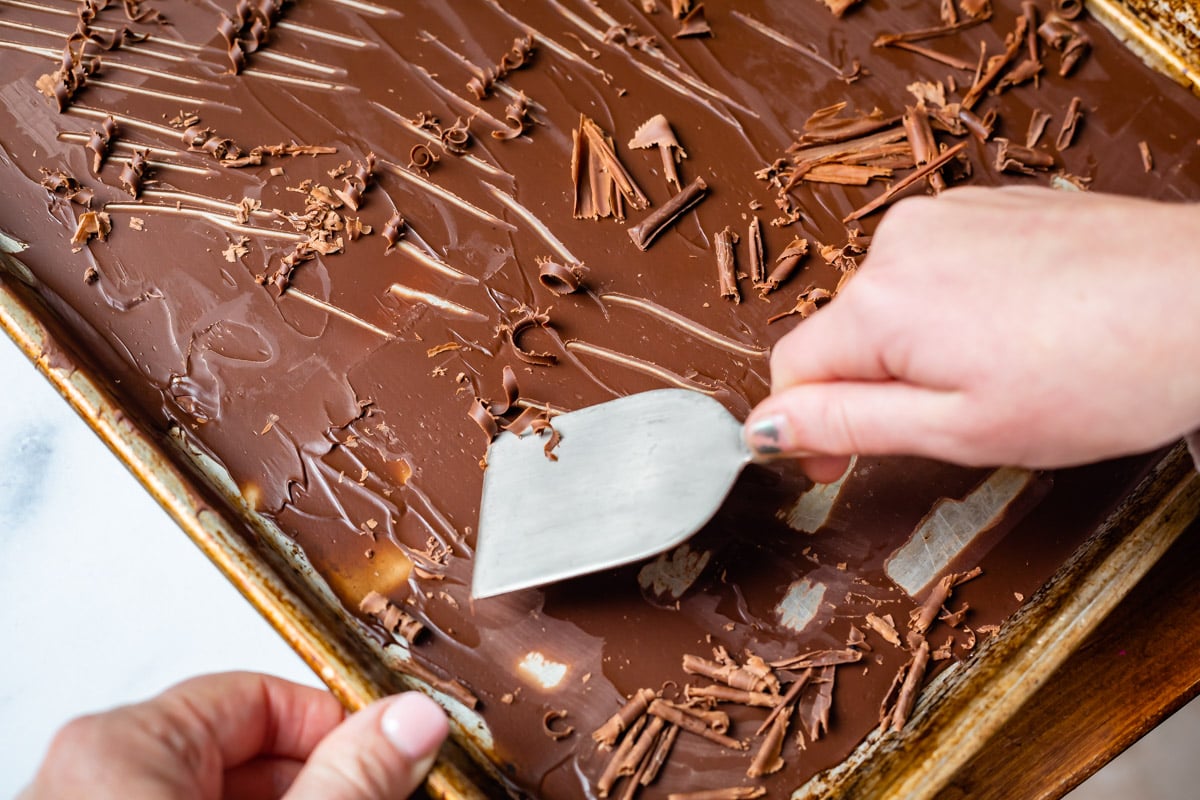
Keep trying until you get curls when you scrape with an upside-down spatula. You can use the full length of the spatula to get tightly rolled curls, or use just the edge to get these spiral curls.
If the chocolate gets limp and slumps instead of curls when you push with the spatula, it’s too warm. Stick it back in the fridge or freezer for a minute. Keep the curls chilled until you’re ready to serve your pie.
How to make easy whipped topping for chocolate cream pie
When your pie is completely chilled and the chocolate curls are ready to go, it’s time to make the whipped cream! {Since making this recipe, I’ve dedicated an entire post to how to make whipped cream – be sure to check it out for my most current tips and tricks!)
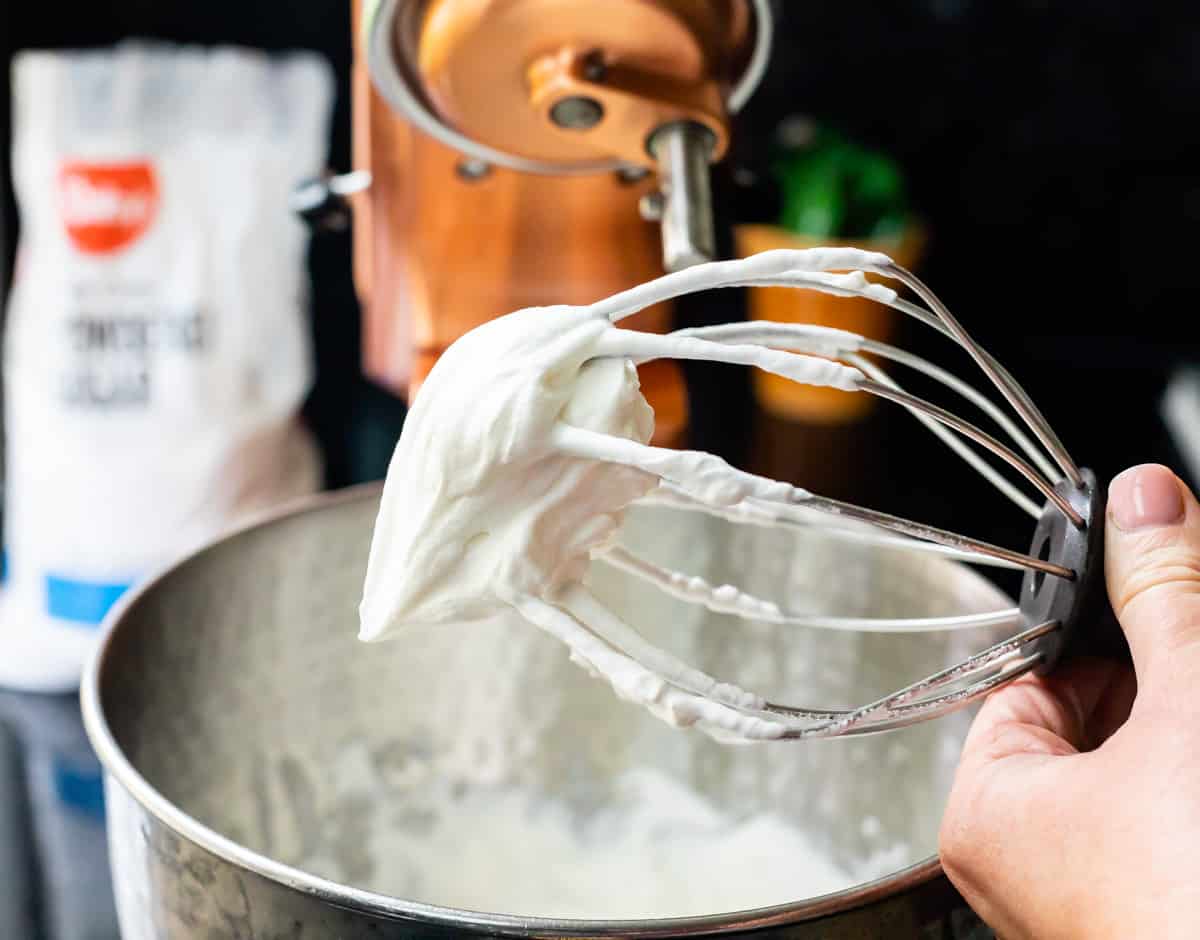
If you have the space, take a few minutes to chill your beater and bowl. It makes the whipped cream even lighter and fluffier.
Heavy cream is the same as whipping cream and ultra-heavy whipping cream. They just have different fat contents. Find the highest fat content available (Costco sells Darigold cream, which is 40%, the highest I’ve seen. Anything above 35% is fine). Some brands don’t even have this info available on the packaging, but if you buy anything called cream or heavy cream, you will be fine. (Don’t buy coffee creamer!)
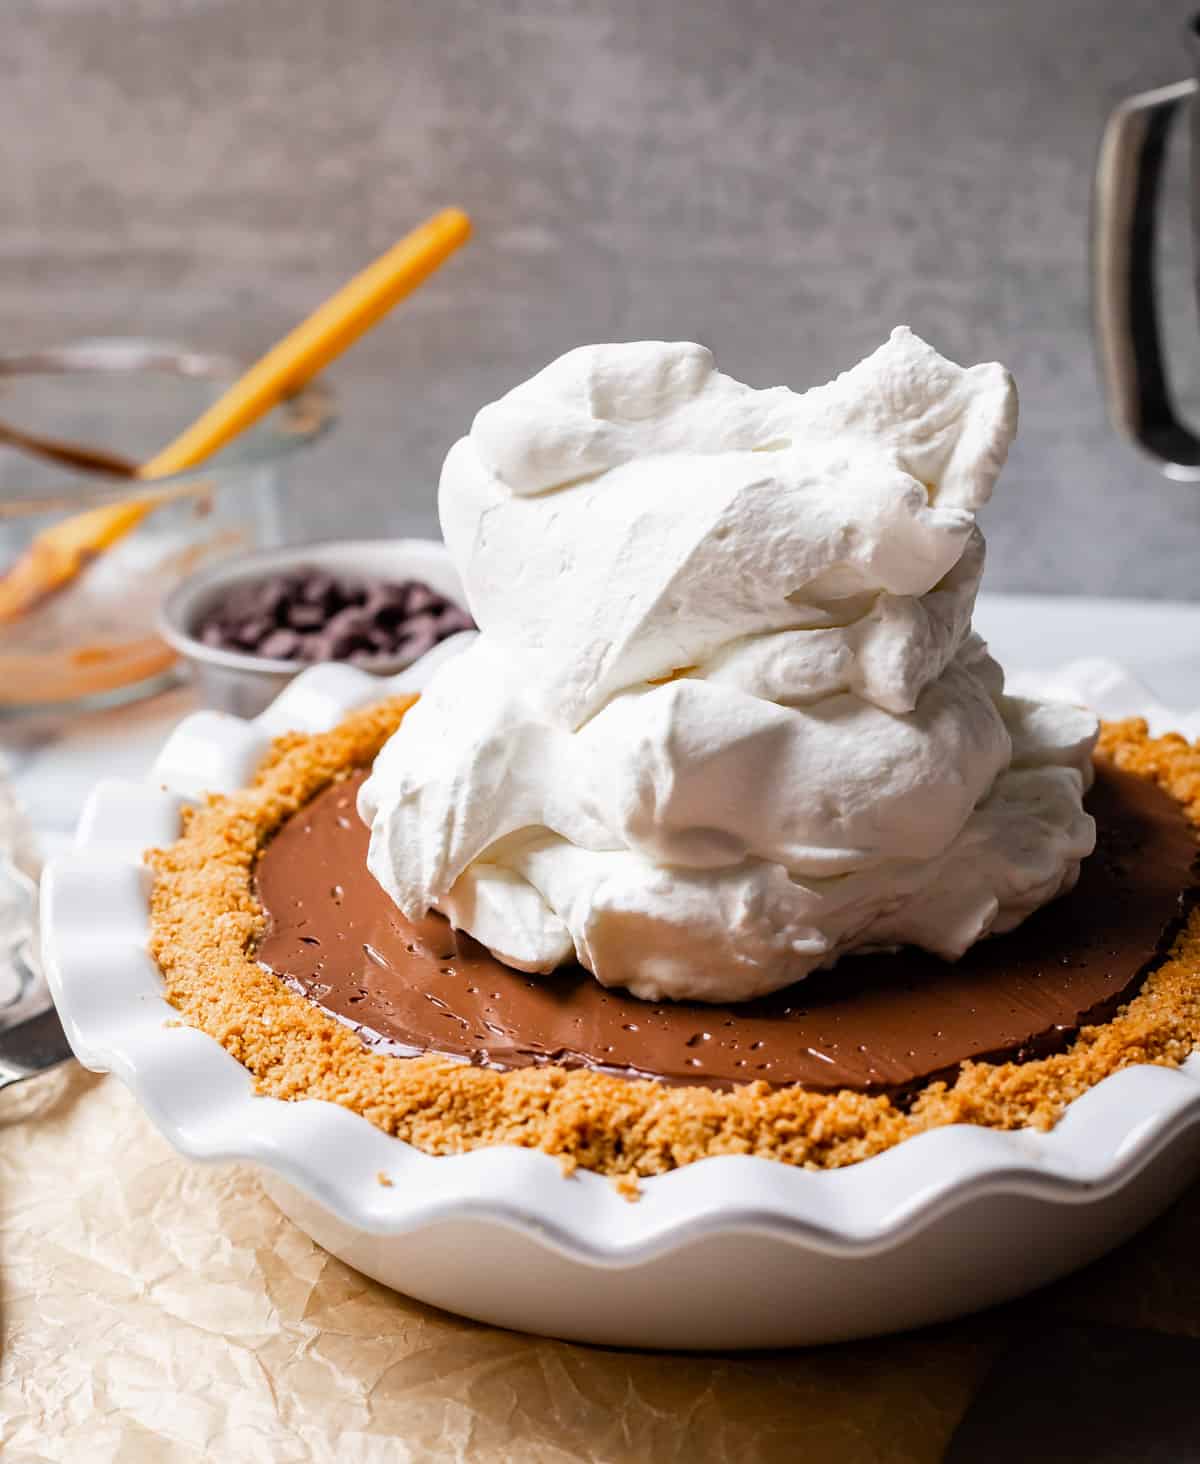
Then pile it on! There’s never too much whipped cream, right?

Sprinkle it with your chocolate curls and voila!
Best chocolate cream pie recipe tips
Here are my best tips for making this chocolate cream pie just right.
- Don’t skip the chocolate curls! They’re absolutely incredible. You can make them with a vegetable peeler or by melting chocolate, spreading it out, chilling it, and then creating the curls. It’s totally an appearance thing; they taste the same.
- Use an electric mixer to whip your eggs. Sure, you can use a whisk, but expect sore muscles the next day! I love my electric mixer, and it makes this job a lot easier.
- Whisk your pudding constantly. Just plan to be at the stove for 10 minutes during this stage. If you walk away, you can scorch the pudding on the bottom. And that’s just sad.
- Use a flat whisk. If you don’t own one, you don’t NEED one, but it’s totally worth it! It makes it super easy to get into the corners of your pot when you’re cooking the custard.
How to serve
Serve this pie in small slices. It is super rich! Or just go all the way and plan to unbutton your pants a little. I’m not judging. I don’t eat pie that’s not worth it. This pie is WORTH IT.
Do you need to refrigerate it?
YES! Don’t you go leaving this pie out after all your hard work. Pudding is meant to be eaten COLD COLD COLD, so chill it in the fridge as soon as you are done if there are leftovers. That said, if you are bringing your pie to an event, it can definitely sit out for a couple of hours at room temp, no problem. I just prefer the flavor and texture when it is ultra-chilled.
Try to top your pie with whipped cream at the very last moment before serving, but if you must do it ahead of time, covering it can be an issue. If you have leftovers, cover with plastic wrap and kiss your pretty presentation goodbye. If you are bringing the whole pie to a party, try sticking toothpicks into the top of the whipped cream, then gently covering the whole pie with plastic wrap. Then remove the toothpicks when serving. My grandma taught me this old trick!
Chocolate cream pie should last about 3-4 days in the fridge, but the longer you leave it, the soggier the crust will get.
Can you freeze a chocolate pie?
Yes! I know because I tried it. Works like a charm. The easiest way is to leave off the whipped topping, wrap it in plastic wrap, and then slip the whole thing into a large ziplock freezer bag or wrap well in foil. If you’re worried about the crust getting soggy, you can also freeze the crust and the filling separately and put the filling in the crust once both are thawed. Either way, the pie will be good for about two months in the freezer. To thaw, place on the counter for 2-4 hours or in the refrigerator overnight. Top with fresh whipped cream and chocolate shavings right before serving.
And that’s a wrap my friends! I’m honestly in love with this pie, you guys. Chocolate cream pie is a classic that you must have in your repertoire, and I’m so pleased that I finally have my “One.” I hope it becomes a new family favorite for you, too! Happy Thanksgiving, y’all!
More pies you’re going to love!
If you plan to make an epic dessert for any holiday, special occasion, or just because, pie is about as good as it gets. Here are some of my favorites!
- The Best Homemade Apple Pie >> easily my best, most popular pie recipe
- My Favorite Homemade Banana Cream Pie >> the other cream pie of your dreams.
- The Only Blueberry Pie that I Truly Love >> I used to hate blueberry pie until this recipe… it’s a keeper
- Creme Brûlée Pumpkin Pie >> like normal pumpkin pie but 1000x better because of the crackly brûlée top
- Pecan Pie Recipe with Buttery Streusel Topping >> you will win many friends with this one
- No Bake Cherry Cream Cheese Pie >> made in a snap, and SO good
- THE Chocolate Chip Pie Recipe >> super easy and tastes like a warm deep dish cookie
- Peach Apricot Slab Pie >> a perfect summer or anytime fruit pie
- The Best Zesty Key Lime Pie Recipe >> nice and tart, just the way it should be
- No Bake Peanut Butter Pie with Hot Fudge >> smooth and creamy deliciousness
- Cranberry Cherry Pie with Almond Glaze >> like classic cherry, but with a nice tart pop from the cranberries
- Marionberry Pie from Life’s Ambrosia
- Black Folks Sweet Potato Pie Recipe from The Soul Food Pot
- Buttermilk Pie from Well Plated
Facebook | Pinterest | Instagram
Chocolate Cream Pie Recipe (Easy)
Ingredients
For the Oreo crust (see notes for graham cracker crust)
- 25 Oreos
- 1/8 teaspoon kosher salt
- 1/4 cup butter, melted (half stick)
For the chocolate pudding
- 1 large egg
- 4 large egg yolks
- 1/2 cup + 2 tablespoons granulated sugar
- 1 cup whole milk
- 3 tablespoons cocoa powder
- 3 tablespoons cornstarch
- 1/2 teaspoon kosher salt
- 2 cups whole milk
- 6 tablspoons heavy cream
- 8 ounces high quality semi sweet chocolate, (I love using two Ghirardelli 4 oz chocolate bars)
- 3 tablespoons butter, chopped
- 1 and 1/2 teaspoons vanilla
For the chocolate curls
- 1/2 cup semi-sweet chocolate chips
- 1 teaspoon shortening, butter, coconut oil, or vegetable oil can be substituted
For the whipped cream
- 1 and 1/2 cups heavy cream
- 1/3 cup powdered sugar
- 1/8 teaspoon kosher salt
- 1 teaspoon vanilla
Instructions
- CRUST DECISION TIME: do you want Oreo, Graham, or regular pastry pie crust? If you want a pastry crust, see my How to Make Flaky Pie Crust post, then follow the instructions for How to Blind Bake a Pie Crust. Graham cracker crust instructions are in the recipe notes!
- Oreo crust: Add 25 Oreos and 1/8 teaspoon salt to a food processor. Pulse until the cookies have turned to fine crumbs. Add 1/4 cup melted butter and pulse again. (Or, crush Oreos with a rolling pin in a ziplock. Then melt butter in a bowl and add the Oreo crumbs to it, stirring well.)
- Scrape the mixture into the bottom and up the sides of a 9 inch pie pan. I like to use a drinking glass or a measuring cup to press the mixture into the corners. Make sure the crust around the edge goes up all the way to the top of the pie pan. Press the back of a spoon around the corners of the crust, you want a rounded edge, not a square edge.
- Bake the crust at 350 for 10 minutes. Let cool while you make the filling. (You can also skip baking entirely and just chill the crust in the fridge/freezer for 30 minutes. I much prefer a baked crust, it is crispier and more flavorful.)
- Make the chocolate pudding: Add 1 large egg and 4 large egg yolks to a 3-quart saucepan that is not on the stove. We're just using it like a bowl for now. Add 1/2 cup + 2 tablespoons granulated sugar.
- Use a hand mixer to beat the eggs and sugar together for 1 minute, until the mixture is fluffy and has turned a light yellow color.
- Add 1 cup whole milk and beat again with the hand mixer until bubbly.
- Add the dry ingredients: 3 tablespoons cocoa powder, 3 tablespoons cornstarch, and 1/2 teaspoon kosher salt. Carefully beat with the hand mixer on low speed, trying to minimize the cloud of cocoa powder. Beat until the mixture is frothy and all the cocoa is incorporated.
- Meanwhile, add 2 cups whole milk and 6 tablespoons cream to a glass measuring cup (or bowl with a spout.) Heat in the microwave for about 2 minutes. The mixture should be very hot and bubbling on the top.
- With the beater on low speed, add the hot milk to the egg mixture, pouring slowly. If a skin has formed on top of the milk, you don't need to scrape it in. (usually it ends up sticking to the dish you're pouring from). Continue beating until frothy. (keep the mixer handy)
- Move the saucepan to a burner on your stove and turn the heat to medium. Use a whisk to continue stirring the mixture over the heat. I love flat whisks best of all because you can get in the corners of the saucepan.
- Cook the mixture over medium heat for about 8-10 minutes. You need to stick around and stir at least every 30 seconds for the first few minutes, and then toward the end, stir constantly with the whisk. The pudding is done right when it starts to bubble, and when the whisk leaves marks when dragged across the surface. Remove from heat immediately and keep whisking when you can.
- Meanwhile, break up the two 4-ounce semi sweet chocolate bars into pieces, and chop 3 tablespoons of butter. When the pudding is off-heat, add the semi sweet chocolate, chopped butter, and 1 and 1/2 teaspoons vanilla. Whisk until smooth.
- Bust out that hand mixer one more time, no need to wash the beaters. Beat the finished pudding for about 1 minute. Don't skip this step! It gives the pudding a light, airy texture that totally makes this pie!
- Pour the beaten pudding into the cooled pie crust. You might think it won't all fit, but keep scraping, you will be surprised. Add the final drops to the center of the pie. If you think one more drop of pudding will absolutely overflow the pie, then scrape the remainder into a small bowl for yourself and devour immediately. You won't be sorry.
- Press plastic wrap directly on top of the pudding right away, or you risk a film or skin forming on the top. Refrigerate the pie for at least 4 hours, or overnight is best.
- Make chocolate curls.* Add 1/2 cup semi-sweet chocolate chips and 1 teaspoon shortening to a small bowl. Microwave in 30 second intervals until almost melted, then stir until smooth. Use an offset spatula to spread the chocolate in a very thin layer on a large baking sheet. Freeze for 5 minutes until the chocolate is hardened, then let rest at room temperature for 1-2 minutes. Scrape the chocolate into curls using an upside down metal spatula, or any flat metal kitchen tool. When the chocolate is the right temperature, it will curl. If it is just coming off in shards, it's too cold. Wait a minute for it to warm up. If the chocolate you scrape is limp, it's too soft. You can always put it back in the freezer if you need to. Gather the chocolate curls and store in the freezer until you are ready to serve your pie.
- Make the whipped cream. Chill your bowl and whisk attachment (or beaters) in the fridge for a few minutes if you have time.
- Add 1 and 1/2 cups heavy whipping cream to the chilled bowl and beat on high speed. Add 1/3 cup powdered sugar, 1 teaspoon vanilla extract, and 1/8 teaspoon kosher salt.
- Beat for 1-3 minutes, depending on how powerful your mixer is. Keep an eye on it and don't walk away. Over beaten whipped cream is so sad (I accidentally do this all the time). You want to stop beating when your whipped cream is still very smooth. You should be able to hold a beater horizontally and the whipped cream stays up. Don't beat it so much that you can see air bubbles. It should not look textured. Spread the whipped cream over the chilled pudding, spreading not quite to the edges so that the chocolate pudding is still visible.
- Decorate the whipped cream with chocolate curls and serve immediately!
- This pie freezes very well before adding the whipped cream. Store well-sealed in the freezer for up to 2 months. Let thaw completely in the fridge, then top with whipped cream and chocolate curls and serve!
Notes
- 2 & 1/4 cups graham cracker crumbs (1 and 1/2 packages, about 13.5 full crackers)
- 2 tablespoons granulated sugar
- 1/4 teaspoon kosher salt
- 7 tablespoons butter, melted


Friends, this is the absolute best recipe and pie I have ever made! Follow it exactly all the way through, but be sure to break up your chocolate bars very small before dropping in the mix. If the mixer hits large chunks, you will have chocolate everywhere! Haha. Trust me! My family devoured this pie. I used Baker’s semi-sweet bars and Ghirardelli 100% cocoa. Be sure to make your own whipped cream and chocolate shavings too. I can’t say enough about this pie.
How do I fix it if I messed up with the pudding ? I didn’t cook long enough on the stove and it’s runny. It’s already in the shell (and chilled ) because I was hoping it would set in the fridge overnight .
Hi Aimee, so sorry your pudding didn’t set up! After attempting the chill (and putting it in the shell) it’s probably best to start from scratch. Hope your next batch turns out perfectly!
It is a wonderful recipe. I can hardly wait to share it with my grandchildren tomorrow.
Gosh this was so good! I didn’t use as much chocolate since I only had one bar but it was perfect! I also made with the graham cracker crust which was the move so it wasn’t toI chocolaty.