
I love this Easy Homemade Pizza Recipe! I have been perfecting this recipe for years. It is quick to put together and so versatile. I’ll give you lots of tips, tricks, and ideas to get the best homemade pizza to ever come out of your wimpy, not-wood-fired oven!

Yesterday my 18-month-old son Edison was snuggling with me after waking from his nap. He saw a large freckle I have on my arm. Reached out his finger to touch it. Then dove in and tried to take a bite out of it.
Chocolate or freckle? Chocolate or freckle??? I mean there’s only one way to find out.
Have you guys heard of that Japanese game show where they lock people in a room and whoever finds the piece of furniture made of chocolate first, wins? For real. Contestants have to go around biting chairs and door handles.
I’m sure they’d never let toddlers onto the show, but if they did I’d be willing to bet a lot of money that Edison would destroy all contenders. I have the bite marks to prove it!! Little monster!
How do you make a good Homemade Pizza?
Are you a pizza person? (Is there a person who is not a pizza person?) We do pizza every Friday at our house! We usually make it right here at home. (not always. Sometimes you just need to order pizza, amiright?) I’ve been making homemade pizza for years and years, and have lots of tips and tricks to share.
Today’s post is part of a 3-part series! First I shared my recipe for Easy Homemade Pizza Sauce. Then I posted about Pizza Dough and everything you need to know to get the perfect crust. Today we are putting it all together to make the best homemade pizza! Way more tasty than eating (chocolate?) freckles.
Tips for making homemade pizza:
Here are the basics. I go into LOTS of detail in the post below, (and in my two sister posts, Pizza Sauce and Pizza Dough), so keep reading for more info.
- Use a homemade dough with lots of flavor. I will bore your brains out about how to achieve this in my Pizza Dough post.
- Use a decent Pizza Sauce (here’s my recipe)
- Preheat your oven at least 30 minutes. Yes, really, set a timer. I don’t care when your oven beeps to let you know it’s reached the right temperature. Wait 30 minutes.
- Par bake your pizza crust to make sure your pizza has a crisp bottom and a cooked center
- Use a pizza stone for crisp edges. Sorry, this is kind of nonnegotiable. Your oven sucks at pizza making. You need a hack.

How to make Homemade Pizza – Step by Step
The best part about pizza is that it is actually pretty quick if you have everything ready to go. I’m going to share my exact method for baking pizza that I have been using for about 10 years now. It’s tried and tested, and results in delicious, crispy-edged, perfectly cheesy pizza every time.
The first thing you must do is preheat your oven up as high as it will go. It takes longer than you think to heat your oven up all the way! You want to give your oven at least 30 minutes to preheat. If you have a pizza stone, make sure it’s inside the preheating oven.
What temperature do you cook homemade pizza?
The answer is always going to be: as hot as your little oven can go. For nice ovens, this can be up to 550 degrees F. For kinda crappy ovens, they are not going above 475 F. Pizza is traditionally cooked in 900 or 1,000 degree ovens. We can’t get our ovens at home quite that hot, but we want to get as close as we can. Figure out what your oven can do and crank up the heat.
Have towels ready to go by your smoke detector! If you have any food particle that drops to the oven floor (oil, sauce, cheese), it will start smoking and set off your alarm right away.
How to roll out pizza dough
Start out with about 12-16 ounces of dough. I worked really hard to perfect my Pizza Dough recipe and highly recommend it! But any pizza dough, homemade or store bought, will work for this recipe.
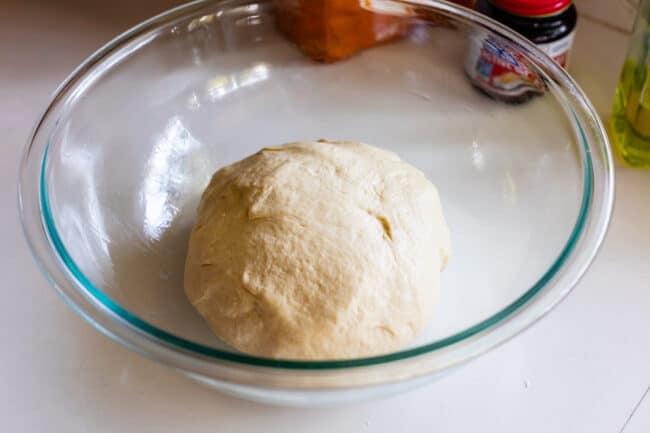
Prepare your work surface. I know most people dust the counter with flour, but I find that you risk ending up with a tougher dough this way. Too much flour = tough crust. (If your dough is very sticky, using flour is going to be just fine).
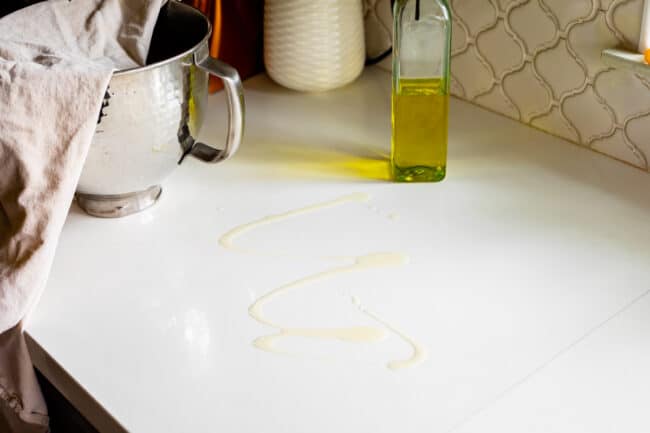
Instead, of flour, I usually drizzle some olive oil right onto my counter. Use your hands to rub it around.
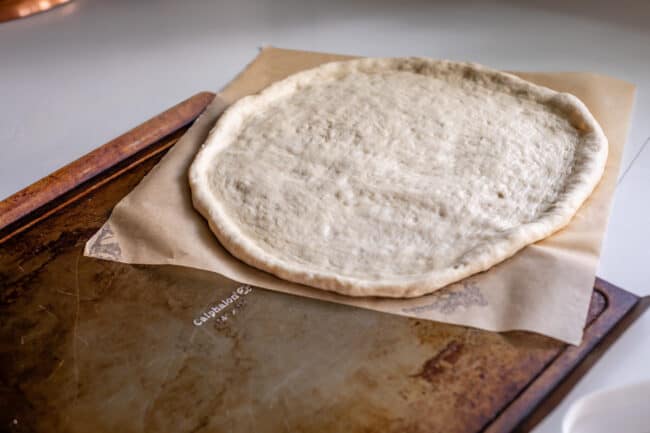
Place your ball of dough in the center of your work surface and use your hands to press it down, starting from the center. Keep gently patting out the dough, moving the dough outward from the center. I like to leave a pretty healthy crust on the edges of my dough.
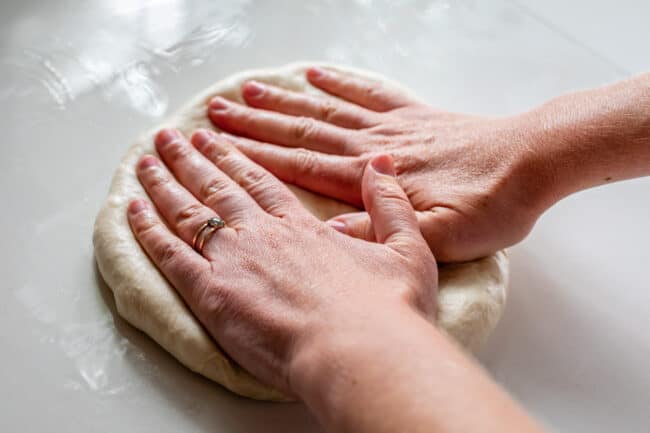
Continue patting and stretching the dough gently with your hands until it is about 12 inches across. Of course you can use a rolling pin if you want! (Use your hands to lift up the edges of the pizza when you are done to get more a lip for the crust.)
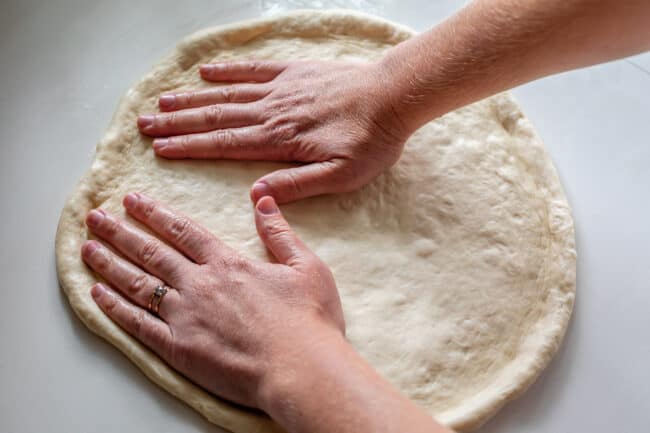
At this point, transfer the dough to a square of parchment paper. I highly recommend using parchment paper because it’s SO much easier transferring your pizza into the oven.
Stretch and arrange the dough on the parchment paper. The dough shrinks a bit when you pick it up to transfer, just gently stretch it out again.
Drizzle a bit of olive oil over the top of your dough. Use your hands or a pastry brush to rub the oil all over the top of the dough, especially the edges of the crust. This layer of oil helps the toppings stay separate from the dough, helping it cook more evenly. It also tastes delicious, especially on your crust, hello.
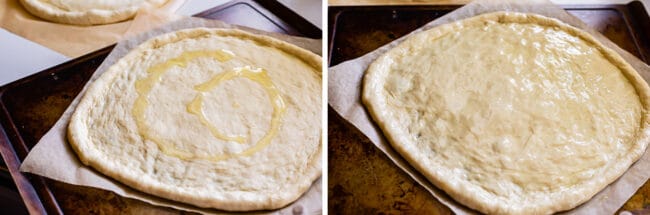
If you love a thicker crust pizza, let the rolled-out dough rest for 10 minutes at this point.
Do you need a pizza peel?
A pizza peel is that wooden board with a handle that you see restaurants using to transfer pizzas in and out of the oven. I don’t have one, because a flat baking sheet works just as well, and takes up less space in my kitchen. But I’m sure you will feel super fancy using a special peel?? You do you. You’re going to need something flat for this next step:
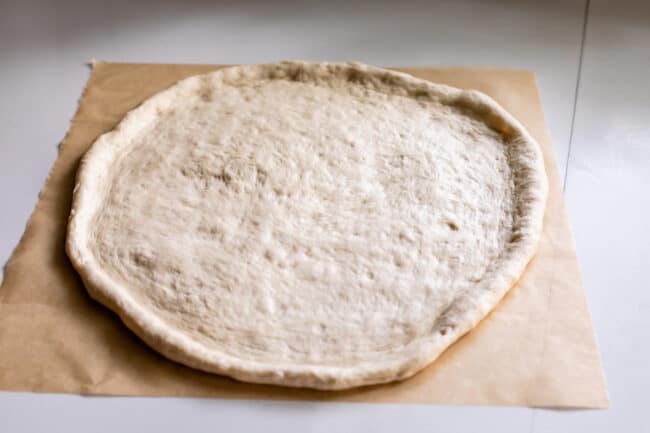
How to par bake pizza crust
Once the oven is up to temperature, we are going to do a 1 to 2 minute par bake. This step is technically not necessary, but I never skip it. It guarantees a thoroughly cooked crust. Nobody wants a doughy pizza, yuck.
Use your pizza peel or a flat baking sheet to transfer the pizza dough and the parchment paper onto your pizza stone, pizza pan, or baking sheet. (I always just pull on the paper to move it onto the stone). Transfer to your stone or pan, shut the oven door and bake for 1-2 minutes, until it is slightly puffed.
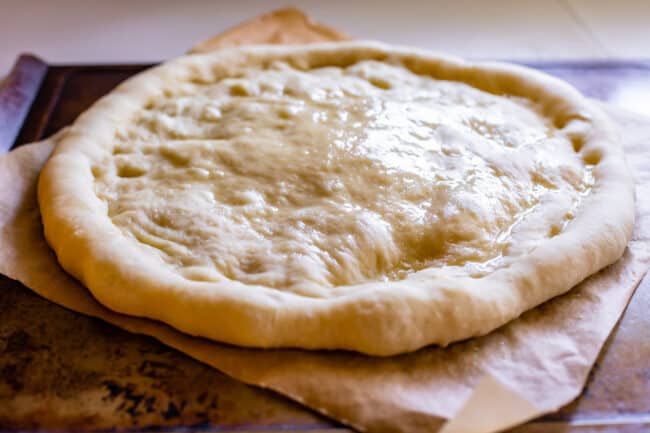
Use your pizza peel or flat baking sheet to remove the pizza (still on the parchment paper) from the oven. Poke down any bubbles. Leave the crust on the peel while you add the toppings.
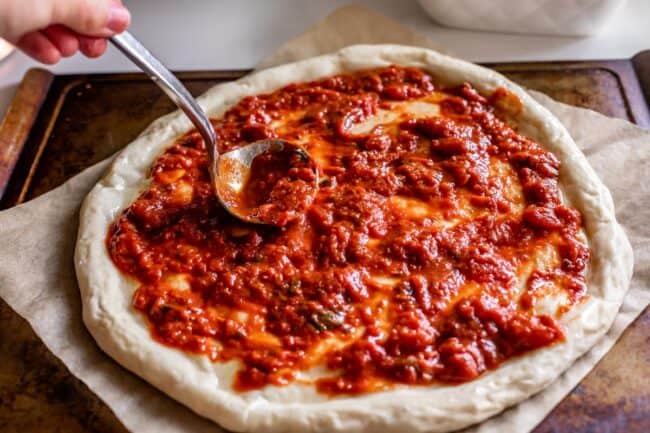
Start out with pizza sauce, of course. Here’s my favorite pizza sauce recipe!
What cheese is best for homemade pizza?
Mozzarella, mozzarella!! It’s hardly even pizza if there is no mozzarella, right? You need parmesan too.
You can use pre-shredded regular (low moisture) mozzarella from the store. It’s what I use most of the time. Mozzarella that you shred yourself is going to melt better though. The shredded stuff has anti-caking agents added to it that inhibits melting.
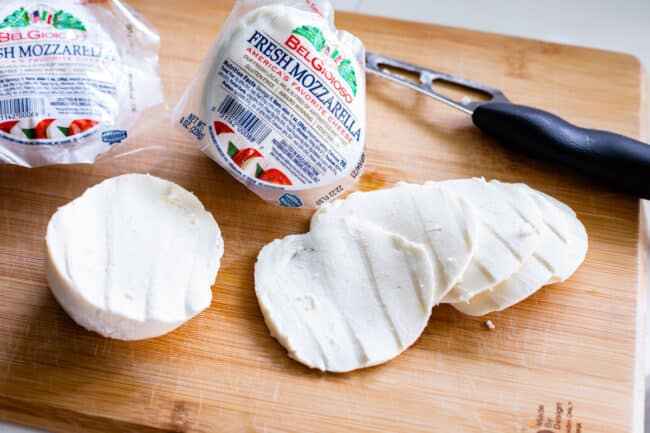
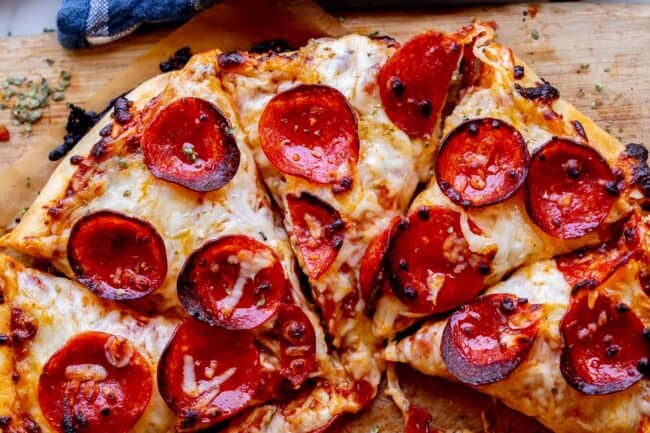
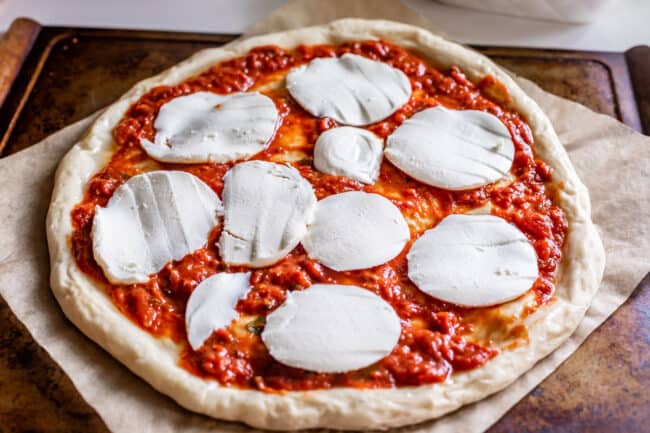
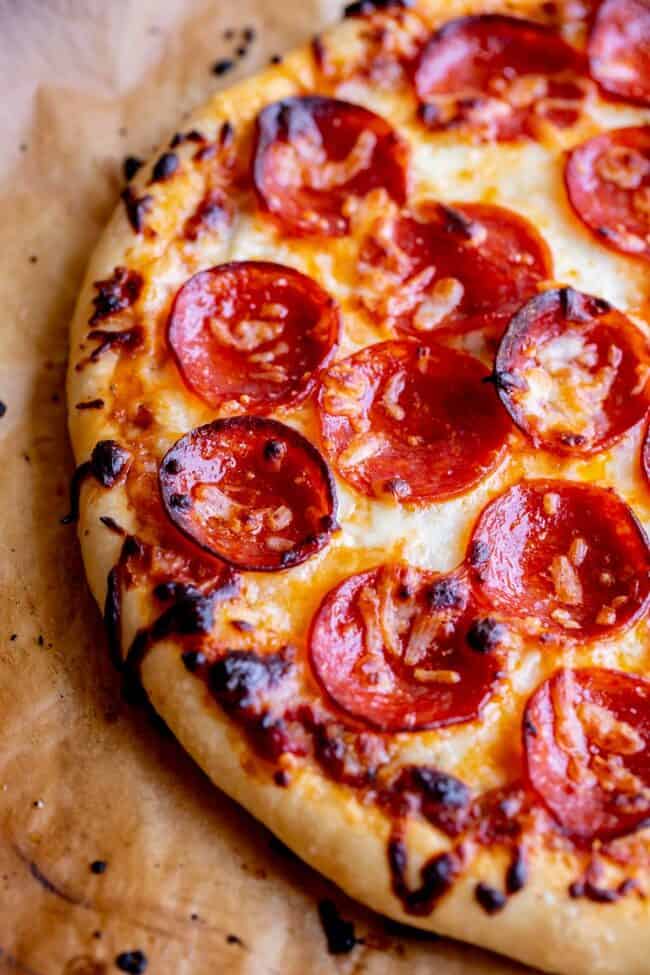
If you are feeling fancy, you can also try out fresh mozzarella. (all the final photos in this post actually show regular low-moisture mozzarella fyi) You can find fresh in the deli section of your grocery store. While you are there, pick up a block of parmesan so you can add a couple tablespoons over the toppings of your pizza. Parmesan adds that little umph, don’t skip it.
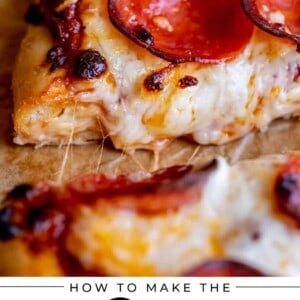
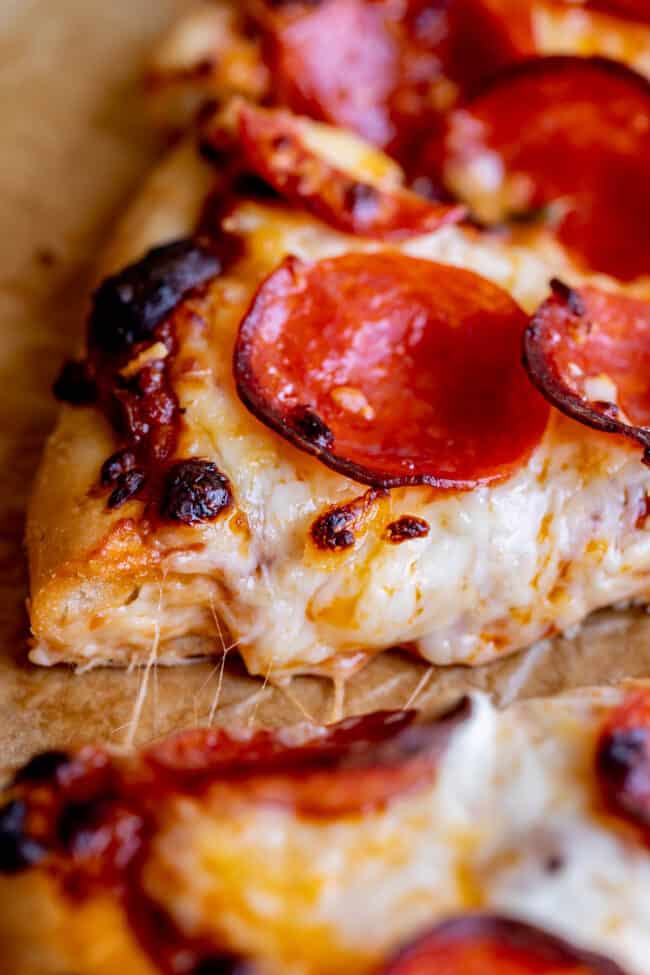
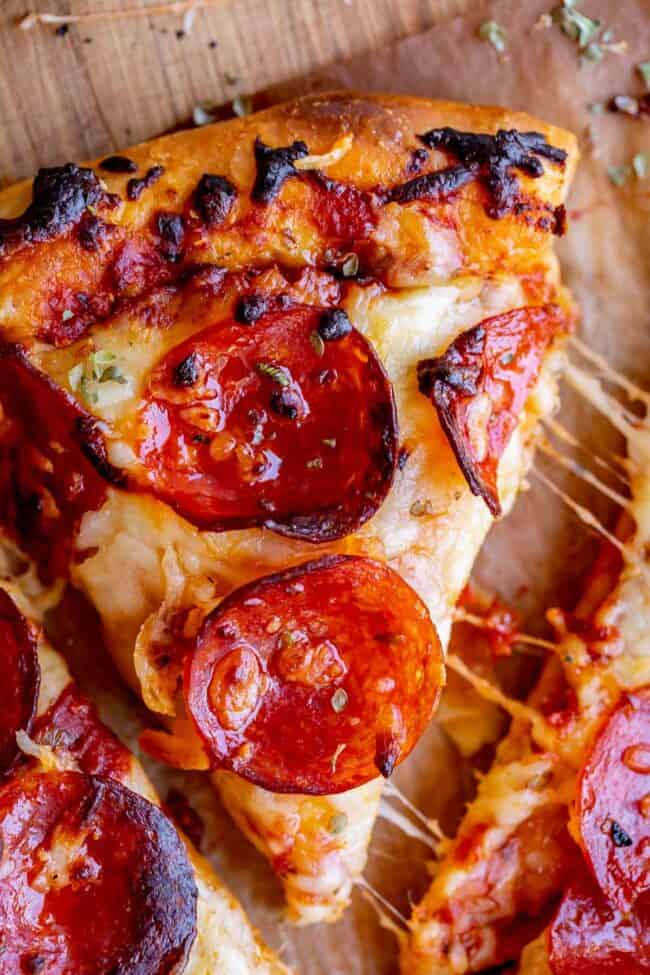
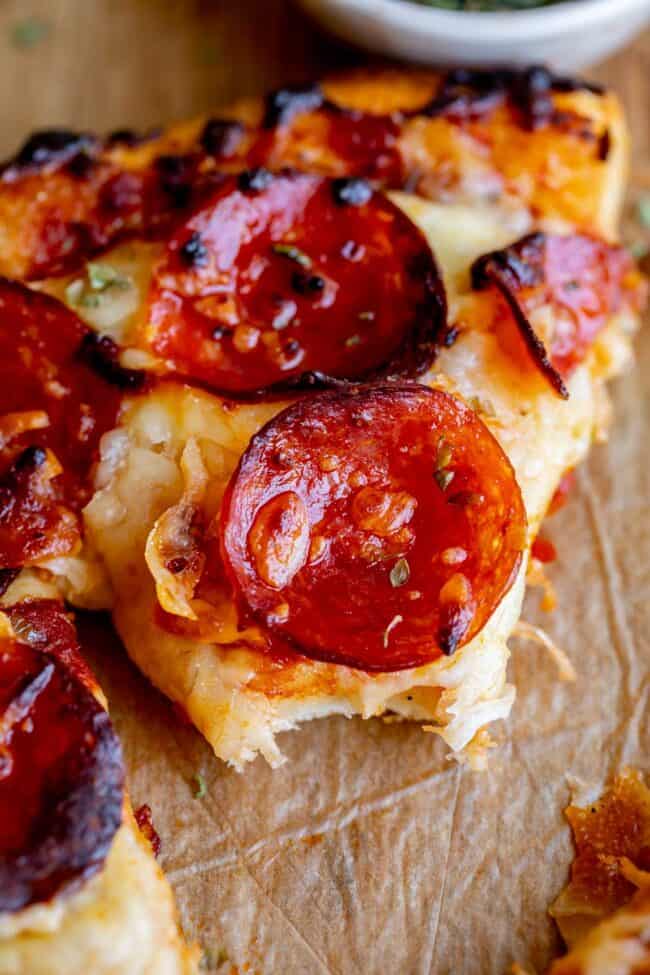
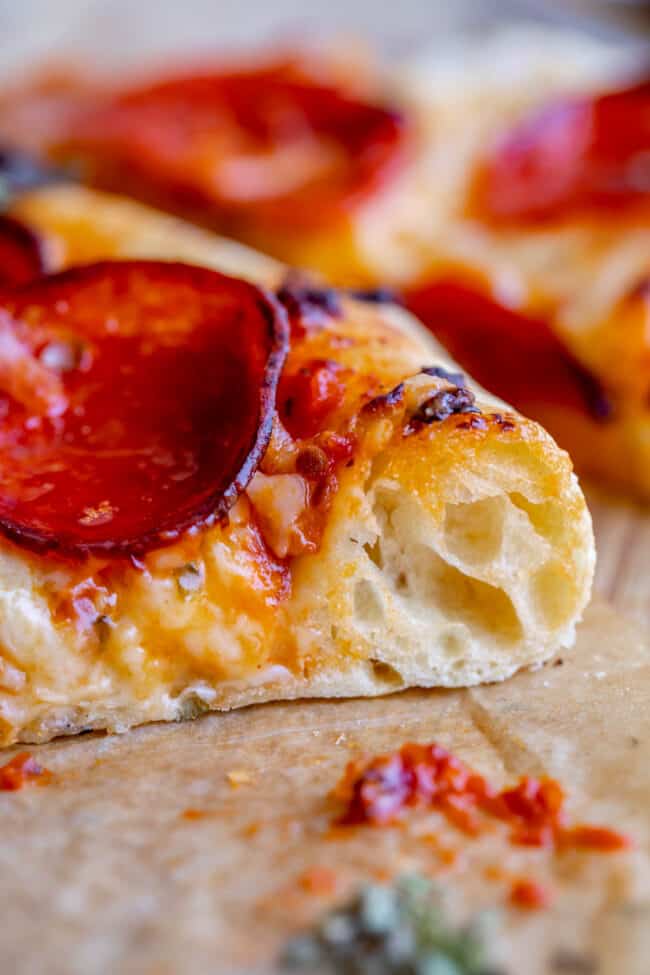
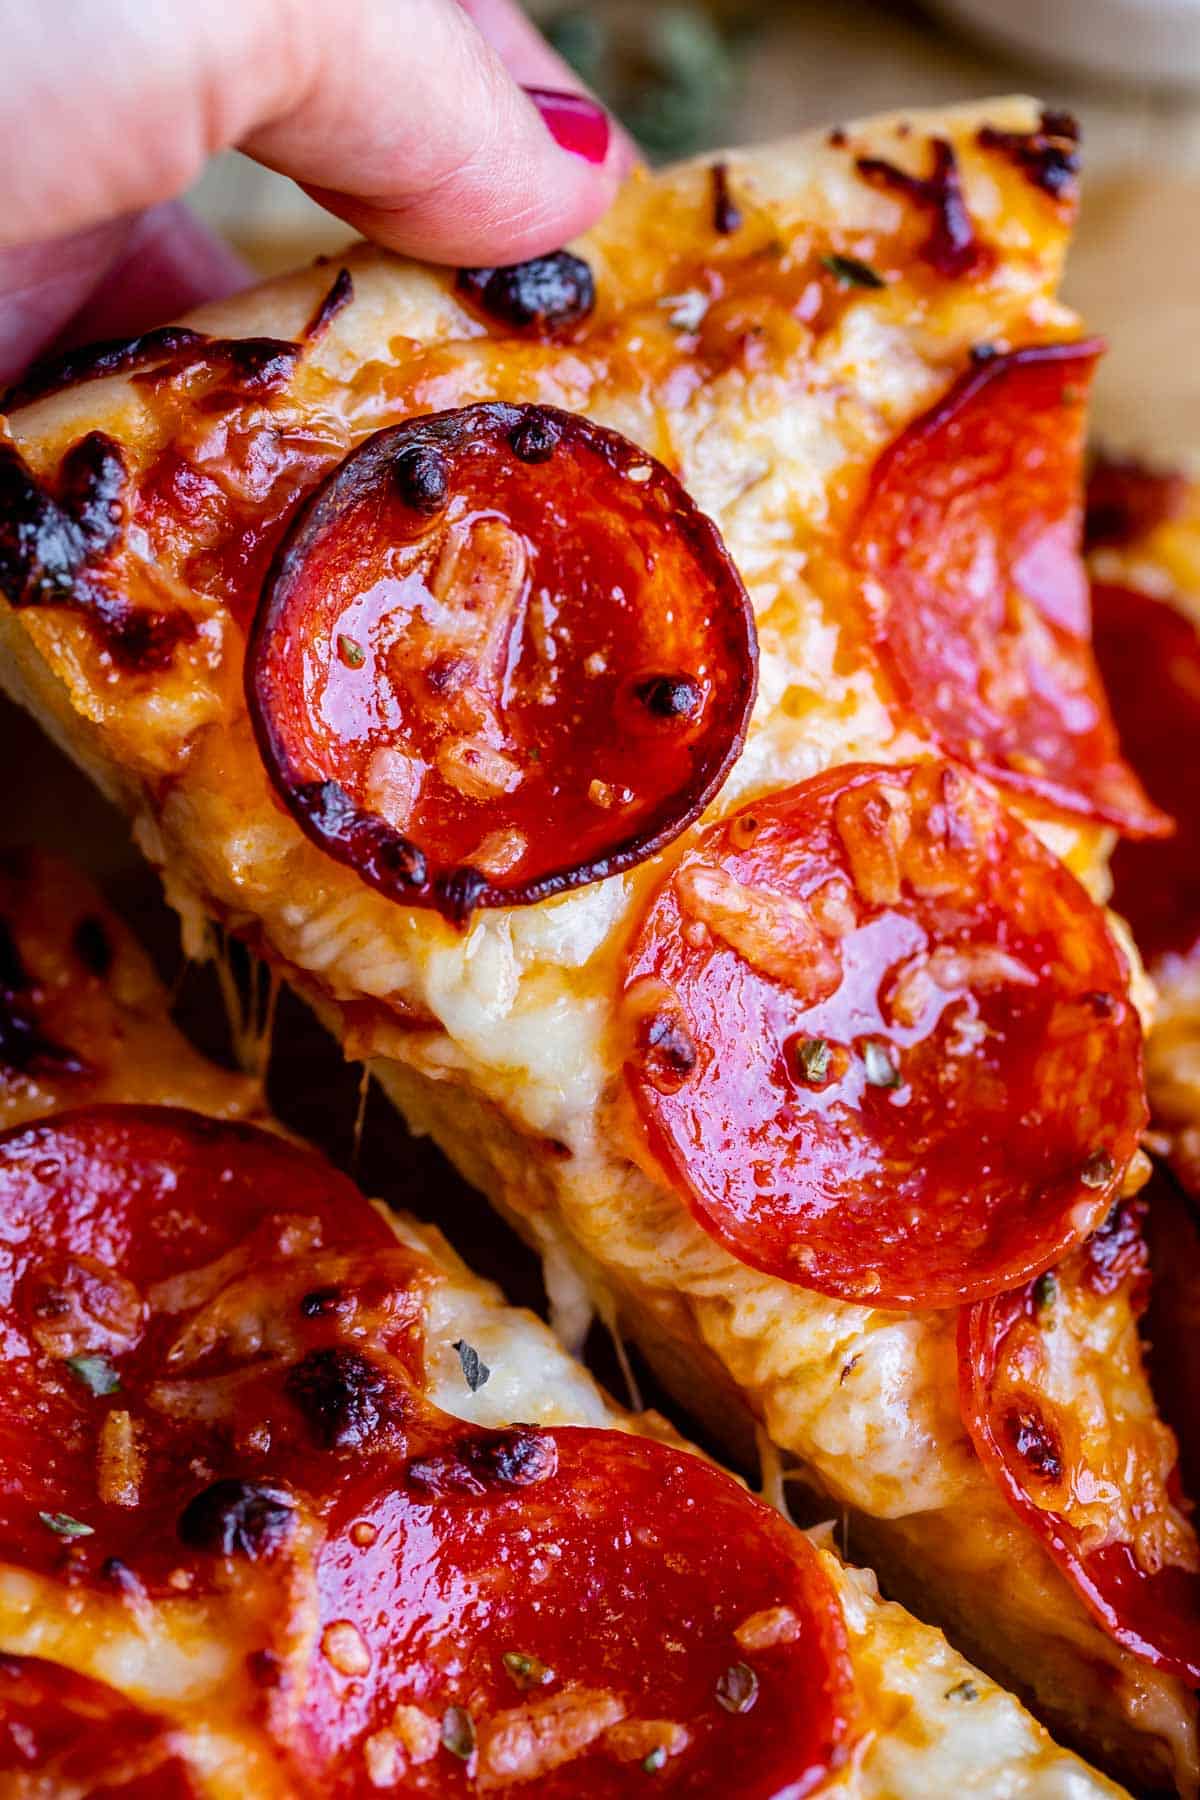
My biggest tip for getting the best melty cheese situation on your pizza is to use slices of cheese AND shredded cheese. You can use regular mozzarella for this, it doesn’t have to be fancy fresh expensive mozz. (sometimes if I don’t have block mozzarella I’ll even use string cheese!) Add a few thin slices of cheese to your pizza, THEN top with more shredded cheese. Using slices makes for the BEST melty cheese situation!
Homemade Pizza Ideas for Toppings – What can I put on a homemade pizza?
The sky is the limit here! Some of my favorite pizza toppings:

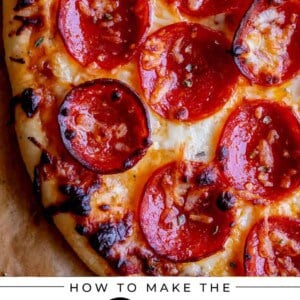
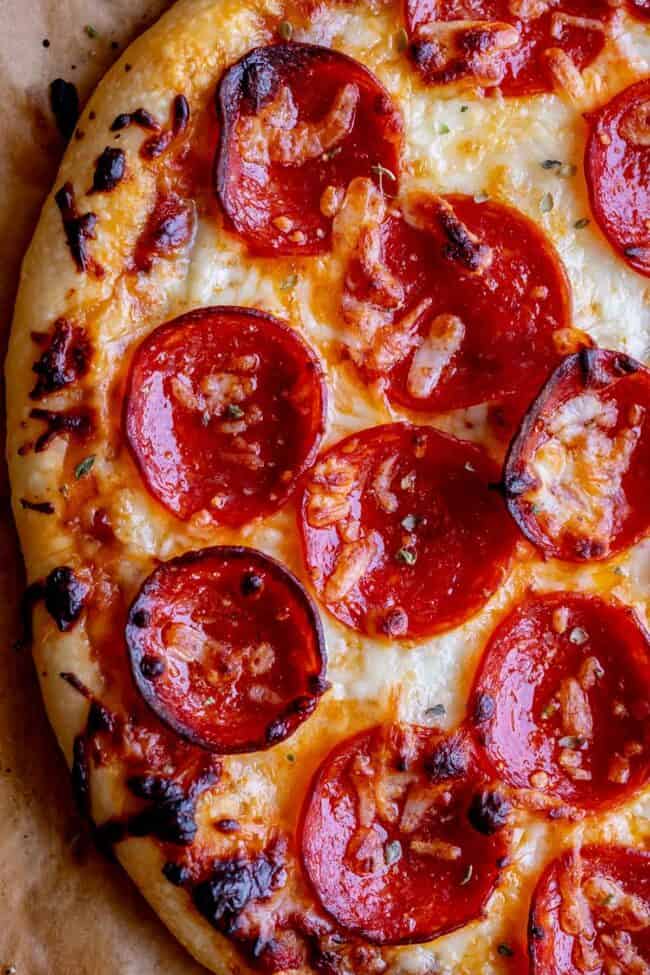
- Just Cheese: don’t underestimate the power of cheese. You need variety: Mozzarella, Fontina, Parmesan, and Gorgonzola would be amazing.
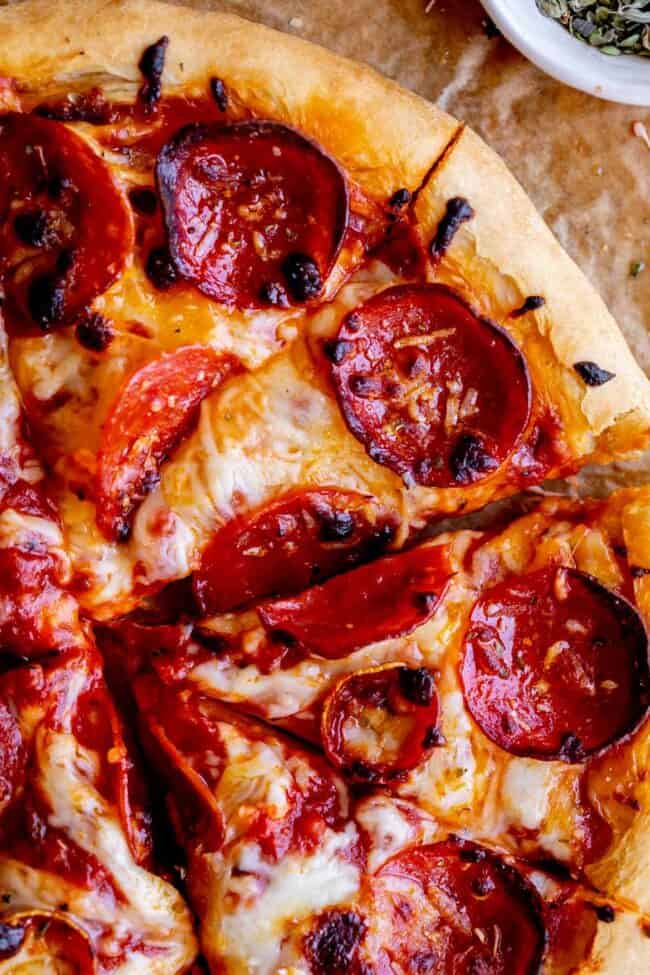
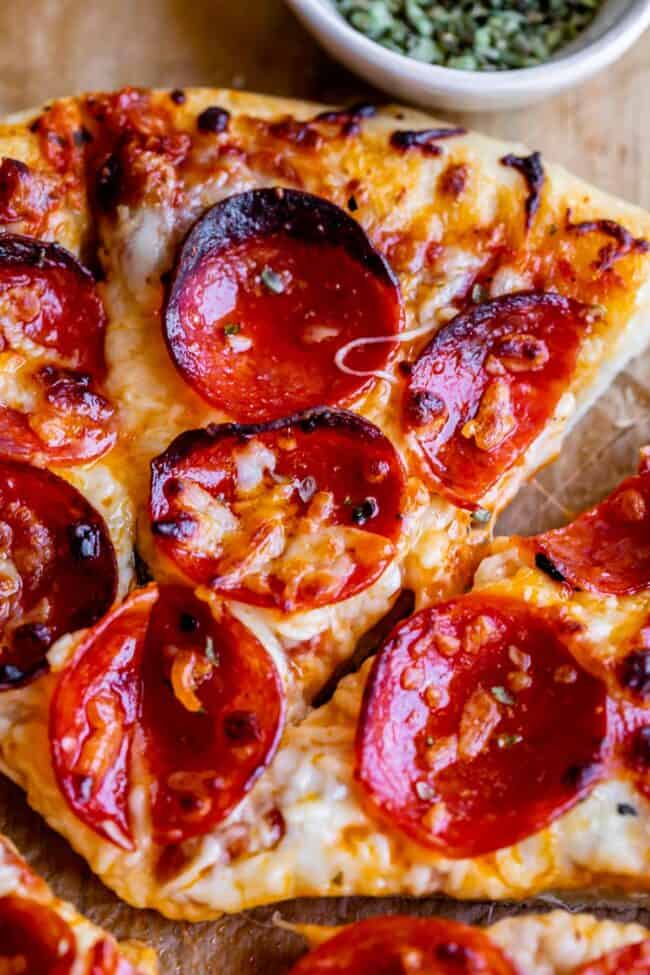
- Pepperoni: Have you tried the new Hormel Cup n’ Crisp Pepperoni? It’s what I’ve been searching for forever!! I love the pepperoni that shrinks up and turns into ultra crispy cups. This gives you exactly that! I’ve never been able to find it at the store, only in restaurants. So excited! (The photos on this post show regular pepperoni, but there is a lil baby Cup n’ Crisp in this photo, can you see it?)
- Supreme: pepperoni, mushroom, red/green bell pepper, red onion, black olives, fresh basil
- Meat Lovers: Pepperoni, salami, Italian sausage, ham, bacon
- Hawaiian: Canadian bacon, pineapple
- Margherita: fresh mozzarella, fresh basil, tomatoes
- BBQ: Use barbecue sauce instead of tomato sauce, then rotisserie chicken, red onions, bacon
- Veggie pizza: spinach, tomato, corn, peppers, red onion, mushrooms
- Buffalo: Use Frank’s sauce instead of tomato sauce, then add rotisserie chicken, garlic, blue cheese, red onions
Bake the pizza
Once you’ve got your toppings on the pizza, it’s time to bake.
Slide the pizza directly onto the pizza stone. I used to leave the pizza on the parchment paper while it baked, because it’s really easy to move the pizza where you want just by pulling the edges of the paper. But you will get a much crispier crust if you remove the parchment paper for the final bake. (The stone is porous and absorbs moisture, so that moisture doesn’t end up in your crust.) Your crust is sturdy enough after the 1-2 minute par bake that it’s not too hard to move the pizza onto the stone without the paper.
How long to cook Homemade Pizza
Once your pizza is in the oven, you need to cook it for about 8-12 minutes. This is of course going to depend on how hot your oven is, and how thick your pizza is. The crust should be golden brown, and the cheese should be bubbly and also starting to brown. If you don’t have a pizza stone, use a spatula to lift the edge of your pizza to make sure that it is browning all across the center on bottom. If the bottom is still white, you are looking at a doughy pizza. No thanks. Leave it in longer.

Try to minimize the time you have your oven door open; every second that the oven is open, you are losing temperature. So keep checks to a minimum. If the top of your pizza is browning too quickly but the bottom crust isn’t done (I’m telling you, this will never happen with a pizza stone) then tent the top of the pizza with foil to slow browning.
Do you need a pizza stone to make Homemade Pizza?
Yes. And no.
Here’s the thing, your oven kind of sucks at making pizza. I don’t care how nice your oven is, unless it’s a specialty item, it only goes up to 550 degrees, max. Pizza needs 700-1000 degrees to be cooked properly.
The solution? A pizza stone. It turns your wimpy oven into a mini brick oven!
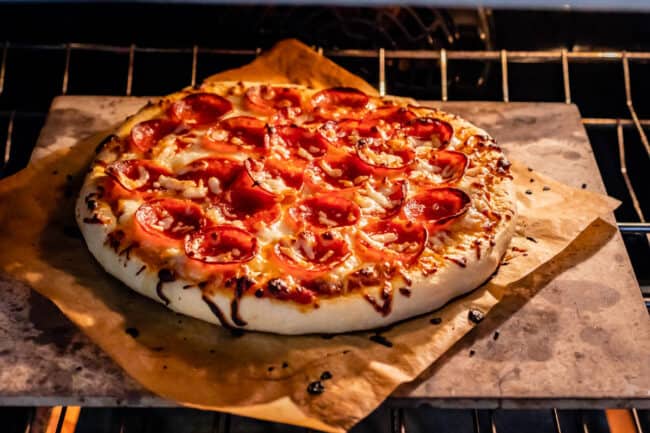
(Pretend that I remembered to remove the parchment paper for this photo. The pizza should be directly on the stone. It’s not the end of the world if you forget, I did it this way for years before I learned more about stones.)
Pizza stones are slabs of ceramic or stone that sit in a preheating oven, absorbing tons of heat (thermal mass. Yep, we’re going there. Stay with me!) A pizza stone mimics a brick oven, which is how pizza is traditionally made. The stone is a poor conductor of heat, meaning your food is less likely to burn on the edges (as it would with a metal pan at such a high temperature.) But it also has thermal mass, which stores heat in the stone and provides inertia against temperature changes. In other words, it heats the pizza more evenly. A pizza stone is going to actually regulate the temperature of your oven.
The stone is also porous, meaning it absorbs the moisture on the bottom of your pizza, making is crispy. Say no to soggy bottom pizza. (I’m lookin at you Papa Murphy’s.)
I’m a homemade pizza fanatic, so a one-time stone purchase totally makes sense for me. You can buy them for about $30 bucks on Amazon. This is the stone I most recently purchased.
If you have never made pizza and aren’t sure you want to make the investment, there are a few other options.
Baking pizza on an inverted baking sheet is a stupid idea
I read about this method and tried it out. It was a bit of a disaster, truth be told. You are supposed to turn a large baking sheet upside down in your oven, let it preheat for about a half hour, then slide your pizza onto it.
It did cook my pizza, in the end. But it also made a huge mess when grease trickled off the edge of the pan onto the floor of the oven (yes, my smoke alarms definitely went off!) The center of the pan bows up at such a high temperature, making all your pizza toppings and grease slide to the edges.
I wouldn’t do this again. Instead, preheat your rimmed baking sheet (right side up), sprinkle with cornmeal, and slide your pizza onto the center.
This method is not going to give you as crispy of a crust. The pizza I tested using this method had a texture like a Papa Murphy’s Take and Bake Pizza. Kinda soggy on the bottom. But, it’ll do in a pinch.
Baking pizza on a pizza pan
I have not personally tested making pizza on a pizza pan. It’s going to have the same problem that a baking sheet does: the higher the temperature goes, the more likely it is to burn (because metal conducts heat so well.)
Tips for choosing a pizza pan: get one with holes in the bottom (to help evaporation and achieve a crispier crust), and get one that has NO non-stick coating. This Cuisinart pizza pan looks like a decent and affordable option. Be sure to put another pan beneath it when baking, to catch any drips.
Homemade Pizza for Life
Okay, is that everything?? Do you have any more pizza questions? Let me know in the comments what I missed! I hope you get to make pizza soon. It really just never gets old, right? Don’t forget to check out the other posts in this series:
More Pizza recipes you will want to check out!
- Easy No Cook Pizza Sauce << here is a really fast and easy pizza sauce recipe that requires no cooking or blending! Just dump and stir.
- Cast Iron Pan Pizza (Pizza Hut Pan Pizza Copycat!) << I thought it couldn’t be done at home. I WAS WRONG. Make this!
- Blackberry Ricotta Pizza with Basil << A very popular post over the years! There is something so summery about this combo.
- Thai Pizza with Zucchini and Pickled Onions << like the one at California Pizza Kitchen!
- Cherry Tomato and Goat Cheese Pizza << this was one of the first recipes I posted on the blog!
- Classic Stromboli Recipe << pizza, all rolled up and baked.
- Veggie Pizza from Neighborfood
- Asparagus Pizza with Garlic Confit from Fox and Briar
- Cheesy Pepperoni Pizza Puffs from Sweet Peas and Saffron
Facebook | Pinterest | Instagram
Homemade Pizza Recipe
Equipment
- pizza stone This is the pizza stone I use!
- parchment paper I highly recommend using parchment paper!
- pizza peel or flat baking sheet I always prefer to use a flat cookie sheet!
Ingredients
- 1 16 ounce ball of pizza dough, 12 to 16 ounces is fine
- 1 tablespoon olive oil, for rubbing dough
- 1 cup pizza sauce
- 3 ounces thinly sliced mozzarella cheese
- 5 ounces shredded mozzarella cheese, about 1 and 1/4 cups
- 2.5 ounces pepperoni , about half a 5 oz package
- 2 tablespoons shredded parmesan cheese
Instructions
- NOTE: The ingredient list has the amount of toppings you need to make one 12-inch pizza. If you followed my pizza dough recipe, you will have 2 balls of dough. If you want to make them both right away, be sure to double the topping ingredients shown here.
- Place a pizza stone in the bottom third of your oven. (place a rimmed baking sheet or a pizza pan in the oven if you don't have a stone.)
- Preheat your oven to 550 degrees F, or as high as it will go (at least 475.) Let the stone preheat for 30 minutes. I don't care when your oven beeps to tell you it's at temperature. Set a timer, 30 minutes at least!
- Prepare a work surface. I prefer to rub my counter with oil, but you can lightly dust it with flour if you have a very sticky dough. (Too much flour can turn your dough tough.)
- Roll out the dough. Place your ball of pizza dough in the center of your prepared work surface and use your hands to press it down, starting from the center. Keep gently patting out the dough, moving the dough outward from the center. I usually use my hands for pizza dough, gently patting and stretching (and yes, picking it up and maybe even tossing!), but you can also use a rolling pin. Make sure to keep rotating the pin so that you get a roughly circular shape. It doesn't have to be perfect! Even if you have used a rolling pin, I like to use my fingers afterward to shape the edges into a thicker crust. See photos. Continue patting and stretching the dough gently with your hands until it is about 12 inches across.
- Transfer the dough to a square of parchment paper. I highly recommend using parchment paper because it’s SO much easier transferring your pizza into the oven. You can pick it up carefully with your hands and rearrange it on the paper, or wrap it around your rolling pin to help transfer. (I've tried rolling the dough out directly onto parchment paper. It doesn't work well.) Make sure you stretch out the dough so that it is about 12 inches.Drizzle about a tablespoon of olive oil over the top of your dough. Use your hands or a pastry brush to rub the oil all over the top of the dough, especially the edges of the crust. This layer of oil helps provide a barrier between the toppings and the dough, helping it cook more evenly.If you love a thicker crust pizza, let the rolled-out dough rest for 10 minutes. You can skip this rest no problem.
- Par bake. Once the oven is up to temperature, we are going to do a 1 to 2 minute par bake. This step is technically not necessary, but I never skip it. It guarantees not only a thoroughly cooked crust, but a nice and crispy one. Nobody wants a doughy pizza, yuck. (If you want to skip it, you can proceed with topping your pizza). Pulling on the edge of the parchment paper, slide your pizza dough onto your pizza peel or flat baking sheet. Open the oven and pull on the parchment paper again to slide the pizza dough and the parchment paper onto the hot hot pizza stone (or pizza pan). Your whole body is basically inside the oven during this procedure so please be careful and make sure there are no toddlers running around who could climb right in and burn to death (these are the thoughts that keep me up at night).Shut the oven door and par bake for 1-2 minutes, until the dough is slightly puffed. Set a timer, don't walk away!Pull on the parchment paper again to transfer the half-baked dough back onto your pizza peel. Keep the oven door shut as much as possible so you don't lose heat. Poke down any large bubbles on your crust.
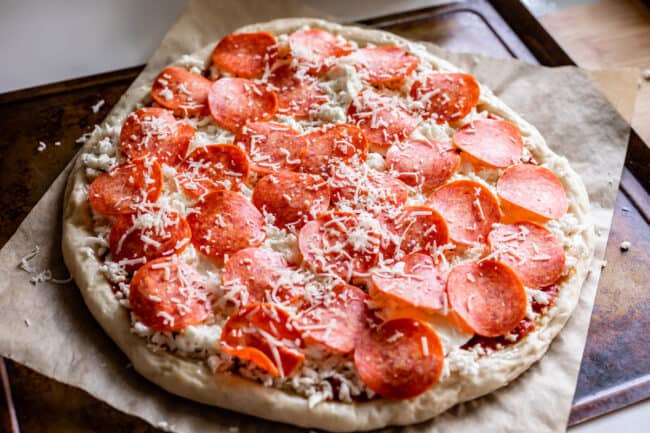
- Top your pizza. Leave the crust on the peel while you add your toppings. Add 1 cup of pizza sauce (I like to spread it around with a ladle). Add 3 ounces thinly sliced mozzarella, and then top with 5 ounces of shredded mozzarella. I like a lot of cheese and this is about the max amount you can add without weighing down your pizza so much that it doesn't cook all the way through. This isn't the Bible, you can eyeball the amounts on cheese, just keep in mind there is a limit if you want a properly cooked pizza. Add about a half package of pepperoni (or olives, mushrooms, ham and pineapple, sausage, red onions, or literally any toppings you want. See post for ideas.) Sprinkle 2 tablespoons shredded parmesan cheese over your toppings.
- Bake the pizza. (See note if you don't have a pizza stone*) Transfer the pizza back onto the pizza stone (or pan), this time without the parchment paper. You want the pizza to do its final bake directly on the stone. (The stone is porous and absorbs moisture, giving you a crispier crust.) Your crust is sturdy enough after the 1-2 minute par bake that it shouldn't be too hard to push the pizza onto the stone without the paper. Bake the pizza for about 8-12 minutes. This is going to depend on how hot your oven is, and how thick your pizza is. The edges of the crust should be golden brown, and the cheese should be bubbly and also starting to lightly brown. If you don't have a pizza stone, use a spatula to lift the edge of your pizza to make sure that it is browning all across the center on bottom. If the bottom is still white, you are looking at a doughy pizza. No thanks. Leave it in longer.If the top of your pizza is browning too quickly but the bottom crust isn't done, tent the top of the pizza with foil to slow browning.
- Remove your pizza from the oven using the pizza peel. Slide it directly onto a cooling rack to help keep that bottom crust from getting soggy. Let cool a couple minutes, then transfer to a cutting board. Slice into 8 pieces and devour!


You know, I really did not follow any of your recipes, but I do not have a pizza stone, so I got your idea of using my cast iron skillet and it all worked so beautifully.
I made the best pizza in the world.
It will definately happen again. Thanks of the tip.
2nd time I’ve made the dough, sauce and followed your baking instructions. THE BEST PIZZA EVER! I live in a small rural town in NC and I am from Upstate NY. It’s hard to get good pizza. This is the dough/crust I knew! My 82 yr old mother eats the crust! That’s huge. I bounced downstairs after my first pizza expecting to get her crust….nope! I used half 00/half bread flour. I did use my stand mixer and kneeded on 4 for 5 minutes. I sponged, did the overnight thing and punched it down 3 times today as it was for dinner. BOMB! I made the sauce using whole San Moritz (sp) tomatoes this time, last time I used passat. I’ll be getting cheese steaks at the local pizzaria. I’ll make my own pizza!
Can you mix dough in food processor?
Hi Bri! I don’t recommend it!
Thank you. I played it safe but I did use the stand mixer.
I just want to say thank you for this detailed with pictures recipe blog. I was nervous really wanted to make a homemade pizza tried before failed miserably. I did the sponge method and also let it sit to rise as long as i could. Meltednsome butter added olive oil italian seasoning and garlic and pur on dough delicious. Everything was delicious I made the sauce who knew could be so simple and taste so great. I’m even going to try it on meatballs. My family loved them couldn’t believe I made them home. Definitely a keeper will make again. I am going to try to make ahead a day or freeze the dough to consume time. When freezing does it still taste the same?
hey Bri! I’m so happy it turned out well on your first try! You’re a natural :) Pizza dough freezes amazing. I have some in my freezer right now! You just have to make sure to not only thaw it completely at room temperature, but then let it rest after thawing. Basically let it sit out for a good long time, punching down and rising as necessary until it’s time to eat. Enjoy!!
I read this whole page, and then the page about your family, you sound like the neighbors I wish I had! One thing that you mention several times ia that baking pizza in an oven doesn’t quite get you to the real pizza oven result. I have owned three Weber grills, they are the hottest things imaginable, I used a laser thermometer, way over 600 degrees. I also use a round cast iron griddle, sprinkle a little corn meal on it, and after 8 minutes you have the equivalent of a authentic pizza. Try it if you get a chance.
Thanks for the pizza tips Jim, we’ll have to give those a try!
Wow I am so impressed how well this pizza turned out! My husband usually makes the pizza dough, but I decided to give this a try. I was feeling brave lol (yeast recipes have always scared me!) The only adjustment I had to make was the cooking time, since I live at a high elevation. Next time I’m going to try adding flavor/seasoning to the dough. I used all bread flour and did 1.5 hours of the sponge method and 3 hours of rising. Turned out perfect! Even my husband was impressed. I think mine even came out better than his recipe…shhhh lol.
Had pre-made dough (Aldi Brand) and only a cookie sheet. Oven max was 500. Followed directions as given with par bake (2 min), popped bubbles. 3/4 cup sauce, talian blend cheese, and pepperoni. I put under broiler for last minute to crisp pepperoni and put a little brown on cheese. It Is A Winner!!! Might even get a pizza stone to raise it even higher.
Wow, I made this two days ago and it was absolutely delicious. Worth the time and effort! I will make again and thank you for the recipe!!
Hi Karen!
Thanks for sharing your recipe. I plan on making it for my 20 grandchildren. My dog will also like it probably. He’s been hiding in the oatmeal lately and I hope this will get him to come out. My fish Juniper has been a big fan of pizza as of late and I hope this please him. I actually am allergic to pizza but my cat will eat my portion of it. His name is Drelp and he is vegetarian so now that I’m thinking about this I may have to adjust the recipe. I’ll update you soon!
Thanks!
Kacey, idk if you are high or what, but I am here for it. 😂 Bring on the vegetarian cat pizza. Keep us updated!
Update
I made the pizza and it worked out great. All 20 grandchildren loved it and so did Juniper. Also, I finally got my dog to get out of the oatmeal bag! Drelp enjoyed it the most. I made him a vegetarian pizza but I think he also snuck some of the pepperoni. I finally found a food that Everyone loves! To anyone who is reading this, try this recipe if your dog won’t come out of oatmeal, ( Or other food ) it is a big hit! Juniper says thank you and the rest of my pets are to busy stuffing their faces to say anything. Bye!
I am 70 years old and have tried unsuccessfully to make great homemade pizza many, many times. This explanation was the first time I loved my home made pizza. Oil on the countertop was a game changer. No rips or tears in the dough. Thank you, thank you!!!
I’ve made homemade pizza since I was 12, perfecting the dough and sauce, but not understanding the pizza stone. I decided to try her recipe on everything, and holy cow! This was as good as a pizza from Little Italy. The tips made everything that much better. We’ll be making this as our go to pizza from now on.
Well let me start out by saying I’m saying some recipes online how to make pizza I’ve never made one yet so we went out and bought a deep dish 16 inch pizza pan. I’ve already got my dough made and ready to make the pizza and I read some comments on About a pizza stone which I looked at and did not know much about the pizza stone until I read some articles on it that’s what I should’ve went with. I understand the principal better now, so what I’m gonna do is use my pizza pan and see how it works out mistake number one read the comments that’s what I should’ve done weather.
if i use the pizza pan with holes in it … do i heat it up to 500 degrees for 30 min and then put the pizza dough on it to cook for 1- 2 minutes ? Take it out of the oven and then put the toppings on it ? Then return to oven and bake the pizza ? Or just put the dough on the cold pizza pan and bake fir 1-2 min , take it out of the oven and put toppings on the dough and return to the oven and bake ?
Hi Johnette! Yes, I recommend preheating your pizza pan with holes (though the recipe hasn’t been tested with this method, so you probably won’t get as crispy a crust). Putting the dough on a cold pan seems more likely to lead to a soggy or raw-tasting crust. Follow the instructions for par-baking as usual, then topping, then returning to the oven for its full bake time. Enjoy!
What did the first paragraph say about the cheese type to use? There was an ad in the way and I couldn’t figure out how to remove it. Great article by the way! I think I will give this recipe a try.
Cheryl, you are so nice. I’m really sorry ads were covering the content, that’s not what I want! I recently did a redesign of the whole site (last week) and there are still some bugs we are working out. so thanks for alerting me, and thanks for not getting angry about it! You’re a gem. Here’s the info about cheese:
“Mozzarella, mozzarella!! It’s hardly even pizza if there is no mozzarella, right? You need parmesan too.
You can use pre-shredded regular (low moisture) mozzarella from the store. It’s what I use most of the time. Mozzarella that you shred yourself is going to melt better though. The shredded stuff has anti-caking agents added to it that inhibits melting. If you are feeling fancy, you can also try out fresh mozzarella.”
Enjoy your pizza!!
Hi i’m 10 and i made this because I just felt the urge to make something and was hungry. (this is my first time making pizza from scratch.) This was so good. my family loved it! I made some adjustments for the sauce. and i also put it to 475 instead of 550 because i was scared i would burn my house down. I would make this all time! but i don’t like kneading but it was worth it! Thank you so much for the recipe!
I’m so happy you enjoyed it Chefz! I’m impressed with your skillz. Also good choice on not burning the house down! But as my brother always says, “Look good, have fun, safety 3rd.” I say bump it up to 550 next time. 😉😂 thanks so much for reviewing!! you are awesome!
Thank you again!
First time ever making homemade pizza, as well as the dough and sauce. I’ve made many sauces but so far I have only made one loaf of bread in my life before this and it was…. just okay. So I am not very experienced with making dough. Following your recipe, it felt super cool kneading it though and the consistency felt like it was just right! I let it rise for about an hour and a half and split it in half, and followed the rest of the recipes. The sauce is absolutely fantastic. I feel comfortable taking some liberties with the sauce to make it the way I like but I nervously and ambitiously followed your dough recipe to the T. I’m not sure what happened in the end, but my pizza wanted to stick to the stone. Between my fiancé and I, we cut the pizza in half to get the more “done” half off first, and then we muscled the stuck part off the stone. The bottom of the crust seemed like it was not quite ready while the outer crust was and they were separating from each other, though I left it in the oven for about 20 minutes at 500. The top was pretty done and I did not think it could take much more so I didn’t want to leave it in longer and risk the rest burning. It was a mess but a hilarious first ever attempt at pizza. And I will say the outer crust is absolutely delicious. I still have the other half of the dough and I’m about to make my second attempt. I’m hoping I learned a little from my mistakes and it will come out better. Thank you for posting these! It’s been very fun to learn!
Love this Reade! Thanks so much for commenting and sharing your first-time experience making pizza. I learn a lot every time I make pizza and I’m still learning! So glad that you enjoyed the crust and the sauce and that you’re having fun learning.
i just went through the steps to bake pizza dough. I loved the way you structured the pizza dough-making so well. I will be trying it on my new OONI KODO 16 Gas Powered Pizza Oven. I’m so excited to bake the pizza for my family as we are having a small get to gather for this Christmas Eve and new year. where I will be trying it exactly the way you have mentioned. in fact, I have taken screenshots of the methods which you have shared I will try all kinds of pizza.
Just tried this recipe for the first time and I can not believe how well it turned out. The crust and the sauce and the perfect, and the detailed instructions all the way through were the key to deliciousness. Follow the instructions exactly, buy quality ingredients, add the crushed red pepper flakes to the sauce, and don’t be afraid to load up on the cheese, and you’re sure to have a fantastic meal
Woohoo, pizza success Jack! So glad it turned out just the way you wanted. Thanks so much for taking the time to comment! That’s so meaningful to me.