I am a Caramel Apple snob. So much of a snob, actually, that I usually don’t even bother eating them. But all that changed recently when I discovered the secret to the BEST homemade caramel sauce. These caramel apples are easy to dip, a dream to bite through, with the most FUDGY caramel texture; they won’t leave you with caramel stuck to the back of your teeth. It holds it’s shape perfectly on the apple, and does not slide off. It is such a fun project for the fall! I will show you how to make this recipe for Halloween, Thanksgiving, or for gifting to neighbors!
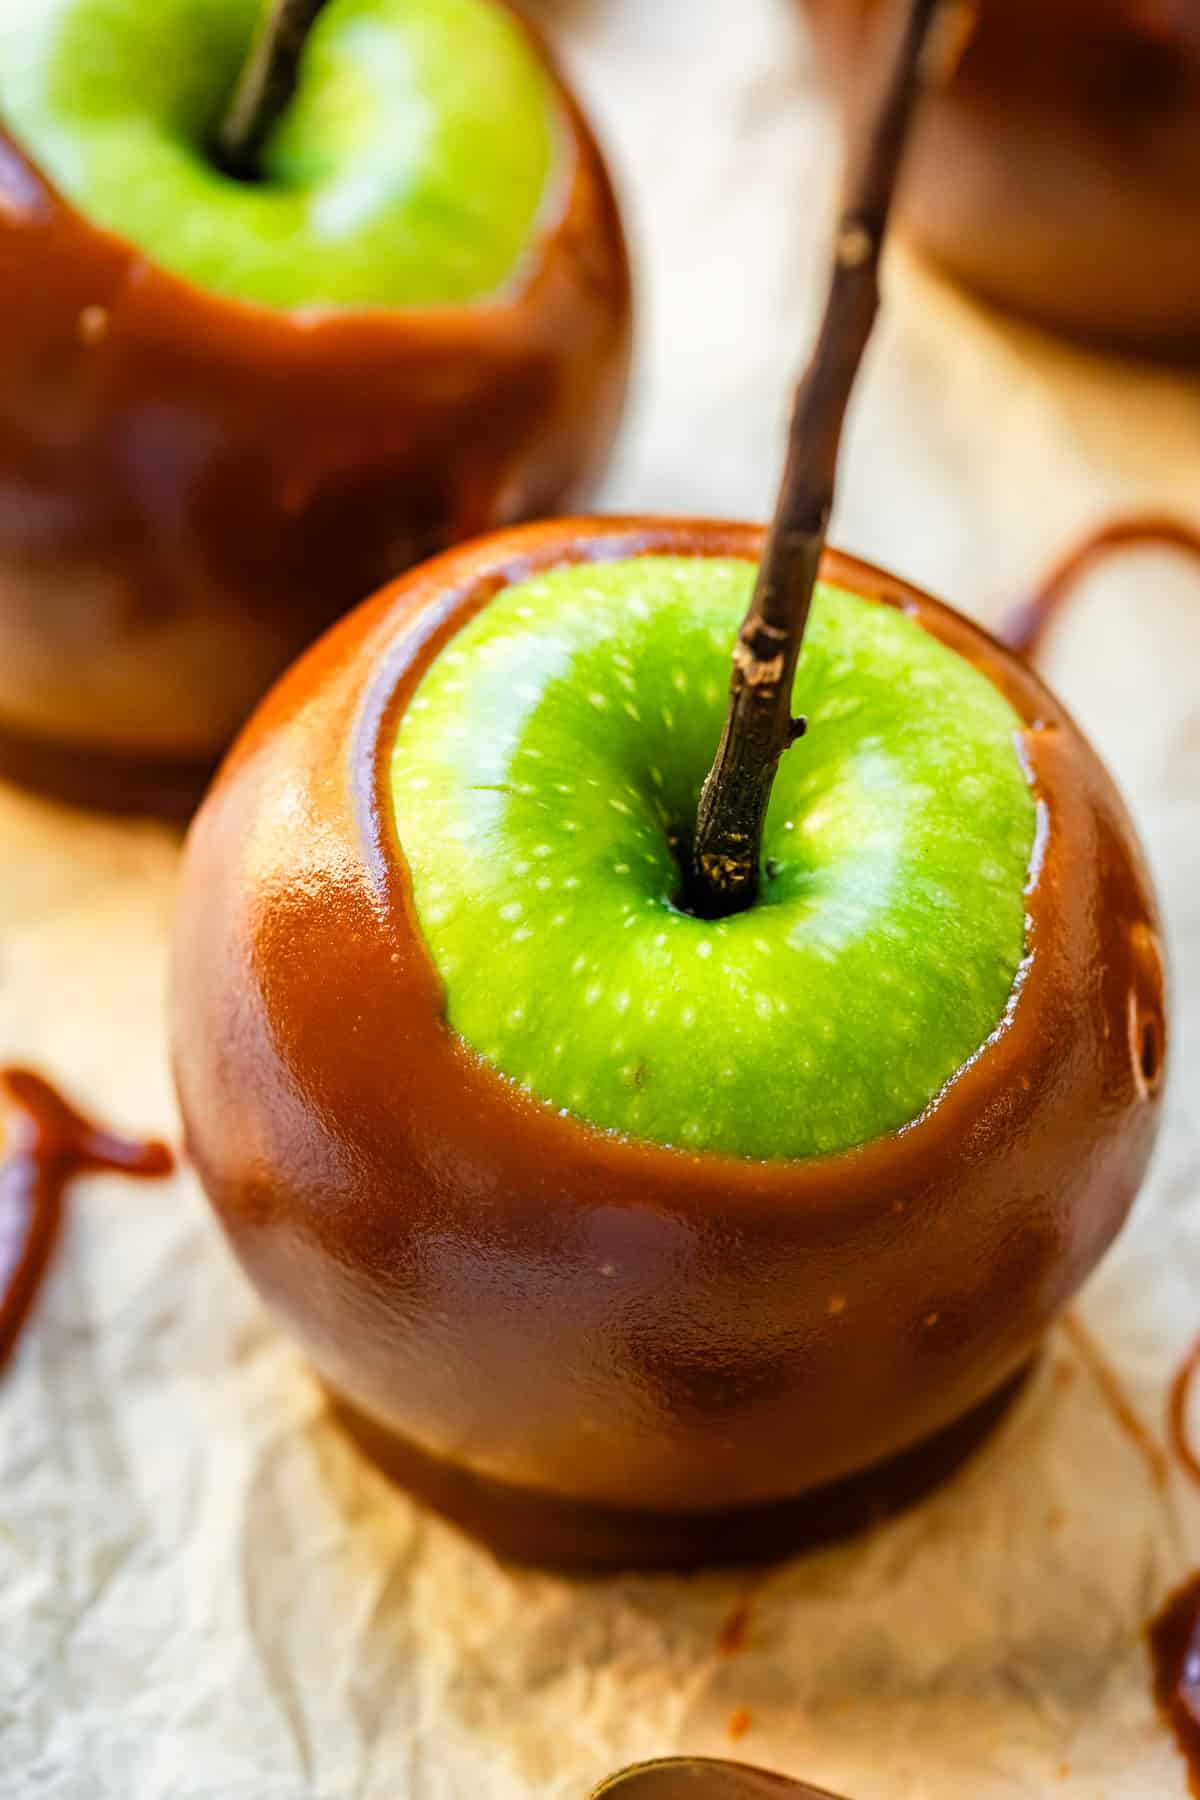
Table of Contents
- Caramel apples are usually not worth it.
- Rules for perfect homemade caramel apples
- How do you keep caramel from sliding off the apple?
- Caramel apple recipe ingredients
- How to make caramel apples
- What are the best toppings for caramel apples?
- How to store leftover caramel apples
- Caramel apple frequently asked questions
- More recipes to make all your fall dreams come true
- The Best Caramel Apple Recipe Recipe
My son Edison is 4-years-old, and has some sneaky tendencies. Yesterday, after I found an entire box of tampons opened, pulled apart, and slung-shot across the room, I told him sternly that he was not allowed to do that.
He was sooo sad. He moped like Charlie Brown for a minute, then told me mournfully, “Nothing is EVER going to cheer me up. Not even Saturday.”
This poor kid! What is life even, without constant destruction!? Where Saturday doesn’t even make it better??

The nice thing about being 4 though, of course, is that you can’t remember what you were sad about 20 minutes after the fact. What I wouldn’t trade for this ability!!
Let me tell you one thing I’m definitely not sad about: F-I-N-A-L-L-Y nailing a Caramel Apple recipe. It’s been a hot minute! This is the final installment of approximately one thousand caramel recipes to go up on the blog recently (what can I say, hyper focusing is my super power.)
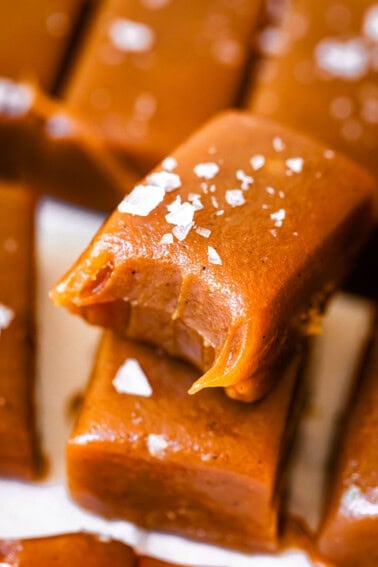
Check out the recipes for The Salted Caramel Sauce of my Dreams, Salted Caramel Sandwich Cookies, and today’s other brand new recipe, Soft Homemade Caramel Candy, the kind that you wrap up and give away at Christmas. All of these recipes are similar but not quite the same, and I wanted to make sure all the finer details didn’t get confused, hence the number of posts on the same topic.
Caramel apples are SO good when done right, and I’ve collected all the details to make sure you nail it on your first try. But first, I have to confess: I used to hate caramel apples.
Caramel apples are usually not worth it.
I said what I said ya’ll. Caramel apples are usually so uncomfortable to eat that they are not worth the jaw gymnastics.
The reason they are so annoying to me is because the caramel is all wrong. It’s too sticky, too tough, too likely to ball up into a mass of too-hard caramel that gets stuck to my back molars and ends up hurting. (Am I the only one here?? Am I outing myself as a soft-toothed old lady?? (it’s true, it’s true)
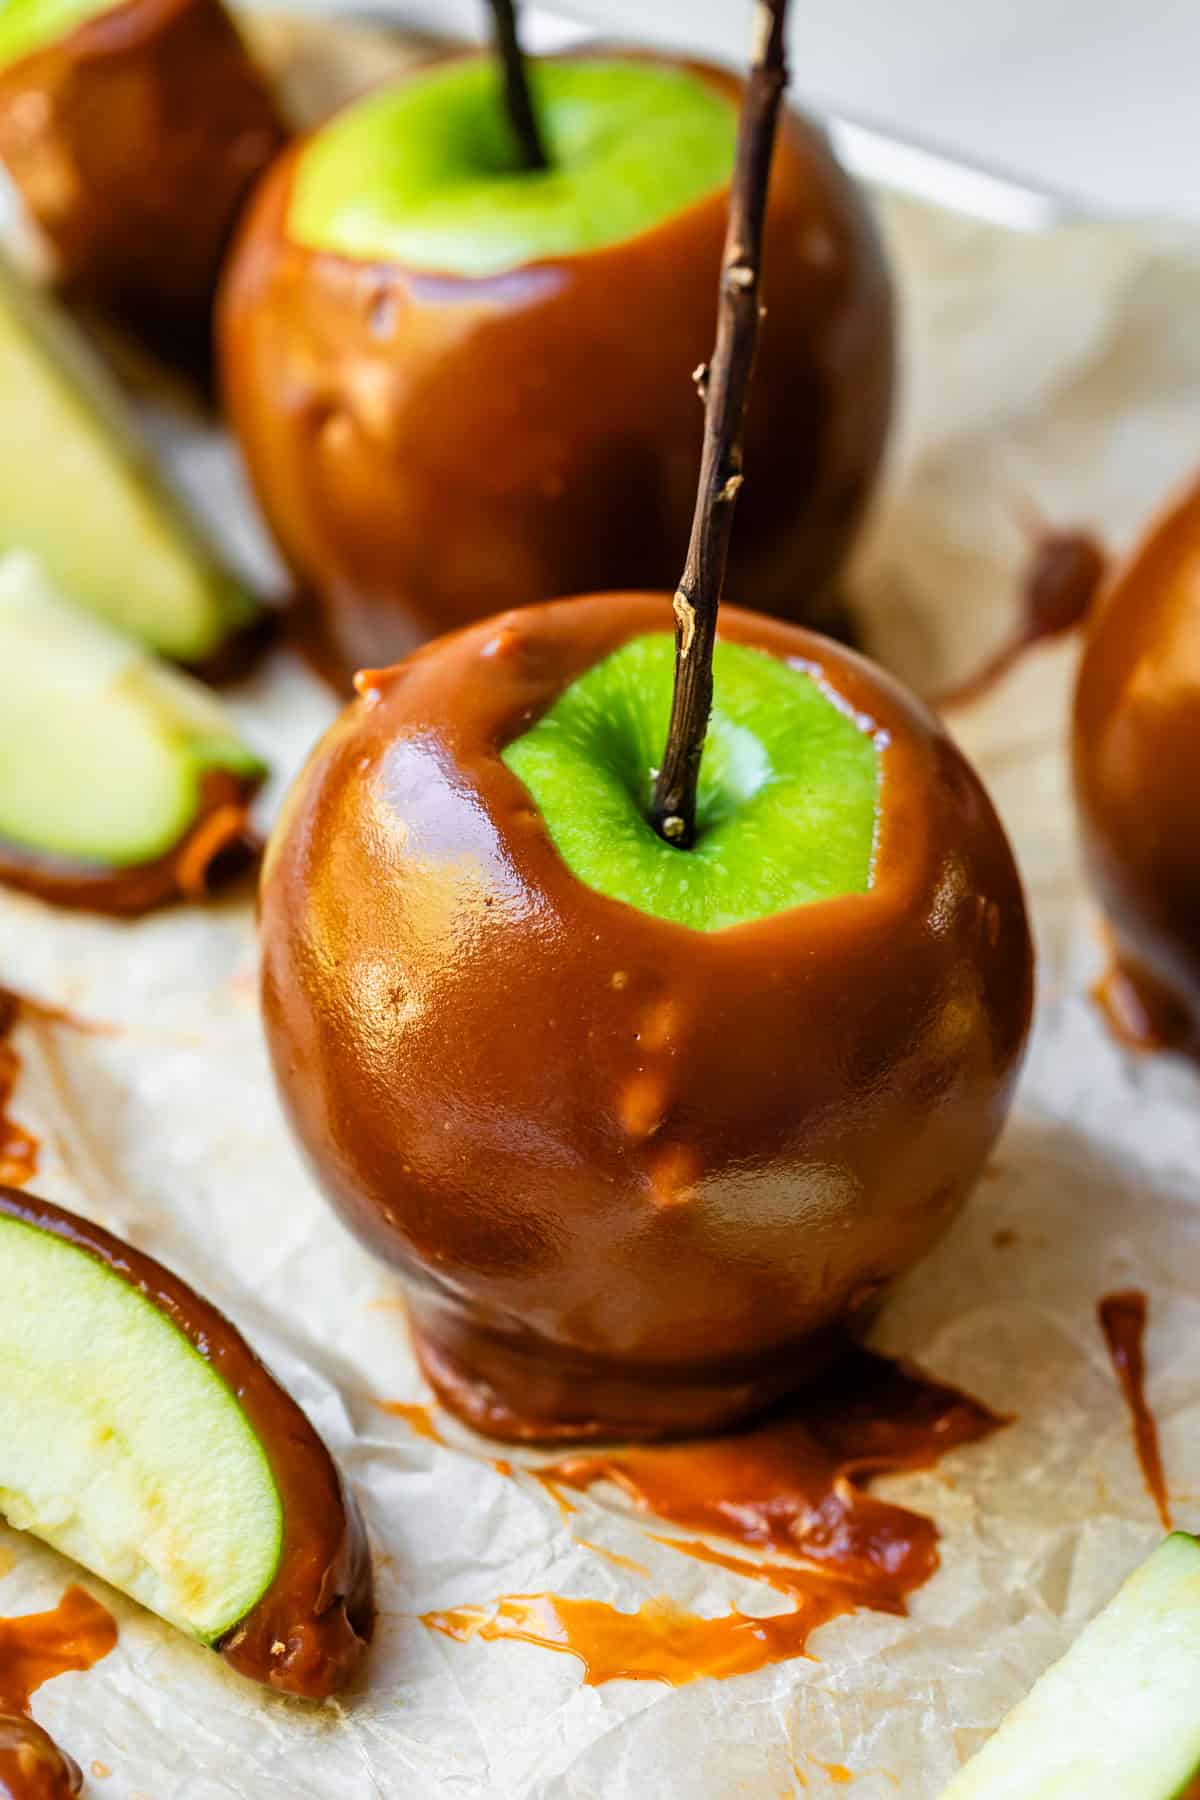
I had dreams for years of finding a caramel apple with the right texture: a dream to bite through, this caramel would melt in my mouth ALONG WITH the apple I was eating, instead of sticking around way past it’s welcome. This caramel would be soft, tender, full of caramel flavor, but not so sweet as to overwhelm the delicate flavor and crunchy texture of the apple itself. It would be the perfect compliment.
I had all but given up on this dream. I never bothered buying (let alone making) caramel apples. But my children had different ideas. They convinced me to buy a caramel apple for them a few years ago at Apple Hill. My expectations were low…until I took my first bite. I basically died and went to heaven. It was PERFECT.
It checked ALL the boxes. Amazing flavor? Yes. Not too sweet? Yes. Not too stretchy? YES. Easy to bite through? You guyyyyyssss. Bliss.
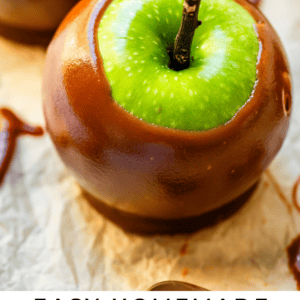
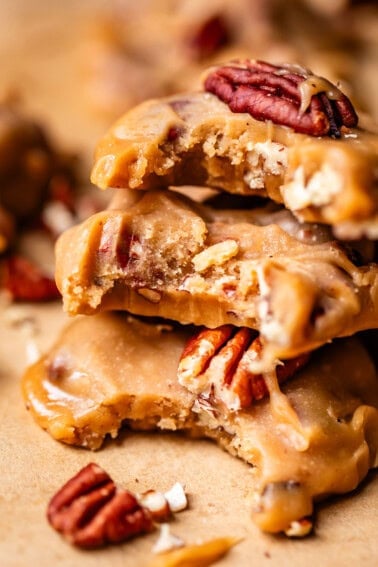
This caramel looked different: it was not perfectly smooth and glossy and shiny. It was…grainy looking. FUDGY looking. And that’s the best way to describe this caramel, honestly. It has a smooth mouthfeel (I promise it doesn’t feel grainy) but a chewy, rich texture that feels like biting into fudge. Fudge that is actually CARAMEL.
And thus started my YEARS long search for how to make this exact caramel sauce. I finally nailed it, and you can read all about the hunt on my Salted Caramel Sauce post.
Today’s recipe is almost the same as the sauce recipe, with a few important changes that make it perfect for dipping apples.
Rules for perfect homemade caramel apples
- Use cold apples, this helps the caramel stick better.
- Wash the apples and rub them thoroughly to get all the wax coating off, again to help the caramel stick
- Dry them completely
- You need caramel that is not too thin
- You need caramel that is not too stretchy
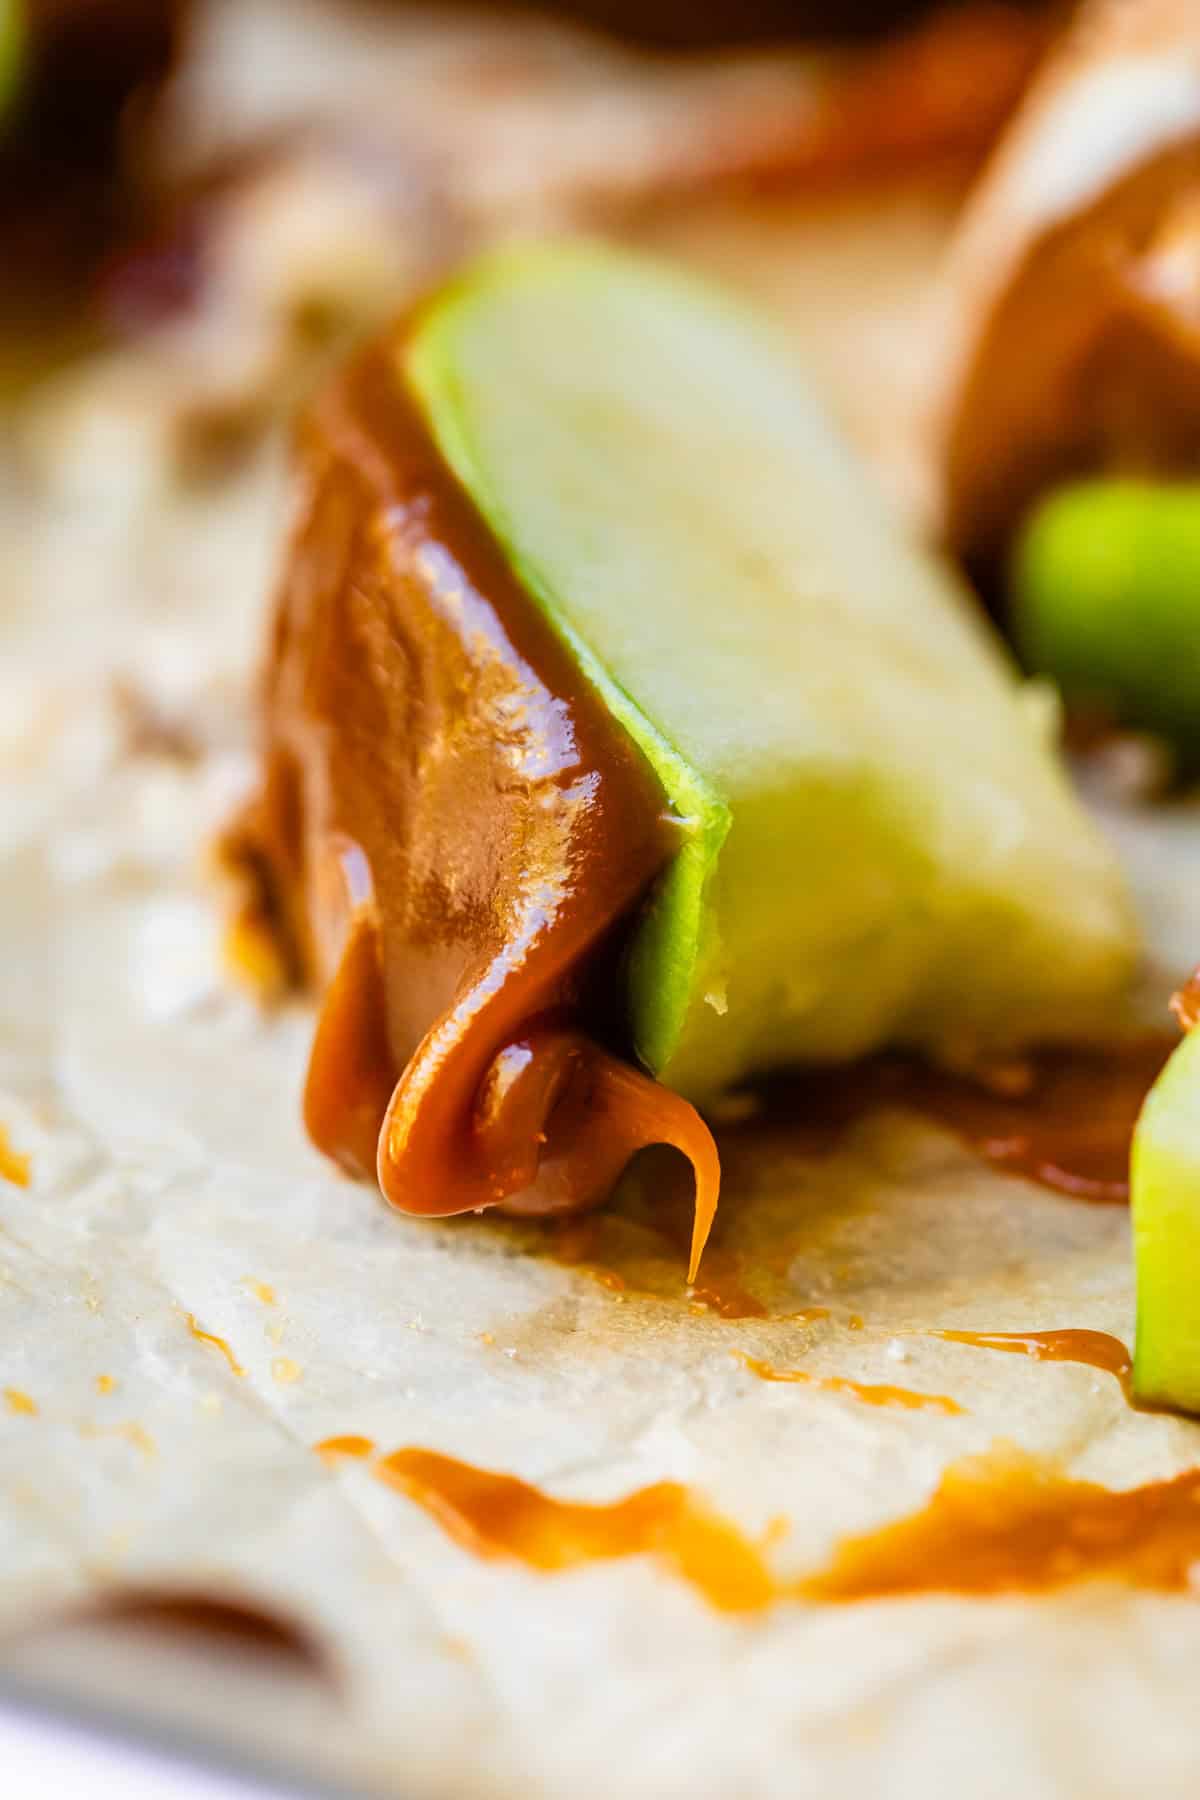
- You need caramel that is tacky to the touch but not so sticky that it won’t firm up eventually.
- Basically, you need this recipe.
How do you keep caramel from sliding off the apple?
The key here is having the right caramel, honestly. There are literally thousands of ways to make caramel, and some recipes (especially melted Kraft store-bought caramels) are just not the right consistency. Cold, dry apples also helps to make the caramel stick.
Caramel apple recipe ingredients
You’re in luck, the ingredients for these caramel apples are super basic! The hardest thing to find will be the apple sticks, and that’s not a problem because you can just find some in your yard in a pinch. We no fancy 😂 Be sure to look at the recipe card at the bottom of the post for all the details!

- Granny Smith apples, or your favorite tart apple
- apple sticks (or popsicle sticks, kebab sticks, lollipop sticks, chopsticks)
- granulated sugar
- salted butter
- corn syrup
- evaporated milk
- vanilla extract
- kosher salt, or sea salt
Optional chocolate or butterscotch dip
- white chocolate, semi sweet chocolate, or butterscotch chips
- vegetable oil
- granulated sugar
- cinnamon
How to make caramel apples
Start by prepping your apples. Wash them off and rub them to get all the wax off. Dry them off as much as you can. Twist off the stem if they aren’t too stubborn. Then poke in your stick:
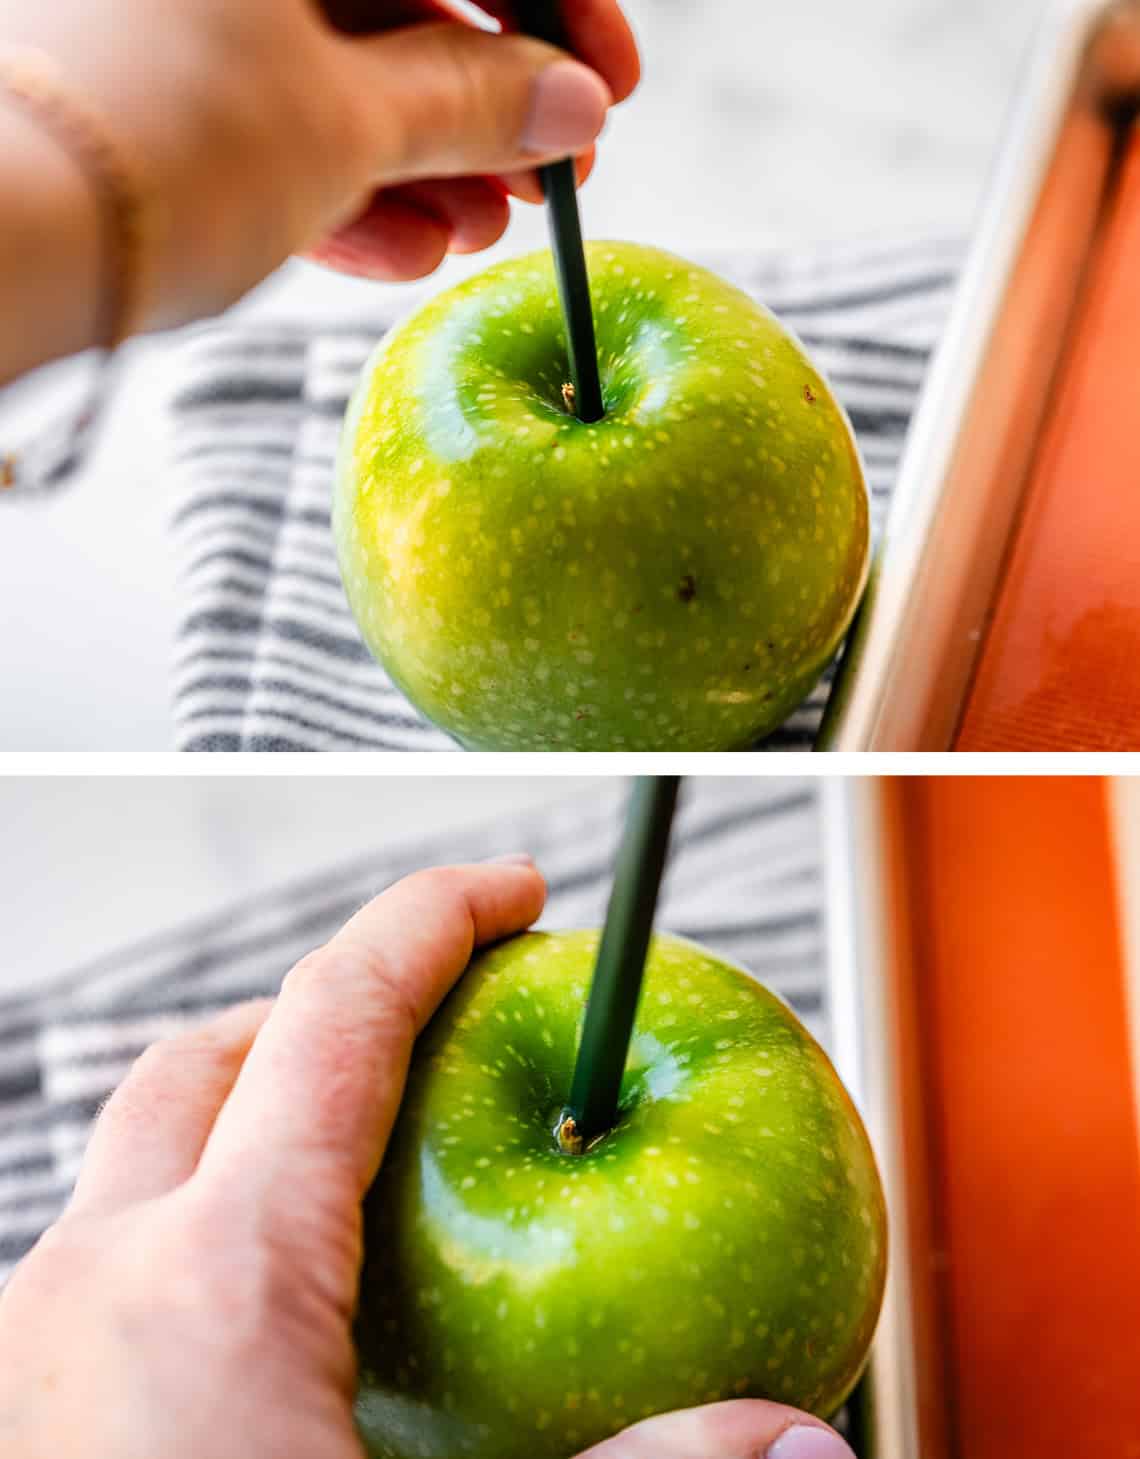
I used a chop stick here, then poked in a stick from my yard in its place. Push it in about 3/4 of the way down the apple.
Stick the apples in the fridge while you make the caramel, here we go!
Make sure you use a HEAVY bottomed saucepan. Add a bit of water and swirl it around to get the edges wet.

Add 4 cups of white sugar to the center of the pot, making sure to not get any sugar crystals on the edge of the pot. If you see any, swipe them into the water using a wet pastry brush.
Use a wooden spoon to draw the water into the center of the sugar, avoiding the edges.

See these sugar crystals on the pot below?

Get rid of them. Don’t worry about adding a bit of extra water to the pot, it’s all going to evaporate anyway. The goal is to dissolve all the sugar. Any crystals on the side could impact the final caramel, making it grainy.
Bring the mixture to a boil, then lower the heat to medium.

Once it’s uniformly bubbly, you don’t need to stir anymore. Toss your spoon, the sugar crystals likely on it are a risk anyway!
After a while it will turn yellow:

Swirl the pan to keep the color even. It will keep getting darker…

And eventually start turning a light amber color, and then a DEEP amber color:

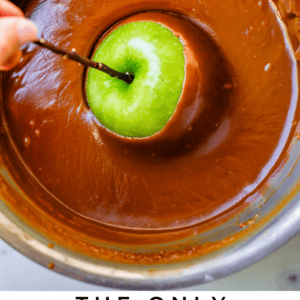
Once your caramel is deep amber AND you see the first few wisps of smoke (not the very first one, a few wisps of smoke is good), your sugar is caramelized. Take it off the heat!
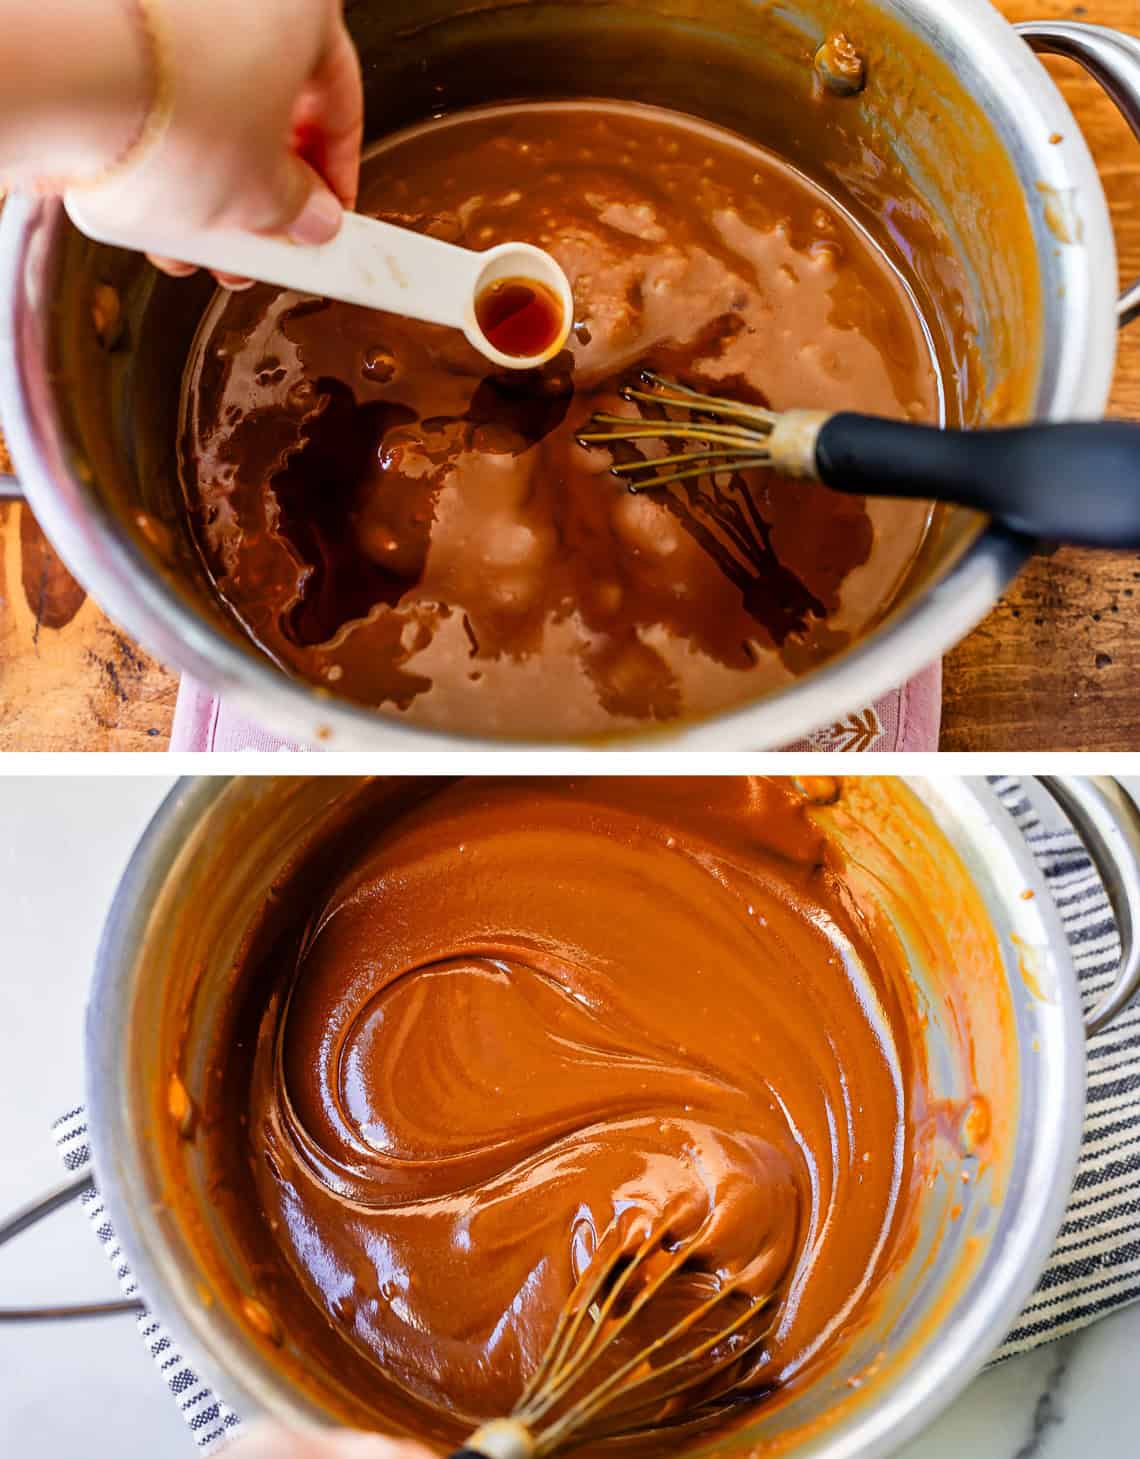
And now it’s go time!! Add the butter right away! You need to stop the cooking process IMMEDIATELY, otherwise the caramel will keep cooking and it will burn before you know it. Get a move on!! Taking it off heat is not enough. You have to add the next ingredient. The caramel will start to get creamy when you add the butter:

Then add in the corn syrup, 2 cups. Keep stirring!
Move the pot back on the heat. Take the next 10 minutes to add 2 cans of evaporated milk. Take your time with this step! If you add it all at once you will get caramel that is not smooth, no thanks.

Now it’s time to settle in for the long boil. Once all the milk is added, continue cooking until the temperature reaches 238 degrees F.
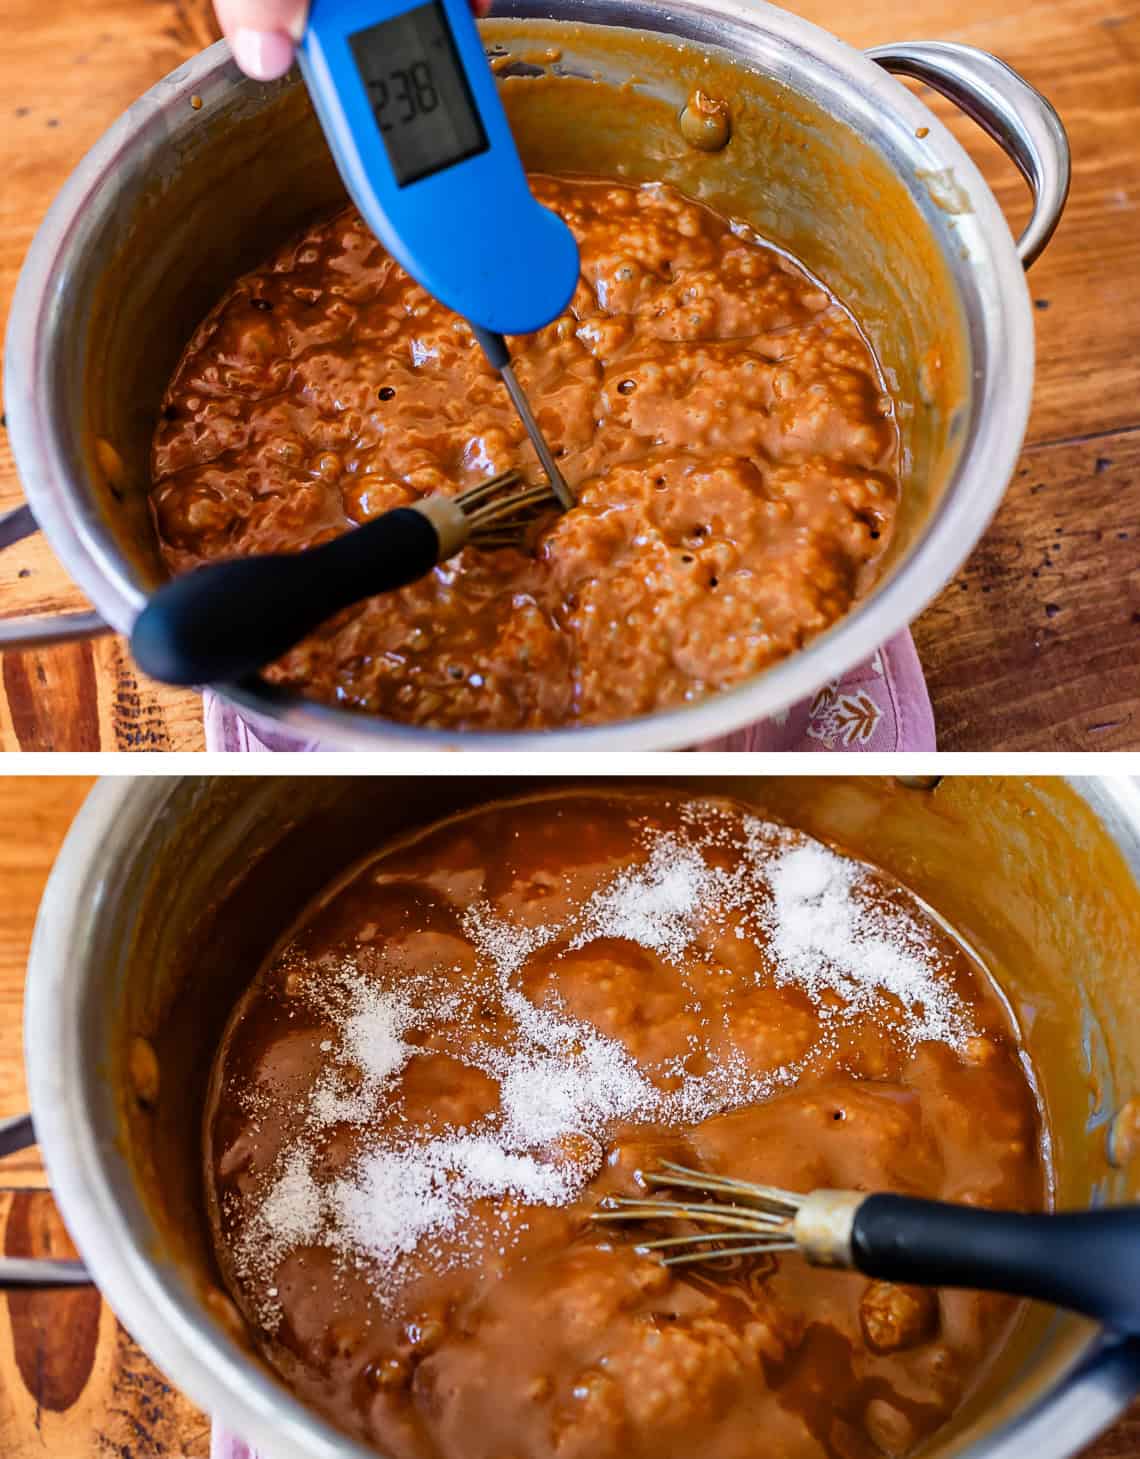
Add in the salt. You can use as much or as little as you like. I add about 1 and 1/2 teaspoons kosher salt, use less if all you have is table salt!
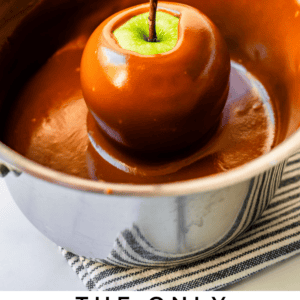
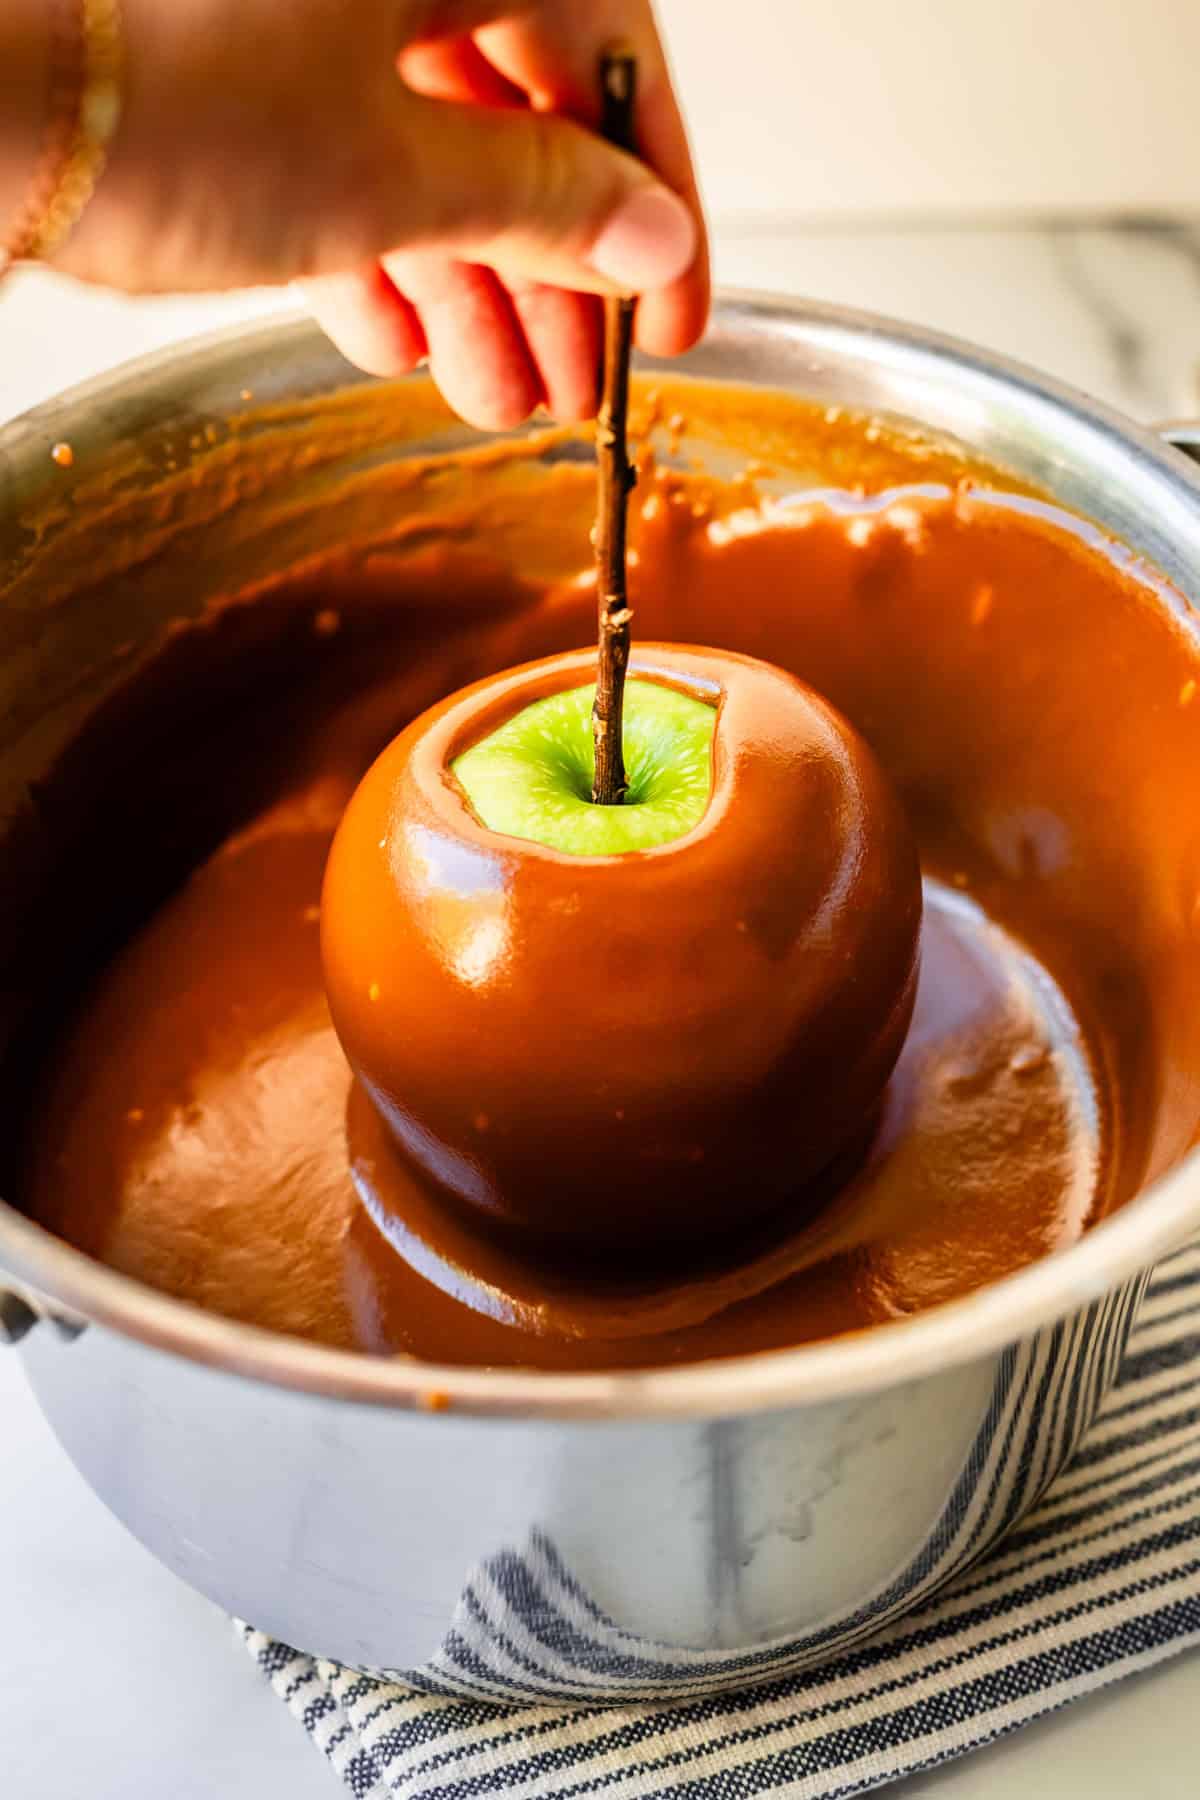
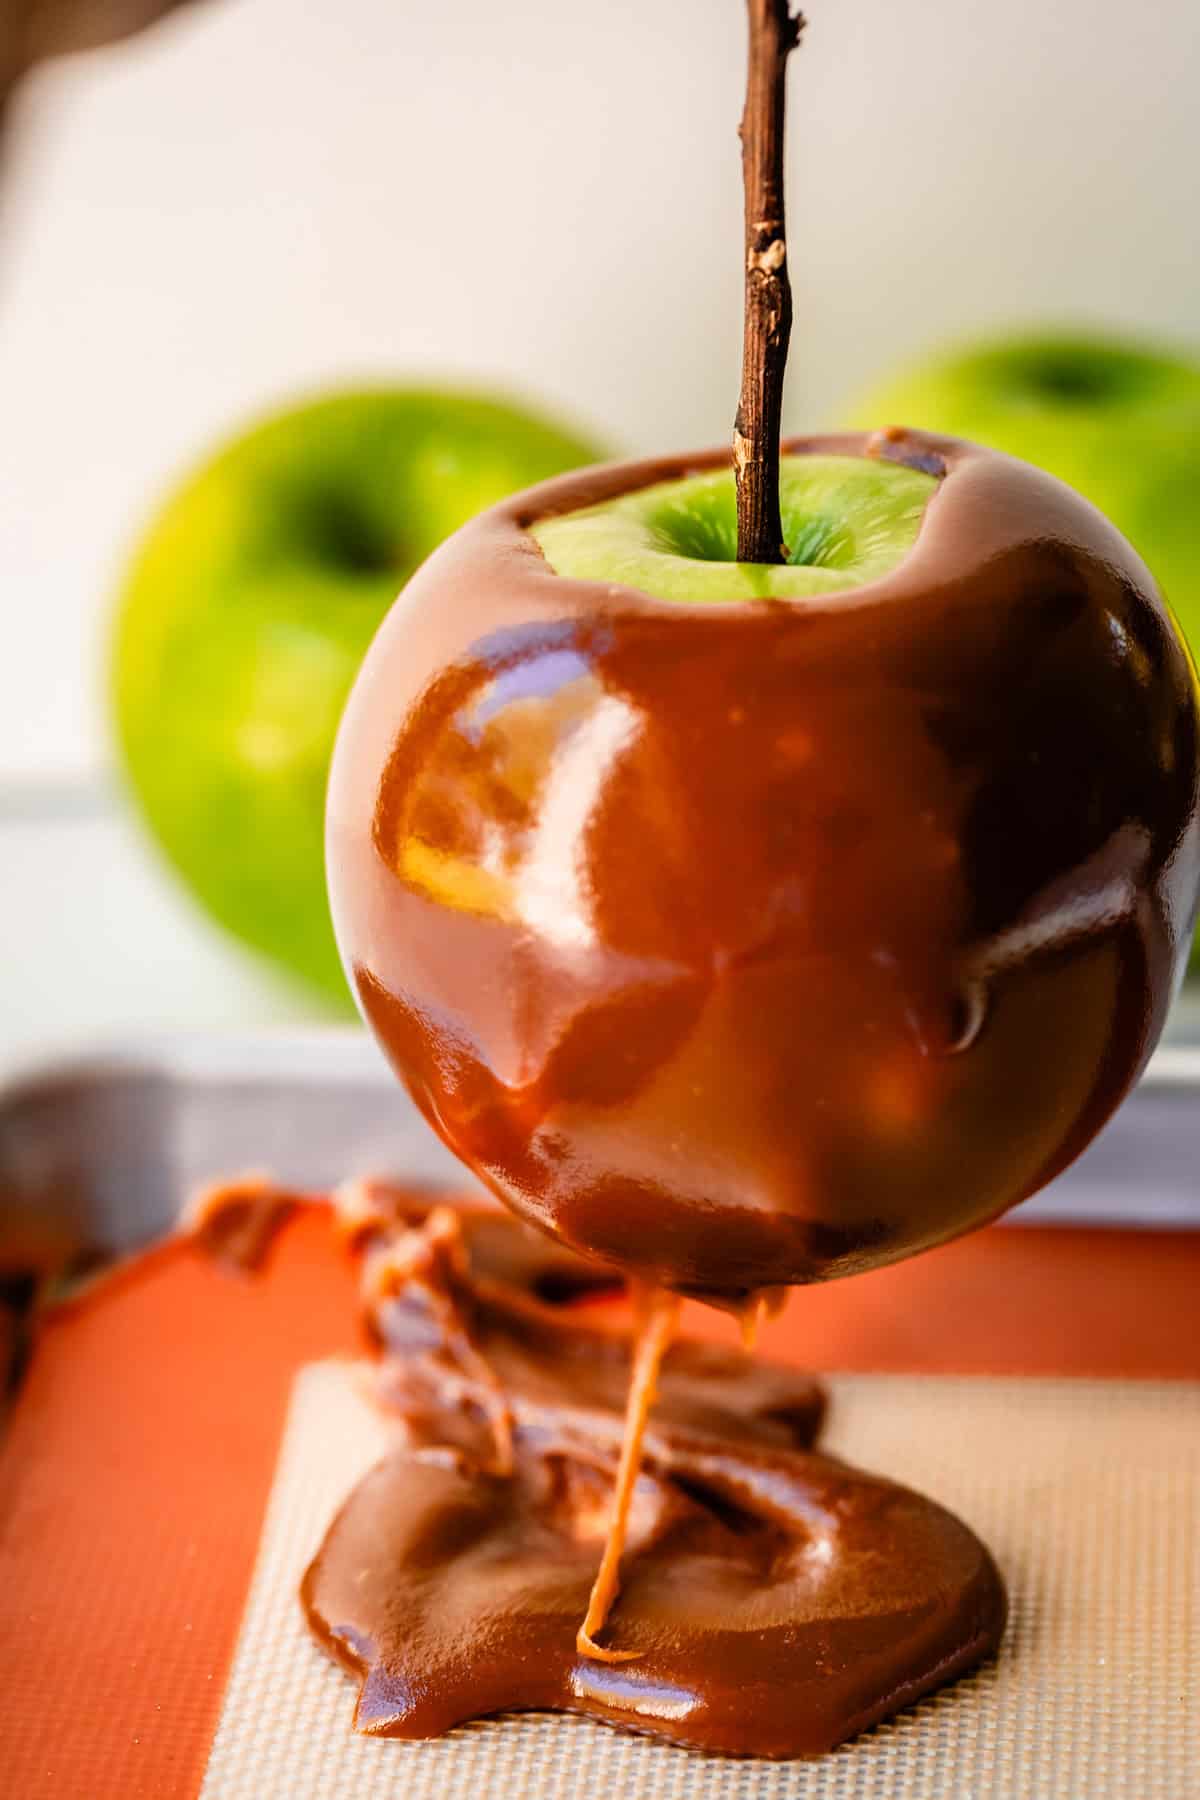
Let the caramel cool off for a few minutes so it’s not burning hot. Then, start dipping your COLD apples:
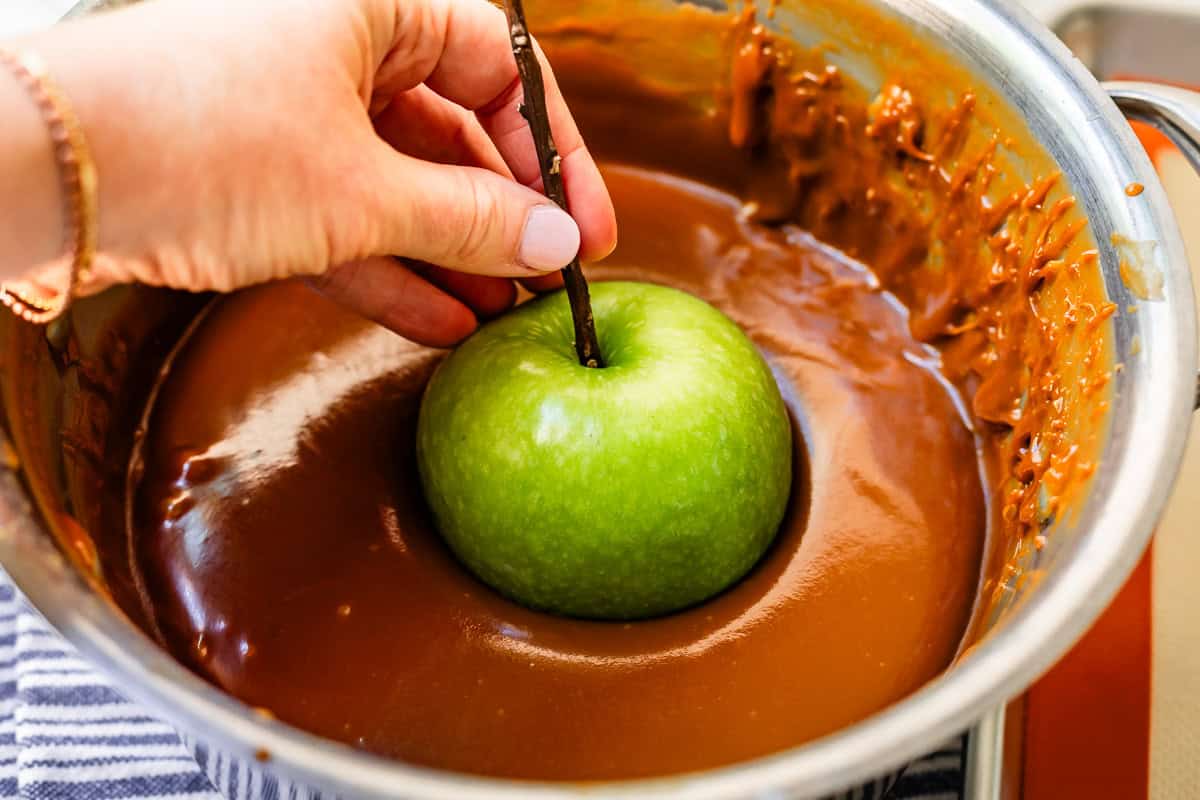
Swirl it around:
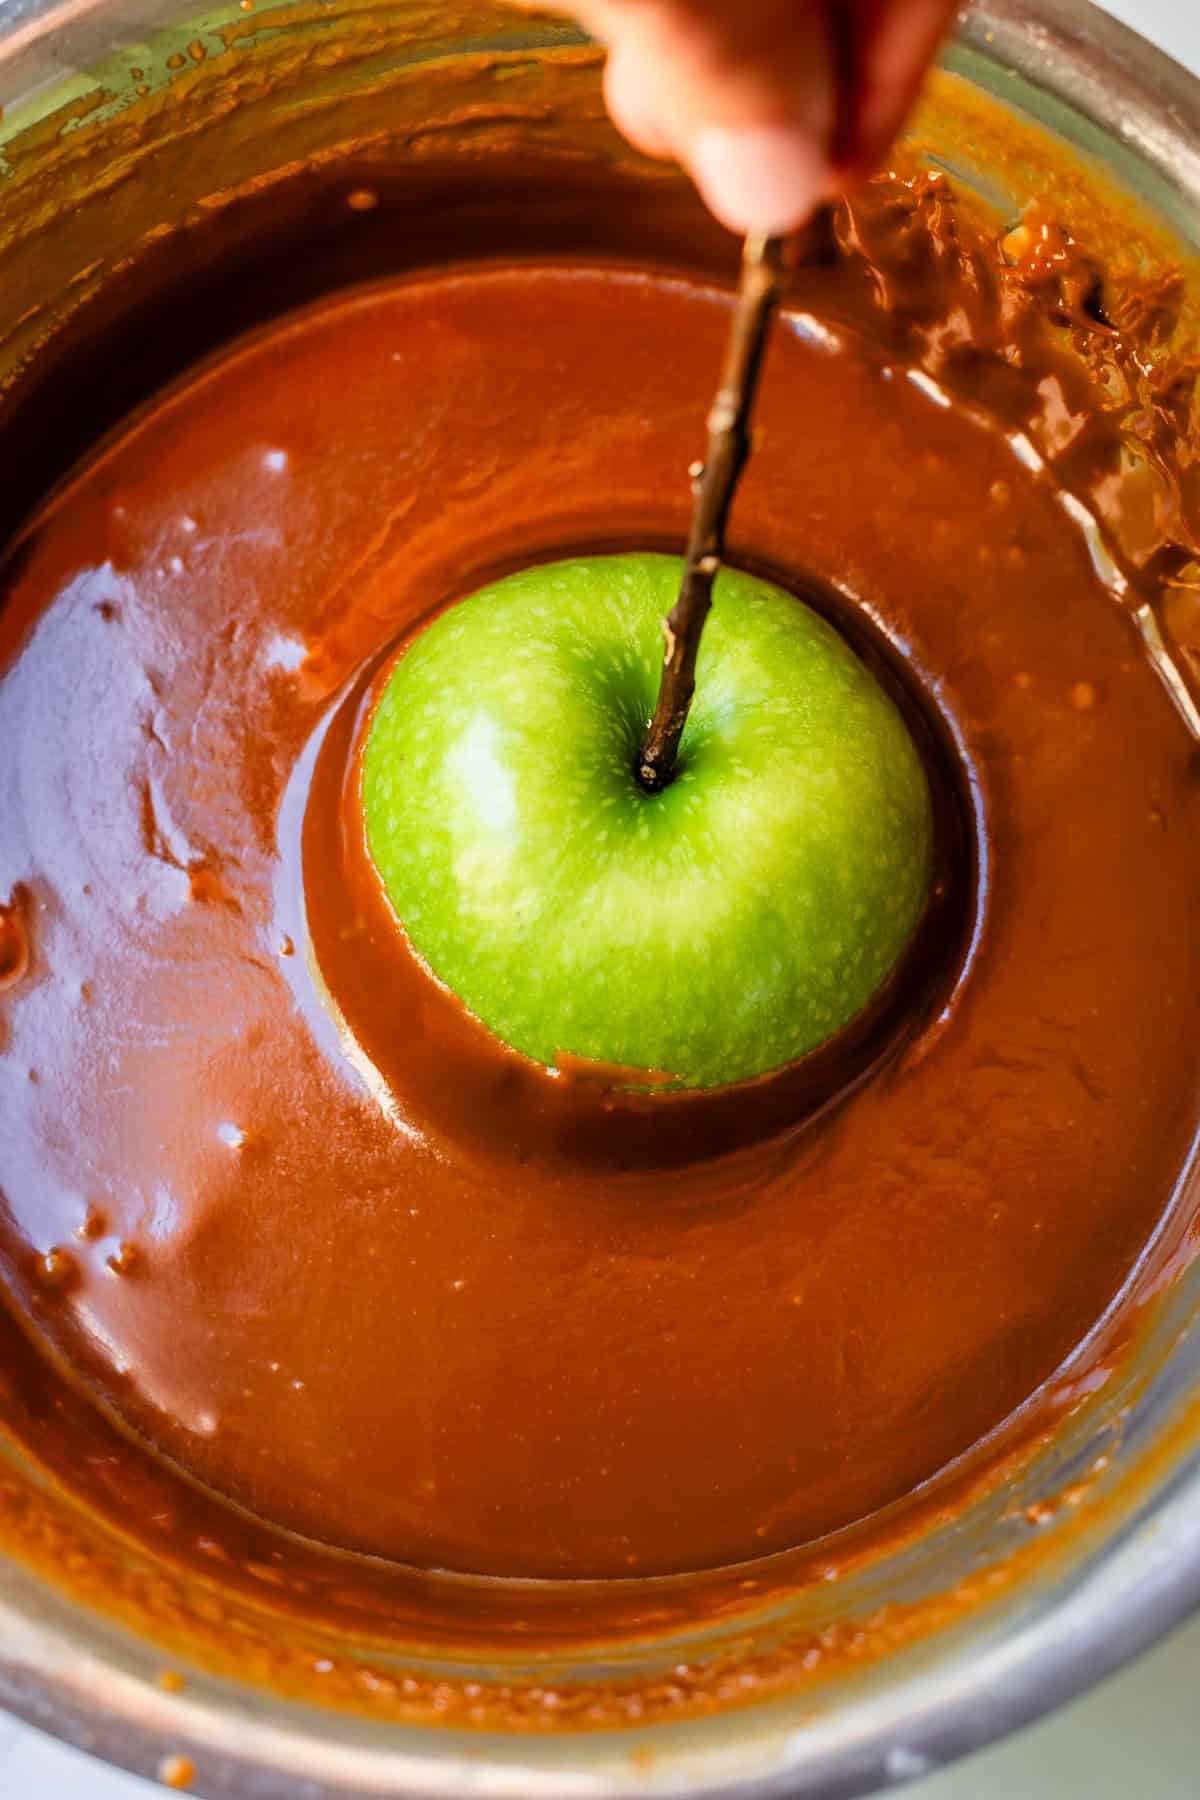
Tilt the pan if necessary, and dunk in the whole thing.
Don’t take too long with this process, or your apple will get warm and the caramel won’t stick as well.
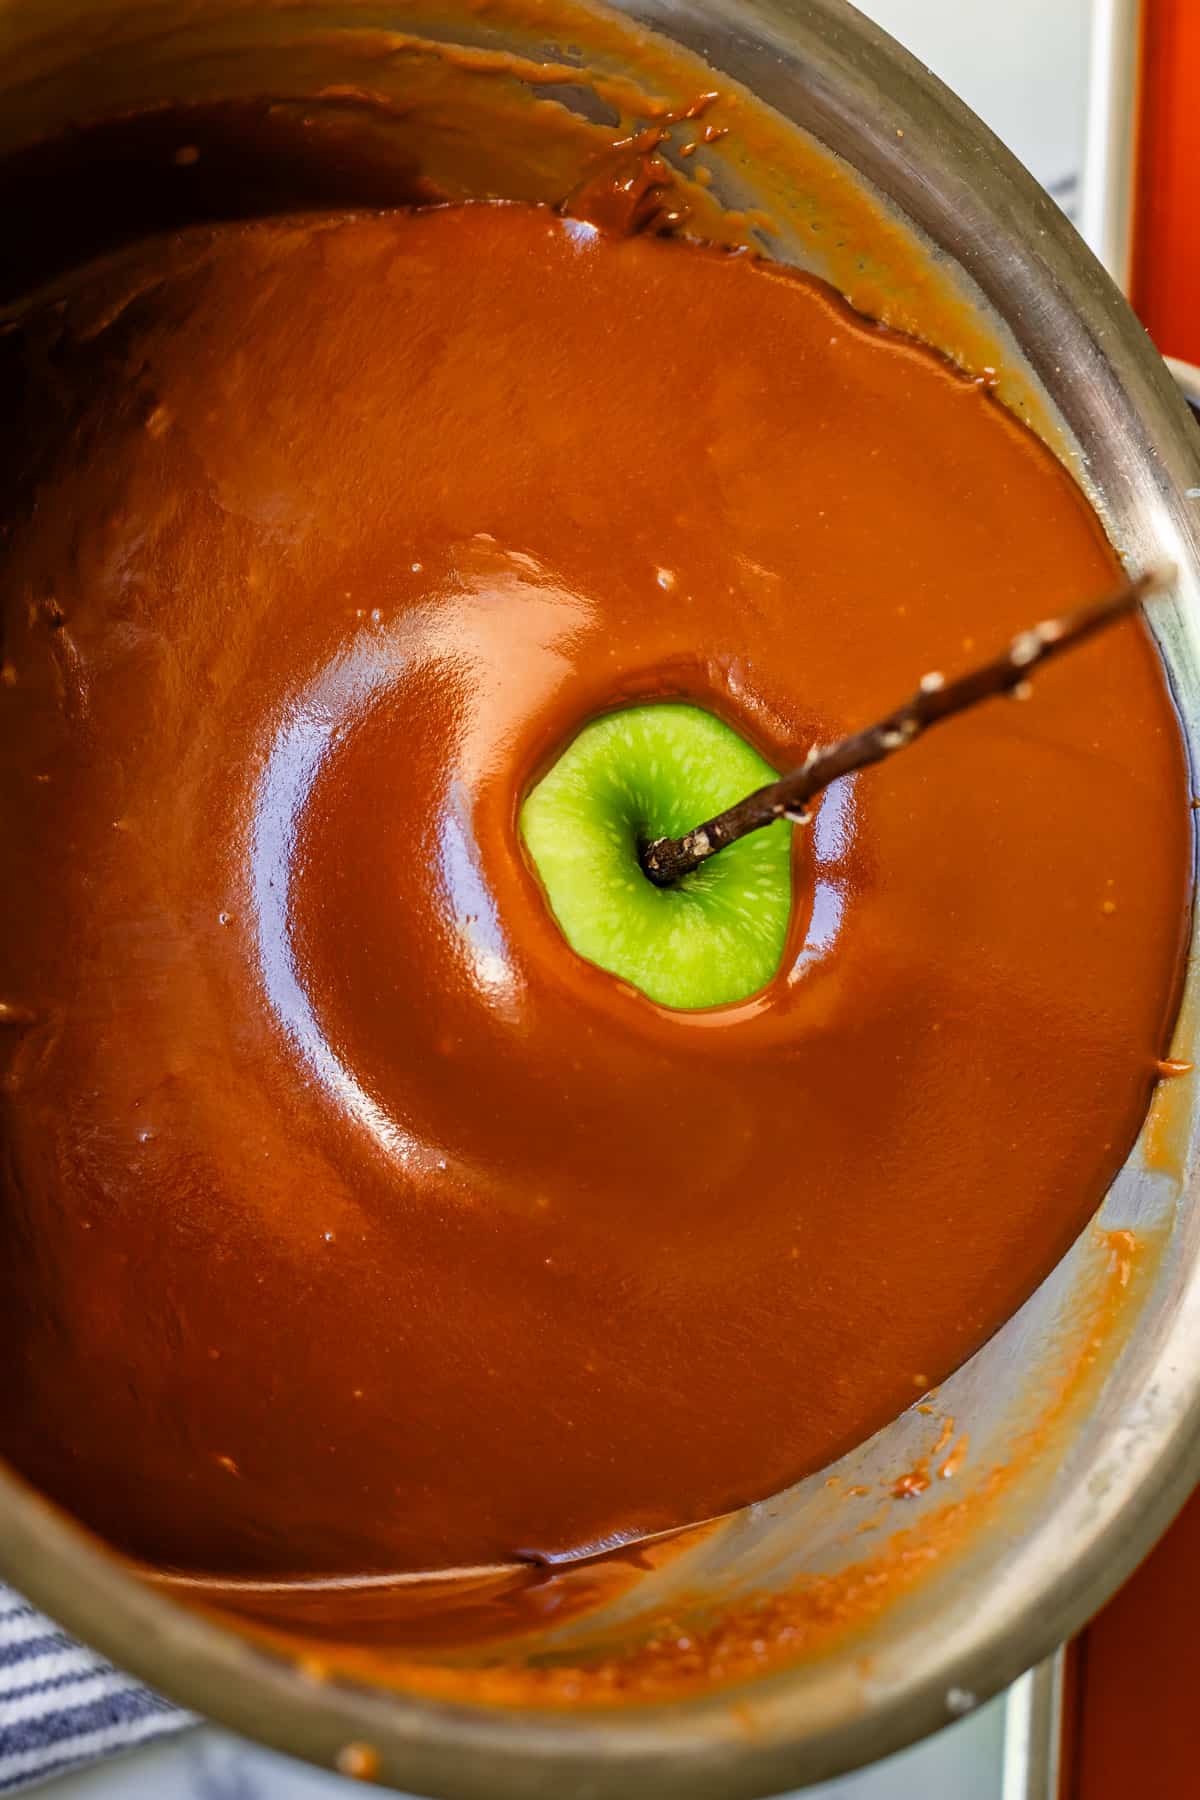
Let it drip off for a moment:
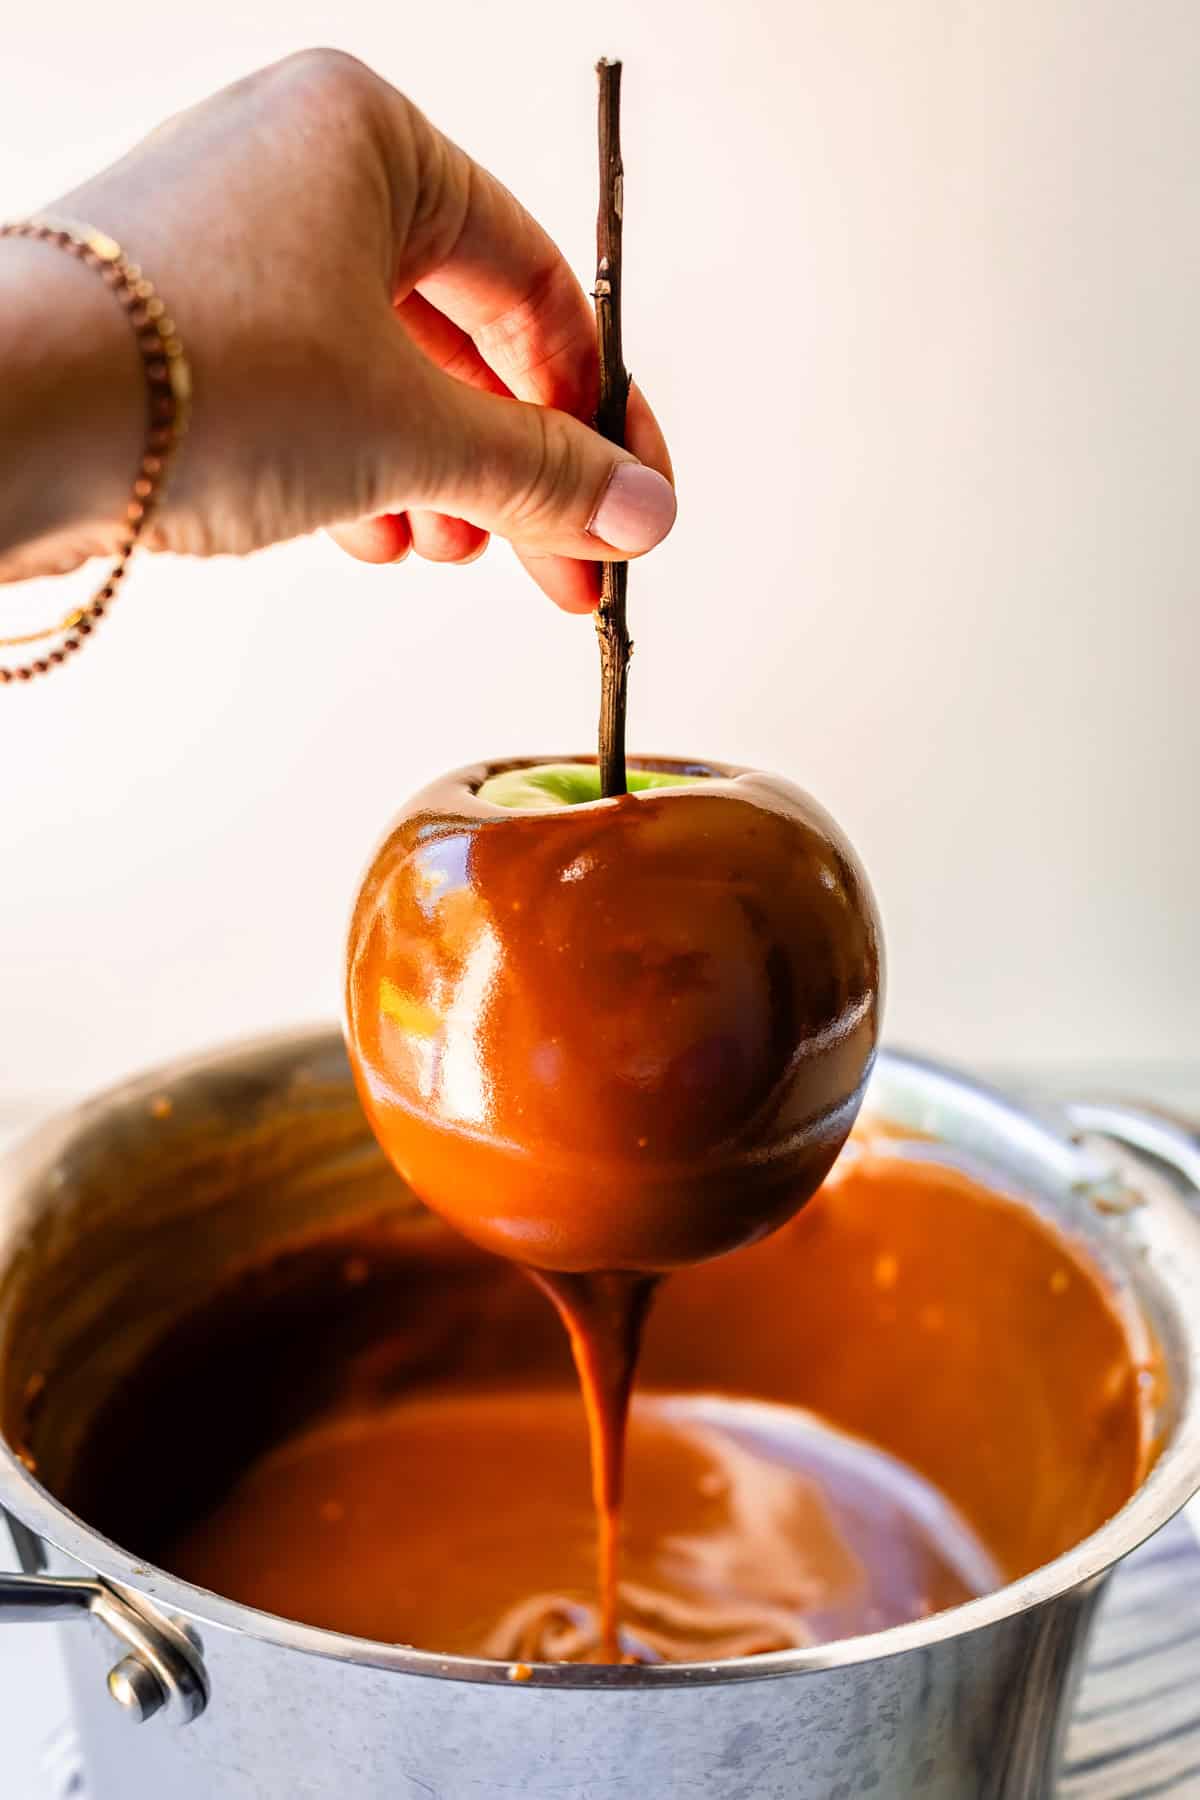
Gently scrape off the bottom edge:
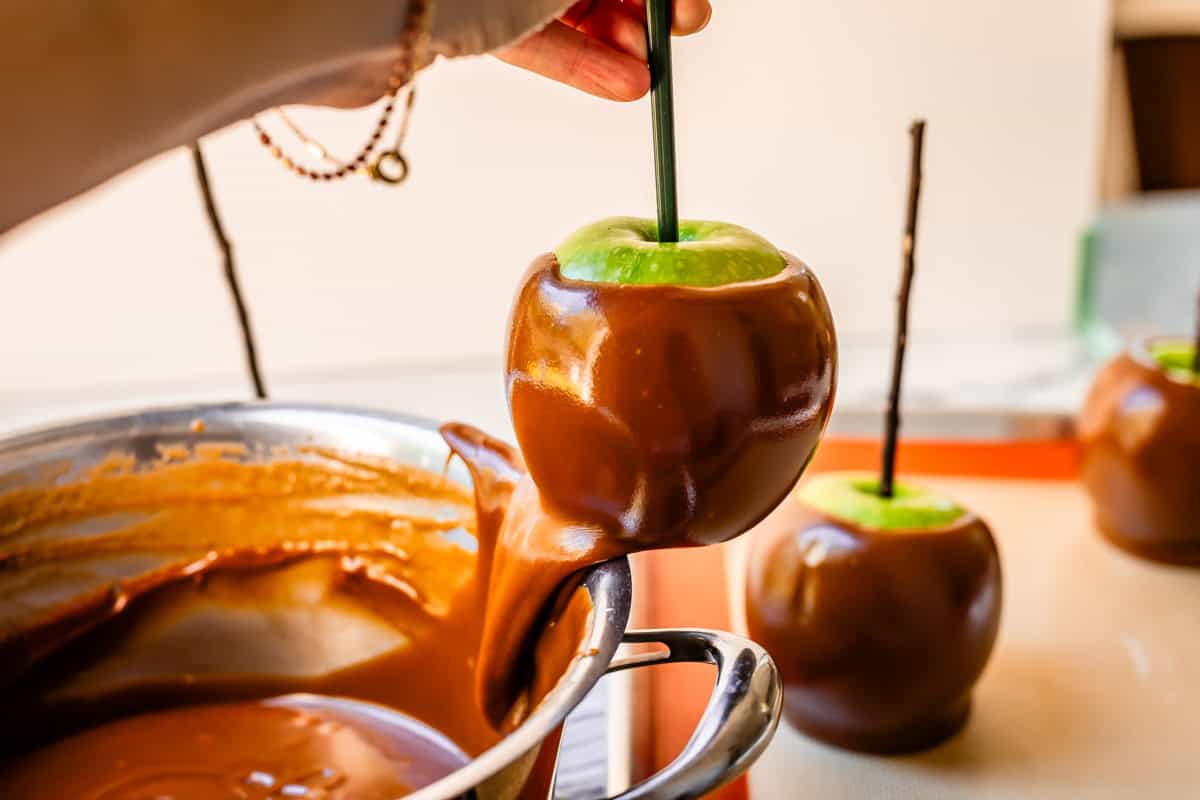
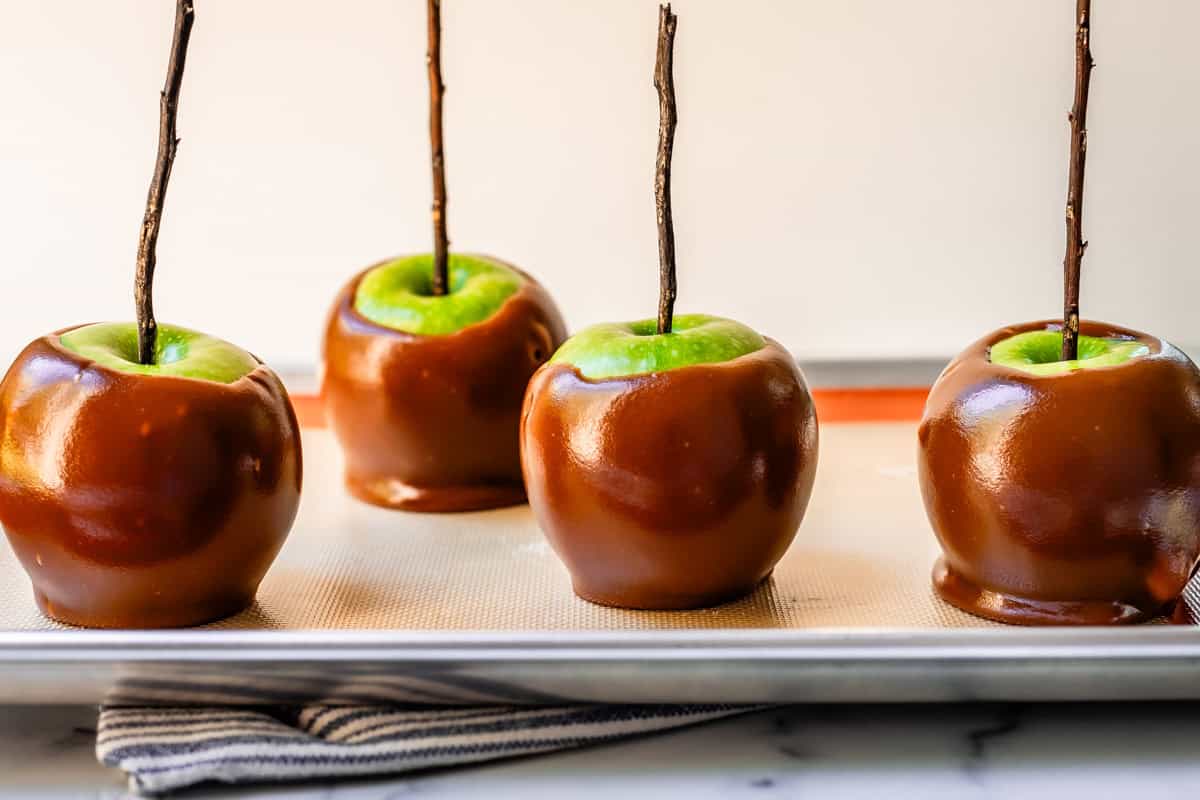
And place the apple on a silpat lined baking sheet. This caramel sticks to almost any other surface, so I really recommend a silpat!
After a few minutes, lift the apple again if there is still a lot of caramel pooling around the apple. (Scrape the remaining caramel back into the pot, reheating the caramel as necessary.)
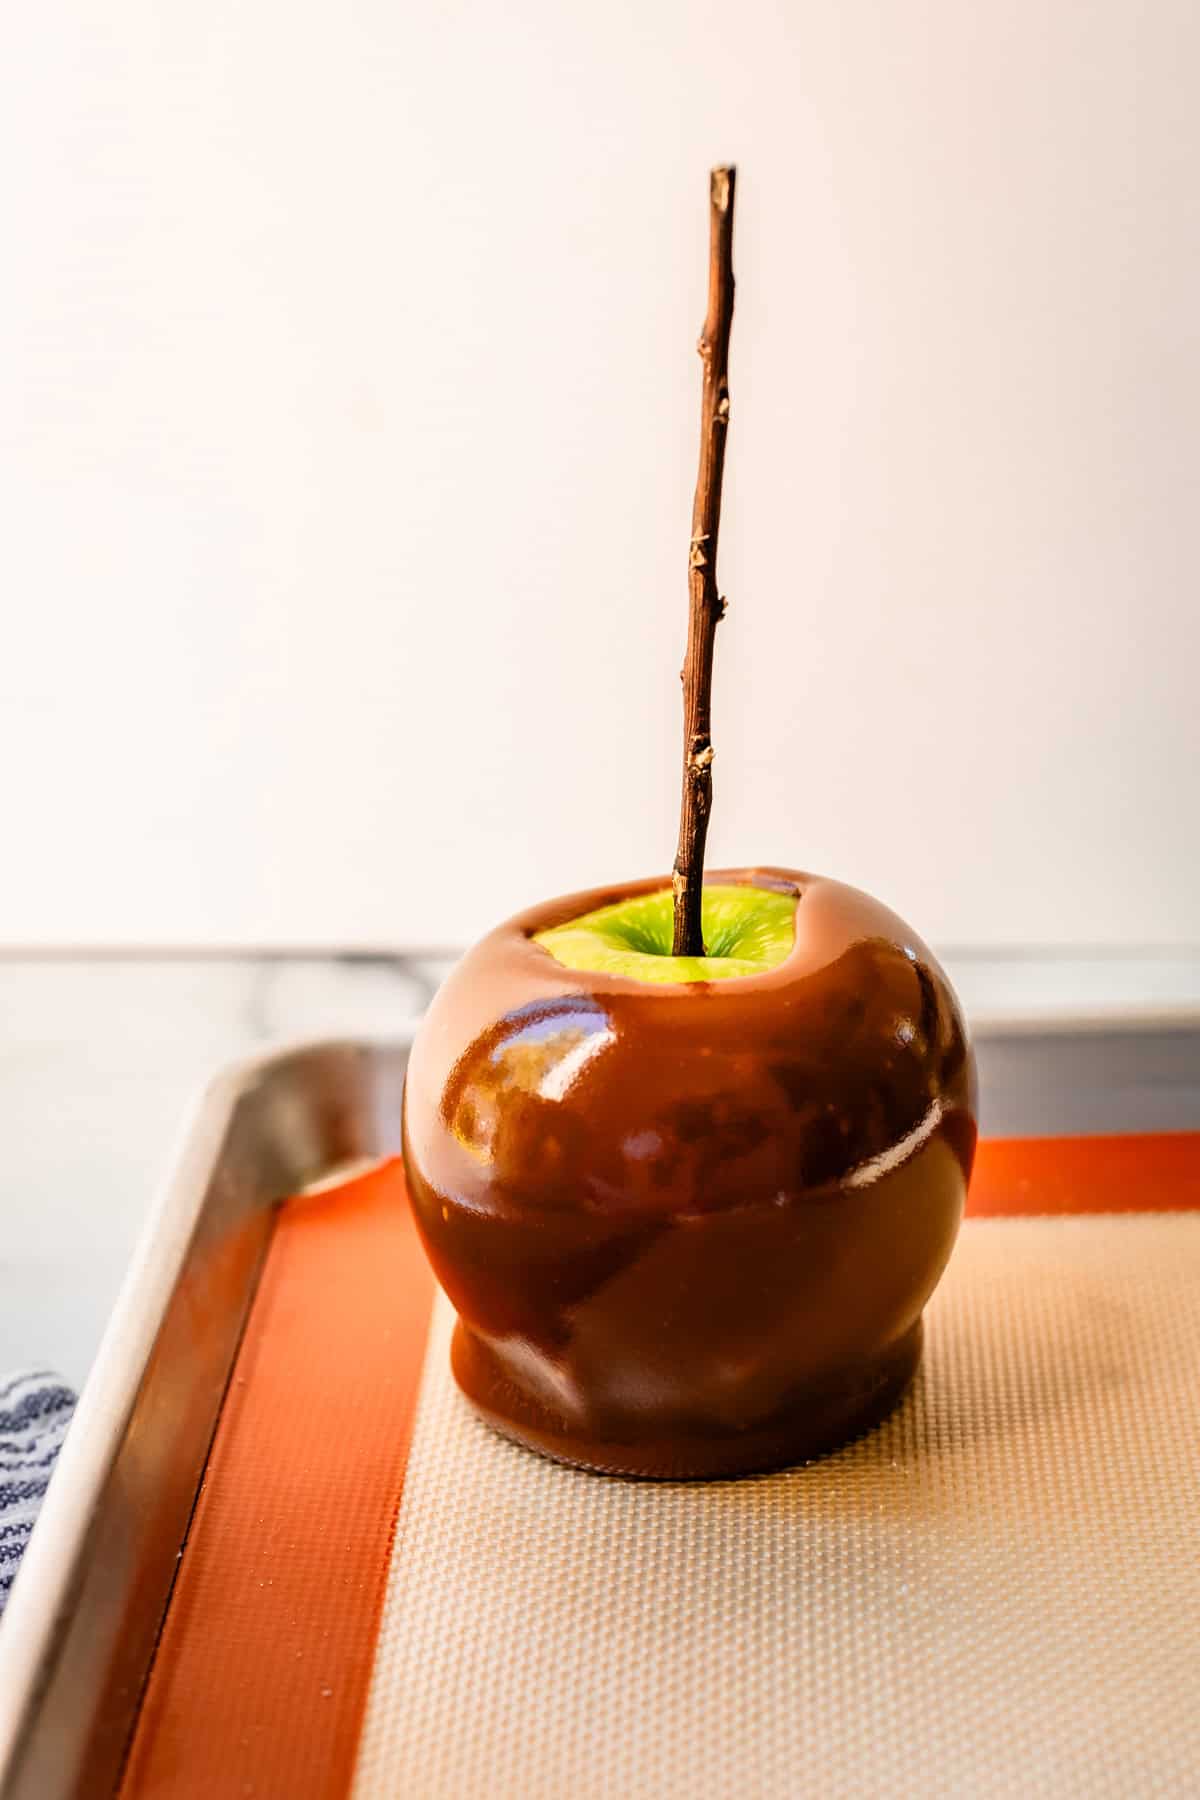
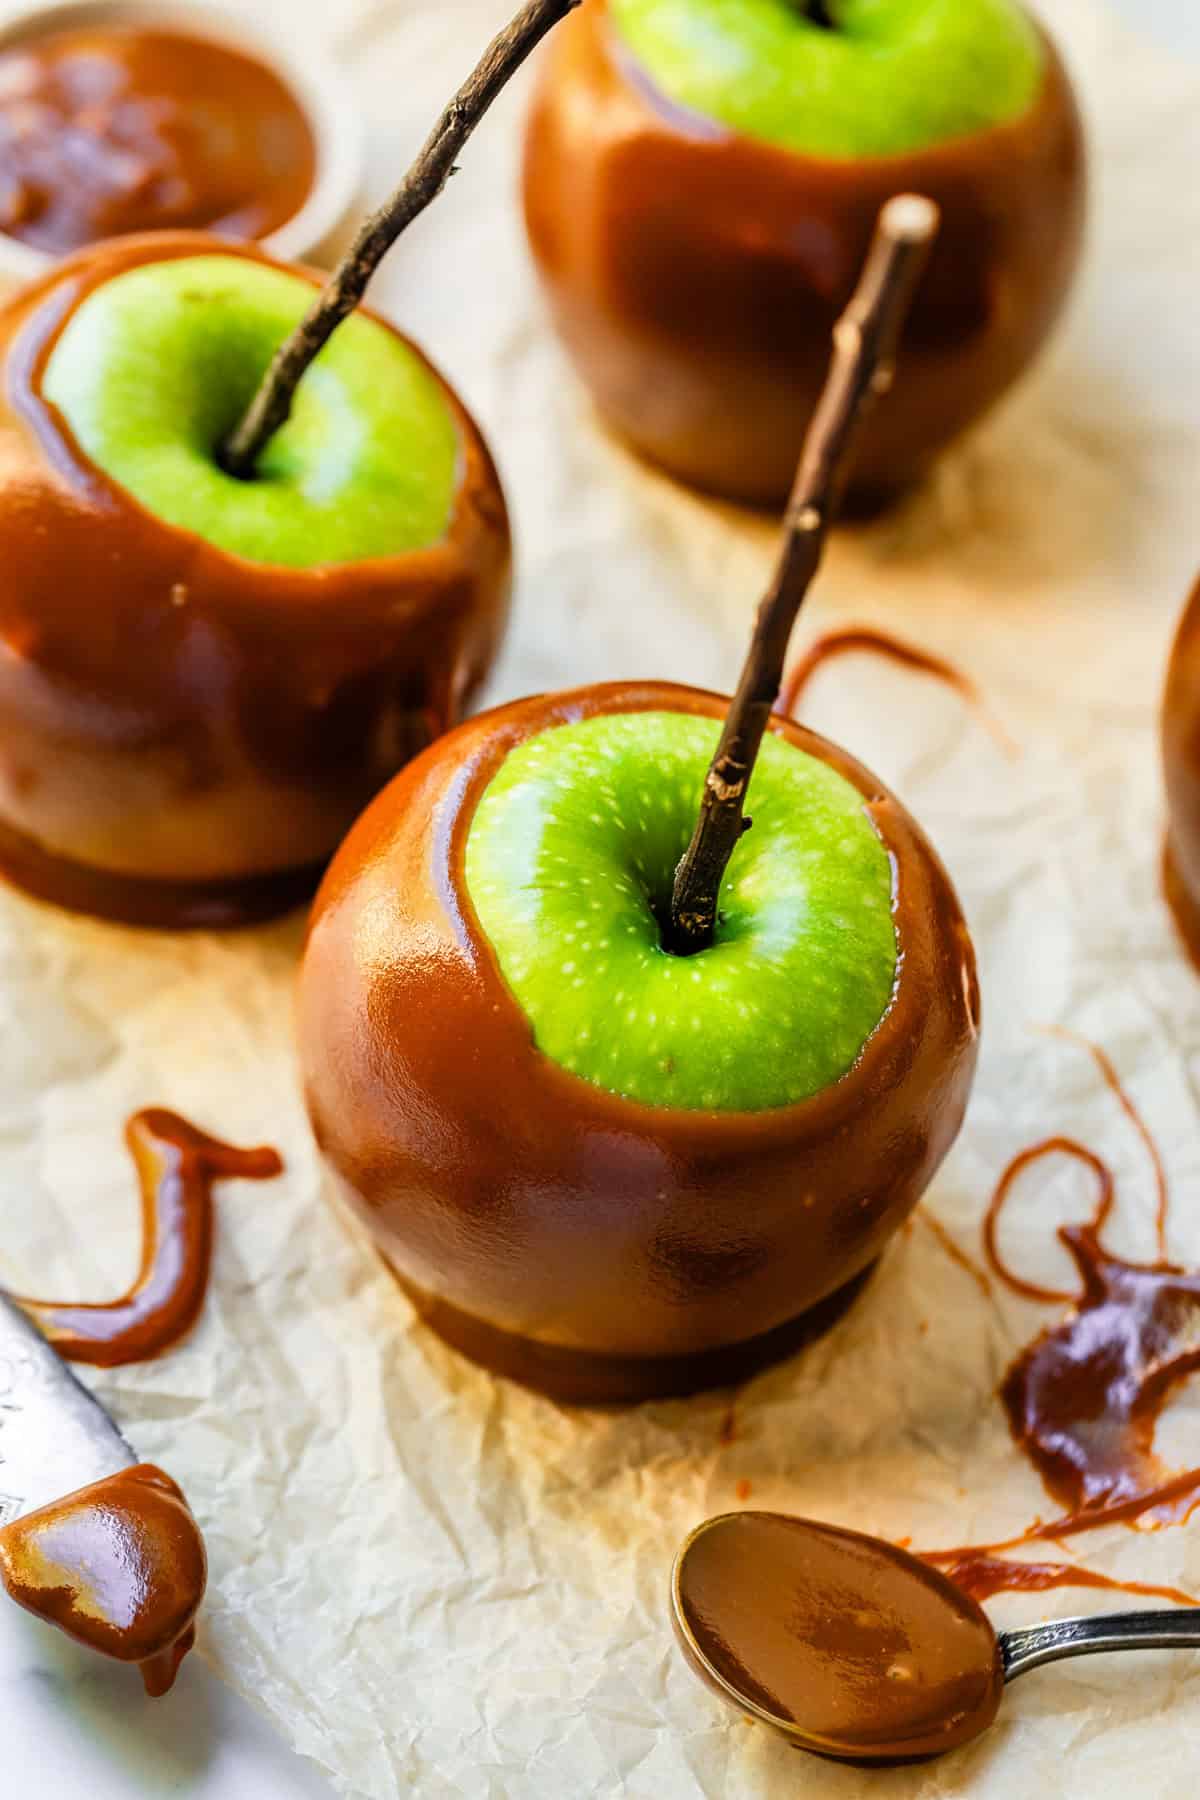
Wait for the caramel to harden a bit, sticking the apple in the fridge if you want. Then, if you want a second flavor, dip in melted chocolate! This is my favorite combo ever:
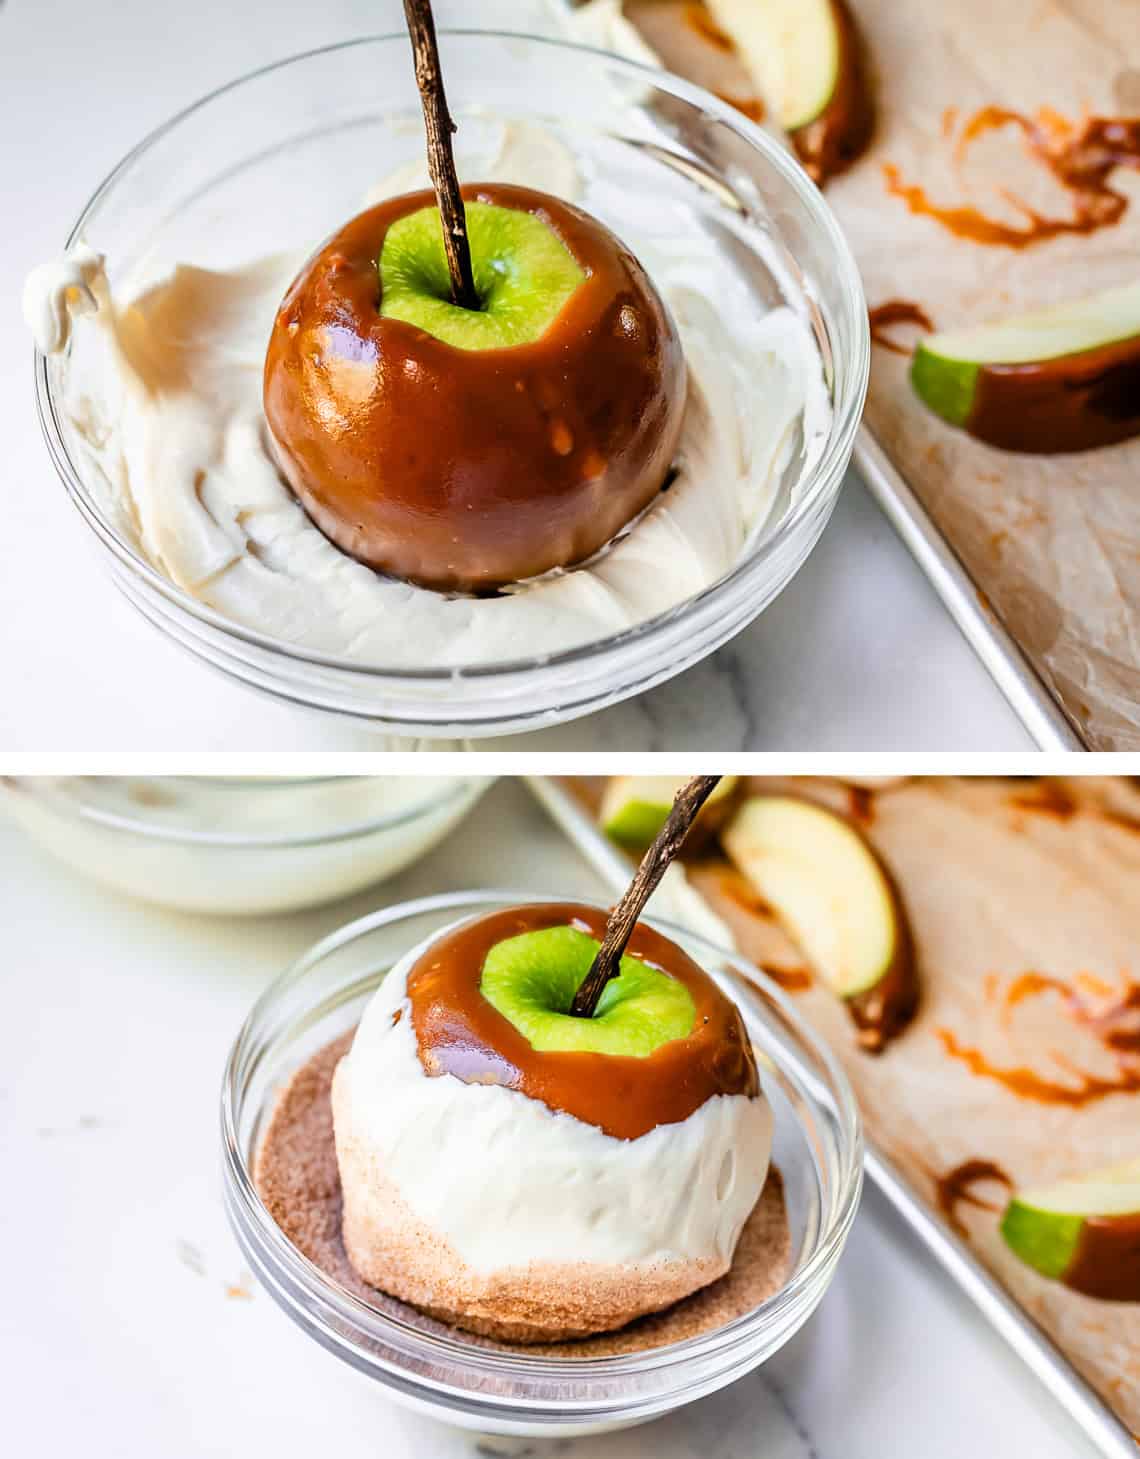
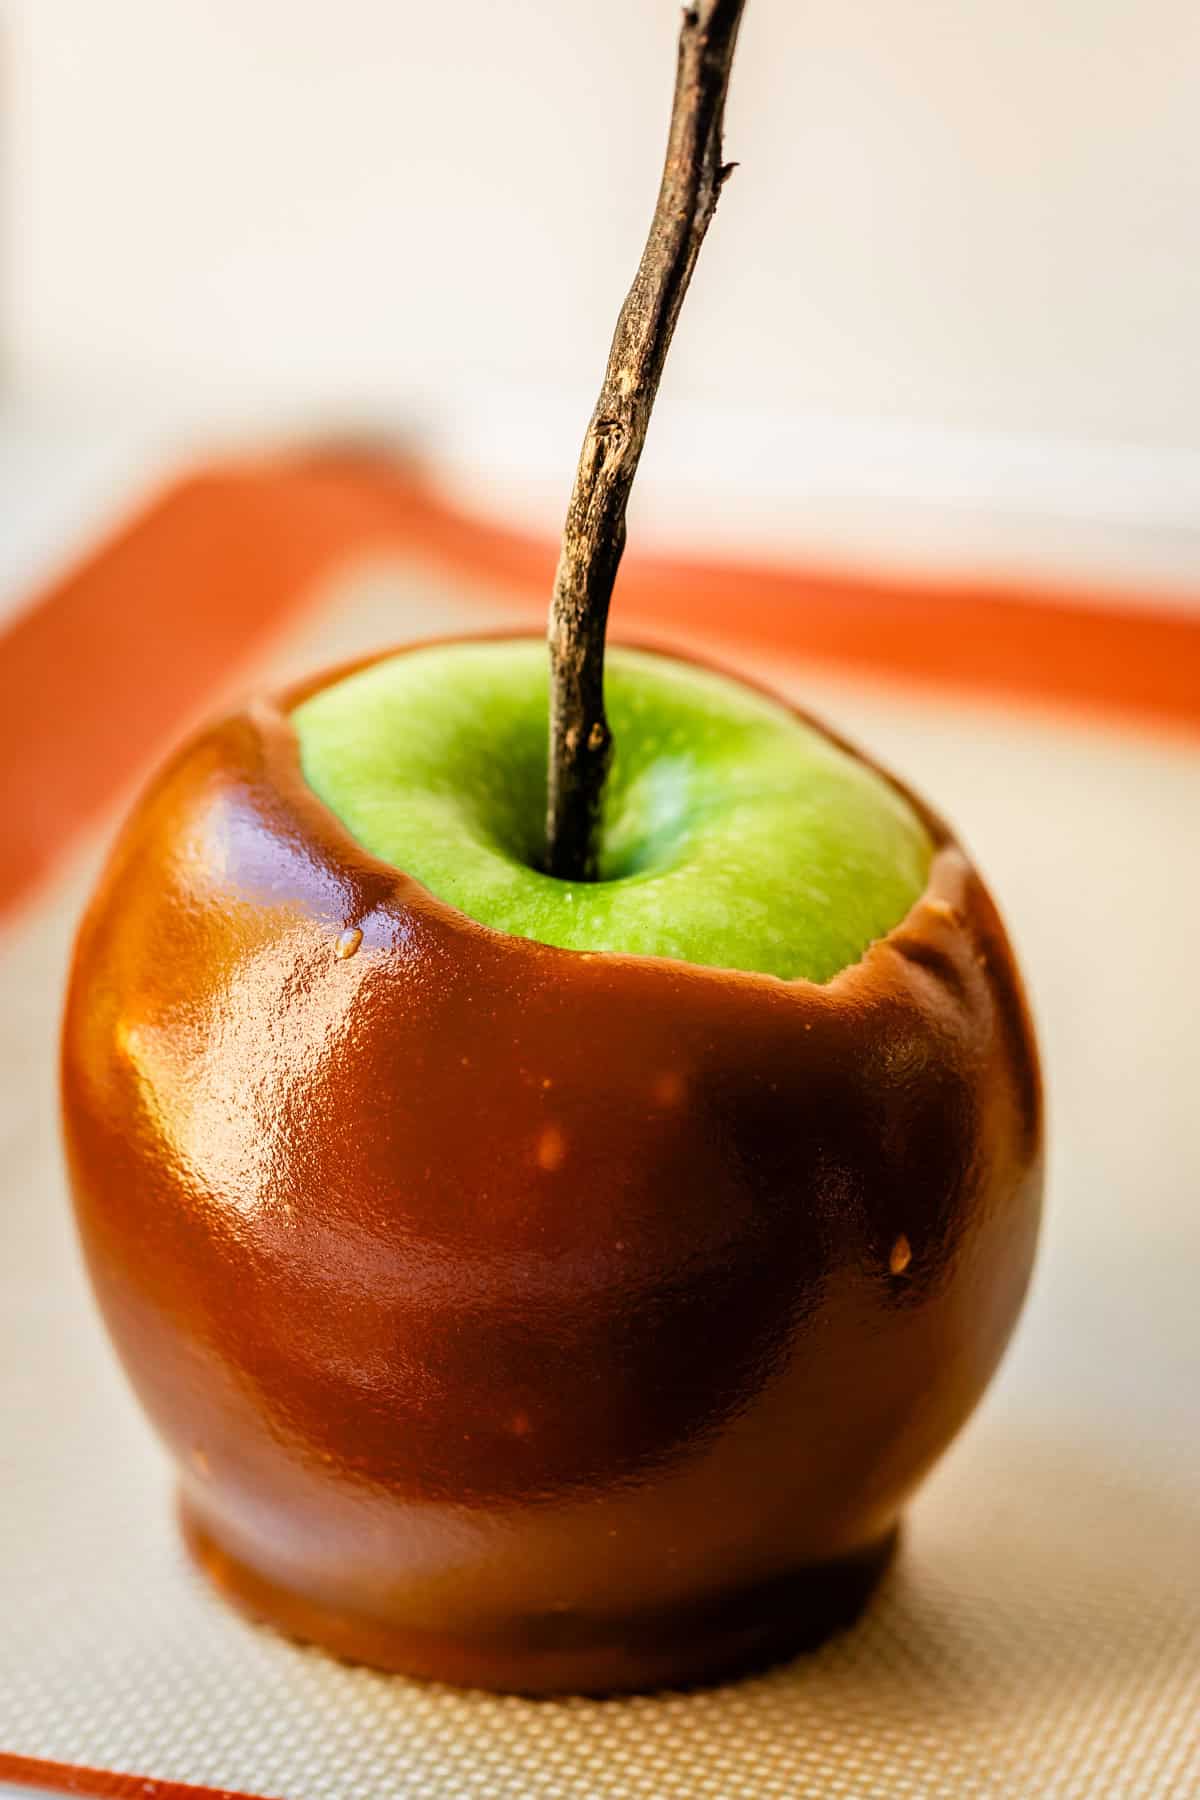
White chocolate and cinnamon sugar! Set them out to dry completely, it doesn’t take long.
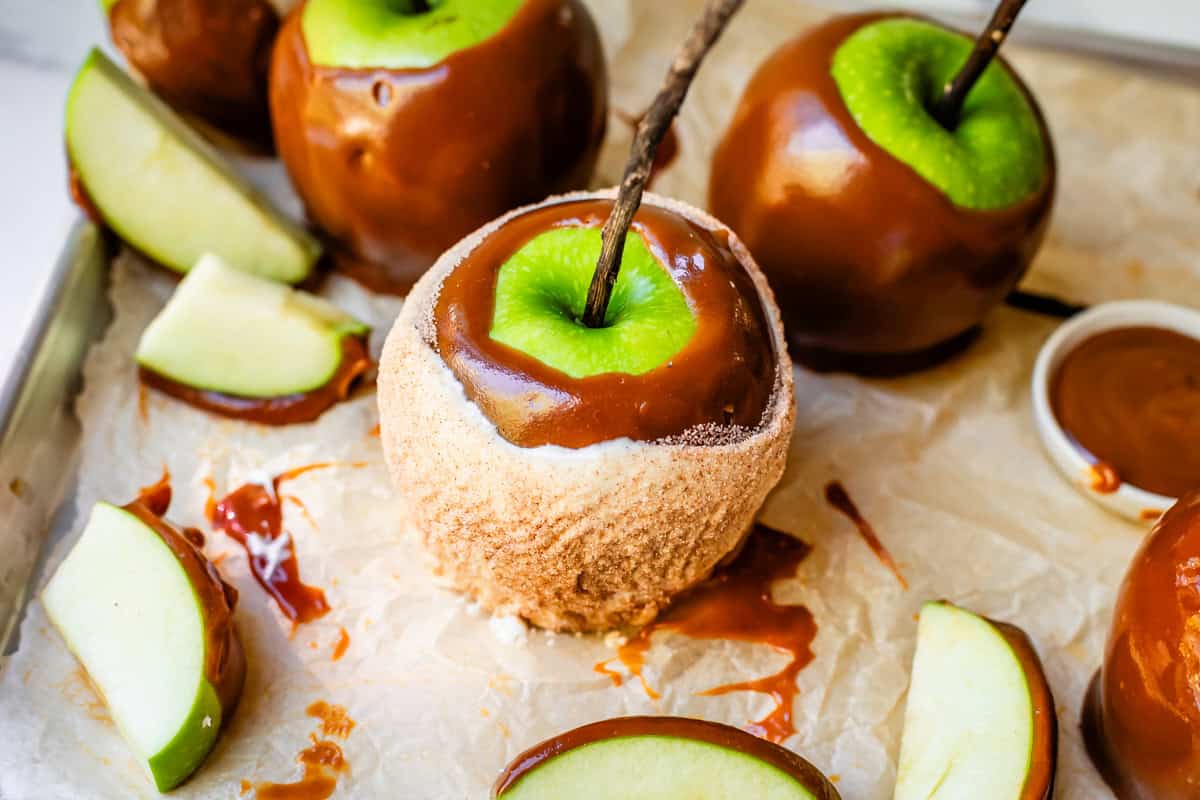
This right here, guys. HEAVEN!!
What are the best toppings for caramel apples?
Obviously, the caramel steals the show on these apples. That being said, I’m a total sucker for the chocolate coatings and allllll the different toppings you can think of. It’s so fun to pile them all on and really turn these into gourmet caramel apples. Try out any of these, and let me know in the comments if you have a favorite topping that’s missing from the list!
- maybe you’re a purist, but imo the chocolate coatings can really take things up a notch – check out the recipe card for instructions on how to do this!
- sprinkles
- chopped nuts – roasted peanuts, pistachio, pecan, almond, or walnut are all great choices
- mini chocolate chips
- mini M&Ms
- crushed Oreos, Nutter Butters, Nilla Wafers, Biscoff, or any other cookie you love
- crushed pretzels
- toasted coconut
- chopped Heath bar
- toffee bits
How to store leftover caramel apples
The best way to maximize the life of caramel apples is in the refrigerator. Wrap the completely cooled and set apples in plastic wrap or wax/parchment paper, then place them in an airtight container. Stored this way, they should last 1-2 weeks. They’ll taste best if you pull them out and let them come to room temperature before eating. If you plan to serve them same day, you do not need to refrigerate. And please, whatever you do, do NOT freeze leftover caramel apples. You’re no dummy.
If you want to get ahead on the process without storing completely finished caramel apples, you can prep the apples, toppings, etc, as well as make the caramel sauce the day before. Then you’ll have everything ready to go for the day of. It would make a super fun family or party activity! Or, you can prep a bunch and give the most incredible gift to friends!
Caramel apple frequently asked questions
Because the caramel and any other toppings you add are so sweet, it’s best to use tart apples to provide contrast. The most commonly used are green Granny Smith apples. If for some reason you can’t get any or prefer a slightly sweeter apple, you can try McIntosh or Pink Lady.
But really, if you have apples of any variety on hand and want to try this recipe, just go for it, you really can’t go wrong with the apple-caramel combo!
No way, Jose. The freezing and thawing process will leave you with a soggy, soft mess because apples are so watery. I mean, would you freeze a normal apple and then eat it? Nope. They just won’t taste as good or have that crisp texture you want. Since they’ll last a good long while in the fridge, keep them there for best results.
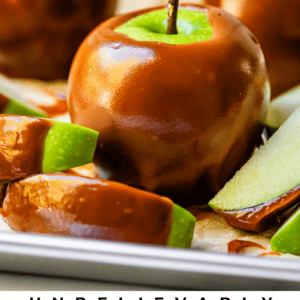
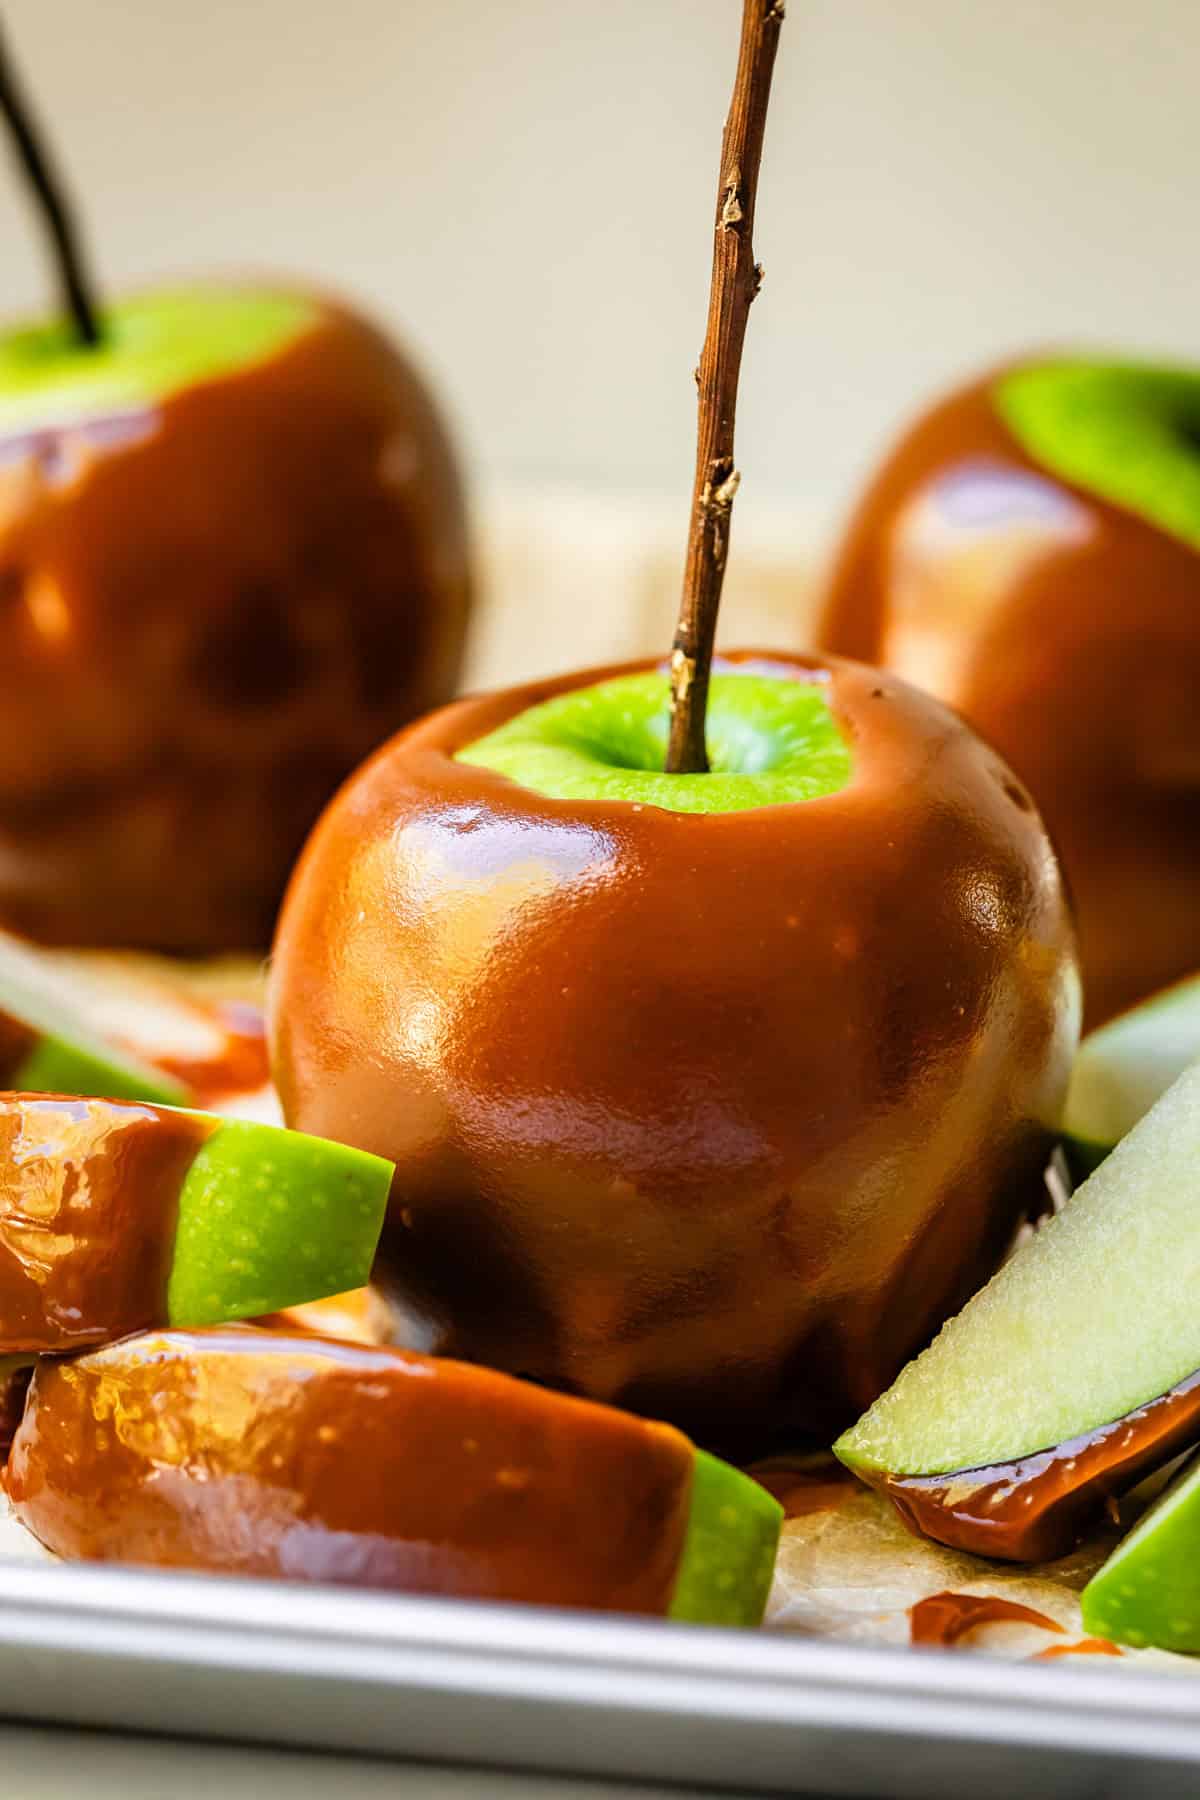
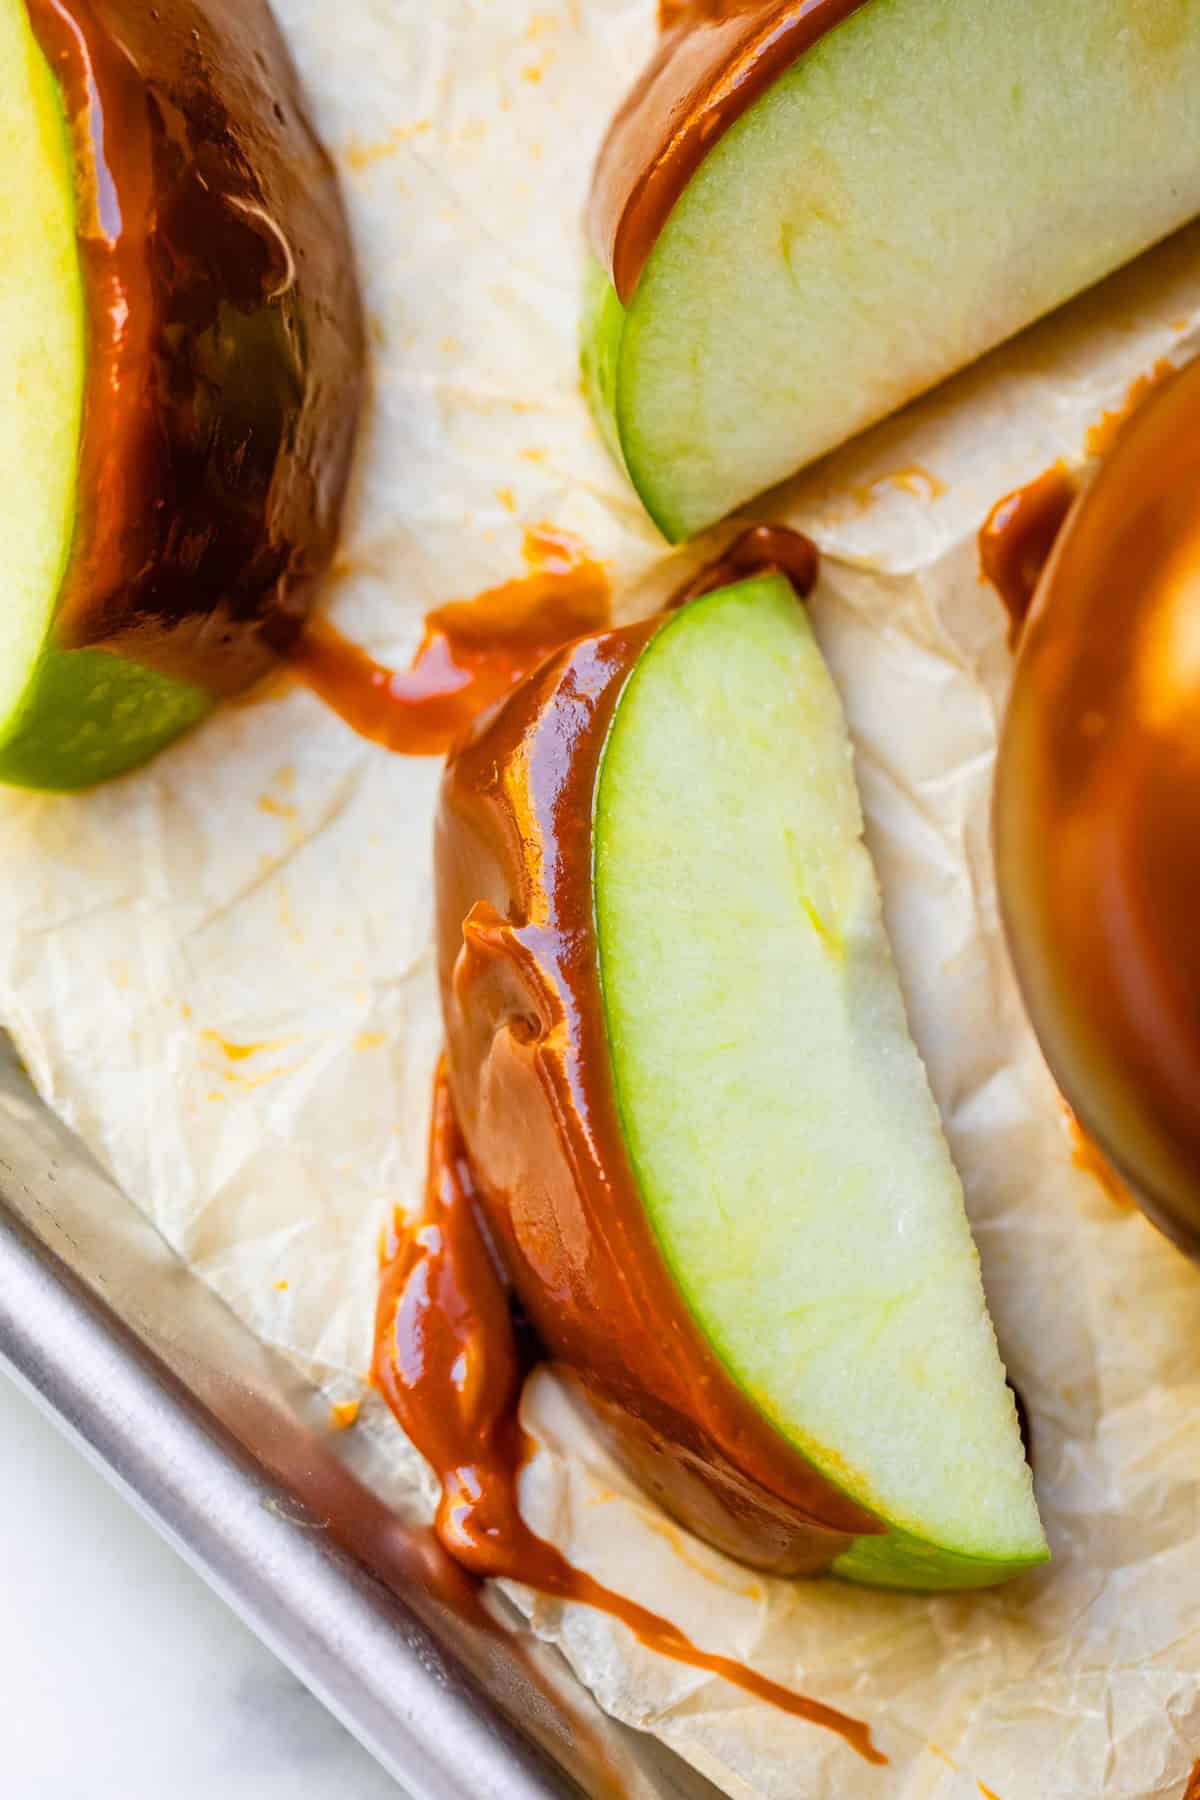
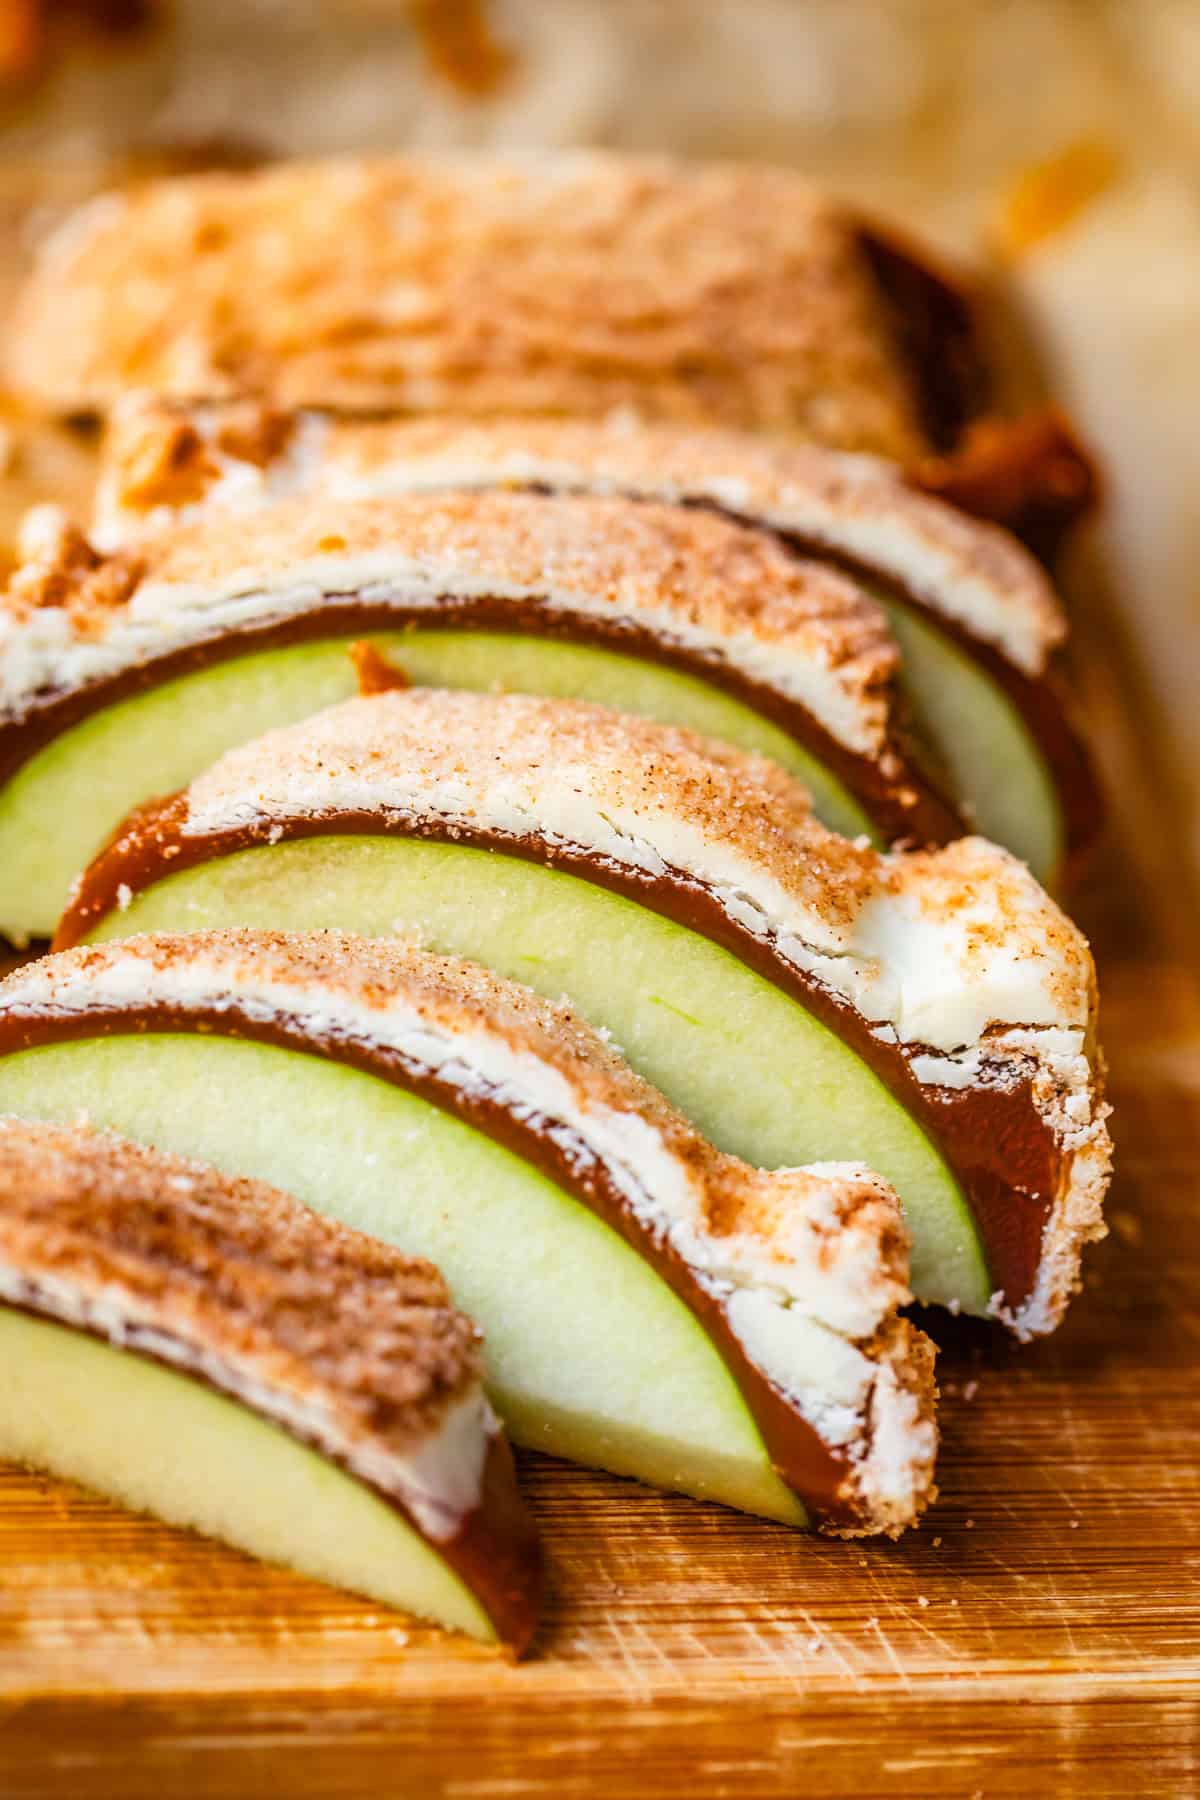
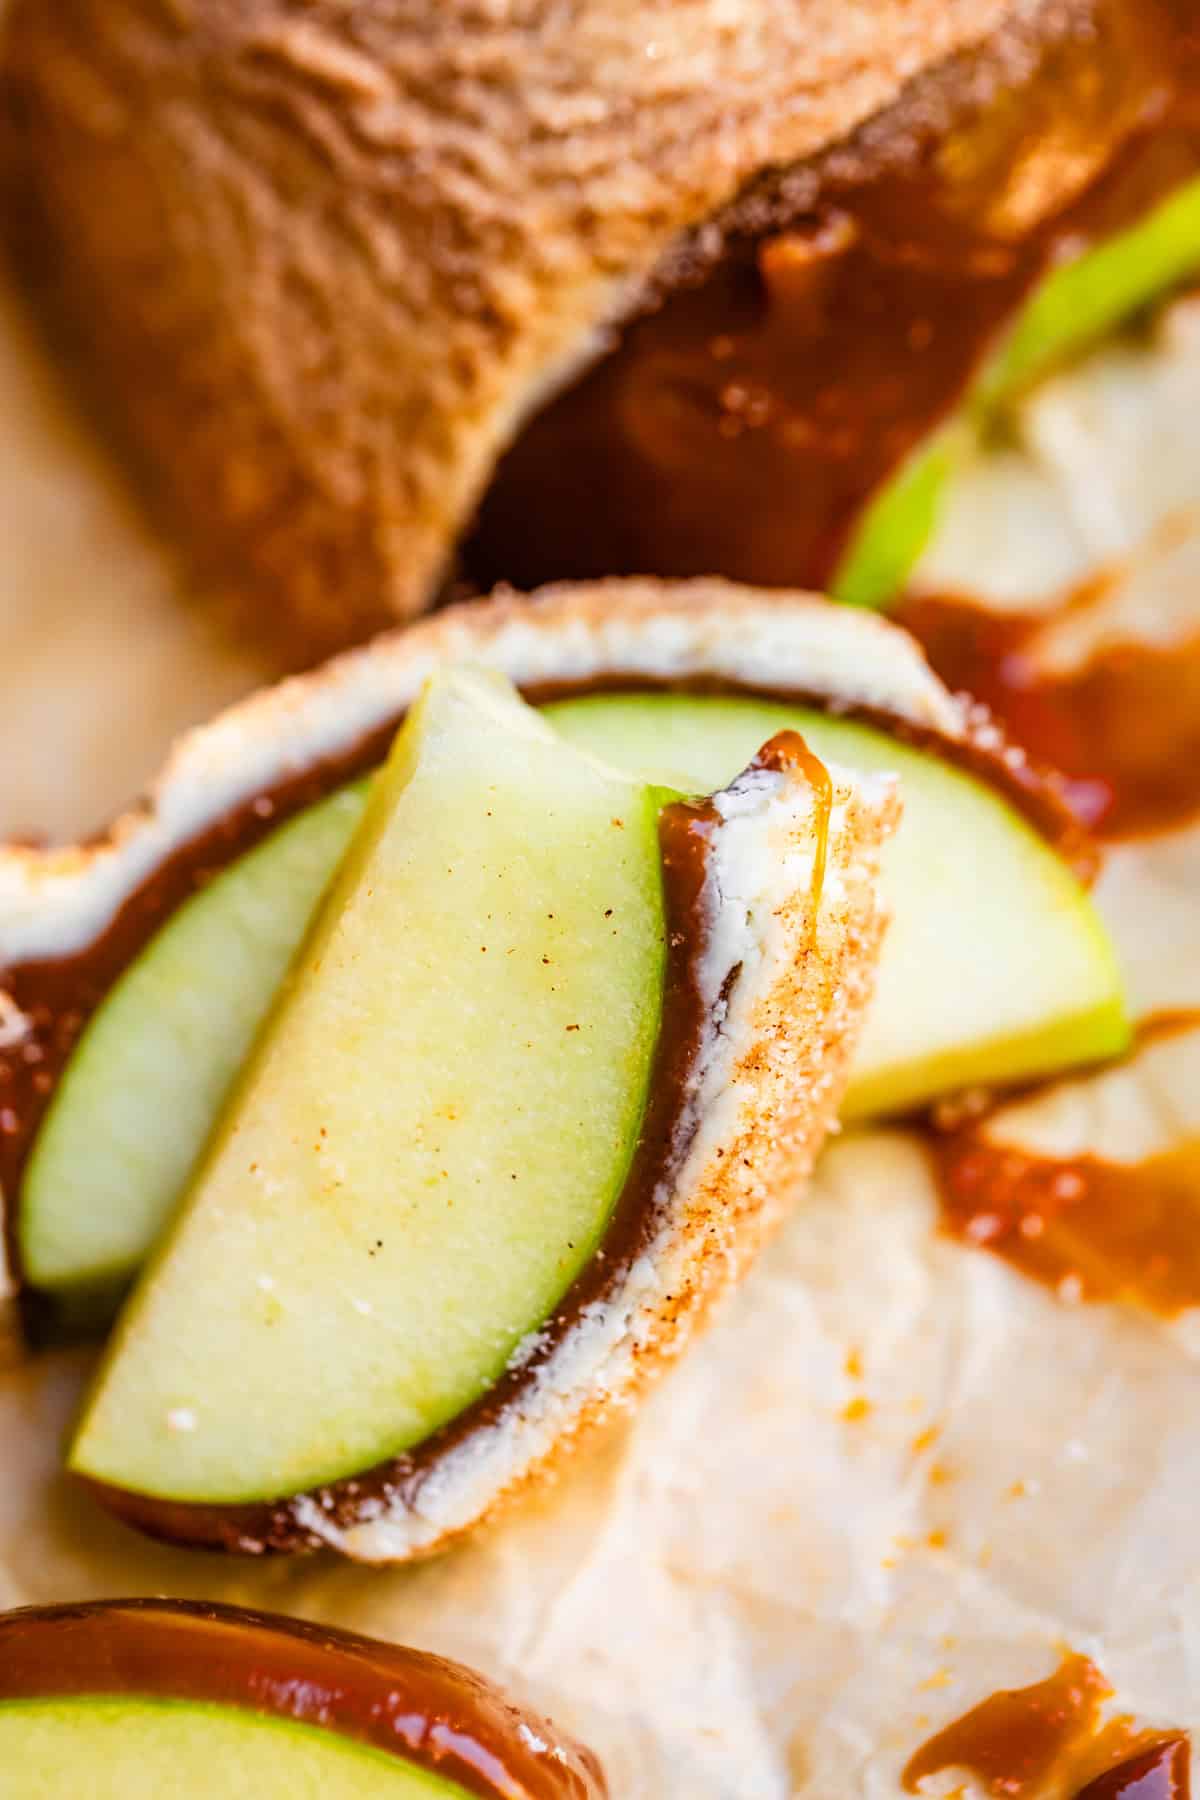
With reckless abandon, obviously!! 😂 Even with the perfect fudgy caramel, I still don’t want to bite into a whole caramel apple, like I would for eating a normal apples. I mean, you do you, of course. But personally I like to slice them up.
Remove the stick and slice the apple in half. Then place it flat-side-down and cut into wedges. Once you have all the wedges, turn each one on its side and slice off the bit of apple core that’s in the middle of each slice.
More recipes to make all your fall dreams come true
Fall is such a fun time of year, right? It feels so celebratory, even when it’s not “the holidays” yet. Baking is a huge part of making it feel like fall to me. You can look through all of my Best Fall Recipes, but here are some of my favorites!
- Best Apple Pie >> if there’s one recipe that’s a showcase for the best of fall, THIS IS IT! Spiced, perfectly cooked apples in a buttery, flaky crust. It’s divine!!
- Pumpkin Cream Cheese Roll >> such a classic, and the pumpkin really shines
- The BEST Snickerdoodle Recipe >> cinnamon spice, and everything nice. For real though, these cookies live up to their name of being the best, check the reviews!
- My Favorite Wassail >> one of the favorite cozy, perfectly spiced drinks to serve in cooler weather
- Maple Donut Recipe (Maple Bars) >> the glaze is to die for, soooo good!
- Spice Cake Recipe from Scratch >> no boring cakes here, this one has ALL the spice flavor you want
- Sweet and Moist Cornbread Recipe >> cornbread is amazing any time of year, but I especially love it in fall with a hearty chili or soup!
- Honey Roasted Butternut Squash Salad >> the perfect salad for Thanksgiving or any fall dinner
- Hasselback Butternut Squash from How Sweet Eats
- Vegan Fall Harvest Pizza with Delicata Squash and Basil from Avocado Skillet
Facebook | Pinterest | Instagram
The Best Caramel Apple Recipe
Equipment
Ingredients
For the apples:
- 8 medium Granny Smith apples, or your favorite tart apple
- 8 apple sticks, or popsicle sticks, kebab sticks, lollipop sticks, chopsticks, a stick from the yard, etc.
For the caramel:
- 1/2 cup water
- 4 cups white sugar
- 1/2 cup salted butter, chopped
- 2 cups corn syrup
- 2 (12-ounce cans) evaporated milk
- 1 tablespoon vanilla extract
- 1 and 1/2 teaspoons kosher salt, or sea salt
Optional white chocolate dip:
- 1 (11-ounce) bag white chocolate chips, or semi sweet chocolate chips, or butterscotch chips
- 1 teaspoon vegetable oil
- 2/3 cup granulated sugar
- 2 tablespoons cinnamon
Optional toppings to dip caramel apples in:
- sprinkles
- chopped nuts
- mini chocolate chips
- mini M&Ms
- crushed Oreos
- crushed pretzels
- toasted coconut
- chopped Heath bar
- toffee bits
Instructions
- Prep the apples. Wash the apples thoroughly, rubbing them under the water with your hand or a vegetable brush to get the waxy coating off of them. This wax coating makes the caramel not stick as well. Twist off the stem. Let the apples dry completely. Caramel will not stick to wet apples.
- Push in sticks. Push your stick into the spot where the stem was, or right next to it. Push about 3/4 of the way down the apple. You can use any kind of stick you want. They sell caramel apple sticks that are just the right size. You can use popsicle sticks, kebab sticks, chopsticks. I found some sticks in the yard that I cleaned off, and they worked great. (Push in a chopstick first to make way, then remove and push in stick, if your yard sticks keep snapping.)
- Refrigerate the apples for at least 20-30 minutes, or longer. This is perfect because this is how long the caramel takes to make anyway. Chilled apples are so much easier to dip, and makes the caramel stick on better.
- Make the caramel: Get everything ready to go, so you're not rushing later! Measure out 2 cups of corn syrup and set it near the stove. Shake the 2 cans of evaporated milk and remove the lids. Unwrap 1/2 cup of butter (this is 1 stick) and use a butter knife to chop it into a few pieces.
- Add 1/2 cup water to a heavy bottomed 3-quart pot. (Do NOT use a cheap pot to make caramel, it might not turn out!) Swirl your pan around to get the sides of the pot wet, a few inches up the sides. Turn the heat up to high.
- Slowly pour 4 cups of granulated sugar to the center of the pot, making sure not to get any sugar crystals on the sides. With your wooden spoon, draw the water in from the edges toward the center, going slowly all the way around the pan until all the sugar is moistened. Do not leave any sugar crystals on the side of the pan. The goal is to dissolve all of the sugar. If there are sugar crystals on the edge of the pot, dip a pastry brush in water and swipe them into the liquid.
- Bring the mixture to a boil over high heat, stirring. Once boiling, reduce the heat to medium. Toss your wooden spoon (that likely has sugar crystals on it) in the sink; you don't need to stir for this part (but don't walk away.) Let the crystal-free pot of sugar bubble and boil for about 8-10 minutes undisturbed. (If you are on an electric stovetop, it could take up to 20-30 minutes to reach the smoke point.) Read on:
- Eventually, the mixture will start to turn a light yellow color, then darker and darker until it reaches amber. Once you see any signs of yellow, do not take your eyes off the pot as the color deepens and deepens.
- Swirl the pan a bit, or rotate the pan on the burner, if the yellow is darker on one side or another. Eventually you will see the first wisps of smoke. As soon as the caramel is evenly amber in color all the way across, AND you see smoke,* remove the pan from the heat right away. You have just made caramel. Do not let it keep smoking, it will burn! Take it off the heat and add the butter right away:
- Off-heat, use a flat whisk to gently stir pieces of butter into the pot, 1/2 cup of butter total, whisking well for every addition. Be careful, splashes will hurt like heck! The caramel will start to become creamy and thicker as you add butter and stir.
- Add 2 cup corn syrup and whisk it in. Move the pot back onto the burner and turn the heat to medium. It should start to boil again fairly quickly. Be sure to scrape the sides and corners and bottom of the pot well; the corn syrup tends to lump up, so be thorough and make sure it's smooth before the next step.
- SLOWLY add 2 (12-ounce) cans evaporated milk. Add a little bit, whisk completely, add a bit more, stir completely. This process of adding the milk should take at least 10 minutes. Your caramel won't be smooth if you rush this.
- Once all of the evaporated milk is added, settle in for the long boil. Keep whisking, only taking short breaks, and making sure to get into the corners of the pan. Boil, whisking for about 20-25 minutes (this could take longer on a non-gas stovetop, up to 40 minutes); read on.
- It's best to use a candy thermometer to know when this step is complete. You want to boil the mixture until it reaches 238 degrees F. The time this takes can vary a lot because there are so many, well, variables (like pot-thickness, burner level, humidity level…) I recommend a Thermapen, the best thermometer on the market, but any old candy thermometer will do. Don't go above 238 or 239 degrees F, or your caramel will be too hard.
- Remove the pot from the heat as soon as it has reached 238 degrees. Let the caramel settle a bit, only using your whisk to swipe the bottom and edges occasionally. Stirring too much at this point brings in air, and the bubbles will show up on your dipped apples.
- Add 1 and 1/2 teaspoons kosher salt (or sea salt) and 1 tablespoon vanilla extract. The vanilla will spit and bubble, that's okay, just stir it in. Start with less salt if you are nervous, or add up to 2 teaspoons total if you like a more salted caramel flavor. (Start with about half the amount if you have table salt.)
- Let the mixture cool for about 15 minutes, coming back to stir once or twice, while you set up your dipping station.
- Lay out a silpat baking mat on a baking sheet. This caramel sticks to parchment paper, wax paper, and aluminum foil. A silpat is the only thing it doesn't stick to, so don't skip this.
- Prep toppings. If you plan to dip the caramel apples in other toppings, get them ready now, in separate bowls: sprinkles, chopped nuts, mini chocolate chips, mini M&Ms, crushed Oreos, crushed pretzels, toasted coconut, chopped Heath bar or toffee bits. I love to dip my caramel apples in white chocolate and then dip in cinnamon sugar, for a Snickerdoodle flavor. If you are doing that, add 2/3 cup sugar and 2 tablespoons cinnamon to a bowl and stir together.
- Dip the apples. Holding a cold apple by the stick, tilt the pan of warm caramel on its side, and submerge the apple in the caramel almost all the way. Tilt the apples as necessary to get it coated. Carefully pull the apple out, and let as much caramel drip off as you can. Gently scrape the bottom of the apple on the edge of the pan.
- Caramel apples with no toppings: Dip the apples, let it drip off, gently scrape the bottom, and set it on the silpat. Repeat with all the apples.
- Caramel apples dipped in crushed toppings: If you are not doing a chocolate coating, dip the caramel apples in their toppings right away, before setting it down. Roll them around until they are coated how you like, then set them down on the silpat.
- Caramel apples dipped in chocolate, then toppings: Set the caramel-dipped apples down on the silpat and refrigerate or freeze the apples for 10-20 minutes, so that the caramel is harder and no longer warm. In a medium bowl, melt white chocolate chips (or semi sweet, or butterscotch) in 30 second increments, stirring each time, until smooth. Add 1-3 teaspoons olive oil (more for white chocolate) to help it get smooth. Dip the cold caramel apples in the chocolate right away, twisting it around and moving quickly so the caramel doesn't melt. Lift the apple, scrape off the bottom, and dip again into further toppings (cinnamon sugar, nuts, etc.) Set the caramel apple down on a silpat.
- Let the caramel apples set completely before slicing and eating.
- To slice, remove the stick, and slice the apple in half. Then place it flat-side-down and cut into wedges. Once you have all the wedges, turn each one on its side and slice off the bit of apple core that's in the middle of each slice.
- Storage: Store the apples in the fridge. They will last for 2-3 days unsliced. Once you slice them, store apple slices in the fridge for no longer than 1-2 days.
- Store any leftover caramel in a mason jar, or any airtight container will do. This caramel is just fine kept on the counter at room temperature for up to 2 weeks. Heat in the microwave to use as a thick caramel sauce (Or try my Salted Caramel Sauce, which is very close to this recipe but turns out creamier.) After 2 weeks, store caramel in the fridge for up to 6 months (or longer, probably!)


Caramel has proved to be a challenge for me. Made this recipe tonight. After the caramel cooled to dip the apples I noticed it was grainy. Looked up the problem. Added some more corn syrup and then some cream hoping to get rid of sugar crystals . It sort of worked. Never completely smooth. I don’t know which step in the process I went wrong. Melting the sugar went fine – used 2 cups of water. Did it slow. It browned nicely. Slow added corn syrup and evaporated milk – unsweetened. Any help is appreciated.
Sorry to hear this was tricky Craig! Caramel can be really challenging. One important step is making sure that the sides of the pot don’t get ANY sugar on them, if they do it’s pretty much instant grainy caramel. If you do get some of the sides you can use a wet pastry brush to gently clean the pot sides and get that sugar back in the water where it belongs. I hope your next batch turns out perfectly!
These turned out PERFECT for my daughter’s Halloween party. I’m not an experienced caramel maker and I’ve never had caramel apples turn out before, but the idea of biting into an appealingly fudgy apple seemed like it would fulfill childhood dreams (mine and hers). The sugar/water mixture started crystalizing but I just brushed down the sides with water, added a little more water to the mixture, and whisked for a minute or so. Problem solved, eventually got to amber color (took a little longer than expected), and then I just proceeded as the recipe directs. Success, we made 18 medium sized Granny Smith apples and all the sixth grade party guests at our house were PSYCHED. Most asked for the apple to be cut in slices off the stick, which worked just fine and they were actually really pretty that way. Oh, and also, yes: fudgy caramel, stayed on the apples beautifully. These were a labor of love but I’d definitely make them again next fall!
Hi,
I’d like to try your caramel appel recipe. If I understood well, I can make the caramel ahead of time and store it in the fridge? How long ahead of time? And when I need to do the caramel apples, I just warm it until it becomes a bit liquid again?
Thank you!
Hi Ioana! Yes you can totally make the caramel ahead of time! It will keep for weeks even just sitting on the counter. Just heat it up again on low on the stove when you are ready to dip! I would love to hear your review of this recipe, as it’s a favorite of mine and has no reviews yet! 💕
Thank you for your reply. I want to do it for Halloween this year, but I live in France and we can’t find evaporated milk or corn syrup here. I’ll try to sub with light cream and glucose syrup. Wish me luck!
Those are good substitutes Ioana! I have made this caramel with heavy cream before, which is about 36% fat. I think any cream you use will be fine. And I looked up glucose syrup, it’s very similar to corn syrup and I think it will be fine. Good luck!!
The BEST Peanut Butter Blossom recipe!!! This has always been my favorite cookie, but this recipe made the best batch I’ve ever had! So peanut buttery, which IS the best part! Thank you!
The caramel apples came out great!! The caramel was not at all sticky to the teeth, but stayed perfectly on the apples.
I substituted the corn syrup with glucose syrup and the evaporated milk with full fat (33%) cream. The caramel was perfect, I reheated it 3 times in bain-marie to make some more caramel apples.
It was my first time making it, so my sugar and water started recristalising, but I just added some more water and turned the heat up a bit.
Your recipe is great!! Definately a keeper, will make it every year.