

I think half the reason people don’t eat butternut squash is fear of cutting it. (It me) Well, fear be gone! Cutting a squash is simpler than it looks. I’m going to show you how a real deal (charlatan) chef does it, with all the best tricks to make it as easy as possible. The next time you make a roasted butternut squash soup, salad, or pasta dish you’ll impress yourself with how quickly you get this done (all fingers intact!)
I can get behind any vegetable whose first name is “butter.’ Toss in that “nut” as a middle name, and I’m all in.
Butternut is like the big friendly giant of fall squashes. Okay, not quite as giant as Sir Pumpkin, but usually we’re not chopping up pumpkin for dinner (unless you’re making Pumpkin Corn Chowder, which I do recommend.)
Butternut is just so BIG. The idea of taking a knife to it is enough to instill fear of life and limb, I get it.
Who’s afraid of the big, bad squash?
You want to know another name for winter squash? Hard squash, no joke. It’s literally in the name! Really, they’re an ingenious trick of nature since their thick, hard rind allows them to be harvested in fall and then stored to be used all winter long. Great for longevity; not so great for ease of cutting.
Because they’re so hard, they are definitely intimidating. I cannot tell you the number of times I have purchased a butternut squash just to have it sit on the counter for weeks because I couldn’t bring myself to do the work of cutting it! Thank goodness they last so long. But, hallelujah, I have found a tried and true method that makes cutting a breeze AND keeps you safe from any lost fingers.
Equipment you’ll need
Before you go out and immediately buy a squash, let’s go over some of the equipment you’ll need. They’re simple, but essential!
- A SHARP knife, preferably a chef’s knife. The most common size is about 8″.
- Cutting board that won’t move around at all on you. Wood or plastic is fine as long as it has grip. To stabilize a non-gripped board, add a damp paper towel or even a silpat baking sheet underneath.
- Vegetable peeler A normal peeler or a Y-peeler will do. The sharper it is, the better it will work on hard squash.
- Large metal spoon or canning lid to scoop out all the seeds once you’ve cut it open
- Optional: metal glove; basically, chain mail to protect your hand. I like to pretend I’m a character on LOTR when I’m sportin this.
Why a sharp knife matters
It feels counterintuitive, but a sharp knife is SO MUCH SAFER than a dull knife! When the blade isn’t sharp enough to slice through the tough skin and rind of the squash, it is much more likely to bounce or slip off, which puts your fingers and hands at the greatest risk. A sharp knife more easily glides through the skin of the squash, so you also don’t have to use as much strength or pressure to cut. That’s great news for my noodle arms, and again more safe since you’re not trying to do any violent hacking!
For this job, what you want is a high quality chef’s knife. If you don’t have one yet, just remember that a really good knife is an amazing investment that will last for years! I have this Henckels Chefs Knife, which is a great quality for an entry level price. Better than most options from a box store, but not prohibitively expensive. My sister has had her Wusthof Chef’s Knife for almost 15 years and it is still in excellent cutting condition.
If you’re looking for an amazing, handmade custom chef’s knife, I have to tell you about Highwater Knives. My brother’s friend Jesse is a mechanical engineer with tons of product development experience. He started making knives in his garage. They are phenomenal. I have one, and everyone who cooks in my kitchen asks about it!
How to pick a butternut squash
If you’re all set with your equipment, it’s time to think about the squash itself. Luckily, unlike many other fruits and vegetables, picking one is pretty easy. Here are a few tips to help you in your search.
- uniform tan/light orange color
- matte skin (shiny means it’s not ripe)
- no soft spots or bruising, and a dry, intact stem
- heavier for its size
- right around 2-3 lbs is the easiest to handle
How to peel and cut butternut squash
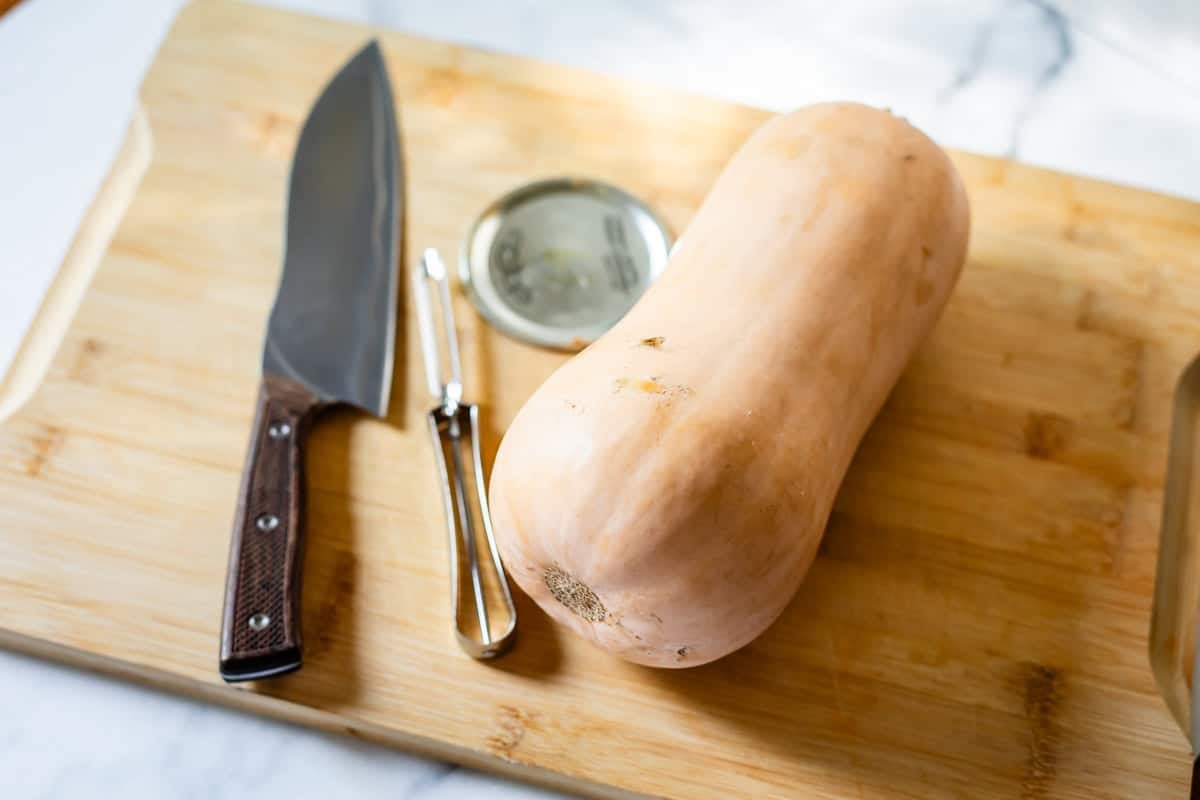
First up, gather all your supplies. You don’t need much, just the squash and a peeler and a knife.
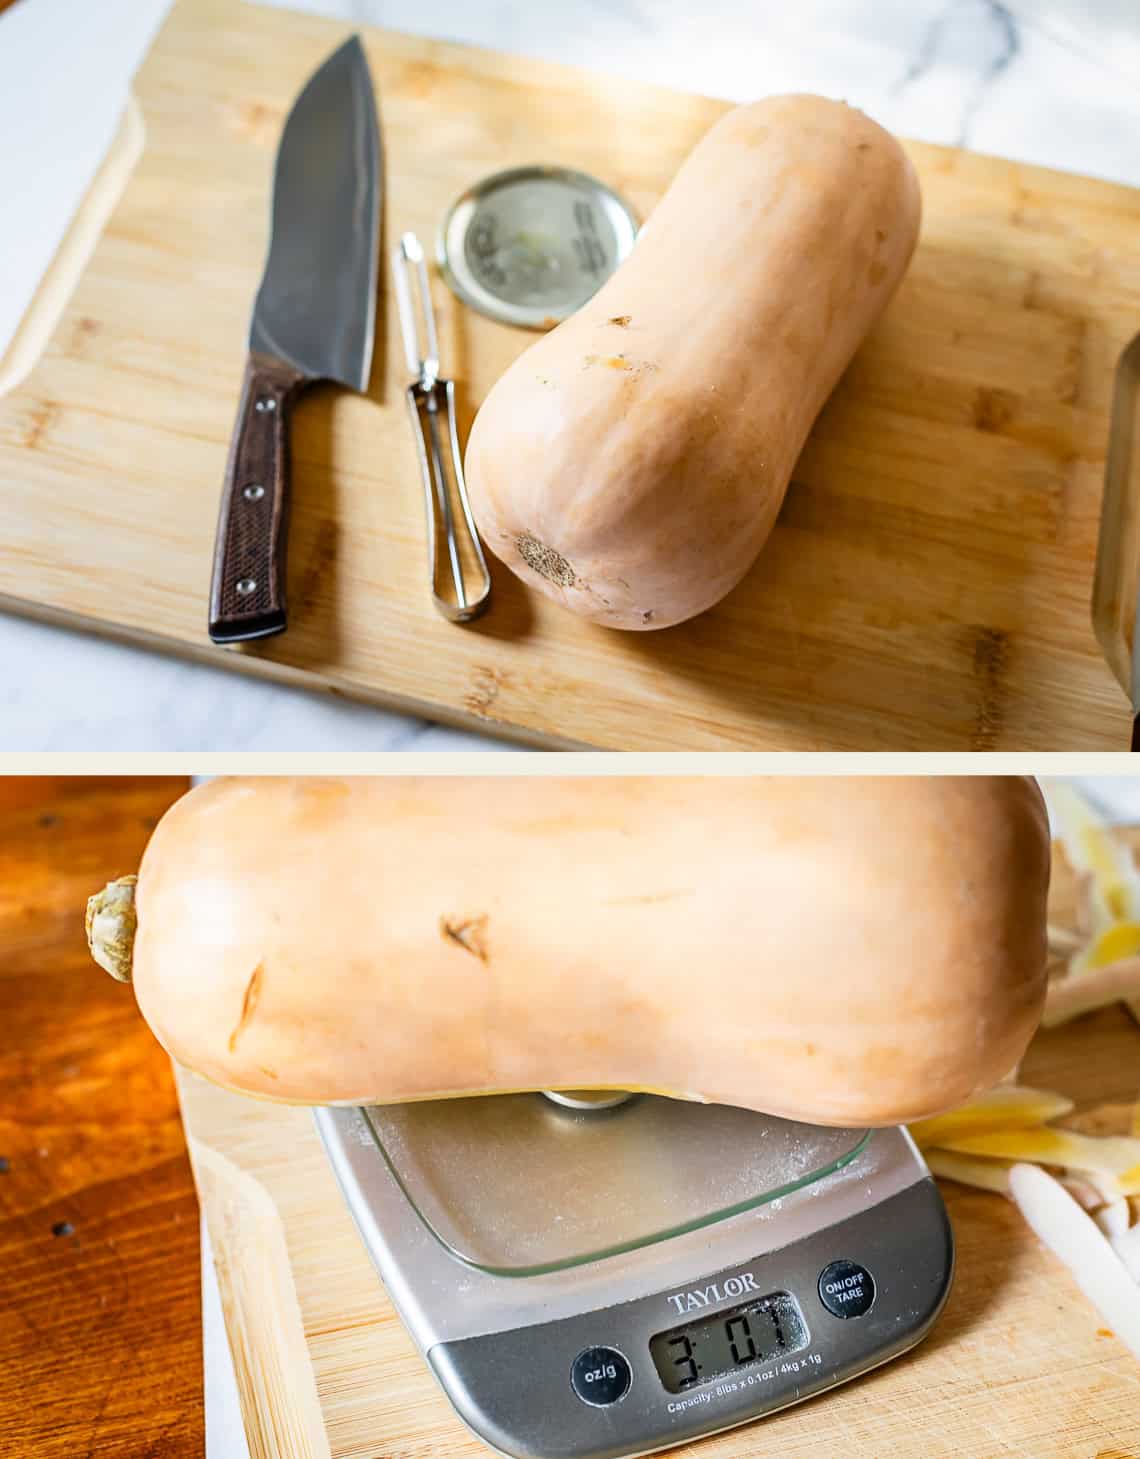
A big squash can weigh about 3 pounds. Take note of how much squash your recipe calls for!
Then, start peeling.
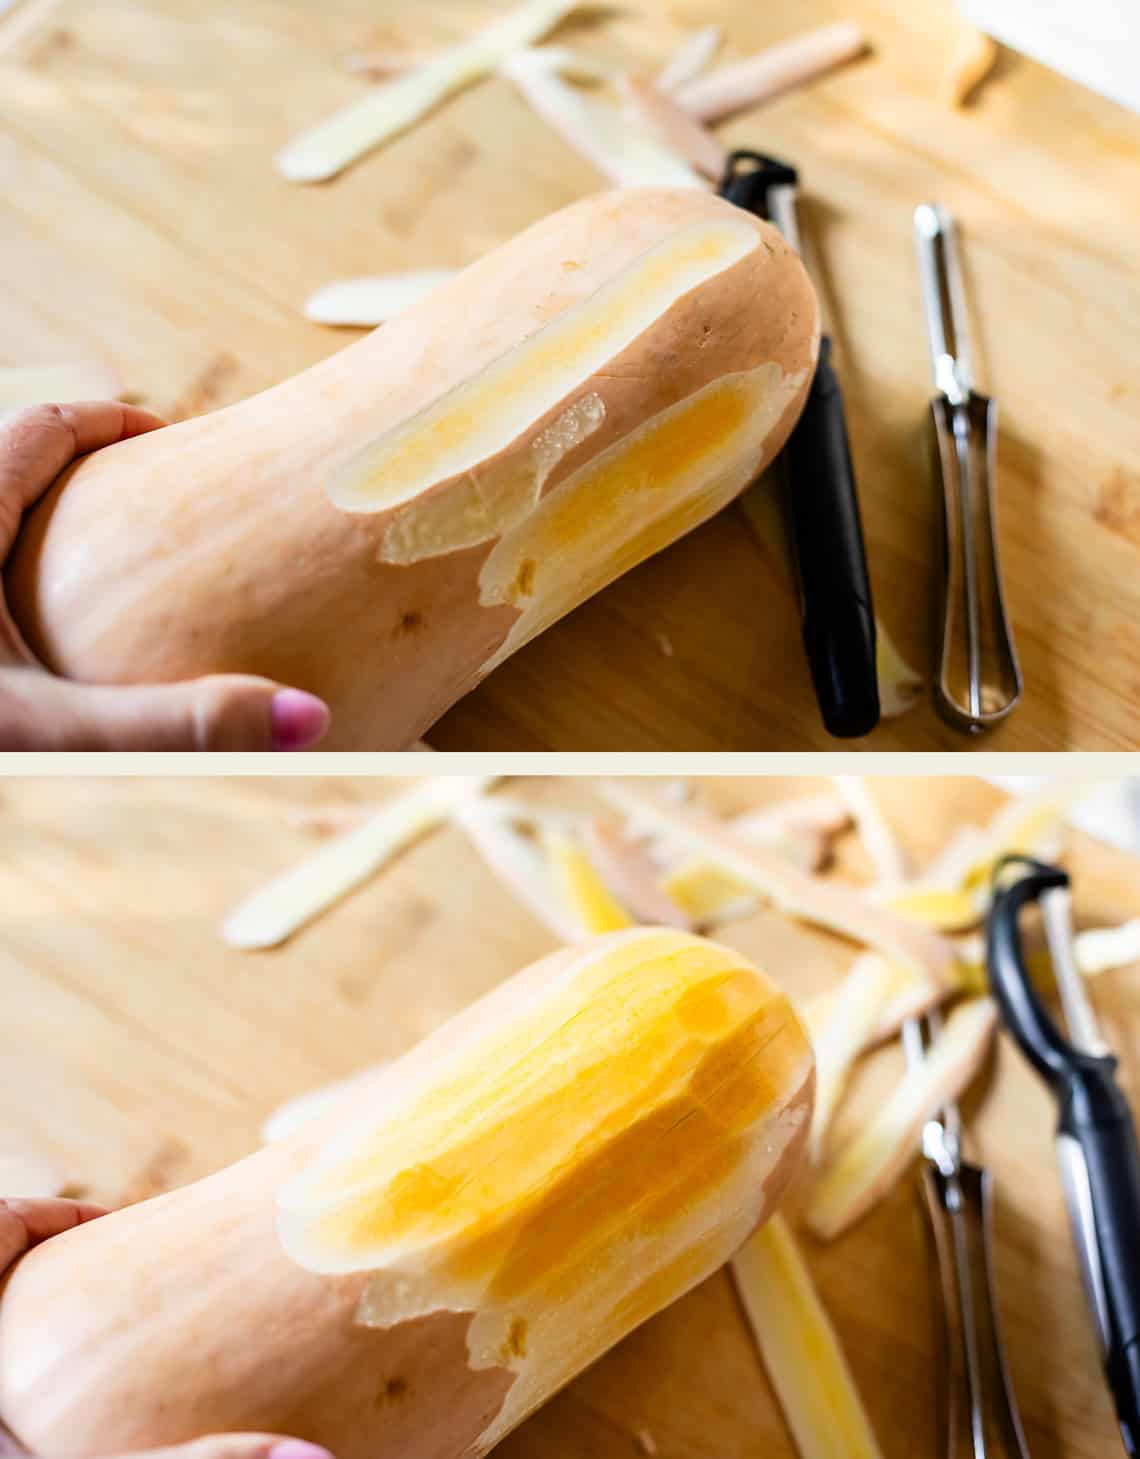
Make sure you peel a couple times in the same spot to reach through to the orange fleshy center. Do you see how the first peel, it was still kind of white? We want to get rid of all of that tough outer later.
Here she is all peeled. I use a kitchen glove when I’m cutting squash because I’m slightly allergic. (only when it touches my skin, not when I’m eating it. Weird, right??)
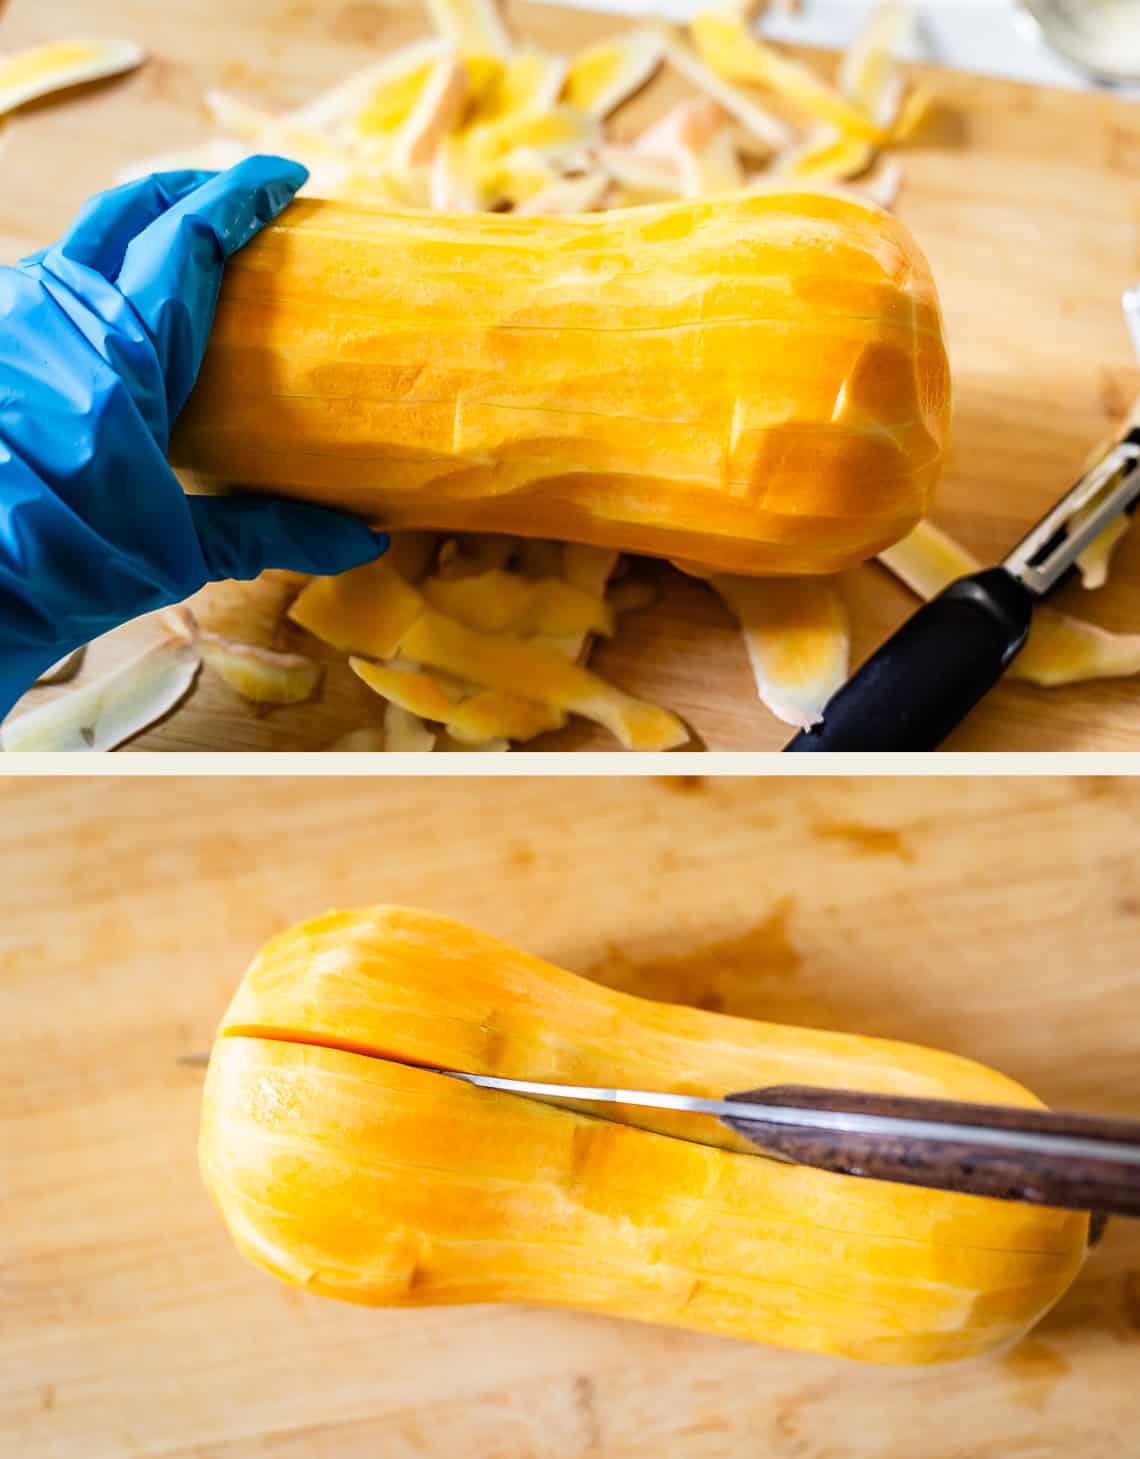
Then get out your SHARPEST knife, take a deep breath, call your mom for moral support…and slice.
Ta-da! You did it.
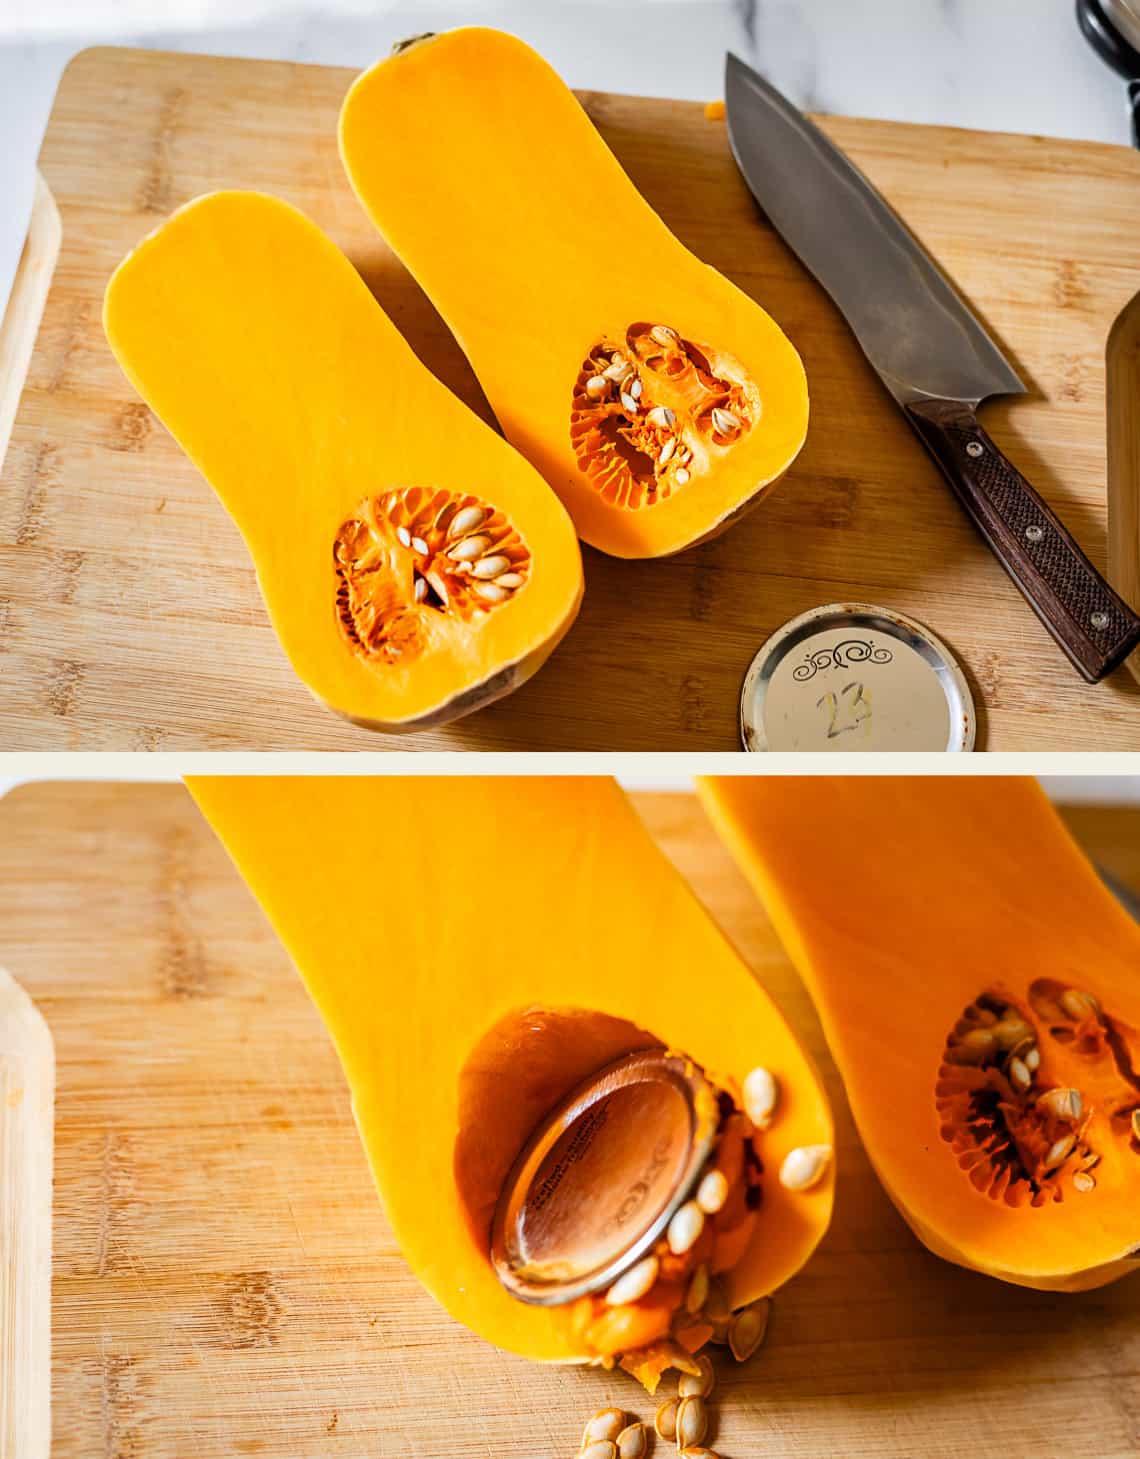
Now it’s time to scoop the goop. I LOVE my hack of using a canning lid for this step. It’s what we use when we carve pumpkins too. The edges of a canning lid are not sharp enough to slice your skin, but they are way sharper than the edge of a spoon, and they cut right through all those strands.
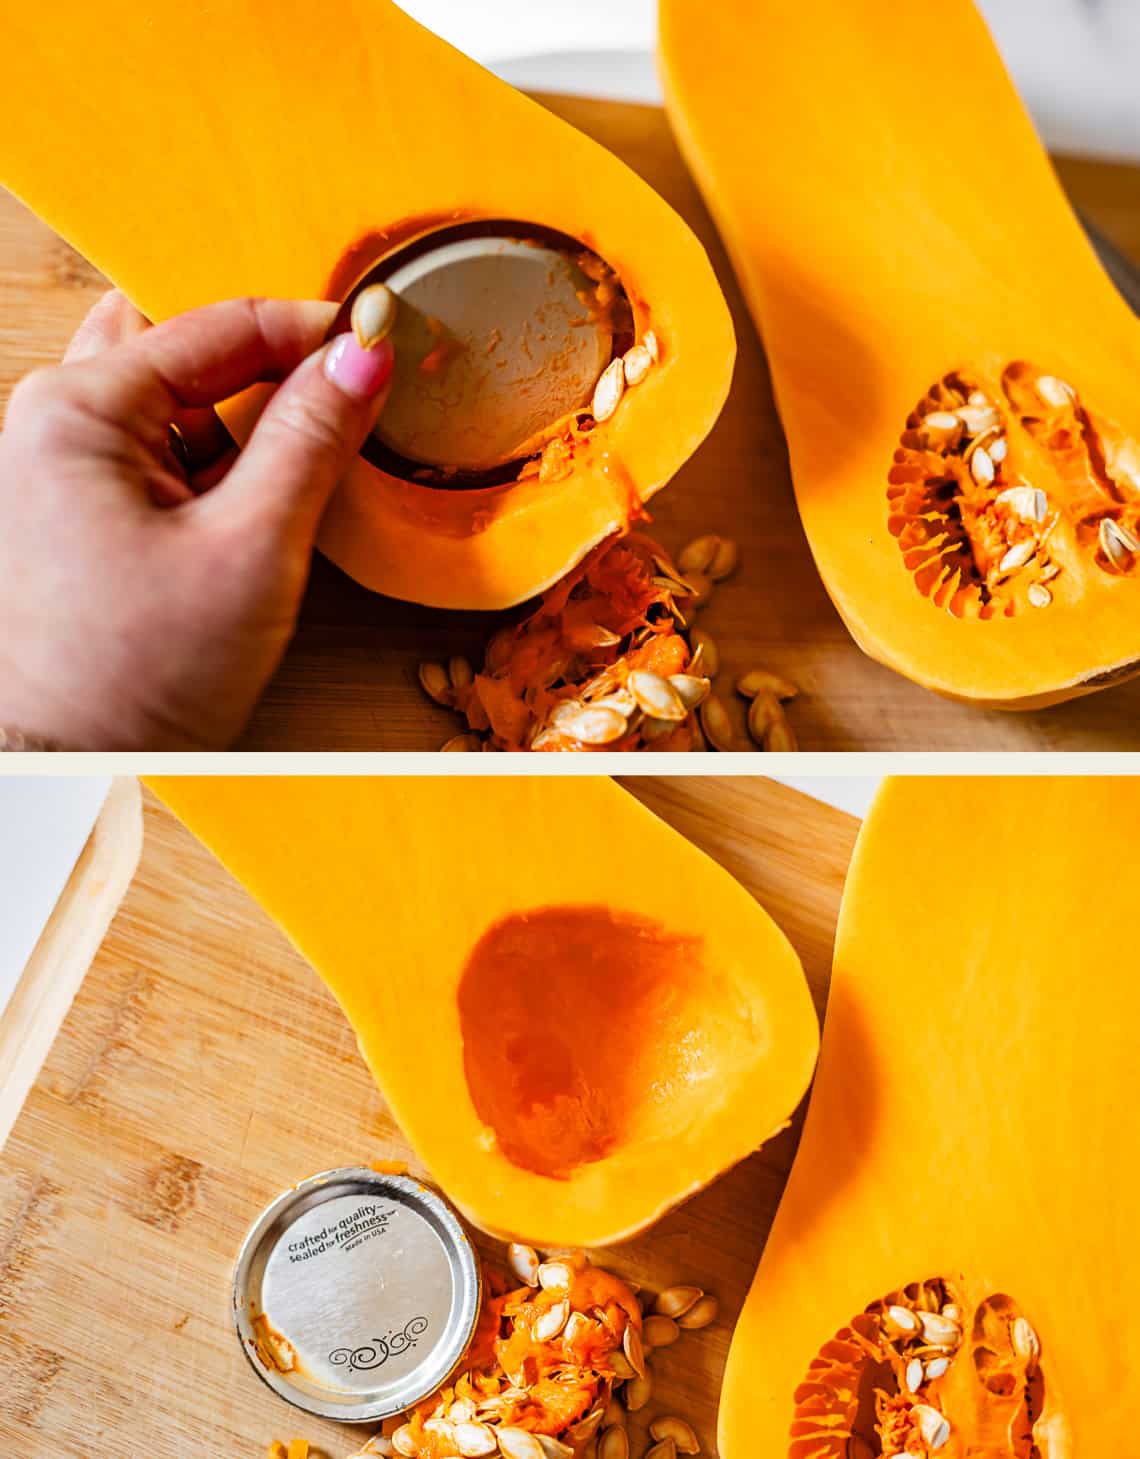
Now chop off the stem and bottom nobby thing.
Now, chop your butternut the short way, right in half:
And slice into neat rows. Slice the rows the other way to form a grid.
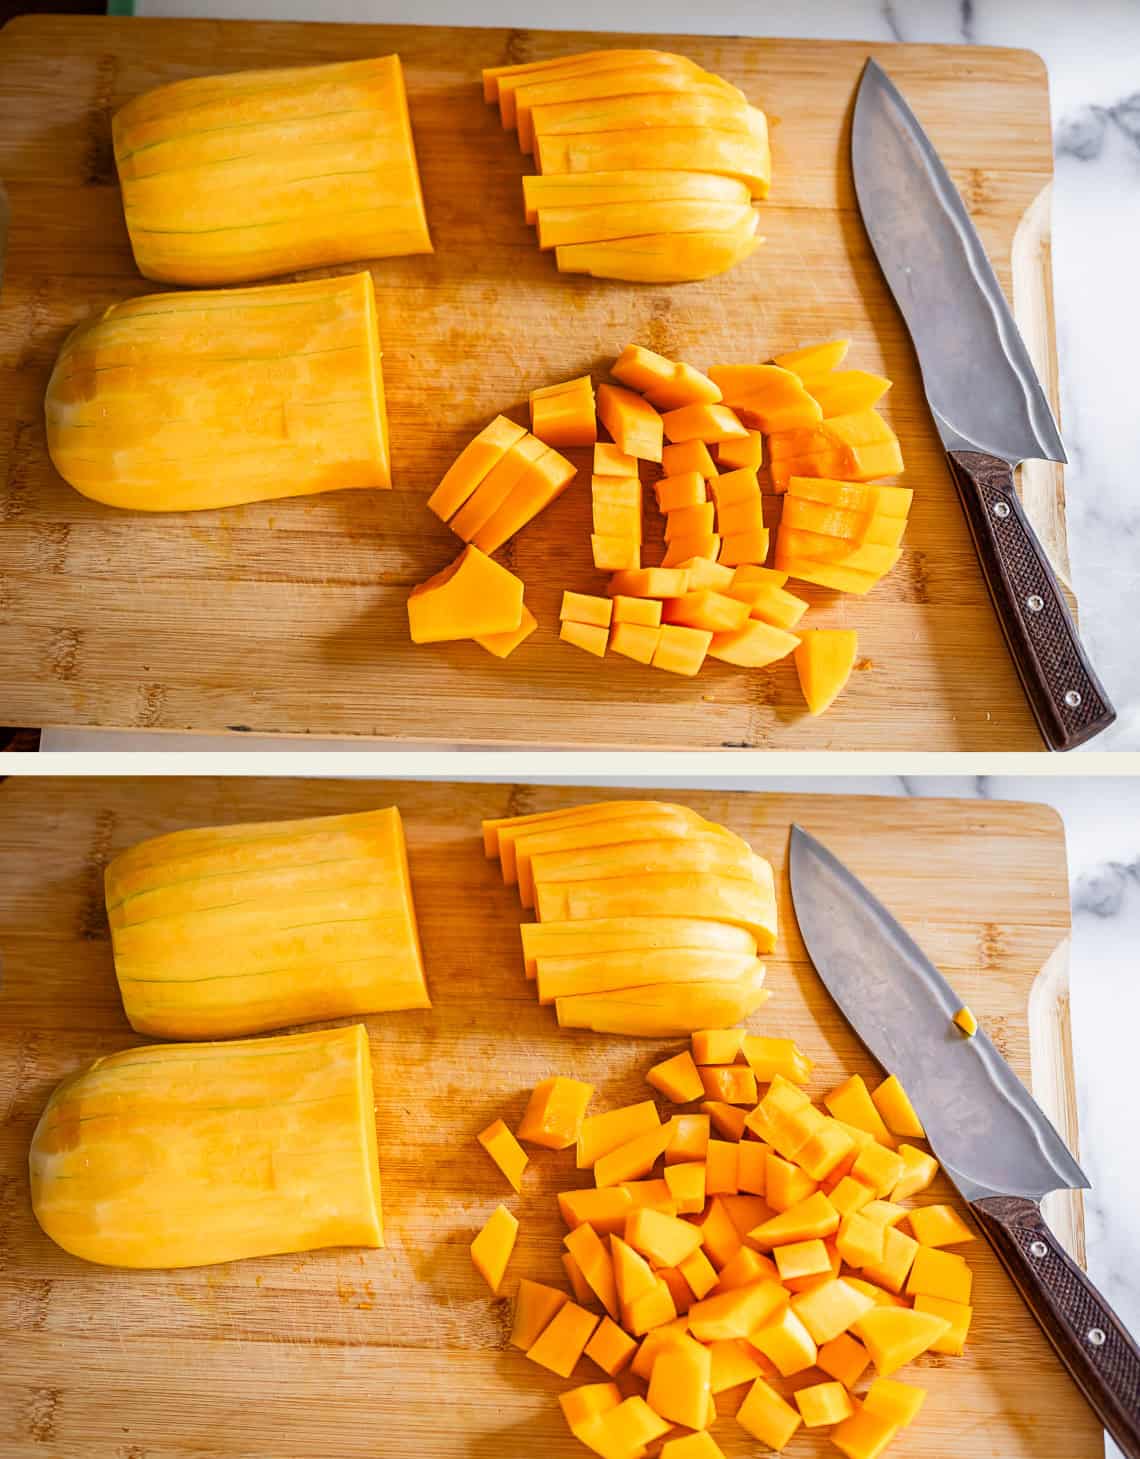
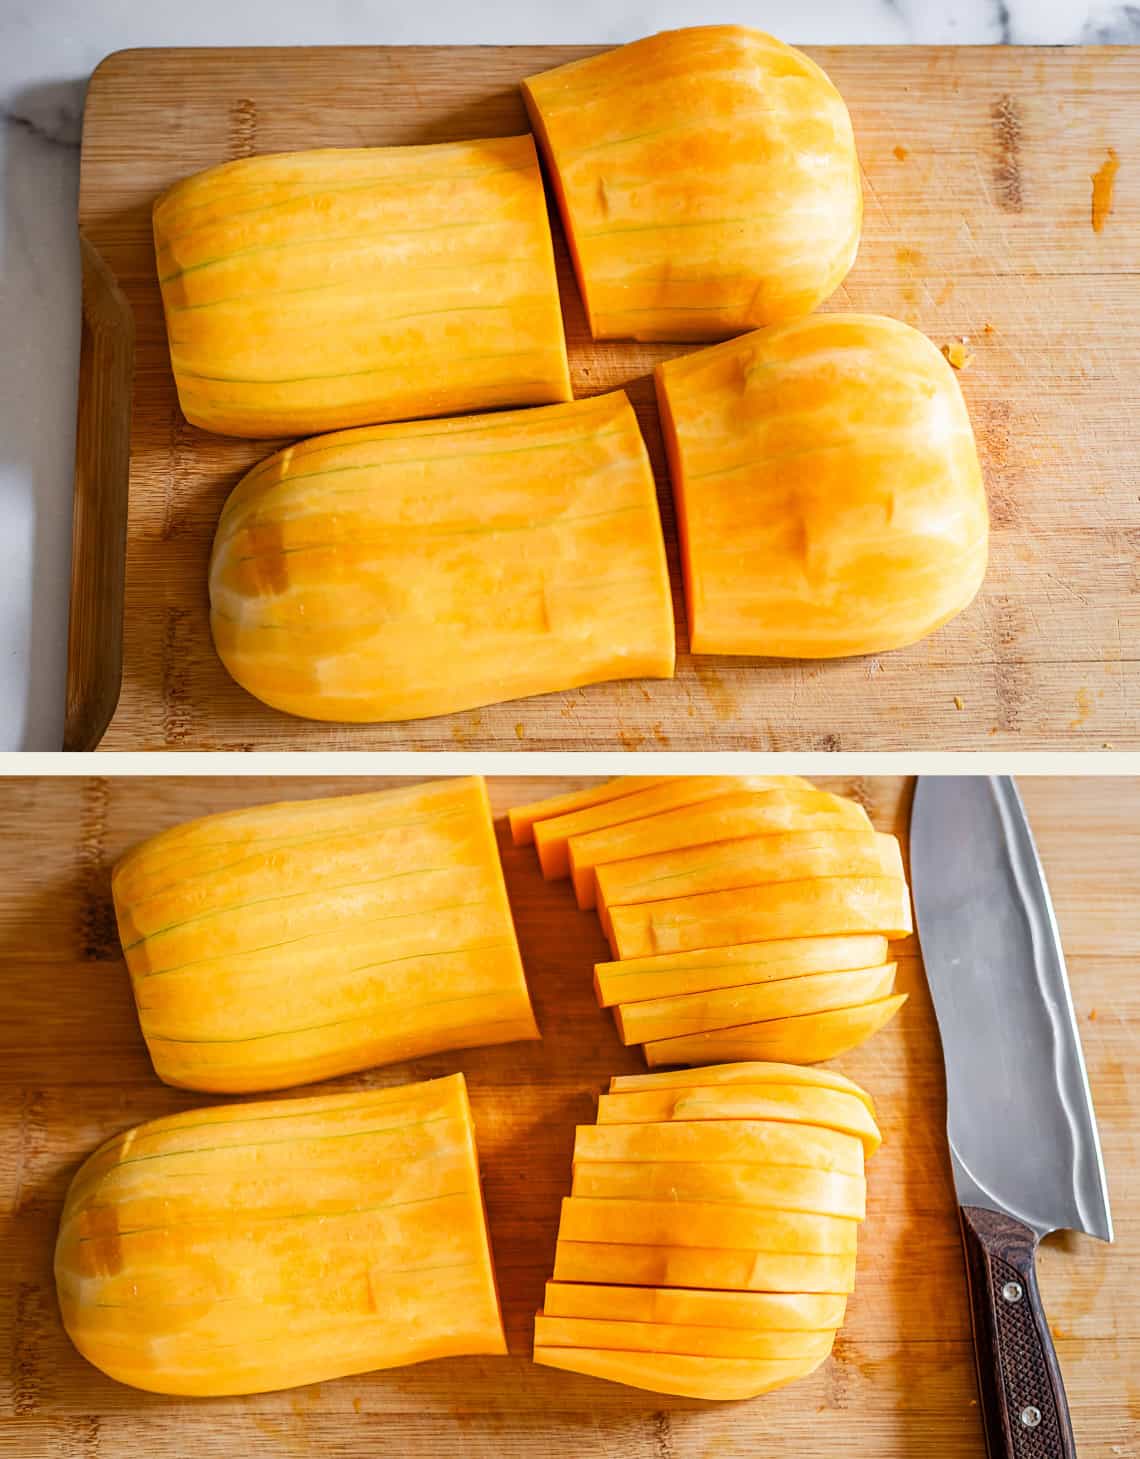
Since this is the section that has the cavity on the bottom, it’s easiest to just knock over these pieces and tidy them up by chopping as necessary. We can be a little more precise with the top half. Slice into neat rows:
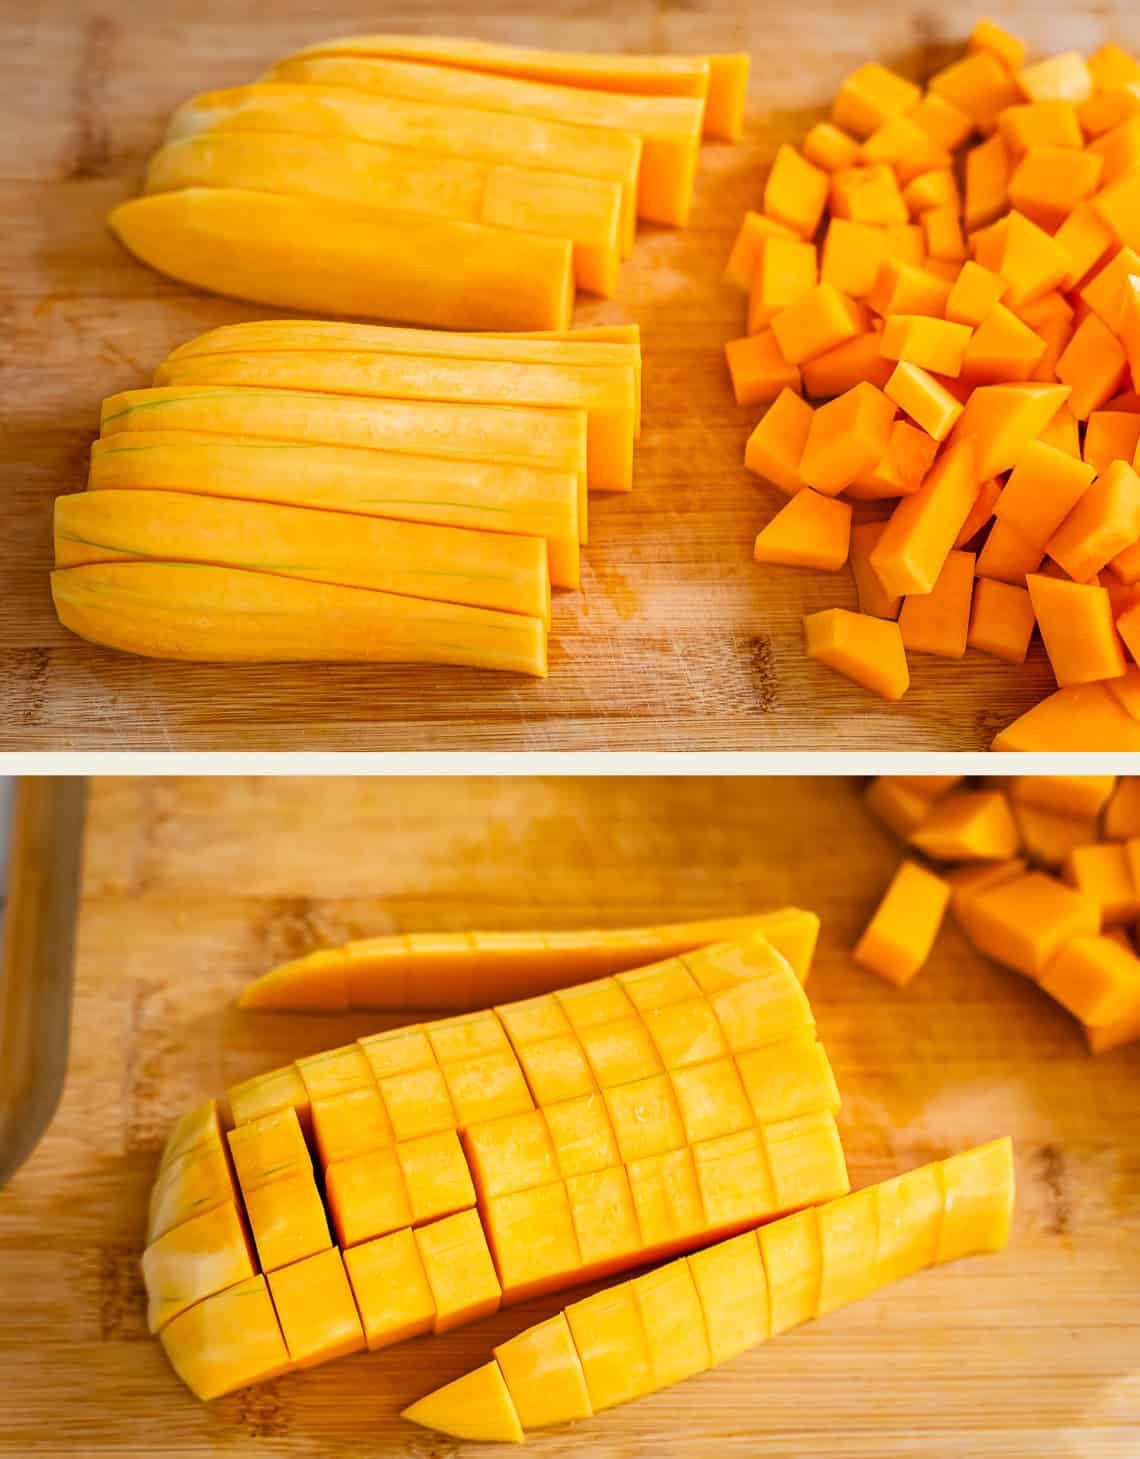
Then slice the other way to form a grid. These two end rows are already small enough that they can just be pulled aside.
Then, take each row and lay it on it’s side to slice the long pieces in half or into thirds.
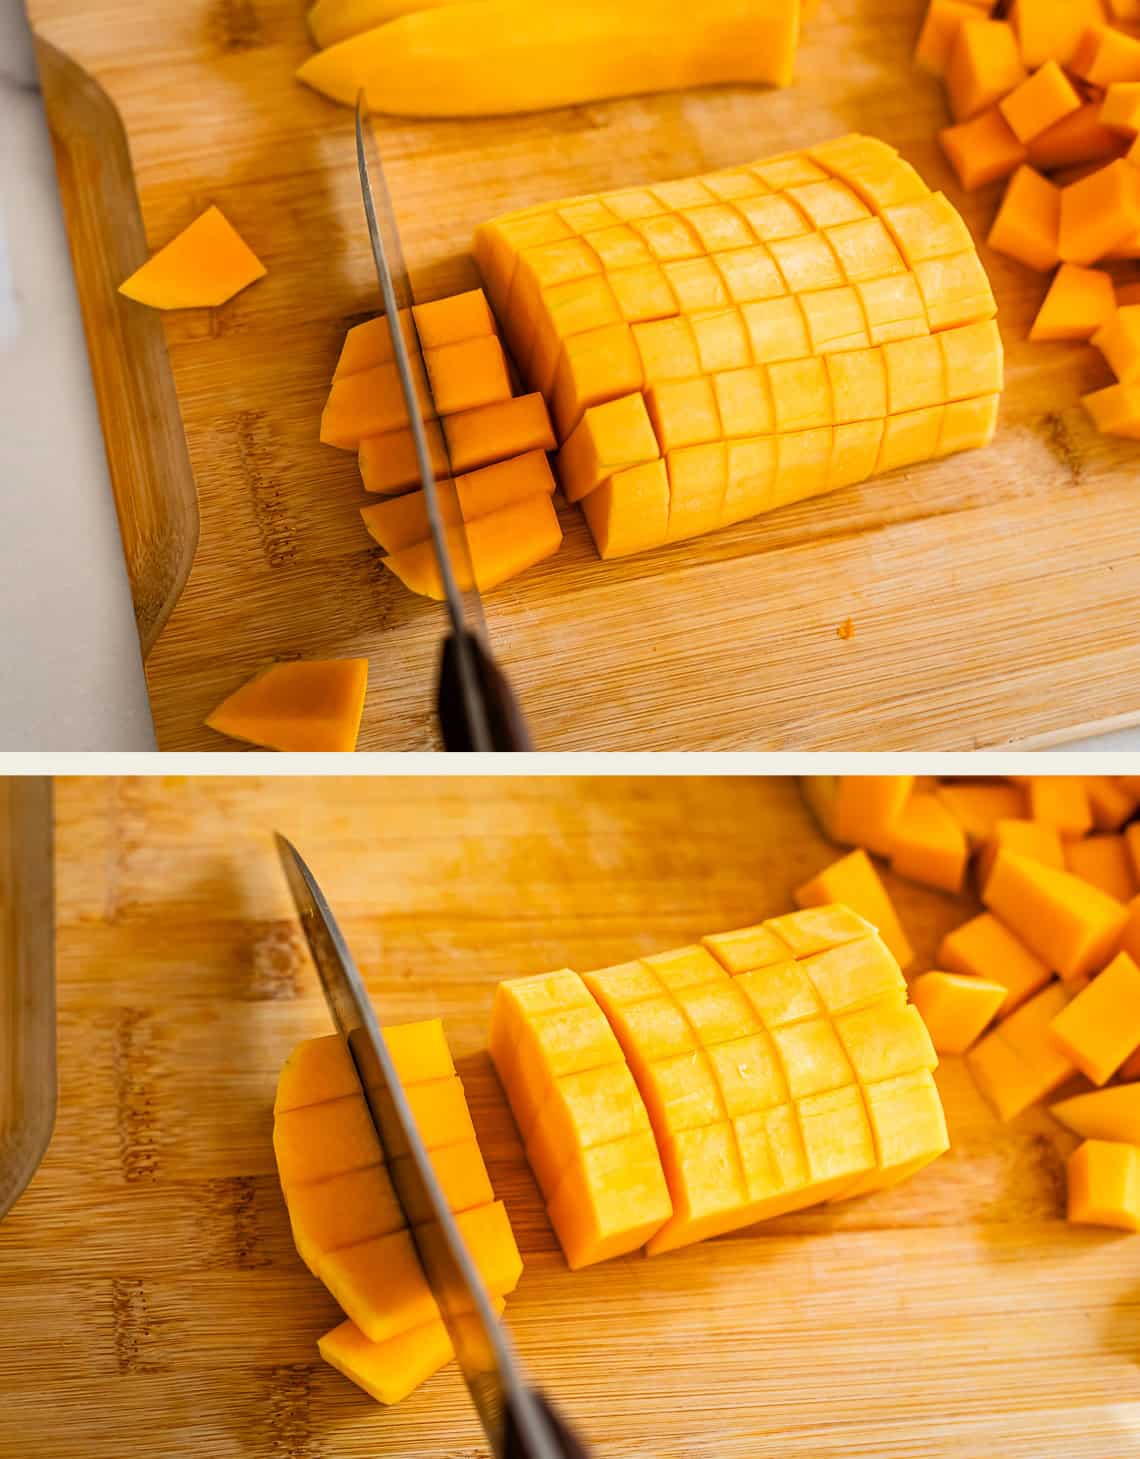
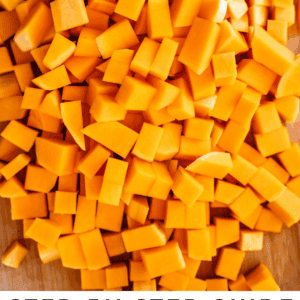
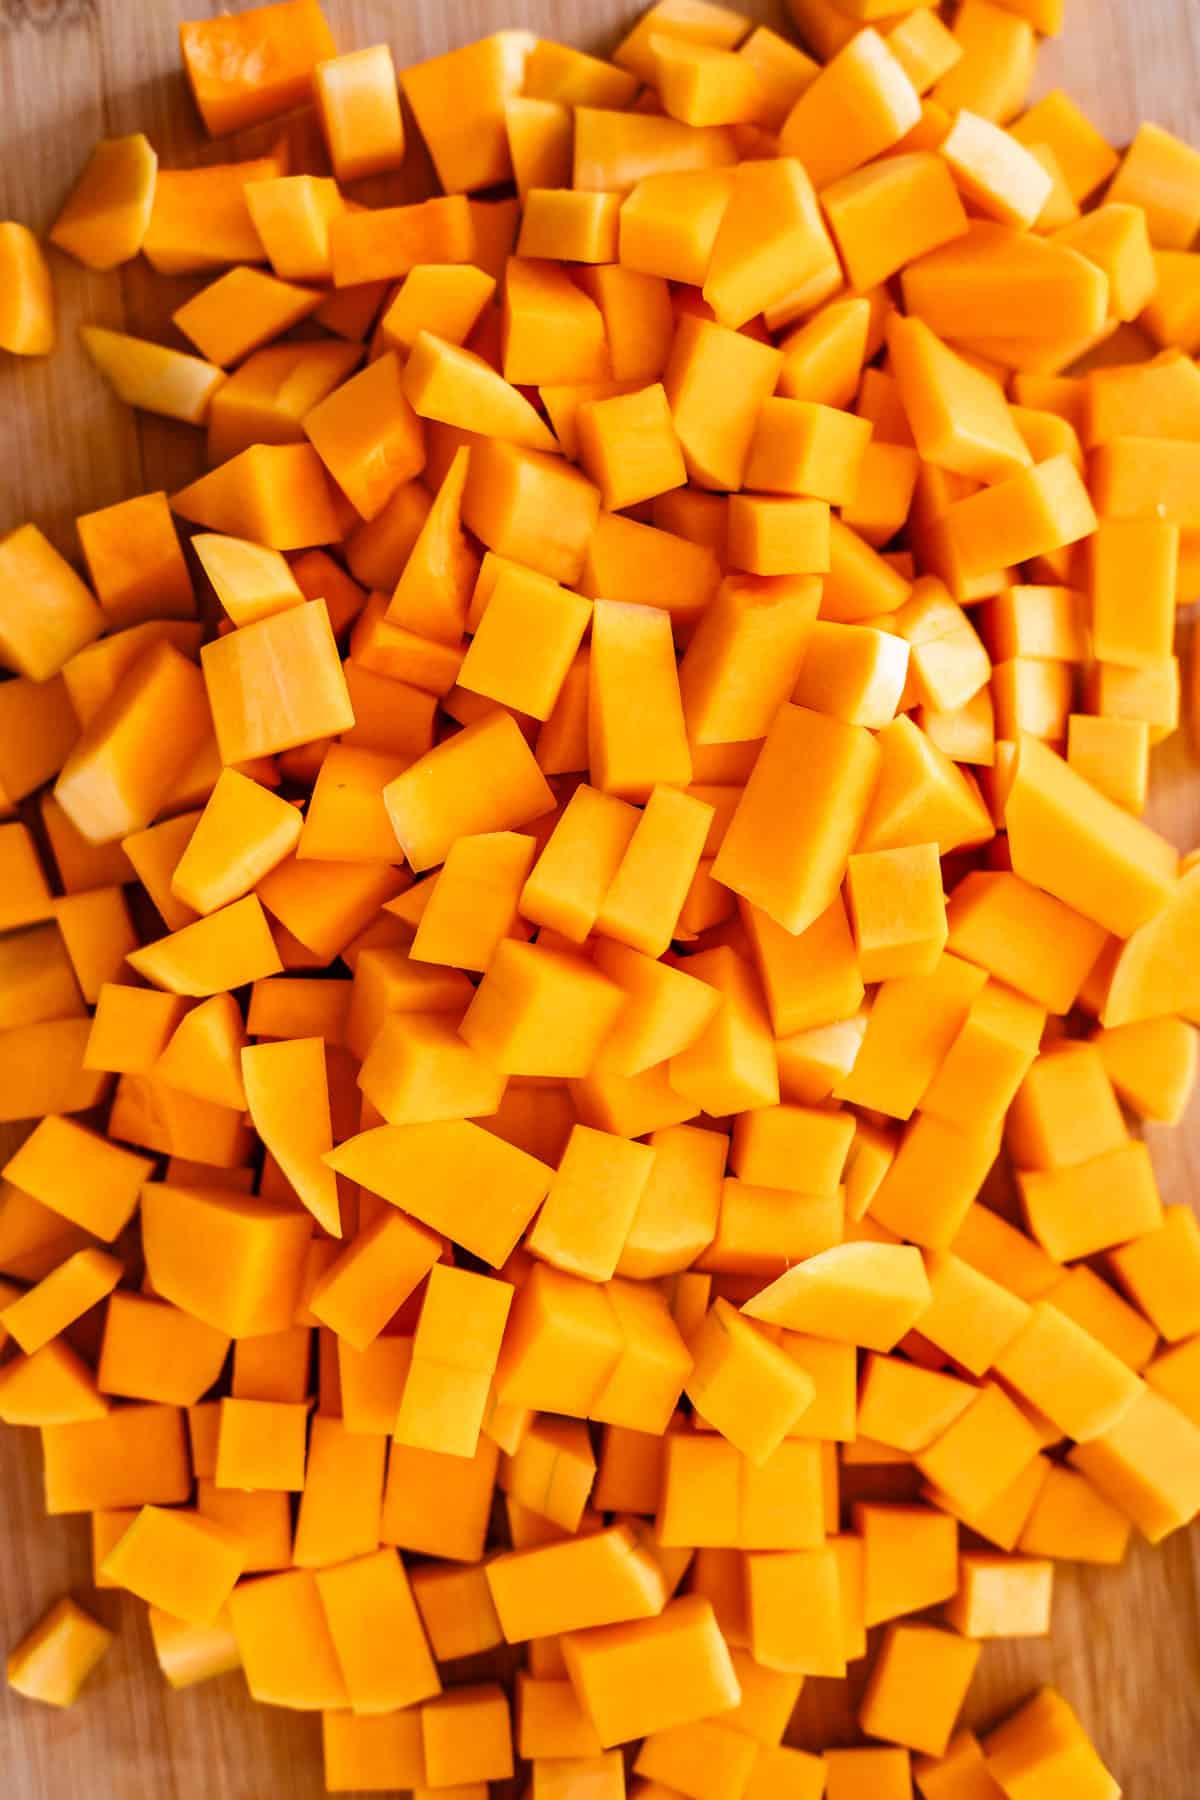
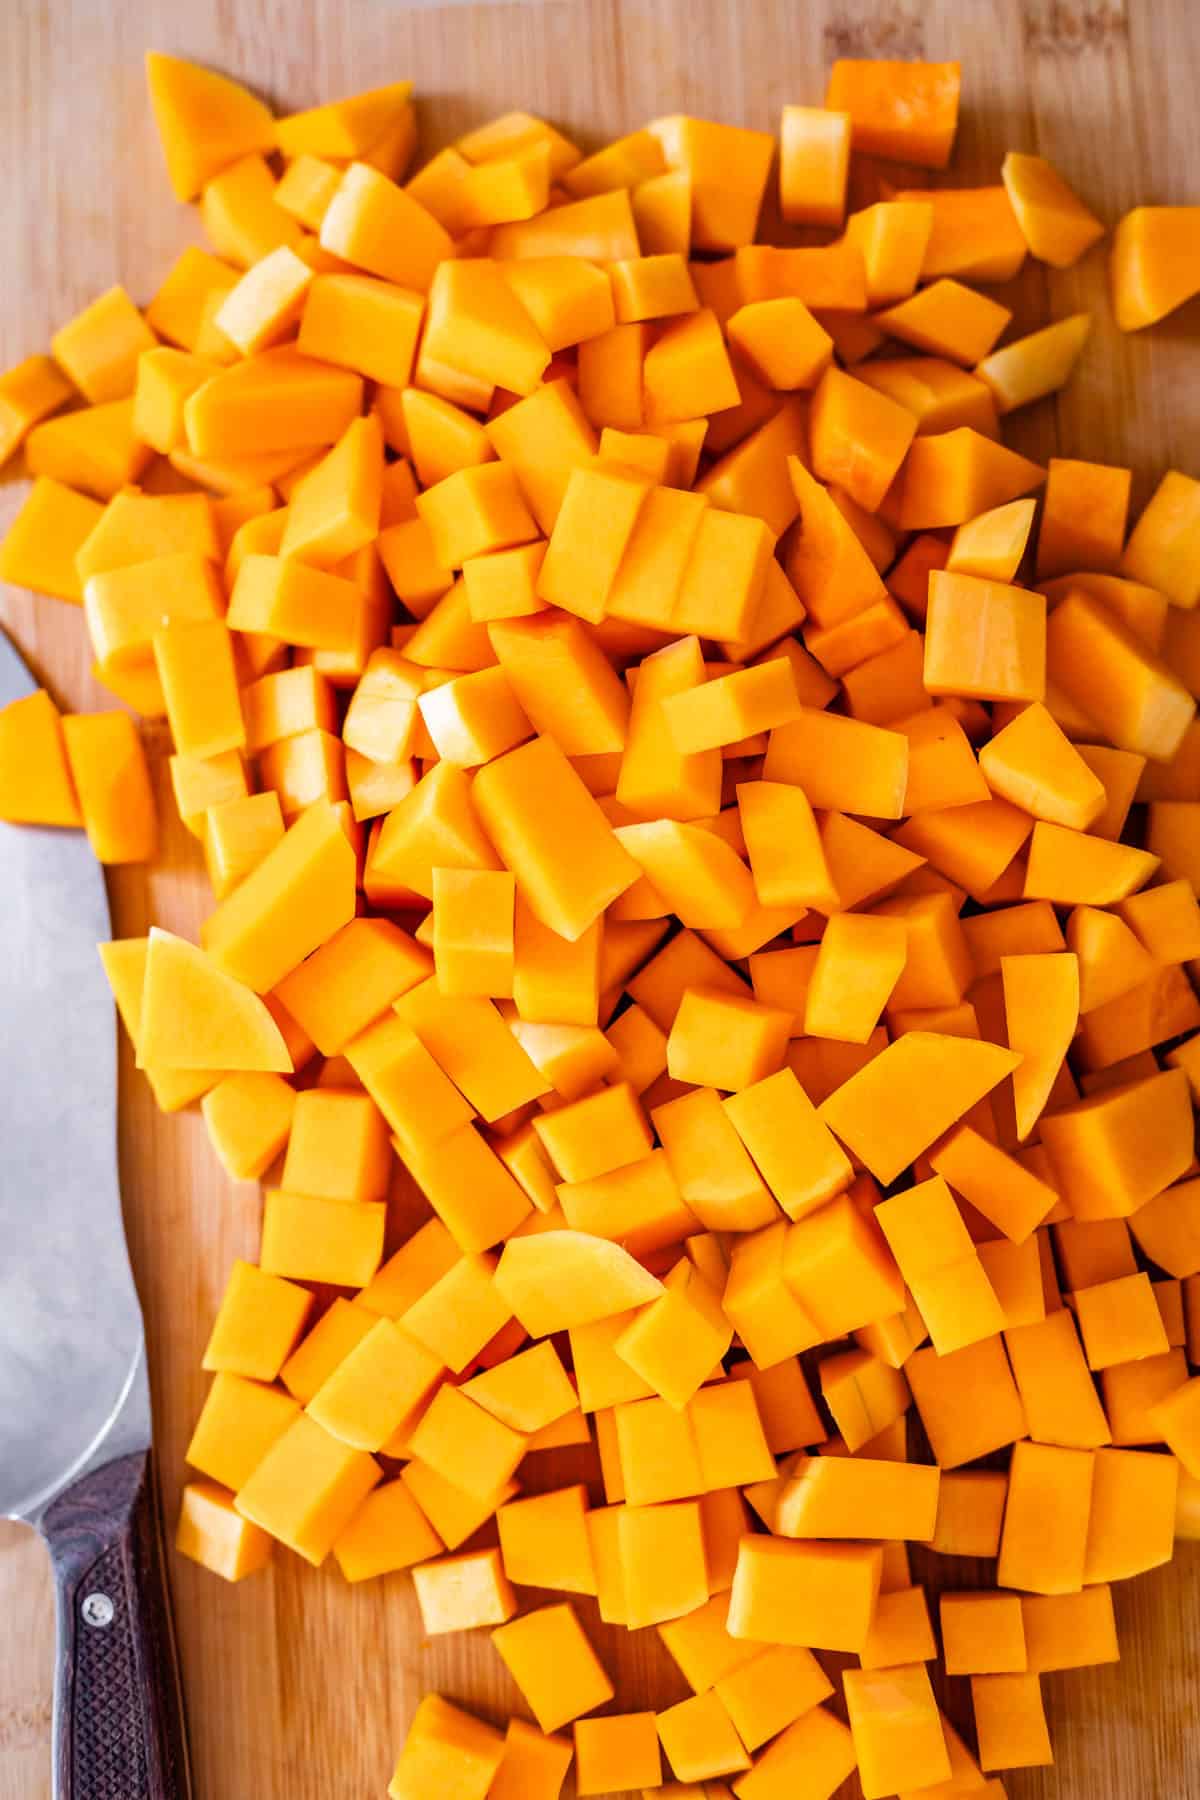
Keep going until you’ve chopped the whole squash.

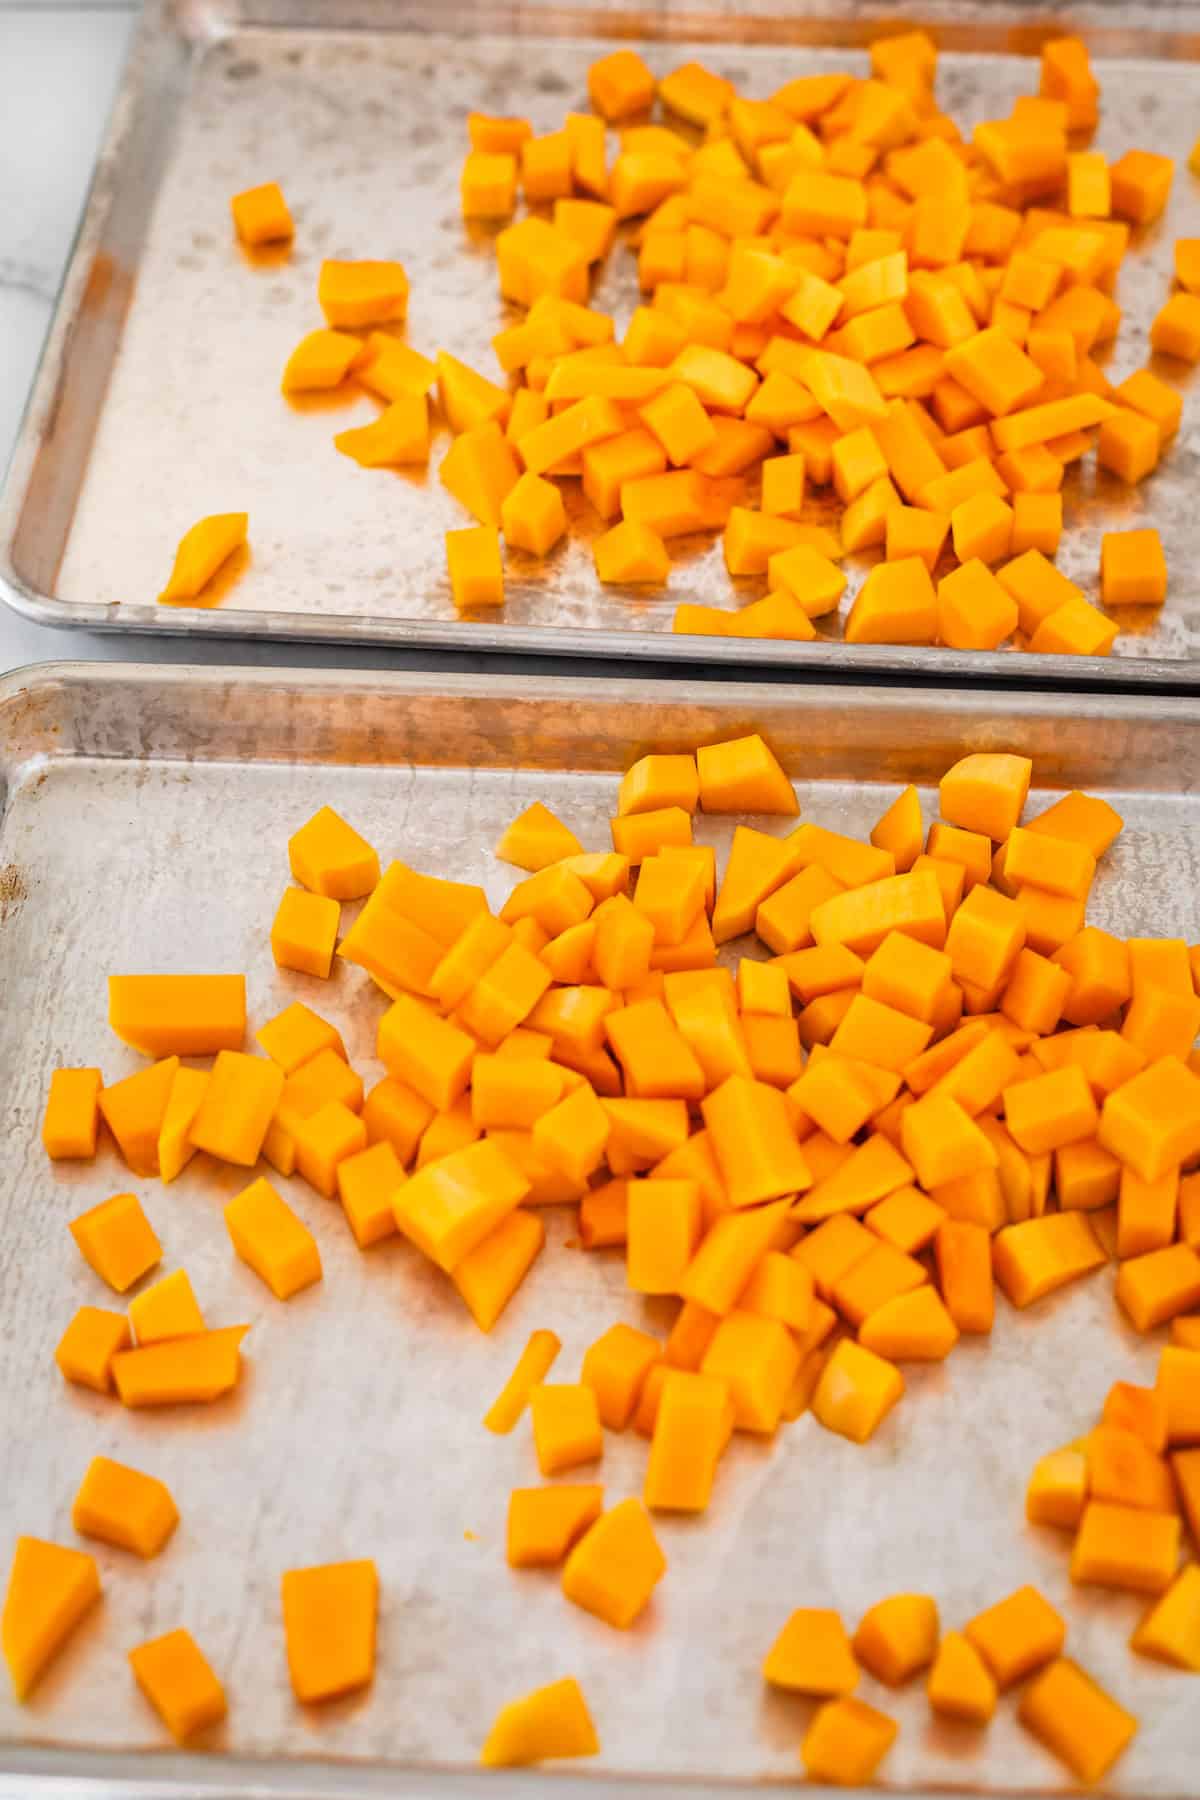
Done! Easy peasy! A 3 pound squash will yield a little less than 3 pounds obviously, you can see this one is coming in at 2 pounds 9 ounces. It should be about 7-8 cups chopped butternut.
How to roast butternut squash cubes
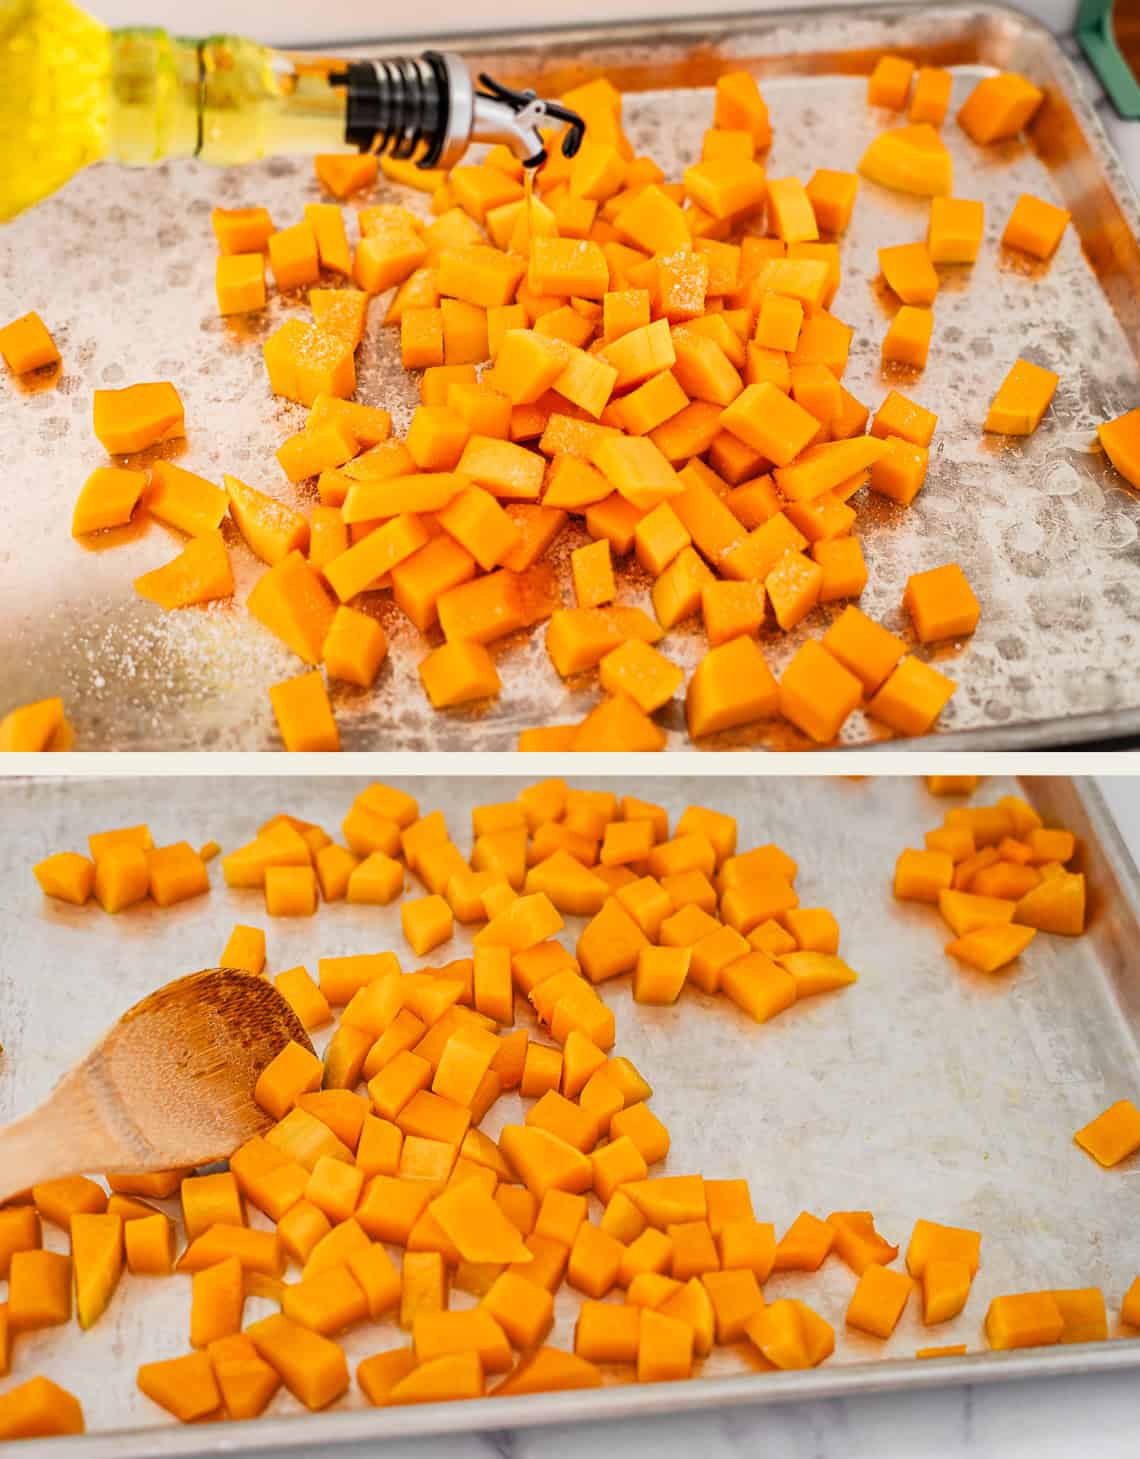
If you are roasting your chopped squash, it’s so easy. Just spread the squash out on TWO sheet pans.
Add a bit of oil and salt on each pan (about 1.5 Tablespoons oil and 3/4 teaspoon salt per pan) and spread it out.
If you dump them all on one sheet pan and bake them, they will cook. They just will be a bit mushier, because they will all be steaming each other instead of roasting. In order to roast, which gives you those browned, caramelize-y looking edges, you have to give each squash cube a little space to breathe.
Roast at 450 for about 30 minutes, stopping to stir once halfway.
That’s it!
Butternut squash recipes
Now that you have your peeling, cutting, and roasting technique down, it’s time to put that squash to good use! Here are some of my favorite butternut squash recipes, and a few I have on my list to try.

Recipes for Dinner
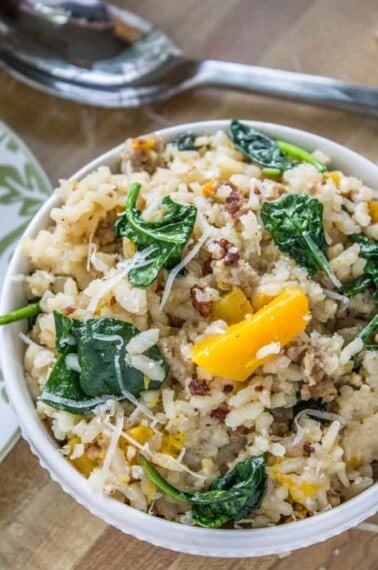
Slow Cooker Butternut Squash Risotto with Italian Sausage
Salad Recipes
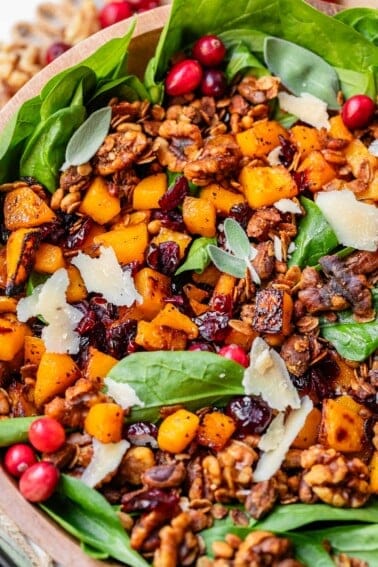
Honey Roasted Butternut Squash Salad

The Best Fall Recipes
Butternut Squash, Cranberry, and Goat Cheese Crostini
From friends!
- Warm Brown Rice & Butternut Squash from Ina Garten at Barefoot Contessa
- Butternut Squash and Black Bean Enchilada Skillet from Ambitious Kitchen
- Butternut Squash Fritters from Our Nourishing Table
Facebook | Pinterest | Instagram
Chopping Butternut Squash
Equipment
- 1 canning lid
Ingredients
- 1 butternut squash
Instructions
- Start by peeling your butternut squash. Make sure you peel enough that you can see the orange flesh. One peel will usually show a still-too-white outer edge layer. See photos. Just make sure you peel enough that you can see bright orange all the way around.
- Set up a cutting board on a towel or silpat so it doesn't slip around. Get out your big chef's knife. Make sure it's SHARP. Call for moral support. Shoo the cats and kids out of the kitchen. Make a vertical slice all the way down the center of the butternut squash.
- Use a canning lid to scrape out the seeds and goop from the cavity of the squash. Canning lids have sharper edges than a spoon, and they gently cut through the strands and pulp.
- If you are roasting the whole butternut, like for Butternut Squash Soup, you're done! If you are chopping the whole squash, continue on:
- Lay your butternut flat side down. Slice off the ends of the butternut: the top with the stem and the bottom little nobby thing. Nobby: a technical term.
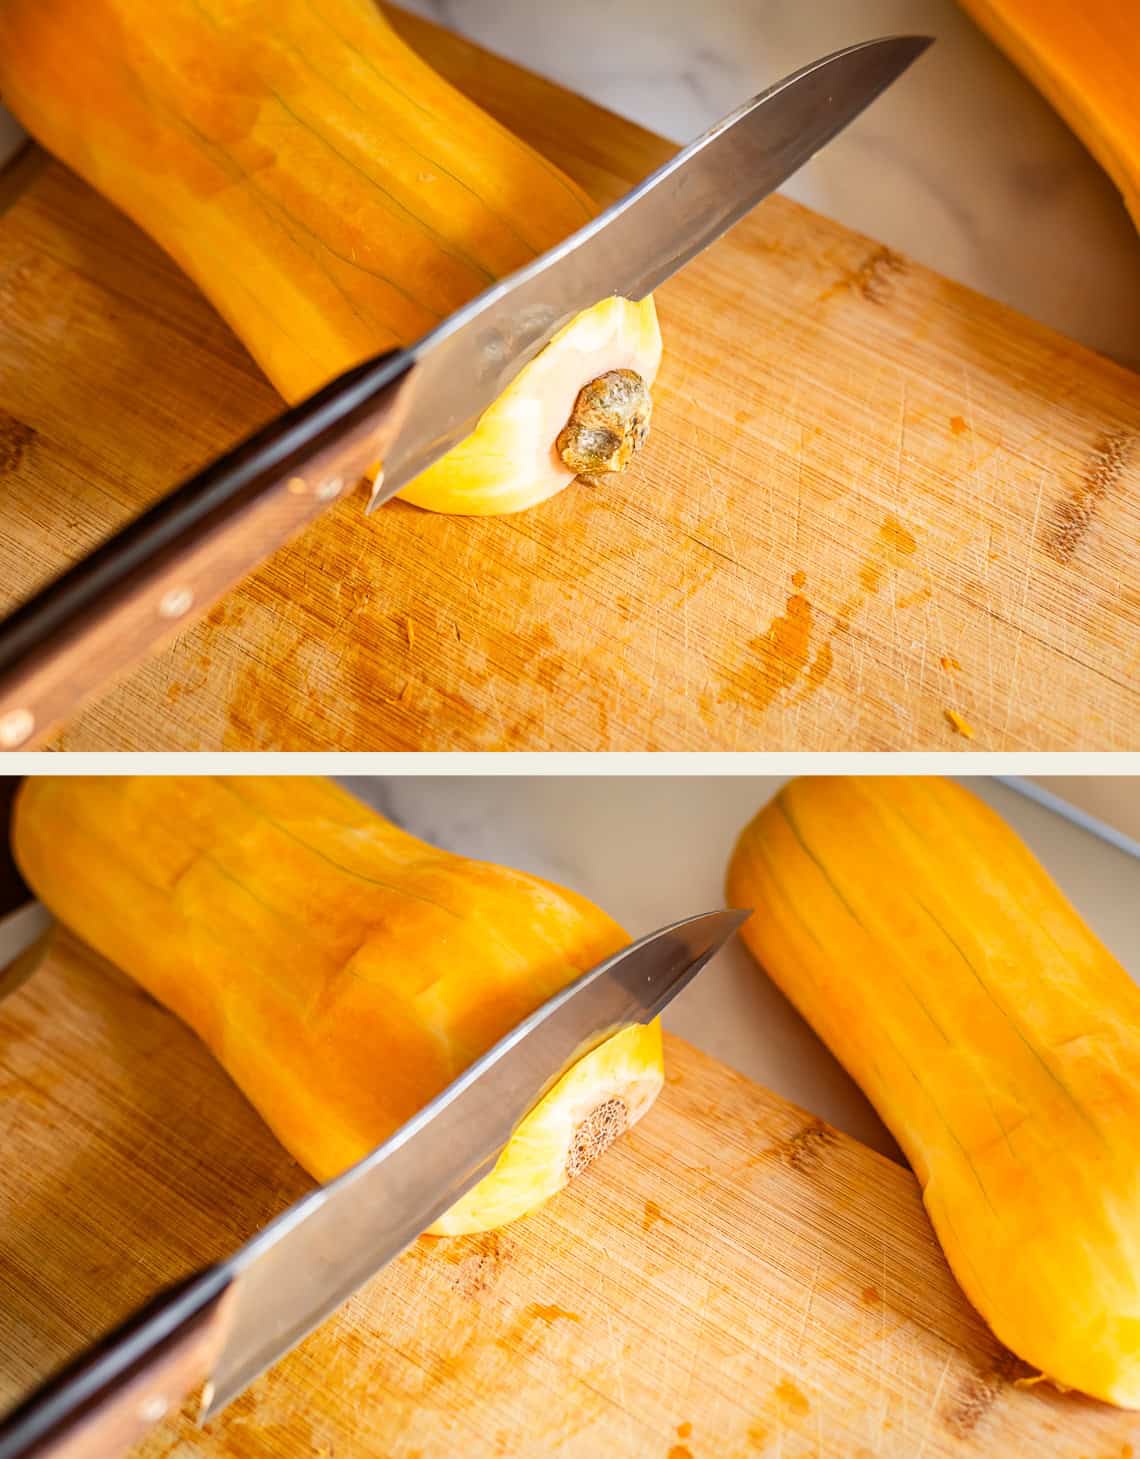
- Cut each half of the butternut squash in half crosswise, not lengthwise. (Hamburger, not hot dog, for you ancients like me. Do teachers still use this??) You want to halve the butternut so that the bulbous bottom half is now separate from the lengthy top half.
- Slice each quarter of the butternut lengthwise, into long pieces. Keep all the slices upright in their original placement, if possible.
- For the bottom half of the butternut (the two halves with the cavity), the pieces will not stay as well in their upright placement. Lay them on their sides and chop into bite size pieces.
- For the top half of the butternut, keep all the slices upright in their original placement.
- Slice the long pieces the other way, so it looks like a grid from overhead.
- One row at a time, lay the long skinny pieces down on their sides and chop them in half or into thirds.
- Finish by making sure each piece of butternut that you have chopped is roughly uniform in size, so they cook evenly.
- For roasting, layer the squash on TWO sheet pans, so they can spread out and have space on the pan. Roast at 450 degrees F with 1 and 1/2 teaspoons oil and 3/4 teaspoon salt on each pan. Roast for about 30 minutes.
- I love to use this butternut for Butternut Squash Lasagna!


Butternut squash, how I love it! I make your Butternut Squash Soup about twice a week in the fall/winter/maybe spring. I roast it, so I’ve never tried peeling the squash, I’ll give it a try next week :)
After I came close to cutting almost a half inch off the tips of both the middle and ring fingers of my left hand, I steered clear of fresh butternut squash for a few years and used frozen. Frozen will do in a pinch, but I’d really like another fresh one to use in a Thanksgiving recipe. Actually, before I succumbed to the frozen route, I tried the suggestion of poking holes in the squash, microwaving it about 3 mins, then peeling the skin off with a vegetable peeler. But, it was still tough and difficult to work with. Maybe it needed to be microwaved longer. Any other ideas or suggestions would be appreciated! Thanks!
Hi Teresa! I know it’s terrifying right?? Using a sharp knife and peeler really does make a difference, because then it takes less effort to get through the peel or flesh of the squash. If you’re pushing really hard, it’s so easy to almost chop your fingers off. Another option is getting a metal glove like this one. Might seem extreme but I mean hey, these are your fingers we’re talking about! Stay safe out there and best of luck with your next squash.
A friend gave me one of those gloves but I’ve never had to use it. Too bad I didn’t have it when I cut up that first butternut. Guaranteed I’ll be using it this time!
A woman who has a chainmail glove definitely needs a kitchen saw!
Ahahahah!!! Touche Dianna!! Kitchen battle, commence. I’m ready 😂
I recommend buying a clean hacksaw at the hardware store and using that if you are on a budget. Saws are cheaper than a good knife, just to get it open. Then I use a chef’s knife to cut it up. I bought the saw to cut dow rods for wedding cakes and decided to use it for big stubborn sweet potatoes and my kitchen saw was born. Although I know Julia Child used a butcher’s saw🤣
Okay, this is hilarious and I thought you might be joking at first 🤣 but it’s actually such a good idea!! I love that you have a kitchen saw. haha. clearly I need to level up!!