


This recipe gets you from zero to chewy chocolate chip cookies in 30 minutes with normal ingredients. These cookies are soft in the middle, perfectly crispy on the edges, and have an ultra-chewy center. There is a secret that is going to change your life; you are never going to look at warm cookies the same way again! Originally published September 27, 2018.

Table of Contents
It turns out that when people come to my blog and use the search box, the most commonly typed word is “cookies.” You guys know what you want. I’m here to deliver! Even though I’m a food blogger, and am supposed to be adventurous and try new things, at the end of the day all I really want are chewy chocolate chip cookies and a tall glass of milk, make that whole milk thank you very much.

Every other month I host a super casual dinner with my extended family who live nearby. My cousins, aunts, and uncles come over for hot dogs and chatting. Last month my cousin Emily brought a giant plate of super chewy chocolate chip cookies, much to the delight of tiny nieces and nephews everywhere. (What do you call the children of your cousins?? Never mind, I don’t even care. We’re all cousins and aunts and uncles in my book.)

Anyway, Emily’s cookies were legit. Like, legiiiit. Tons of buttery flavor, soft, mounded, CHEWY center, and delightfully crisp on the edges to provide sturdiness and flavor, without being hard or dry.
Her cookies were too gorgeous and tall and puffy in the middle to not have a trick. I asked her, did you use half shortening? “No, they are all butter.” Oh, you must have chilled them then. “No, I baked them right away, I don’t have time for chilling!”

I looked at the cookies again. They were not flat. At all. They were nice and tall and mounded in the middle. Flat cookies are the worst, and I always take at LEAST 20 minutes to freeze or refrigerate my dough to avoid it. Or use half Crisco/half butter. This is the only life I have ever known, you guys, and I bake a LOT of cookies. Then Emily explained her magical secret for perfect chewy chocolate chip cookies.
What makes this the best chewy chocolate chip cookie recipe?

It’s not a special ingredient, but rather a technique. When the cookies have just barely come out of the oven, are looking a little pale and sad, and have that domed shape that threatens to cool into a hard, too-crispy-edged hockey puck of a cookie, there’s something that must be done.

As soon as the cookies come out of the oven (don’t wait!), use two spoons or the bottom rim of a glass to gently push the edges in, shaping them into a circle and slightly lifting the center—this helps create that soft, thick middle. If you wait too long, the edges will firm up and won’t reshape easily, so move fast!


When Emily mentioned the spoon trick, we moved from casually chatting in the kitchen to me sitting her down and taking notes while I made her meticulously go through every step of her cookie making process. (I’m afraid poor Emily probably felt like she was being interrogated. I’m used to people giving me recipes and forgetting to tell me half of the techniques they use to make them. I’m looking at you, Kris.)
Featured Comment
“I don’t know how you came up with this, but boy are they AMAZING! This was quick, perfect, and easy to make for my school’s show and tell. Thank you for providing all of us with such an amazing recipe!!” – Abigail
Easy chocolate chip cookies ingredients
Here’s a quick shopping list to help you gather your ingredients. Jump to the recipe card below for the full ingredients and instructions!
- salted butter
- brown sugar (dark or light)
- white sugar
- vanilla extract
- eggs
- flour
- baking soda
- semi-sweet chocolate chips
How to make chewy chocolate chip cookies
All butter, 2 eggs beaten in one at a time, light brown sugar, white sugar, flour, baking soda (make sure it’s fresh!!)…no chilling, bake at 350 for 11 minutes. Mysteriously mundane and un-special. Sounds like every cookie recipe ever, right?
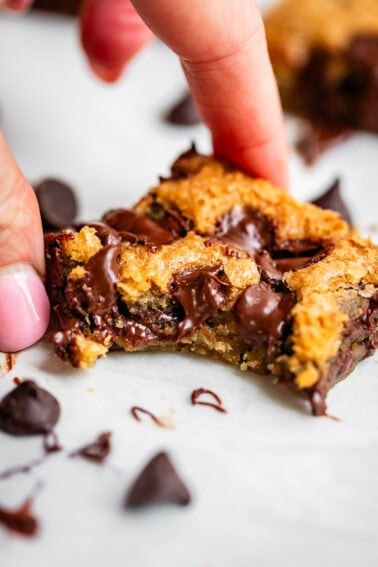
But once out of the oven, you’ll gently shove together each cookie with two spoons until they have that delightfully mounded look, the telltale sign of a rich and chewy cookie center. When I first tried this method, I kept taking bites into the center of her cookies and showing Emily the center. “You don’t get this fudgy gooey center without chilling or Crisco! This is amazing!! Life changing!”
The secret to this chewy chocolate chip cookie recipe
Spoons are where the magic is at. Smooooooosh.


Add a few extra chocolate chips on top to make them extra pretty and extra chocolate-y. I used my fingers to squish the cookie together a bit more. Once those golden edges have cooled and firmed, you will not be able to mold the cookie anymore; it will just break. You really have to do it right out of the oven.
(Here’s a bit of my photo setup. I make such a huge mess when I shoot cookies! There are always like 10 cookies with one bite taken out; me trying to get a good shot. I’m the worst.)

I should have known that Emily would have an amazing chewy chocolate chip cookie recipe. She’s an amazing baker. She is the source of these Caramel Nougat Pecan Rolls, after all, which is to this day my FAVORITE candy to make at Christmas. Seriously, try it, it is so good.
You could of course apply this spoon method to any cookie recipe ever. Like I said, Emily’s recipe is very basic: no cornstarch, no special chocolate, no fancy sea salt, just butter, sugar, and flour. I guarantee you that I will be using the spoon trick on basically every cookie I make from now on!
Easy chocolate chip cookies serving ideas
Step one: get a tall cold glass of milk. Step two: dunk, eat, repeat.
Seriously…it’s not that complicated! These cookies are the perfect dessert, bake sale treat, after-school snack, and solution to your late-night cookie cravings.

How to store chewy chocolate chip cookies
To keep these chewy chocolate chip cookies soft and fresh, store them in an airtight container at room temperature for up to 5 days. For extra softness, you can add a slice of bread to the container—the cookies will absorb moisture from the bread and stay chewy longer. I’d avoid refrigerating them, as that can dry them out. But you can freeze them in a sealed bag for up to 3 months.
If you want to reheat chewy chocolate chip cookies and make them warm and gooey again, pop one or two in the microwave for about 10–15 seconds. This softens them and brings back that fresh-from-the-oven taste and texture. If you’re reheating a larger batch, you can warm them in a 300°F oven for 5–7 minutes. Just don’t overheat them—they can dry out quickly.
Chewy chocolate chip cookies FAQs
Getting the perfect cookie texture eluded me for a long time. The secret lies in the spoons! When you have still-hot, slightly underbaked cookies that have flattened out a little, all you have to do is use two spoons to gently push their edges toward the center. As the cookie cools with its new, pressed-together form, it naturally develops the perfect chewy texture. You can also do this with the bottom rim of a glass, moving gently in a circular motion around the cookie with the rim in contact with the baking sheet. Either one works, but you have to do it immediately after they come out of the oven.
I love using salted butter in my cookies. It doesn’t make them salty! The salt naturally enhances the flavor of the other ingredients, amplifying them for amazing flavor. If you only have unsalted, it’ll still make great cookies.
Yes. You can freeze balls of this cookie dough on a baking sheet, then toss them in ziplock bags for later baking. You can also freeze baked cookies for 2-3 months. Pull them out whenever a cookie craving strikes!
Never enough chocolate chip cookie recipes!!
- Brown Butter Chocolate Chip Cookies >> because browned butter makes everything better
- The Best Chocolate Chip Cookies I’ve Ever Made >> this recipe has a few unusual ingredients and it’s so good!!
- The Best Bakery-Style Double Chocolate Chip Cookies >> you are seriously going to LOVE these
- Mint Chocolate Chip Cookies >> one of the TOP recipes on my blog!
- Coconut Pecan Chocolate Chip Oatmeal Cookies from The Baker Mama
- Red Velvet Chocolate Chip Cookies from Give Recipe
- Orange-Chocolate Chip Cookies from Taste and Tell
Facebook | Pinterest | Instagram
Chewy and Easy Chocolate Chip Cookies Recipe
Ingredients
- 1 cup salted butter, 2 sticks
- 1 cup dark or light brown sugar, packed
- 1/2 cup white sugar
- 1 teaspoon vanilla extract, I love to use Mexican vanilla
- 2 large eggs
- 3 cups flour, spooned and leveled
- 1 & 1/2 teaspoons baking soda
- 3/4 teaspoon salt
- 3 cups semi sweet chocolate chips
Instructions
- Preheat your oven to 350 degrees F.
- Line 2 large baking sheets with parchment paper or a silicone baking mat.
- In a large bowl or stand mixer, beat the butter until fluffy, remembering to scrape the sides. If you have a stand mixer, start with cold butter and just beat and scrape the sides until it's creamy. If you are using an electric mixer, let your butter soften on the counter for at least a few minutes. (Or live dangerously and put it in the microwave for one minute on power level ONE. I do this all the time. Who remembers to soften butter?? Not this girl.)
- Once your butter is creamy, add the brown sugar and white sugar. Beat well until fluffy, at least 1 minute. Scrape the sides halfway through.
- Add the vanilla and one egg. Beat well. Add the next egg. Beat, scraping the sides.
- Add the flour but don’t mix it in yet. (Make sure you spoon it into the measuring cup and level it off!)
- Use a small spoon to stir the baking soda and salt into the flour.
- Turn the mixer on low and beat until there are still a couple streaks of white flour. You want to stop mixing as soon as the flour is mostly incorporated.
- Add the chocolate chips and mix until just barely combined. Don’t over mix or you will get tough cookies!
- Use your hands, an ice cream scoop, or a medium cookie scoop to shape cookie dough. See photo. I made mine about the size of a golf ball. I put 12 on one baking sheet, make there there is about 2 inches of space between each one. (Don't pay attention to the photo of the raw cookie dough so close together up there; I was prepping them to go in the freezer. That is the size you want to shape the cookies though.)
- Bake at 350 for about 9 minutes. Depending on your oven and how big you shaped your cookies, you might need to bake for as long as 11 minutes, but you want to take the cookies out of the oven when they are VERY pale on top and have just barely started browning on the edges. See photos.
- Immediately after you take them out of the oven (seriously, don’t wait) use two spoons to gently push each cookie together. I just used two regular spoons, the kind you eat cereal with. Push the cookie together so that it comes up a bit in the middle, that’s how you’re going to get a soft, thick center. If you wait even just a minute after taking them out of the oven, the brown edges will start to crisp up, and you won’t be able to shape the cookies. Work your spoons all the way around the edges so that your cookie is a nice circle shape. Work quickly to shape all the cookies before they crisp on the edges.
- Press more chocolate chips into the top of each cookie, if you want. (Who doesn’t want that??)
- Let the cookies cool on the pan for several minutes. They will continue cooking on the hot pan, even after you take them out of the oven.
- Remove to a cooling rack after the cookies have set. Dip in milk and let all your cookie dreams come true!


Who knew two teaspoons could enhance the bite of a chocolate chip cookie!?! Had a stressful week and needed a cookie fix. This chewy chocolate chip cookie always makes everything much better.
Hi it is super yummy and ok ur daughter hahaha it’s harmonee heheh ur food is so yum and my dad loves them to
HI HARMONEEEEEE!!!!! So glad you and your dad are loving these!!! You are a pro cookie maker now. Thanks for leaving a comment! You’re the best!!
This is AWESOME!!!
SO GOOD!!!
Hello. I’ve used this recipe twice and LOVED it. I always get amazing complements.
However, last night I attempted the recipe for the 3rd time. I used 2 eggs from our farm rather than the store. It obviously made the batter very yellow and the cookies but the taste was just completely off. I had to spit out my cookie. Also when they began to bake, they went completely flat. No rise at all. Do you think this could be the eggs? The only other difference was the baking soda I used wasn’t fresh. It has been in the fridge for a while. Would that affect anything? Also, for future reference can you interchange baking soda and baking powder? What’s the difference and do you use the same measurement when swapping.
Lastly, do you have any tips for not everything sticking to the beaters on the mixer. I’m constantly having to turn it off and use a lot of muscle to scrape the batter off and I feel like it’s not getting mixed well because of this.
Thank you! I love your recipes!
Hi Harleigh! Yes, eggs from the farm could have changed things a little, especially if they were much smaller or larger than the eggs you usually buy at the store, but more likely it was your baking soda. A fresh box is essential for good cookies. Baking soda and baking powder can’t be substituted for each other one to one. If you want to substitute, use three times as much baking powder as baking soda called for in a recipe, since baking soda is much more powerful. We haven’t had trouble before with batter sticking to the beaters, since usually the batter gets pulled in and then whirled out in turns. Hope your next batch turns out perfectly!
If I don’t have salted butter, how much salt should I use?
hi Sarita! Add about 1/4 teaspoon salt per stick of butter (half cup) Enjoy!
I saw the spoon trick in your (delicious!) snickerdoodle recipe and followed the link to this recipe to read more about the trick. My cookies didn’t turn out nearly as pretty as yours the first go around! As quickly as I tried to shape them, I wasn’t able to make it through them quickly enough before the edges started to harden. The ones I did make it to turned out pretty misshapen…although the centers were soft and delicious! Do you by any chance have a video of the spoon trick on any cookie? I want to give it another shot, but would love a visual first to see where I’m going wrong. Thank you for such a game changing hack!
Hi Hillary, we don’t have a video of the spoon trick, but it can be tough to get them all shaped before they harden! Another, faster way to do it is to use a drinking glass that’s larger in diameter than the cookies. Place it so the rim of the glass is in contact with the cookie sheet around the cookie, then move it in a circle so that the edges of the cookie bump up against it. Try that next time and let us know how it turns out, and thanks for taking the time to comment!