


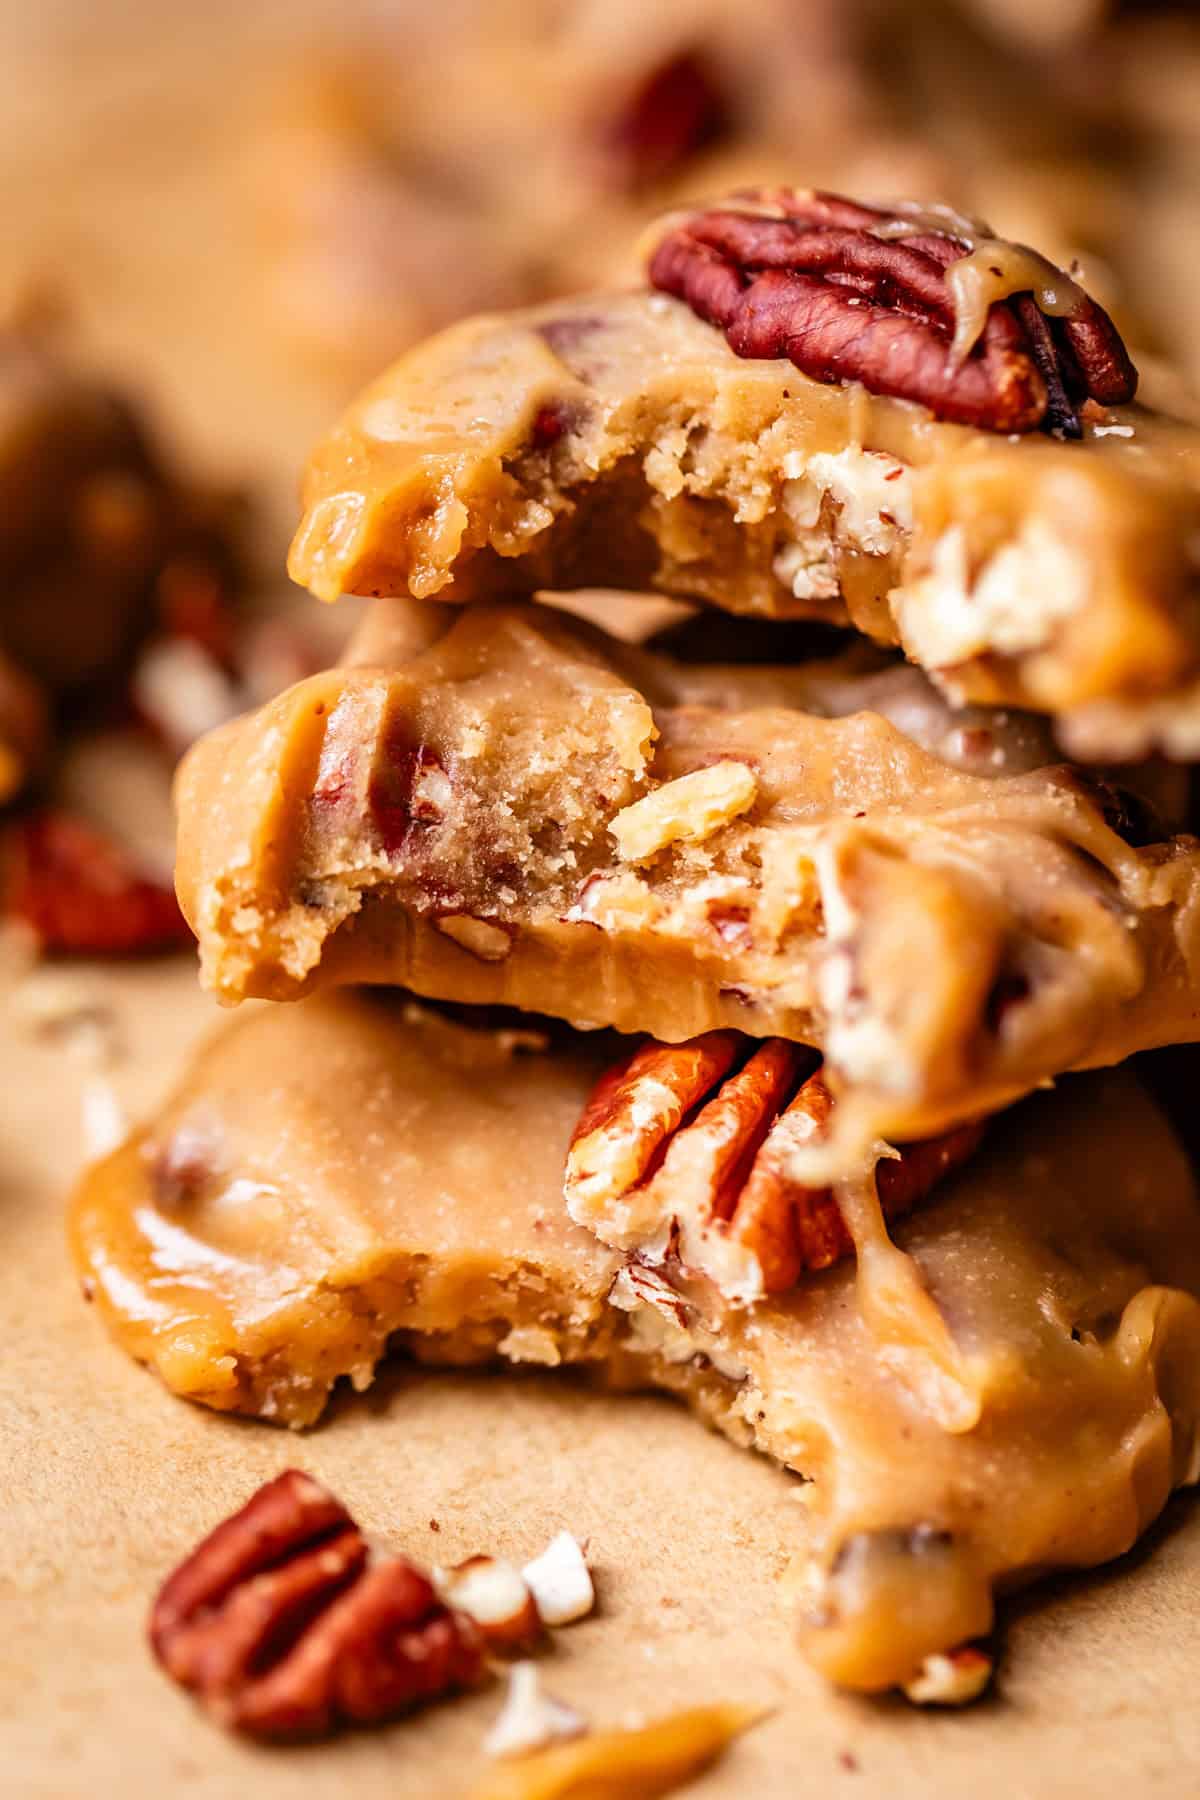
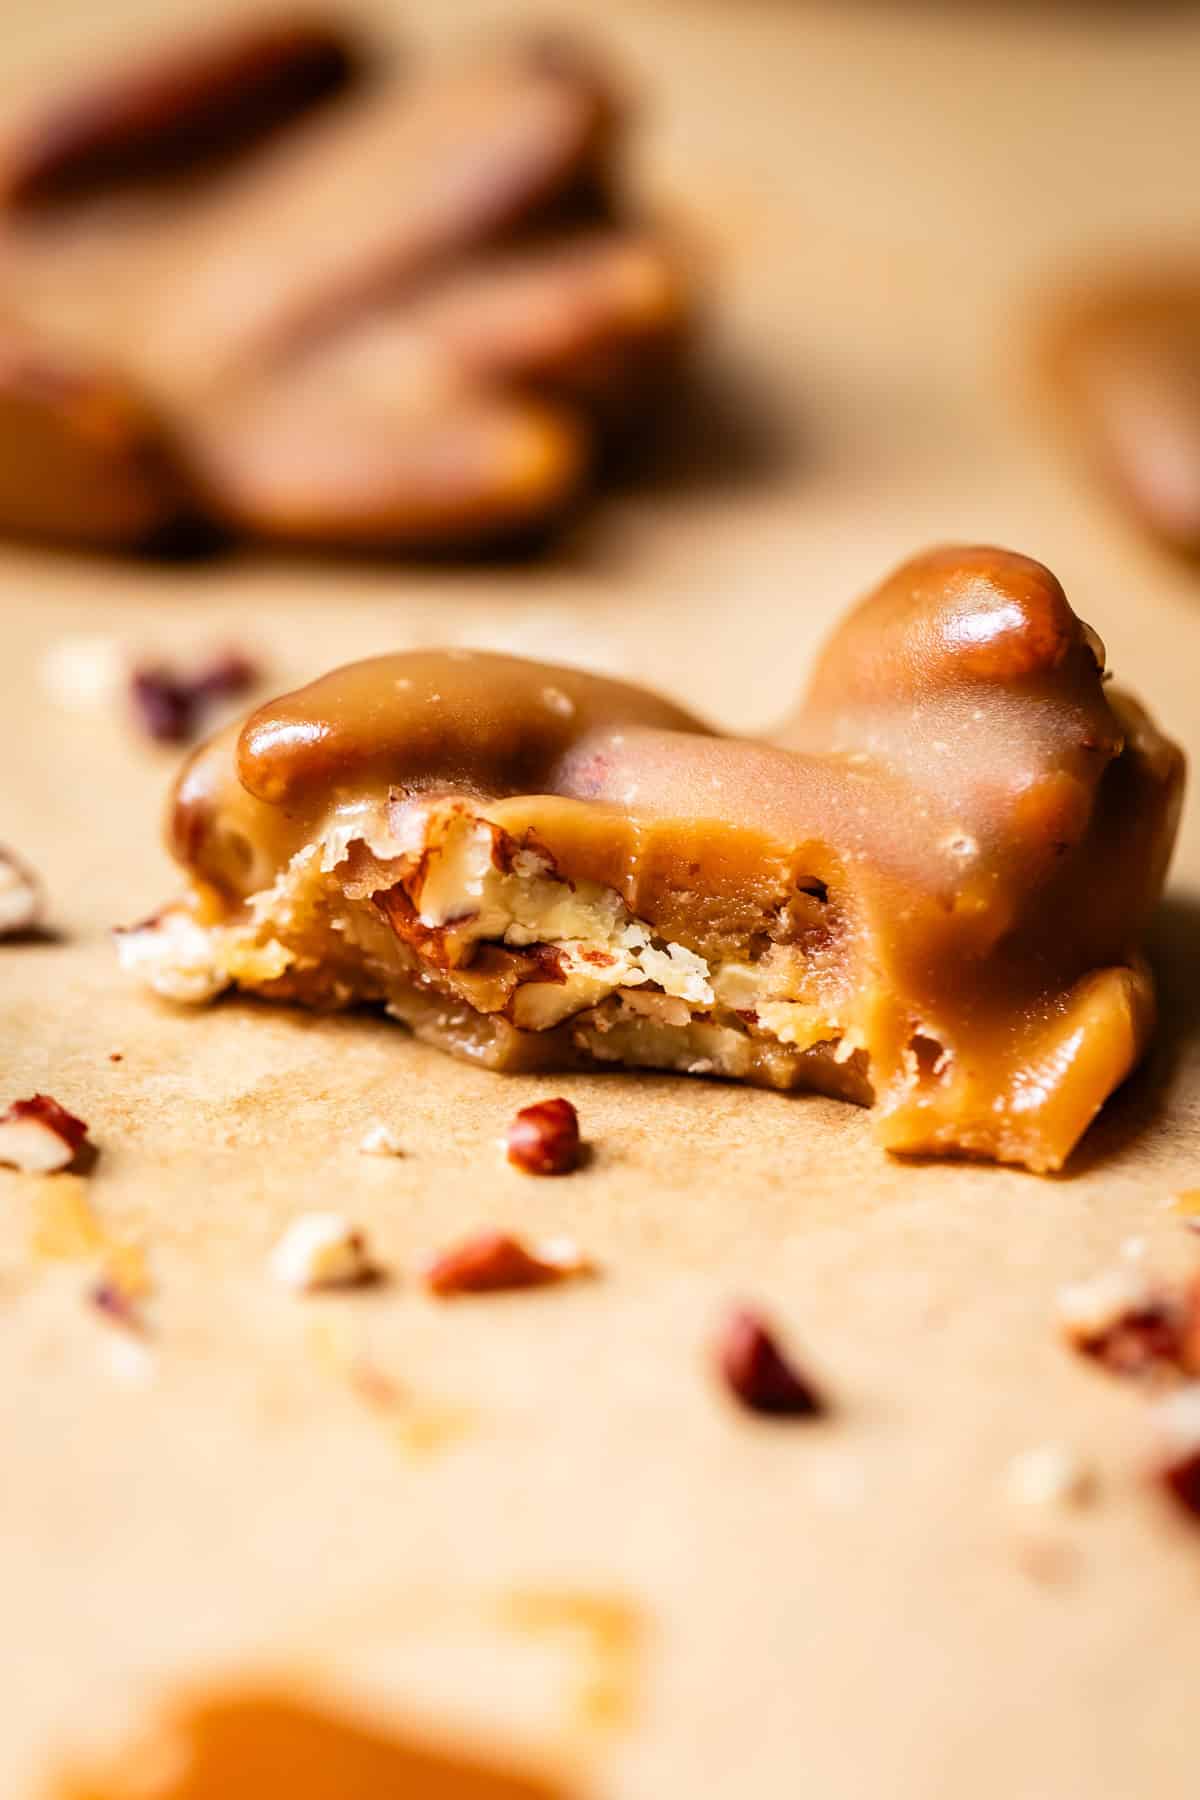
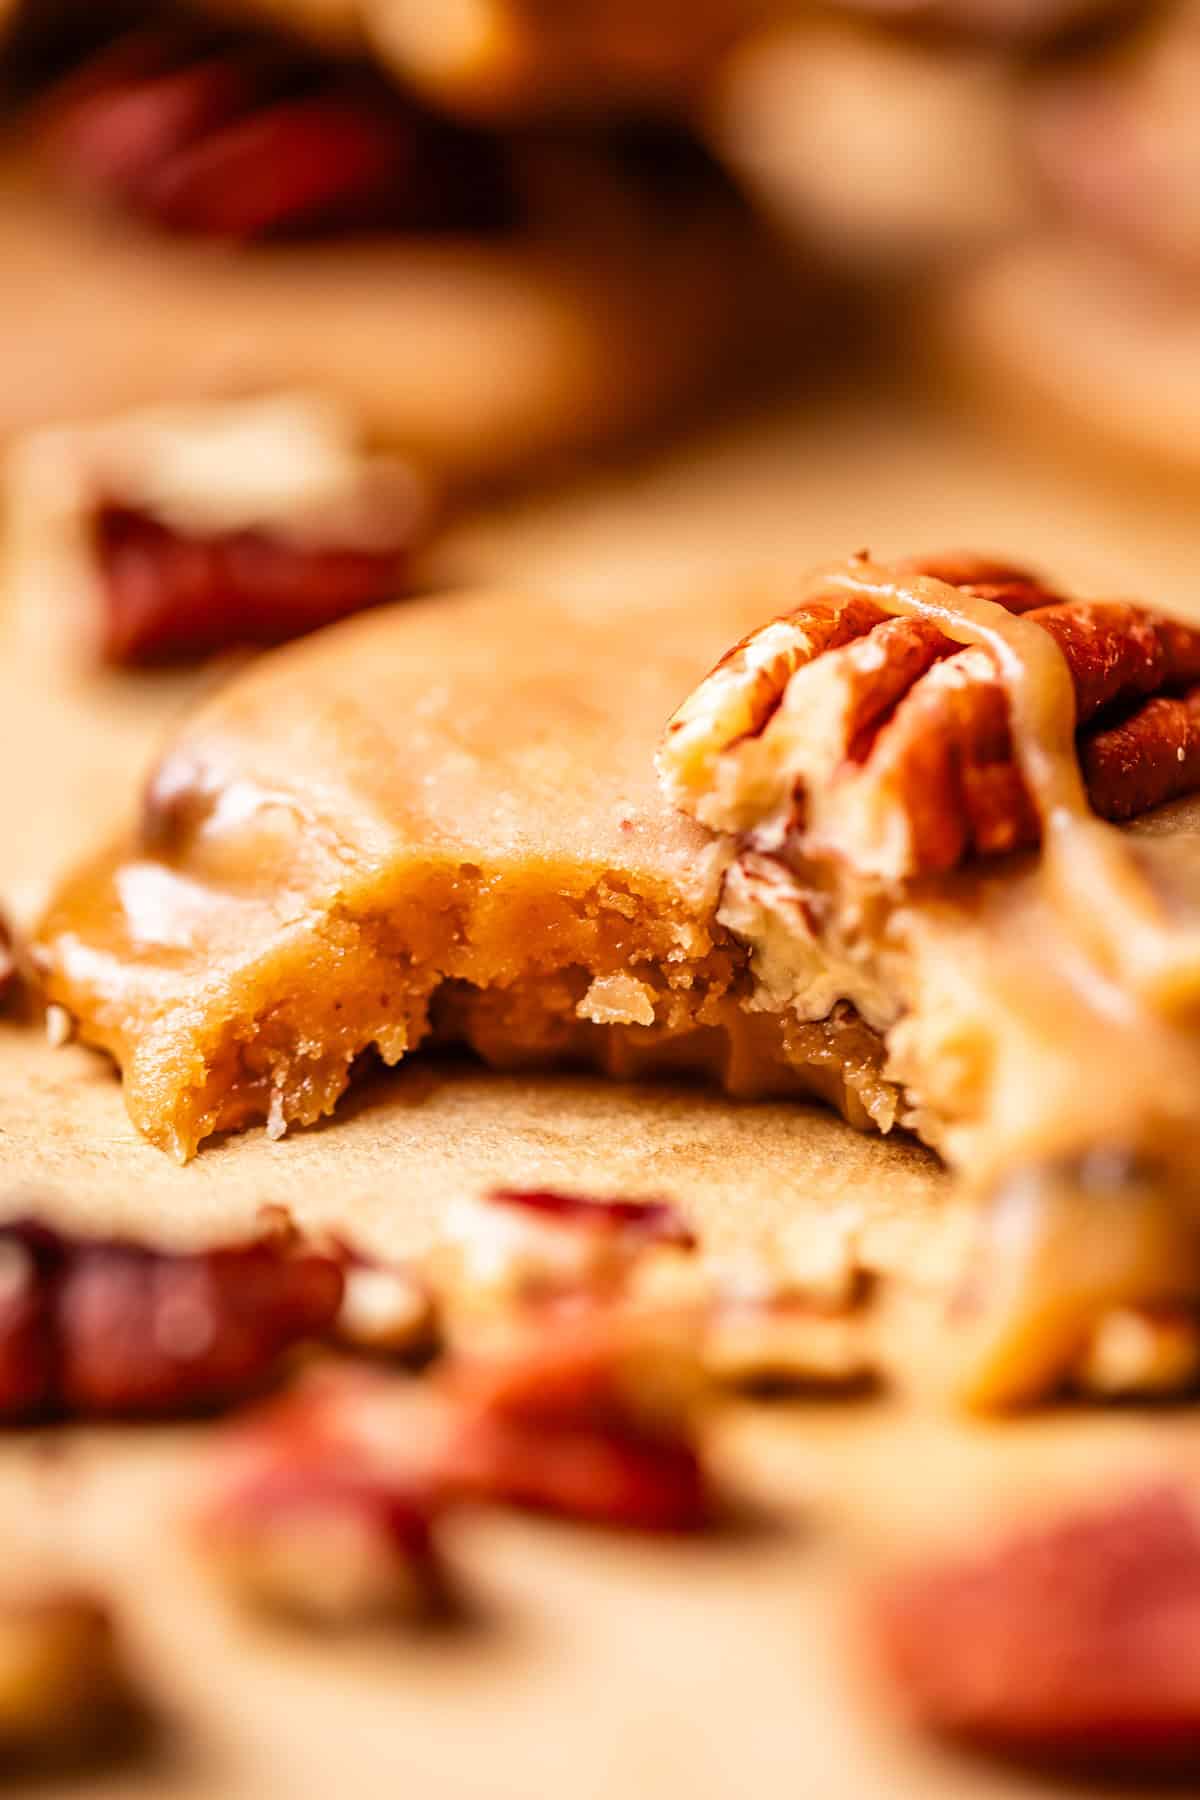
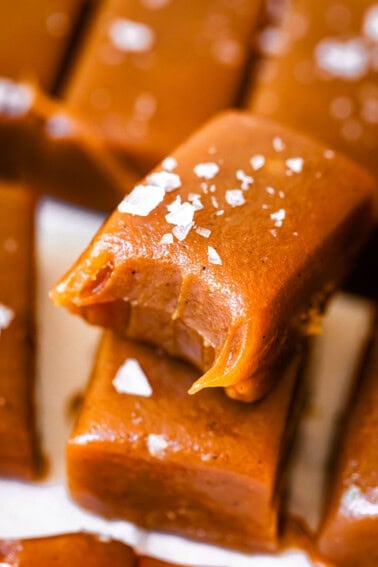
Pecan pralines are a buttery, caramel-y, melt-in-your-mouth cookie. Or is it candy? It’s kind of both! The recipe consists of toasted, crunchy pecans in a creamy cloud of brown sugary, caramely, fudgy candy, dropped into the shape of a cookie. They are a New Orleans classic, and I am obsessed. You only need a few easy ingredients to make them! Follow my step-by-step guide for your new favorite Christmas neighbor treat!
PECAN PRALINES, I FINALLY GOT YOUUUU!! lol, guys, this recipe took me forever to master. I’m super excited to share this today! Add these to your Christmas treat list to make this week.
Back in 2022, my sister-in-law Britta wanted to go to New Orleans for her 40th birthday, so we took a girls trip and had the BEST time. I remember hearing some great music, eating some deep fried alligator, but mostly I remember my first time biting into a Pecan Praline.
It was truly a magic moment. I had never had anything like it. Buttery, brown sugary, caramel-y, creamy goodness melting on my tongue, with the crisp snappy toasty pecans rounding out the sweetness. And thus began the insane obsession that followed in the next 3 days of hunting down the best pecan pralines in every single shop I could find in the city.
It wasn’t hard. Pralines are ubiquitous in New Orleans. But it WAS hard finding good ones. Don’t think that just because you are in the south, every Praline you eat is going to be fabulous, ohhhh no. (I learned this hard truth buying a crepe from a street vendor in Paris once. I watched in horror as he dumped FAKE lemon juice from a bottle all over my too-thick-and-rubbery pancake of a “crepe”…no, I’m not bitter, why do you ask?)
Anyway, not all pralines are made the same and some are definitely better than others. It was really interesting to see the range of what was labeled a praline. I had never even tried a praline before that trip, but I tried enough versions to know exactly what I was looking for in a homemade recipe.
What makes a good Pecan praline
So, what makes a Pecan Praline fabulous?
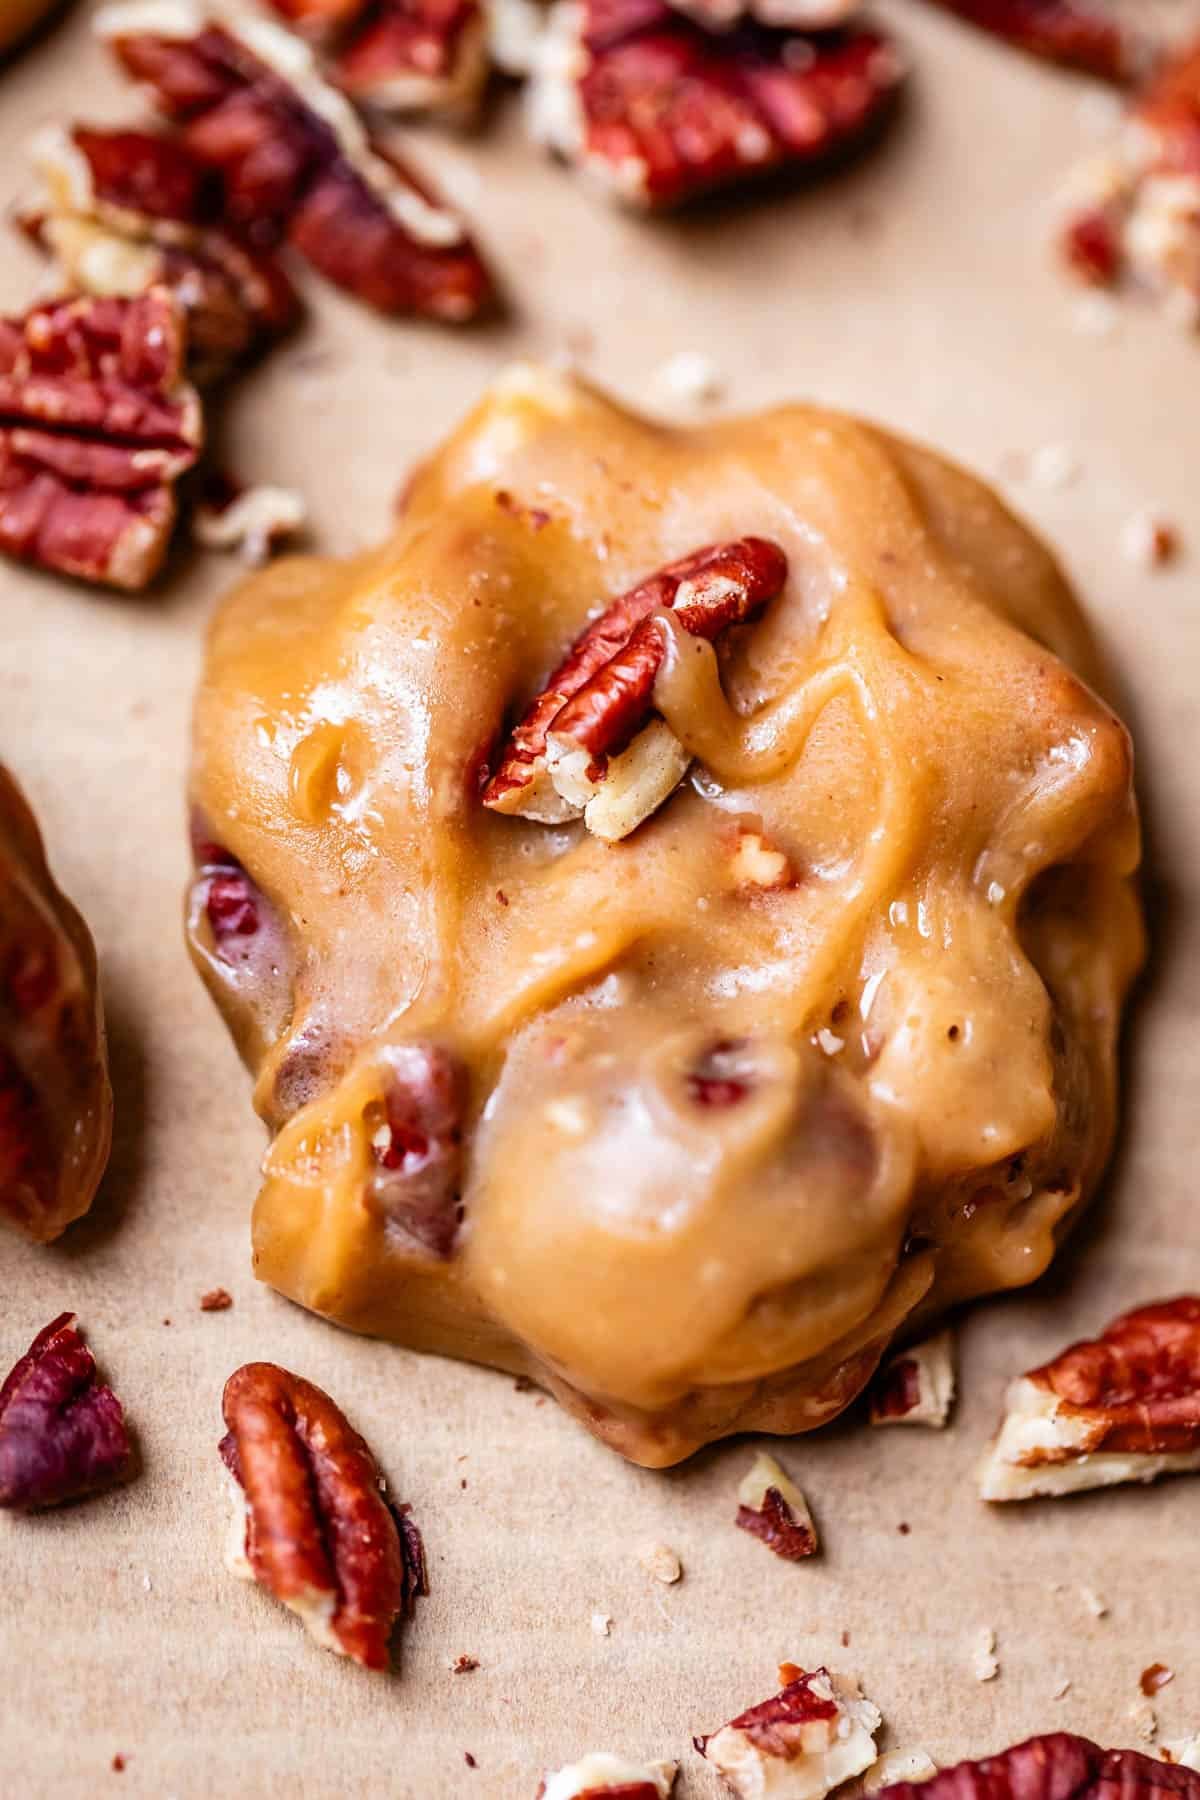
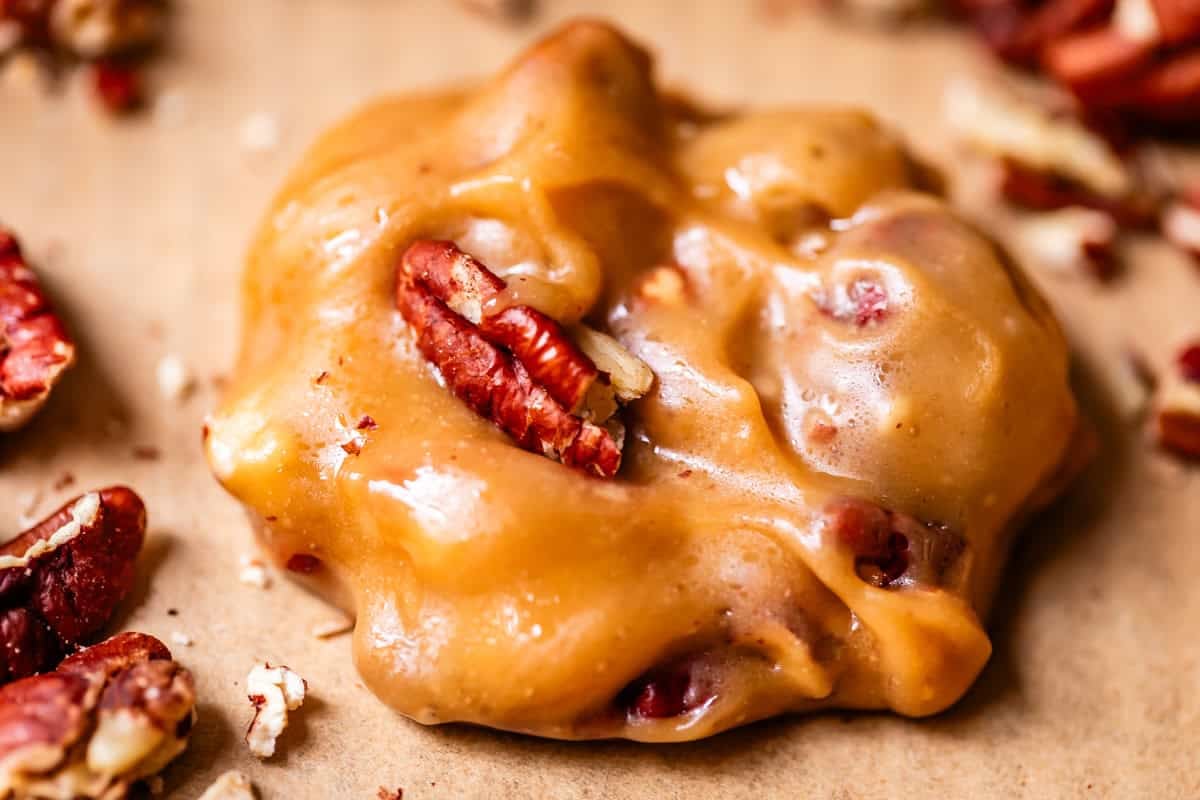
- The best pralines are CREAMY. This is not caramel. There should not be a significant “stretch” (like caramel stretches) when you take a bite of a praline. Baking soda is the ingredient that gets us there.
- The best pralines have a FUDGY texture, achieved by cooking to the exact right temperature.
- The best pralines are not overcooked, meaning they are not crystalized, dry, hard, or brittle. They are soft and have the perfect crumble-stretch. (A technical term.)
I’m from California, and we don’t do pralines round these parts. But every person that I have offered these to has taken a bite, looked up, eyes wide, and said what is this?? They are that good.
Here are the rules:
Are you ready? I’m about to get a lil bossy here guys. Praline is candy, and candy making is no joke. So listen up.
- You need a candy thermometer. I’m sorry, but unless you are an expert candy maker with a serious intuition about candy temps just by look and feel…you need a thermometer.
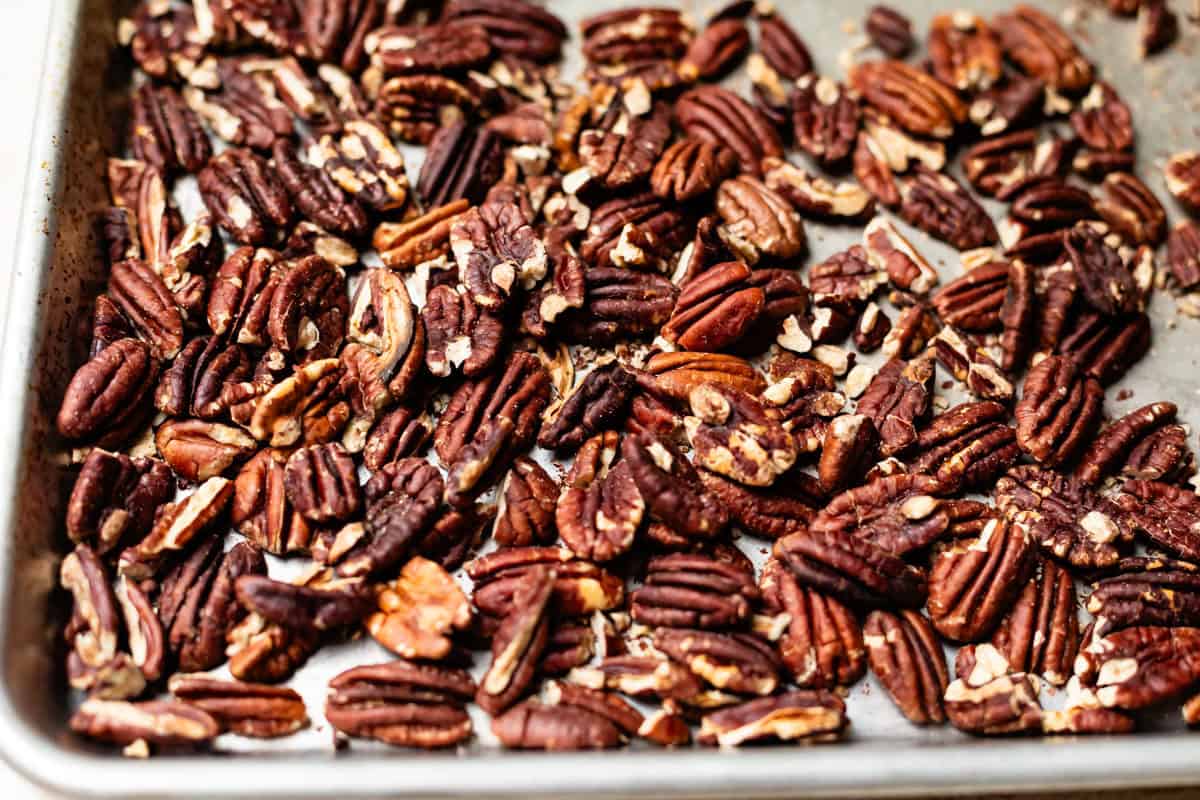
- You MUST toast your pecans. You just won’t get the flavor without toasting. The texture will be off too: untoasted pecans tend to mush and bend. We want them to SNAP.
- You must follow all the meticulous stir—don’t stir—don’t stir—NOW STIR A LOT instructions. This is essential for avoiding crystallization, more on that below.
- You can only drop the pralines onto your prepared pan when the mixture has become opaque. If it is glossy, your pralines will not set up.
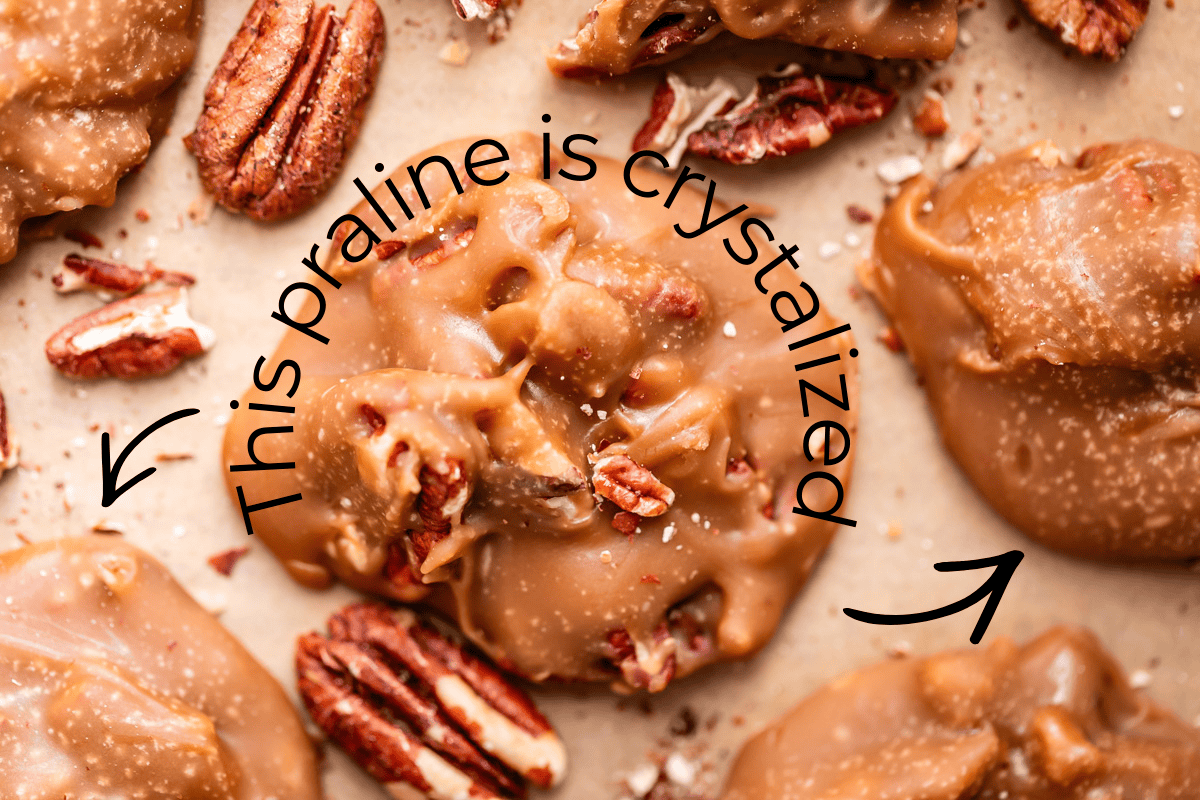
How to avoid crystalization (white spots)
I nearly lost my ever loving mind trying to make these pralines without those white spots that show up on the top of the final cookies. The white spots form when the pralines crystalize. The pralines taste fine, but they don’t look pretty and they dry out faster.
There are many, many recipe online that show crystalized pralines as the final product. Even many shops in New Orleans sell crystallized pralines. It ain’t right. They still taste good, but the BEST pralines are silky smooth with nary a hint of a white spot drying them out.
Crystallization is a chemical process where the sugar molecules (that you so carefully dissolved in the beginning of your candy making process) come BACK together to form solid crystals as the candy cools. Many of the extremely specific steps I’ve included in this recipe are added to help avoid this!
There are actually two points in praline-making where you can run into crystallization: the process of bringing the mixture to a boil, and later, when during the stirring and cooling process.
- Grease the edges of the pot all the way to the top, with the butter called for in the recipe. This layer of fat helps keep the sugar in the center of the pot where it can slowly melt, instead of crystallizing on the edge.
- You must dissolve the sugar into the liquid mixture BEFORE you bring it to a boil. If you come to a boil hard and fast, your pralines will crystalize and end up brittle and chalky instead of smooth and creamy.
- Once the mixture boils, DO NOT STIR. The candy is taking care of itself at this point, and you stirring with a spoon that likely has crystals on it will not help. Leave it alone.
- Let the mixture COOL completely undisturbed. This part is hard! But stirring right away after the boil will just bring all those antsy sugar molecules back together. They need to cool off.
- When the candy is the right temperature, add in the baking soda and stir the heck out of it. The danger of crystalizing has gone now that it’s cooled off, and we need to stir a bunch to help the mixture solidify enough to be dropped.
(you can see in this photo that there are some white spots on the top of this praline. Those are bubbles! not crystallization. They come from the baking soda added at the end, a necessary ingredient to make the pralines creamy and light. You will know it’s crystallization if the white keeps spreading more and more. Looks like the freakin measles. By the next day, the pralines will have completely changed color to a pale white, instead of being a rich caramel color.)
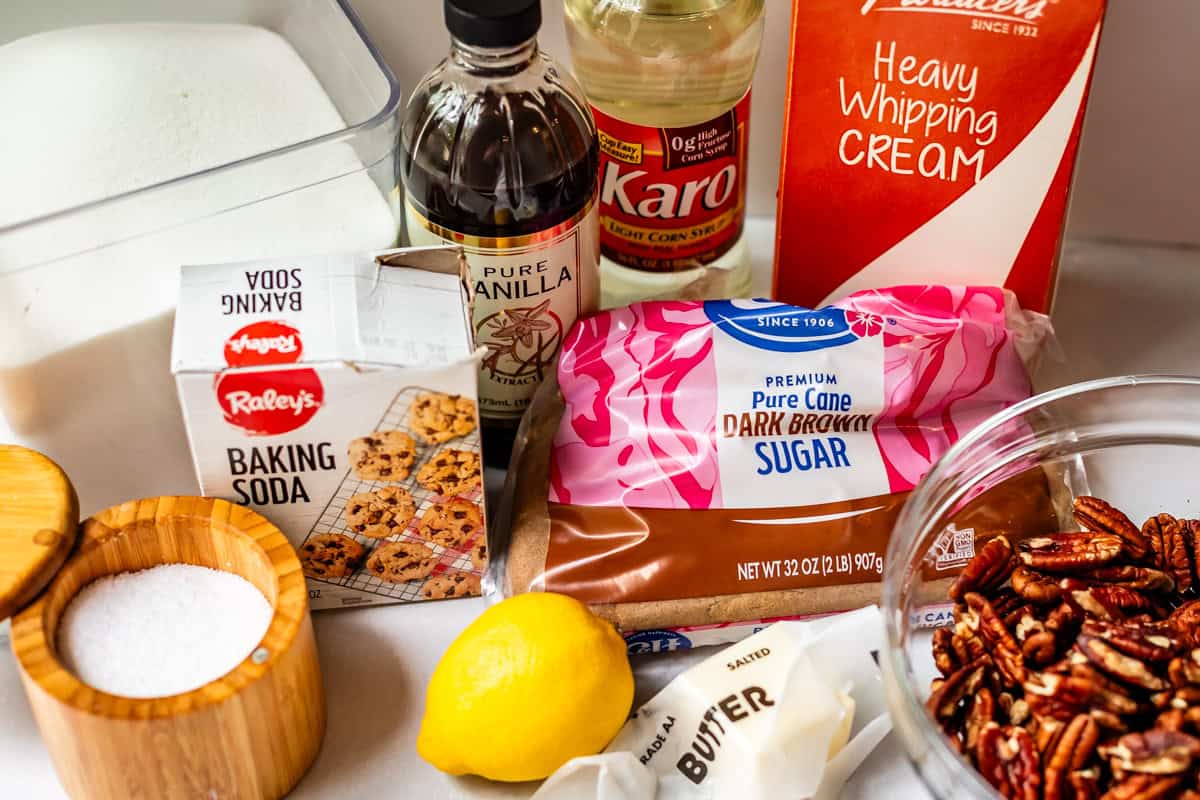
Important ingredients:
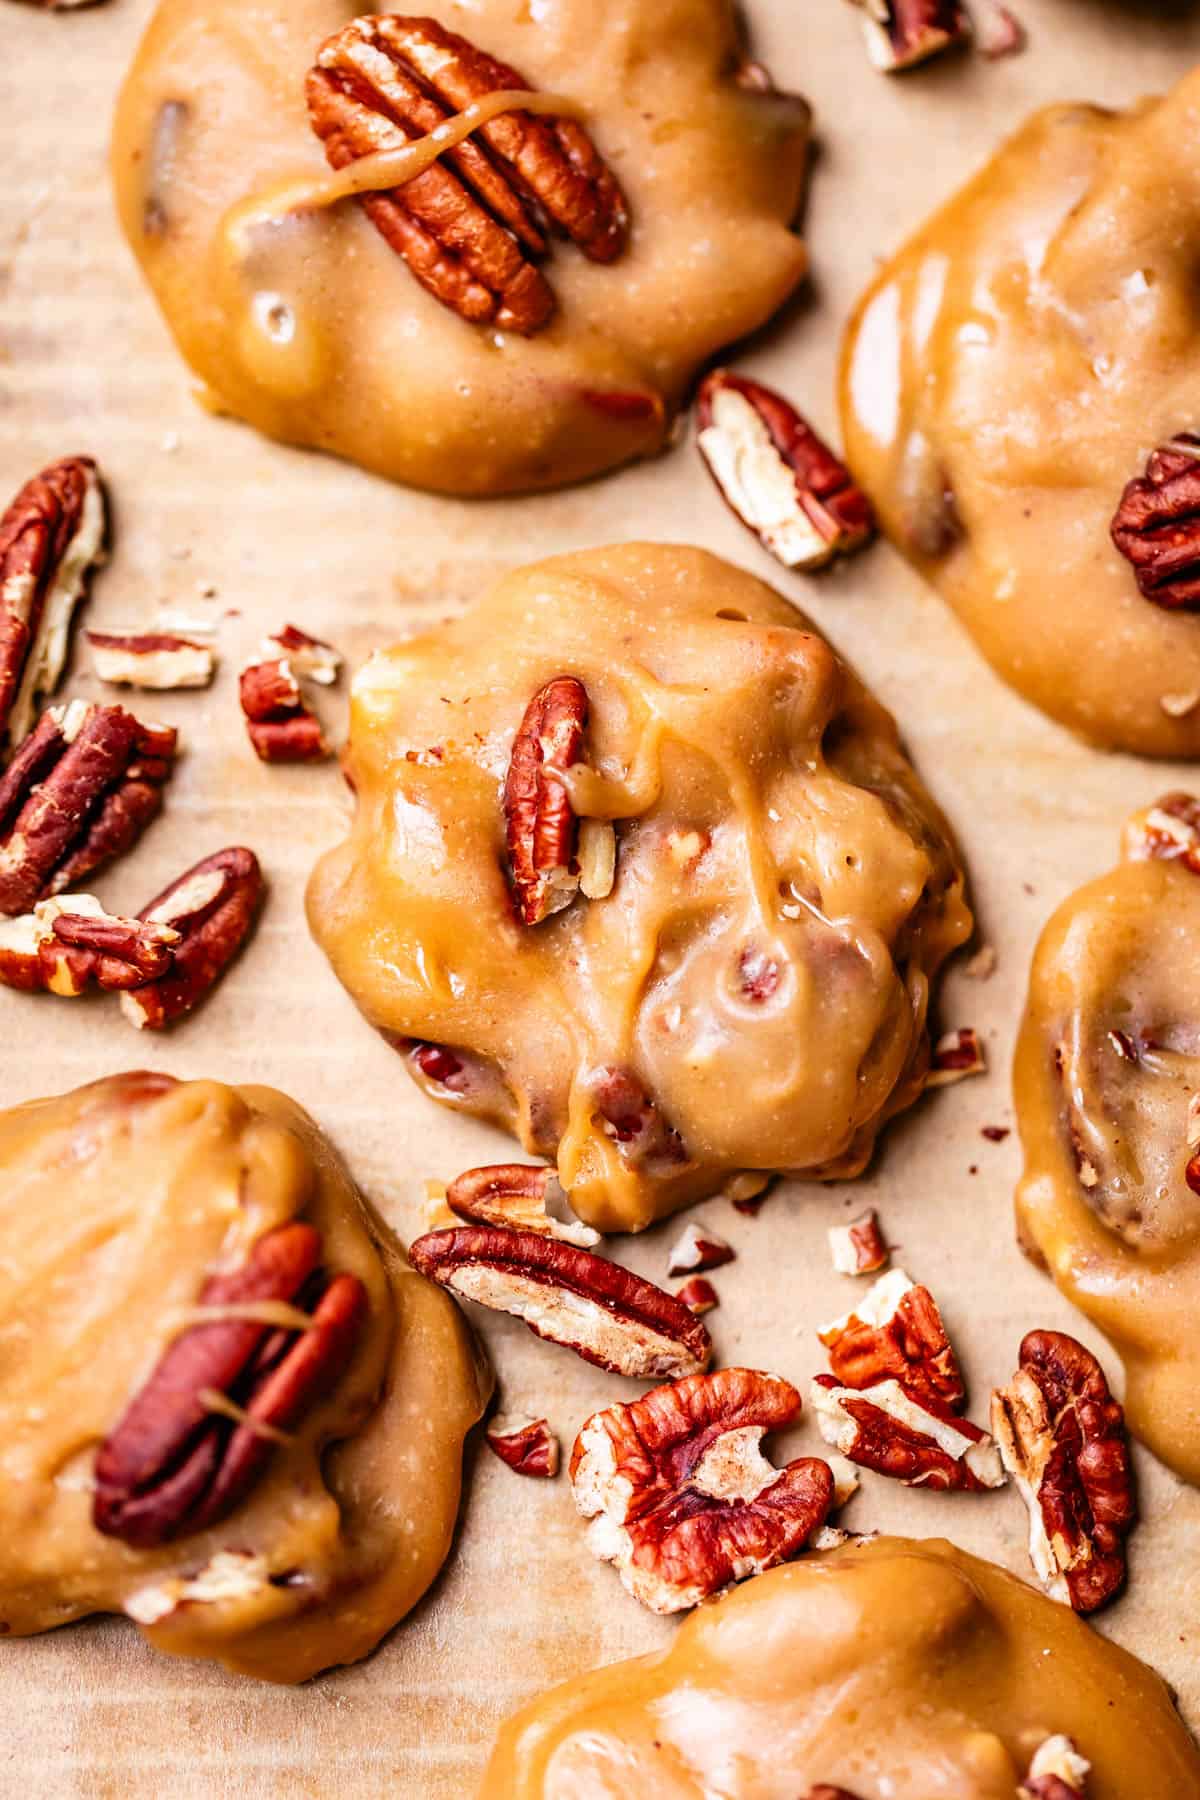
- TOASTED Pecan Halves are a must for that perfect, warm, nutty flavor! I’m telling you, don’t even bother making these if you’re going to skip the toasting step. I like to toast mine within an inch of their lives, until some of them have actually blackened on the edge. I want them toasty and brittle and snappy as a whip crack. Don’t give me any of this mealy mushy bendy business. TOAST OR BUST Y’ALL
- Heavy Cream and Butter for richness and depth that make the perfect caramel flavor
- You can use evaporated milk in place of the cream if you like!
- Lemon Juice now hear me out on this one. Lemon is an ingredient not all pralines have, but we’re adding a whopping 3 tablespoons. Why?
- It all comes back to that crystallization. Acidic lemon is a crystallization KILLER. It SLAYS those crystals, I tell you. I also love the added brightness that it brings, that gets balanced out later when you add the baking soda. The pralines don’t taste lemony at all, just light and bright and perfect.
- Baking Soda is my favorite ingredient of all! It reacts with the hot sugar mixture and lemon juice to create these teeny tiny bubbles that make the pralines softer, creamier, and smoother. It is a game changer to get that “creamy” or fudgy texture, instead of a sticky-caramel texture.
How to make them step-by-step
Here’s the line up of everything you need to make this recipe! Pantry staples, mostly. Are pecans a pantry staple for you? I stockpile them in my freezer. You never know when you need to make last minute Pralines or Butter Pecans.
First up: toast your pecans to within an inch of your life. I’m not kidding, if some of them aren’t going black, you’re not doing it right.
Then, get some butter and add it to a HEAVY bottomed pot. If you use a cheap thin pot that you got 20 years ago for your wedding from Aunt Olga, your pralines might not even turn out. It’s super important! Grease the post all the way to the top.
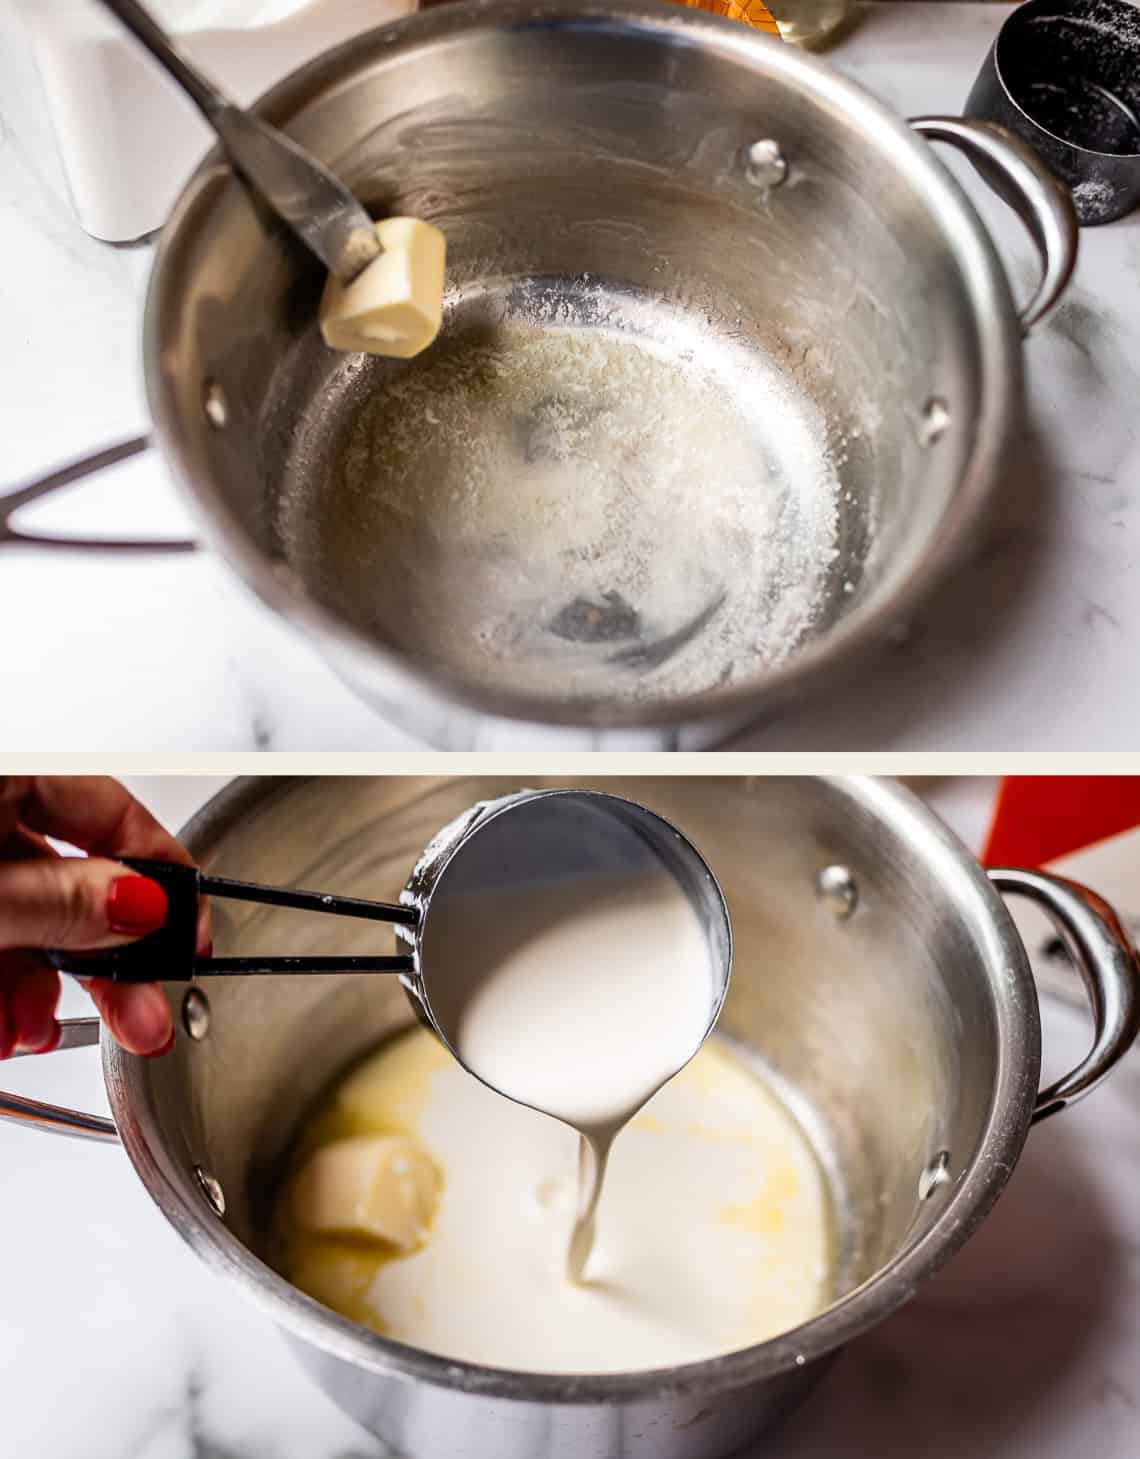
Add in the heavy cream, and then the sugars right in the middle, not touching the sides. Sugar granules on the edge of the pot leads to crystallization, no thank you!
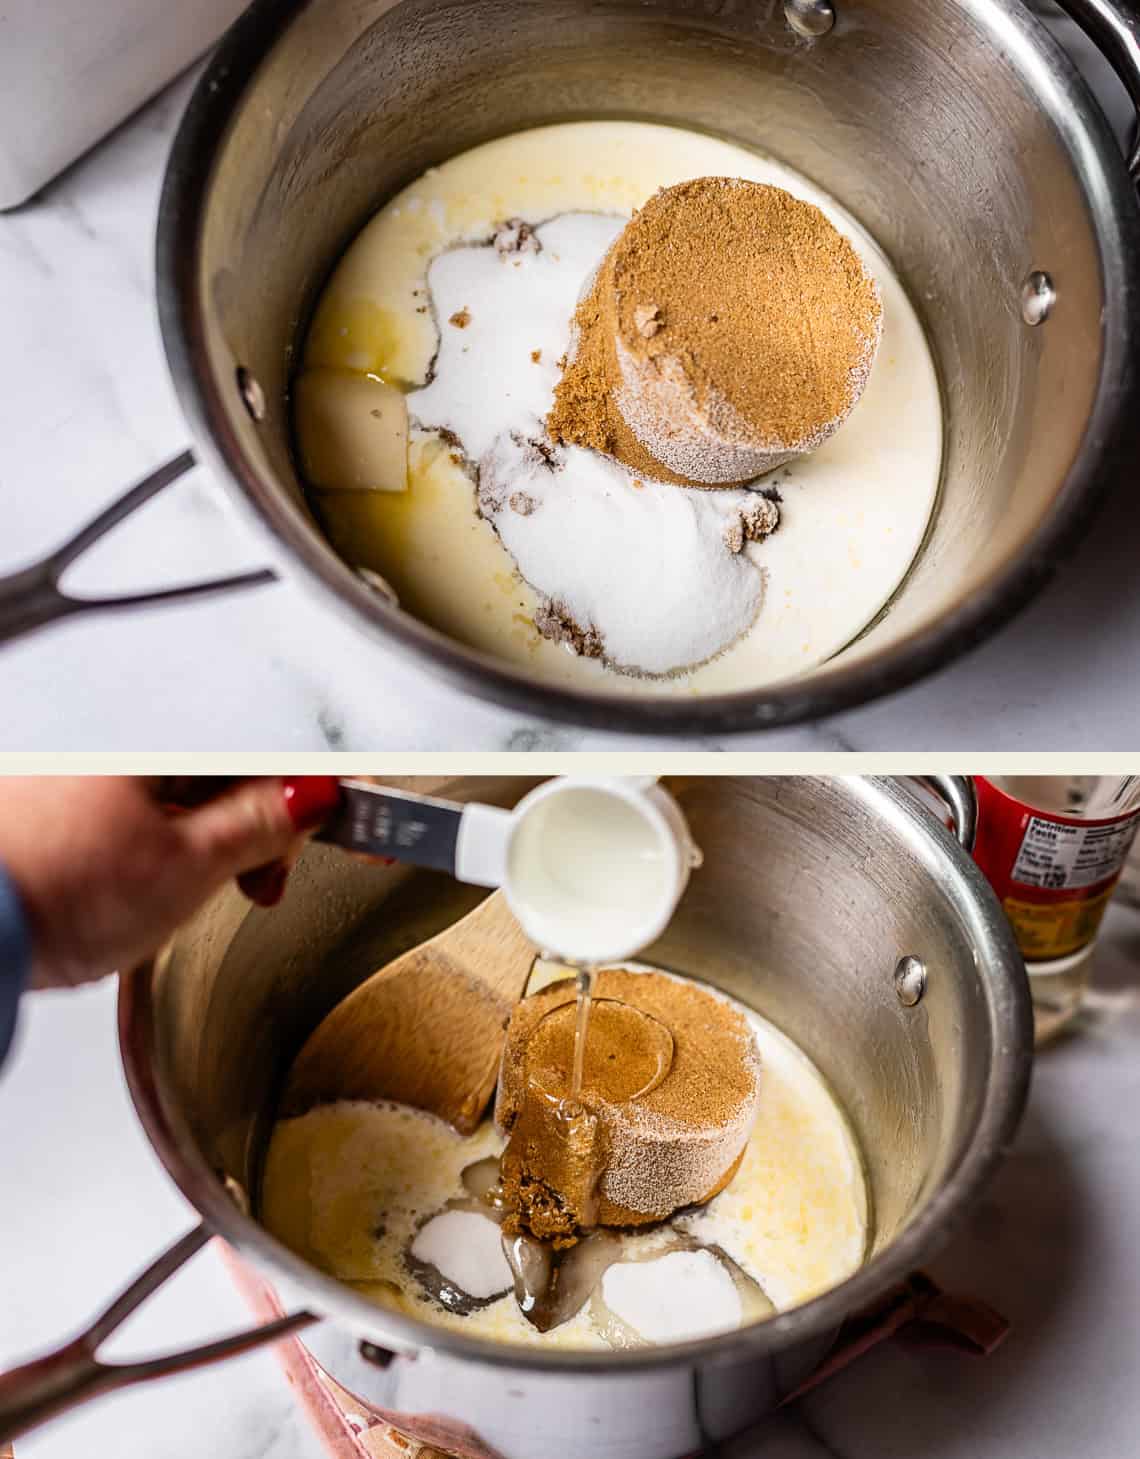
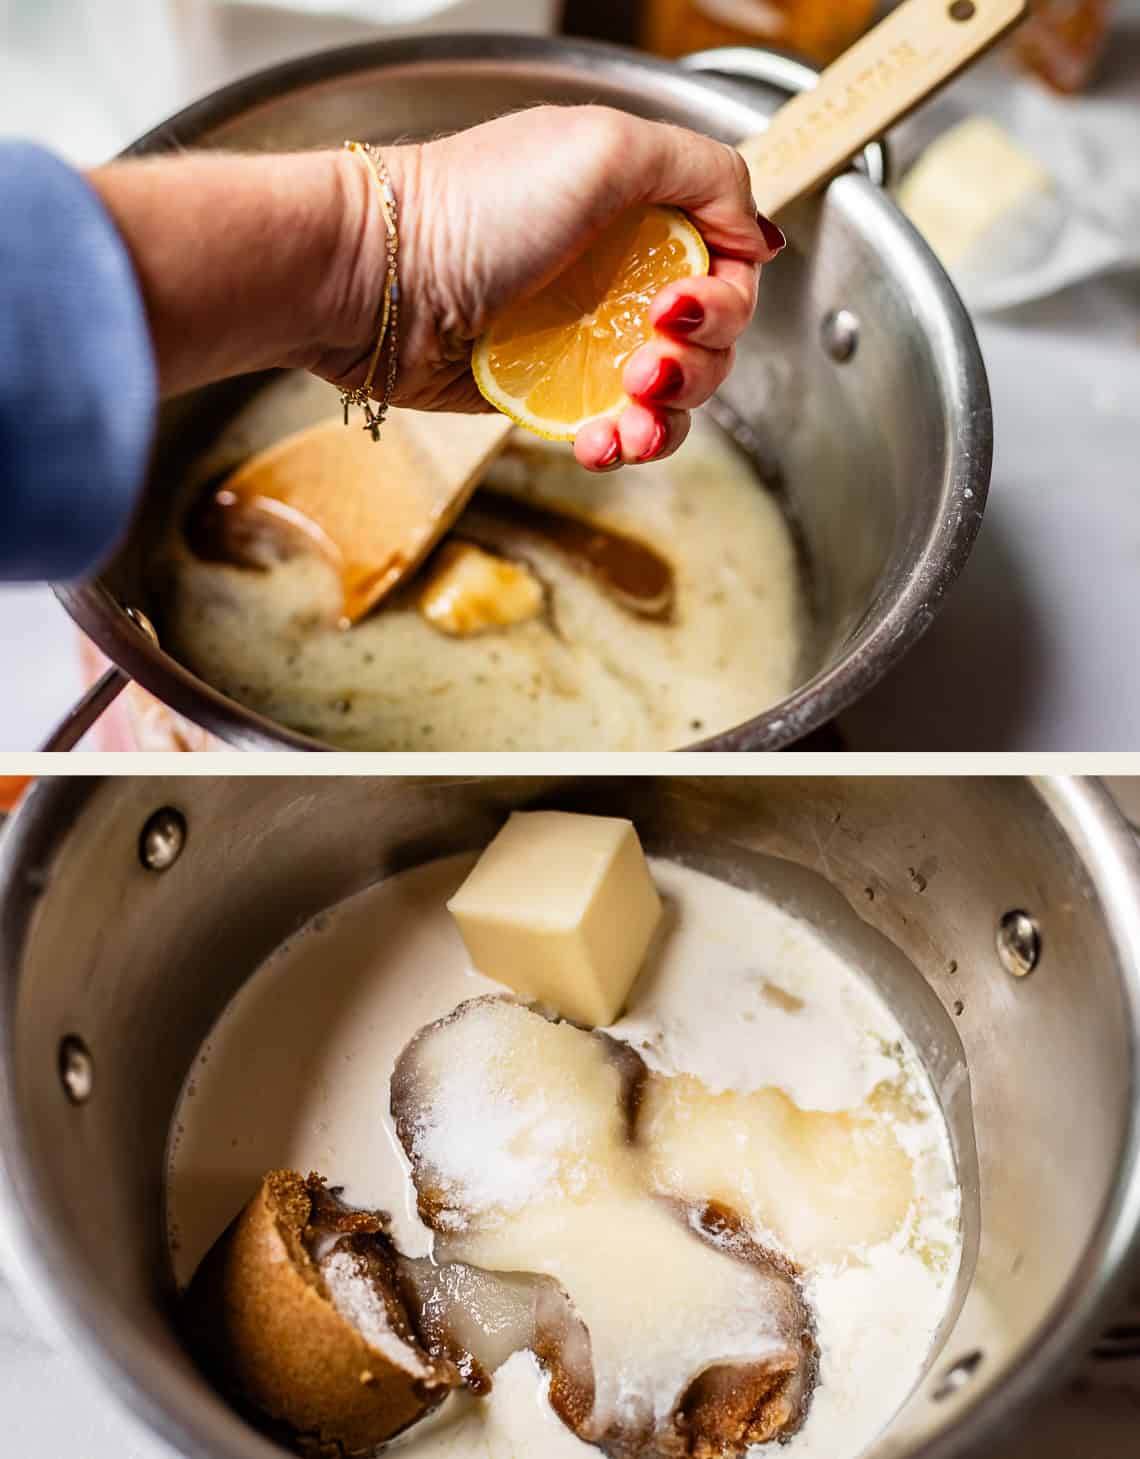
Add in a bit of corn syrup and some lemon juice. Both of these are more insurance against crystallization!
Now it’s time to cook this SLOOWW. You should be taking at least 5-10 minutes for this step. The goal is to dissolve all the sugar BEFORE the mixture even THINKS about coming to a boil.
You will know all the sugar is dissolved when you rub a bit of the mixture between two fingers and it’s completely smooth: no granules of sugar that you can feel.
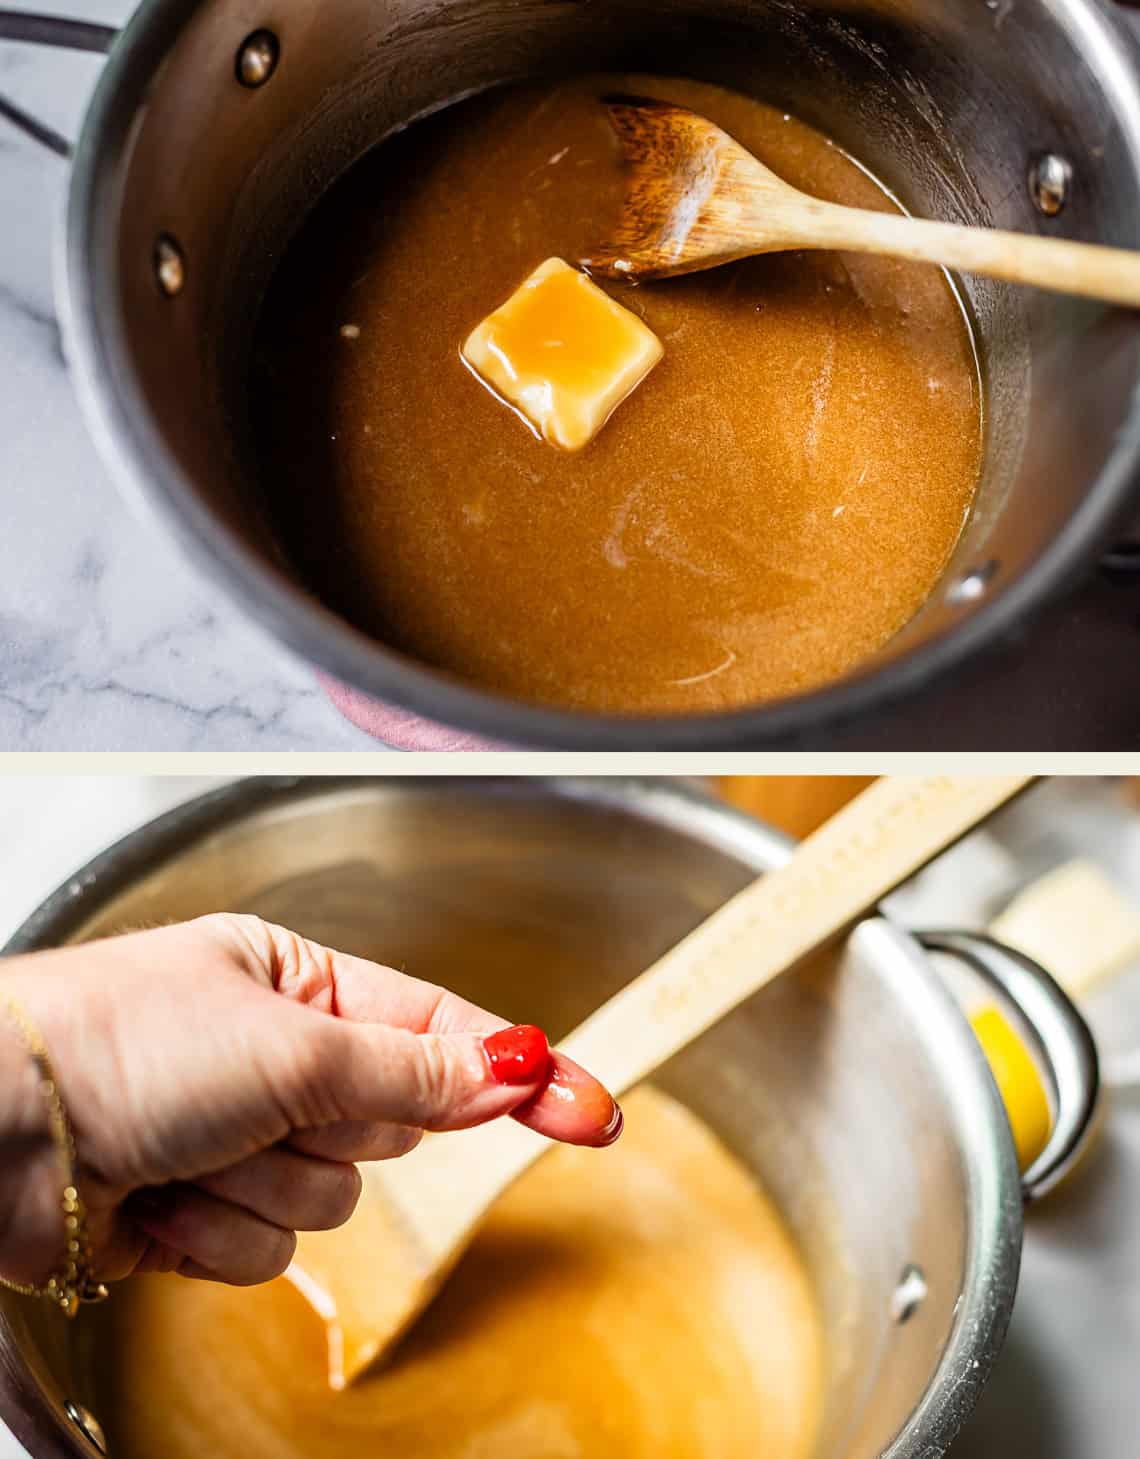
Only THEN can you turn the heat up (still only to medium) and bring the whole thing to a boil. Once it’s at a rolling boil, DO NOT STIR. Throw your spoon directly in the sink so you’re not tempted to use it again.
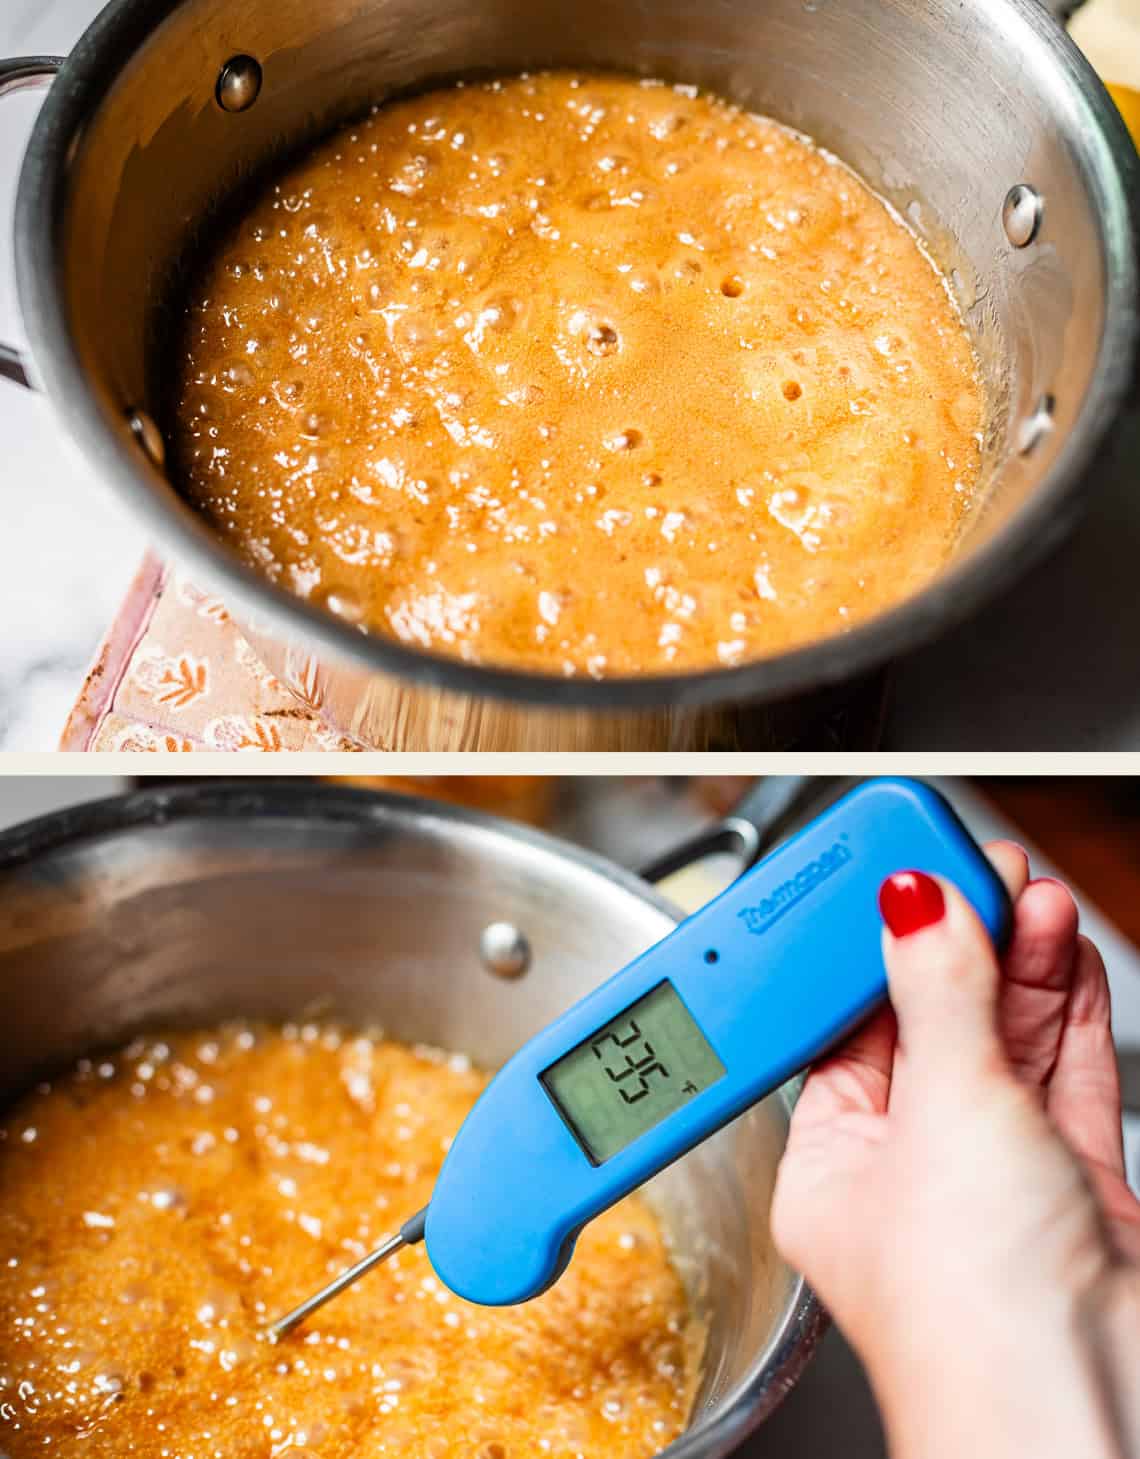
Once it boils, bust out your thermometer. After a few minutes, it will reach 236. Anywhere between 235-237 is a good temperature for these pralines. Then, take it off the heat, and still, NO STIRRING. Let it be. This step is crucial so that it doesn’t start crystallizing! Let it cool. This temp of 154 is not important, it’s just one of the times I checked it, after about 20 minutes. You need to wait for the temperature to get down to about 115-120 degrees.
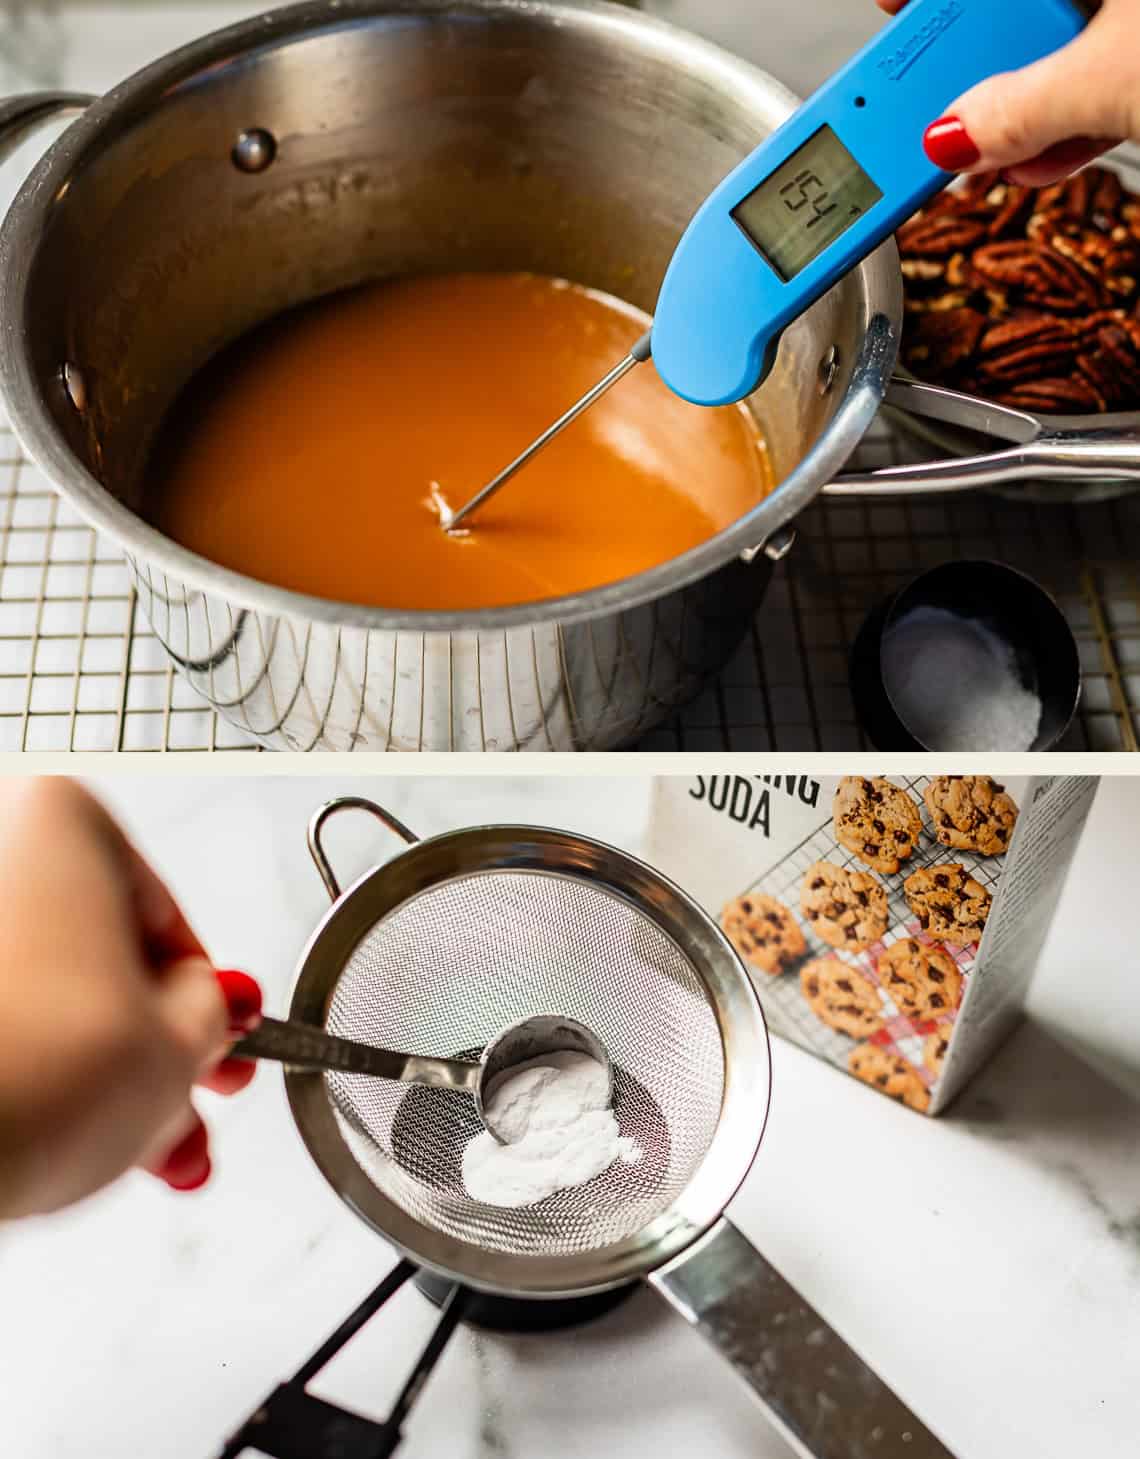
Meanwhile, sift 1 teaspoon of baking soda to make sure there are no clumps. When the mixture has dropped in temperature to 120-115, add the soda to the praline mixture, along with the vanilla.
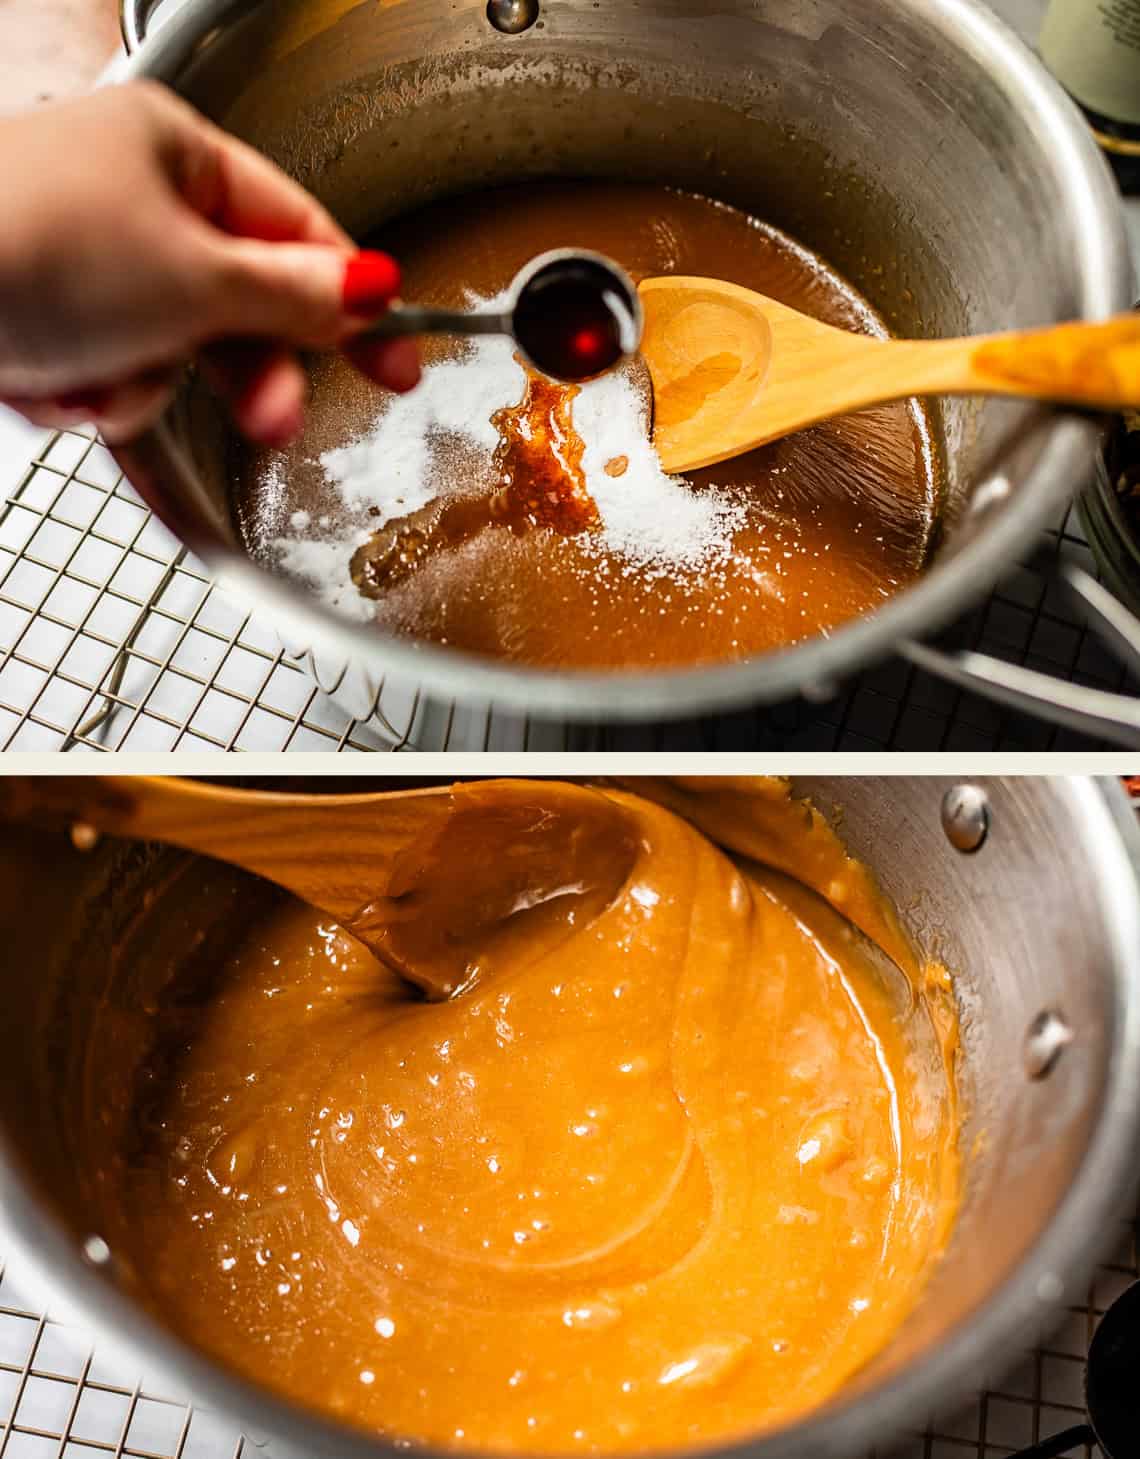
Then start beating the heck out of it! Do you see all the bubbles coming up? That’s the baking soda working it’s magic to make these pralines creamy and light.
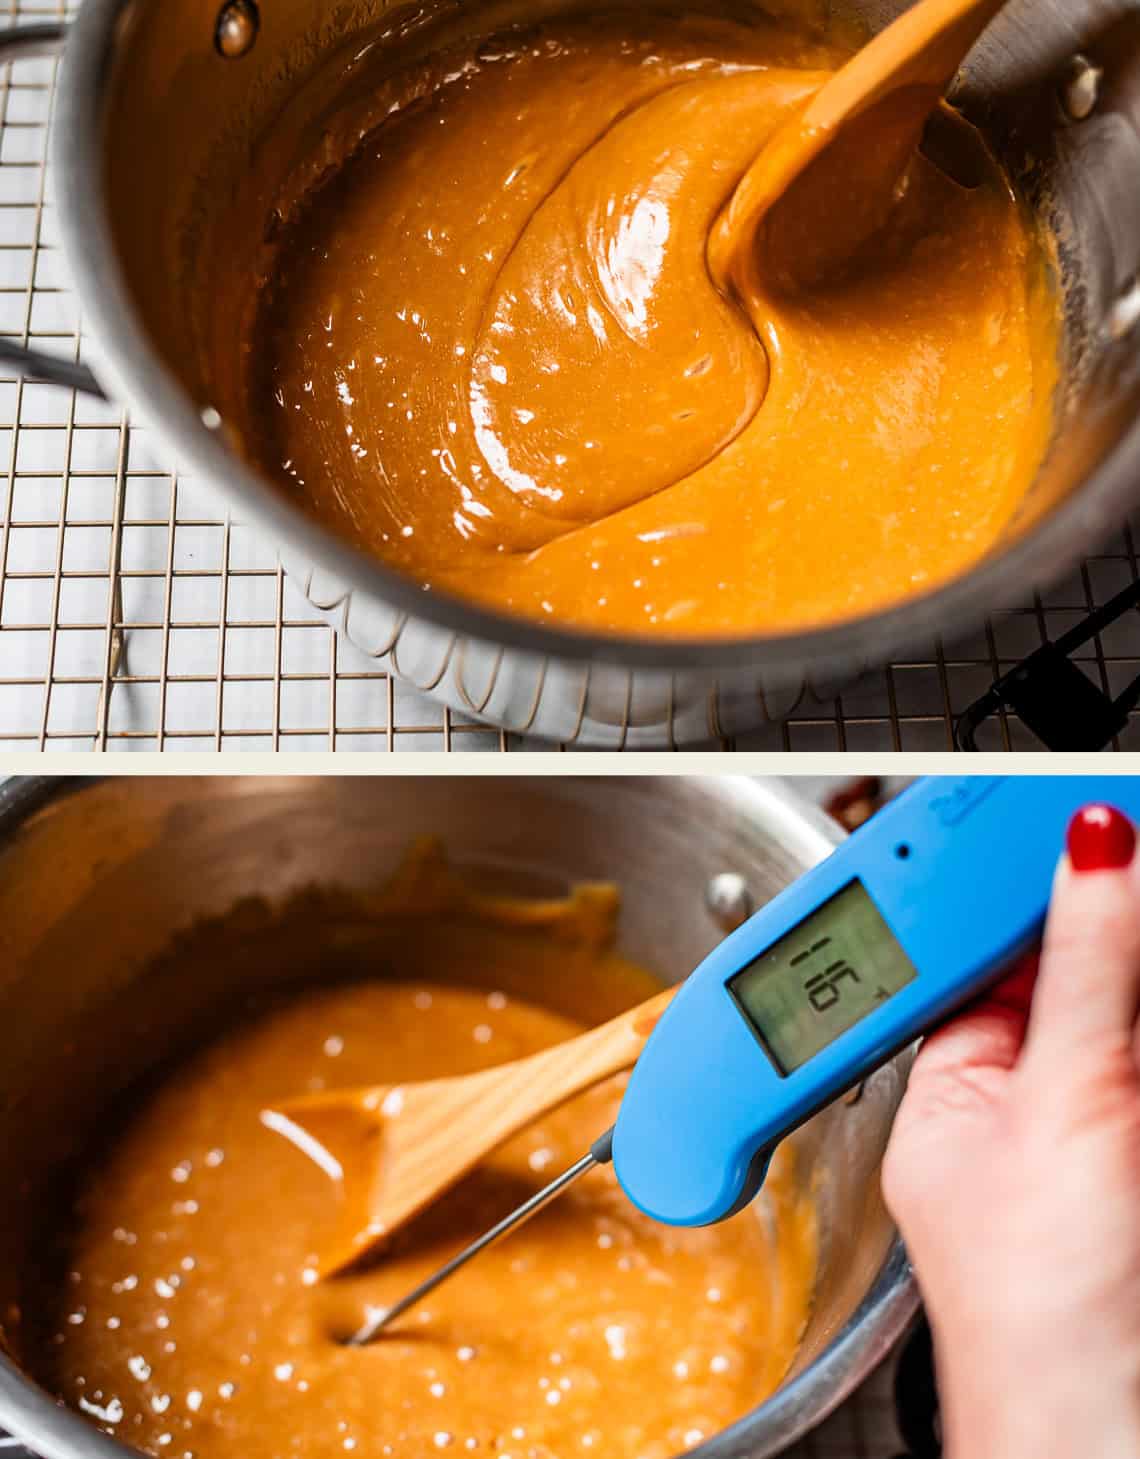
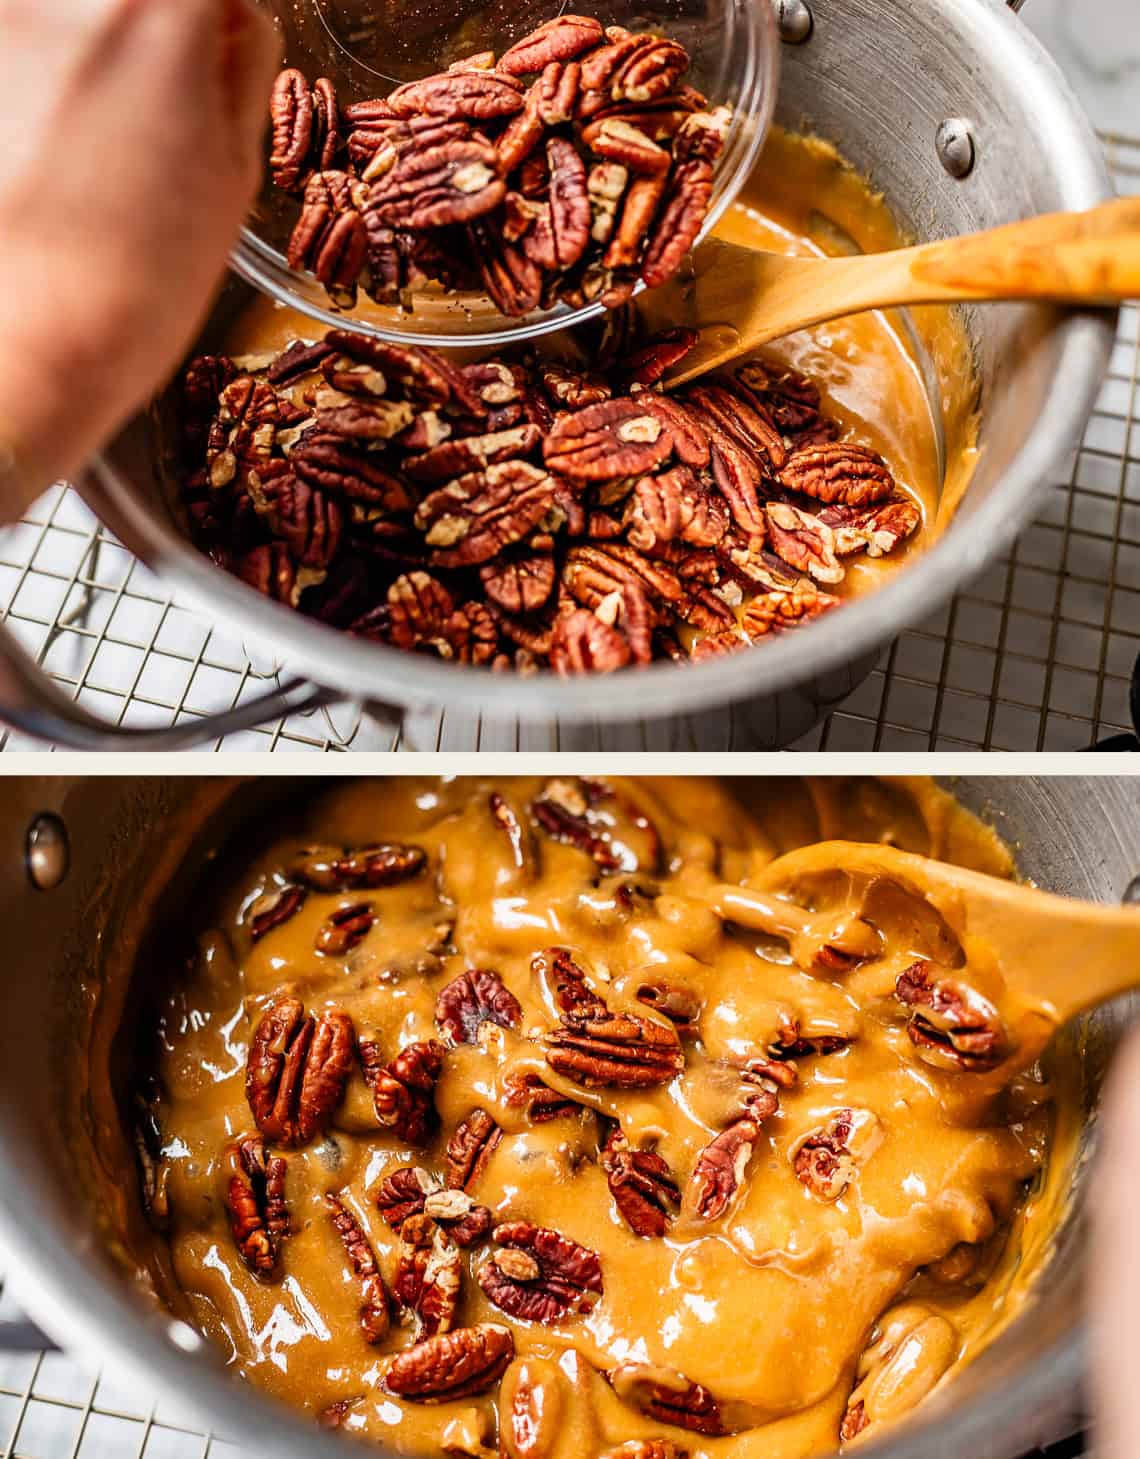
Here it is after a couple minutes of stirring in the baking soda and vanilla. It’s gotten down to 116. Then add in the toasty pecans:
And keep beating the mixture. THIS is the tricky moment for pecans, and it does take a bit of practice. There is a very small temperature window when you can drop pralines: too early, and they will never set up; they will just stay sticky, like caramel. Drop them too late, and they will end up dry and hard. It’s actually crazy what this little bit of stirring does.
I like to start testing the praline mixture without any pecans. Just scoop a teaspoon from the corner of the pot and drop it on the pan. Look at #1, on the bottom right. Can you see how glossy it is? It looks like a shiny pool reflecting back at you. #2 was dropped a minute or two later. Still too glossy. Keep stirring. #3, still shiny. #4, getting better!
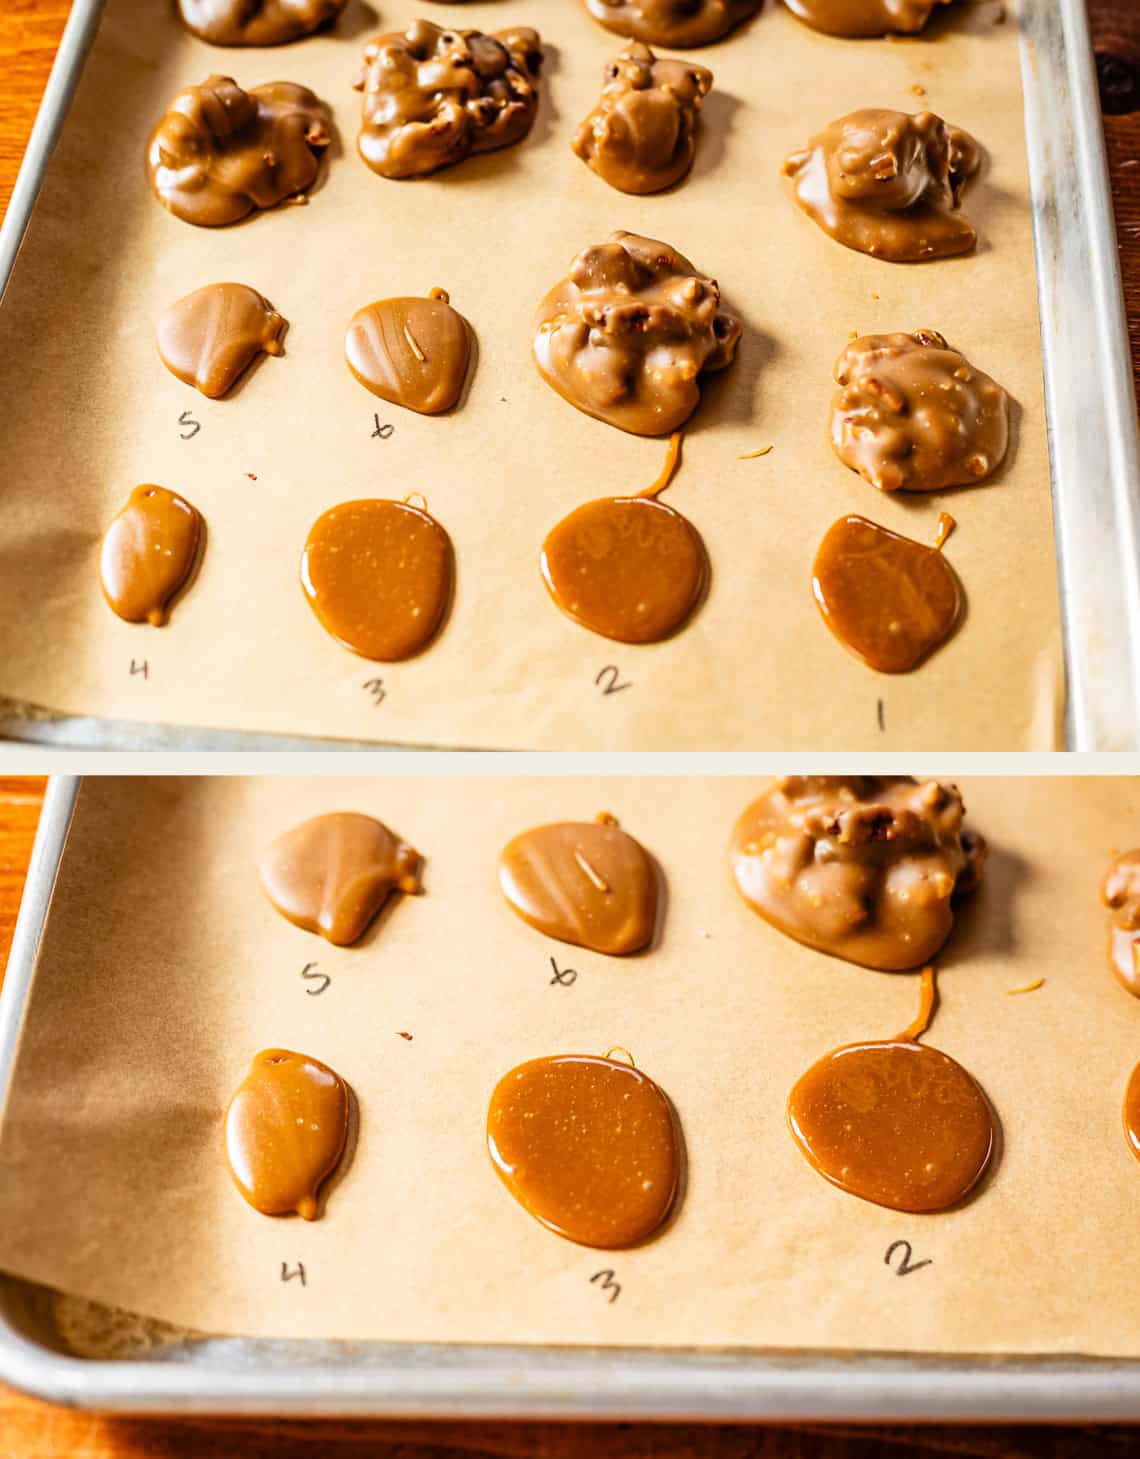
This is the same photo as above, just a close up on these drops. Can you see the difference in opacity between drops 4 and 5? The light reflecting off of #5 is fuzzier and not so sharp. The edges of #5 and 6 are rounded at the top corner, instead of the edges pooling out like liquid. You can see that after drop #6 it was ready, and I scooped a final praline with pecans.
I hope this makes sense!! I read so many descriptions of this process, but it’s really hard to explain until you see it.
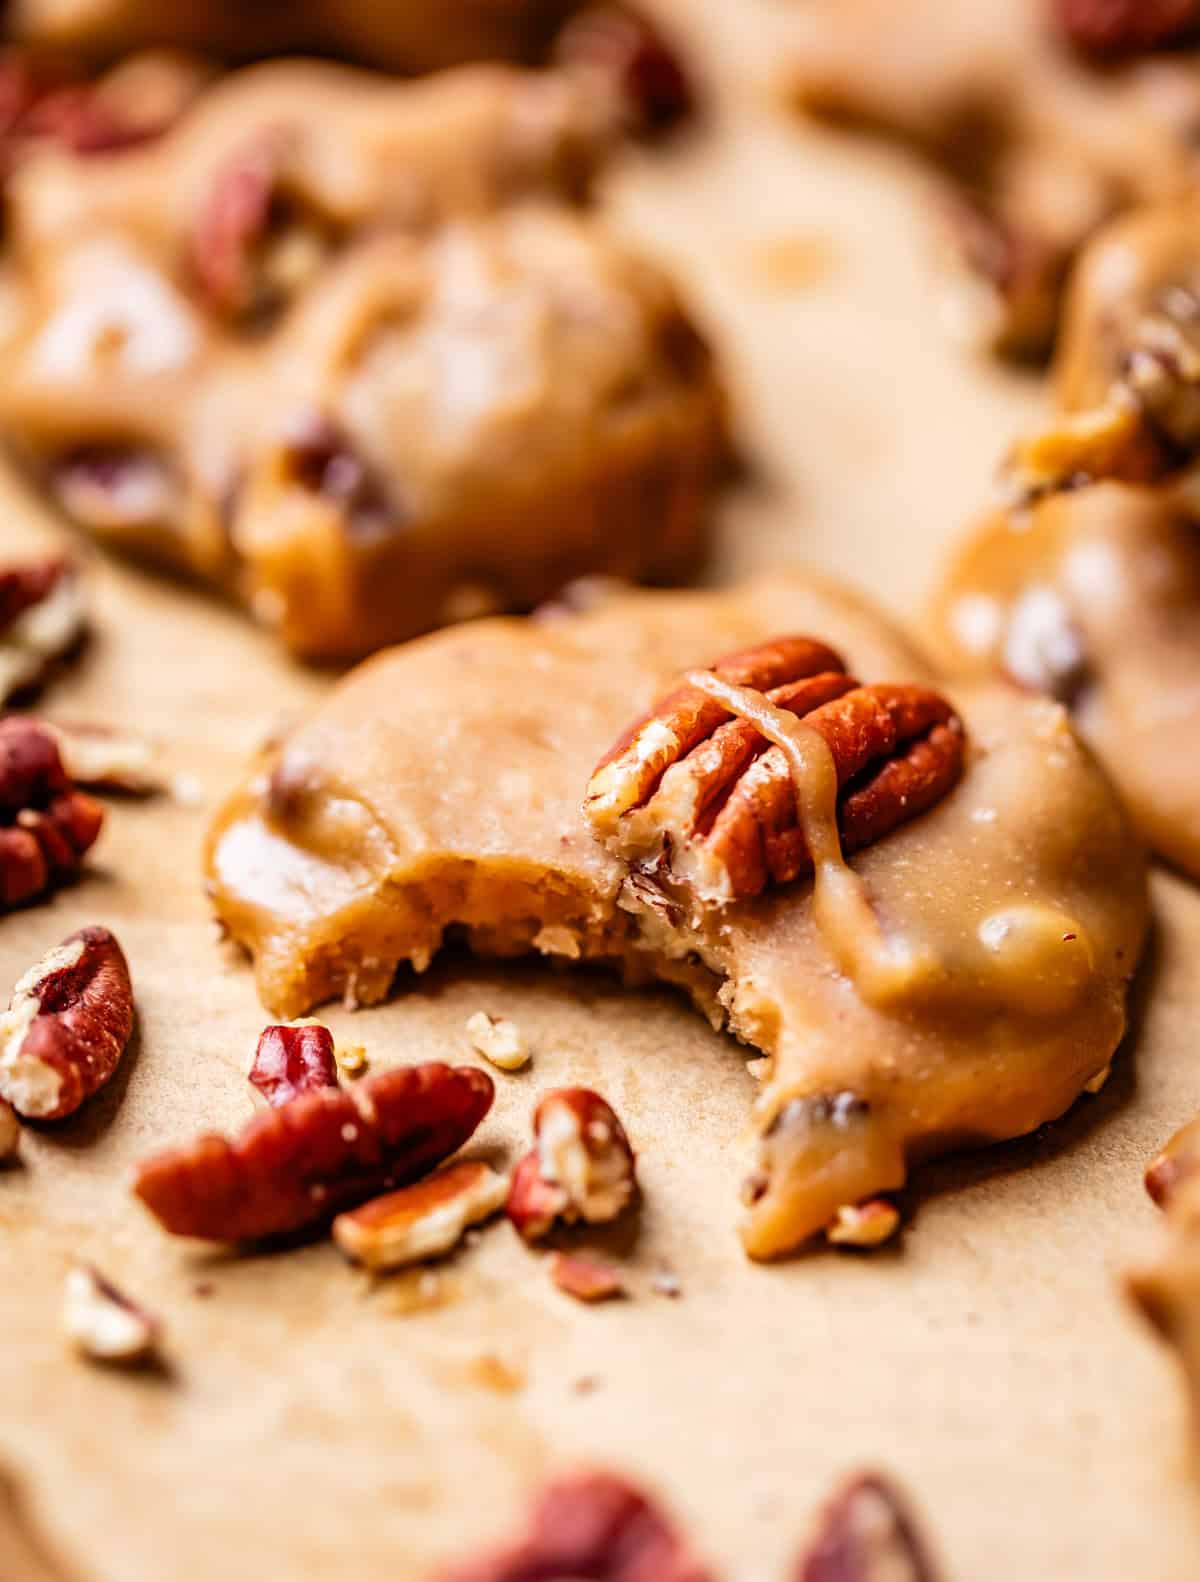
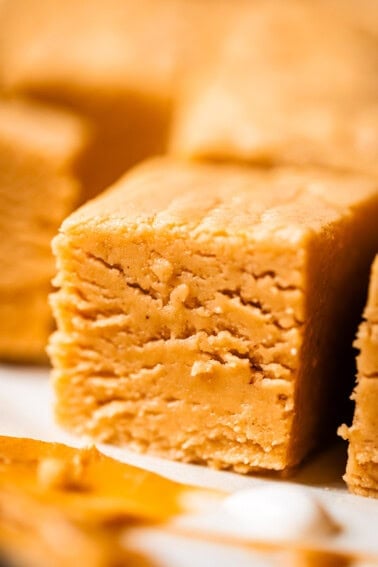
Here is the texture of praline #1 hours after it was dropped: still sticky. Not handle-able at all.
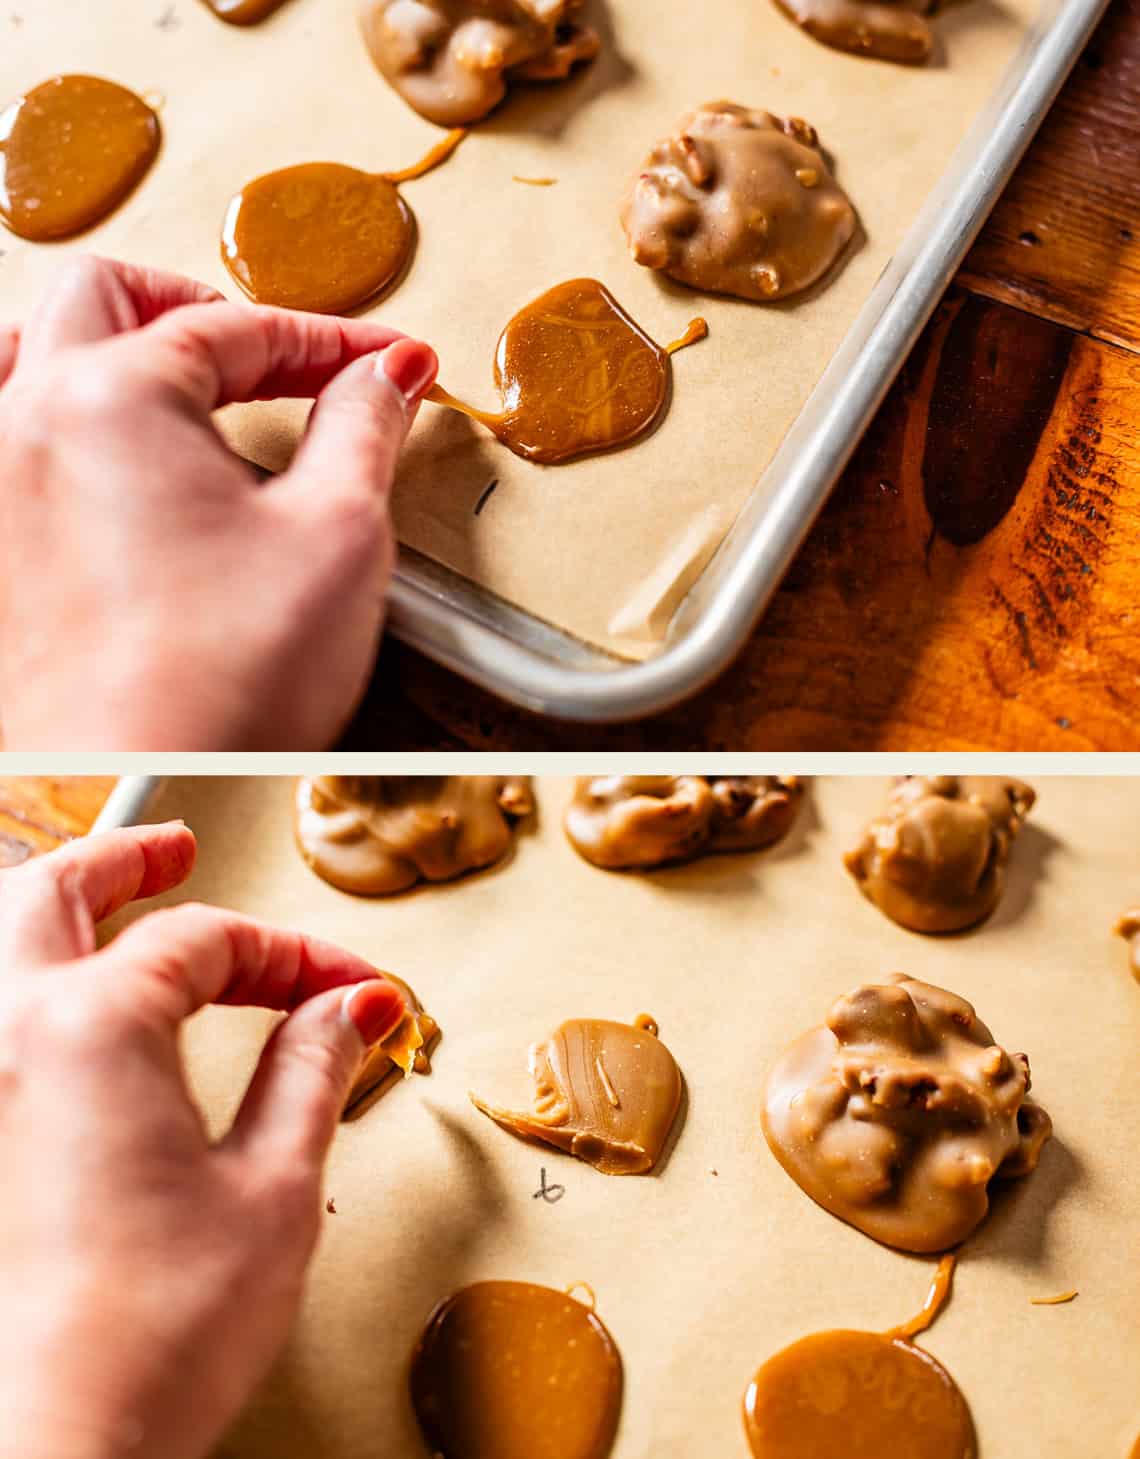
Here is #6. It is still a little stretchy, but you can see that it is fudgy and is not going to make my fingers stick together.
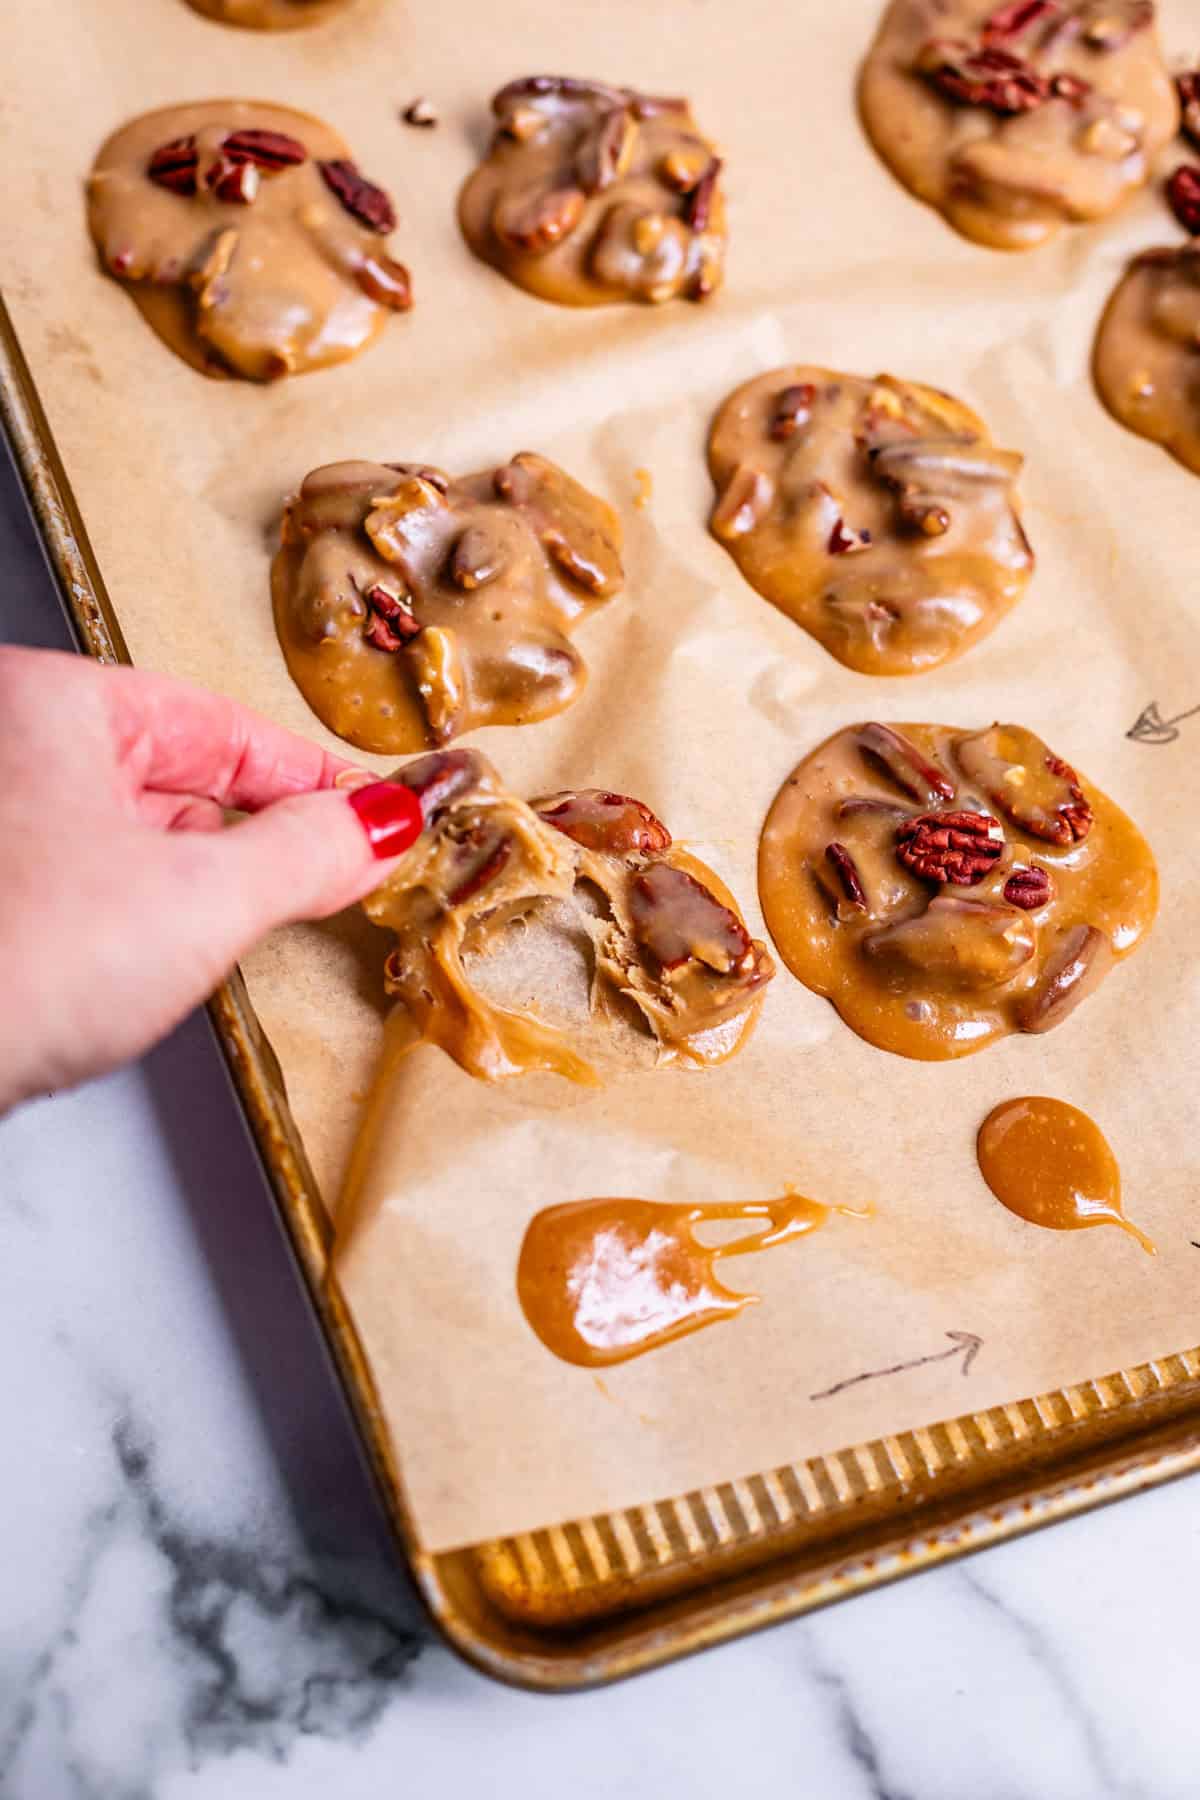
Move along QUICKLY and drop all the pralines asap.
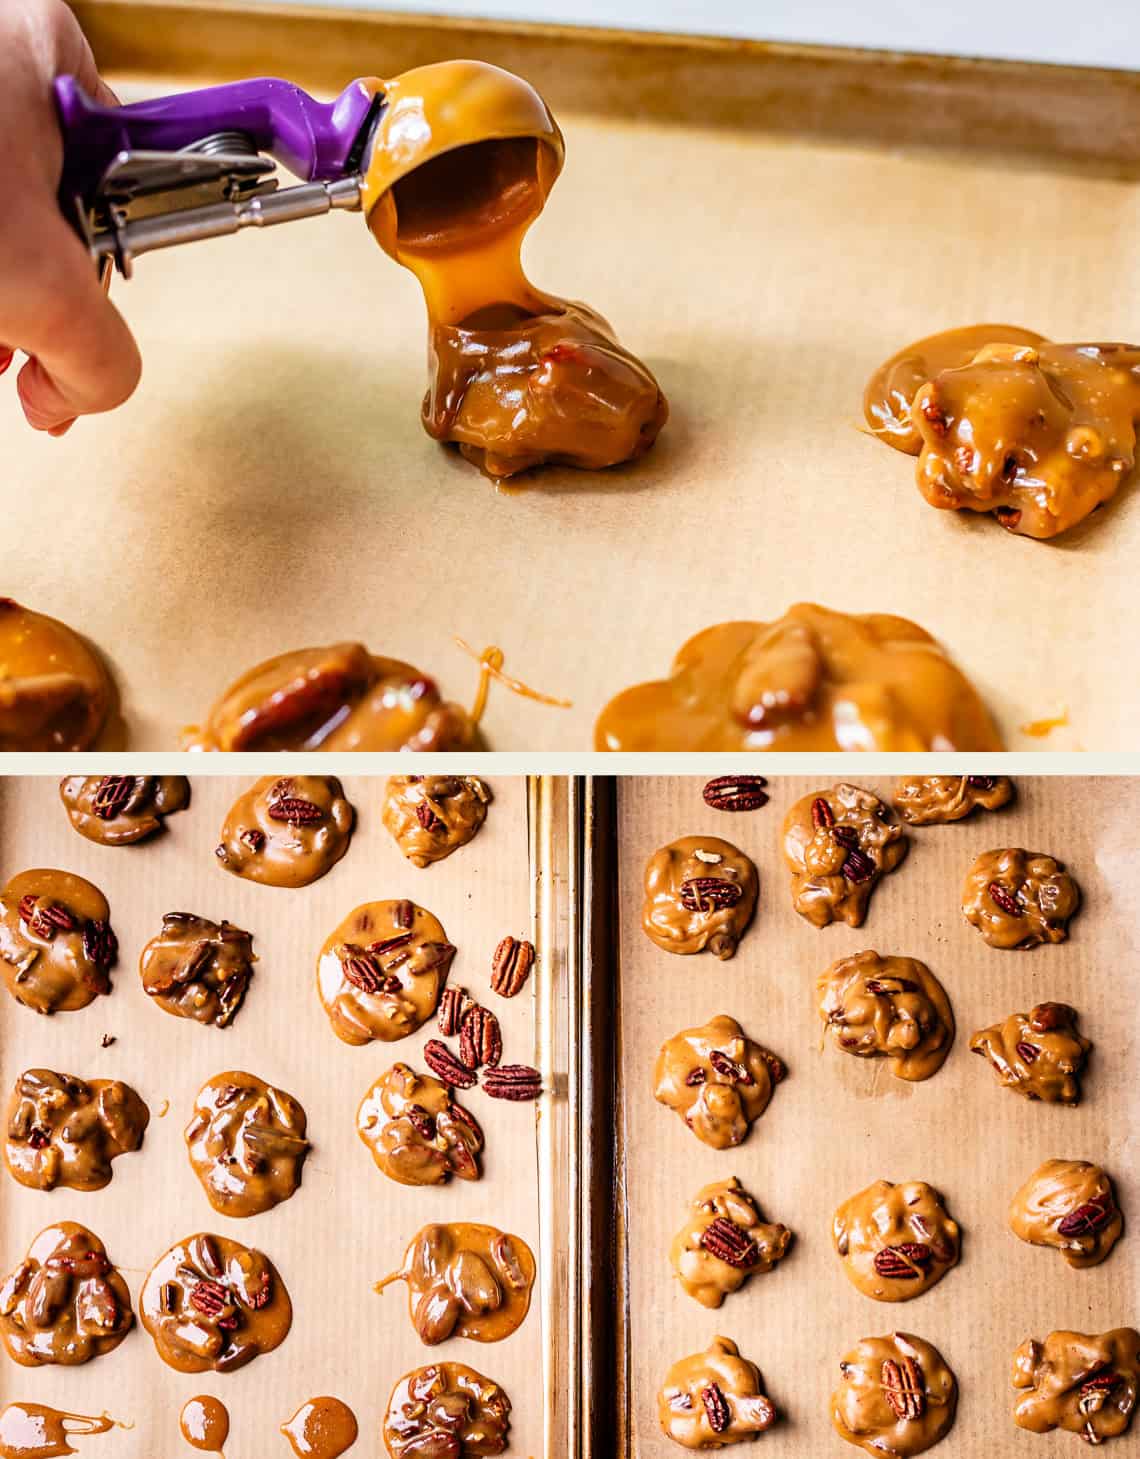
Here is another batch I made. I started testing in the lower left, moved all the way up that pan, then started scooping the other pan on the right. You can see that the first few that I scooped were too glossy. This is after they are completely cool. The should look like the pralines on the right: opaque and rounded, not glossy and flat.
Here is the empty pot after I scooped all the pralines. The candy will start to harden as is cools, eventually becoming impossible to scoop. That’s why you have to hurry!
Here is another example of a not-set praline. I dropped it too early. Hours later, it still wouldn’t hold together. You have to save it as an ice cream topping at this point 😝 it’s delicious, trust me
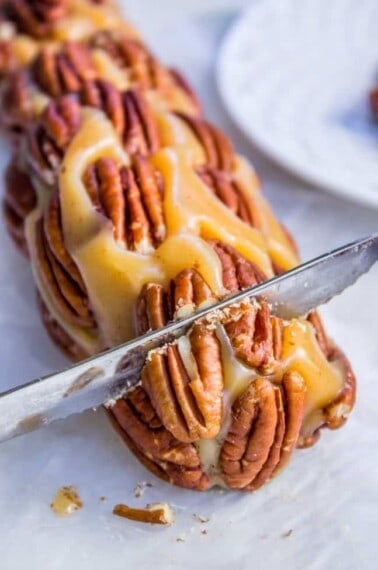
Here is a final praline that was dropped at the right time, and no crystallization! Success! If you make these, I would LOVE to see a picture, tag me on Instagram @thefoodcharlatan. Pralines are a journey, and it is SO fun when you get them just right.
Tips for no fail pralines
- Always use a heavy-bottomed pot for candy-making! It helps everything cook evenly and not burn.
- Using low and steady heat is best way to get that really glossy look for pralines. Do NOT stir during the boil, and use a thermometer so you can get the temperature right!!
- Work quickly when spooning the pralines, they set fast! Drop onto a silicone mat or parchment paper so they don’t stick.
- Weather can have more of an effect than you might think. Humidity is the enemy of pralines. I thought these warmings were a bunch of BS to be honest, because pralines are famously made in Louisiana, where it is super humid. But I tried this 7 times on a day when the humidity was over 80% and had some definite issues. See the notes in the recipe for the full saga! There is a way to make it work, but it’s not ideal.
FAQ
The most likely culprit is not cooking the praline to the right temperature. It needs to get to 236 degrees in order to set properly! The next most common issue is making the candy in a humid environment.
-Use a candy thermometer to make sure you’re getting to the correct temperature.
-Avoid making these on rainy or overly muggy days. If you live in a very humid environment and are getting sticky pralines, you can try cooking the mixture up to 240-245 degrees. See notes in the recipe!
If your pralines are just a bit sticky for your liking, you can put them in the refrigerator (covered!) for about 10-15 minutes right before serving to help them set.
All it means is that the sugar in your praline mixture crystalized. That can happen from not cooking to the right temperature, getting sugar crystals on the side of the pot or on the spoon from stirring while it boils, or even stirring too quickly after removing the mixture from the heat. Any of those will interrupt the chemical process of the sugar crystals melting and forming a smooth candy.
Make sure you use a candy thermometer to get the right temperature, don’t stir the mixture while it boils, and wait til the temperature drops to about 120 degrees before stirring once it’s cooked.
It may not work every time, but there are a few methods you can try to save grainy pralines or sticky pralines. The first is the stove top method. Add the grainy pralines back into a CLEAN heavy pot (you’ll end up with the same problem if there are sugar crystals still on the sides). Add 2 tablespoons of cream and heat on low until everything turns back into a thick liquid. Turn the heat back up to medium (do NOT stir once it starts to boil!) and cook until the mixture reaches 236 degrees, then continue with the recipe as instructed.
You can also try microwaving a few pralines at a time in bowl with 2 teaspoons of water. Heat for 10 seconds, then stir. Repeat until the mixture is smooth. Let the mixture rest for 30-60 seconds, then re-drop new pralines onto silpat or parchment.
If you don’t want to try those, or you try and they don’t work, make it into an ice cream topping! Add more cream or half and half until you get a smooth mixture, and you have praline sauce! It’s perfect to pour over ice cream or cheesecake. YUM!
How to store
Repeat after me: room temperature is best! Like many other candies, the amount of sugar prevents pralines from going bad quickly, so the main goal is to keep them fresh and soft. The refrigerator will dry them out in a flash due to the forced air that keeps things cool. Instead, put the pralines in an airtight container between layers of parchment so they don’t stick together. They’ll stay good on the counter for up to two weeks!
Can you freeze pecan pralines?
You can definitely freeze these, and they are a great make ahead option. They can be a bit more finicky if you want the BEST results, but there are several ways to freeze them. The absolute best way to ensure the highest quality pralines after freezing is to individually wrap each praline in plastic wrap. Place all the wrapped candies into a freezer ziplock bag, remove as much air as possible, and seal. This way the pralines won’t stick to each other and they will maintain their soft and chewy texture.
If you don’t want to go to all the trouble, you have a few more options. One, you can place all of the candies while still on your silpat or parchment lined baking sheet into the freezer and flash freeze for about 20-30 minutes, then transfer them all to a freezer ziplock bag. Two, you can add the pralines to a ziplock freezer bag with parchment paper separating layers. Either way, remove as much air as possible before sealing.
They will be best when used within 2-4 weeks (that darn air again!), but can stay frozen for up to 2 months. To serve after freezing, make sure any candies are not directly touching each other so they don’t stick, keep them covered, and let them sit out on the counter for 2-3 hours until soft.
More candy for your sweet tooth
I love candy making. It can be challenging at first, but it gives such a sweet reward! Plus, candies are amazing options for holiday treats to share. Here are a few of my absolute favorites, but you can also check out the Candy & Fudge page on the blog for even more ideas!
Dessert
Caramel Nougat Pecan Rolls
Candy & Fudge Recipes
Peanut Butter Fudge Recipe
Dessert
Mom’s Easy Fudge Recipe
Candy & Fudge Recipes
Soft Homemade Caramel Candy
Facebook | Pinterest | Instagram
Pecan Pralines
Ingredients
- 4 tablespoons butter
- 1 cup heavy cream
- 1 and 1/2 cups brown sugar, packed
- 1 and 1/4 cups granulated sugar
- 2 tablespoons corn syrup
- 3 tablespoons fresh lemon juice
- 1/2 teaspoon kosher salt
- 1 teaspoon baking soda, sifted
- 1 teaspoon vanilla extract
- 2 cups pecans, TOASTED, please for the love
Instructions
- Toast your pecans. Preheat the oven to 350 degrees F.* Add 2 cups pecan halves to a rimmed baking sheet and spread out into a single layer. Toast in the oven for about 5 minutes, then stir. Continue stirring every 2 minutes until the pecans are very fragrant. When you see the tips of some of them turning dark brown, they are toasted. Remove from the oven and set aside to cool.
- Prepare your pans. Line 2 half baking sheets with parchment paper and set aside.
- Butter the pot: Set a HEAVY bottomed 3-quart pot on the stove over medium-low heat. Add 4 tablespoons butter to the pot and use a wooden spoon to move the butter all around the edges toward the top of the pan, so all of the bottom and sides of the pot are greased with melting butter. (This will help your pralines not to crystallize.)
- Immediately add 1 cup heavy cream.**
- To the center of the pot, avoiding getting sugar granules on the side of the pot, add 1 and 1/2 cup packed brown sugar and 1 and 1/4 cups granulated sugar. Gently stir the mixture with a wooden spoon.
- Add 2 tablespoons corn syrup, 3 tablespoons fresh lemon juice, and 1/2 teaspoon kosher salt.
- Dissolve the sugar SLOWLY. Use your wooden spoon to stir the mixture together over medium low heat. Continue stirring occasionally for about 5 minutes. The goal right now is to get all the sugar to dissolve into the liquid BEFORE the mixture comes to a boil. You can move your heat up to medium if it's going really slow, but be careful. Do not let it come to a boil right away.
- Rub the mixture between your fingers: You will know it's ready to bring to a boil when you dip a finger into the mixture and rub it between two fingers. If it's completely smooth, all the sugar is dissolved. If you still feel anything grainy, those are sugar granules, and it's not ready yet. Keep cooking at about a medium-low heat.
- Bring to a boil. When you are sure the sugar is completely dissolved, move the heat up to medium and bring to a boil.
- Do not stir: Once you see bubbles coming up from the center of the pot, take your wooden spoon out and put it directly in the sink. Do NOT stir while the mixture boils; this can cause crystallization.
- Candy thermometer. Let the mixture boil for anywhere from 3-7 minutes (there are too many variables to rely on exact times unfortunately). It's time to bust out the candy thermometer. Set the thermometer on the side of the pan, making sure it's not touching the bottom, and watch it bubble until the temperature reaches 236 degrees.
- Remove from heat when the bubbling candy has reached 236 degrees. DO NOT STIR. Set the pot on a cooling rack away from the stove so it can start cooling.
- WAIT. This part is hard. Let your candy sit undisturbed for about 20-40 minutes. (The amount of time will depend on the temperature of the house) Use your candy thermometer to check the temperature occasionally. When the candy cools down to about 115 degrees F, it's go time.
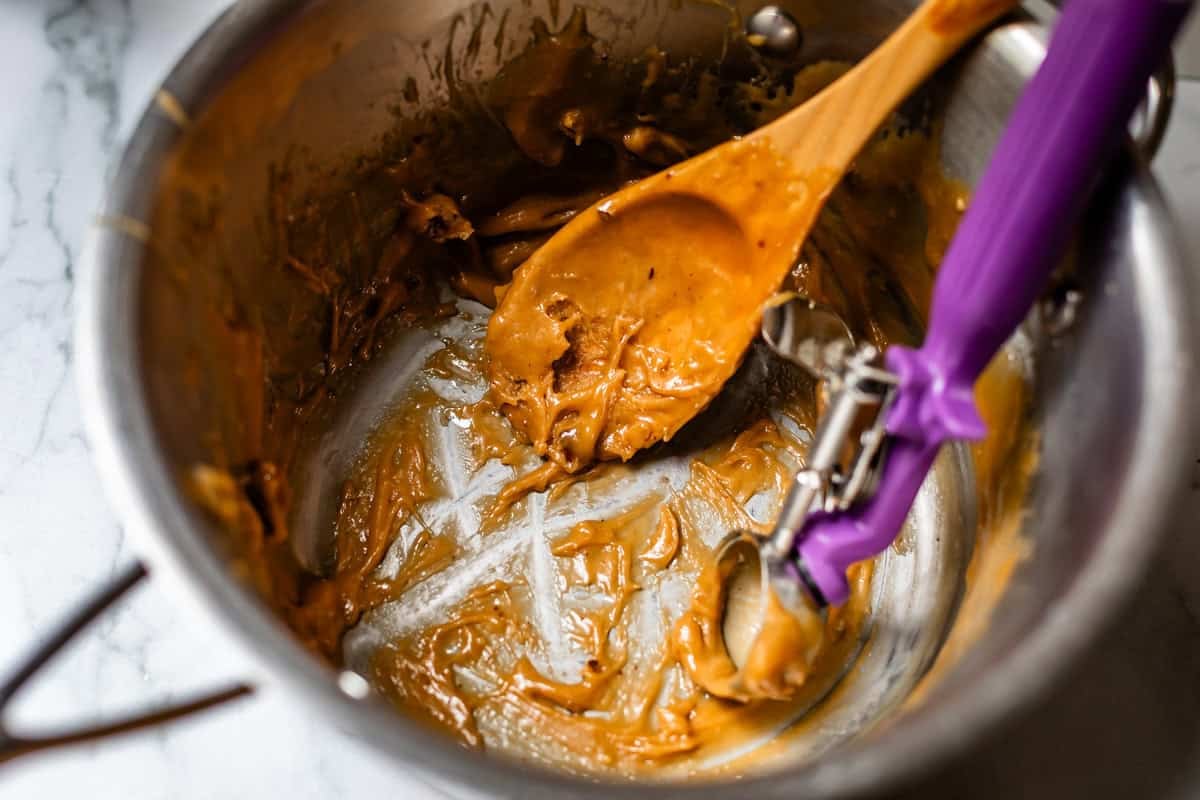
- When your candy has cooled to 115 degrees F, use a brand new clean wooden spoon to add in the next ingredients: 1 teaspoon SIFTED baking soda (to avoid clumps) and 1 teaspoon vanilla extract.
- Stir the mixture for 3 minutes: NOW, finally it's time to stir. You can't skip this step, or the pralines will never set up. Beat the baking soda and vanilla into the mixture. Even though it's off the stove now, you will see the baking soda work it's magic. The mixture will bubble and froth a bit. This is how we get CREAMY pralines.
- Add 2 cups pecans. Add 2 cups of toasted pecan halves and stir them into the candy.
- Keep your thermometer in the candy. Keep stirring. When the candy has reached about 105-110 degrees F, it's time to start testing them on the cookie sheet.
- Test: Drop a small teaspoon of the candy (without any nuts) onto a parchment paper lined pan. If it is shiny and glossy even after dropping it, it's too early. Keep stirring. See photos.
- When you drop a teaspoon of candy and it starts to look opaque, that's when you know the candy is ready to drop. The candy should look fudgy and creamy, not glossy, shiny, or pool-like. It should have rounded edges that look plump at the top edge, and not instantly flatten out like liquid spreading.
- GET MOVING. Now that your candy is at the perfect temperature for dropping, MOVE FAST. You have a very limited amount of time before they start to get TOO cool for dropping.
- Drop the pralines. Use a spoon, or I like to use this exact 1 and 3/4 inch cookie scoop, to drop the pralines on the prepared sheet, with space in between so they don't run into each other.
- If you notice that the pralines you have dropped are looking too glossy and shiny, stop dropping and start stirring the pot again. If you drop them before they are opaque, they will NOT set up. They will be too soft to hold their shape.
- Continue dropping the pralines until all the candy is shaped. You will get about 27-30 pralines, depending on how big you make them.
- Let cool completely. Let the pralines cool on the pan at room temperature until they are easily lifted off the pan with a spatula without bending, at least 20-30 minutes.
- Store pralines tightly sealed on the countertop. Do not refrigerate, it will just dry them out faster. I keep mine in a tupperware, but if you really want them to last, wrap each praline individually in plastic.
- Freezing: Pralines freeze well! They are a great make ahead option. Wrap each praline individually in plastic wrap. Place all the wrapped candies into a freezer ziplock bag, remove as much air as possible, and seal. This way the pralines won't stick to each other and they will maintain their soft and chewy texture. They will be best when used within 2-4 weeks, but can stay frozen for up to 2 months.
- To serve after freezing, make sure any candies are not directly touching each other so they don't stick, keep them covered, and let them sit out on the counter for 2-3 hours until soft.


I’m about to use your recipe to make pralines but I have one question. Evaporated milk averages 6% fat whereas heavy cream can go up to 40%. I have both but I really want to use up this evaporated milk and I need cream for my coffee tomorrow morning. Are you sure that the evaporated milk doesn’t compromise the richness of these pralines?
Hi Ellen! I know it sounds crazy, but the evaporated milk really does work just fine, in spite of the fat difference. Let me know what you end up trying out! Enjoy!
Ok girl, I have made so many of your recipes and I love reading them. I swear if you lived closed I’d be trying to casually bump into you at the grocery store so that we could potentially be friends…
Anyhoo…I fancy myself a bit of a seasoned cook and novice baker. I feel confident with all your tips and bossy instructions I could nail this recipe. My bestie lives in Texas, I’d love to make these for her. She’ll appreciate all the effort. She LOVES Nola but I’ve not yet been.
I will definitely post a photo and tag you once I’ve made them – Happy Holidays Karen!
We would have such a good time at the grocery store Christene!! Haha! I’m so excited for you to try these out, I love that you are sending them to your bestie! I’m looking forward to your post! Merry Christmas!!
Once you have had a New Orleans praline pecan you will have another and another all night long. Sadly, my husband doesn’t like pecans and I can’t afford the calories but, by ALL means, you have to try them!
Alternative title to this post: “Another and Another All Night Long” hahaha!! It’s so true Mugsy!! Once you start you can’t stop. So funny :) Thanks for chiming in, so good to hear from you!