
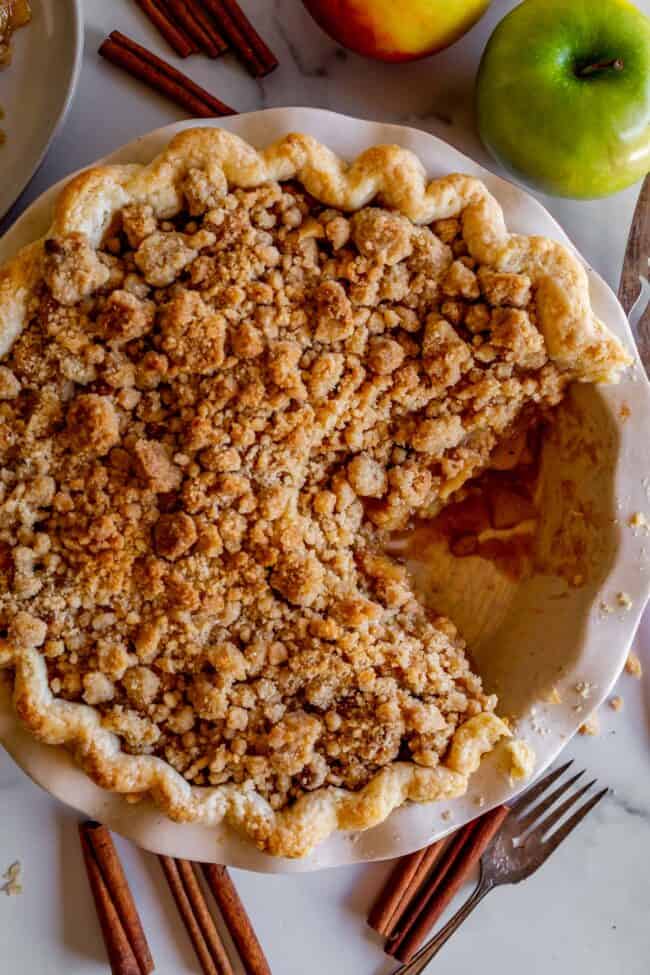
This Dutch Apple Pie Recipe has the BEST apple flavor! A flaky, buttery crust on bottom, cooked apple filling in the center, and the most amazing golden-crisp, buttery crumb streusel topping! This pie is adapted from one of my top recipes, traditional Apple Pie. You are going to love it! I’ll show you just how to make it with step by step photos. Originally posted November 14, 2021.

Table of Contents
- The best apple crumb pie
- What is Dutch Apple Pie?
- Apple pie vs dutch apple pie
- Here is why you will love this dutch apple pie recipe
- Apple crumble pie recipe ingredients
- Tools to use for dutch apple pie
- Best apples for an apple pie recipe with crumb topping
- How many apples are needed for this pie?
- Dutch apple pie: is it better to use cooked or raw apples?
- Best dutch apple pie recipe filling
- How do you keep dutch apple pie from getting soggy?
- How to make crumb topping for apple pie
- Freezing apple pie with crumb topping
- Apple crumb pie FAQs
- More great pies you are going to love!
- Dutch Apple Crumble Pie Recipe Recipe
Does anyone else feel like they are just not with it lately? A giant package arrived in the mail this week, the day before my daughter Valentine’s 5th birthday. Certain grandmas had told me to be expecting something, so I figured this was it and set off to wrap it.
(Eric tried to convince me that it was big enough that it didn’t need to be wrapped. Just slap a bow on and call it good. But I mean come on, what could a 5-year-old love more than ripping a ridiculous amount of paper from a present the size of her body??)
So anyway, I wrapped it all up and tied on the ribbon. On Val’s birthday, we face timed grandma to let her in on the fun. She took one look at the wrapped present and said, that’s not what I sent.
Utterly confused, we opened the box to find a beautiful baby play mat. And we even had a moment looking at each other with blank faces, asking, who would think a 5-year-old would be into this baby toy??
And ONLY THEN did I remember that just days previously, I had bought the play mat for my cousin, whose baby shower is coming up. And I had even commented to Eric about it. “That present for my cousin hasn’t arrived yet, I’d better check the order.”
You guys! What is it with me! I guess I’ll have to wrap it back up again, for the second time. (There’s no “slapping a bow on it” for a baby shower either, Eric. This is your etiquette tip for the day. There will be a test. Just kidding.)
The best apple crumb pie
Tis the season for PIE my friends. I mean I know it’s Thanksgiving and all, but Dutch Apple Pie kind of transcends the holidays, don’t you think?
Raise your hand if you’ve made my Best Homemade Apple Pie? I posted this recipe in fall 2020, and all you Covid hermits went INSANE. I’ve never seen traffic on a recipe like that before. Thousands of people have since made that pie and fallen in love.
I’ve had so many requests over the last year to create a Dutch Apple Pie version of that recipe, and today is the day my friends! The best homemade apple pie, Dutch-ified! But what does that even mean, you ask??
What is Dutch Apple Pie?
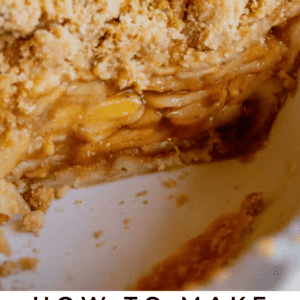
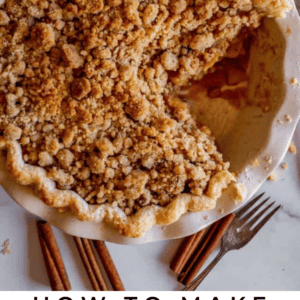
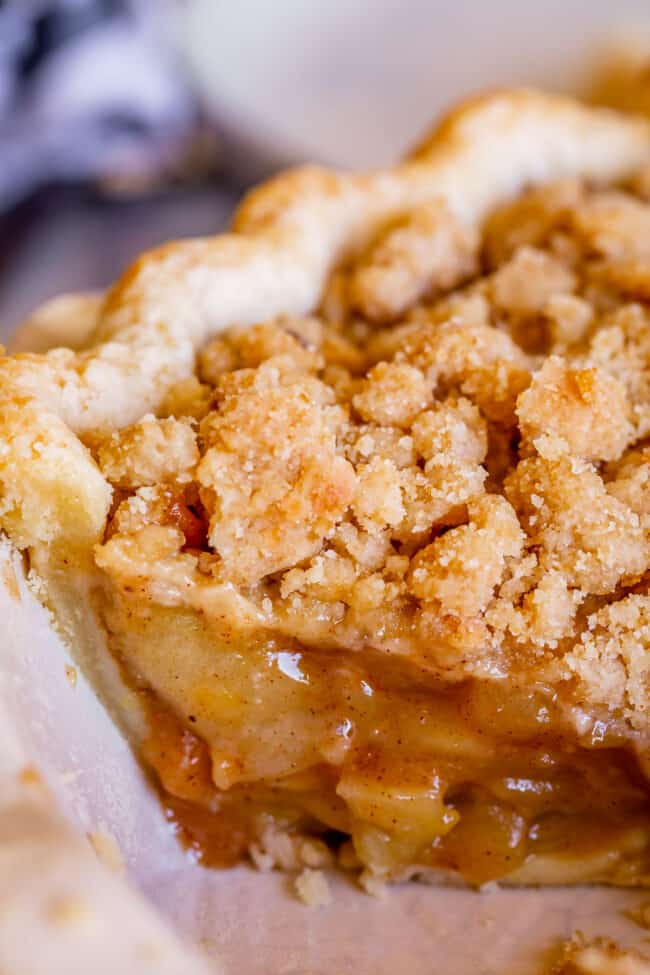
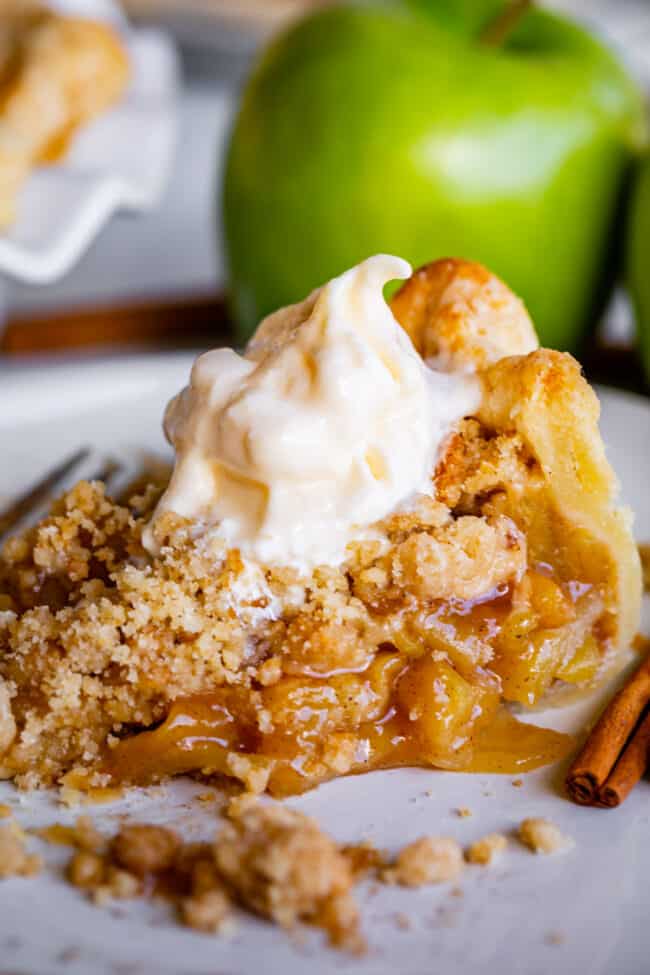
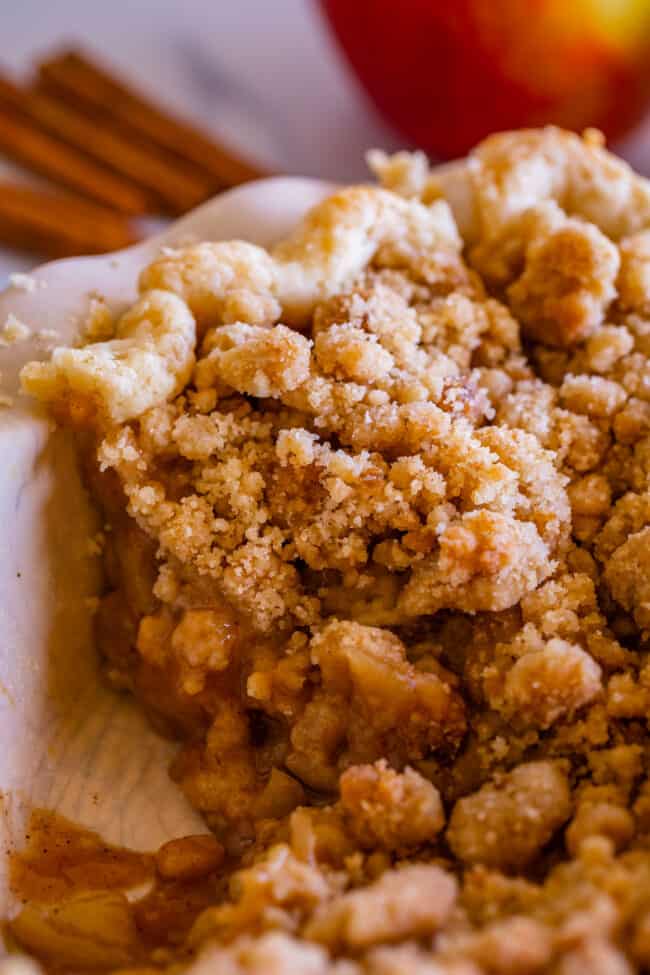
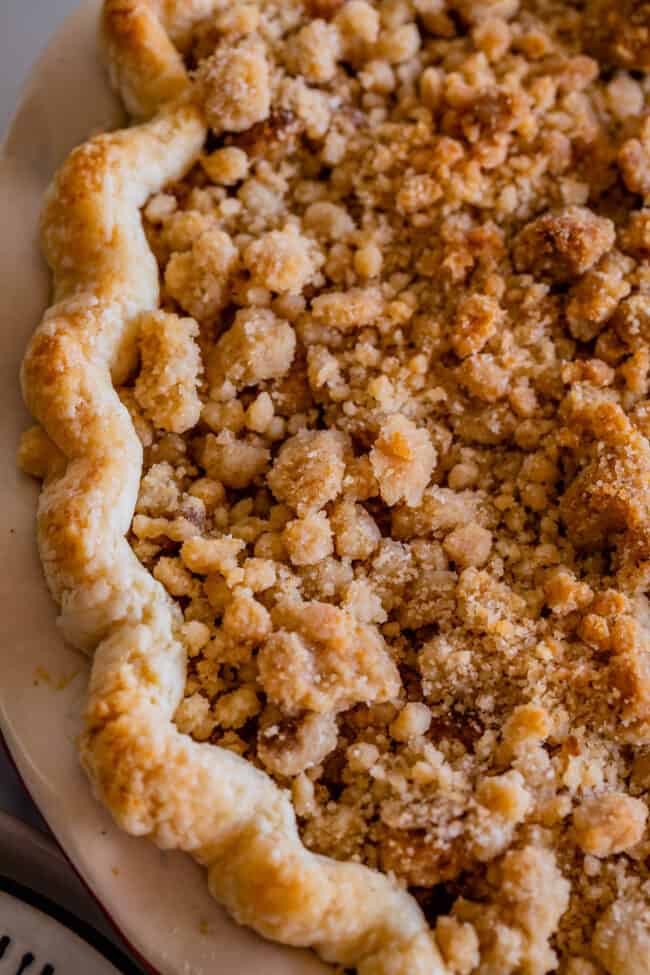
Dutch Apple Pie has flaky crust on the bottom, apple filling in the center, and the most amazingly golden-crisp, buttery crumb streusel on top. It’s heavenly!
Apple pie vs dutch apple pie
Traditional Apple Pie has pie crust on the top and bottom, with apples and sugar in the middle.
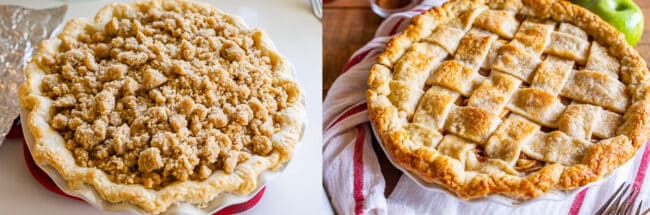
Dutch apple pie, like so many other American traditions, is a combining of cultures. Basically, it’s like traditional Apple Pie (which is French, using pie crust) and Apple Crisp (which is German/Dutch, using streusel on top) got busy and had a pastry-bottomed, crumb streusel-topped baby. A delicious, glorious baby. Business on the bottom, party on the top. Best of both worlds!
Here is why you will love this dutch apple pie recipe
- A homemade flaky, tender and buttery pie crust
- We’re using a heck ton of apples for supreme apply flavor
- The apple filing is cooked on the stovetop to caramel-y perfection. No crunchy raw apples here my friends. (Most Dutch apple pies call for raw apples layered into the pie pan but we are so much better than that.)
- a pinch of cardamom rounds out the cinnamon and nutmeg so nicely
- double the amount of streusel that most recipes call for, because I AM ALL ABOUT THE STREUSEL!
- it’s even easier than regular Apple Pie!
Apple crumble pie recipe ingredients
Here are the ingredients you’re going to need! Quantities are listed in the recipe below but here are the basics:
- Single pie crust
- Lemon juice
- Heck ton of apples (see below)
- Brown sugar
- Granulated sugar
- Flour
- Salt
- Cinnamon
- Nutmeg
- Cardamom (optional, but AMAZING, try it y’all)
- Vanilla
- Butter
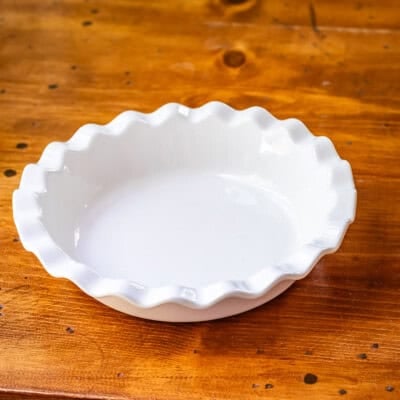
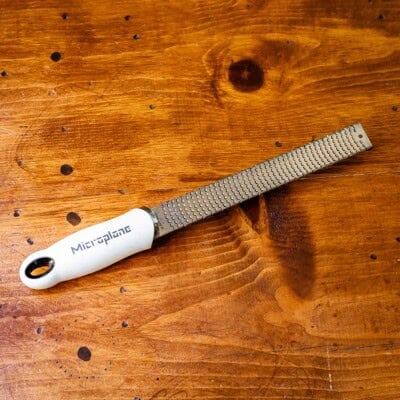
Tools to use for dutch apple pie
These are my favorite kitchen tools to use when I’m making apple pie!

Best apples for an apple pie recipe with crumb topping
An apple pie can only be as quality as the apples themselves. Fortunately these days we have access to a massive variety of apples to choose from. These are my most important tips when it comes to apples:
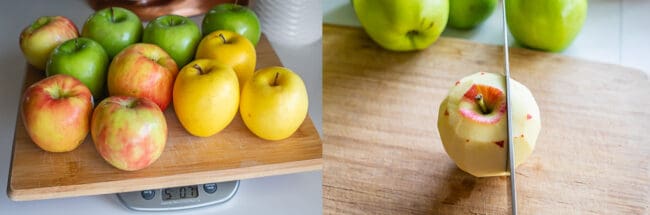
- Use a ton of apples! The best way to get the MOST apple-y flavor in your pie is to utilize the apples themselves! Most apple pies call for 2-3 pounds of apples. We are using 5 pounds! Like 11 or 12 big apples.
- Use a variety of apples. I used Granny Smith (very tart), Honeycrisp (middle), and Golden Delicious (on the sweet side). Using only one type of apple gives you only one flavor profile. Using a blend means your pie will land somewhere perfectly in the middle of tart and sweet. Here is a list of common apple varieties, listed from most tart (Granny Smith) to sweetest (Fuji).
▪️Granny Smith
▪️Braeburn
▪️Macintosh
▪️Honeycrisp
▪️Red Delicious
▪️Golden Delicious
▪️Ambrosia
▪️Gala
▪️Fuji
If you like pies a bit more on the tart side, grab a few more Granny Smith. If you like them a bit more sweet, go heavier on the Gala or Golden Delicious. I would avoid Red Delicious (too mushy, and honestly if you don’t like to eat it plain why would you want it in a pie? Are there people who actually still eat Red Delicious??)
How many apples are needed for this pie?
Since apples can vary in size, it’s best to weigh them rather than to go by count. However, there are about 3 medium apples in 1 pound. Buy at least 15 to be on the safe side. With the large apples I used, I only needed about 12. If you have leftovers, you have something to snack on while making your pie!
Dutch apple pie: is it better to use cooked or raw apples?
Cook your apple pie filling. My last tip is kind of super duper important: COOK YOUR APPLES. So many apple pie recipes add raw sliced apples to a pie shell, and bake a long time so the apples soften in the oven. I’ve tried this lots of times, and just don’t love it. For one, you risk under baking your apples. Does anyone else hate this as much as I do? Say no to crunchy apple pie! That is the absolute worst!
Secondly, apples have a lot of water, and all that water ends up in your pie if you don’t cook some of it off first. This means your apple pie is not as flavorful.
I tested this pie twice: the first one with uncooked apples and the second one with cooked apples. The raw apple pie definitely had less flavor. It was bland guys. I mean, still a passable apple pie, just nothing to write home about.
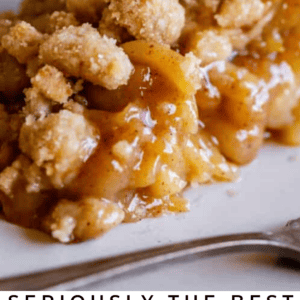
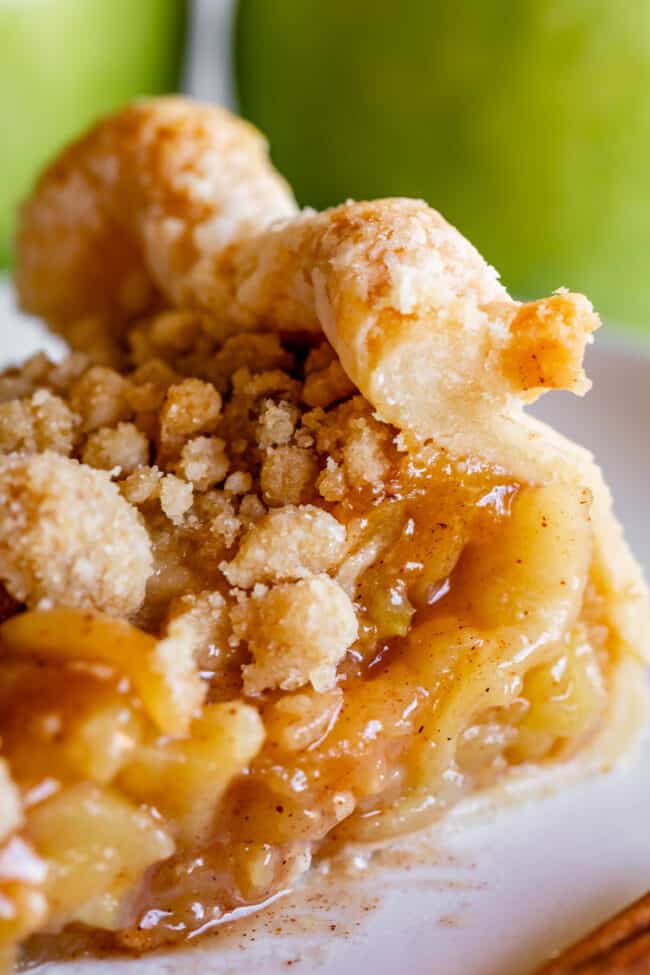
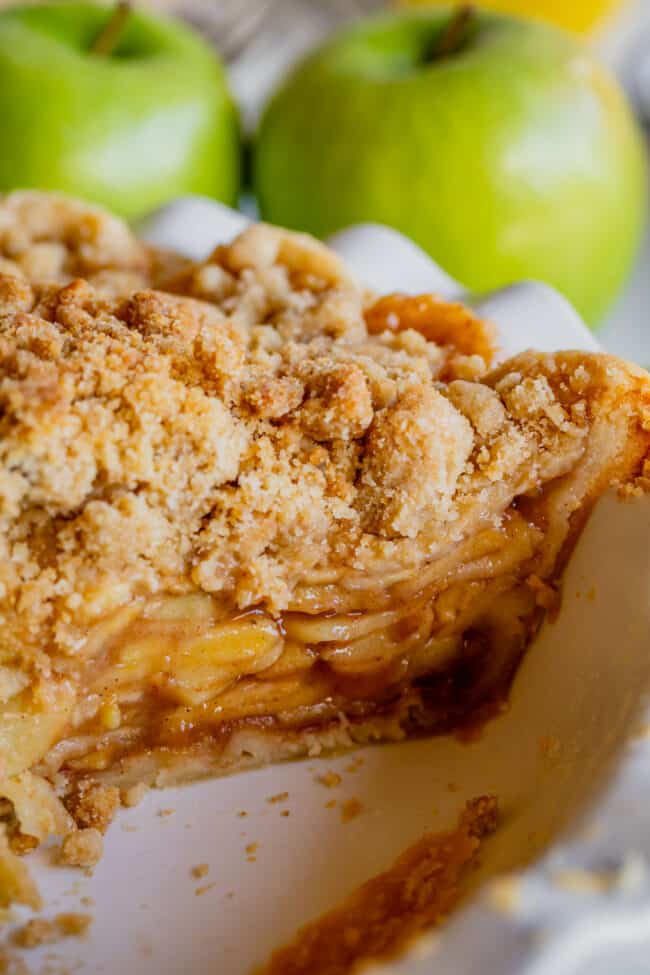
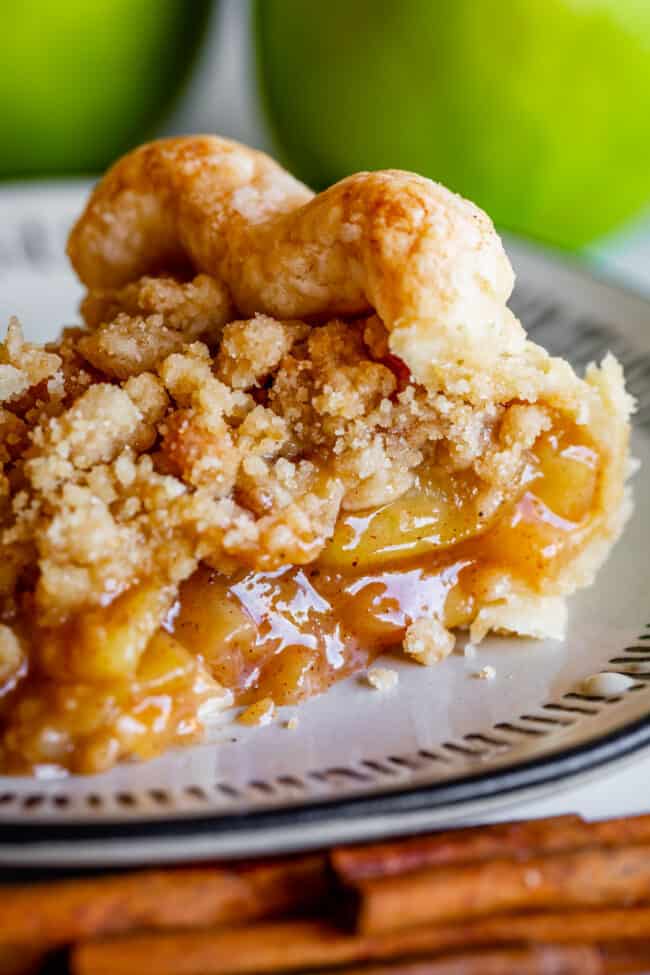
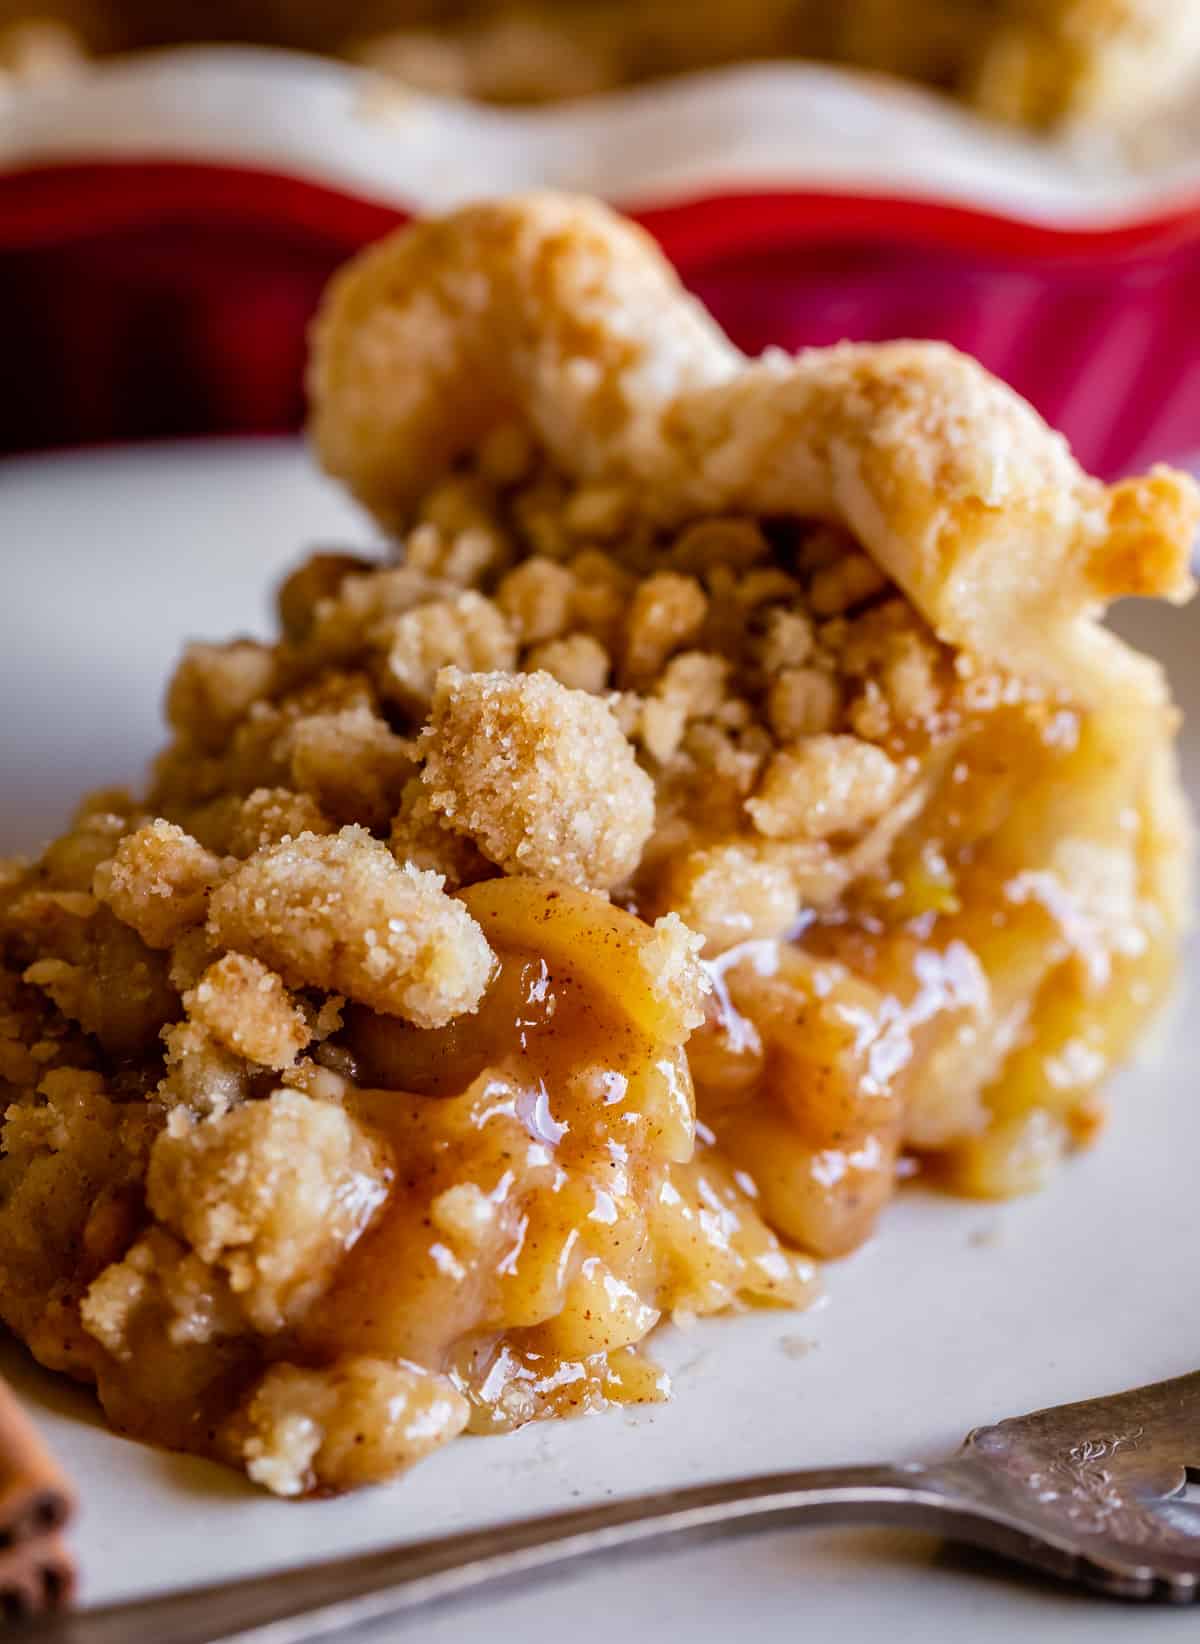
The pie with the cooked filling, on the other hand, had a darker, deeper flavor. It was almost caramel-y, and there was more sauce in the filling. There’s no chance of under-baking, and the flavor is INCREDIBLE.
I know it’s inconvenient to cook the filling (even more inconvenient when I tell you that you’re going to have to cool that filling before adding it to the pie) but hey, you didn’t sign up to make an apple pie because you needed a quick dessert, did you? Take the extra 20 minutes to cook the filling. You won’t regret it!
Best dutch apple pie recipe filling
First gather up all your apples.
You need 5 pounds before coring and peeling. That’s about 11-12 large apples to make 5 pounds.
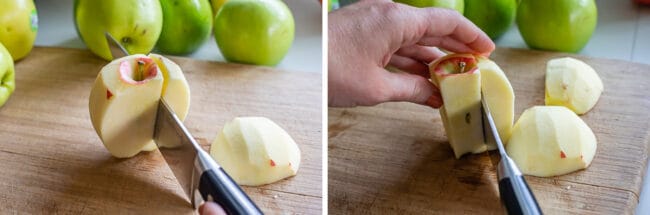
Here’s how I slice my apples. You can use a mandolin if you want, but be sure to use a metal glove. Those suckers are sharp!
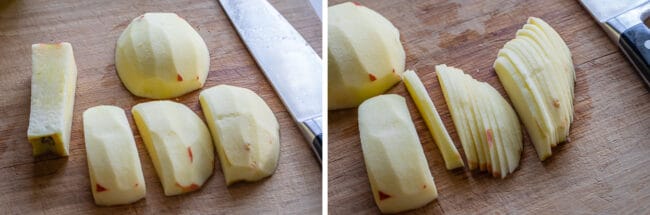
Keep slicing around the core until you have these segments. Then slice to about 1/8 inch. You can slice thicker than that if you like (you may have to cook longer), but I love thin apples in my pie.
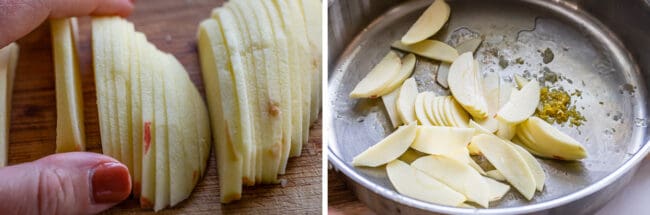
As you are slicing up the apples, toss them in a 12 inch high sided skillet (heat should be off) with the lemon juice and zest. Give it a stir to coat the apples with lemon.
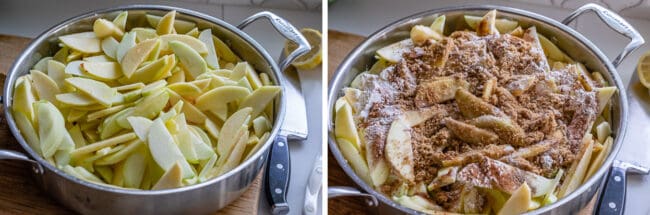
Time to cook it down. Add some sugar, brown sugar, flour, salt, and spices. NO extra liquid, the apples will release plenty!
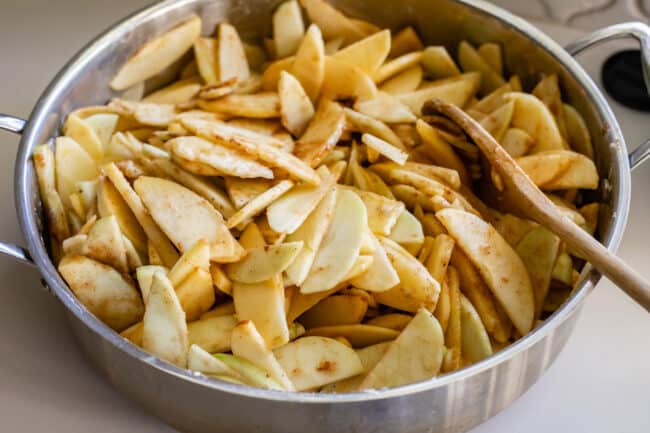
Place it over medium heat and let cook for about 20 minutes. Cover the pan, but stay nearby because you’re going to have to stir the mixture every couple minutes, replacing the lid each time. This keeps the steam in and helps cook the apples. You are going to get this glorious caramel-y sauce going.
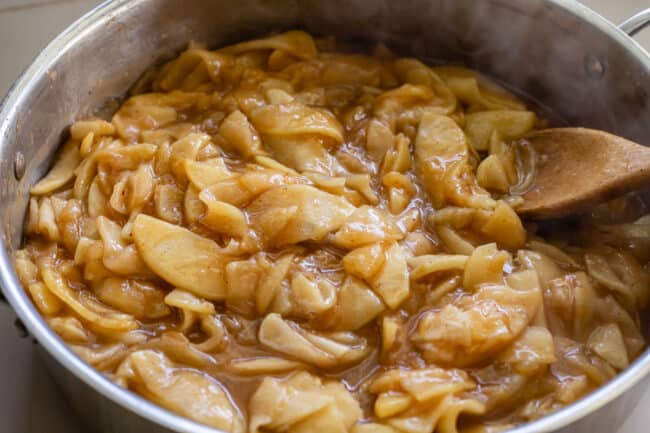
Something magical happens when you gently cook the apple pie filling over a longer period of time like this. The pectin in the apples is converted to a heat-stable form. (Thanks Cooks Illustrated!) That means when you cook the apples again in your pie in the oven, the apples won’t become mushy. Whatever level of “al dente” they are at when you finish cooking them on the stove, that’s how it will taste in your pie. So you can adjust the cooking time a bit to reach your level of apple perfection. Cook longer if you like softer apples; shorter if you like them more firm. You don’t have to calculate for further cooking in the oven. Crazy, right? Science!
How do you keep dutch apple pie from getting soggy?
The biggest trick to prevent a soggy or melting crust is to make sure all your ingredients go COLD into the oven. This includes all 3 components of the pie: pie crust, apple pie filling, and the crumble.
If you added this hot filling into a pie crust right now, it would melt your crust into a sad heap of butter. Your crust will be soggy sad.
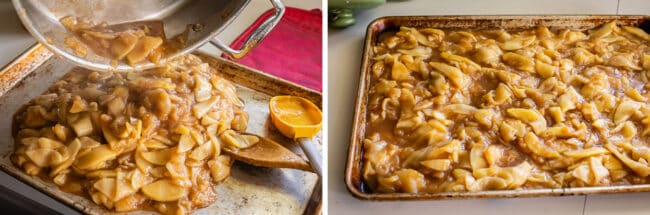
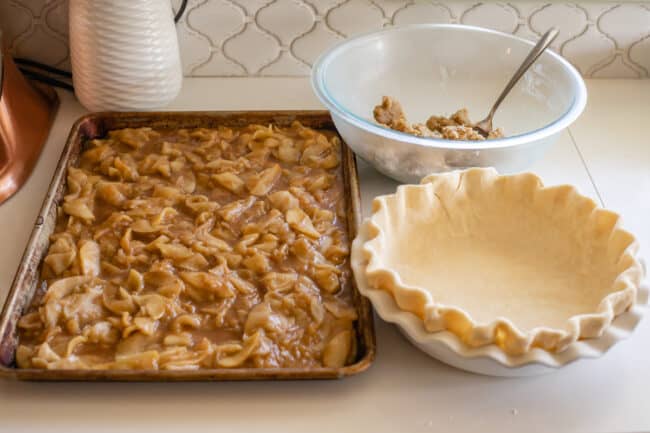
So we are taking that hot apple, caramel-y goodness and giving it a chill. Pour the mixture onto a half sheet pan (any cookie sheet, one with a lip) and spread it out evenly. I stuck mine in the freezer to chill for about 20 minutes. You can put it in the fridge, or just leave it in the pan you cooked it in and wait for it to come to room temperature (a couple hours), if you are not in a hurry.
Now for the crust. I have an entire post about How to Make Flaky Pie Crust, you are definitely going to want to check it out! The most important thing to remember is to keep your pie crust super cold before putting it in the oven, so after crimping the edges to look nice, toss it in the freezer for a half hour. Dozens of people have sent me pictures of their apple pie crusts literally melting off because they went in the oven too warm. It’s about the saddest thing to happen to a pie. Don’t skip chilling!
The other important step you need to take to avoid a soggy crust is to blast the heat in the beginning of your cook time. Turn your oven up all the way to 425 degrees and stick a pizza stone (or sheet pan if you don’t have one) on the center rack in your oven. Let it preheat while everything is chilling, about 20-30 minutes. Having direct contact with that really hot surface distributes heat evenly to the bottom of the crust, which results in a firmer, crispier crust. Nobody wants a soggy bottom!
Once your apple pie filling is chilled, pour it into your cold pie crust.
How to make crumb topping for apple pie
Now it’s streusel time! Besides the amazing flavor, one of the best things about a crumb topping is just how easy it comes together.
What is the crumble on apple pie made of?
- Flour
- White and Brown Sugar
- Salt
- Butter
How do you make the crumble for an apple pie?
Grab a medium bowl and add in the dry ingredients: flour, white and brown sugars, a little salt. Whisk em up.
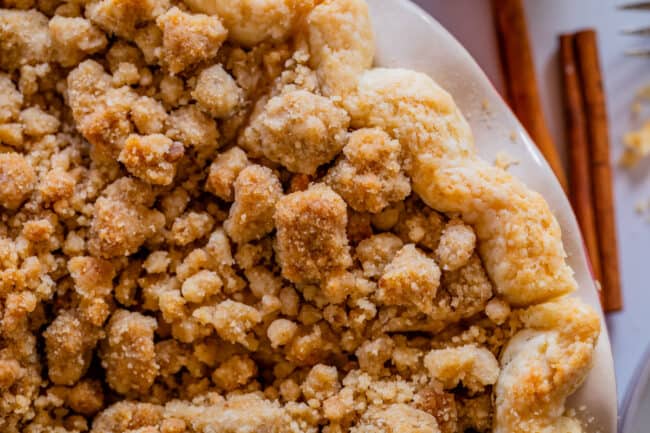
Then melt some butter and drizzle it over the top. Use a fork or spatula to mix it together, but don’t overdo it! It’s going to come together like cookie dough almost. Chill for a few minutes, then use a fork to break it up into crumbly bits. I’m a sucker for HUGE bites of crumble, but you can mix it into a sandier texture if you prefer.
Here’s all your components chilled and ready to assemble!
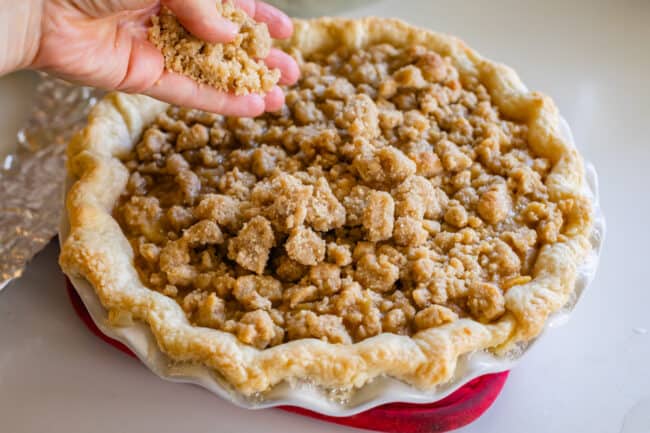
Top your pie with just enough crumble to cover the top. Don’t use all of it! Probably about a cup. Stick the rest in the fridge for later.

Bake about halfway, then we’re lowering the oven temperature a bit and adding the rest of the crumble. Adding the crumble in layers like this makes the topping nice and thick how I like it, but crispy and golden all the way through. It’s the price you pay for a ridiculous amount of streusel on your pie. I’ll take it! (we have to shield the crust anyway so we’re already taking the pie out of the oven. See below)
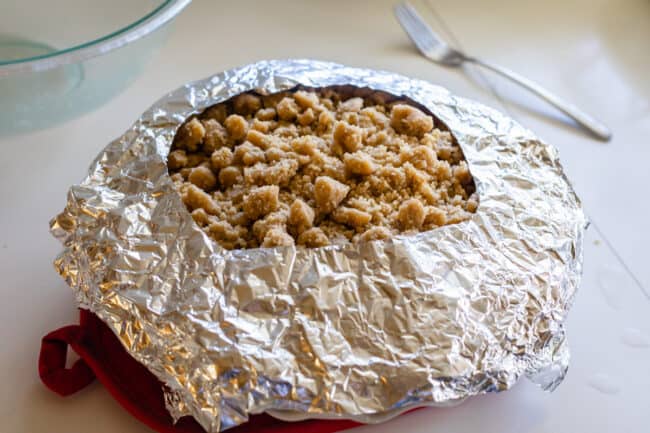
At this point we’re also going to top the edges of our pie with a crust cover made from super fancy tin foil. Tear off a square of foil about the same size as your pie. Fold in half, then in half again, and cut out the center. Open it up again and voila! You’re pie is ready for outer space! Just kidding. This will let the center of the pie brown without burning the edges.
You’ll know your pie is ready to come out when the crumble is a nice, light golden brown and the edges are brown.
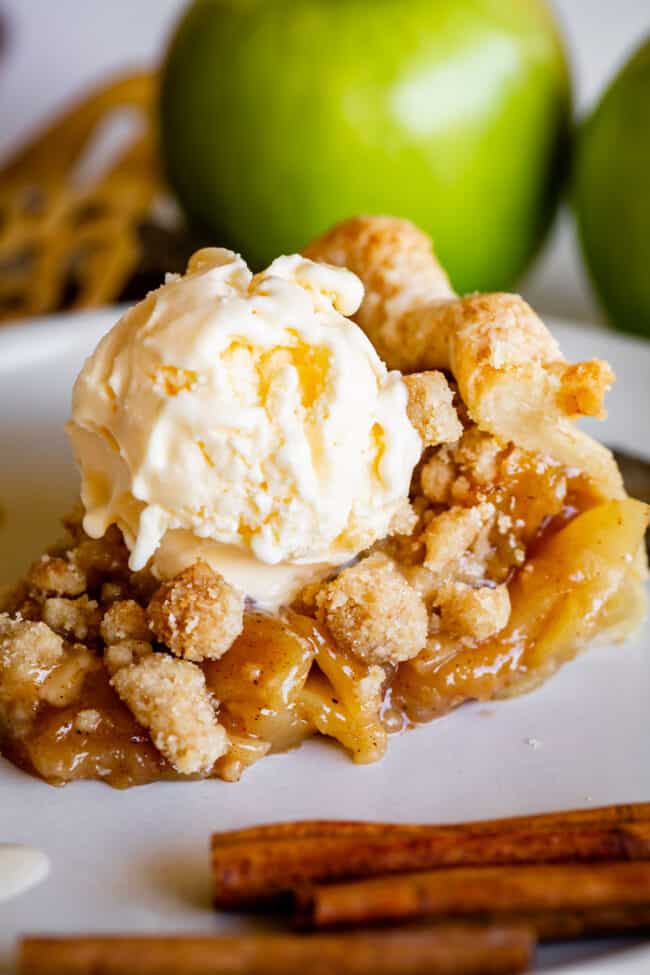
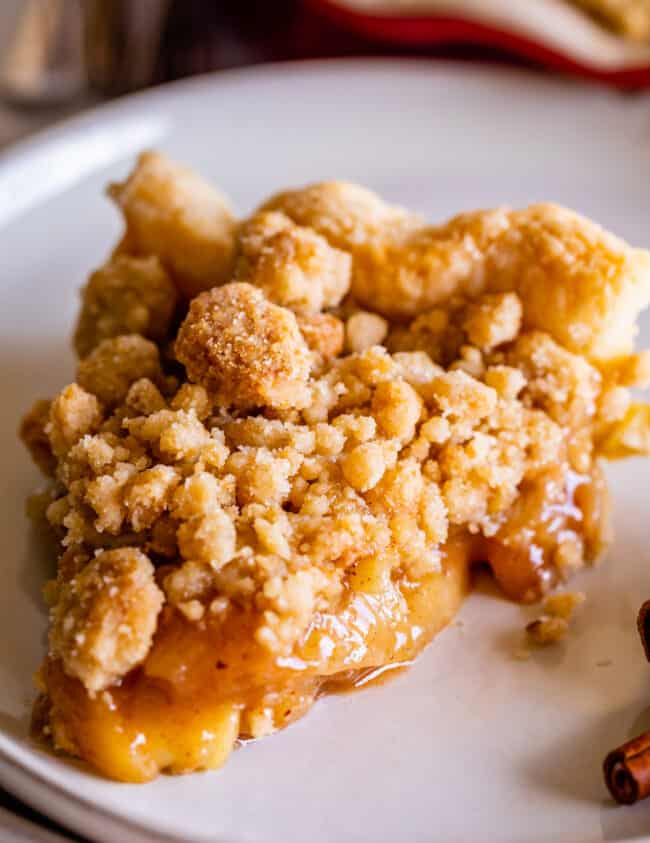
Let the pie cool on a rack for at least 4 hours before digging in. I know, this is killer! But if you cut into it now it won’t really be pie, it will be soup. The juices need time to return to room temperature to be the right consistency. Don’t forget to serve it with some delicious Salted Caramel Sauce!
This is a great pie for making ahead (see more below), but once you cut into it, it needs to be eaten very soon afterward. The problem is that once the moisture inside the pie touches the dry crumble on top, the wetness spreads and makes your whole crumble wet. So it’s a great pie to make the day before your event, just make sure not to sneak a slice, or your crumble won’t be crumbly. You must resist!
Your pie is best served the day after making it, without any early cuts made. (This is why it’s perfect for Thanksgiving!) Store leftovers on the counter loosely covered with plastic wrap or foil for about 2 days. After that stick in in the fridge.
Freezing apple pie with crumb topping
Dutch Apple Pie is such a great candidate for making in advance: it freezes beautifully. (Total life-saver during the holidays!)
There are 3 ways to make your pie ahead of time.
- The first is to make the crust, filling, and topping and freeze each separately in freezer ziplock bags. Thaw in the fridge, then follow the directions for assembly and baking.
- If you prefer, you can completely assemble the pie in the pie pan, then wrap the whole pie, pan and all, really well in plastic wrap and then foil (I suggest two layers of each to avoid freezer burn) and the second half of the crumb topping in a small freezer ziplock bag. Store upright in the freezer for 1- 3 months. See notes for instructions on how to bake.
- To freeze after baking the pie, allow the baked pie to cool completely, like a full 8 hours. Wrap it really well in plastic wrap and then foil (I suggest two layers of each to avoid freezer burn). Store upright in the freezer for 1- 3 months. See notes for cooking instructions!
Apple crumb pie FAQs
If you’ve made an apple crumb pie the traditional way, just layering in raw apples, then it’s not surprising that your pie is watery. Apples release moisture as they cook. This recipe solves that problem by cooking the filling before it goes in the pie. It makes for a super caramel-y, perfectly textured, no-moisture-releasing apple pie.
It shouldn’t be all the way to crunchy, but it should be crispy. It won’t be all the way to a potato chip crunch. It WILL get soggy after you cut into it, because the moisture from the apple filling will spread to the topping. That’s why it’s best NOT to cut into this pie until you’re ready to serve it, crisp perfect streusel topping intact.
Crumble topping will be soggy if you’ve cut into the pie and the moisture from the filling has had time to reach it. It will also be soggy if you cut the pie before you let it cool completely. It’s best to chill the crumble topping before baking it so the butter is cold when you bake it.
I would love to hear if you try out this pie! Especially if you’ve already made my original Apple Pie. Let’s hear how you think they compare!! It’s like choosing a favorite child, kind of. Happy pie baking!
More great pies you are going to love!
- The Best Homemade Apple Pie << this is one of the top recipes on The Food Charlatan!
- Apple Custard Pie with Cinnamon Streusel << Like today’s pie, plus a custard layer!
- Pecan Pie with Butter Streusel Topping << streusel is life.
- Crème Brulée Pumpkin Pie << You will never eat a regular pumpkin pie again. Crackly top forever!
- French Apple Cake from Once Upon a Chef
- Apple Pie Bars << a pie you can eat with your hands! The crust is unreal.
- Apple Crisp, with a Ridiculous Amount of Streusel << but really though.
- Homemade Peach Cobbler << can be made with fresh, canned or frozen peaches!
- Key Lime Pie from Spaceships and Laserbeams
- No Bake Peanut Butter Pie from Fresh April Flours
Dutch Apple Crumble Pie Recipe
Ingredients
- 1 homemade single pie crust, 1 sheet of pie dough
For the apple filling
- 1/4 teaspoon lemon zest
- juice from half a lemon, 2 tablespoons, no more
- 5 pounds apples, 5 pounds before peeling and coring
- 1/2 cup brown sugar, packed
- 1/2 cup granulated sugar
- 1/3 cup all-purpose flour
- 1/2 teaspoon kosher salt
- 1 & 1/2 teaspoons cinnamon
- 3/4 teaspoon nutmeg
- 1/2 teaspoon cardamom, optional
- 1 teaspoon vanilla
For the sugar crumble
- 1 & 1/2 cups all purpose flour
- 1/3 cup granulated sugar
- 3/4 cup brown sugar, packed
- 1/2 teaspoon kosher salt, use a little less if using table salt
- 3/4 cup butter, melted (1 and 1/2 sticks)
Instructions
- Choose your apples.You need 5 pounds of apples for this recipe, which is about 11 large apples. I like to use a mix of apples for the best flavor. For this pie I used Granny Smith, Honeycrisp, and Golden Delicious.
- Make the filling: Use a microplane grater to zest 1/4 teaspoon lemon peel into a 12-inch high sided skillet. The heat should be off.
- Add the juice from half the lemon to the skillet, about 2 tablespoons. Don't use much more than this, you're not making a lemon apple pie. We just want to wake up the apples a bit and keep them from browning.
- Use a potato peeler or this handy apple peeler to peel the apples. Slice the apples into 1/8 inch pieces. Check out the photos above to see my method for slicing apples. I like to peel and slice one apple at a time so that they don't get brown: I peel one apple, then stop and slice it, add it to the pan with the lemon juice, and then move on to peeling the next apple. Stir the apples in the pan occasionally to coat everything with lemon juice.
- Once you have all the apples peeled and sliced in the pan, set it over medium heat on the stove.
- Add 1/2 cup packed brown sugar, 1/2 cup granulated sugar, 1/3 cup flour, 1/2 teaspoon kosher salt, 1 and 1/2 teaspoons cinnamon, 3/4 teaspoon nutmeg, and 1/2 teaspoon cardamom (optional). Stir it together gently so you don't break all the apples.
- Once the mixture is all moistened and you don't see patches of flour or cinnamon, set a timer for 20 minutes. Cover the mixture completely with a lid, but don't walk away. Stick around and stir the mixture every 3 minutes or so, replacing the lid each time. Cook for 20 minutes, until the apples are fork tender but still hold their shape. The apples will not soften more while baking in the oven. So have a taste and see if you want to cook a longer or shorter time. Only you can know your apple al dente perfection level. If your apples start to stick to the pan, add 1 tablespoon water (plus more as needed); use sparingly.
- Remove the pan from heat and stir in 1 teaspoon vanilla.*
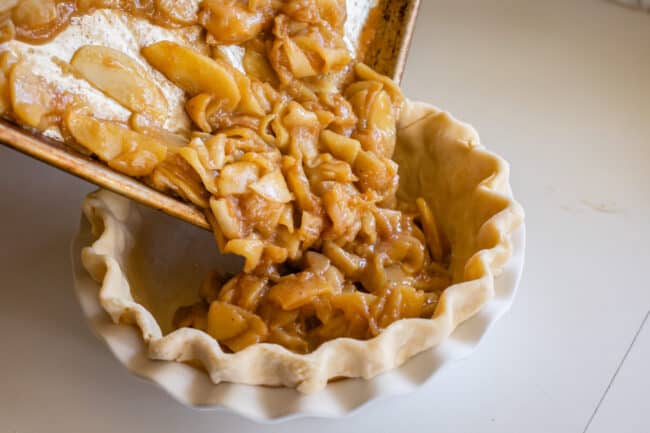
- Transfer the apple pie filling (including all the the brown caramel gooeyness) to a half sheet pan, or any pan with a lip. Spread the apples all the way to the edges. Cool the apple pie filling completely by placing it in the fridge or the freezer. If you put it in the freezer, it only takes 30 minutes or so. (If you have plenty of time, you can just leave the apples in the pan to cool down; it will take a couple hours.)
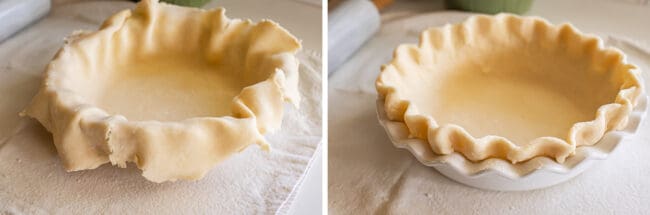
- Roll out your pie dough and place in a 9-inch pie dish. Fold the edges underneath and crimp them with your fingers and thumbs. See my pie crust recipe for lots of photos and details.
- Place the pie crust in the fridge or freezer for about 30 minutes, for a really flaky crust.
- While the crust and filling are chilling, place a baking sheet or pizza stone in the center rack of your oven and preheat to 425 degrees F. Let it heat up for at least 20-30 minutes to make sure it's really hot.
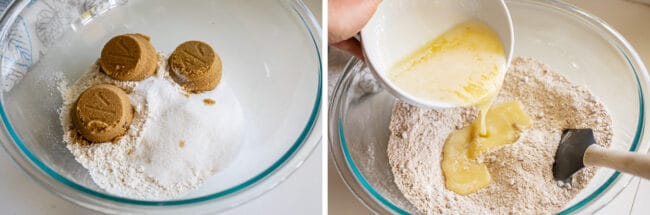
- Make the sugar crumble:In a medium bowl, add the dry ingredients for the crumble: 1 and 1/2 cups flour, 1/3 cup white sugar, 3/4 cup packed brown sugar, and 1/2 teaspoon kosher salt (use less for table salt). Whisk together.
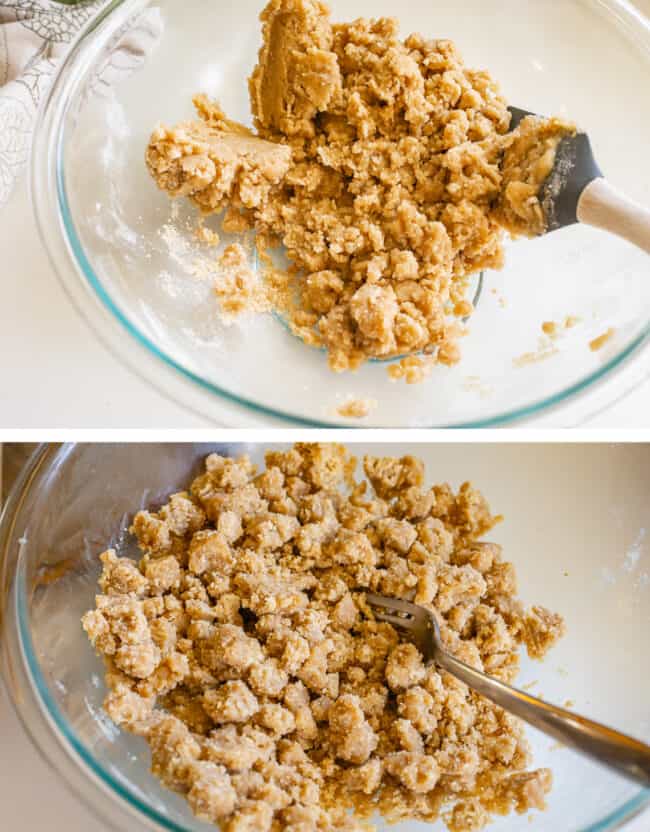
- In a small bowl, melt 3/4 cup butter (1 and 1/2 sticks). Pour the butter over the dry ingredients and stir together gently. You should end up with a pretty wet sandy mixture with some large clumps. See photos. Let it chill in the fridge until you are ready to assemble. Try not to eat it all.
- When the apple pie filling in the freezer is completely cooled, and the pie shell is mostly frozen, take them out of the freezer. Use a rubber spatula to scrape all the chilled apple pie filling into the pie shell. Don't forget to scrape in every last bit of the gooey filling.
- Use your hands or a fork to break the crumble into smaller bite size pieces. Top the pie with about a cup or two of the sugar crumble, not all of it! You only want to add enough to cover all the apples, we are not piling it on. (That's for later.) Place the remaining crumble back in the fridge to chill.
- Bake the pie:Place the chilled pie onto the baking sheet in the oven and let bake for 15 minutes at 425 F. The crust on the edge should be turning light brown.
- Meanwhile, get a square of tin foil that is the same size as your pie. Fold it in half, then in half again. Cut out the center. Open it up again. You should have a square of foil with a circle cut out of the center (or use a pie shield). See pie crust post for more details.
- After baking at 425 for 15 minutes, reduce the heat to 350 degrees F. Don't take the pie out of the oven. Just change the temperature. Bake at 350 for an additional 10 minutes.
- At this point, remove the pie from the oven and quickly shut the oven door.Sprinkle the remaining chilled crumble all over the top of the pie. Break up large pieces with your fingers. Place the foil on top of the pie crust (the center of the pie should be exposed). Loosely crimp it around the crust on the edge. This will protect the edges from burning.
- Don't forget that your oven temperature should be at 350. Place the pie back on the hot baking sheet in the oven and bake at 350 for about 25-35 more minutes. (the pie should be in the oven for a total of about 55-65 minutes)
- You will know the pie is done when the edges of the crust are brown and the crumble is turning a light golden brown in the center. If you want your crust and crumble to brown a little more, remove the foil shield and bake another 5-10 minutes.
- Let the pie cool on a wire rack for about 4 hours. I know, this is killer. But if you cut into it now, the juices will be lava hot and way too liquid-y. Your crumble will get wet and soggy sad. You have to wait for it to cool to room temperature to get the right texture for the filling AND to not ruin the crumble. Pie! A lesson in patience indeed.
- Once the pie is completely cool, slice and serve! My husband Eric considers it a crime to serve this without vanilla ice cream, and I tend to agree. Treat yoself right. Drizzle on some Salted Caramel Sauce for a really decadent treat!
- Store the pie on the counter for up to 2 days, covered with plastic wrap or foil. After that transfer it to the fridge.
- See notes for detailed freezing instructions!


I’m making this pie today in preparation for tomorrow’s Thanksgiving dinner. With that being said, do I leave the pie out over night or should it be refrigerated?
You can leave this pie on the counter Karina! Just cover it with some tinfoil or plastic wrap. Enjoy!
What if I’m using a glass pie dish? Should I still preheat a baking sheet to put the pie on? I’m afraid the glass pie dish may break if I put it on a hot baking sheet.
Hi Gianna! Yes, you can still preheat a baking sheet to put the pie on if you’re using a glass pie dish. If you’re nervous you don’t have to, but the bottom crust may not brown as well.
Do not make this recipe, I had followed it exactly and it was a disaster. The crumble ended up turning out to be a paste and you end up wasting so much product.
I made two of these this evening, they turned out PERFECTLY. IF you follow everything step by step, it will turn out to be a beautiful pie, you have to remember to chill in between steps, do not rush it.❤️ I am so excited to dig in!
Hi! Quick question –
I’m planning on making this a day before Thanksgiving and after reading it sounds like that’s the recommendation! I’m wondering – if guests want the apple pie to be warm when eating what is the best way to re-warm when ready to serve?
Thank you! Can’t wait to try :)
Hi Lucy! You can warm it in the oven just before serving, covered with tinfoil, at about 350 for 20-30 minutes. Enjoy!
Hello! I baked my crust before hand to be safe. I made everything and it’s chilling in the fridge,I’ll assemble it all tomorrow. My question is … since the pie shell is cooked & my filling is cooked ,what temperature and how long to bake the pie in the oven… when I’m only putting the pie in the oven to cook the crumb topping pretty much?:) thank you
Hi Faith! We’ve never tested this pie with a pre-baked crust, but have always baked the filling, crust, and topping at the same time, as directed in the recipe. Now that your crust is completely baked, it may be difficult to cook the crumb topping without over baking or even burning the crust. You will definitely want to make sure that your crust edges are covered in tinfoil. To get the crumble to bake completely, it needs to be in the oven at 350 for about 25-35 minutes. If you do decide to proceed with the pre baked crust, we’d love to hear how it turns out and if you discover any tricks to keep the already baked crust from over browning.
Ok so I tried it with pre-baked. I followed your recipe on everything & let chill in the refrigerator the day before. I put it all together today. I followed your advice on cooking just the crumb with everything already cooked,including the crust. Did crumb 350 for 30-35 minutes. Nothing burned. I did cover my crust with foil to prevent burn. I precooked my store bought pie crust at 375 for 15 minutes,which is how I do my crust when cooking quiche. All in all it turned out perfect!:) thank you for your help!
Ok so I tried it with pre-baked. I followed your recipe on everything & let chill in the refrigerator the day before. I put it all together today. I followed your advice on cooking just the crumb with everything already cooked,including the crust. Did crumb 350 for 30-35 minutes. Nothing burned. I did cover my crust with foil to prevent burn. I precooked my store bought pie crust at 375 for 15 minutes,which is how I do my crust when cooking quiche. All in all it turned out perfect!:) thank you for your help!
Ok so I tried it with pre-baked. I followed your recipe on everything & let chill in the refrigerator the day before. I put it all together today. I followed your advice on cooking just the crumb with everything already cooked,including the crust. Did crumb 350 for 30-35 minutes. Nothing burned. I did cover my crust with foil to prevent burn. I precooked my store bought pie crust at 375 for 15 minutes,which is how I do my crust when cooking quiche. All in all it turned out perfect!:) thank you for your help!
I made it with pre-baked pie crust & followed your directions on everything else. Made the filling & crumb the day before. Put all in the fridge to chill. Today I assembled everything with pre-cooked pie shell. I baked my pie shell 375 for 15 minutes. Since the only thing left to cook is the crumb topping, I followed your advice & put in oven at 350 for 30-35 minutes,with a pie shell guard on the crust to prevent burning. It turned out great! I put back into the fridge to cool.
Do I need to pre bake the pie crust at all?
Hi Natalie! No, you don’t need to pre bake the crust. If you follow the instructions for chilling the crust and filling, the bottom crust will bake through and won’t be soggy. Enjoy!
I’ve made this recipe for the past couple of years (and it’s the best apple pie I’ve ever had!), but I’m wanting to see if I can make the pie filling sooner than two days out if I’m only making the filling and not putting it all together?
Hi Kimberly! Honestly I would trust this apple pie filling in the fridge for at least 5 days. It’s apples coated in plenty of sugar, and sugar acts as a preservative. So it should be fine. Much longer than that, and I would just freeze it and then thaw before you bake. So happy you are loving this pie, thank you so much for reviewing!!
Hello! How far in advance can I make the filling and refrigerate it before assembling? Ideally, I’d love to make the dough and filling 5-7 days ahead of thanksgiving, refrigerate all the parts without freezing, and assemble and bake the day-of. This recipe is always a hit!!
Hi Haley! Yes I think you could totally refrigerate this pie filling for about 5 days! The pie crusts too, although they might start to get dried out and be difficult to roll out. Let me know how it goes!
hello , I am wanting to make this pie for Thanksgiving, but can I use pre made pie crust ?
Hi Jody! Yes, you can, but I recommend giving homemade a try if you have a chance. It’s so good!
Hello! If using a storebought crust would you still cook in increments and different temps? Thanks!
Hi Lexi! We’ve never tested this pie with a storebought crust. I wouldn’t change anything about the time increments or the temperature unless the package directions on your pie crust seem significantly different than what you’re seeing here. If you already made it, how did it go?
I have made this pie many times and always use refrigerated pie crust (usually pillsbury) rather than making my own.
What is your bake time with pillsbury crust?
Hi Sarah,
Thank you for this recipe, it looks amazing, can’t wait to makeit. I’m wondering about the crust—do you find it bakes fully without a partial blind bake? I’ve seen some bakers recommend it for a crisper bottom, so I wanted to understand your preference.
Hi Carly! Karen here, I created this recipe. I think you can skip the partial blind bake! Follow instructions for baking on a sheet pan to help crisp the crust, and do follow the change in temperature instructions. Tell me how it goes! Happy Thanksgiving!
Hello! I’m hoping to bring this to my family’s Thanksgiving. How far in advance can you make the pie (without having to freeze it?) Thank you!
Hi Liz! You’re good to make this up to 2 days ahead and don’t even need to refrigerate it during that time. If you like, you can warm it in the oven just before serving, covered with tinfoil, at about 350 for 20-30 minutes. Enjoy!
This looks amazing and I want to try it this year! Do you think this would still be good if I reduced the apples to 3 lbs? If so, do you recommend any adjustments of the ingredients? Sorry if this is a weird question, with so many apples, I’m concerned I won’t be able to lift this pie out of the oven. (have a back problem)
Hi Nancy! You could reduce the apples to 3 pounds, if you also reduce the all the other ingredients in the filling by 2/5. That’s more math than I can imagine being excited to do, especially when you consider that you’d also need to reduce the streusel topping by 2/5 to keep the sweetness at a pleasant level. However, if you’re worried about the additional 2 pounds of apples hurting your back, you could either use 2 smaller pie pans (6.5 inches is a common size) or maybe even call a friend or neighbor to come lift the pie out for you! I might not worry too much about that 2 pounds though, because that’s the weight of the apples before removing the seeds, stem, core, peel, and some of the water weight when you cook the filling. Best of luck and let us know if you give it a try Nancy :-)
Is the butter for the topping salted or unsalted butter? Thank you!
Hi Alondra! Salted butter was used in developing this recipe, but either one is fine. Enjoy!
Yum
Once this has been left to cool, does it need to be reheated for serving ?
That’s up to you Alice! There are “cold pie” people and “warm pie” people. Which one I am depends on whether or not I have enough vanilla ice cream in the freezer and how desperate I am to get a slice of pie in my mouth. This pie is great at room temperature but maybe even better warm. If you’re just doing a single slice the microwave works. If you’d like to reheat the whole pie, I recommend covering the top with tinfoil and popping it into a 350 degree oven for 20 minutes or until you’re satisfied. Enjoy!