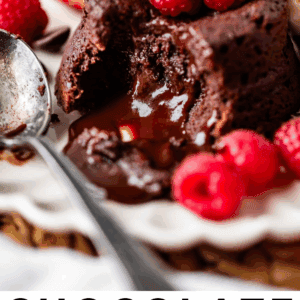

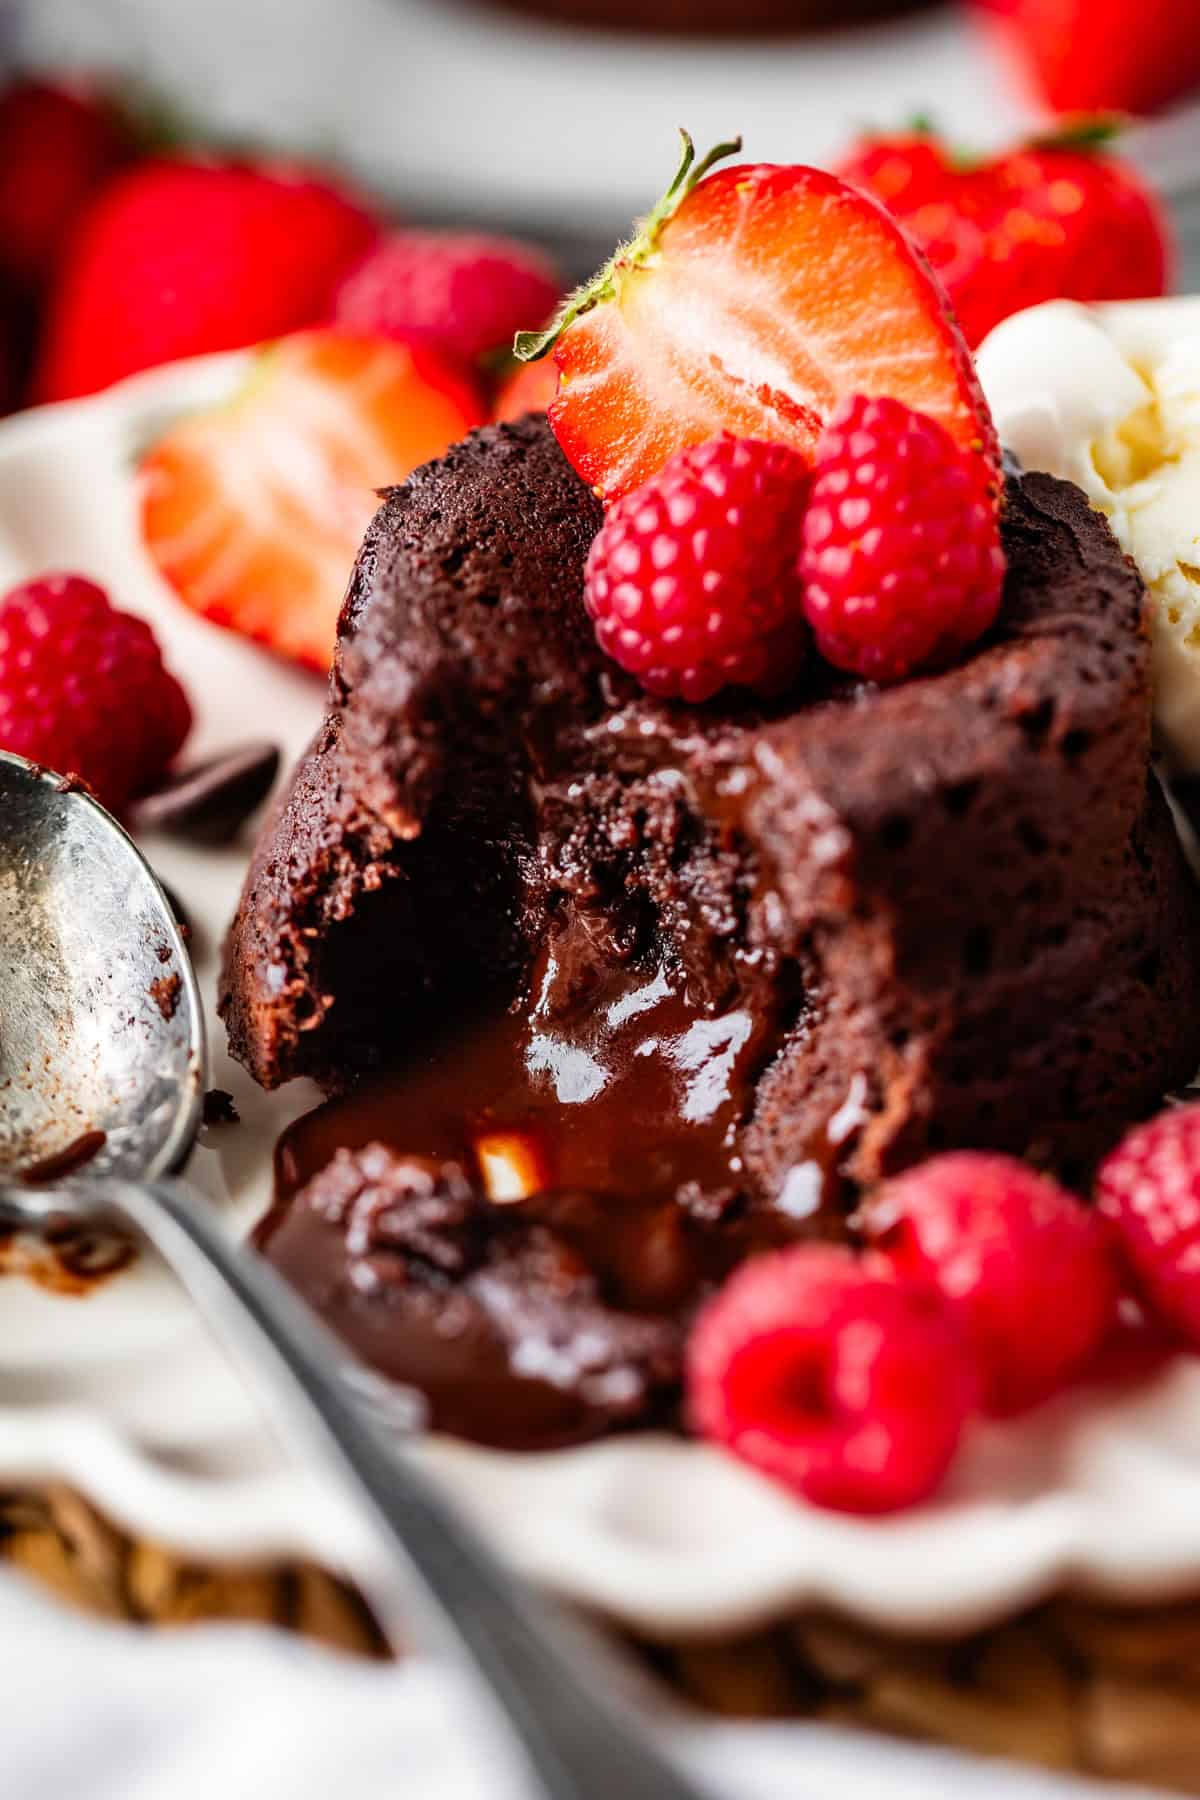
Chocolate Lava Cakes are featured on thousands of menus across the country for a good reason! An intense chocolate cake is slightly underbaked, revealing a surprise ganache center when you cut into it. There is something about molten chocolate that speaks to us, as humans. This is my favorite recipe for these 40 minute beauties! Easy, simple ingredients make it perfect for impressing guests or loved ones for Valentine’s Day!
Charlotte, who is about to turn 15, out of nowhere: “Mom, sometimes I want to use corded earbuds… because they go with my outfit.”
Me: “I’m sorry what now??”
Charlotte: “Oh yeah. It’s a whole thing. Even if you aren’t listening to them, just having them hang out of your pocket is a statement.”
Sometimes I try to remember what life was like when I was 15. Did I know the equivalent fashion nuances of 2002?? I guarantee you, I did not. Do I now?? Questionable. I need a fashion fairy godmother guys. (Plot twist, I believe she has come to me in the form of a teenage daughter.)
But I don’t know if I can trust her, at least for my demographic. Just recently I was coworking at a coffee shop with my friend Jackie. We both had stuff to do so we had our computers out. I was listening to music with my CORDED EARBUDS. During a break, Jackie mentioned it. Suddenly the guy eavesdropping at the table next to us was like, yeah, I’ve been silently judging you about that. WHAT EVEN, GUYS
A twist of the knife for you: when I go running, I don’t use earbuds of any kind. I play music out loud on my phone, that innocent bystanders have to hear for 30 seconds as I run past them. I may as well bust out the 1980s boom box.
I lava you, lava cake
Today we are talking Lava cakes! Who hasn’t ordered a lava cake from a chain restaurant?? Or even from a fancy restaurant? I heard a quote from a chef once, that there always has to be a chocolate option on a dessert menu, because people will riot if there’s not. (I know I do) Chocolate lava cakes check all the boxes.
✔️ They are not just chocolate, but
✔️ intense chocolate.
✔️ Gooey
✔️ Rich
✔️ Over the top
✔️ Leave you feeling happily maxed out
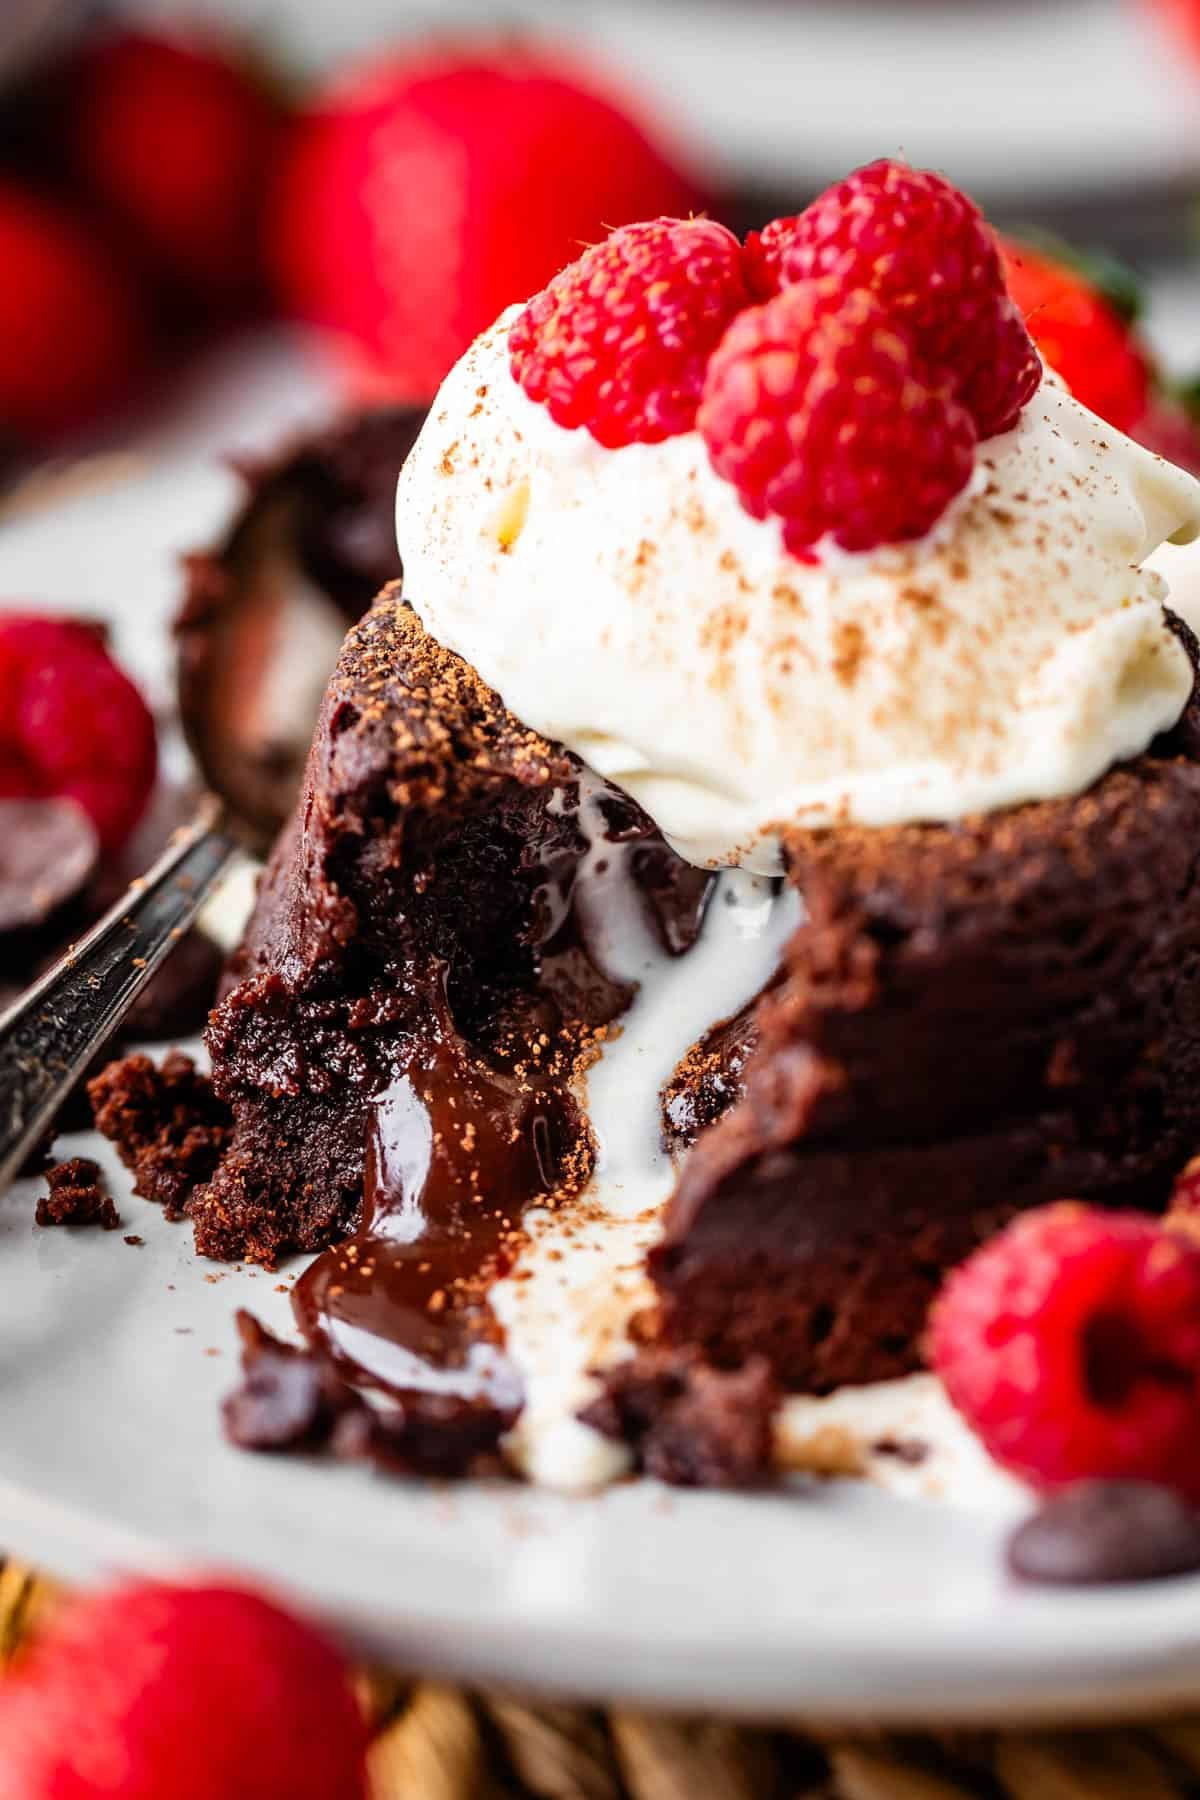
My favorite lava cakes have ganache
Traditionally, a lava cake is just an underbaked tiny cake. It’s baked at a really high temperature for a short period, so the outside is baked and the inside is nothing but raw batter.
I tried several recipes like this. Guys, I’m just not into it. The hot raw batter is too…eggy? Gooey but not chocolate-y enough? I felt like it was missing flavor. (I was not worried about egg contamination—the lava cake center is baked hot enough to make it safe to eat, even if it’s still liquidy.)
The solution? A ganache center. The flavor just can’t be beat. I promise it doesn’t take long, and the results are incredible. I still like to slightly under bake my cakes to get a little bit of uncooked center, that mixes with the melted ganache and creates Chocolate Lava Level 1000. It is SO good, so rich, and incredibly satisfying. I’m so excited for you to try them!
Lava cake success:
I made dozens of lava cakes trying to see what I liked. These tips below are what made the biggest difference in baking the BEST cake, not just an average one:
- My recipe has a ganache center that is not traditional but has MUCH better flavor; don’t skip it!
- Don’t over bake these cakes! Lots of details on this below! My biggest piece of advice is to test one cake by itself to see how your oven bakes, and to see how gooey YOU like your cake to be.
- They’re ridiculously fast to make, you can have this done in 40 minutes.
- My cakes are small: only 4.5 ounces. Any bigger and the cake is too overwhelming to finish!
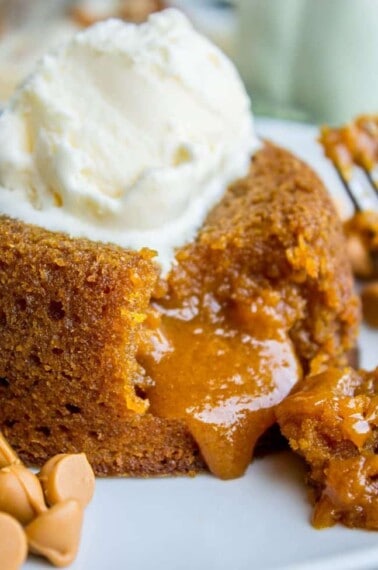
- Serve with garnishes, it makes a huge difference for not only presentation, but flavor! Ice cream, whipped cream, fruit, etc.

Important ingredients
This is a pretty straight forward recipe, but there are a few key ingredients that are important to talk about:
- high quality semi-sweet chocolate chips are the main ingredient in the ooey gooey ganache filling, which is of course the main event in these cakes! Get the good stuff, you can thank me later.
- heavy cream is another essential part of the ganache. Don’t substitute any percentage of milk, and definitely don’t use coffee creamer! You need the thickness of the cream to get the right consistency.
- bittersweet chocolate is not the same as semi-sweet and you need this super dark flavor for the cakes!! This type of chocolate is most commonly found in 4 oz bars rather than chips, and you’ll need two bars. Notes in the recipe if you want to use high quality bittersweet chocolate chips!
How to make lava cake
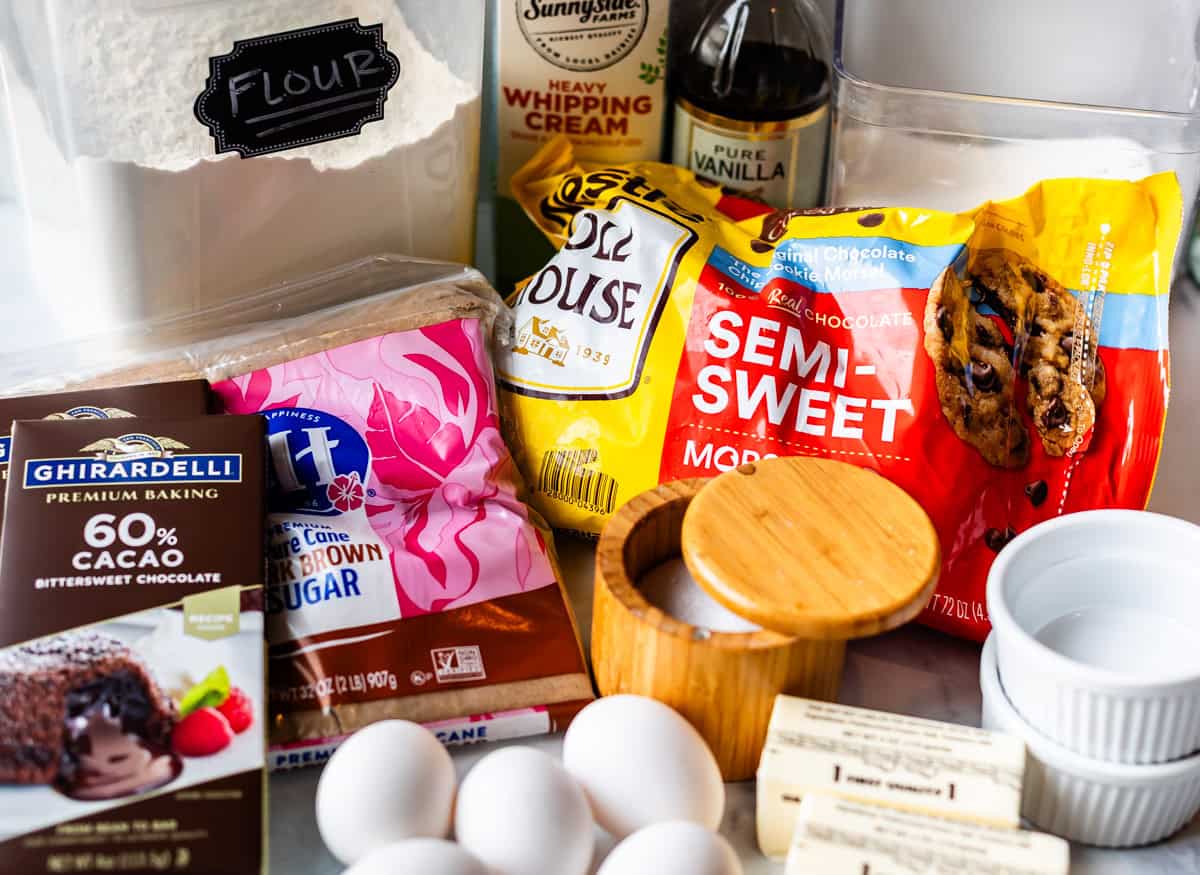
Here’s the lineup! Nothing crazy here, you don’t need fancy ingredients to make lava cakes. The one thing that’s important is to get high quality chocolate. Yes, Nestle counts as high quality! What I want you to avoid are store brand labels (Great Value, I’m lookin at you) that are made with chocolate liquor instead of real cocoa butter. Nope, nope, nope. Use the real stuff for this recipe.
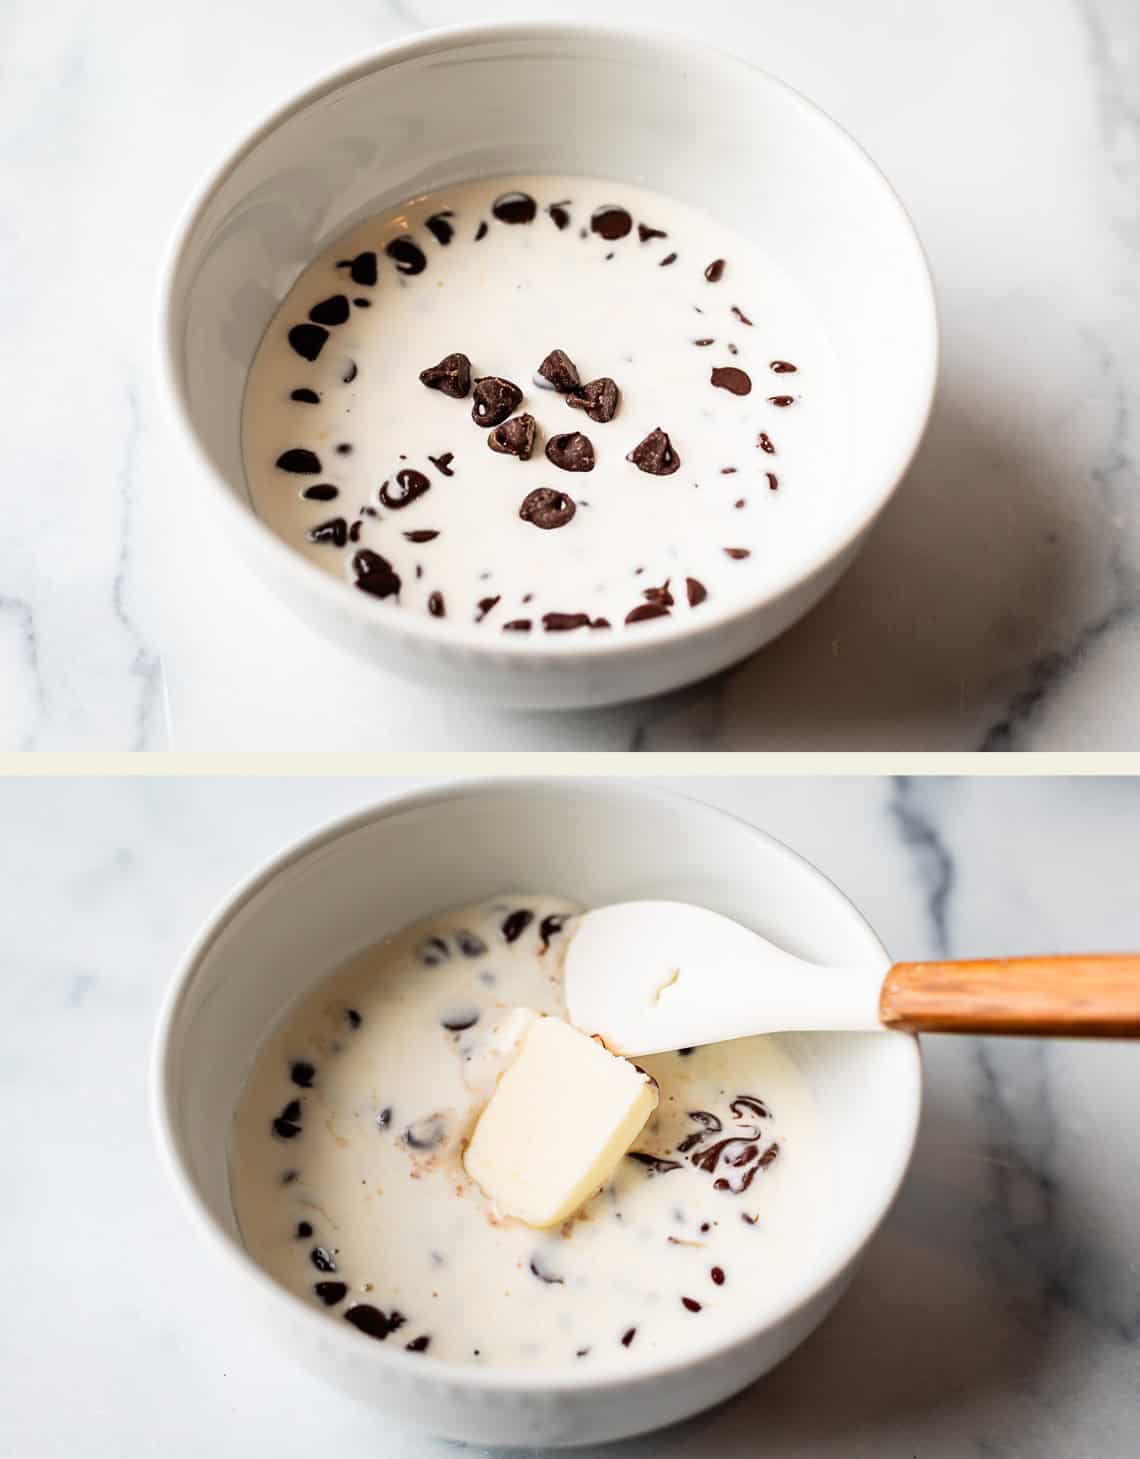
Add your chocolate chips to a cereal bowl and pour the cream over the top. Zap it in the microwave in 30 second increments, ONLY until you notice bubbles on the edge of the cream.
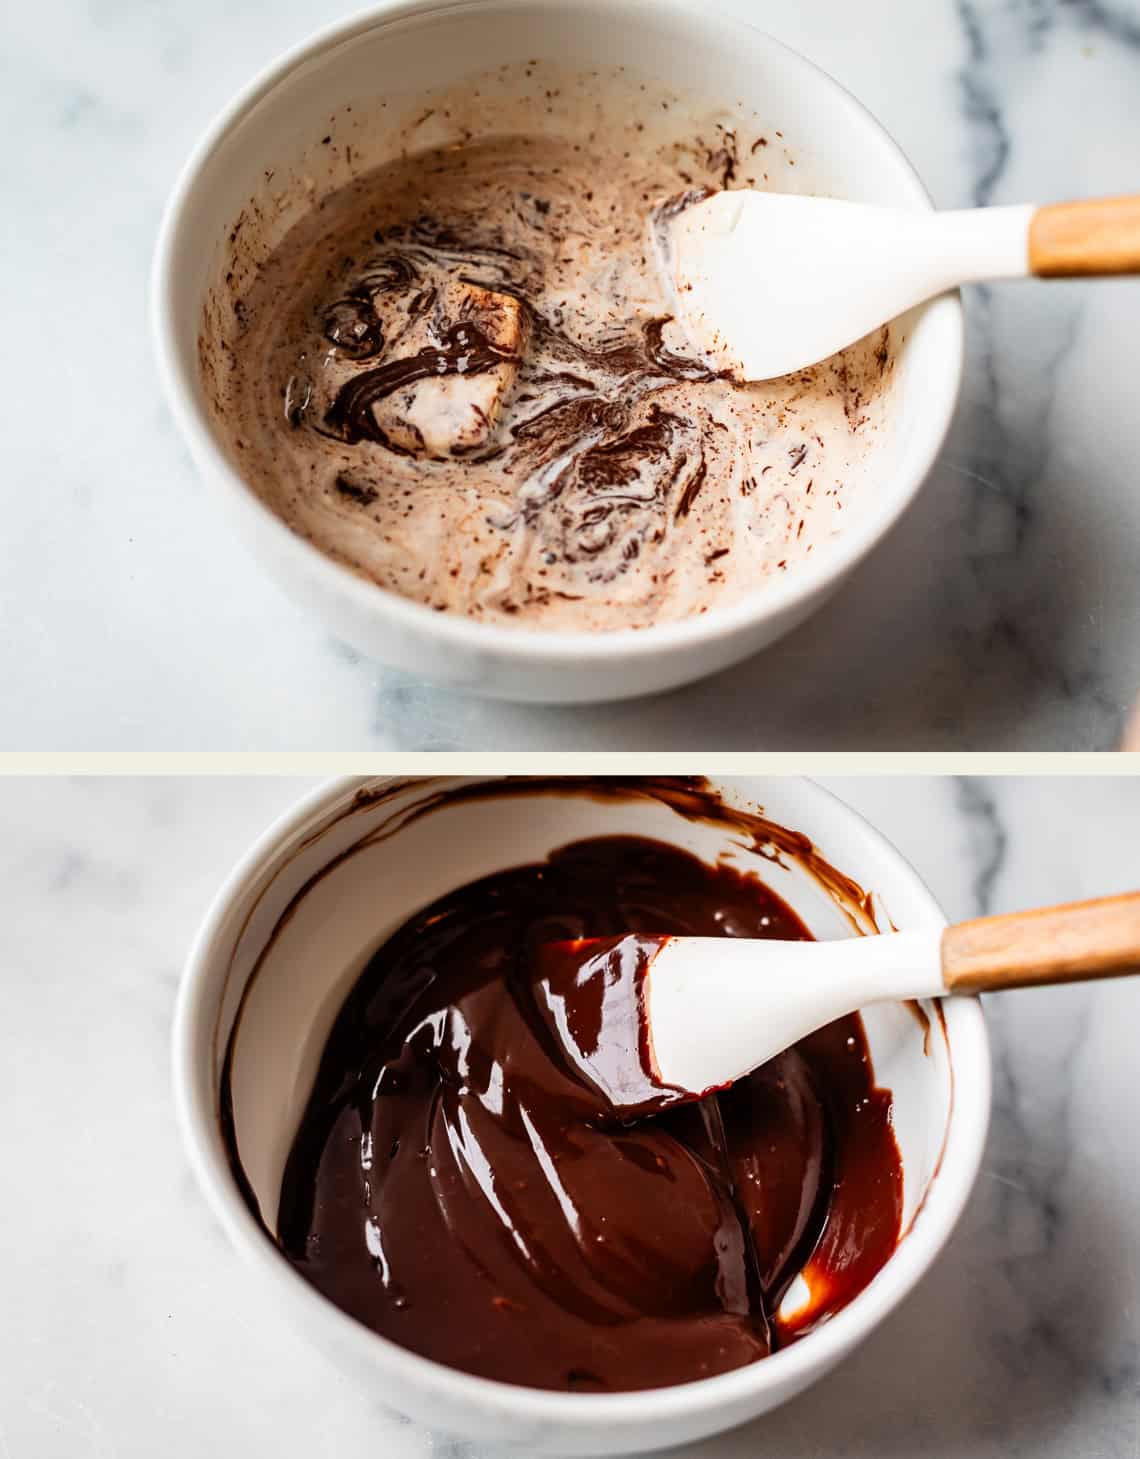
Take it out, add some butter, then whisk till smooth. Pop it in the freezer while you make the cake batter.
Now it’s time to get started on the batter. Add your high quality bittersweet chocolate and some butter to a bowl.
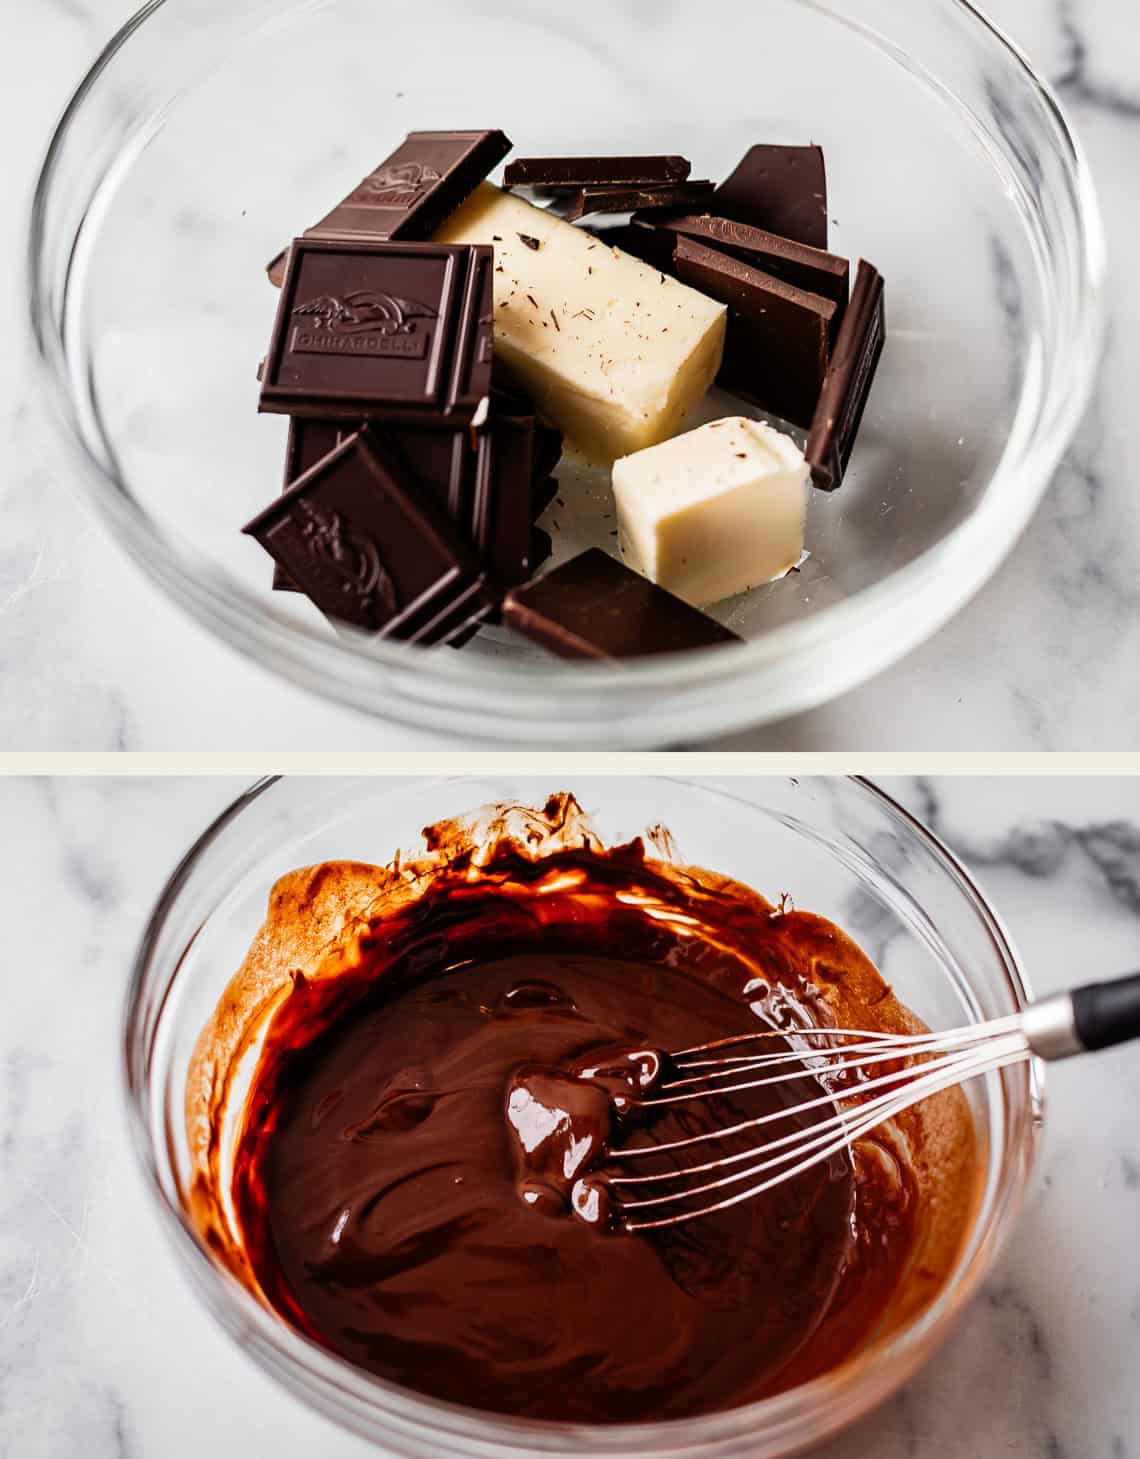
Back to the microwave. Do the 30 second increments again. Stop microwaving when there are still a few lumps of chocolate left. Then whisk until smooth. The chocolate will keep melting and eventually become smooth. If you heat it too much it could scorch, which would be tragic!! You can also do this process in a double boiler, but who has a double boiler? Not this girl.
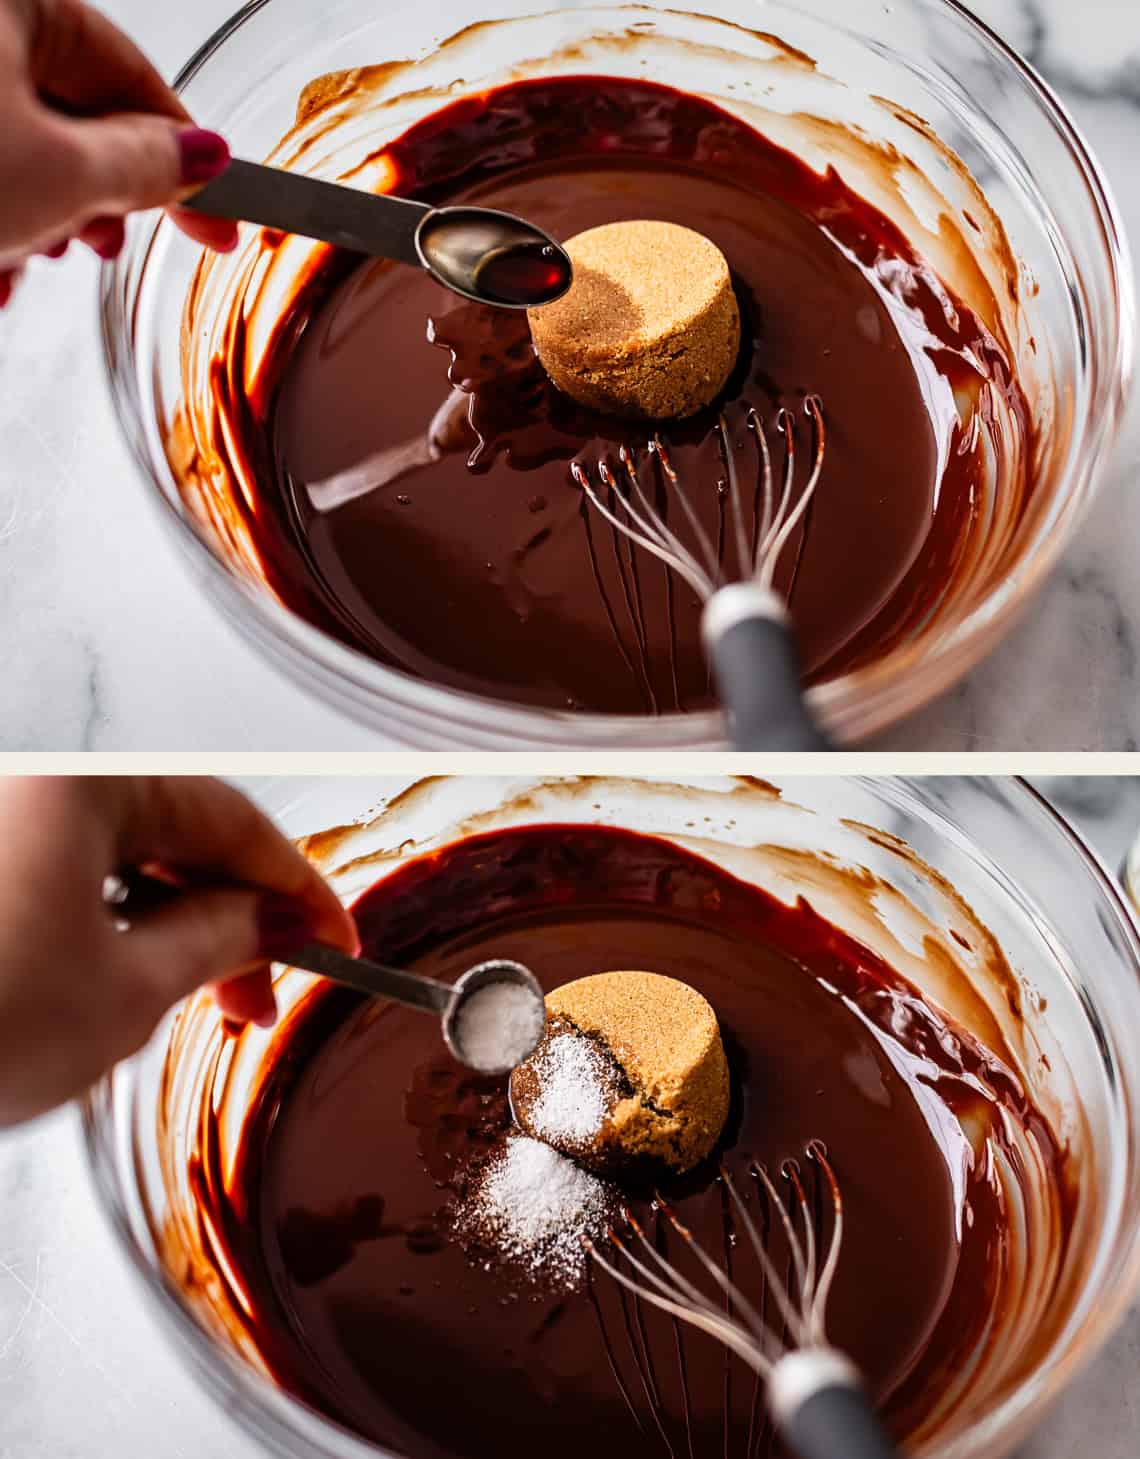
Add some brown sugar, vanilla, and salt into the melted chocolate mixture. Whisk it up.
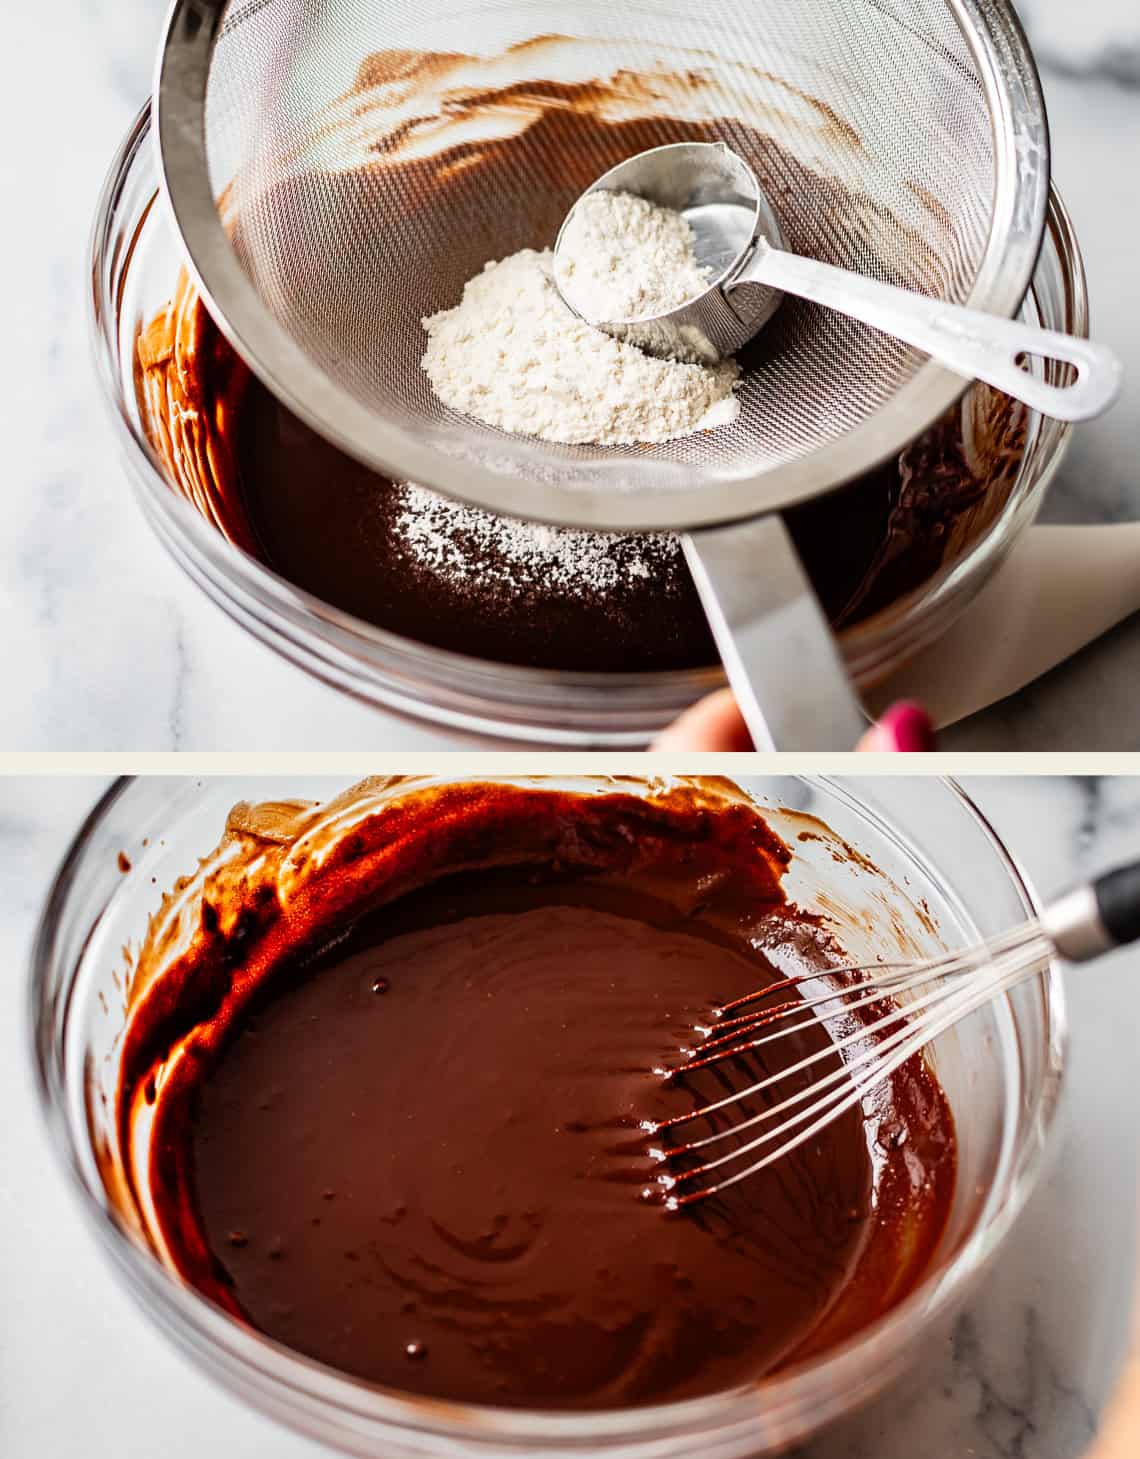
Then add in the flour. But there are RULES! Make sure you spoon and level the flour. That means, use a spoon to add flour to the 1/4 cup measuring cup, then level off the top with a knife. Then, add the flour to the batter through a strainer, so that it’s sifted. We don’t want any flour lumps in these cakes!
Mix it up, then set the batter aside for a minute. We need to beat the eggs.
Add 3 yolks to a mixing bowl.
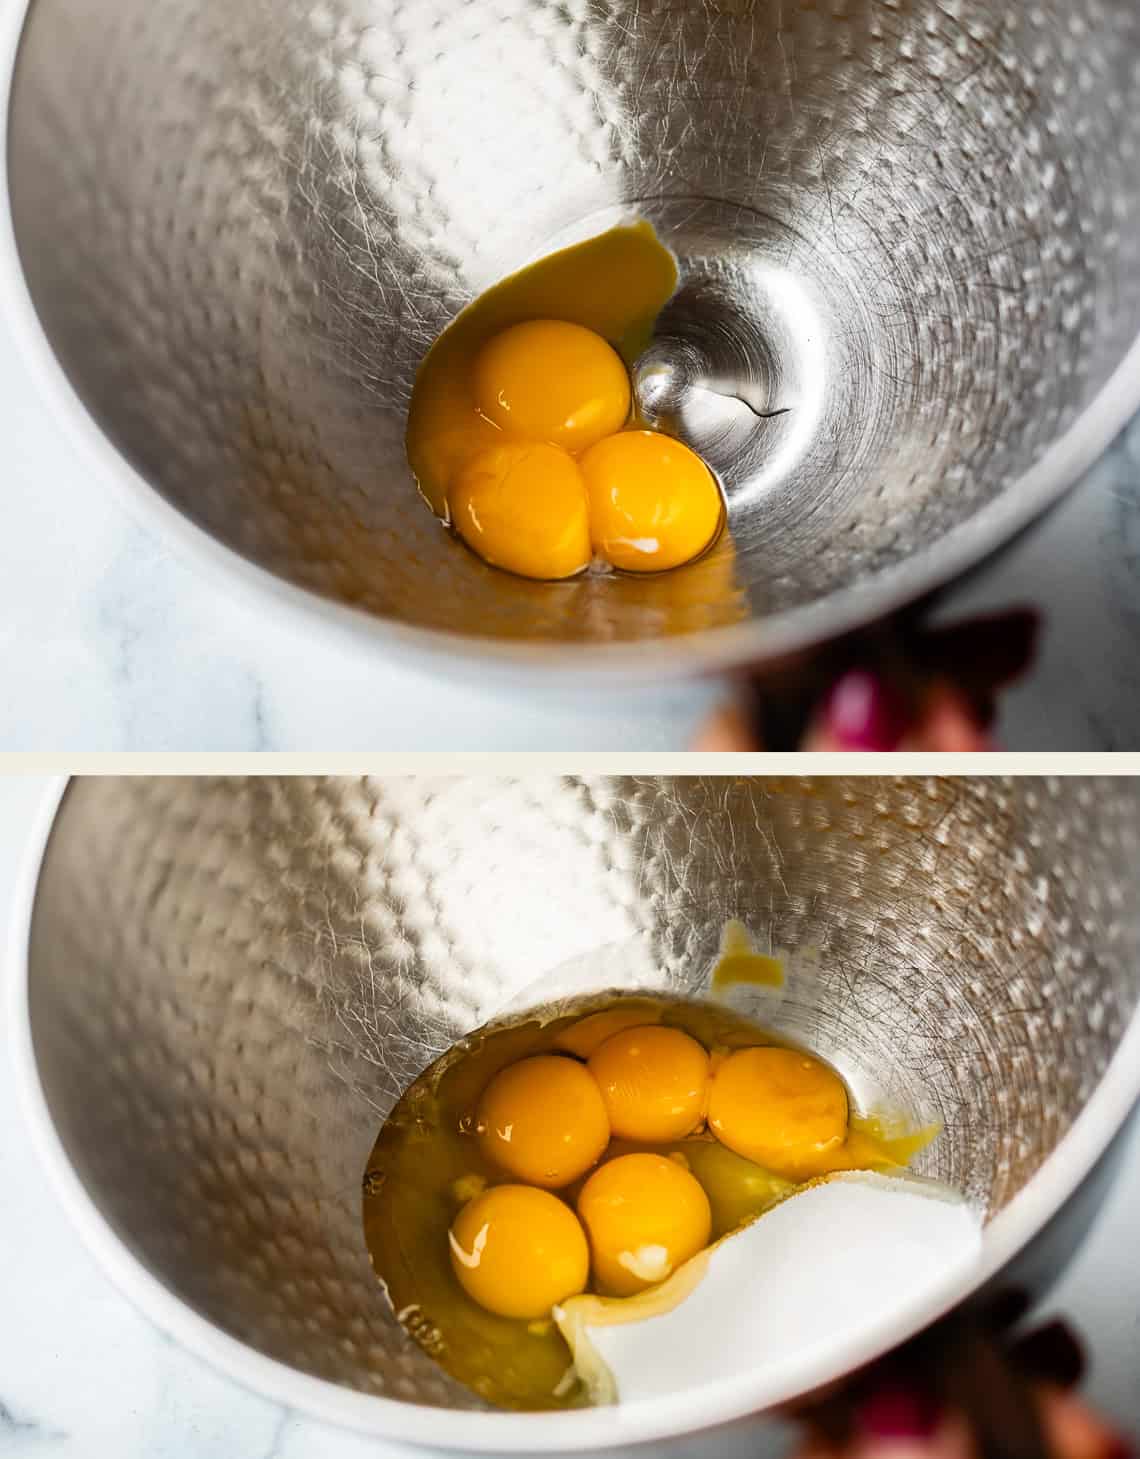
Then add two whole eggs and some sugar. Whisk it for a full 3 minutes, until it gets light and fluffy, like this.
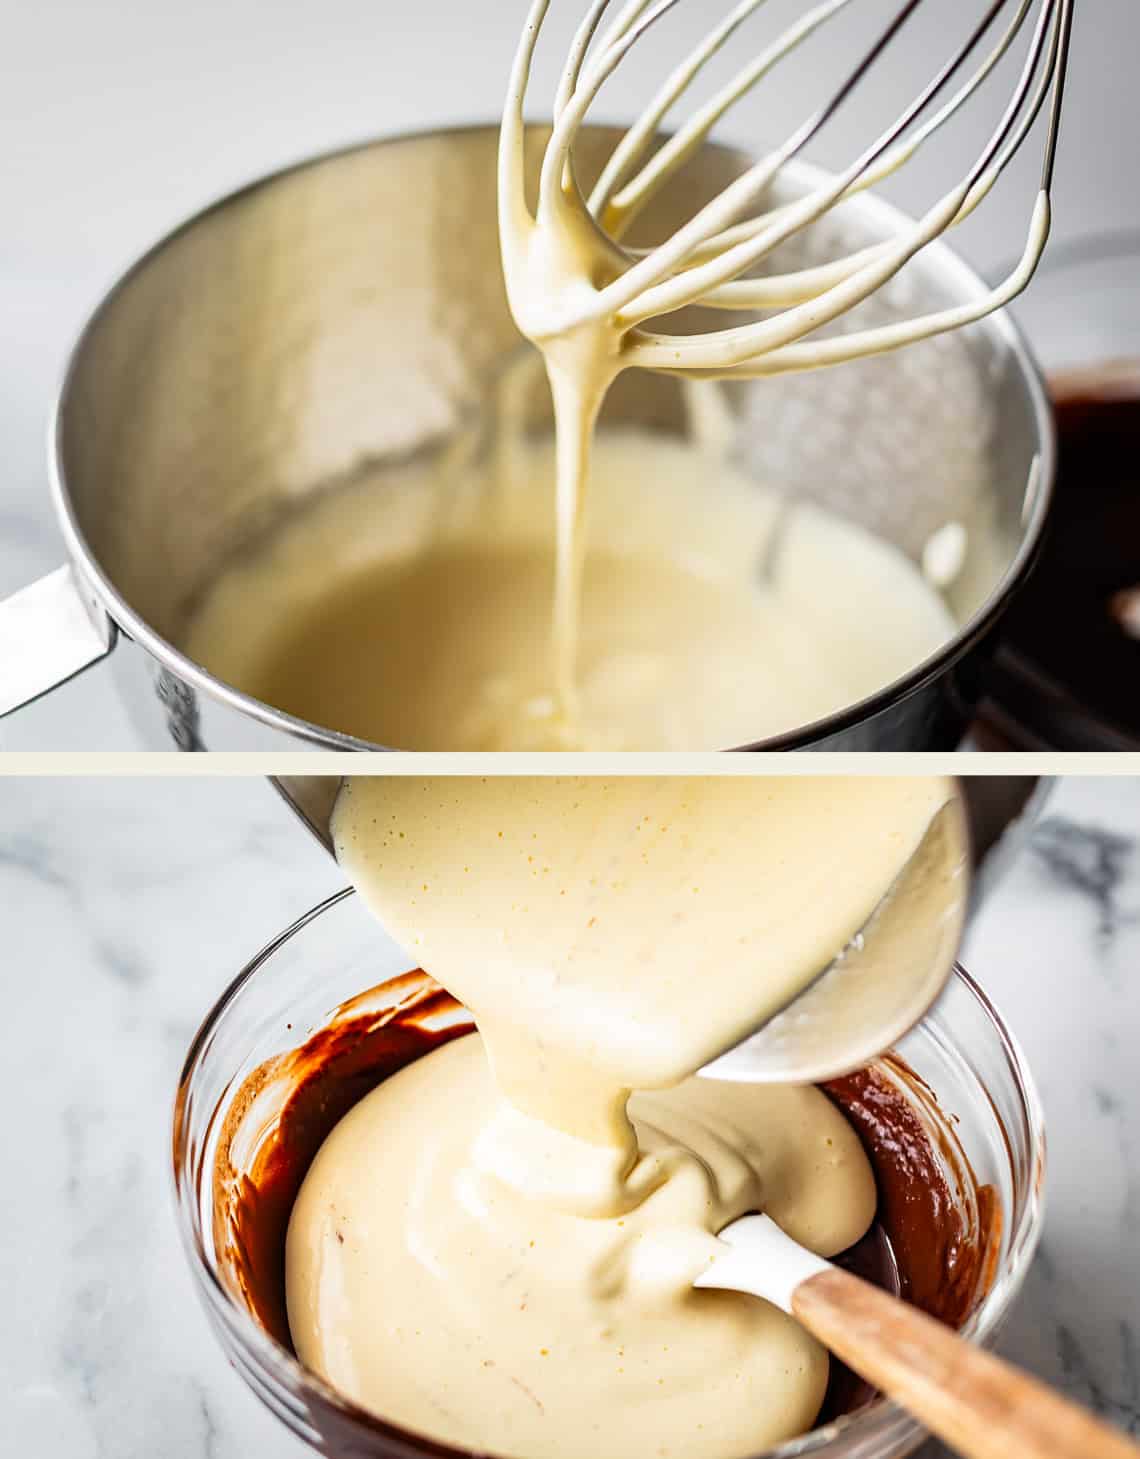
Add the beaten up eggs into the chocolate and flour mixture.
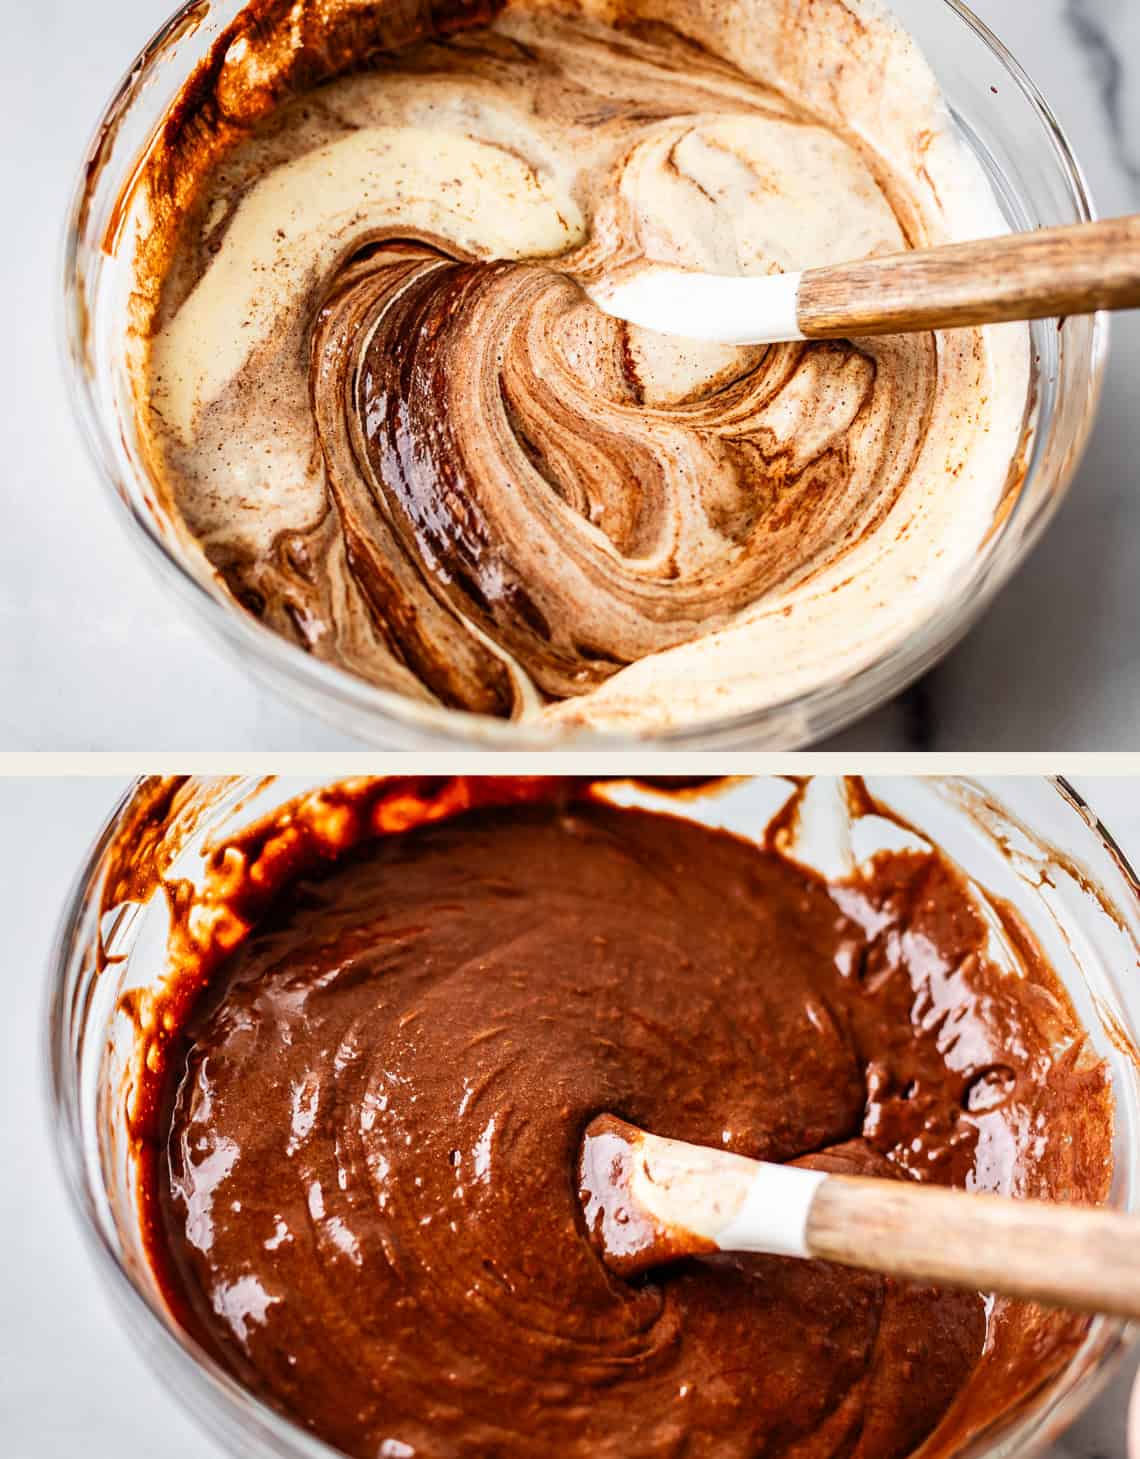
And here she is! The final batter. It’s thiccc. Try not to eat it all. Toss it in the fridge for a couple minutes while we finish the ganache and prep the ramekins. We don’t want WARM cake batter going in the oven (room temp is fine. Just not hot.)
The ganache that we put in the freezer should be almost solid by now. Use a butter knife to score it into 6 sections.
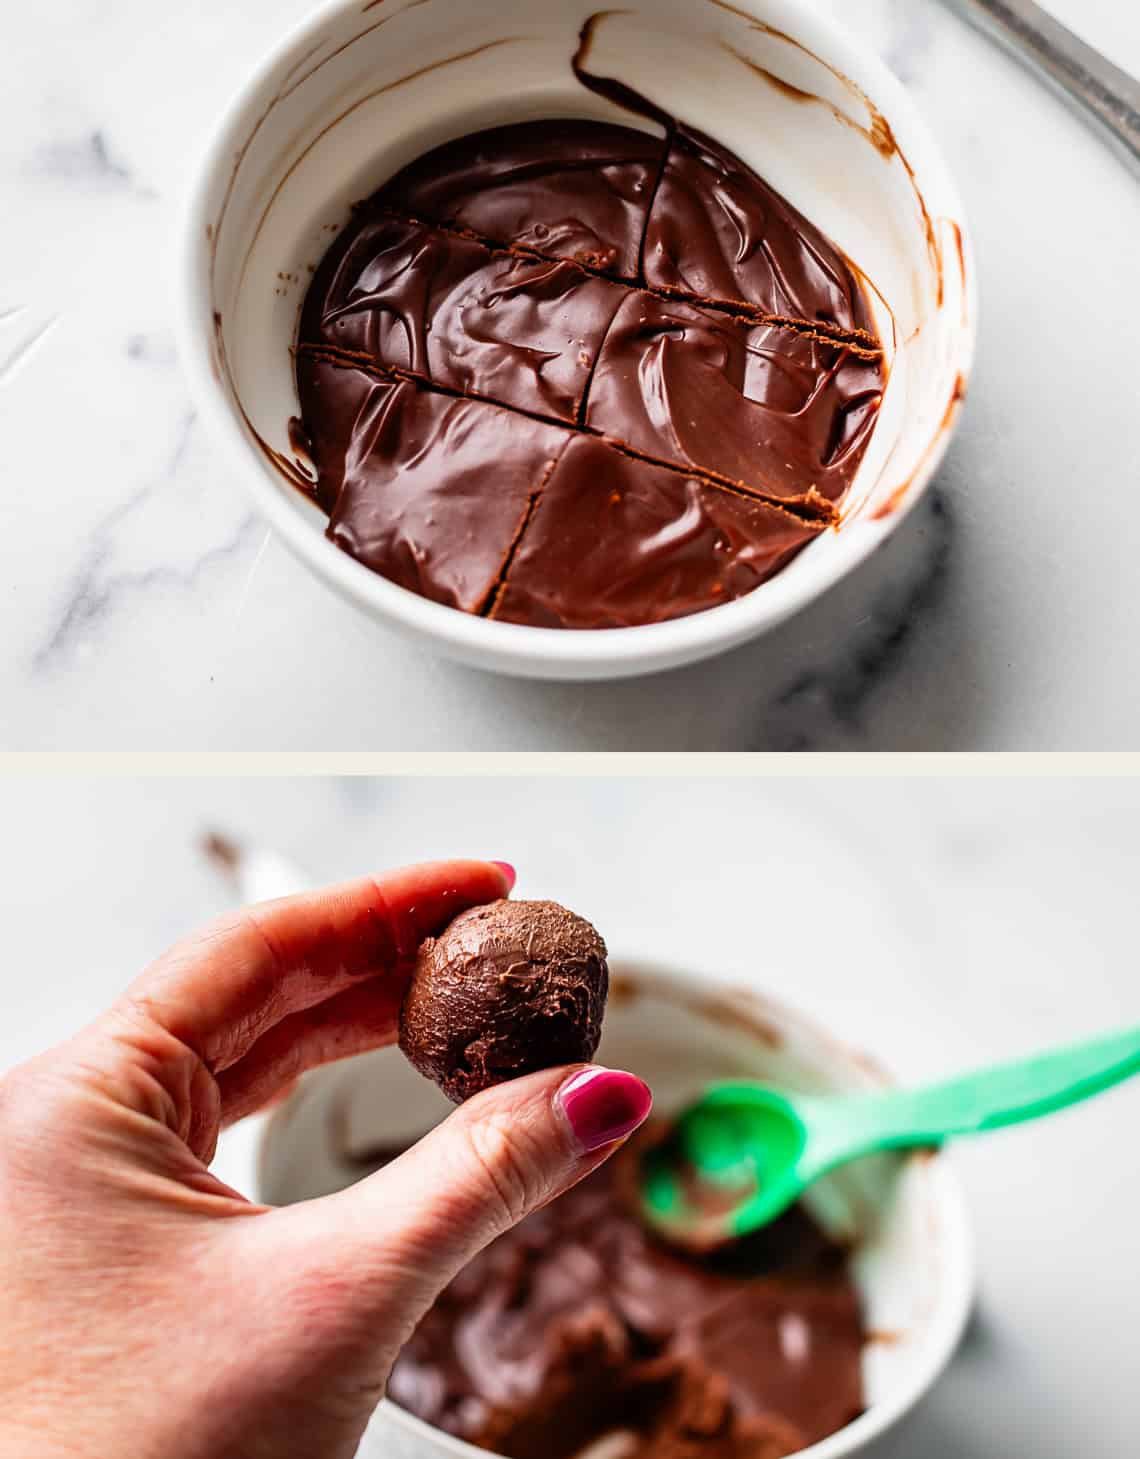
Then use a small rubber spatula, a spoon, or your hands to scoop out 1/6 of the ganache and shape it into a ball. It should be about the size of a walnut. (Do you know how big a walnut is? I feel like this is a classic size-marker for small round things, but who sees whole walnuts on a regular basis?? We need a new thing)
Anyway. Make 6 of ’em. Throw them back in the freezer. We want the ganache hitting the oven when it’s as cold as possible!
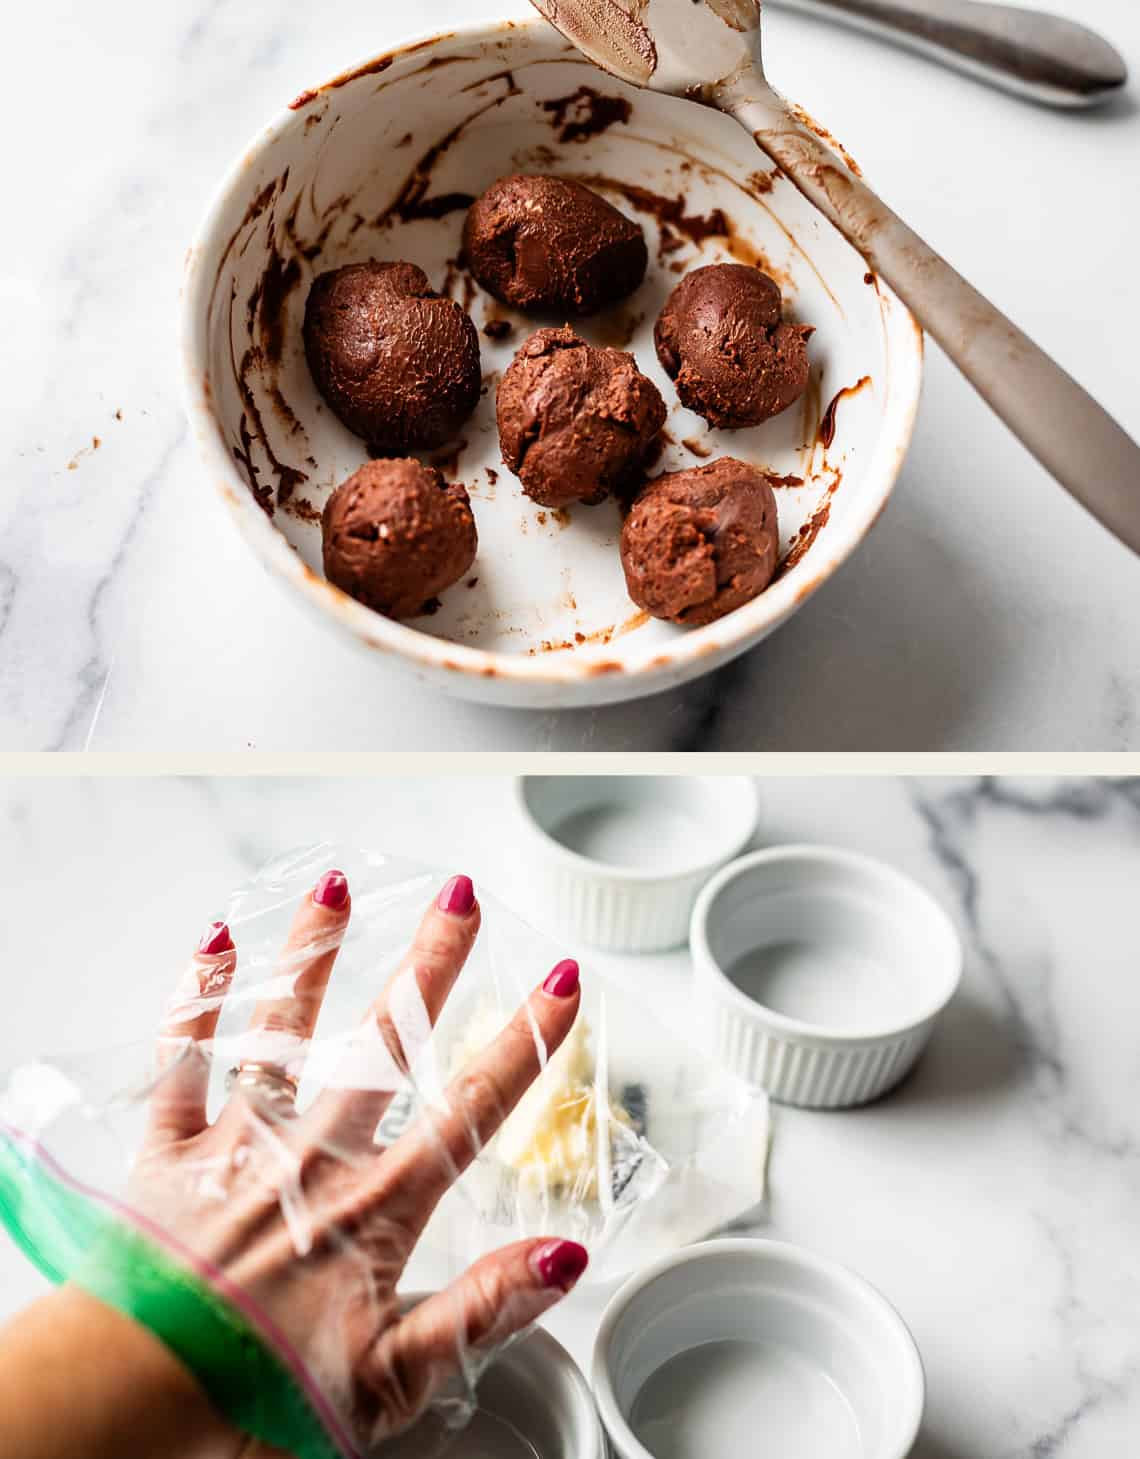
Now it’s time prep the ramekins. You need a LOT of butter on these dishes!! Don’t skimp! You need these cakes to come out without breaking, so we need a thick layer of butterrrrr yum. Use a ziplock if you want, or just your bare hands to go au natural. It’s a great moisturizer, too. Kidding. maybe
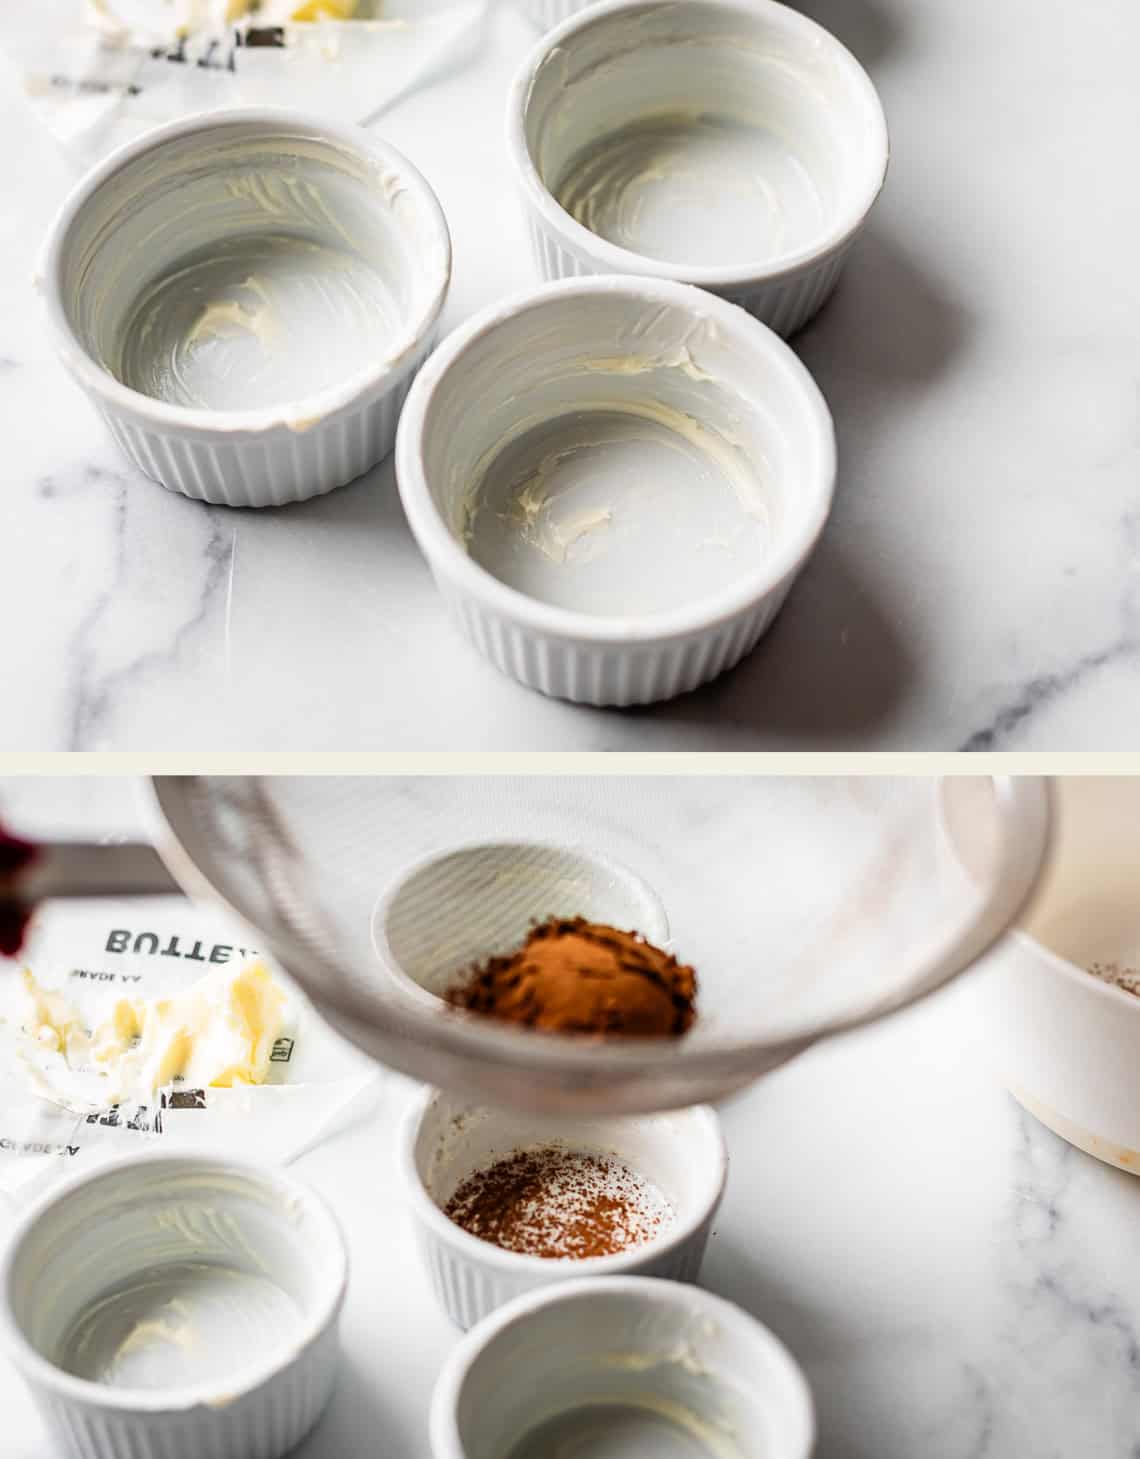
Then, dust the ramekins with cocoa powder. You can do flour if you like, but cocoa is prettier and tastier on the final cakes!
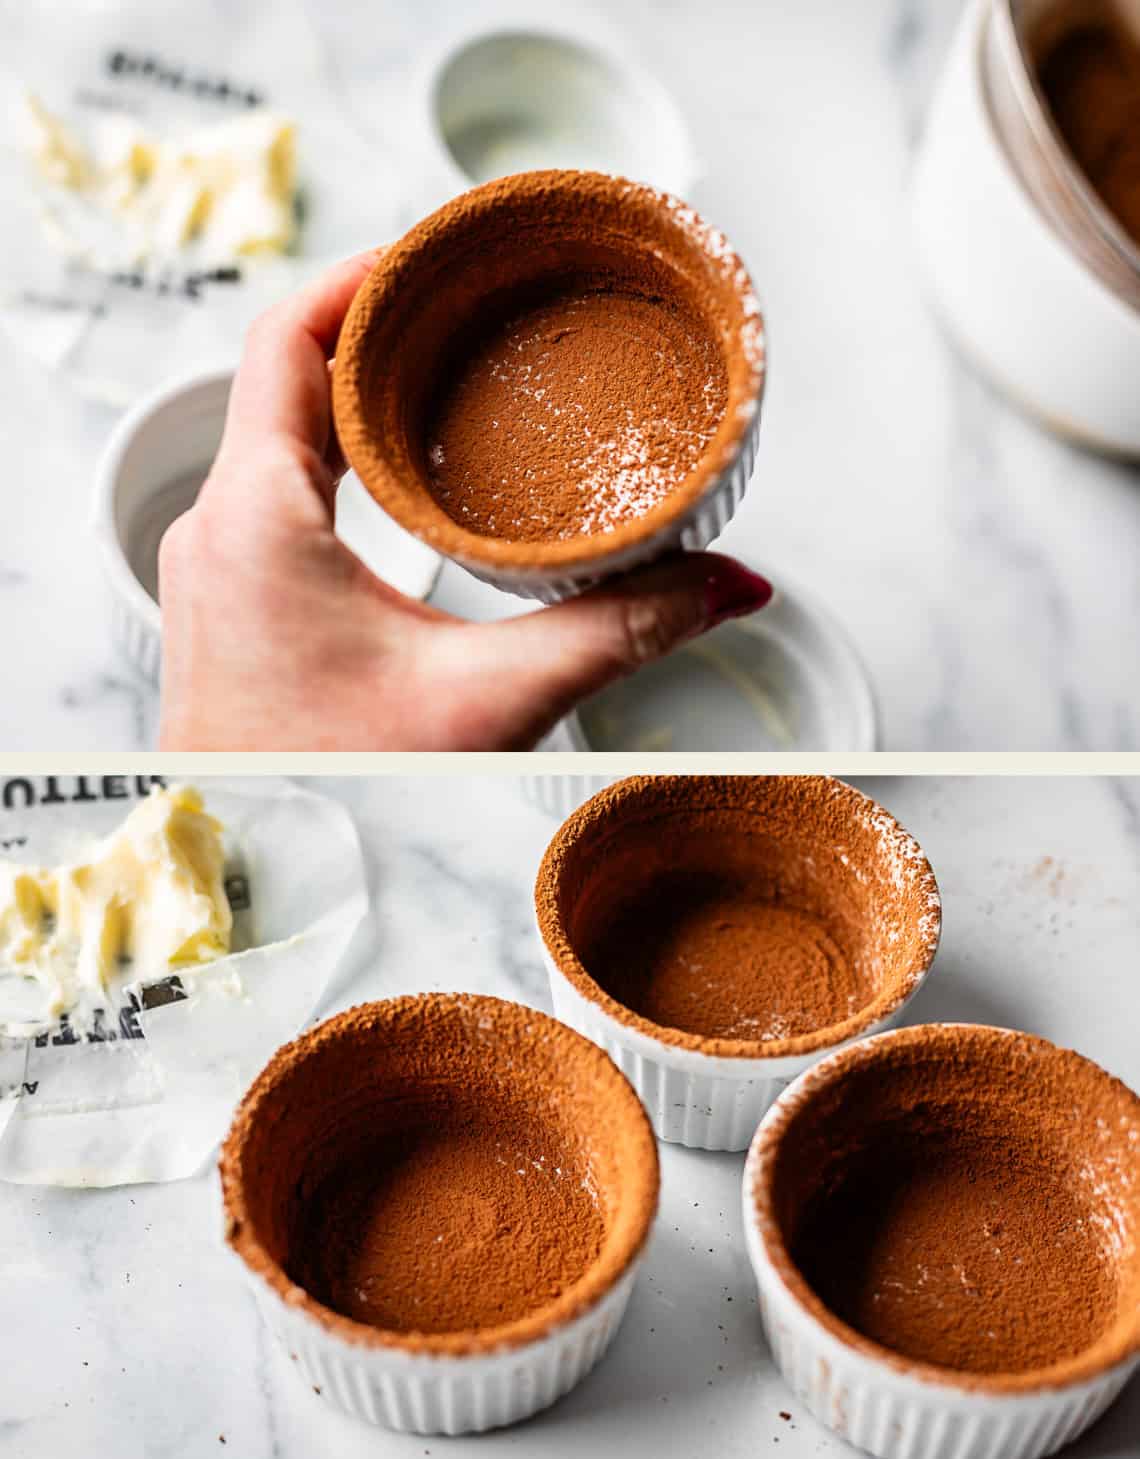
Again, don’t skimp. You want it completely dusted.
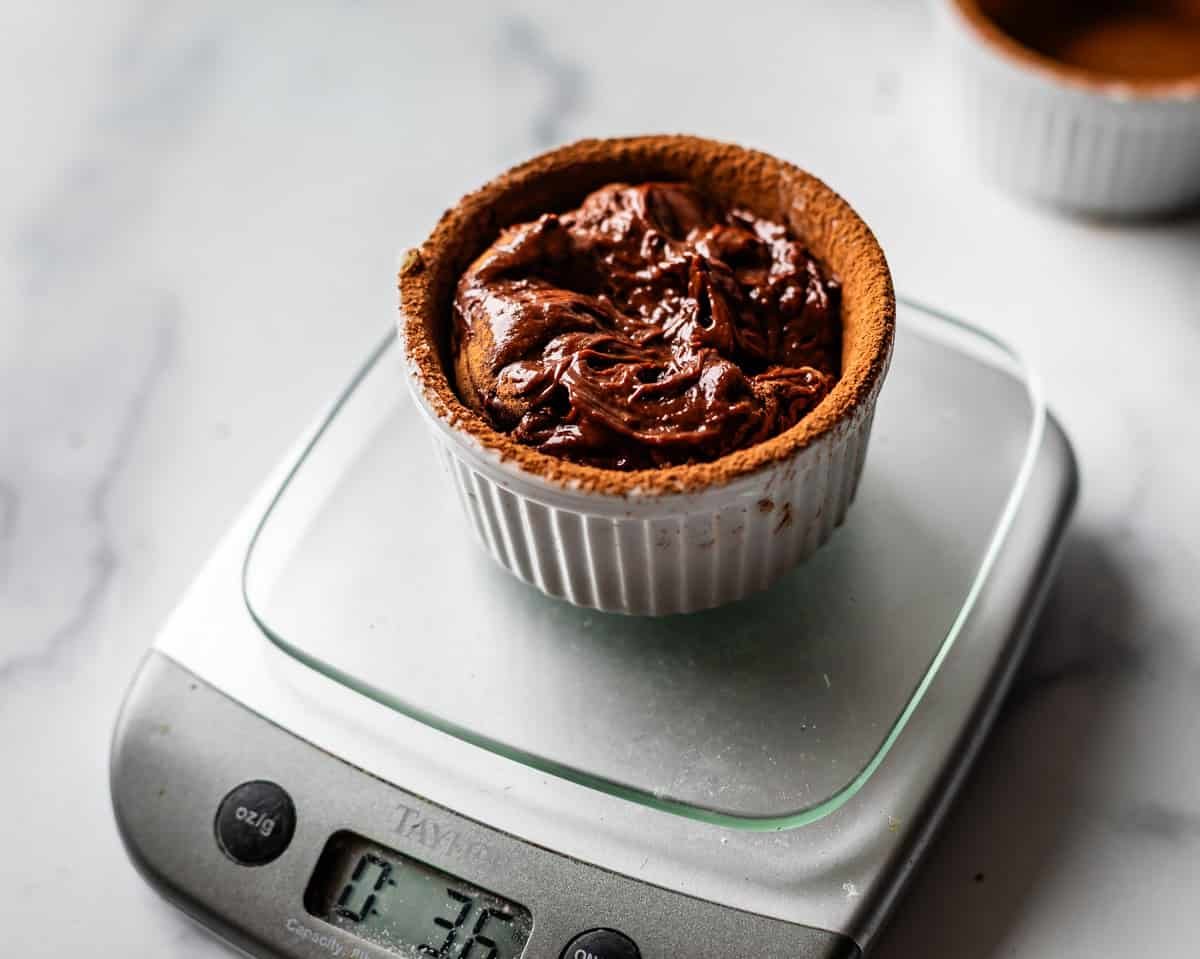
Then, add in the batter. You can see here that I added about 3.5 ounces of batter (this is not including the weight of the ramekin.)
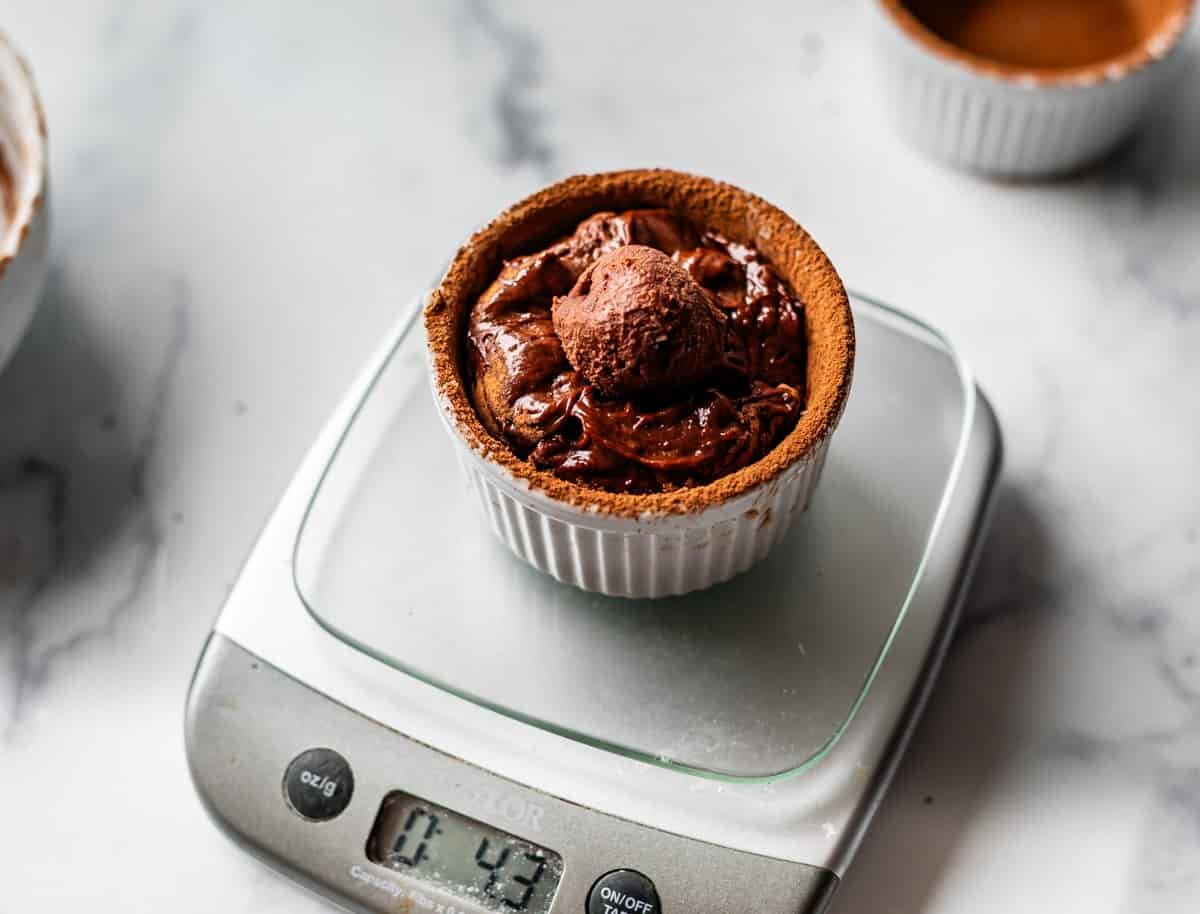
Then, add one ball of ganache to the center, which made it 4.3 ounces. (this is a 4 ounce ramekin)
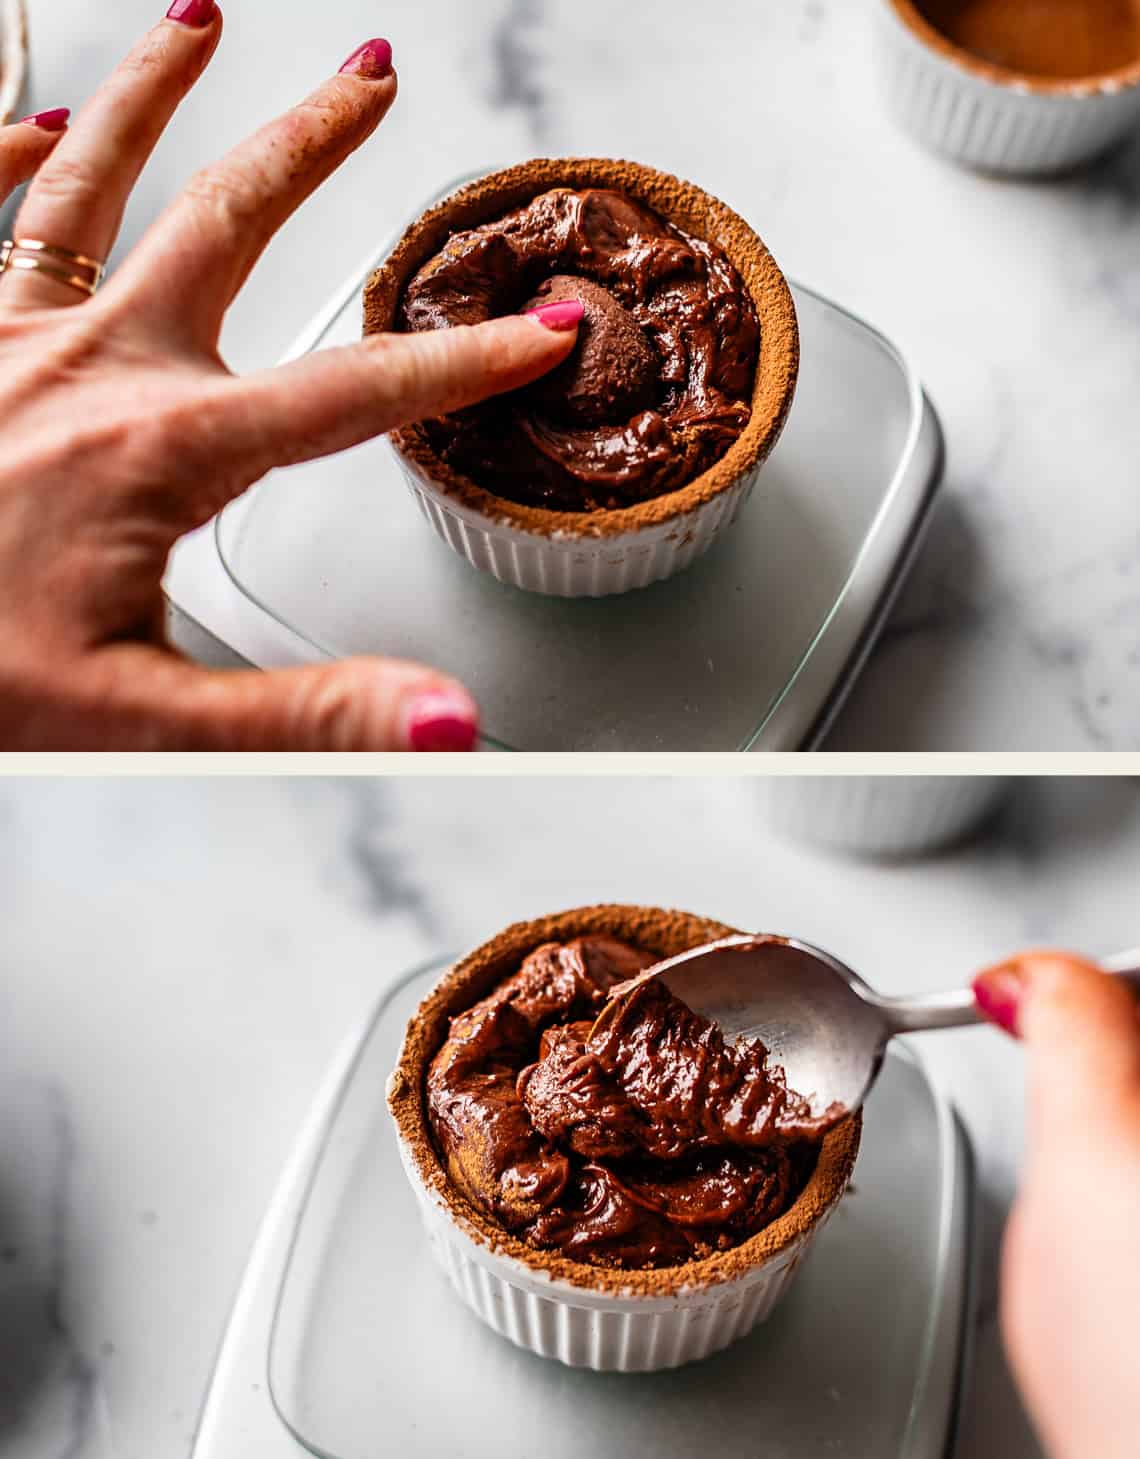
Press it down, then add another spoonful of batter on top to make sure it’s even and the ganache is covered. The final weight of the cake will be about 4.5 ounces.
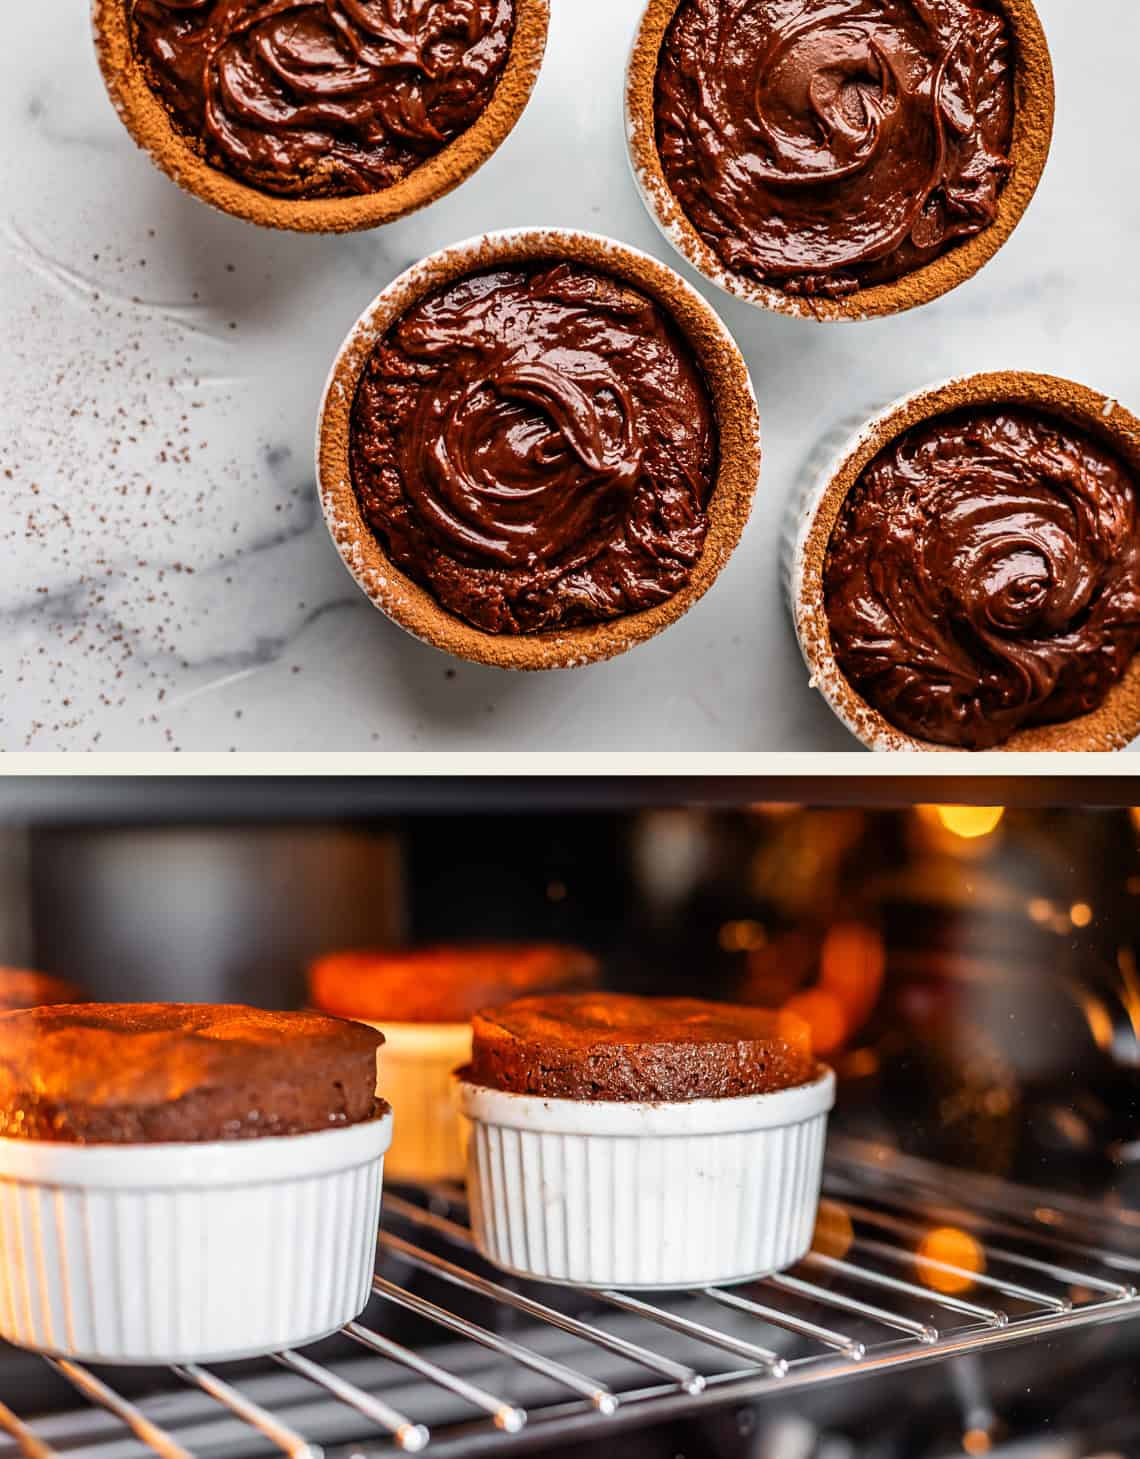
Now, it’s time to bake! Guess what, I baked these in my air fryer!! We are renovating and I don’t have an oven right now. I also tested them in my neighbor Susie’s regular oven, so either one will work. Times were about the same. Look at how high they rise up! So fun.
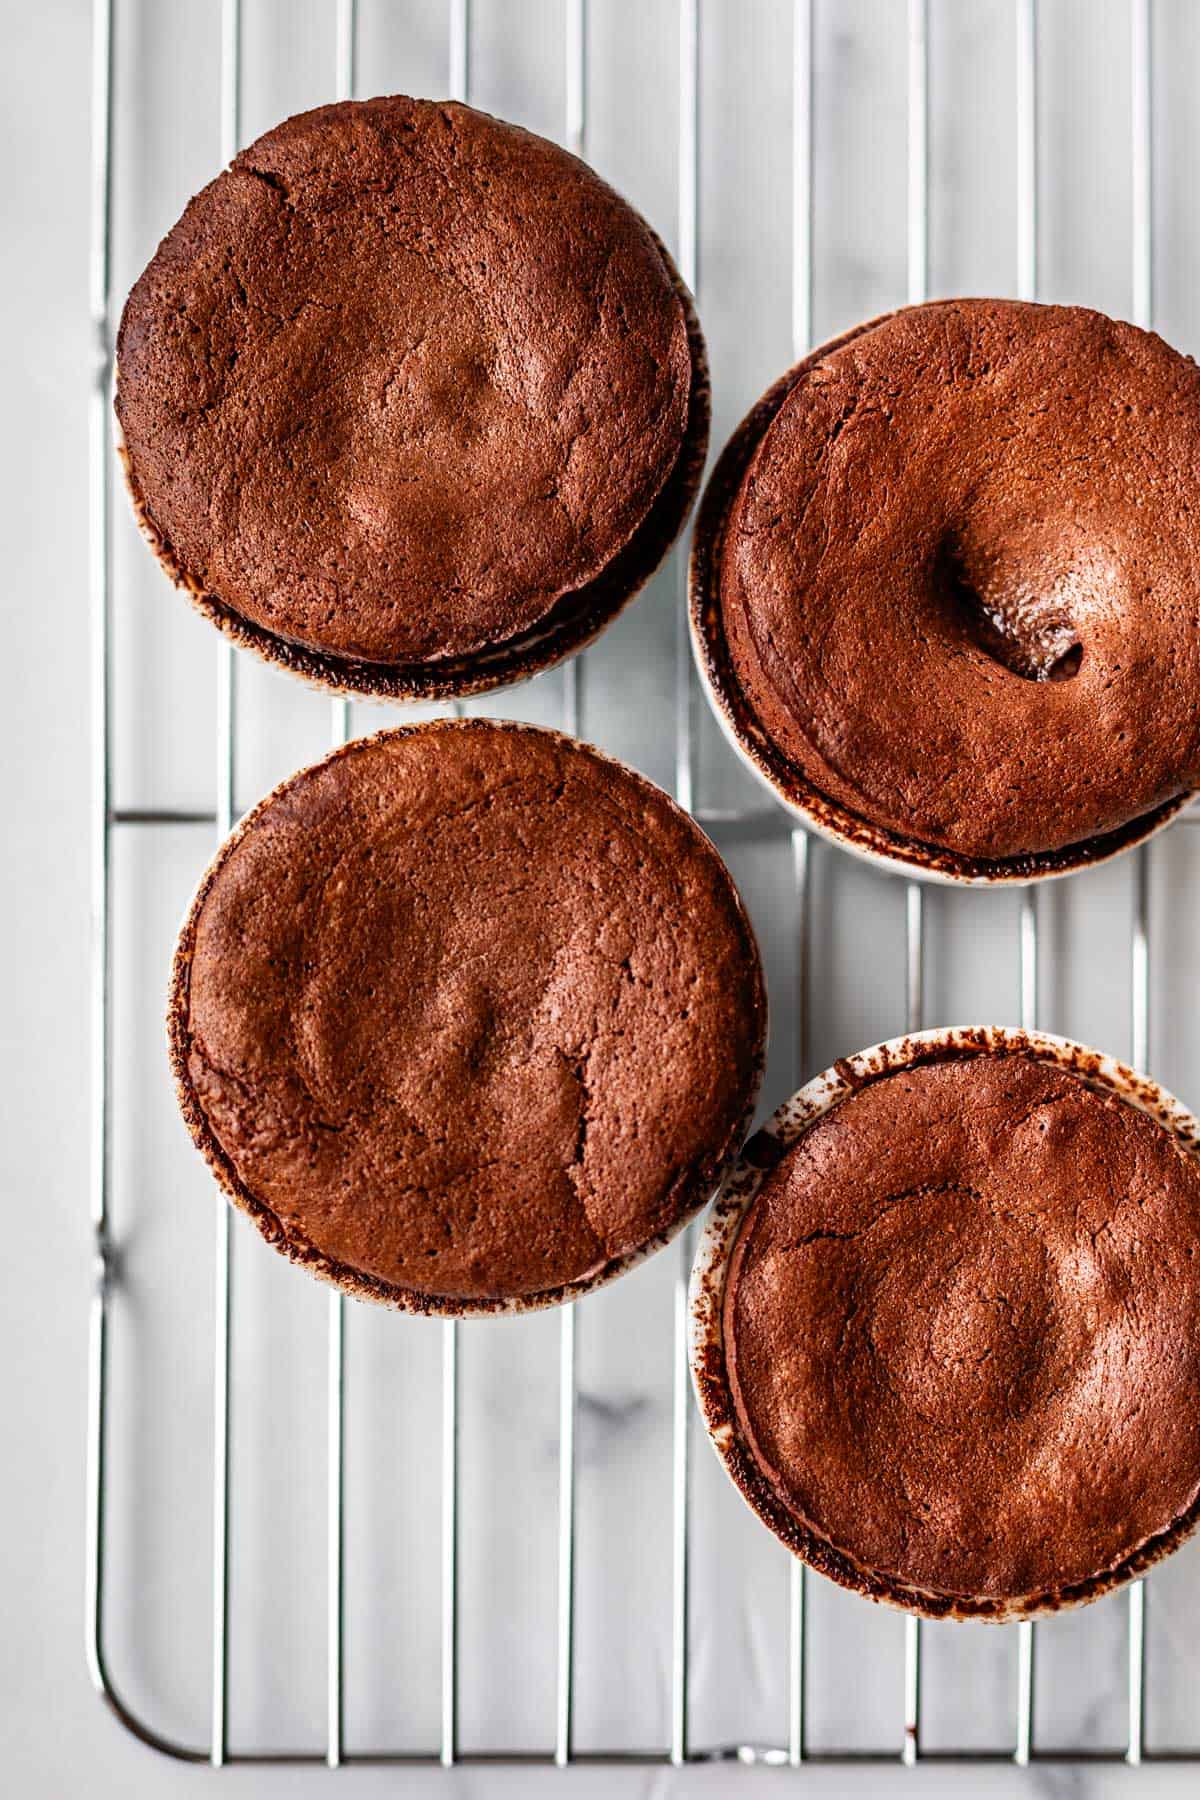
I like to bake these until they are nearly matte across the top, meaning there is only a small shiny spot on the top of the cake. These cakes above were baked a couple minutes too long. (The ganache ball on that cake on the top right above didn’t get pushed down far enough, that’s why there is a hole)
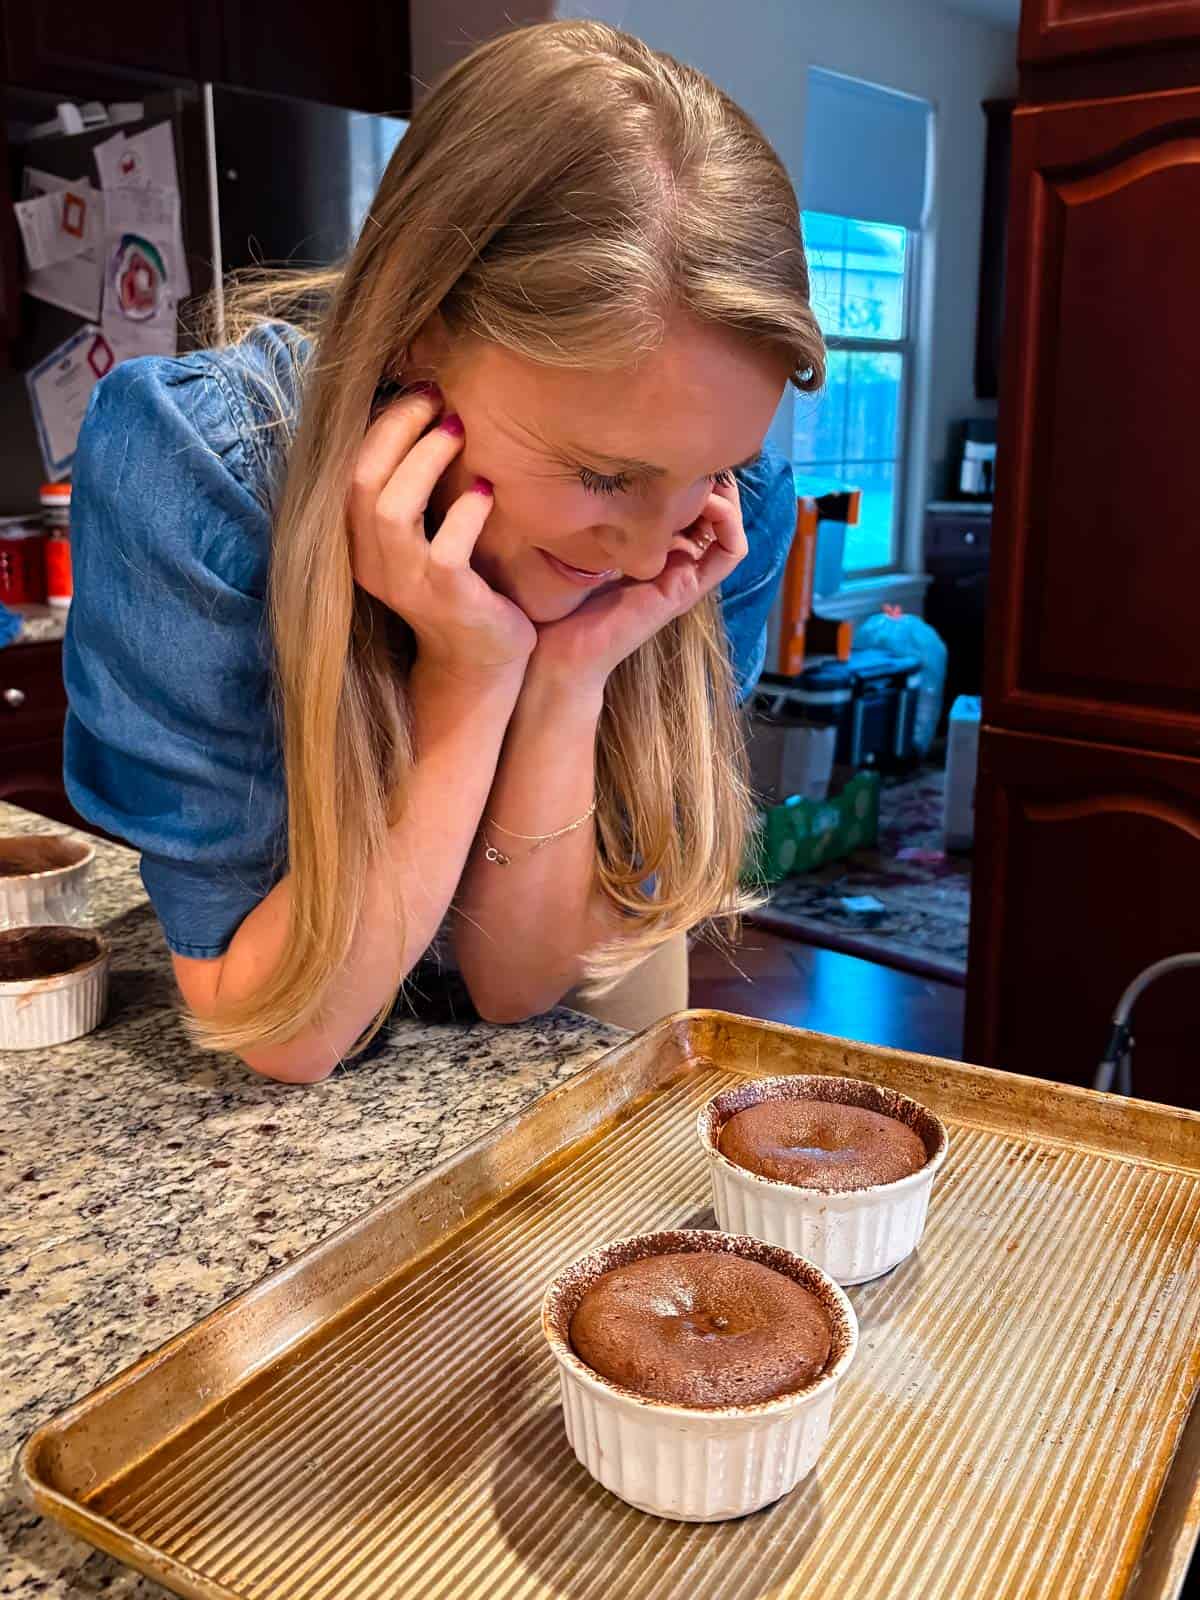
Here’s another photo of me contemplating my baked cakes 🤣 Susie took this photo after I tested the cakes in her oven. You can see that these cakes still have a spot in the center that is shiny—not quite matte, and it’s indented a little. This is a perfectly acceptable time to take them out of the oven.
The truth is, the amount of time you bake these cakes is kind of up to you.
I prefer a mostly-baked cake with a rich melty ganache center, so, nearly matte top. But as I explained, a traditional lava cake is just an under-baked cake with raw batter in the center (and no ganache at all). So if you like a REALLY liquid-y center, all you have to do is underbake the cakes a little, and you will get all the ganache, some raw batter, and a cooked edge. I recommend taking notes on what times you prefer from your own oven!
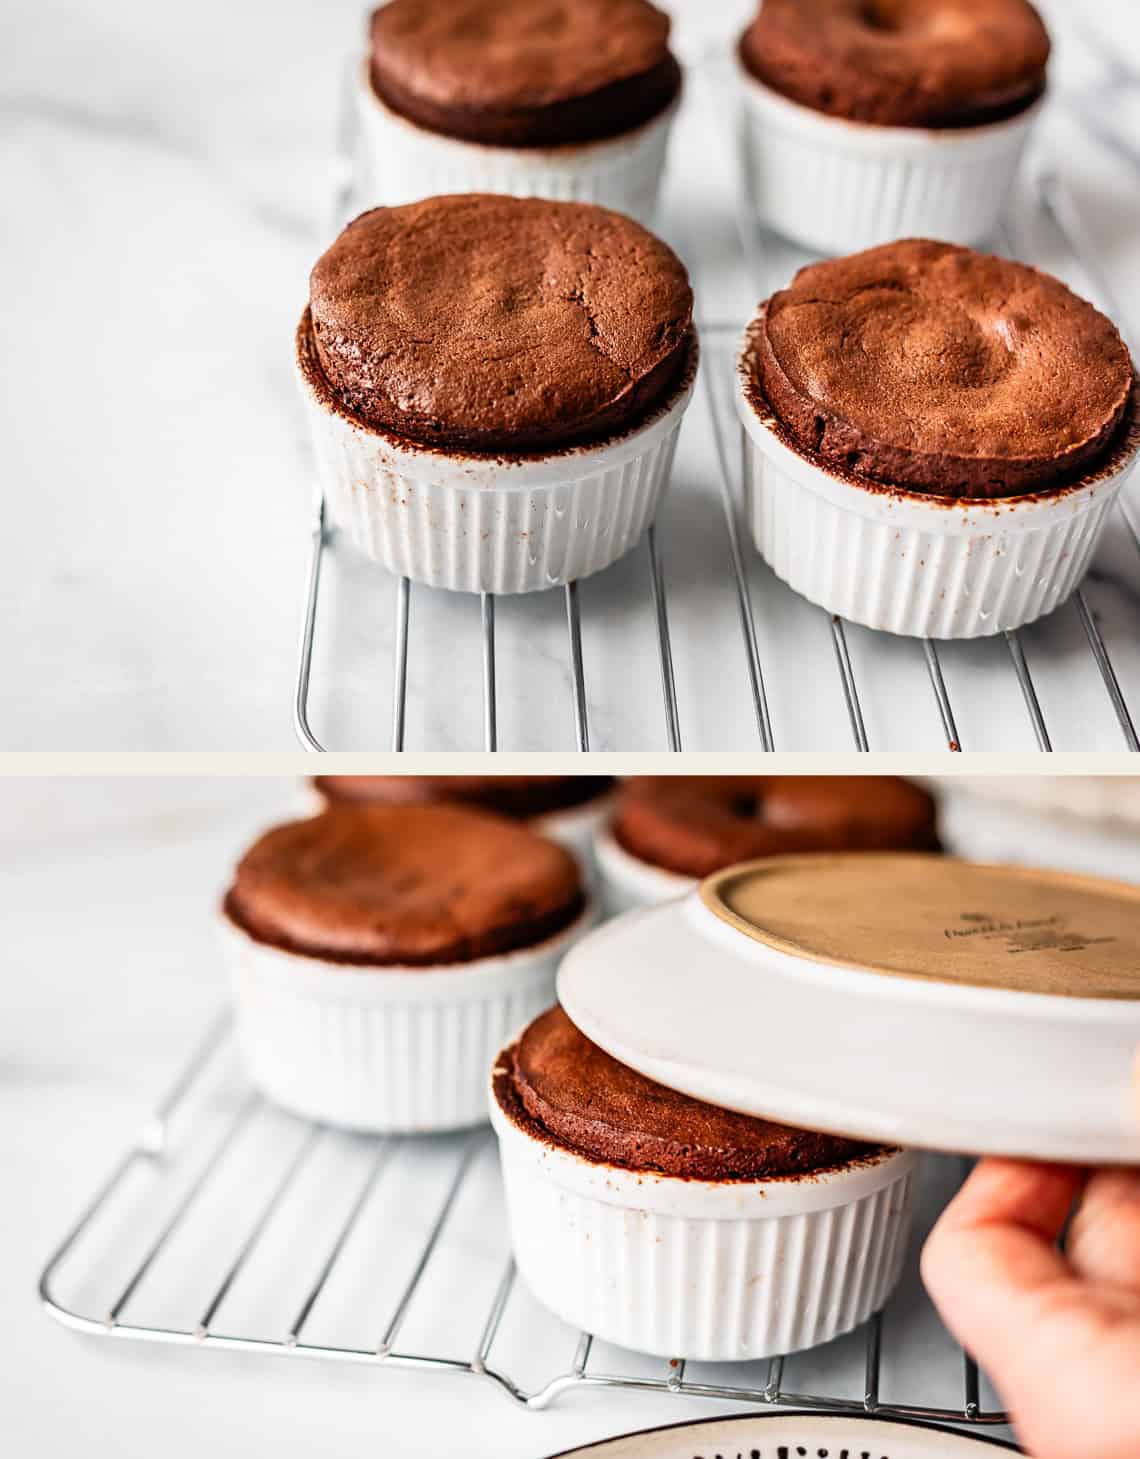
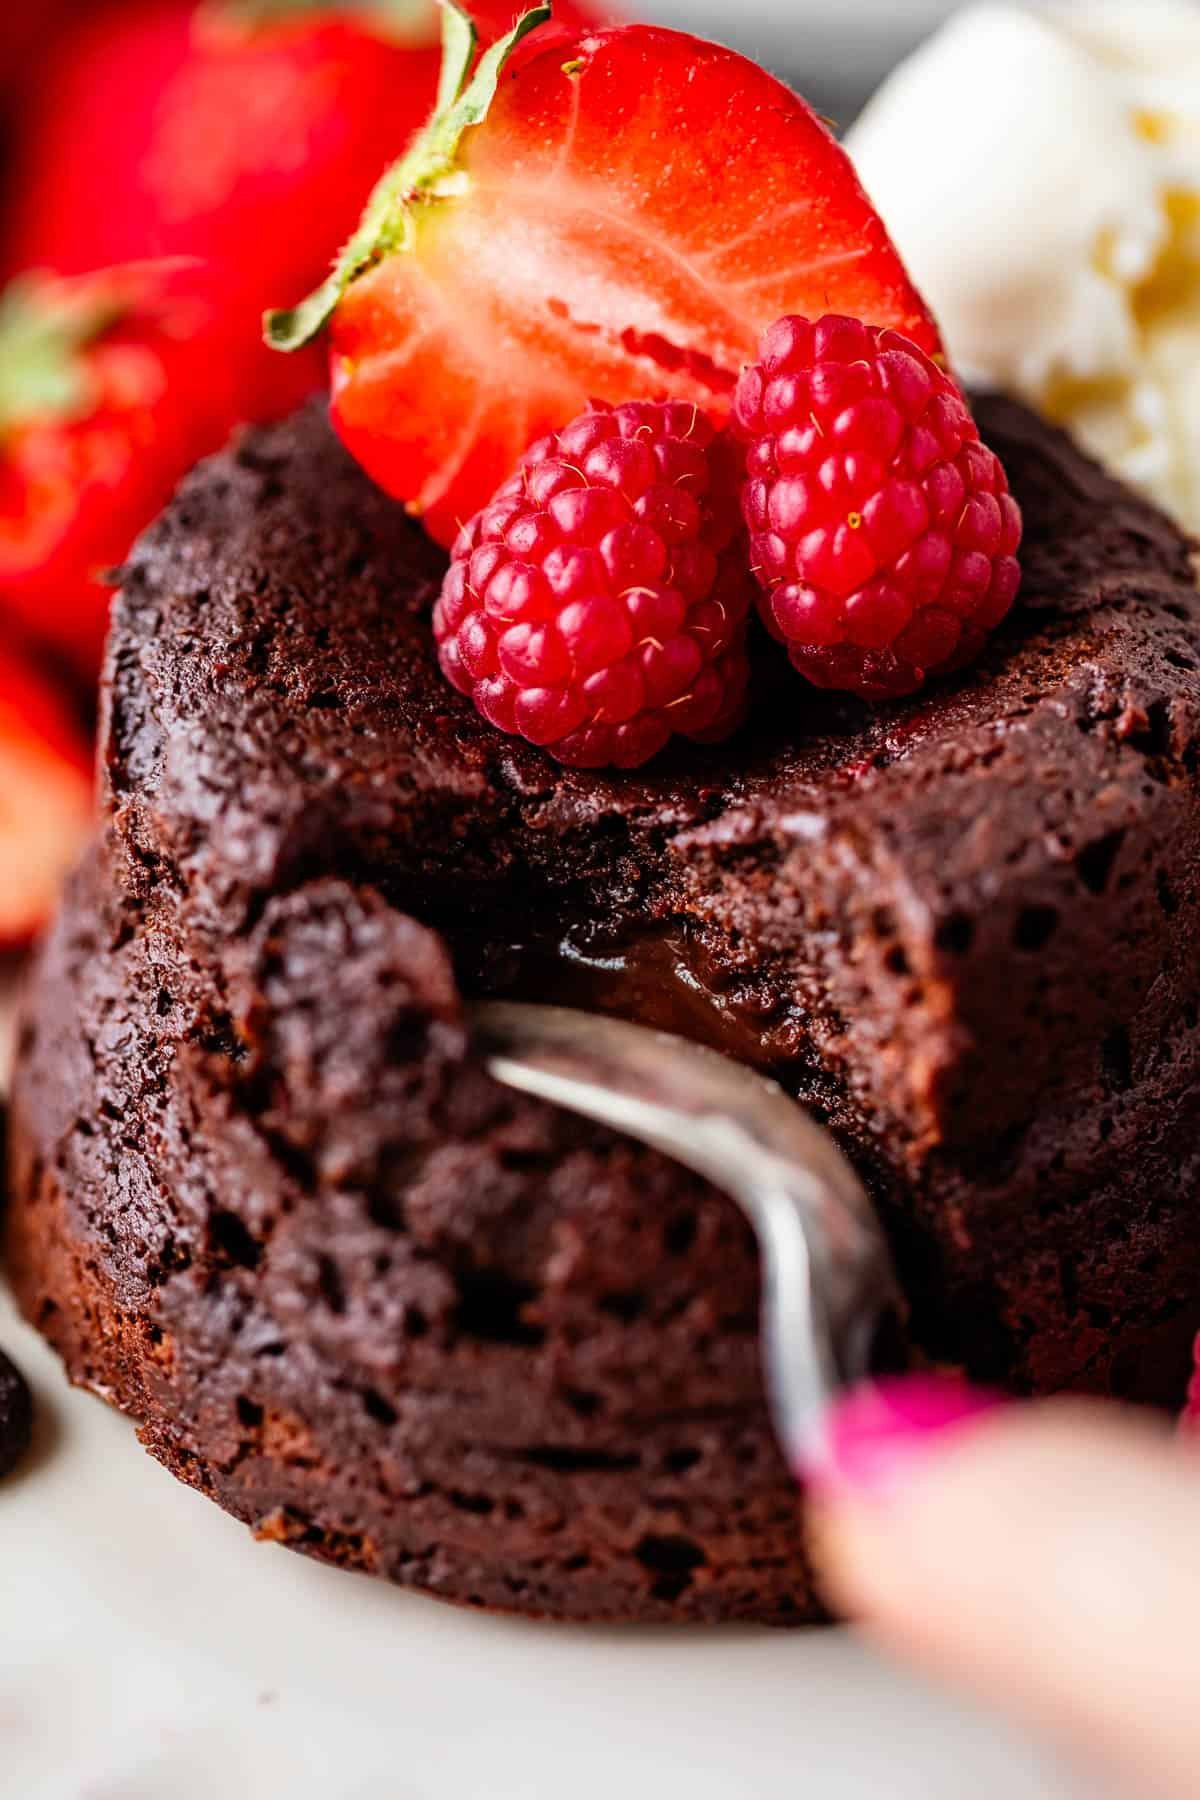
Once you take the cakes out of the oven, set a timer for 3 minutes. Then, place a plate over a cake and flip it over with a kitchen towel (a thin towel works better than hot pads, for gripping) Count to 10, say a prayer, and lift off the ramekin.
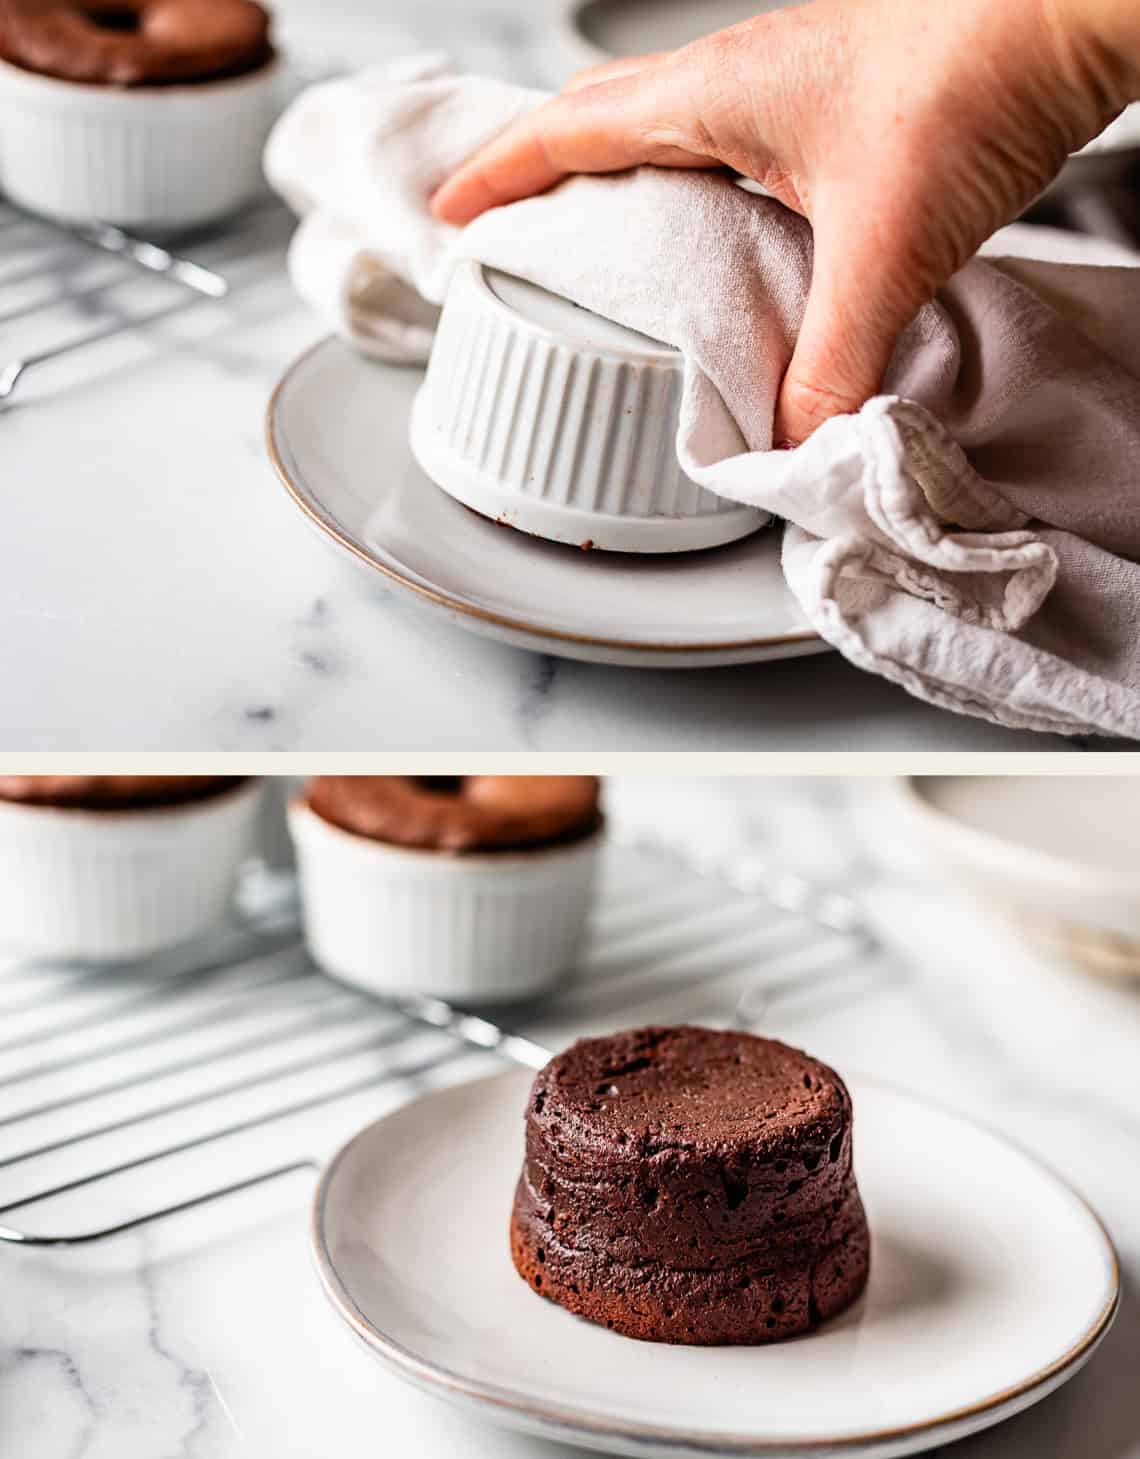
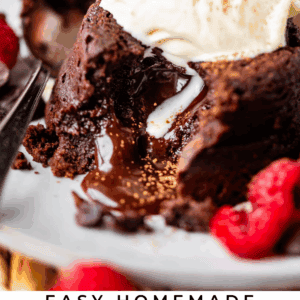
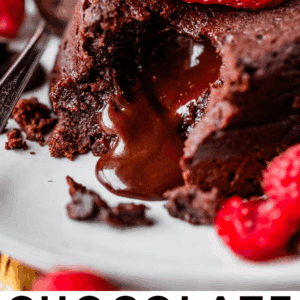
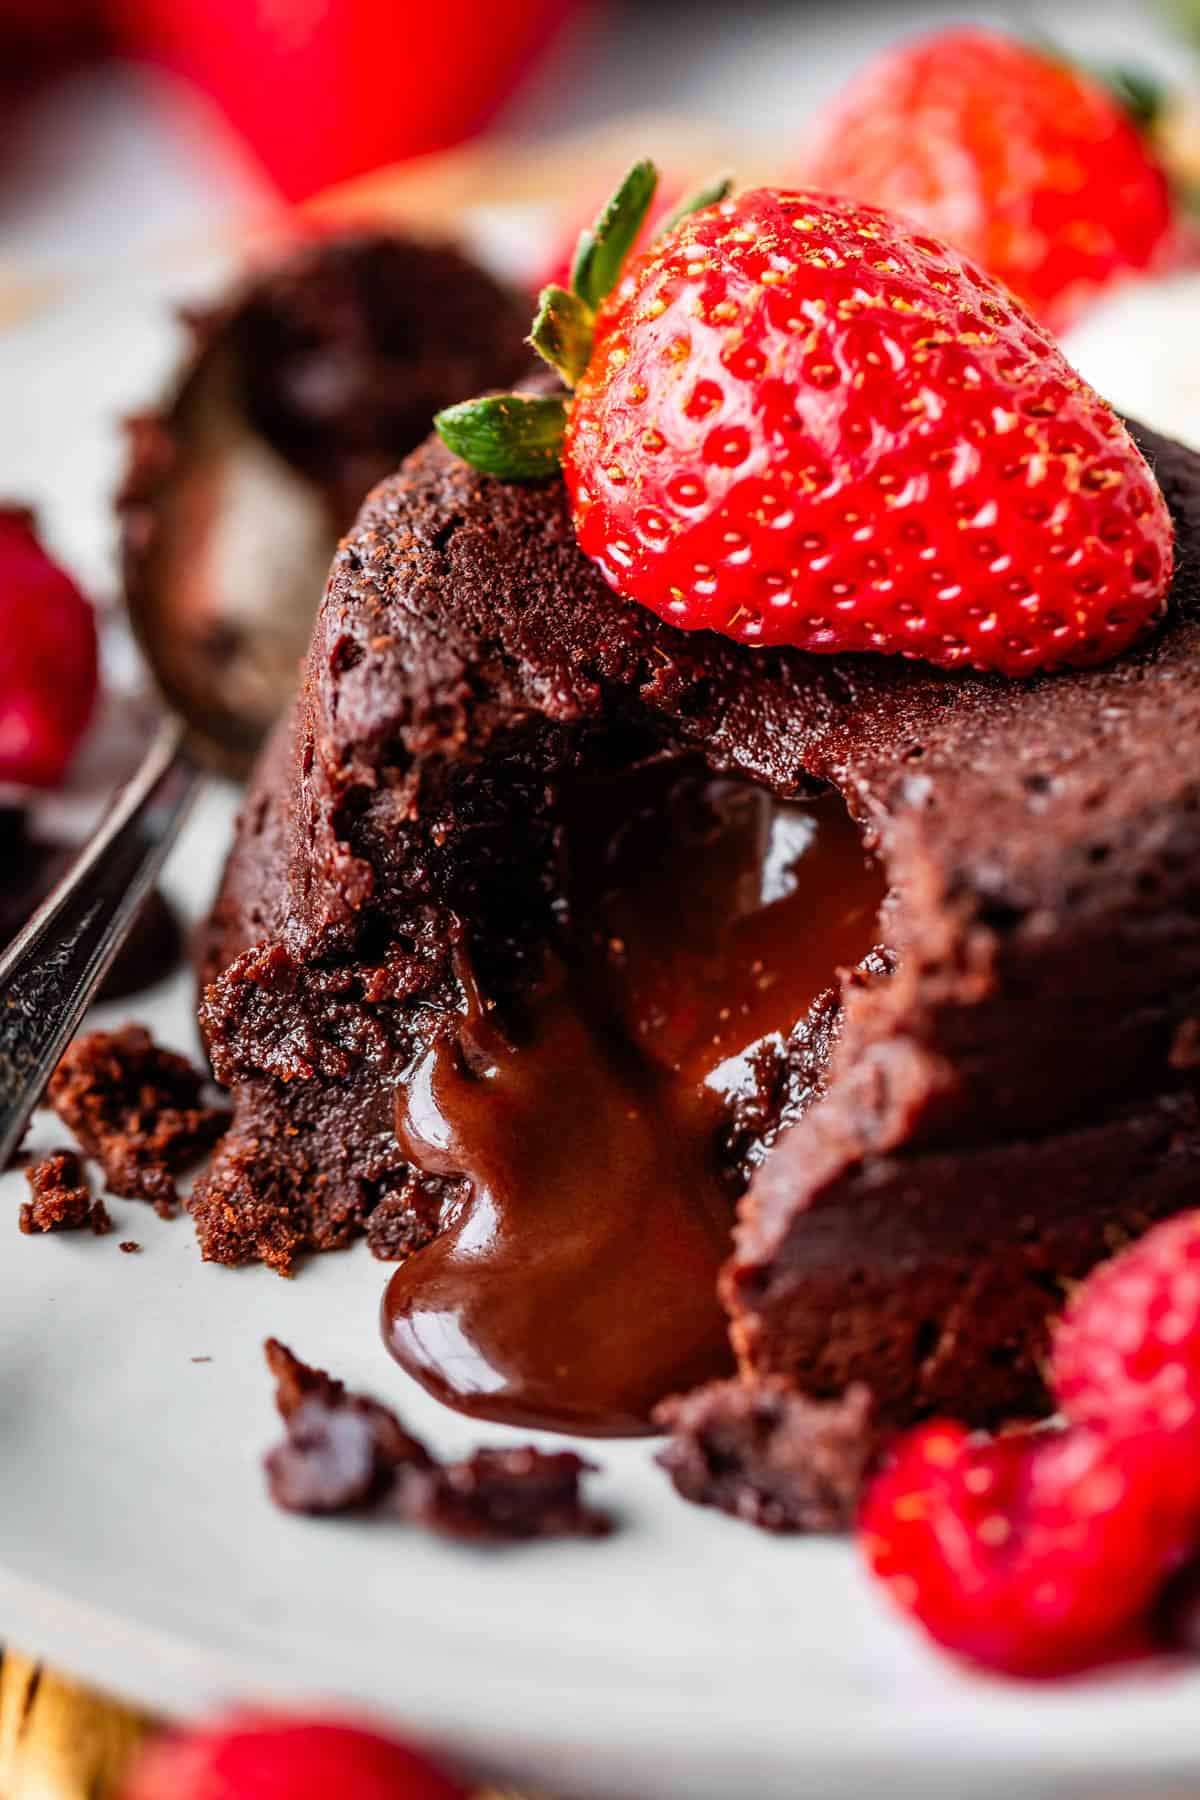
Voila! Look at this beauty! Just wait till you cut inside…
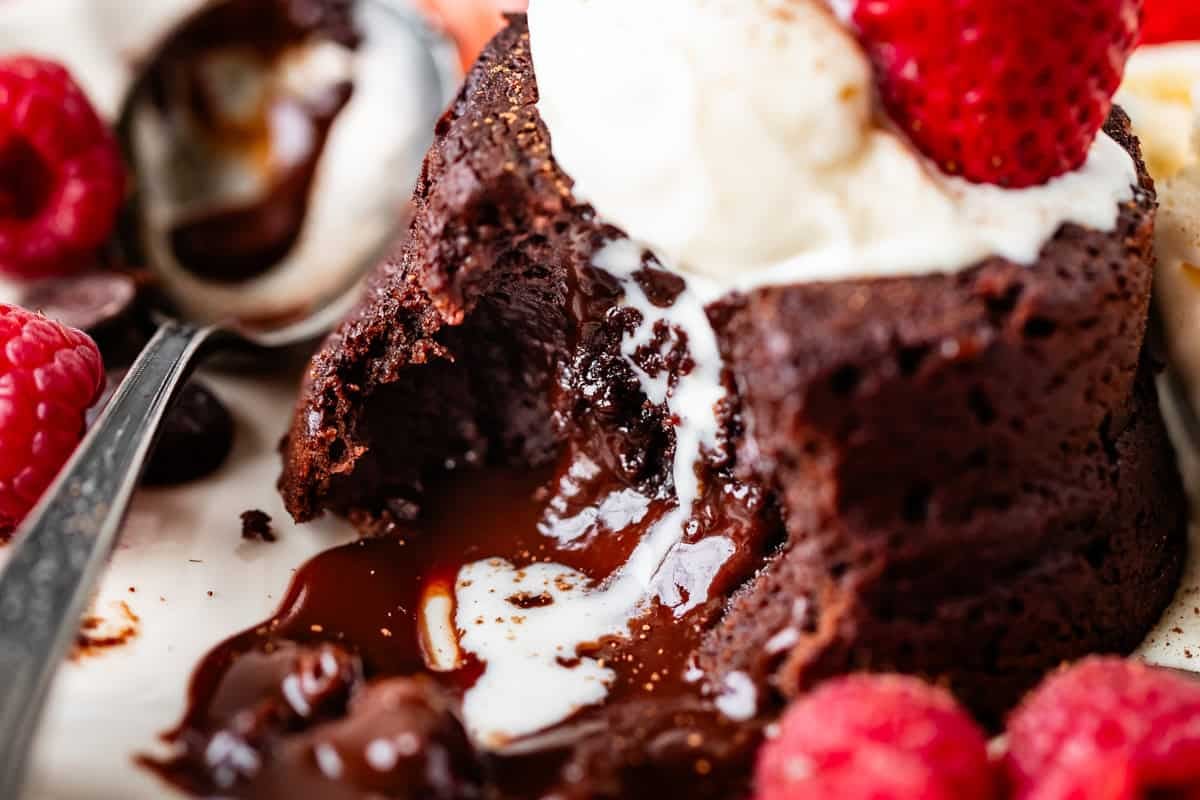
Garnishes are kind of everything for chocolate lava cakes, so don’t skimp. Ice cream or Whipped Cream are essential. Berries really help to cut the sweetness. And a dusting of cocoa or powdered sugar makes it so pretty. You can also serve these with even more Chocolate Sauce or Salted Caramel Sauce if you really want to go over the top!!
How to make lava cakes ahead of time
These lava cakes are an amazing make ahead dessert! It will work best to either refrigerate or freeze UNBAKED batter, then bake them right before serving. Since these cakes have a ganache center, they’re less likely to turn into “just cake” after a reheating, but there is more potential for the cake drying out. Freezing or refrigerating the batter in prepared ramekins allows you to bake the cakes and eat them fresh, with all their lava glory, when you want them.
Prepare the ramekins as outlined in the recipe card. (You can add a circle of parchment paper to the bottom before buttering/dusting with cocoa powder if you’re really worried about sticking). Cover each ramekin tightly in plastic wrap. If you plan to bake within 24 hours, store them in the refrigerator. Remove the plastic wrap, and bake per the original instructions.
Unbaked batter in ramekins can also be frozen for 1-2 months. Add the wrapped ramekins to a freezer ziplock bag in one layer, using as many bags as needed to fit them all. Thaw the ramekins in the refrigerator for 12-18 hours, then follow the same baking instructions as above.
How to store leftover cake
Storage is a piece of cake (ha!) Let the cakes cool completely, then put them in an airtight container and store them in the refrigerator. They’ll last for a good 2-3 days there. If you need to store for longer than that, follow the freezing instructions below in the next section. Reheat individual cakes in the microwave for about 1-2 minutes at 50% power until warm all the way through. To reheat several cakes at once, you can place them on a lined baking sheet and warm them in a 350 degree oven for about 7-10 minutes.
If you need to freeze leftover cakes, place them on a lined baking sheet, flash freeze for 30 minutes, and transfer to a ziplock freezer bag. You can thaw one at a time or all of them in the refrigerator overnight or on the counter for a few hours. Once thawed, reheating instructions are the same as above.
Let them eat cake
I am sooo picky about cake, you guys. It better be amazing if it’s going to be worth eating! You can trust that these are all the best tasting, and MOIST cakes. Check out some of my faves!
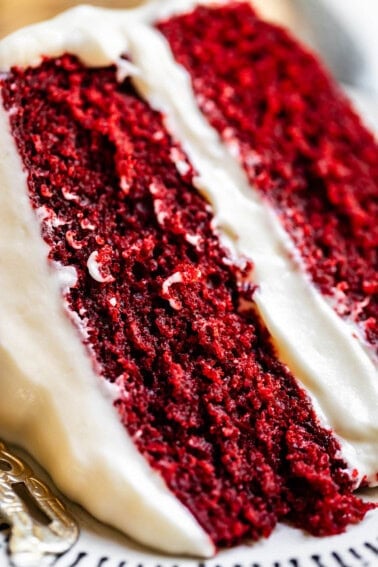
Cake & Cupcakes
Moist Red Velvet Cake with Incredible Flavor
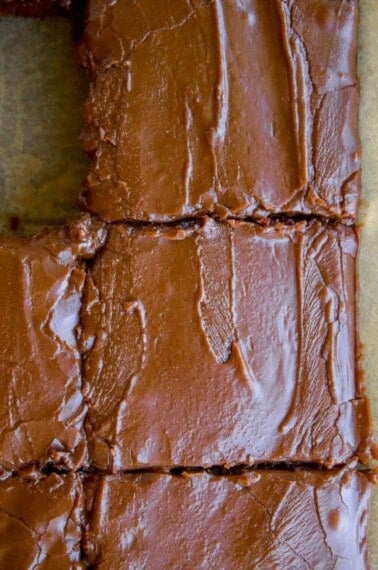
Cake & Cupcakes
Best Texas Sheet Cake Recipe
Facebook | Pinterest | Instagram
Lava Cake
Equipment
- 6 (4-ounce) ramekins (If you have 6-oz ramekins, see note)
Ingredients
For the ganache center:
- 1/3 cup semi sweet chocolate chips, make sure they are high quality
- 1/4 cup heavy cream
- 1 tablespoon butter
For the lava cakes
- 10 tablespoons butter, (1 stick + 2 tablespoons)
- 2 (4-ounce bars) bittersweet chocolate, 8 ounces total*
- 1/4 cup dark brown sugar, packed
- 1 teaspoon vanilla
- 1/2 teaspoon kosher salt, (use 1/4 teaspoon table salt if that's all you have)
- 1/4 cup all purpose flour, spooned, leveled, and sifted
- 2 large eggs
- 3 large egg yolks
- 1/4 cup granulated sugar
For preparing the ramekins
- 1 tablespoon soft butter, for greasing the ramekins
- 1 tablespoon cocoa powder, for dusting the ramekins
Topping ideas
- powdered sugar, for dusting on cakes
- raspberries
- strawberries
- vanilla ice cream
- Whipped Cream
- Hot Fudge Sauce
- Salted Caramel Sauce
Instructions
- Make the ganache center. In a small microwave safe bowl, add 1/3 cup semisweet chocolate chips and 1/4 cup heavy cream.
- Microwave for 30-60 seconds until you can see small bubbles forming around the edge of the cream. Let sit for 1 minute, then whisk until completely smooth.
- Add 1 tablespoon butter, let it sit for a minute, this whisk again until smooth.
- Chill. Put the bowl of ganache in the freezer for about 30 minutes. Or put it in the fridge if you don't have room, for about an hour.
- Shape the ganache. Once the ganache has been chilled for a while, check to see if it has hardened enough to shape. You want it to be hard enough to scoop into a ball shape, but not so frozen that you can't mold it. (Leave it out for a few minutes if it's too hard) Use a spoon or your hands to shape the ganache into 6 equal balls. Return the 6 balls to the freezer or fridge to chill.
- Preheat the oven to 325 degrees F.
- Make the cake batter. In a large microwaveable bowl, add 10 tablespoons butter and 2 (4-oz) bars bittersweet chocolate*, broken into pieces.
- Microwave the chocolate and butter for 30 seconds, then stir. Continue heating in 30 second increments, stirring every time. When it is mostly melted but there are still a few lumps of chocolate, don't heat anymore, just whisk for a minute until all the chocolate melts and it is completely smooth.
- Add 1/4 cup packed brown sugar to the chocolate.
- Add 1 teaspoon vanilla and 1/2 teaspoon kosher salt. Whisk until smooth, making sure there are no lumps.
- Use a spoon to add flour to a 1/4 cup measuring cup, then level off the top. (You don't want to pack it in.) Set a strainer over the bowl of chocolate and sift the flour into the bowl. Use a whisk to make sure it is combined well, but then stop once all the flour is incorporated. We don't want to over work the batter. Set aside.
- In a large stand mixer or bowl, add 2 eggs and 3 egg yolks.
- Add 1/4 cup granulated sugar.
- Use the whisk attachment to beat the eggs and sugar on high speed for at least 3 minutes, scraping the edges halfway. The mixture should have lightened to a pale yellow color, and the egg mixture will come off the beater in ribbons.
- Scrape the eggs into the bowl of chocolate and use a rubber spatula to fold it together. Do make sure that it is well combined (no more streaks), but do NOT over mix. Try not to deflate the beaten eggs too much.
- Chill: Cover and chill the batter for about 10-15 minutes. It doesn't need to be cold (although it can be; you can refrigerate this batter overnight and make these the next day) but the batter should not be WARM going into the oven. Room temp or cold batter is great.
- Prepare the ramekins: Use a paper towel or small sandwich baggie to cover your hand, then dip your fingers into some soft butter. Rub about 1/2 teaspoon butter into the bottom and up the sides of 6 ramekins. (1/2 teaspoon butter per ramekin!) Make sure there is a lot of butter in the bottom corners.
- Use a sifter to sprinkle cocoa powder over the ramekins (I do this over the sink). Do a pretty heavy dusting so that the butter is completely covered. Tap out the excess cocoa powder.
- Divide the chilled cake batter into the prepared ramekins. You can use a spoon, it's too stiff of a batter to pour. You want about 3.5 ounces of batter in each ramekin, even if you have larger ramekins.
- Get out the chilled balls of ganache from the fridge or freezer. Use your hands to gently press each ball of chocolate into the cake batter. Do not press it all the way down to the bottom of the ramekin. You want at least 1/4 inch of batter in between the bottom of the ramekin and the ganache.
- Use a spoon or offset spatula to smooth the cake batter over the ganache, so that it's completely covered. Add another little spoonful on batter on top if necessary, to make it flat on top. The ganache should not be poking out, make sure it's completely covered with batter.
- Place the lava cakes on a baking sheet. (SEE NOTE about baking a single test cake first)
- Bake the lava cakes at 325 degrees F for about 15 minutes. When it's baked and ready to come outlook for these cues:
- 1) The cake should look ALMOST cooked on top; it should be matte (not at all shiny) all along the edges. The very center of the cake (about the size of a quarter) can be shiny. 2) The edges will have risen up and pulled away from the edge of the ramekin.3) When you gently shake the pan, the cake will jiggle in the center more than it's jiggling on the outside. (If the whole surface looks wobbly, leave it in a couple minutes longer.
- Remove the cakes from the oven and set a timer to let them set up for 3 minutes. Prepare the serving plates.
- Loosen edges. After 3 minutes, run a butter knife along the edge of each cake to loosen it from the ramekin.
- Flip. Place a serving plate upside down on top of the ramekin. Hold the plate on top with one hand, and, using a kitchen towel to protect your other hand, flip the ramekin over. Count to 10, to let it settle, then carefully use the kitchen towel to lift the ramekin off of the lava cake. Repeat with all the cakes.
- Dust each cake with a bit of powdered sugar shaken through a strainer. (or cocoa, if you prefer)
- Garnish with raspberries or strawberries.
- Serve immediately with vanilla ice cream or Whipped Cream, and don't forget the Chocolate Sauce or Salted Caramel Sauce if you really want to go over the top!!
- Store leftover baked cakes in an airtight container in the refrigerator for up to 3 days. Reheat in the microwave for 1 or 2 minutes at 50% power, or in the oven set to 325 for about 7-10 minutes.
- You can prep these ahead of time and bake later! Prepare the ramekins per the instructions above, then wrap tightly in plastic wrap. Store in the fridge for up to 24 hours or the freezer for up to 2 months. Make sure the batter is thawed and then set on the counter for 30 minutes before following the original bake time.
- You can also freeze already baked cakes. Put the unmolded cakes on a lined pan and flash freeze for about 30 minutes, then transfer to a freezer ziplock bag. To serve, leave on the counter for 3-4 hours, then reheat in the microwave for 1-2 minutes at 50% power or in to the oven at 325 for 7-10 minutes.


that looks delicious I am going to bake this lava cake for my self exactly the way you show me because I am a chocolate lover
Tracy, this is the recipe for you, then! I hope you get to try it out soon, I would love to hear how it goes!