Easy Smoked Beef Brisket in the Oven
Hallelujah! I've found a way to make KILLER Texas-style smoked beef brisket...without a smoker. Yes, for real! This recipe is magic. Use your gas grill to smoke it, then move it to the OVEN to get the most amazing, mouth-watering, tender, smoky brisket that will make you cry happy tears. I have tons of pictures and details to show you exactly how to cook a smoked brisket. Make this for any cookout, holiday, or meal when you want to knock 'em dead!
Servings: 8
Calories: 450kcal
Equipment
- heavy duty aluminum foil or a smoker box
- pink butcher paper optional; you can use foil in a pinch
Ingredients
- 5-6 pound brisket flat OR whole full-packer brisket (12-18 lbs)***
- 1/4 cup kosher salt
- 2 tablespoons coarse ground black pepper*
- 2 tablespoons garlic granules this is a step up from garlic powder
- 8 cups hickory smoke chips
- 1 batch Homemade BBQ Sauce** or your favorite sauce
Instructions
- Read carefully. There are some special items needed for this recipe. In addition to the brisket and spice rub, make sure you read over the equipment list above: you need heavy duty foil, butcher paper, and a leave-in probe thermometer.
- Choose your brisket: Go to a quality butcher or a high-end grocery store. Ask the butcher for a choice grade flat cut brisket (or a full-packer, if you are all in). If they only have prepackaged cuts, make sure it is Choice grade. Find the one with the biggest fat cap you can find. Bend the brisket to see if it folds in half easily (if it's vacuum sealed, skip this, bending won't tell you much.) The fat cap should be white, not yellow.
- Assemble the spice rub. In a small bowl, add 1/4 cup Diamond Crystal kosher salt. DO NOT USE TABLE SALT. (If that's all you have, use half the amount.) Add 2 tablespoons coarse black pepper and 2 tablespoons garlic granules.
- Prepare the brisket. Set out a rimmed half baking sheet and a cooling rack. Cut open the packaging and pat the brisket with paper towels to dry it off. Place it on the baking sheet, fat-side up.
- Dry brine. Rub about one third of the seasoning over the fat cap and edges, carefully patting it onto the meat. Flip the brisket over and sprinkle the remaining dry rub all over the sides and top of the brisket. If the spices fall onto the baking sheet, scoop it up and rub it in.
- Make sure every part of the meat is seasoned, top, bottom, and sides. Make additional rub if you haven't covered every part of the brisket. The ratio is 2 parts kosher salt to 1 part pepper, to 1 part garlic. Lift the brisket and slide the cooling rack underneath the meat, so that the brisket is sitting on the cooling rack, which is nestled in the baking sheet.
- Refrigerate. Transfer the brisket to the refrigerator to chill, UNCOVERED. This helps dry out the edges so you get an amazing crispy "bark." It does not make your brisket dried out, I promise it will still be moist (if it has enough fat). Chill overnight or for at least 4-6 hours.
- Let the brisket rest out of the fridge. Take the meat out of the fridge and let it sit on the counter for about 30 minutes while you prepare to smoke.
- Instructions for wood chip smoker foil packets. Use large sheets of heavy duty foil to make four 4 packets, each filled with about 2 cups dry wood chips. See photos. Seal the foil at the top by folding it over, then fold up the ends. Your packets should be about 8×5 inches. Make sure that they are well sealed, and that the chips do not puncture the foil on the bottom or edges. Use a sharp knife to poke a 2-inch slit on either side of the top of the packets. This will allow smoke to escape, and oxygen in to feed our chips. Make 4 packets total, we will be using 2 at a time on the grill.
- Smoker box instructions: (I have a smoker box and still prefer to use foil smoke packets - save your money unless you already have one.) Add 4 cups dry hickory wood chips to your smoker box, or however much will fit with the lid closed.
- Prepare the grill. Clean off your grill grates of any debris from the last time you grilled. Remove the grill grates on the side that has the primary burner. Place 2 foil packets over the primary burner, either on the heat plates, or directly on the burner. (If you have a smoker box, remove the grates from your grill and place the smoker box directly on the primary burner. You may need to remove the heat plate entirely from your grill.)
- Turn on the grill. Turn all the burners on the grill to high heat if you are using a smoker box, or to medium heat if you are using foil packets. Let it preheat for 10 minutes.
- After 10 minutes, turn off the burners on the empty side of the grill, the side with the grill grates still on. This is where our brisket will sit. Turn the other burners down to LOW. You need to bring the grill temperature all the way back down to 250 degrees and make sure it stays at 250 degrees. You can open the lid for a minute or two to let some heat escape if it's too hot. Do NOT put the brisket into the grill if it's too hot! It will not cook the proper way and you'll end up with dry meat.
- Oil the grate. Use tongs to dip a crumpled paper towel into a bit of oil, then rub on the grill grate.
- Smoke. Place the brisket fat side UP on the oiled grate over the burners that are TURNED OFF. Save the cookie sheet and cooling rack for later. Close the lid and smoke the brisket for about an hour, maintaining a grill temperature of about 250 degrees. Come back and adjust it as necessary. Use an oven thermometer set inside your grill to gauge the temperature if your grill doesn't have a built in thermometer. Check to make sure your wood chips are still smoking (turn heat up a bit momentarily to get them to smoke again if necessary, returning the heat back down to maintain 250 degrees F.)
- Smoke again. After an hour, remove the spent foil packets if they are no longer smoking, or move them to the back if they still have smoke coming out. Add the remaining two foil pouches to the side with the flame. Or, if you have a smoker box, carefully dump out the spent chips and add 3 more cups of hickory chips to the smoker box.Close the lid and smoke the brisket for another 60-70 minutes, maintaining a grill temperature of 250 degrees. Come back and adjust it as necessary.
- Preheat the oven to 250 degrees, about 10 minutes before your brisket is done smoking.
- Remove from grill. Once the smoke packets are spent, turn the grill off, and use grill gloves or a large metal spatula to move the brisket back over to the cooling rack on top of the cookie sheet. VERY carefully, take it inside.
- Wrap the brisket. Making sure you have a wide space, pull out a large section of butcher paper but don't cut it yet. Set the brisket fat side up on the paper, then fold the paper up over the brisket. Flip the brisket over in the paper, then wrap up the ends like a birthday present. See photos. Flip the brisket again and MAKE SURE the fat side is up. (Unwrap it if you're not sure!!) Tuck and wrap the paper as necessary to make sure the paper doesn't come undone in the oven.
- Transfer to the oven. Place the wrapped brisket back onto the cooling rack on the baking sheet, fat side up. If you have one, insert the probe of a leave-in meat thermometer into the thickest part of the brisket, and set the alarm to ring when the internal temperature reaches 203 degrees F. Double check that your oven is set to 250 degrees, and place the wrapped brisket in the oven. Settle in for the long haul! Do not open the oven door until your brisket reaches that 203 mark. If you don't have a leave-in thermometer, start checking the temperature with an instant read thermometer after about 3-4 hours, depending on how big your brisket is. Keep checking until it reaches 203. It could take twice as long! Plan to make this a day ahead of your event if you are not sure!
- Rest. Once it's reached temperature, as carefully as possible remove the baking sheet (there will be melted fat and juices so don't burn yourself!). You will be tempted but DON'T UNWRAP it! Let it sit at room temperature for 30-60 minutes to let it rest and reabsorb all the fat. Check the temperature and make sure the meat is 140-150 degrees before unwrapping.
- Unwrap. Unwrap the brisket, carefully catching all the juices in the rimmed baking sheet. Place the brisket on a cutting board with a juice groove.
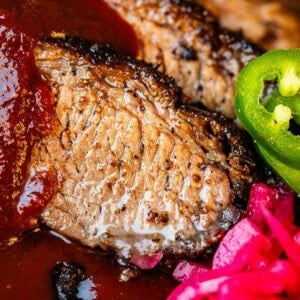
- Slice. Look for the grain in the brisket, and then slice against (perpendicular to) the grain with a sharp chef's knife (see photos). Snag a bite. Die and go to heaven.
- Serve with Homemade BBQ Sauce. On the side! I like to serve brisket with Mac and Cheese, or Santa Maria Pinquito Beans!
- Storage. Store covered in the fridge for 4-5 days. Brisket freezes very well! See post for details, as well as reheating instructions.
Notes
THE RUB: The ratio for the spice rub is 2 parts kosher salt, 1 part garlic granules, 1 part pepper. Make as much as you like for the amount of brisket you have. I used the amount called for in the recipe for the briskets I tested that were 5 pounds, but for one brisket I tested that was 8 pounds, I used 6 tablespoons kosher salt, and 3 tablespoons each pepper and garlic.
- *The amount of pepper you add is up to you. Some people in Texas like a super peppery crust and add as much as a whole cup of pepper to a full packer brisket! The most common is a 1:1 salt to pepper ratio, but I like things a little milder, so I went with half as much pepper as salt. Follow your heart to decide how much you want!
- 1/2 cup Claude's Fajita Marinade
- 1 cup Hickory and Brown Sugar BBQ Sauce
- 2 tablespoons mustard
- For a flat we don't remove any of the fat cap. For a full brisket, you'll definitely want to trim the fat cap to about 1/4" thick, especially on the fatty point.
- Double the amount of marinade you use. 1/2 cup salt, 1/4 cup of coarse pepper, and 1/4 cup garlic granules should be enough to cover a whole brisket.
- Follow the same smoking, wrapping, and oven cooking steps. The main difference will be cook time - it may need to cook a bit longer (which is why Laura and her mother in law often smoke in the evening and cook all night). Just BE AWARE that it may seems like it would take twice as long since it's twice as big, but it's just not true. In testing, a full brisket only took an hour or two longer than a flat! Timing is still finicky so you still need to very much depend on your thermometer!!
- Letting the brisket rest will take slightly longer as well, but again, not twice as long. Just keep an eye on things.
- Slicing the brisket: Use the image in the post for slicing the flat. Once you start to get to the point, you should notice that the grain switches directions due to the way the muscle works. Switch angles and cut against the new grain! Because it's thicker and more fatty, many people cut the point into cubes rather than slices. You could also try to resmoke the cubes to make burnt ends!
- As with most foods, the more often you make it, the better you will understand what works for you in your kitchen, with your tools. There's a lot of room for variation in this recipe due to your specific brisket, your grill and oven, your thermometer, etc. If it isn't perfect the first time, take note of what could improve and try again! If you have any questions as you think through the process, let us know in the comments and we'll do our best to get the answer to you!!
Nutrition
Calories: 450kcal | Carbohydrates: 2g | Protein: 59g | Fat: 21g | Saturated Fat: 7g | Polyunsaturated Fat: 1g | Monounsaturated Fat: 10g | Cholesterol: 176mg | Potassium: 980mg | Fiber: 1g | Sugar: 0.1g | Vitamin A: 8IU | Vitamin C: 0.02mg | Calcium: 25mg | Iron: 6mg
