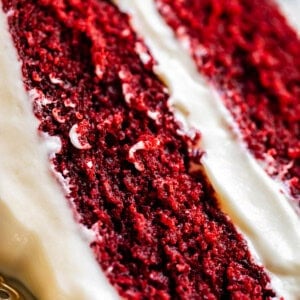
Red Velvet Cake
I used to think Red Velvet Cake was superfluous. Why would I want a dyed-red less-than-chocolate cake? But oh, my friends. I have been converted. When done right, Red Velvet is incredibly unique and indulgent. It's not just a treat for the eyes! There is a reason this recipe has become a classic. The velvety texture of the cake paired with thick layers of Whipped Cream Cheese Frosting is unreal. Perfect for special occasions (like today's anniversary :) birthday's, or holidays. It doesn't matter when you make it, Red Velvet always impresses a crowd!
Servings: 16 servings
Calories: 361kcal
Equipment
- red gel food coloring
Ingredients
In a large bowl:
- 1 cup butter melted
- 4 tablespoons* Special Dark cocoa powder* SEE NOTE FOR RED COLOR
- 1/2 cup light brown sugar packed
- 1/2 cup light olive oil or any neutral vegetable oil
- 2 large eggs
- 1 large egg yolk
- 2/3 cup buttermilk
- 1/2 cup sour cream
- 2 teaspoons vanilla extract
- 2 teaspoons red gel food coloring
- 2 teaspoons white vinegar
Sift into a medium bowl:
- 2 and 1/4 cups all purpose flour
- 1 teaspoon baking soda
- 1 teaspoon baking powder
- 1 teaspoon kosher salt use 3/4 teaspoon table salt, if that's all you have
- 1 and 1/2 cups granulated sugar
The frosting
- 1 large batch Whipped Cream Cheese Frosting
Instructions
- Preheat your oven to 325 degrees F.
- Line your cake pans. Trace the outline of two 9-inch cake pans** on parchment paper. Cut out the circles and place in the bottom of each cake pan. See photos. With the paper in the bottom of the pan, use nonstick spray to grease each cake pan very well, right on top of the parchment, in the corners, and all the way up the sides. No part of this cake batter should touch the pan without a layer of fat in between it.
- Wet ingredients: Add 1 cup butter (this is 2 sticks) to a large microwave-safe bowl. Add 1/4 cup special dark cocoa powder* and 1/2 cup packed brown sugar. Heat in 30-second increments, stirring in between, until the butter is melted. Whisk until completely smooth.
- (If you have a stand mixer, scrape the butter mixture into the metal bowl of your stand mixer. If not, continue add all the wet ingredients to the butter mixture.)
- To the butter mixture, add all the remaining wet ingredients: 1/2 cup neutral vegetable oil, 2 eggs, 1 egg yolk, 2/3 cup buttermilk, 1/2 cup sour cream, 2 teaspoons vanilla extract, 2 teaspoons red gel food coloring, and 2 teaspoons white vinegar. Use an electric mixer (or the stand mixer with the whisk attachment) to beat this all together thoroughly on medium speed until there are no lumps. Scrape the bottom and the sides of the bowl and mix again. It will be bright red!
- Dry ingredients: Spoon and level your flour. (Spoon it into the measuring cup , then level off the top; don't scoop it.) Sift 2 and 1/4 cups all purpose flour into a medium bowl. I like to shake the flour through a large strainer. Sift in 1 teaspoon baking soda and 1 teaspoon baking powder. Set the strainer aside. To the flour, add 1 teaspoon kosher salt and 1 and 1/2 cups granulated sugar. Whisk the flour and sugar together thoroughly.
- Combine wet and dry. Add the dry ingredients to the bright red wet ingredients and beat (with the whisk attachment, if you have one) until combined, scraping down the sides of the bowl. Do not over mix. You want to make sure that all the ingredients are mixed and there are very few (if any) lumps. Stop beating as soon as this happens; over-beaten cake batter makes for a tough chewy cake.
- Pour the batter evenly into the 2 parchment-lined and greased cake pans. I like to use a scale to make sure each cake is even.
- Bake at 325 degrees F for about 27-30 minutes total, BUT, stop to rotate the cakes about 20 minutes into the bake time. Read on:
- Rotate the cakes: When you can see that the tops of each cake have started to solidify (meaning they are not completely liquid all the way across the top), open the oven to rotate the cakes. If they are side by side on the same rack, swap their places. If one is on top and one on a bottom rack, switch their places. Don't move the cakes until you are certain that shifting them around will not cause them to collapse in on themselves.
- After rotating, continue baking for another 7-10 minutes. The total bake time is about 27-30 minutes.
- Check for doneness: You will know the cake is done when a toothpick inserted in the center comes out with no wet batter on it. When tapped gently, the top of the cake will spring back immediately, instead of sinking in.
- Set the cake pans on a cooling rack for about 10-15 minutes.
- Release from the pans. Run a butter knife around the edges of the pans and carefully turn the cakes out onto your hand, then settle them onto the cooling rack. Let them cool completely.
- Frost. When the cake is completely cool, lay one cake on a cake stand or flat plate. Top with about 1 cup of Whipped Cream Cheese Frosting. (The frosting recipe as written covers all of a 2-layer cake, but if you like a lot of frosting, make the version in the notes that says "Scaled up".) Top with the second cake, then frost the top and sides with the rest.
- Storage: This cake is fine to leave out at room temperature, but the Whipped Cream Cheese Frosting needs to be refrigerated. Make sure it's covered well so it doesn't dry out! See notes about make ahead and freezer options.
Notes
*COCOA POWDER: I like to add 4 tablespoons total cocoa powder to this cake, to increase flavor. If your priority is a VERY RED cake, then use only 2 tablespoons cocoa powder, or even just 1 tablespoon.
*What kind of cocoa powder? I tested this cake with Ghirardelli natural cocoa powder and Hershey's Special Dark Cocoa powder. I slightly prefer the Special Dark (which is actually a mix of natural cocoa and Dutch-prcoess cocoa) but any kind of cocoa will work just fine!
**Parchment paper: I ALWAYS take the time to do this annoying step of lining my pans with parchment paper. I’ve destroyed too many cakes trying to flip them from the pan! I don’t trust the grease-and-then-dust-with-flour method. It’s failed me too many times. If you line the bottom of the pan with a circle of parchment paper and then grease the sides really well, you are guaranteed success.
Nutrition Facts: These amounts are for the cake only! Head to my Whipped Cream Cheese Frosting post for that nutrition info.
How to freeze:
You can make this cake 2-3 months in advance. amazing right??-
- To freeze unbaked cake layers: after they cool completely, wrap them in a couple layers of plastic wrap, then put them each inside a 1 gallon ziplock bag and seal it tightly (or put both in one of these big 2 gallon ziplocks, I love these). Defrost at room temperature or in the refrigerator.
-
- To freeze a whole frosted cake: Put the uncovered cake in the freezer for 2 hours to chill the cake and set the frosting. Remove it and wrap with 2 layers of plastic wrap, then a layer of tin foil. Defrost in the refrigerator overnight. (if you are doing the whole cake and it's not in a sealed container or ziplock, I would only freeze for about 1 week.)
-
- To freeze individual slices of frosted cake: line a sheet pan with parchment and set the cake slices out, lying on their sides. Put the pan in the freezer for an hour to chill the cake and set the frosting. Remove the pan and wrap each slice in plastic wrap, then add them to a ziplock bag and seal it tightly. Defrost in the refrigerator (if you've used cream cheese frosting) or on the counter (if you've used buttercream).
Nutrition
Serving: 1serving | Calories: 361kcal | Carbohydrates: 41g | Protein: 4g | Fat: 21g | Saturated Fat: 10g | Polyunsaturated Fat: 1g | Monounsaturated Fat: 9g | Trans Fat: 0.5g | Cholesterol: 71mg | Potassium: 85mg | Fiber: 1g | Sugar: 26g | Vitamin A: 465IU | Vitamin C: 0.1mg | Calcium: 52mg | Iron: 1mg
