Grandma Georgia's Blackberry Pie Recipe
No pie will ever top this Blackberry Pie, not for me, and not for anyone in my family. This is Grandma Georgia's pie, and she was famous for it. Fresh OR frozen blackberries are crushed and cooked on the stove, then added to a Flaky Homemade Pie Crust and baked to perfection. Cooking the filling ahead of time may sound like a pain, but the consistently juicy, saucy, tart, impossible-to-resist berry pie filling is worth the extra effort. This recipe is for the generations!
Servings: 10
Calories: 195kcal
Ingredients
For the crust
- 1 batch Homemade Flaky Pie Crust tap for the recipe
For the filling
- 3 cups fresh blackberries to puree (see note for frozen blackberries)
- 6 cups fresh blackberries to leave whole (see note for frozen blackberries)
- 1 and 1/2 cups granulated sugar packed
- 1/4 cup cornstarch SEE NOTES if using frozen berries
- 2 tablespoons flour
- 1/2 teaspoon cinnamon
- 1/2 teaspoon kosher salt
- 1 tablespoon milk for brushing on pie
- 1 tablespoon raw sugar for sprinkling on top crust
- vanilla ice cream, or whipped cream for serving, not optional ;)
Instructions
- Make the pie dough. If you have never made pie dough, read through my Flaky Pie Crust post. Lots of helpful photos for beginners!*
- Make the filling. (See notes for frozen blackberry instructions) Add 2 cups of fresh blackberries to a blender. Blend until liquified. You should end up with about 1 and 3/4 cup blackberry pulp. Add a few more blackberries and blend again if it's not enough. (If you don't have a blender, add 2 cups blackberries to a large glass measuring cup. Use a potato masher to crush the berries into a pulp.)
- Add 1 and 3/4 cup pureed blackberries to a 3 quart saucepan. Add 1 and 1/2 cups sugar, 1/4 cup cornstarch, 2 tablespoons flour, 1/2 teaspoon cinnamon, and 1/2 teaspoon kosher salt. Whisk together until thoroughly combined, making sure there are no lumps of powder.
- Turn the heat to medium. Whisk the mixture occasionally for about 3-5 minutes until it comes to a very light boil. As soon as the mixture has thickened (you may not even see bubbles), remove the pan from the burner.
- Add 6 cups whole blackberries to the mixture in the pot. Stir it all together. Give it a taste! If it's too sweet, add a few more blackberries if you have them. If it's very tart, add in an extra tablespoon or two of sugar.
- Chill. This is very important: let the blackberry mixture cool completely. I like to stick it in the fridge to speed this up. If you dump hot hot pie filling into your pie crust, it will end up gummy on the bottom and won't be flaky. (If you use frozen blackberries, the frozen whole berries will instantly cool your filling. It's actually faster to make this pie with frozen berries! See notes)
- Roll out the pie crust. On a well-floured work surface or pastry cloth, roll out one disc of the pie dough, keeping the other one chilled. Place the rolled out pie crust into a 9 inch pie pan, letting the edges hang over the sides. If the pie dough has warmed, place the whole pie pan into the fridge or freezer for about 15 minutes. Cold pie dough is essential.
- Add the chilled blackberry filling. Pour the cold blackberry pie filling into the rolled out crust, leaving it mounded in the middle.
- Roll out the second pie crust. Make it into a lattice crust if you like, here is my Lattice Pie Crust tutorial. Or you can place the pie crust on top as one whole piece. (If you do this, be sure to use a sharp knife to make a few cuts into the top pie crust. This vents the pie and allows steam to escape.)
- Trim excess pie dough so there is only about an inch of the top and bottom hanging over the edges. Fold the overlapping pie dough underneath on the edges, and crimp the edges with your thumb and fingers, sealing the edges.
- Preheat. Place a baking sheet in the center rack of your oven and preheat to 425 degrees F. Let it heat up for at least 20-25 minutes to make sure it’s really hot.
- Freeze the pie. While the oven heats, place the entire pie in the freezer for 20 minutes, or the fridge for 30 minutes if you don't have freezer space. Chilling makes your crust SUPER flaky.
- Brush the top of the pie. Right before putting your pie in the oven, brush the crust of your pie all over with about a tablespoon of milk. Sometimes I like to use 1 tablespoon milk beat together with 1 tablespoon beaten egg that I have leftover from making the crust. Milk will help your pie crust brown but will stay matte; egg will add gloss and shine to your pie crust.
- Sprinkle the whole pie with 1 tablespoon raw sugar, or regular sugar is also great. My mom always sprinkles her pie with cinnamon-sugar, that is my go-to!
- Bake. Place the chilled pie onto the baking sheet*** in the oven and let bake at 425 degrees for 15 minutes. The crust on the edge should be turning light brown.
- Meanwhile, get a square of tin foil that is the same size as your pie. Fold it in half, then in half again. Cut out the center. Open it up again. You should have a square of foil with a circle cut out of the center. See pie crust post for photos.
- Reduce the heat to 350 degrees F. Remove the pie from the oven (shut the door!) and place the foil on top. Loosely crimp it around the crust on the edge, making sure it's all covered but the center of the pie crust is exposed. This will protect the edges from burning.
- Don’t forget to lower the oven temperature to 350. Place the pie back on the baking sheet in the oven and bake at 350 for 40-50 more minutes. You will know the pie is done when the edges are brown and the center of the crust is light golden brown. The crust should not look at all wet on top.
- Let the pie cool on a wire rack for about 4 hours. I know, this is killer. But if you cut into it now, the juices will be lava hot and way too liquid-y. You have to wait for it to cool to room temperature to get the right texture for the filling. Pie! A lesson in patience indeed.
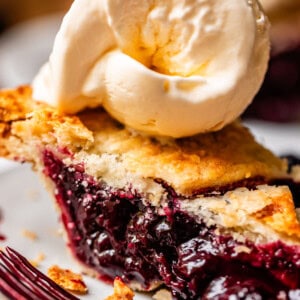
- Once the pie is completely cool, slice and serve! A word to the wise: Blackberry Pie is nothing, NOTHING, without a scoop of vanilla ice cream. Or at least some whipped cream. Treat yoself right.
- Store the pie on the counter for up to 2 days, covered with plastic wrap. After that transfer it to the fridge.
- Freezing: You CAN freeze an entire unbaked blackberry pie, and it is such a great way to get all the prep work out of the way if you're making this for Thanksgiving or any other big event or holiday! Top the filling with the second crust, but don’t brush with egg/milk or sprinkle with sugar. Put the pie dish in the freezer for an hour to flash freeze, add a layer of plastic wrap, then wrap it a second time. Then wrap in foil. Make sure it’s sealed as best you can! Toss it in a 2 gallon ziplock to seal completely, if you have it. Freeze for up to 3 months.Bake it straight from frozen. Brush with egg/milk, sprinkle with sugar, and pop it in the oven according to the recipe. Same temperature, same times, maybe just a couple minutes longer to get browned on top.
Notes
**FROZEN BLACKBERRIES: This pie is super easy to make using frozen blackberries. You DO need to change just one thing in the recipe:
- Use a total of 6 tablespoons cornstarch when making this pie with frozen berries.
Nutrition
Calories: 195kcal | Carbohydrates: 48g | Protein: 2g | Fat: 1g | Saturated Fat: 0.1g | Polyunsaturated Fat: 0.4g | Monounsaturated Fat: 0.1g | Cholesterol: 0.2mg | Potassium: 215mg | Fiber: 7g | Sugar: 38g | Vitamin A: 280IU | Vitamin C: 27mg | Calcium: 41mg | Iron: 1mg
