Parker House Roll Recipe
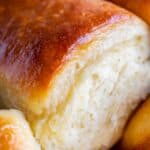
These homemade Parker House Rolls are unbelievably soft and fluffy! A rich, buttery dough with potato flakes results in that cloud-like, puffy texture you love. The swirl of butter in the center of these dinner rolls makes them completely irresistible! You can even make this recipe ahead of time for Thanksgiving.
Servings: 16 rolls
Calories: 179kcal
Ingredients
- 1/4 cup warm water
- 1 cup warm milk
- 1 & 1/2 tablespoons active dry yeast
- 2 teaspoon granulated sugar
- 3 tablespoons butter* softened
- 3 tablespoons shortening* I used butter flavored shortening
- 1/3 cup granulated sugar
- 2 teaspoons kosher salt use less if all you have is table salt
- 1 large egg
- 3/4 cup instant potato flakes from a box of instant potatoes
- 2 & 1/2 cups bread flour or up to 2 and 3/4 cup
- 4 tablespoon butter or more for brushing on dough
Instructions
- Make the dough. In a small bowl or glass measuring cup, add 1/4 cup water and 1 cup milk. Microwave in 20 second increments until the mixture is nice and warm but not hot. Stick your finger in: it should feel like a nice warm bath. If it is too hot you will kill your yeast. The temperature should be about 105-110 degrees F.
- Add 1 and 1/2 tablespoons active dry yeast and 2 teaspoons sugar. Stir the mixture together and let it sit for 5 minutes while you prep the other ingredients.
- In a large bowl or stand mixer, add 3 tablespoons soft butter and 3 tablespoons shortening.*
- Add 1/3 cup granulated sugar, 2 teaspoons kosher salt, and 1 large egg.
- By this time your yeast mixture should be nice and bubbly. (If it has not bubbled or foamed at all, (the top of the liquid looks flat) throw it out and start over, because your yeast is dead as a doornail. So sad but better to find out now than in an hour when your dough doesn't rise!) Add the foamy yeast mixture to the bowl with the butter and shortening. Stir it together. If you are using a stand mixer, use the paddle attachment.
- Add 3/4 cup instant potato flakes and 2 cups bread flour. Continue stirring with the paddle attachment until the mixture has come together. The dough starts out a little bit chunkier than usual bread dough because of the potato flakes, but it will smooth out as you keep mixing.
- Switch to the dough hook. (if you don't have a stand mixer, you can turn the dough out onto a floured work surface and start kneading.) Add 1/2 cup bread flour and mix with the dough hook until it is incorporated.
- Touch the dough with your fingers. If it is still very sticky, add another 1/4 cup bread flour (for a total of 2 and 3/4 cup bread flour). When you mix it, it should clean the bowl or at least mostly clean it. Getting bread dough just right has a lot of variables, including climate and the weather, so you are going to have to use your best judgment. Use the least amount of flour possible, and remember that it will become even more homogenous after kneading. See photos.
- Knead the dough with a dough hook for about 7 minutes, or knead by hand for 10 minutes.
- First rise. Grease a large bowl with oil or nonstick spray. Gather the dough into a ball and smooth it out. Place in the bowl and turn it over so all sides are greased. Cover the dough with plastic wrap or a tea towel.
- Let the dough rise in a warm place for 60-90 minutes, until doubled in size. I like to let my dough rise in a warm oven. Turn your oven on for about 1 minute, then turn it off, so that it is just nice and warm, but not hot. (If you can't touch the racks with your fingers, it's too hot.) Place the rising dough in the oven.
- When the dough has doubled, and when a finger poked into it does not spring back immediately, it is ready to be shaped into the classic Parker House Roll shape.
- Shape the rolls. Prepare a work surface with nonstick spray. This is a thick dough and we don't want to add any more flour to it, so grease your workspace instead of flouring it. (Alternatively you could use a large silicone mat that is meant for rolling dough.)
- Punch down the dough and divide it in half. Roll out half the dough into a rectangle that measure 8 inches by 12 inches. See photos.
- Melt 4 tablespoons butter in a small bowl and use a pastry brush to brush a good and healthy amount of butter all over the top and edges of the dough. You won't use all the butter, you need the rest for brushing the other half of the dough, and for brushing the finished rolls.
- Use a pizza cutter to slice the dough in half lengthwise, so you have two long rectangles. See photos.
- Fold each rectangle in half the long way. Instead of folding it exactly in half, fold it so that there is about 1/2 inch of the underside of the dough exposed. So it should be folded over, but not quite all the way to the edge. See photos! Use your fingers to stretch the edges of the dough as necessary so that they line up.
- Use a pizza cutter to cut each long rectangle into 4 pieces. (So cut it in half, then each half in half.) These are your shaped rolls. They should be about 2 and 1/4 inches by 3 inches. See photos.
- Prepare a 9x13 inch pan with nonstick spray. Place the finished rolls in the pan upside down, meaning that the short end of the fold goes on bottom. The long edge of the rolls should line up with the long edge of the pan. You will place them 4 across and 4 down.
- Roll out the other half of the dough and repeat the process. Don't forget to brush the dough with butter before cutting and folding.
- Second rise. Cover the shaped rolls with plastic wrap or a tea towel and let rise in a warm place for about 45 minutes, until they have almost doubled and are looking quite puffy. Start preheating your oven about halfway through the rise time (be sure to take your rising rolls out of the oven if you are rising them there!)
- Bake the rolls. Preheat your oven to 350 degrees F.
- Bake the risen rolls for about 15-20 minutes. They should be completely golden on top, and the bottoms should also be golden (you can only tell this if you have a glass pan.) If the rolls have only slightly tanned, they are probably not done. The tallest rolls should be a deep golden or light brown color. A thermometer should read about 190 degrees.
- Take the rolls out of the oven and brush the tops with remaining butter. (You might need to melt a couple tablespoons more butter.) Sprinkle with flaky sea salt, if desired. DIG IN!
- If you are not serving them immediately, do not brush with butter. Remove the rolls from the pan after about 5-10 minutes so that the bottoms don't become soggy. Let cool on a wire rack before transferring (immediately, once cool) to a tightly sealed ziplock or tupperware.
- These rolls freeze beautifully! Seal tightly and freeze for up to 3 months. Let thaw on the counter in the sealed container. If you know you are planning to freeze them, don't brush them with butter. (Brush with butter when reheating)
- To rewarm rolls: Brush the rolls (make sure they are thaw) with butter if you haven't already (or even if you have! Who's going to say no to double butter helping?), sprinkle with flaky salt (optional), place the rolls in a pan, and bake at 350 for about 5-7 minutes, until warmed through.
Notes
*You can use all butter or all shortening if you like. I prefer a combination: butter for flavor and shortening for that ridiculous soft puffiness that it lends to rolls.
Making ahead and storing Parker House rolls
Parker House rolls can be kept in an airtight container or ziploc on the counter for a few days. No need to put them in the fridge. If you want to make these ahead, you can start them an entire month before you want to bake them. Shape the rolls and place them on a baking sheet instead of in a 9x13 pan. Don’t let them rise–instead, put them in the freezer for an hour. After that you can put them in a ziploc. When you’re ready to bake them, place the frozen rolls in a 13x9 pan and let them rise on the counter, lightly covered, as you usually would. Freezing baked Parker House rolls for later is even easier. Just pop them in a freezer bag and BAM, now you’ve got rolls to pull out whenever you like.Nutrition
Serving: 1roll | Calories: 179kcal | Carbohydrates: 22g | Protein: 4g | Fat: 9g | Saturated Fat: 4g | Polyunsaturated Fat: 1g | Monounsaturated Fat: 3g | Trans Fat: 1g | Cholesterol: 26mg | Potassium: 80mg | Fiber: 1g | Sugar: 6g | Vitamin A: 195IU | Vitamin C: 2mg | Calcium: 25mg | Iron: 1mg
