Maple Bar Donut Recipe
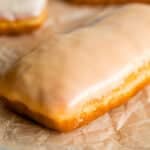
If you live out west, you've surely had a Maple Bar! An impossibly soft-and-chewy raised yeast donut, shaped in a long rectangle and topped with maple glaze. They are a standard menu item in every donut shop west of the Rocky's. I will show you exactly how to make them at home, it's super easy. The maple donut glaze is to die for!
Servings: 12 Servings
Calories: 390kcal
Ingredients
For the dough:
- 1 cup warm water about 105 degrees F
- 3 tablespoons active dry yeast
- 1 tablespoon granulated sugar
- 1/2 cup granulated sugar
- 1/4 cup butter-flavored shortening or regular shortening is fine
- 3 large egg yolks
- 1 teaspoon vanilla
- 3 & 1/2 cups bread flour* spooned and leveled, you can use up to 4 cups
- 2 & 1/2 teaspoons kosher salt
- 1/2 teaspoon baking powder
- peanut oil for frying I used two 24-ounce bottles**
For the Maple Icing
- 4 cups powdered sugar plus an extra 1/2 cup (1 pound total)
- 2 teaspoons light corn syrup
- 1/4 teaspoon kosher salt
- 1/2 teaspoon vanilla
- 1 teaspoon maple extract or more to taste
- 1/3 cup hot water plus more if needed
Instructions
- In a large bowl or stand mixer, add 1 cup warm water (105-110 degrees F), 3 tablespoons yeast, and 1 tablespoon sugar. Let sit for 5 minutes until it is bubbly. (If it doesn't bubble, you killed your yeast! Start over!)
- Once your yeast is nice and frothy, add 1/2 cup granulated sugar, 1/4 cup shortening, 3 large eggs yolks, and 1 teaspoon vanilla. Beat it all together with the paddle until the shortening is broken up but hasn't blended in.
- Add 1 cup of the bread flour but don't stir yet. Add 2 and 1/2 teaspoons kosher salt (use a little less for table salt), and 1/2 teaspoon baking powder on top of the flour, and use your teaspoon to stir it into the flour a bit. Beat the flour into the dough for about 1 minute until well blended.
- Add the remaining flour 1 cup at a time. Switch to the dough hook (or turn out onto flour and start kneading by hand). You want to add a total of 3 and 1/2 cups of flour to the dough, or up to 4 cups if it is extremely sticky. But keep in mind that a stickier dough is going to be more tender (yes please). Add more flour a little bit at a time if necessary. The dough should be in a mass and pulling away from the sides of the bowl. Once all the flour is added in, knead the dough for about 5 minutes.
- While the dough is kneading, bring a large pot of water to a boil (at least 2 quarts). Lightly flour a baking sheet. DON'T use a silicone mat.
- When you are done kneading and the dough is smooth, shape it into a ball and transfer it to the floured baking sheet. Form a 6×6 inch square out of the dough, and cover it with a clean cloth. (Sprinkle the top of the dough with flour too, so the cloth doesn't stick to it. Not that that happened to me.)
- Turn your oven on to 350 degrees F for about 30 seconds, then turn it off. We're creating a warm humid environment for the dough to rise in. The oven should not be hot. You should be able to touch the racks comfortably with your fingers. WARM not hot.
- Place the pan of dough in the oven. Place a glass 9x13 inch cake pan on the rack below the dough. Pour the boiling water into the 9×13 inch pan and close the door to the oven. (save the boiling pot) Allow the dough to rise in this homemade proofing box for 1 hour or until doubled.
- When the dough has doubled in size, pour the water from the 9x13 inch pan back into the boiling pot. Add more water if necessary (2 quarts-ish). Bring to a boil. Meanwhile, remove the dough from the oven and gently turn it onto a lightly floured work surface (I like to use a pastry cloth.) I like to tilt the pan until the large square of dough falls onto the floured surface, not even disturbing it with my fingers. We want PUFFY donuts. Dust two baking sheets (one of the ones you just used) with flour. Don't be stingy now.
- Use a rolling pin to gently roll the dough into an 11x12 inch rectangle. It shouldn't take much rolling. Don't press it hard to make it lose all its puff. Use a pizza cutter to cut the dough into quarters, see photos. Cut each quarter square into 3 long rectangles to make 12 donuts. They should be about 5 inches by 1.5 or 2 inches. Trim about 1/2 inch off the edges of the rounded corner donut, so that you get nicely shaped rectangles. (If you don't care what shape your donuts are, skip trimming! Or trim, and then use the scraps to make a 13th ugly-doughnut.) Cut the dough into 12 rectangles about 5×2 inches each.
- Use a flexible bench scraper or long metal spatula to carefully transfer the dough rectangles onto to two well-floured baking sheets, spaced at least 2 inches apart. Preheat the oven as before, for about 30 seconds, then turn off the oven (we just want it warm.)Place the baking sheets uncovered back onto the top rack of the oven, and pour the boiling water back into the 9×13 inch dish. Let rise for 45 minutes (or more), until the dough is doubled.
- When the dough is about 15 minutes out from finishing the second rise, heat about 2 inches of peanut oil in a large, high-sided pot with a candy thermometer attached to it. Heat it to 350 degrees, this should be about medium heat. It should take at least 15 minutes. Keep checking the temperature of the oil to maintain even cooking.
- In batches of 2 or 3, use a rubber scraper or spatula to carefully transfer the puffy rectangles to the hot oil. Be very careful and movie quickly so your donut doesn't deflate! Fry for 30-40 seconds and then flip and cook for another 20 seconds or until golden brown. Remove doughnuts from the hot oil with a slotted spoon, allow to drain on paper towels, and repeat with the remaining dough. Let the donuts cool completely. If you try to ice them while warm, the glaze won't stick.
- Whisk together all the icing ingredients in a large bowl or stand mixer: 4 cups powdered sugar, 2 teaspoons corn syrup, 1/4 teaspoon salt, 1/2 teaspoon vanilla, 1 teaspoon maple extract, and 1/3 cup hot water. Add more hot water a teaspoon at a time, or up to 1/2 cup extra powdered sugar as necessary if the consistency isn't right. It needs to be liquid-y enough to dip the donuts in, not spreadable like cake frosting. Taste it and decide if you want to add more maple extract! This is a personal choice! I like lots of maple to I usually add a bit more.
- Transfer the glaze to a pie plate or other shallow bowl. Dip the roundest side of the donuts into the icing and let it drip for a second. Place on a wire rack. Allow to stand for 15-20 minutes before serving to allow the glaze to harden.
- Store these donuts on the counter in a sealed container for however long you think they will last! (2-3 days is fine.)
Notes
*All purpose flour is a fine substitute! Your donuts will be a little less chewy.
**I saved the used peanut oil. Just funneled it right back into the bottles for the next time I make these babies.
Source: This recipe is adapted from Top Pot Doughnuts
Nutrition
Calories: 390kcal | Carbohydrates: 78g | Protein: 6g | Fat: 6g | Saturated Fat: 2g | Polyunsaturated Fat: 2g | Monounsaturated Fat: 2g | Trans Fat: 1g | Cholesterol: 49mg | Potassium: 58mg | Fiber: 1g | Sugar: 46g | Vitamin A: 66IU | Vitamin C: 1mg | Calcium: 24mg | Iron: 1mg
