Learn how to make your own Candy Christmas Tree craft to deck the halls this year! Get some felt and burlap and a TON of old fashioned candy and start glueing away. My mother-in-law still has the one she made 30 years ago!

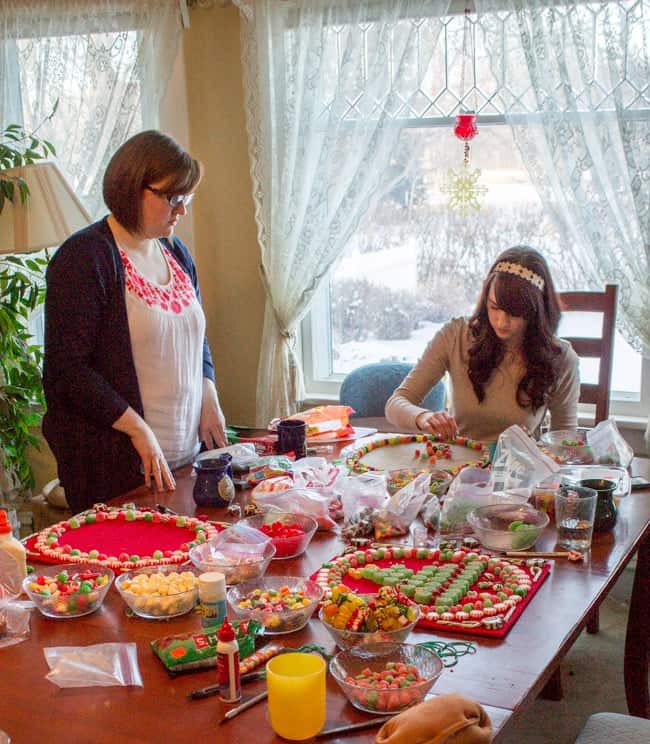
Guys, I made a craft! This is kind of momentous. I’m the one who can barely put together an outfit on my own, remember? I don’t do cutesy stuff. I can’t even claim this Candy Christmas Tree, really, because I had Eric’s mom and sisters to help me out. They are the classy type. They throw around terms like “chartreuse” and “charger plates” and “damask” on a regular basis and I’m like, what are you even talking about? I come from a paper plate kind of family.

We made these last year, and I’m sitting here trying to remember all the details so that I can tell you about it. I text my mother-in-law Kris to see if we used a stapler or a staple gun to secure the burlap to the wood. She texted back that we used a “heavy dory stapler,” and I googled what that was immediately, because Kris knows stuff about crafts and I don’t. I’d never heard of a heavy dory stapler but it must be a thing. Probably you can buy them at Hobby Lobby.
Nope. Heavy duty stapler. It was a typo.
So I promise, even if you don’t consider yourself crafty, or even if you’re idiotic enough to think that heavy dory staplers are a thing, you can do this one. (Also, this is the first and probably last craft to be featured here on The Food Charlatan; I’ll have another recipe up for you soon.)

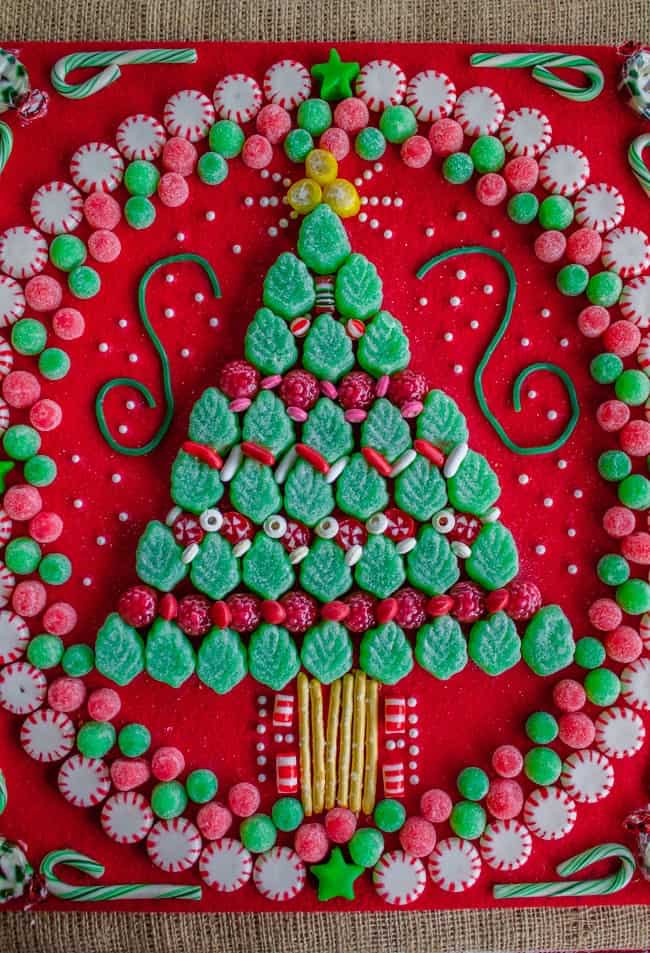
My mother-in-law Kris made her Candy Christmas tree back in the 80s, and her mom made her first one back in the 60s. They last for years and years, which is always the first question I get when people see it (also, “can you eat it.” Uuuhh, if you like eating glue??) You just need to make sure you store it properly (read: no bugs, critters, or heat.) The colors will fade over time, but as you can see from the photos of Kris’ original tree, it looks kind of cool and vintage:


These two are the ones my sisters-in-law made. Jessie’s is on the left and Britta’s is on the right. We hadn’t mounted them on the second board yet.
I’m going to walk you through the tutorial, but there is a printable “recipe” below. Here we go!
Candy Christmas Tree Craft Tutorial: Getting Started

Use an exact-o knife to cut your foam core board to 14×16 inches. Place the foam core in the center of the piece of felt or burlap that is 18×20 inches. (You will be glueing the candy to this fabric, so see photos to decide whether you like the candy contrasted with red or burlap better.)


Use a heavy duty (or “dory”) stapler to wrap the edges of the fabric around the back of the board. You can trim the excess fabric if there is too much to staple easily.
Creating your frame & backing
Sadly I don’t have any pictures of the next step. Use the same method described above to staple the 20×22 inch piece of burlap (or felt; whatever is opposite of what you just did) to the plywood.
Use the stapler to secure the smaller rectangle (foam core) onto the covered plywood. Think this through before you staple; you should only staple on spots where you KNOW you want to glue candy on top, so that the staples aren’t visible. I think we made 4 staples on mine, in the 4 corners underneath the Christmas Tree Nougats (the only candy that I left in the wrapper, for reference).
(We did this backwards. We glued the candy on first and then had to pry some off to staple it to the wood; don’t be like us. But that’s why the photos show us glueing candy on the foam core board without the plywood backing.)

If you would like to have the oval shape of candy surrounding your tree: get a large piece of paper and cut it to 13×15 inches. (I used Costco brand parchment paper; it’s already 15 inches wide.) Fold the paper in half horizontally, then vertically (into quarters; look at the folds you can see on the picture). Then use a pencil to draw a curve on one edge (the edge that doesn’t have the fold.) Use scissors to cut the edge. Unfold it. It should be an oval shape that is about a half inch from the edge of the covered foam core board on each side. Use a pen to trace the oval (you will cover up the marks with candy anyway.)
Now it’s time to bust out the candy.
Assemble an assortment of old-fashioned candy


You can use any kind of candy you want for your tree, but I love the look of old fashioned hard candy. I bought most of the candy for my tree at an awesome candy shop in Old Sacramento, you know the kind with huge barrels of hard candy and a bazillion flavors of taffy. But if you don’t live close to an old-timey candy shop I found some on Amazon:
Spearmint Leaves (the green part of the tree)
Cut Rock Primrose Candy
Filled Red Raspberries
Mini Ribbon Candy
Deluxe Filled Candy
Gumdrops
Here’s a pretty good assortment box of hard candy
White Pearl Sugar
Christmas Tree Nougats
Mini Candy Canes
Star Light Mints
Rainbow Licorice Laces
I tried to find links for all the candy I used, but definitely check out what your grocery store has first. Candy canes and gumdrops won’t be too hard to find. I was just at WinCo earlier today and they had an assortment of old fashioned candy in the bulk section. (The links up there are all affiliate links by the way, which means that it’s the same price for you and I make a small commission.)
I didn’t provide amounts for the candy, because it totally depends on what you want your tree to look like. But the good news is that you can eat any that’s left over! It’s kind of like how “making gingerbread houses” is really code for “let’s eat tons of candy.” Don’t forget to buy pretzel sticks if you want to use that for your tree trunk.
Constructing your Christmas tree out of candy
Start by glueing candy on the oval before you start on the tree, to make sure you have room for everything. Here are some different ideas we tried:


Don’t forget to embellish the corners somehow. Once the oval is done, get to work on the tree!

I almost used the bear and the green and yellow candies at the bottom as “presents” under the tree, like Britta and Kris’s up there, but in the end decided to do more pearl sugar and some red candy.

Once your candy is all glued on, let it dry at least overnight.
Add hardware so it can hang
Nail or screw in a picture hanger on the back. If you have a specific spot on the wall where you’ll be hanging your Christmas tree craft don’t forget to measure. Use a measuring tape to center the hanger left-to-right.

And it’s done!

How to store your Christmas Tree craft.
Now for storage. Here’s what we came up with. (and by we, I mean Eric’s dad Chip. Thanks Chip!)


Two large pieces of cardboard that were the same size (bigger than the plywood). Pieces of styrofoam that he glued around the edge of one. (Styrofoam that is taller than the candy sticks up.) The candy tree goes in the middle, then the other piece of cardboard is taped on top. This year when I opened it, I slit the tape on 3 sides so that it opened up like a book.
You will want to store this in your house, not in the garage or attic. The candy needs to be stored somewhere where there is climate control; if it gets too hot it might melt. This year I think I will take an extra step and wrap the cardboard in plastic (we have the kind of plastic that movers use to protect furniture, but saran wrap would probably work the same, you would just need a lot.) If you have a sealed plastic bin that it can fit in, even better.
Whew! I hope you enjoy looking at your candy tree every Christmas! I’ve been dying to hang mine up all year and love the way that it looks now that it’s on the wall.
You have to promise to show me your tree if you do this project! Snap a photo and share it on Instagram using the hashtag #thefoodcharlatan. I would love to see what your tree looks like!
Facebook | Pinterest | Instagram | Twitter
Candy Christmas Tree Craft
Ingredients
- 1 foam core board*, you're going to cut it to 14x16
- exact-o knife, to cut foam core board
- 18x20 inch piece of red felt OR burlap
- heavy duty stapler, or staple gun for wood
- 20x22 inch piece of burlap OR red felt, opposite of what you put on the foam core board
- 1/4 inch thick plywood or chipboard, cut to 16x18 inches
- 13x15 inch piece of paper, parchment paper, tracing paper, etc
- pencil/pen
- scissors
- Elmer's glue or a hot glue gun
- assorted candy, see suggestions above
- pretzel sticks, for tree trunk, or you can use candy
- 1 large sawtooth picture hanger, including screws/nails to secure it to the wood
Instructions
- Use an exact-o knife to cut your foam core board to 14x16 inches. Place the board in the center of the piece of felt or burlap that is 18x20 inches. (You will be glueing the candy to this fabric, so see photos to decide whether you like the candy contrasted with red or burlap better.)
- Use a stapler to wrap the edges of the fabric around the back of the board. You can trim the excess fabric if there is too much to staple easily.
- Use the same method described above to staple the 20x22 inch piece of burlap (or felt; whatever is opposite of what you just did) to the plywood.
- Use the stapler to secure the smaller rectangle (foam core board) onto the covered plywood. Think this through before you staple; you should only staple on spots where you KNOW you want to glue candy so that the staples aren't visible.
- To get the oval shape around the tree: get a large piece of paper and cut it to 13x15 inches. Fold the paper in half horizontally, then vertically (into quarters; look at the folds you can see on the picture). Then use a pencil to draw a curve on one edge (the edge that doesn't have the fold.) Use scissors to cut the edge. Unfold it. It should be an oval shape that is about a half inch from the edge of the felt (or burlap) covered foam core board on each side. Use a pen to trace the oval (you will cover up the marks with candy anyway.)
- Start by glueing candy on the oval before you start on the tree, to make sure you have room for it.
- Use lots of glue and candy to make your tree. Don't forget to embellish the corners.
- Once your candy is all glued on, let it dry at least overnight.
- Nail or screw in a picture hanger on the back.
- To store: Use two large pieces of cardboard that are the same size (larger than the wood). Use pieces of styrofoam and glue them around the edge of one piece of cardboard. (Styrofoam must be taller than how far the candy sticks up from the felt) The candy tree goes in the middle, then the other piece of cardboard is taped on top. When you open it the next year, slit the tape on 3 sides so that it opens up like a book.
- You will want to store this in your house, not in the garage or attic. The candy needs to be stored somewhere where there is climate control; if it gets too hot the candy may melt. This year I think I will take an extra step and wrap the cardboard in plastic (we have the kind of plastic that movers use to protect furniture, but saran wrap would probably work the same, you would just need a lot. If you have a sealed plastic bin that it can fit in, even better.
Notes
Here are some Christmas recipes to check out if you are not into crafts!
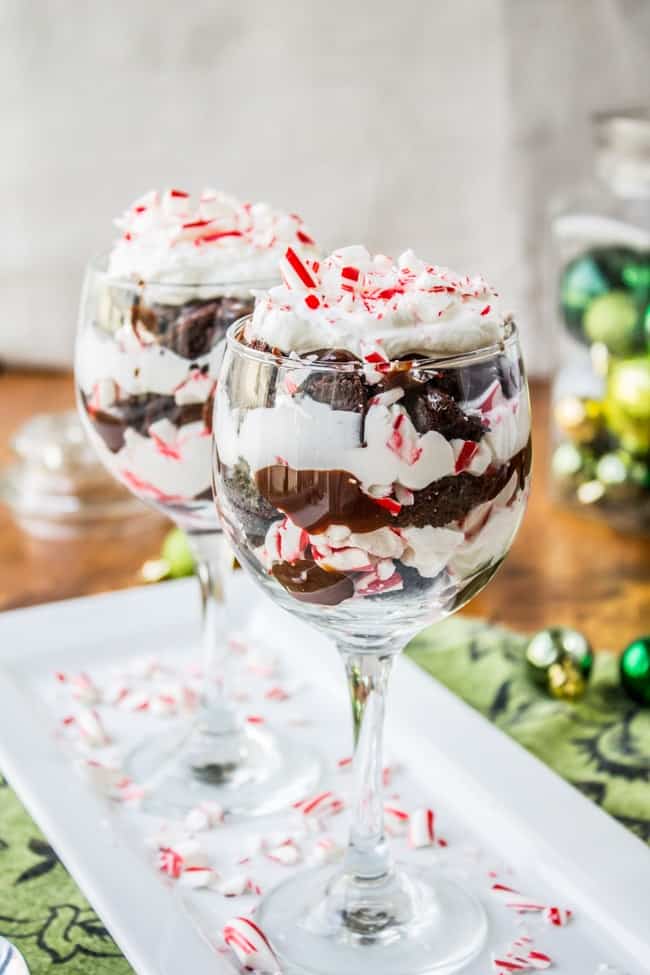
Candy Cane Brownie Trifle << hugely popular and one of my favorite Christmas desserts! So rich.
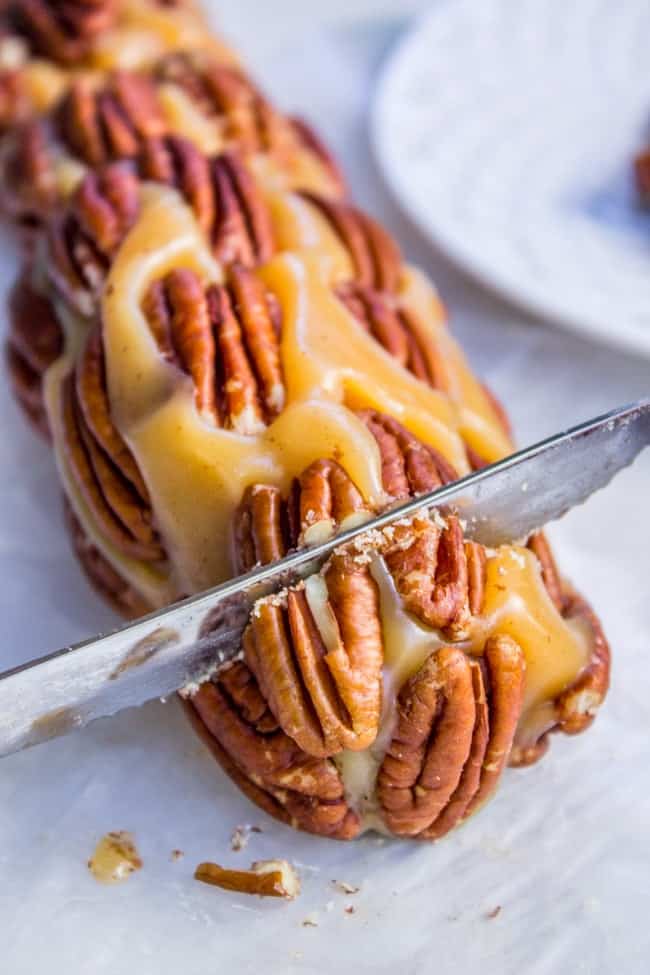
Caramel Nougat Pecan Roll << this one takes some doing, but it’s SO worth it!
Cinnamon Honey Butter << this makes a great spread for rolls or even a neighbor/host gift!


Thanks for sharing this tasty decoration idea.
I’m seriously impressed! First by your craft skillz. But not least of which by the fact that you managed to make this without it getting attacked by ants. I had some old candy canes in a bag in a drawer and the ants found them – they would LOVE me to make a craft christmas tree :)
This is such a CUTE idea!! LOVE LOVE it!!
Thanks for sharing this Karen! I hope lots of families enjoy making this together. I have so many fond memories of my mother and I making this and other Christmas projects together. It’s what makes Christmas feel like Christmas! Just add some hot chocolate and Christmas music and you are ready for the season!
DUDE. This is amaaaaazing! Martha Stewart ain’t got nothin’ on you!
I love this idea! Cute, SWEET, and something fun kiddos can help with!
Impressive! Reminds me of the candy wreath that my great grandmother made and shared with us when we visited one Christmas. But we ate the candy after cutting it off the wire! So it was not an enduring craft like this one.
What! Edible Candy Wreath!! That sounds so fun! Did she just use lifesavers or what? I think I need to adopt this tradition !